
IN THIS CHAPTER
Working with packages and classes
MXML and ActionScript
Understanding events in Flex
Data providers
Working with item renderers
Building a sample Flex application
In this chapter, you learn how to develop Flex applications by using Flex Builder. You learn how to set up and use classes and packages while also learning how to use a mixture of MXML and ActionScript.
The last part of the chapter takes you through the process of building a basic application to make sure that you understand the fundamentals before moving on to other chapters that involve the Flex development process.
Unless this is your first time using Flex, you've probably worked with ActionScript classes at some point. However, you may not have built your own custom classes; this is explained in the following section.
A package is a bundle of classes that function in one easy-to-use container. Packages are common in class-based development because they add another level of separation for your code. Packages allow you to share pieces of classes without also exposing that content to foreign code.
The most common way to determine a path for a package definition is to use reverse domain format. Let's say you have a class Person located in your project. The reverse domain format takes your Web domain, and starting with the com, you define the package path, as in the following example:
com.example.people.Person
In this example path, Person is the class name, and com.example.com is the domain name. This is used to ensure that packages and classes don't collide with other libraries because it's likely that you would name your classes, but another developer may not.
Note
Make sure you check your package paths to ensure that they don't collide. This can cause many long nights of debugging.
Now that you have the package path, let's take a look at a sample package declaration:
package com.example.people
{
     class Person
     {
          .
          .
          .
     }
}
The package path that you see in this example is also in the directory structure. For this example, it means that the Person class would be located in the following directory structure:
com/example/people/People.as
A class is built up of methods and properties. Classes can be placed inside a package, which is essentially a folder of classes that most likely have some similarities.
Here's an example of a very basic class:
class HelloWorld
{
   public function HelloWorld()
   {

   }
}
This HelloWorld class isn't all that useful; it doesn't even actually have a use other than to explain the concept. Let's add a method, which is a function inside a class:
class HelloWorld
{
     public function HelloWorld()
     {

     }
public function sayIt():void{trace("Hello World!");}}
You can start to see the class coming to life, but for a useful class, you would probably need to assign a property. A property is a variable within a class. Properties can be defined as public, private, internal, or protected. Public and private are the most common properties and are used extensively in this book. A private property means that it exists only within the class. This is useful when you want to store sensitive information or data that you don't want to expose to the public.
An internal property is accessible to other classes within the same package. This is also the default attribute of classes in ActionScript 3. A protected property is accessible to the class it's created in and classes that are subclasses.
Now that you know about the different property types in a class, let's look at a few examples that warrant a protected or private property.
One example of a class that should contain private properties is a users class that's subclassed for each specific user.
By contrast, defining a property as public means that anyone can read it or write to it, as shown in the following sample of code. The sayIt() method accesses the public property myString and outputs it to the Output panel:
class HelloWorld
{

     public var myString:String = "Hello, World!";

     public function HelloWorld()
     {

     }

     public function sayIt():void
     {
          trace(myString);
     }
}One of the ways to write a class is to make all the properties private, using getter and setter methods to modify them. This allows you to limit access to and modification of a variable. Let's say you have the following Person class:
class Person
{
     public var personName:String;

     function Person()
     {

     }
}
Malicious coding could directly access that variable and change it to anything, such as in the following example:
var person:Person = new Person();
person.personName = "9999";
Obviously, this isn't a good thing. One of the ways around this potential issue is to make the property private and use a getter/setter to access and modify the value. The getter and setter functions make it so that the variable can't be directly accessed.
The Accessor, or getter, is a simple method like any other:
public function get personName():String
{
     return _personName;
}
Conversely, the Mutator, or setter, would have some level of security to ensure that the proper value is sent:
public function set personName(s:String):void
{
   if(s.length > 0 checkID(s))
   {
           _personName = s;
   }
}
The method first checks to ensure that the length of the string is greater than 0 (nonempty) and then ensures that the value is a proper string. If you typed your value properly as a string (:String), you probably wouldn't need the second check, but it's a best practice when dealing with security.
The completed Person class with the proper methods and properties is shown below. This should give you a good understanding of how your classes should be built.
class Person
{
   private var _personName:String;

   function Person()
   {

   }

   public function get personName():String
   {
           return _personName;
   }

   public function set personName(s:String):void
   {
           if(s.length > 0 && typeof(s) == String)
           {
                   _personName = s;
           }
   }
}ActionScript does allow you to create multiple classes in the same file. However, only one of the classes can be marked as public. All the other classes must be marked as internal and placed outside the class declaration. Here's a quick example:
package
{

   public class Person()
   {

   }

   internal class Role()
   {

   }

   internal class WorkHistory()
{
}
.
.
.
}Note
You can't overload methods or constructors in ActionScript, but you can set default values for method parameters.
Note
Any classes with required arguments can't be instantiated in MXML tags.
At this point, you should have a basic understanding of classes. For a more in-depth look, you can pick up the ActionScript 3.0 Bible or a similar title.
A more advanced topic of classes is extending, which is also referred to as inheritance. Inheritance is useful when you want to use properties and methods of another class but don't want to manage two classes.
Let's look at a simple example to better understand extending classes. The first class is Person, and the second class is Runner:
class Person
{

   public var name:String;
   public var age:uint;

   function Person()
   {

   }
}

class Runner
{

   function Runner()
   {

   }

}
It's safe to assume that a Runner is a person; thus, the name and age of the runner don't need to be duplicated in the Runner class. A better option is to extend the Person class. This makes it so that the Runner class has access to the contents of the Person class:
class Runner extends Person
{

   function Runner()
   {

   }

}
Here's an example that shows the relationship of the classes:
var runner:Runner = new Runner();
runner.name = "Jamie";
runner.age = 24;

trace(runner.name) // outputs: Jamie
As you can see, the name variable can be set because the Person class is being extended. Extending a class isn't limited to variables. You can borrow methods, constants, or properties. Extending classes offers a greater level of customization and allows you to manage the code without breaking something else. However, be aware that private variables won't be inherited.
Extending classes allows you to write less but more manageable code.
MXML is an XML-based set of tags used to instruct the compiler how to build an application. In fact, almost anything you can do with MXML, you can also achieve by using standard ActionScript.
The MXML code is typed in the Flex Builder IDE in the editor portion of the Flex Development perspective. You can type it directly in Source view or add components by using the visual Design view. Start off by creating a new Flex project and then jump into Source view to start writing MXML code.
The simplest code you could write would have to be a button:
<mx:Button label="Click Me" />
The components in Flex that are standard normally start with mx, which is the namespace. A namespace is a container created to hold a group of unique identifiers. In this case, that would be the default components. As you get into custom component development, you define your own namespace — just like you did with the package creation earlier in this chapter — which is covered later in this chapter.
You can define actions directly in MXML tags, such as by adding a click event handler to a button. Actions are not the only element you can define in MXML. Remember the label="" in the previous component example? This property, along with overall style, can also be defined by using standard MXML attributes:
<mx:Button label="Click Me" click="trace('I am a button')" />However, for a more complete application, you would create ActionScript code in external files or directly in the MXML component. If you choose to code directly in the MXML file, all ActionScript code is placed between script tags:
<mx:Script>
<![CDATA[

]]>
</mx:Script>
If you've developed in JavaScript in the past, that code may look familiar to you. The structure of the Script block is very similar to the code block found in JavaScript, as defined by the <script> tags. Building on the simple button example from before, let's add a bit more ActionScript to the example:
<mx:Script>
<![CDATA[

     private function buttonClick():void
     {
          trace("Button Clicked!");
     }

]]>
</mx:Script>

<mx:Button label="Click Me" click="buttonClick()" />
This approach is much cleaner and allows greater modification without having to work entirely in the MXML tags. You can also create this example entirely in ActionScript, which is covered later in this chapter.
If you move over to Design view, you see your Button component on the canvas, which you created with MXML. However, for more complex applications, you may want to drag and drop the components and then code the remainder. In this case, Flex also has you covered. Simply toggle to Design view and then locate the Components panel to the left of the screen. Drag out any of those components to the stage and then switch back to Source view. You see that Flex Builder automatically created the necessary MXML code.
Flex Builder only adds the required properties into a component tag unless you set others in the Properties view. As a result, if you resize the component on the canvas and then return to the code, you see Flex Builder has now added the width and height properties because you modified the size of the component.
In the button example, you added a click event but never defined the event handler function. To do that, you start by importing the necessary class. For example, you import the MouseEvent class for a button click:
<mx:Script>
<![CDATA[

     import flash.events.MouseEvent;

     private function buttonClick(e:MouseEvent):void
     {
            trace(e.currentTarget.label);
     }

]]>
</mx:Script>

<mx:Button label="Click Me" click="buttonClick(event)" />
Notice that the MXML Button tag has the word event as the argument. This is a special object in MXML that refers to the tag's events. In this case, that would be the mouse click.
The buttonClick method now has an argument, which is typed as a MouseEvent. In order to send a proper event, you must place the variable event in the method call located within the click() event in the Button component.
You should now have a basic grasp of MXML and how to mix it with ActionScript to make your applications more useable. This is only the beginning of MXML usage in Flex; throughout this book, you're introduced to various topics surrounding the MXML tags and overall usage.
Now that you've seen how to create this simple Button component example by using MXML, let's look at how to create exactly the same application by using only ActionScript. Well, almost exclusively using ActionScript; you still need an MXML script block and an event to kick off the entire process:
<mx:Application ... initialize="init()">

     <mx:Script>
     <![CDATA[

           import flash.events.MouseEvent;

            private var button:Button;

            private function init():void
            {
                    button = new Button();
                    button.label = "Click Me!";
button.x = 20;
button.y = 20;
button.addEventListener(MouseEvent.CLICK,
buttonClick);
addChild(button);
}
private function buttonClick(e:MouseEvent):void
{
trace(e.currentTarget.label);
}
]]>
</mx:Script>
</mx:Application>The contents of the init() method are where the Button component is created, moved, and added to the display list. The addEventListener() method of the Button is used to define the click event, which is similar to its MXML sibling.
The addChild() method is where the Button is sent to the display list and is visible on the canvas. In a more complete application, you may have various levels of display to ensure that the data was properly loaded and initialized.
The ActionScript code is fairly similar to the MXML version. The neat thing about Flex is the ability to choose whichever option works best for your application or coding style. Some developers like to work entirely in ActionScript files, whereas others prefer MXML. You may prefer a mixture of both and find it very useful to know about both ways. MXML does offer the ability to work with other technologies, such as Thermo (its code name), an upcoming graphics product from Adobe.
A more advanced topic of Flex development is data providers. You will probably use them in almost every application you develop.
Let's assume that you have a simple chat application. That application would be responsible for packaging and sending messages and for receiving messages from others. Data providers give you a way to achieve an almost automatic way of updating data. Rather than setting up complex event listeners or timers to watch variables, Flex gives you the ability to subscribe to a variable's changes and then automatically display them.
Going back to the chat application concept, you would have some process polling a server for changes, and when they existed, you would need to update a list box or some other similar component. As an example, let's take a look at some pseudo-code that better explains how to use a data provider.
You start off by assigning the metadata tag [Bindable] to the variable definition. What this does is tell all the items that are assigned to that variable of any changes that occur:
[Bindable]
private var messages:ArrayCollection;
Once the variable is set as Bindable, you can assign a component to that variable. For example, bind the messages property to a List component dataProvider.
<mx:List dataProvider="{messages}" />Now whenever new entries are added to the messages property, the List component automatically shows them. This is, of course, a very simple example of Bindable variables, but it gets you started, and you can continue to explore binding on your own.
Let's look at a sample chat application in pseudo-code that takes advantage of this Bindable variable ability:
<mx:Application ... initialize="init()">

     <mx:Script>
     <![CDATA[

          [Bindable]
          private var messages:ArrayCollection;

          function init():void
          {
                  messages = new ArrayCollection();

                  // enable server loading process
          }

          function getNewMessages(e:ResultEvent):void
          {
                  messages = ArrayCollection(e.result);
          }

     ]]>
     </mx:Script>

     <mx:List dataProvider="{messages}" />

</mx:Application>Flex offers many components to build your applications with. Some of these are purely for display (such as Canvas, HBox, and VBox); the others are for data management and interaction. Each of these data components is built up of rows and columns called items. In fact, they all share the ListBase subclass. These components all start with a default and similar view. Applications often call for a little customization to these components.
Flex offers the item renderer to let you achieve this level of customization without having to build your own component. The item renderer gives developers the ability to custom-design each of the columns in a data component. An item renderer can also be used to modify data.
For example, you could have a data grid with a row that displays pricing information and, based on an amount, changes the background color of the column for that one entry. This is certainly not a feature of the standard data grid, so you could develop your own component or use an item renderer.
The definition of an item renderer is placed in the DataGridColumn. There's no limit to how many columns can have an item renderer, and each column could use the same one, although that isn't likely.
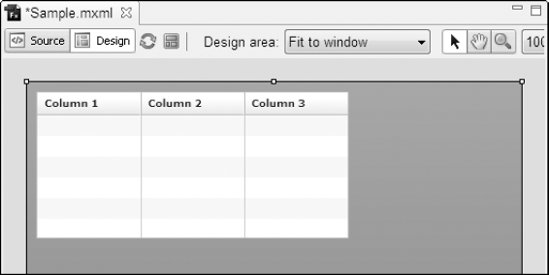
Start by opening a new Flex project. Once the new project is opened, jump into Design view and drag out a DataGrid component to the canvas, as shown in Figure 4.1. Once the DataGrid is on the canvas, jump back to Source view to see the code Flex created.
Here's the default DataGrid code:
<mx:DataGrid x="128" y="108">
     <mx:columns>
          <mx:DataGridColumn headerText="Column 1" dataField="col1"/>
          <mx:DataGridColumn headerText="Column 2" dataField="col2"/>
          <mx:DataGridColumn headerText="Column 3" dataField="col3"/>
     </mx:columns>
</mx:DataGrid>
Each column in the DataGrid is assigned by a DataGridColumn node. In order to ensure that the item renderer is placed in the correct row, it's added to the DataGridColumn node.
For this example, the itemRenderer has been named PricingView. This name corresponds with an MXML component file, which is built in just a moment:
<mx:DataGrid x="128" y="108">
     <mx:columns>
          <mx:DataGridColumn headerText="Column 1" dataField="col1"/>
          <mx:DataGridColumn headerText="Column 2" dataField="col2"/>
          <mx:DataGridColumn headerText="Column 3" dataField="col3"
    itemRenderer="PricingView"/>
     </mx:columns>
</mx:DataGrid>
If you were to run this code, you would likely receive an error because that item renderer doesn't exist, and Flex would have no way to render that column properly.
Before creating the item renderer, it's a good idea to fill the data grid with some fake data, at least for testing purposes, unless you're already loading real data, in which case you can simply use that.
You can use MXML or ActionScript to create fake data. The contents of a DataGrid are in an array/object type.
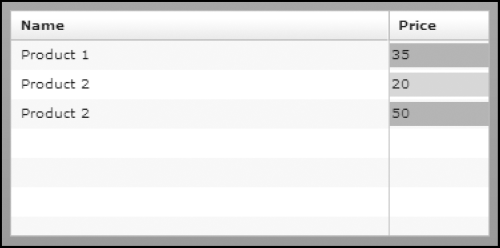
Following is a sample ArrayCollection that's prefilled with product data for testing. This ArrayCollection is technically identical to one created entirely in ActionScript. In order to add it to the DataGrid, you need to place it within the <DataGrid> node to mimic the dataProvider property:
<mx:DataGrid x="128" y="108">

     <mx:ArrayCollection>
           <mx:Object col1="Product 1" col2="35.00" />
            <mx:Object col1="Product 2" col2="20.00" />
            <mx:Object col1="Product 2" col2="50.00" />
     </mx:ArrayCollection>

     <mx:columns>
            <mx:DataGridColumn headerText="Column 1" dataField="col1"/>
            <mx:DataGridColumn headerText="Column 2" dataField="col2"/>
            <mx:DataGridColumn headerText="Column 3" dataField="col3"
     itemRenderer="PricingView"/>
     </mx:columns>
</mx:DataGrid>
Now that you've filled the DataGrid with sample data, you can continue with the development of the custom item renderer.
An MXML component file is used to build custom components or subapplications that are used in the main application. Follow these steps:
Choose File

In the Filename text field, type PricingView.mxml. You can leave the Based on: option with its default.
Set both the Width and Height to 100 (percent) so that the component fills the entire column.
Click OK to create the component.
You should see a skeleton of the Canvas component in the component file that has just been created. The width and height that were set in the configuration screen appear toward the end of the Canvas node:
<?xml version="1.0" encoding="utf-8"?>
<mx:Canvas xmlns:mx="http://www.adobe.com/2006/mxml"
     width="100%"
     height="100%">

</mx:Canvas>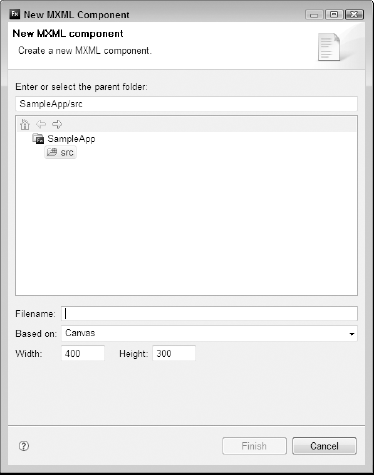
If you ran the sample application now, you would notice that the text for the custom column has disappeared. That's because the item renderer takes the place of the default view. In order to add the text back, you need to create some form of a text view for the DataGrid to display. You can use a Label or Text component; it really doesn't matter which one you decide to use.
Here's the Canvas code with a Label component added. The Label component is given a unique id of "lbl", which is required when the data needs to be displayed:
<?xml version="1.0" encoding="utf-8"?>
<mx:Canvas xmlns:mx="http://www.adobe.com/2006/mxml"
     width="100%"
     height="100%">

     <mx:Label id="lbl" />

</mx:Canvas>
Using the id property isn't the only way you can add the content. You can also use data binding, which you learned about earlier in this chapter. The item renderer has a globally defined data object, which currently holds the contents of this row's data. To quickly set the Label value, you can add this code:
<mx:Label text="{data.col2}" />This code takes the data object and extracts the col2 property, which in this example is holding the price. The {} is telling Flex that the value being requested is a bindable property and can be updated automatically.
However, this doesn't allow you to modify or update this value but simply to display it. In order to modify the value, you must use a process called overriding.
Overriding is creating a method to take the place of a default process. In a way, an item renderer is like an override but for display.
In this case, you want to override the data property, so you need to set up a custom setter function. The data property holds the values for the components. You find that almost all the components have the data property, which can be set in MXML and ActionScript code. In MXML coding, you would set the dataProvider attribute:
<mx:Script>
     <![CDATA[

           override public function set data(value:Object):void
            {

            }

     ]]>
</mx:Script>
That method sits before the data is sent to this component and allows you to modify it. However, you still need to allow the original process to run, as you never really know what Flex is doing behind the scenes.
Note
You can Ctrl+click a method or property and then see the origination of it. This is a common way to learn the abilities of a class.
The super() method is used to call the original process:
<mx:Script>
     <![CDATA[
override public function set data(value:Object):void
{
super.data = value;
}
]]>
</mx:Script>Once you've made a call to the original process, you can begin modifying the data. Let's set the code to look for a price value and then set the background color of the canvas based on the amount. If the price is above $25, make the background red; otherwise, make it green:
<mx:Script>
     <![CDATA[

          [Bindable] private var bgColor:uint;

          override public function set data(value:Object):void
          {
                  if(value != null)
                  {
                         super.data = value;
                       if(value.col2 > 25)
                          {
                                  bgColor = 0xFF0000;
                          }
                           else
                           {
                                  bgColor = 0x00FF00;
                           }
                  }
          }

     ]]>
</mx:Script>
This code is setting a property of bgColor to the specified color, but you may have noticed that the color is never sent to the canvas. This isn't a problem, as the bgColor property is marked as Bindable, so you can easily add it to the Canvas node, as follows:
<mx:Canvas xmlns:mx="http://www.adobe.com/2006/mxml"
     backgroundColor="{bgColor}" ...>
Figure 4.3 shows the result of adding this code to the previous code example.
The background of the canvas is now changing properly, but the label isn't being filled. Using the label id you assigned earlier, you can set the text property:
<mx:Script>
<![CDATA[

     [Bindable] private var bgColor:uint;

     override public function set data(value:Object):void
     {
             if(value != null)
             {
                     super.data = value;
                     if(value.col2 > 25)
                     {
                            bgColor = 0xFF0000;
                     }
                     else
                     {
                            bgColor = 0x00FF00;
                     }

                     lbl.text = String(value.col2);
             }
     }

]]>
</mx:Script>
Now that the function is changing the background color properly and updating the label, the last step is to alert other components that the data has changed. This is done by using the dispatch Event() method. This code creates a new FlexEvent and sets up a broadcast to any objects or items that are watching for the DATA_CHANGE event.
dispatchEvent(new FlexEvent(FlexEvent.DATA_CHANGE));
You must also add an import at the top of your ActionScript for the FlexEvent class. If you didn't load this class, Flex is unable to generate the event and throws an error:
import mx.events.FlexEvent;
At this point, you have completed the custom item renderer. Feel free to add to this concept or adapt it to your other work.
Here's the completed item renderer:
<?xml version="1.0" encoding="utf-8"?>
<mx:Canvas xmlns:mx="http://www.adobe.com/2006/mxml"
   backgroundColor="{bgColor}" alpha="0.4" width="100%"
   height="100%">

   <mx:Script>
   <![CDATA[

          import mx.events.FlexEvent;

          [Bindable] private var bgColor:uint;
          [Bindable] private var myLabel:String;

          override public function set data(value:Object):void
          {
                  if(value != null)                  {
                          super.data = value;

                          if(value.col2 > 25)
                          {
                                 bgColor = 0xFF0000;
                          }
                          else
                          {
                                 bgColor = 0x00FF00;
                          }

                          lbl.text = String(value.col2);
                  }
// Dispatch the dataChange event.
dispatchEvent(new FlexEvent(FlexEvent.DATA_CHANGE));
}
]]>
</mx:Script>
<mx:Label id="lbl" />
</mx:Canvas>Now that you've been introduced to the various aspects of Flex application development, let's take that information and build a sample application. Most Web sites have some form of RSS feed, so let's build a simple reader application.
Start by creating a new Flex project. Keep all the default options and then click Finish to wrap up the project-building process. Open the MXML file that's displayed to the left in the Flex Navigator. Switch to Source view to start building the application.
This RSS feed displays the entries in a DataGrid, and when the user clicks a row, the contents of that entry are displayed in a TextArea component. A Button component is used to start the XML loading, but you could easily modify the code to load the feed once the application starts:
<?xml version="1.0" encoding="utf-8"?>
<mx:Application xmlns:mx="http://www.adobe.com/2006/mxml" layout="absolute">

   <mx:Button x="308" y="12" label="Get RSS Feed"/>
   <mx:TextArea id="desc" x="10" y="178" width="400" height="150"/>
   <mx:DataGrid x="10" y="40" width="400" height="125">
         <mx:columns>
         <mx:DataGridColumn headerText="Title" dataField="title"/>
         <mx:DataGridColumn headerText="Date" dataField="date"/>
         </mx:columns>
     </mx:DataGrid>

</mx:Application>
Once the overall application is designed, you can start adding the events and bindable variables to the DataGrid and Button components:
.
.
.
<mx:Button x="308" y="12" label="Get RSS Feed"click="getFeed()"/> <mx:DataGrid ...dataProvider="{feed}"itemClick="storySelected(event)"> . . .
The next step is to begin writing the code for this application. Start by importing the necessary packages and then defining the variables. In this application, two bindable variables and one standard variable direct the code to the XML file:
<mx:Script>
<![CDATA[

     import mx.collections.ArrayCollection;

     [Bindable]
     private var feed:ArrayCollection;

     [Bindable]
     private var feedTitle:String;

     private var feedURL:String = "http://mkeefedesign.com/blog/feed";

]]>
</mx:Script>
When the user clicks the Get Feed button, an event is dispatched that calls the getFeed() method. This method creates a URL request to the server and attempts to load the XML data. A URLLoader instance is also created to set up a response function that handles the XML being returned.
The last part of the getFeed() method makes the actual call to the server-side file, passing the URL request object as an argument:
<mx:Script>
<![CDATA[

     .
     .
     .

     private function getFeed():void
     {
            var urlRequest:URLRequest = new URLRequest(feedURL);
            var urlLoader:URLLoader = new URLLoader();
urlLoader.addEventListener(Event.COMPLETE, feedLoaded);
urlLoader.load(urlRequest);
}
]]>
</mx:Script>Once the XML data has been loaded, you need to build a handler to take that XML data and display it in the DataGrid component. This is painlessly achieved by using E4X in ActionScript 3. E4X is a way to traverse XML data. In previous versions of ActionScript, you had to use childNodes[] and actually drill down into the XML object in order to find the information you were searching for.
Now in ActionScript 3, you can simply say xml..itemToBeFound, and it automatically finds that correct item. If there were multiple items, you would build a loop to go through them. This is exactly what's needed for this example.
You start off by retrieving the XML data, building a new XML instance, and then using a for..each loop to traverse the block of data:
<mx:Script>
<![CDATA[

     .
     .
     .

     private function feedLoaded(e:Event):void
     {
            var urlLoader:URLLoader = URLLoader(e.target);
            var xml:XML = XML(urlLoader.data);

            feedTitle = String(xml..title[0]);

            feed = new ArrayCollection();

            for each(var item:* in xml..item)
            {
                   feed.addItem({
                            title:item..title,
                              date:item..pubDate,
                              body:item..description
                    });
            }
     }

]]>
</mx:Script>
That for..each loop goes through the XML object and pulls out all the item nodes, sticks them in the item variable, and then continues on the loop. For each item in the XML object, you need to create a row in the DataGrid.
The feed property is bindable, so any changes to it are automatically displayed in the DataGrid. If you could slow down this loading process, you would see that each row is added to the feed variable and then placed in the DataGrid.
The addItem() method is part of the ArrayCollection class and is how you push new data in to the array. The type of data it accepts is an object, so one is created automatically for each row in the XML:
feed.addItem({title:item..title, ...});Now that the DataGrid is being filled properly, the last part of the code is an event handler for whenever the user clicks a row. This action displays the body of the message in the TextArea component you added earlier:
<mx:Script>
<![CDATA[

     .
     .
     .

     private function storySelected(e:Event):void
     {
            desc.htmlText = DataGrid(e.target).selectedItem.body;
     }

]]>
</mx:Script>
In order to display the proper entry, you need to reference the correct row in the DataGrid. One of the properties of the DataGrid is selectedItem. This property holds the data for that current row. The e.target makes a reference to the object that called this event, which in this example would be the DataGrid.
The property that you're looking for is body. This property is stored in the selectedItem object, so a simple bit of code, such as the following, does the trick:
DataGrid(e.target).selectedItem.bodyThe DataGrid() portion of the code is ensuring that the value is typed as a DataGrid instance. This is done to ensure that your data is pure. This is especially important if this code handled something of a more secure nature, such as a login or access-specific action.
Whenever a user clicks that DataGrid row, the correct story is loaded into the TextArea. Now that the application is complete, you can test it and expand it to your liking. You may have noticed that this application was loading a remote XML file.
If you happen to be working offline, below is the XML structure; simply create a new XML file and then load this file locally. You can also replace the feedURL with another feed that's online. The structure that's expected is the one found in any WordPress RSS feed:
<?xml version="1.0" encoding="UTF-8"?>
<rss version="2.0"
     xmlns:content="http://purl.org/rss/1.0/modules/content/"
     xmlns:wfw="http://wellformedweb.org/CommentAPI/"
     xmlns:dc="http://purl.org/dc/elements/1.1/"
     xmlns:atom="http://www.w3.org/2005/Atom"
     >

<channel>
     <title>Sample Feed</title>
     <description>Sample feed for flex app</description>
     <pubDate>Tue, 19 Jul 2008 16:04:28 +0000</pubDate>

     <item>
           <title>Sample Story</title>
           <pubDate>Tue, 08 Jul 2008 15:57:45 +0000</pubDate>
           <dc:creator>mkeefe</dc:creator>
           <description><![CDATA[Contents of the story here.]]>
           </description>
         </item>
         <item>
           <title>Sample Story 2</title>
           <pubDate>Tue, 01 Jul 2008 15:57:45 +0000</pubDate>
           <dc:creator>mkeefe</dc:creator>
           <description><![CDATA[Contents of the story here.]]>
           </description>
         </item>
         <item>
           <title>Sample Story 3</title>
           <pubDate>Tue, 20 June 2008 15:57:45 +0000</pubDate>
           <dc:creator>mkeefe</dc:creator>
           <description><![CDATA[Contents of the story here.]]>
           </description>
         </item>

      </channel>
      </rss>
You have now completed a sample application that should give you a firm understanding of Flex application development. At this point, you can start building your own applications, and with the knowledge you obtain in the rest of this book, those applications will be very well-developed.
Here's the sample application in its entirety:
<?xml version="1.0" encoding="utf-8"?>
<mx:Application xmlns:mx="http://www.adobe.com/2006/mxml"
   layout="absolute">

<mx:Script>
<![CDATA[

   import mx.collections.ArrayCollection;

   [Bindable]
   private var feed:ArrayCollection;

   [Bindable]
   private var feedTitle:String;

   private var feedURL:String = "http://mkeefedesign.com/blog/feed/";

   private function getFeed():void
   {
         var urlRequest:URLRequest = new URLRequest(feedURL);
         var urlLoader:URLLoader = new URLLoader();
         urlLoader.addEventListener(Event.COMPLETE, feedLoaded);
         urlLoader.load(urlRequest);
   }

   private function feedLoaded(e:Event):void
   {
           var urlLoader:URLLoader = URLLoader(e.target);
           var xml:XML = XML(urlLoader.data);

           feedTitle = String(xml..title[0]);

           feed = new ArrayCollection();

           for each(var item:* in xml..item)
           {
                  feed.addItem({
                         title:item..title,
                         date:item..pubDate,
                         body:item..description
                  });
           }
     }

     private function storySelected(e:Event):void
     {
desc.htmlText = DataGrid(e.target).selectedItem.body;
}
]]>
</mx:Script>
<mx:Button x="308" y="12" label="Get RSS Feed" click="getFeed()"/>
<mx:TextArea id="desc" x="10" y="178" width="400" height="150"/>
<mx:DataGrid x="10" y="40" width="400" height="125"
dataProvider="{feed}"
itemClick="storySelected(event)">
<mx:columns>
<mx:DataGridColumn headerText="Title" dataField="title"/>
<mx:DataGridColumn headerText="Date" dataField="date"/>
</mx:columns>
</mx:DataGrid>
<mx:Label x="10" y="10" text="{feedTitle}" fontSize="14"/>
</mx:Application>In this chapter, you learned how to develop Flex applications. You first learned how classes and packages are built and then how you can benefit from using them. You also learned that the majority of standard Flex coding is built up of packages and classes, even when it comes to the MXML format.
You were also introduced to events and how they can be used to create more responsive and more solid applications. The event section also gave you a firm understanding of how events are used in MXML development.
Later in the chapter, you learned about data providers and how binding is used to create more interactive applications. You also learned that data binding allows you to keep track of variables without a lot of extra coding.
Being introduced to this information as well as the item renderers should put you well on your way to developing very interesting and useful applications. Now that you understand the basics, it's time to move on to connecting Flex with Java data services.