
IN THIS CHAPTER
Relational database concepts
The MySQL database server
An application can have the most beautiful design or slick intuitive interface, but the fact remains that without the ability to retrieve, update, and store useful data, that application won't see much use. Most data-driven Web applications have a relational database on the back end to manage that data. In this chapter, you learn about key relational database concepts and work with MySQL, a popular open-source database server that powers many of today's Web applications.
The purpose of a relational database is to store data and allow for the retrieval and manipulation of stored data in response to a user's query. Data in a relational database is stored in structures called tables. Data is retrieved from the tables in a relational database by using a querying language called SQL. SQL can also be used to manipulate data stored in database tables. Complex data manipulation and retrieval operations can be grouped together in a stored procedure, which is a construct much like a Java method or ActionScript function. Let's look at these three relational database concepts in more detail.
Tables in a relational database are structured much like spreadsheets, composed of columns and rows. Columns describe each field of data being stored, and rows each contain a single unit of stored data.
Typically, a row in a database table represents a single entity. For example, look at the PERSON table in Figure 8.1. The columns each describe some attribute of a person, such as name or gender. Each row in this table represents one person's attributes. Row 1 contains only the information for John Smith.

Figure 8.1. A database table is structured much like a spreadsheet, with columns describing the data fields and rows representing a single unit of the data.
The concept of a database table can be related to the concept of a class in Java. A class in Java contains fields that describe the properties of an entity, much like the columns in a database table describe the properties of the entities stored in the table. Each row of the table represents a single entity, much like an instance of a class in Java represents a single entity.
Note
For more on Java concepts, such as classes and class instances, see Chapter 1.
Each column in a table is said to be of a specific data type. In the PERSON table, a few different datatypes are used:
FIRST_NAME, LAST_NAME, andGENDERare all variable character fields, commonly referred to as varchar fields. These are fields containing text data of variable lengths. The maximum length of a varchar field is specific to the database system being used. For example, Oracle caps the length of varchar fields at 4,000 bytes, whereas MySQL allows varchar fields as long as 65,535 bytes.HEIGHT_IN_INCHES, WEIGHT_IN_LB, andAGEare all number fields. Number fields can hold integer values or decimal values.DATE_OF_BIRTHis a date field. Date fields store date information based on the Gregorian calendar. Implementations of date fields vary wildly between database systems. In Oracle, a date field contains both date and time information, whereas MySQL uses a separate datetime data type for fields that require both date and time information. When creating a database table, consult the documentation for the database system you're using to determine which data type best fits your needs.
When adding rows to a database table, these data types are checked to make sure the data being added conforms to the data types for each column. Attempting to set the value of a varchar field to a numeric value, for example, would cause the database to raise an error.
Database tables typically include one column or a set of columns used to uniquely identify each row in the table. This column or set of columns is referred to as the primary key of the table. Because the primary key is meant to identify the row, the following two conditions are always true of the primary key:
The primary key must be unique. No two rows in a table can have identical primary keys.
The primary key must have a value. Primary keys can't be null, a term used to describe a field with no value.
In the PERSON table, the PERSON_ID field is the primary key. Each row in the table can be identified by this field. The row containing John Smith's information has a PERSON_ID of 1. Asking the database for the row with a PERSON_ID of 1 will always return John Smith's information; no other row has the same PERSON_ID value.
Columns in other tables can refer to the primary key of a table to form a relationship with that table. Columns in a table that refer to primary keys in other tables are called foreign keys.
Figure 8.2 shows a table called PET. The PET table contains a PERSON_ID column that's a foreign key to the PERSON_ID primary key column in the PERSON table. You can see that Sam Taylor (PERSON_ID 3 in the PERSON table) has two cats: Fluffy and Mittens. John Smith (PERSON_ID 1 in the PERSON table) has a dog named Rocky. The foreign key column establishes the relationship between the pets in the PET table and the people in the PERSON table.
It's important to note that rows in a table with primary keys that are referred to by foreign key columns in other tables can't be deleted without the rows with the foreign key columns being deleted first. For example, if you needed to delete the Sam Taylor row (PERSON_ID 3) from the PERSON table, you would first need to delete the two rows in the PET table with foreign key relationships to that row (PET_ID 1 and PET_ID 3). The database raises an error if an attempt is made to delete Sam Taylor while these two rows exist in the PET table. On the other hand, Mary Jones (PERSON_ID 2) can be deleted freely because no corresponding foreign keys exist in the PET table.

Similarly, a foreign key column can't contain a value that doesn't exist in the primary key column to which it refers. Attempting to insert a new row with a PERSON_ID value of 6, for example, would cause the database to raise an error because no row with a PERSON_ID of 6 exists in the PERSON table.
Note
In the MySQL relational database engine, tables can be created by using different types. The default type, known as MyISAM, doesn't enforce foreign keys as described above. When you're using MySQL, tables that use foreign keys should be created by using the InnoDB table type.
The values stored in a particular column can be further controlled by the use of constraints. A constraint places limits or conditions on the data that a column accepts. A foreign key is a type of constraint in that it restricts the data being stored in a column to the set of values in the primary key to which it refers. There are a few other types of commonly used constraints:
A not-null constraint requires each row to provide a value for this column. Any attempt to insert null into a column with a not-null constraint or to change a value in a not-null column to null causes the database to raise an error.
A unique constraint requires all values in this column to be unique. Each row must contain a unique value in this column. A primary key is by definition also a unique constraint because all values in a primary key column must be unique. Any attempt to insert nonunique data into a column with a unique constraint or to update a unique column to a nonunique value causes the database to raise an error. A unique constraint doesn't prevent multiple nulls from being inserted into columns that allow nulls. Nulls are treated specially; two nulls when compared with each other are considered to be neither equal nor unequal. Therefore, having two nulls in a column with a unique constraint doesn't violate the constraint.
A check constraint checks any added or modified data to see that it meets certain conditions. For example, if you add a check constraint to the
AGEcolumn of thePERSONtable to ensure that any inserted values are less than or equal to 100, then any attempt to insert a row with an age value greater than 100 causes the database to raise an error.
All these constraints can be used in conjunction with one another. For example, a single column might not allow nulls, require uniqueness, and check for specific conditions for its data.
Note
Check constraints aren't supported in MySQL.
Once the structure of your data is defined by database tables and the permissible data further clarified through data types, keys, and constraints, you need a way to work with and manipulate the data. Relational databases typically retrieve and manipulate data in response to queries from a user or application. A query is simply a request to the database to retrieve or manipulate some data. The language used to make such a request is known as Structured Query Language, or SQL. SQL is a standardized language understood by relational databases.
The SQL language is quite expansive, and explaining it in detail could fill a book on its own. However, understanding the basics of SQL can give you a solid foundation to build upon later. Although SQL can be complex, it really boils down to only a few key query types, or statements.
An SQL select statement tells the database to retrieve a specific set of information from one or more tables. A basic select statement to retrieve the data in the PERSON table would look like this:
SELECT * FROM PERSON;
This statement tells the database that you want to retrieve all columns and all rows of the PERSON table. The * is a wildcard character that means everything. You can limit the fields returned by the select statement by specifying the ones you want in a comma-delimited list in the query. For example, if you wanted only the first and last names of everyone in the PERSON table, you could modify the query to read like this:
SELECT LAST_NAME, FIRST_NAME FROM PERSON;
Similarly, you can filter the rows that are returned by adding specific search criteria by using a WHERE clause. The WHERE clause tells the database to retrieve only the rows that match the given criteria. For example, to retrieve only rows for people whose last name is Smith, the select statement would look like this:
SELECT * FROM PERSON WHERE LAST_NAME = 'Smith';
A SQL insert statement tells the database to add the given row of data to the given table. A basic insert statement to add a row of data to the PERSON table would look like this:
INSERT INTO PERSON (FIRST_NAME, LAST_NAME, GENDER, HEIGHT_IN_INCHES,
   WEIGHT_IN_LB, AGE, DATE_OF_BIRTH) VALUES ('Tom','Davis','M',72,
   180,35,'1973-07-24'),
This statement tells the database that you want to insert a new row containing the given values into the PERSON table. Each column in the table is listed in a comma-delimited list, and each value for the row to be inserted is listed in a corresponding comma-delimited list. In this example, the new row contains the value Tom in the FIRST_NAME column, Davis in the LAST_NAME column, etc.
You can leave one or more columns out of the insert statement, and the database leaves those fields blank. For example, if you want to insert a new row into the table with only the first and last names filled in, your query might look like this:
INSERT INTO PERSON (FIRST_NAME, LAST_NAME) VALUES ('Tom', 'Davis'),If you're inserting values for every column, you can omit the column listing. The database inserts the values in the order in which the columns appear in the database:
INSERT INTO PERSON VALUES ('Tom','Davis','M',72,180,35,'1973-07-24'),However, it's recommended that you don't use this approach when using insert statements in application development. If the PERSON table is modified to add or remove columns, the last SQL statement no longer works. Also, explicitly listing the columns in your queries makes them easier to understand and maintain for others who might need to work with your code.
Note
For more on using SQL queries in your applications, see Chapter 9.
A SQL update statement tells the database to update one or more existing rows in the database. A basic update statement for the PERSON table would look like this:
UPDATE PERSON SET AGE = 45;
This statement tells the database to set the value of the AGE column to 45 for every row in the PERSON table. You can add criteria by using the same WHERE clause syntax used for select statements to tell the database that only rows in the table that match the criteria should be updated. For example, to change the value in the AGE column for only those people under 30, the update statement would look like this:
UPDATE PERSON SET AGE = 45 WHERE AGE < 30;
This statement executes successfully even if no rows match the criteria. However, no rows are updated.
You can specify more than one column to be updated by separating the column name-value pairs with a comma:
UPDATE PERSON SET AGE = 45, WEIGHT_IN_LB = 150 WHERE LAST_NAME =
   'Smith';
A SQL delete statement tells the database to delete one or more existing rows in the database. A basic delete statement for the PERSON table would look like this:
DELETE FROM PERSON;
This statement tells the database to delete all rows from the PERSON table. You can add criteria by using the same WHERE clause syntax used for select and update statements to tell the database that only rows in the table that match the criteria should be deleted. For example, to delete everyone in the PERSON table under age 30, the delete statement would look like this:
DELETE FROM PERSON WHERE AGE < 30;
This statement executes successfully even if no rows match the criteria. However, no rows are deleted.
Many databases allow you to create user-defined functions to group a set of database operations together into a single logical unit called a stored procedure. Stored procedures are typically written in a stored procedure language that incorporates SQL statements and proprietary language elements specific to the database system being used. The syntax for creating a stored procedure also varies from database to database.
A stored procedure is much like a method in a Java class. It can accept zero or more parameters for input, use those parameters in its operations along with any local variables it declares, and return some value or values to its caller.
There's some debate as to whether stored procedures should be used when developing applications. On the pro side, stored procedures are typically very fast to execute, thanks to optimizations and caching provided by the database. Using stored procedures to encapsulate your business logic also allows you to switch out the implementation of your application (for example, switching from Java to C#) more easily because the business logic in the database wouldn't need to change. On the con side, some argue that the database should be used only for data storage and not contain application logic, maintaining a separation of concerns that's one of the cornerstones of modular programming. Furthermore, because of the differences in stored procedure languages and implementations across different database systems, having application logic in the database makes the application dependent on one specific database, making it more difficult to port to other platforms.
In the end, the decision of whether to use stored procedures comes down to what best fits your application's requirements and your application's development roadmap.
MySQL is a free database server and is among the most widely used database servers for Web applications. MySQL is known for being lean and high-performing but also scalable for larger applications. One of the largest and most frequently accessed Web sites, Wikipedia, is powered by MySQL.
MySQL is available for many different platforms and processors. The MySQL download for 32-bit Windows operating systems can be found at http://dev.mysql.com/downloads/mysql/5.0.html#win32. As of this writing, the most stable version of MySQL is 5.0.67.
To download, install, and configure MySQL, follow these steps:
Download the installer:
Type the URL in a browser. The MySQL 5.0 downloads page, as shown in Figure 8.3, opens. There are three installation packages to choose from for Windows. You should install the Windows Essentials (x86) package. This is a Windows installer package that contains everything you need to run MySQL on your development machine.
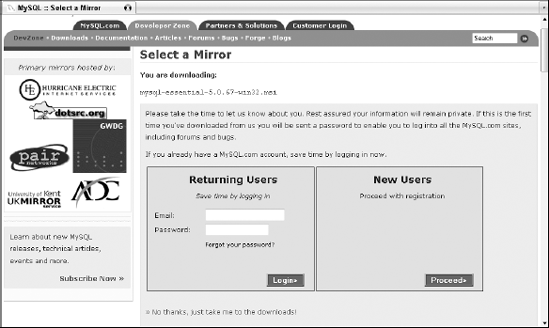
Click the Pick a mirror link to the right of the Windows Essentials (x86) package. The Select a Mirror screen, as shown in Figure 8.4, opens. You're presented with the option of registering for an account on the MySQL Web site. Registering gives you a login that can be used for the MySQL user forums as well as other MySQL Web sites. You may also register at another time by visiting the main MySQL Web site at
www.mysql.com. For now, proceed with the download.Click the No thanks, just take me to the downloads! link. The list of mirror sites appears.
Click either the HTTP or FTP link for the mirror site that's geographically closest to you. The Download File dialog box opens.
Click Save, choose a location for the file in the Save File As dialog box, and then click the Save button. The installer is downloaded to your machine.
Double-click the installer. The MySQL Server 5.0 Setup Wizard opens.
Click Next. The Setup Type screen, as shown in Figure 8.5, opens. The Setup Type screen presents you with three options: Typical, Complete, and Custom. Typical is the default selection and installs everything you need for typical MySQL development.
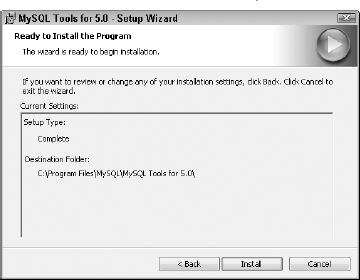
Click the Typical radio button and then click Next. The Ready to Install the Program screen, as shown in Figure 8.6, opens. Confirm that the settings are correct.
Click Install. MySQL is installed. When installation is complete, the MySQL Enterprise screen opens. This screen and the next one simply display the benefits of a MySQL Enterprise subscription. These benefits are more for corporate customers than individual customers.
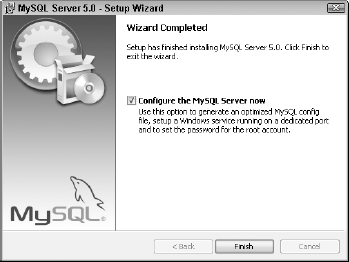
Click Next on this screen and on the next screen. The Wizard Completed screen, as shown in Figure 8.7, opens. The check box on this screen offers you the chance to configure MySQL now. This configuration generates a configuration file optimized for your MySQL usage, installs MySQL as a Windows service, and allows you to set a password for the MySQL root user.
Click the check box next to Configure the MySQL Server now and then click Finish. The MySQL Server 5.0 Setup Wizard closes, and the MySQL Server Instance Configuration Wizard opens.
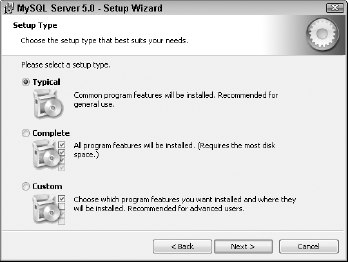
Figure 8.5. The Setup Type screen offers three installation options. Typical is the default selection and is appropriate in most cases.
Click Next. The MySQL Server Instance Configuration Wizard screen, as shown in Figure 8.8, opens. This screen presents you with two options for configuration. The Detailed Configuration option contains options for optimizing and tuning the database for a variety of environments, from developer machines to large-scale data warehouses. The Standard Configuration option sets up sensible defaults without needing to go into that level of detail and is the more appropriate option in this case.
Click the Standard Configuration radio button and then click Next. The next screen of the wizard, as shown in Figure 8.9, opens. This screen contains two configuration settings. The first setting is whether to install the MySQL server as a Windows service. Installing as a service allows you to control the MySQL server from the Windows Services dialog box and also gives you the option of having MySQL start up when Windows starts up. As the dialog box explains, this is the recommended way of running MySQL on Windows. The second setting allows you to put the MySQL
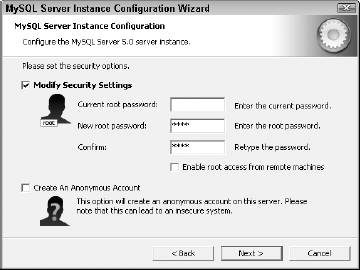
bindirectory, where the MySQL executables are installed, into thePATHenvironment variable. This gives you access to the MySQL command-line tools from any directory.Click the check boxes for Install As Windows Service and Include Bin Directory in Windows PATH and then click Next. The root account configuration screen, as shown in Figure 8.10, opens. On this screen, you're given the opportunity to set a password for the root user. By default, MySQL's root user doesn't have a password. Because the root user has access to all databases, this isn't very secure. Choose a password that's easy for you to remember but hard for someone else to guess. You can also click the Enable root access from remote machines check box. Unless you're doing development on multiple machines that need to access this MySQL installation, there's no need to enable this option. Similarly, leave the Create An Anonymous Account check box deselected, as it's not necessary.
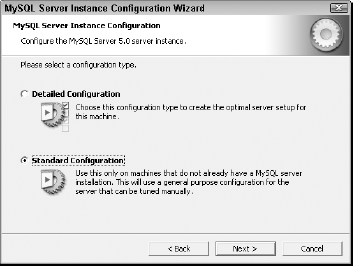
Figure 8.8. The MySQL Server Instance Configuration Wizard screen offers two choices for configuration. The Standard Configuration option is more appropriate here.
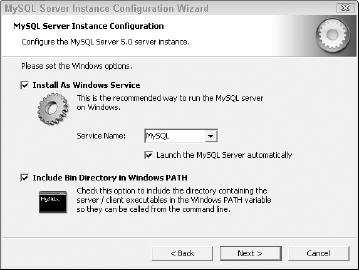
Figure 8.9. This screen allows you to install MySQL as a Windows service and add the path to the MySQL
bindirectory to thePATHenvironment variable. The defaults are fine for the first setting. The check box for the second setting isn't checked by default, but it's recommended that you also select this option.Type a password for the root user in the New root password and Confirm boxes and then click Next. The Ready to Execute screen opens.
Click Execute. The wizard performs the configuration steps. When it's finished, the wizard should look like Figure 8.11.
Click Finish. The wizard closes. The installation and configuration of MySQL are complete.


Out of the box, MySQL ships with a set of command-line tools for creating databases and tables and executing queries. For those who prefer working in a graphical user interface, MySQL offers a GUI tool set as a separate download. Although these tools aren't necessary for MySQL development, they provide a more convenient way of creating databases and tables without needing to type SQL statements by hand, and they also let you examine the SQL statements that MySQL runs behind the scenes. Because of this, it's worth taking the time to download the tool.
The MySQL GUI Tools installer for 32-bit Windows operating systems can be found at http://dev.mysql.com/downloads/gui-tools/5.0.html. As of this writing, the most stable version is 5.0-r14.
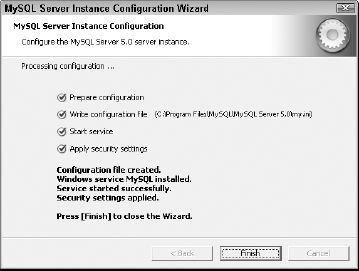
Figure 8.11. Once the wizard has performed the configuration steps, confirmation of success appears on the wizard screen.
To download and install the MySQL GUI Tools, follow these steps:
Download the installer:
Type the URL in a browser. The MySQL GUI Tools downloads page opens.
Scroll down to the Windows Downloads section and then click the Pick a mirror link to the right of the Windows (x86) item. The Select a Mirror page opens. You're again presented with the option to register for an account on the MySQL Web site. For now, proceed with the download.
Click the No thanks, just take me to the downloads! link. The list of mirror sites appears.
Click either the HTTP or FTP link for the mirror site that's geographically closest to you. The File Download dialog box opens.
Click Save, choose a location for the file in the Save File As dialog box, and then click the Save button. The installer is downloaded to your machine.
Double-click the installer. The MySQL Tools for 5.0 Installation Wizard opens.
Click Next. The license agreement screen opens.
Read the license agreement, click the radio button to agree to the terms, and then click Next. The destination folder screen opens. The default folder is appropriate for most installations.
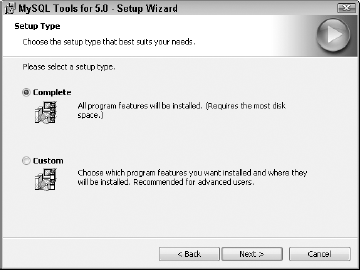
Click Next. The Setup Type screen, as shown in Figure 8.12, opens.
Click the Complete radio button and then click Next. The Ready to Install the Program screen, as shown in Figure 8.13, opens.
Verify the installation settings and then click Install. The MySQL tools are installed. When installation is complete, the MySQL Enterprise screen opens. This screen and the next one simply display the benefits of a MySQL Enterprise subscription. These benefits are more for corporate customers than individual customers.
Click Next on this screen and on the next screen. The Wizard Completed screen opens.
Click Finish. The wizard closes.
Now that MySQL and the MySQL GUI Tools have been installed and configured, it's time to create a simple database that contains the PERSON and PET tables shown earlier in this chapter by using the MySQL Query Browser, one of the tools installed with the MySQL GUI Tools:
Launch the MySQL Query Browser by choosing Start
All Programs MySQLMySQL Query Browser. The Connect to MySQL Server Instance dialog box, as shown in Figure 8.14, opens.
Type the following values in the dialog box:
Click OK. A warning dialog box, as shown in Figure 8.15, appears, reminding you that you haven't selected a default schema. Click Ignore to dismiss this dialog box. The MySQL Query Browser launches. The term schema is essentially equivalent to database. A schema contains all the database objects, such as tables and stored procedures, that belong to a single database. A single MySQL server supports many databases at a time. Each database is separate from the others. You will create a new schema by using the tool, so you don't need to select a default schema here.
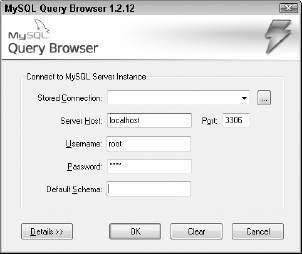

Figure 8.15. A warning dialog box appears to remind you that you've not selected a default schema. Click Ignore to dismiss this dialog box. You will create a new schema by using the tool.
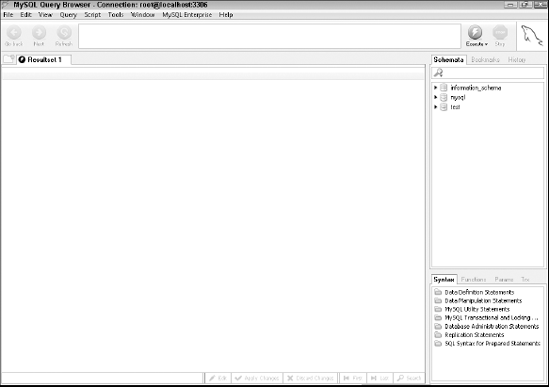
The main interface of the MySQL Query Browser is shown in Figure 8.16. The interface is divided into several components:
The text field at the top of the screen is the query editor. This is where you can type SQL queries and statements to execute.
The large area below the query editor contains a single tab labeled Resultset 1. This is the results tab. It displays the results of any queries you execute in the query editor.
The tabbed area at the top right of the screen is the browser. The Schemata tab allows you to browse the tables and stored procedures in each database. The Bookmarks tab stores queries that you have bookmarked. You can then load a query into the query editor by double-clicking it. This is very handy for queries you run frequently. Finally, the History tab stores every query run in the query editor. You can also load a query into the query editor by double-clicking it here, much like you can in the Bookmarks tab.
The tabbed area at the bottom right contains links to inline documentation. The Syntax tab contains links to documentation about the syntax of SQL query statements and data definition language (DDL) statements for operations such as creating or modifying databases, tables, and stored procedures. The Functions tab contains links to documentation for MySQL's built-in data functions for operations such as string comparison or manipulation, date/time operations, and more. Finally, the Params and Trx tabs show any global parameters in use that affect all queries executed in the query editor and show the set of queries and statements that are executing within a single transaction, or single unit of work within a database.
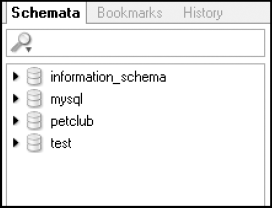
As you can see in the Schemata browser tab, the MySQL server includes three databases by default:
The information_schema database is where MySQL stores its database metadata, which is information about all the other databases running in the MySQL server and their objects. This metadata is also referred to by the term data dictionary because it contains the definitions of the structure of the data present in the system.
The mysql database contains information about the user accounts in the MySQL server and their access privileges for databases running in the MySQL server.
The test database is an empty database that can be used as a safe place to test SQL queries or stored procedures before using them on a real database.
Note
It's possible to render your MySQL installation unusable by modifying or deleting data in the information_schema and mysql databases. It's strongly recommended that only experienced database administrators perform operations in these databases.
Using the MySQL Query Browser, you can create a new database called petclub and then create the PERSON and PET tables in that database:
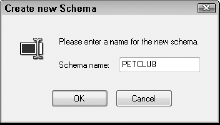
Right-click within the Schemata tab in the top-right corner and then choose Create New Schema from the popup menu. Alternatively, you can press Ctrl+N. The Create new Schema dialog box, as shown in Figure 8.17, opens.
Type PETCLUB in the Schema name text field and then click OK. The
petclubschema appears in the Schemata tab, as shown in Figure 8.18.Right-click the
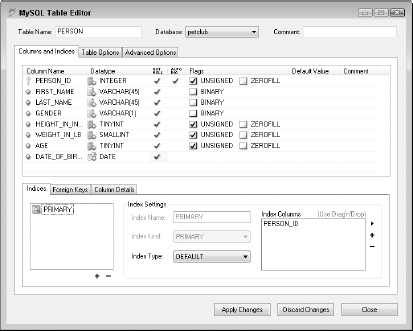
petclubdatabase within the Schemata tab in the top-right corner and then choose Create New Table from the popup menu. Alternatively, you can press Ctrl+T. The MySQL Table Editor dialog box, as shown in Figure 8.19, opens. This dialog box has a lot of fields and tabs, but for now, only the Table Name text field and the Columns and Indices tab are important. The Columns and Indices tab is where the columns for your table are defined.Type
PERSONin the Table Name text field.Double-click below the Column Name column in the Columns and Indices tab. A text field appears.
Type PERSON_ID in this text field, as shown in Figure 8.20, and then press the Tab key. When you press Tab, the rest of the row for the new
PERSON_IDcolumn fills in with some default values, and a key icon appears next toPERSON_ID, as shown in Figure 8.21. The key icon indicates that thePERSON_IDfield is used as the primary key for this table. The table editor makes the first column created for a table the primary key by default. Also by default, the table editor assigns some other attributes to the primary key column. It's given a data type of integer, given a not null constraint, set to automatically increment, and given an unsigned flag. The auto-increment option tells MySQL to automatically assign this field an incrementing integer value, starting from 1. This is a commonly used attribute for primary keys, as it ensures that the same value isn't used twice. SQLinsertstatements that add data to this table won't include this field; the database automatically assigns it a value. The unsigned flag is an attribute of integer and other numeric data types that tells the database to use only non-negative values for this field. By default, an integer field can hold values ranging from −2147483648 to 2147483647. Using the unsigned flag changes this range from 0 to 4294967295.Continue adding the columns for the
PERSONtable as specified by double-clicking below the previous column name to type the column name and then using the Tab key to move between the other settings. When you've finished, the MySQL Table Editor should look like Figure 8.22, with the following columns:Column Name:
FIRST_NAME; Datatype:VARCHAR(45); checkNOT NULL. The data typeVARCHAR(45)creates a variable-length character data field with a maximum length of 45 bytes.Column Name:
LAST_NAME; Datatype:VARCHAR(45); checkNOT NULLColumn Name:
GENDER; Datatype:VARCHAR(1); checkNOT NULL.For this column, only a 1-byte field is needed because gender is stored as either M or F.Column Name:
HEIGHT_IN_INCHES; Datatype:TINYINT; checkNOT NULL; checkUNSIGNED. TINYINTis a MySQL-specific datatype. An unsignedTINYINTcolumn can range in value from 0 to 255.Column Name:
WEIGHT_IN_LB; Datatype:SMALLINT; checkNOT NULL; checkUNSIGNED. SMALLINTis a MySQL-specific datatype. An unsignedSMALLINTcolumn can range in value from 0 to 65,535.SMALLINTis more appropriate thanTINYINTfor this column, as a person might weigh more than 255 pounds.Column Name:
AGE; Datatype:TINYINT; checkNOT NULL; checkUNSIGNEDColumn Name:
DATE_OF_BIRTH; Datatype:DATE; checkNOT NULL
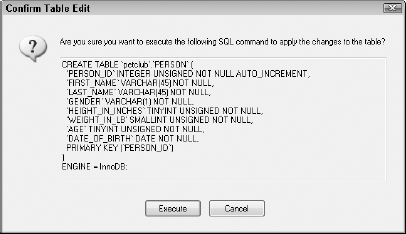
Click Apply Changes. The Confirm Table Edit dialog box, as shown in Figure 8.23, opens. This dialog box shows the actual SQL code that's executed to create the table.
Click Execute. The
PERSONtable is created, and the Confirm Table Edit dialog box closes.Click Close. The MySQL Table Editor dialog box closes.
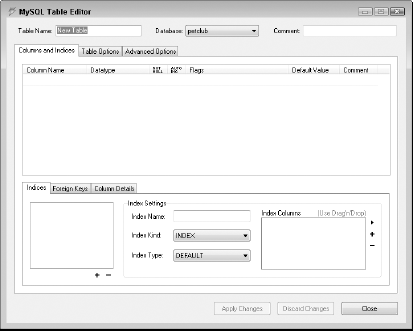
Right-click the
petclubdatabase within the Schemata tab in the top-right corner and then choose Create New Table from the popup menu. Alternatively, you can press Ctrl+T. The MySQL Table Editor dialog box opens.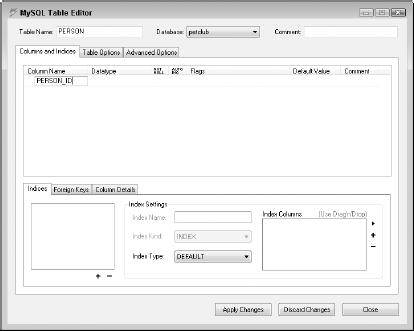
Figure 8.20. Double-clicking below the Column Name column in the Columns and Indices tab creates a text field where a column name can be typed.
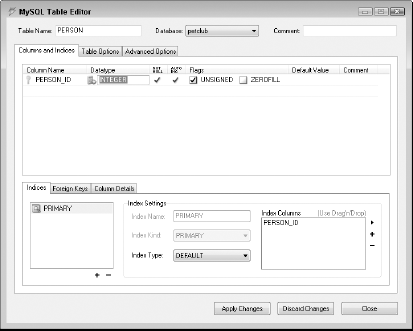
Figure 8.21. After you type the column name and pressing the Tab key, the MySQL Table Editor fills in some default values for the rest of the column attributes. Because
PERSON_IDis the first column in the table, the MySQL Table Editor has made it the table's primary key.Type
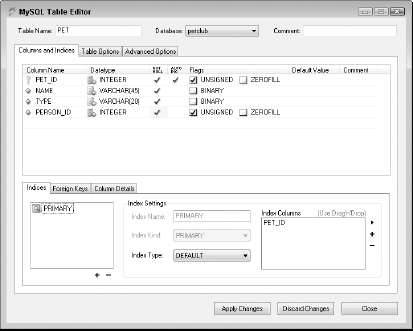
PETin the Table Name text field.Double-click below the Column Name column in the Columns and Indices tab. A text field appears.
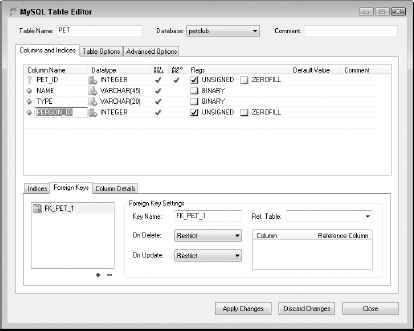
Type
PET_IDin the text field and then press the Tab key. When you press Tab, the rest of the row for the newPET_IDcolumn fills in with some default values, and a key icon appears next toPET_ID, indicating that thePET_IDfield is used as the primary key for this table. It's given a data type ofinteger, given anot nullconstraint, set to automatically increment, and given an unsigned flag, similar to thePERSON_IDcolumn in thePERSONtable.Continue adding the columns for the
PETtable as specified by double-clicking below the previous column name to type the column name and then using the Tab key to move between the other settings. When you've finished, the MySQL Table Editor should look like Figure 8.24, with the following columns:Column Name:
NAME; Datatype:VARCHAR(45); checkNOT NULLColumn Name:
TYPE; Datatype:VARCHAR(20); checkNOT NULLColumn Name:
PERSON_ID; Datatype:INTEGER; checkNOT NULL; checkUNSIGNED
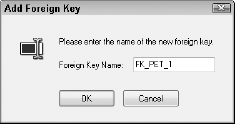
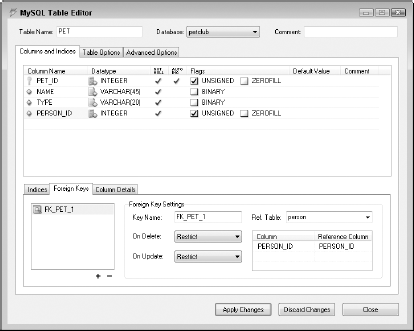
Click the Foreign Keys tab next to the Indices tab in the bottom-right corner, click the
PERSON_IDfield in the Columns and Indices tab, and then click the + symbol below the Foreign Key tab. The Add Foreign Key dialog box, as shown in Figure 8.25, opens.Click OK. The new foreign key appears in the Foreign Keys tab, as shown in Figure 8.26.
Choose
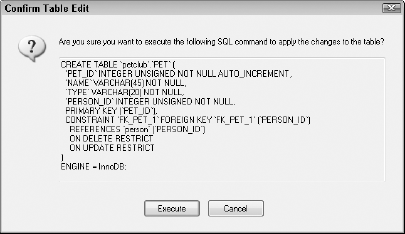
personfrom the Ref Table dropdown list on the right side of the Foreign Keys tab. The Column and Reference Column fields in the table below the dropdown list fill in with the valuePERSON_ID, as shown in Figure 8.27. The Column and Reference Column fields refer to the table columns from thePETandPERSONtables, respectively. This foreign key establishes that thePERSON_IDcolumn in thePETtable references thePERSON_IDprimary key column in thePERSONtable. Now thePETtable'sPERSON_IDcolumn can contain only values found in thePERSON_IDcolumn of thePERSONtable.Click Apply Changes. The Confirm Table Edit dialog box, as shown in Figure 8.28, opens. This dialog box shows the actual SQL code that's executed to create the table. The code to create the foreign key is part of the table creation code that's executed.
Click Execute. The
PETtable is created, and the Confirm Table Edit dialog box closes.Click Close. The MySQL Table Editor dialog box closes.
Now that the tables have been created, the next step is to add some data to them. First, right-click the petclub database in the Schemata tab and then choose Make Default Schema from the popup menu to tell MySQL to use the petclub database for these operations. Next, type the following three SQL statements in the query editor, one at a time. After typing a statement in the query editor, click the Execute button to execute the statement. Once the statement has been executed, delete it from the query editor, type the next statement, and then click Execute. Continue until all three statements have been executed:
INSERT INTO PERSON (FIRST_NAME, LAST_NAME, GENDER, HEIGHT_IN_INCHES,
   WEIGHT_IN_LB, AGE, DATE_OF_BIRTH) VALUES ('John','Smith','M',70,
   165,30,'1978-08-10'),

INSERT INTO PERSON (FIRST_NAME, LAST_NAME, GENDER, HEIGHT_IN_INCHES,
   WEIGHT_IN_LB, AGE, DATE_OF_BIRTH) VALUES ('Mary','Jones','F',63,
   120,25,'1983-04-01'),
INSERT INTO PERSON (FIRST_NAME, LAST_NAME, GENDER, HEIGHT_IN_INCHES,
WEIGHT_IN_LB, AGE, DATE_OF_BIRTH) VALUES ('Sam','Taylor','F',65,
130,35,'1973-11-24'),These three records are now added to the PERSON table. You can see the data inside the PERSON table in a few different ways:
Type SELECT * FROM PERSON in the query editor and then click the Execute button.
Click the arrow next to the
petclubdatabase to expand it and then drag thePERSONtable into the Resultset 1 tab.Click the arrow next to the
petclubdatabase to expand it and then double-click thePERSONtable. The querySELECT * FROM petclub.personappears in the query editor. Click Execute to run the query.
Any of these operations results in the three rows of the PERSON table appearing in the Resultset 1 tab, as shown in Figure 8.29.

Figure 8.29. The results of querying the database for the records in the PERSON table are displayed in the Resultset 1 tab.
Now add rows to the PET table by running each of the following SQL statements, one at a time, just as you did for the PERSON table:
INSERT INTO PET (NAME, TYPE, PERSON_ID) VALUES ('Fluffy', 'cat', 3);

INSERT INTO PET (NAME, TYPE, PERSON_ID) VALUES ('Rocky', 'dog', 1);

INSERT INTO PET (NAME, TYPE, PERSON_ID) VALUES ('Mittens', 'cat', 3);
You can verify that these three rows were added the same way you checked the rows in the PERSON table. Your data should look similar to that in Figure 8.30.

Figure 8.30. The results of querying the database for the records in the PET table are displayed in the Resultset 1 tab.
If you try to add a new record to the PET table with a PERSON_ID that doesn't exist in the PERSON table, you see an error. Try executing the following statement in the query editor:
INSERT INTO PET (NAME, TYPE, PERSON_ID) VALUES ('Aquaman', 'fish', 9);When you click the Execute button, an error message appears at the bottom of the screen, telling you that the foreign key FK_PET_1 has been violated, as shown in Figure 8.31.
Figure 8.31. An error results if you try to add a row to the PET table with a PERSON_ID that doesn't exist in the PERSON table.
Finally, SQL allows you to select data from multiple related tables at a time in a single query. This type of query is said to contain a join. There are many types of joins. The simplest is called an inner join. An inner join selects values from each table where one or more related rows exist in each table being joined.
Suppose that you want to retrieve a list of people's first and last names alongside their pets' names. Type this query in the query editor and then click the Execute button:
SELECT person.first_name, person.last_name, pet.name
FROM person, pet
WHERE person.person_id = pet.person_id;
The WHERE clause of this query specifies that the PERSON_ID column in the PERSON table is related to the PERSON_ID column in the PET table. The results returned are shown in Figure 8.32. Notice that Mary Jones (PERSON_ID 2) doesn't appear in this list. That's because the PERSON table and the PET table were joined, and there's no row with a PERSON_ID of 2 in the PET table. Sam Taylor (PERSON_ID 3) appears twice because she has two pets.

A more formal way of writing the same query is:
SELECT person.first_name, person.last_name, pet.name
FROM person
JOIN pet on pet.person_id = person.person_id;
The JOIN keyword is the ANSI standard syntax for joining tables in a select statement. The on keyword is used in conjunction with JOIN to define the column in each table used in the join. Both this version of the query and the previous version produce the same results. Which version you use largely comes down to personal preference and any coding standards your development team uses.
ANSI Join is the current syntax for joins:
SELECT person.first_name, person.last_name, pet.name
FROM person
JOIN pet on pet.person_id = person.person_id;
In this chapter, you learned about relational databases and some of the key concepts involved with them, such as tables, structured query language (SQL), and stored procedures. Then, you downloaded, installed, and configured MySQL, a popular and robust open-source database server. You also downloaded and installed a suite of GUI tools for working with MySQL databases. Finally, you built a simple database by using the GUI tools and then ran some queries against it to get a feel for how relational databases in general and MySQL specifically operate. This introduction to relational databases gives you a solid foundation upon which to build when working with MySQL to develop your Java and Flex applications.