
IN THIS CHAPTER
Understanding the sending process
Writing the sample test
In this chapter, you learn how to send data from Flex. The concepts you learn aren't specific to Java because no matter what back-end language you decide to work with, you still need to send and load some form of data.
The actual process of sending data consists of packages and classes that ship with Flex, paired with a custom response handler that the developer would create and which you will now learn to create.
The process of sending data in Flex requires an object to send the data and another to handle the response that's captured once the requested server returns a result. This is because Flex uses an asynchronous sending process, which means that the response calls are assigned to an response handler because it's not known when the response will be available. In a synchronous (blocking) process, the application waits until the response is available.
The object for the asynchronous call is also used to hold any variables that need to be passed to the server.
When creating a service to send data, first you need to determine the purpose and functionality of the service. For example, if you want to load a user's information from a server-based database, you would make a request with a user ID and expect a slug (fragment) of XML or a formatted string that contains the response.
The above scenario may look something like this when developed by using ActionScript:
private function sendData():void
      {
     var url:String = "http://localhost/app/getUser";

     var variables:URLVariables = new URLVariables();
     variables.userID = 2;

     var urlRequest:URLRequest = new URLRequest(url);
     urlRequest.data = variables;

     var loader:URLLoader = new URLLoader();
     loader.addEventListener(Event.COMPLETE, handleServerResponse);
     loader.load(urlRequest);
      }

     private function handleServerResponse(e:Event):void
     {
           // handle server response here
     }
This code is a simplified example of creating a service to contact the server. You start off by creating an instance of the URLVariables object, which contains the parameters that are passed to the server. Next is the URLRequest instance, which is stored in the urlRequest variable.
Then you create a new URLLoader instance, passing in the previous URLRequest, and add an event listener that's called once the response has been loaded.
All that probably looks pretty straightforward and familiar to you if you've worked with Flex before. Now let's look at a simpler approach using HTTPService.
Building the service by using ActionScript is only one option. When using Flex, most of the ActionScript you develop can be re-created by using only MXML, depending on how you construct your application.
The HTTPService tags simplify the process of building a request service and require only a few bits of code to re-create what the previous ActionScript approach contained.
Start by adding the HTTPService tag to your document. The placement within the MXML file doesn't matter because it's purely for runtime use; you won't see anything on the stage or in your completed application as a result of simply adding the HTTPService tag:
<mx:HTTPService
     id="httpService"
     url="http://example.com"
     method="POST"
/>
The HTTPService tag is given an id, which would be referred to within your script block. The url parameter is the fully qualified path to the back-end server processor, similar to the one you would connect to in the previous section.
The last parameter, method, is used to define the method that sends the data. Valid options would be GET and POST, exactly the same as you would find in an HTML-based application.
Note
You can find other methods, such as PUT and DELETE, in third-party libraries.
The HTTPService code can be assigned to a binding response. This allows your application to be updated automatically, minimizing the amount of code that's required to handle the response.
Here's an example of a bindable response based on the previous HTTPService tag:
<mx:Label
     text="Response: { httpService.lastResult.id }"
/>
Note
The lastResult variable is cleared after each call. It's a good idea to store this response in case you want to use it later.
You don't have to assign the service call to a bindable string. You can manually handle the response from the server. Start by adding a function to the result property, which is called once the response is complete:
<mx:HTTPService
    id="httpService"
    result="xmlResponse"
Then, once the tag has been updated, the next step is to create the function, which in this example is xmlDecodeResponse:
public function xmlResponse(xml:*):void
{
   trace("User ID: " + xml.firstChild.attributes.userID);
}Now that you know how to send data from Flex, let's take a moment to develop a sample test, which you can refer to in case you run into problems.
Before you write the sending process, start off by creating a new Flex application and adding the components.
To create a new Flex project, follow these steps:
Choose File

Type SendingData in the Project name text field.
Click OK to create the project.
Switch to the Design view and then drag out three Button components and a TextArea component, as shown in Figure 5.1. The buttons are used to call functions, which are created when you start to define the code for this example.
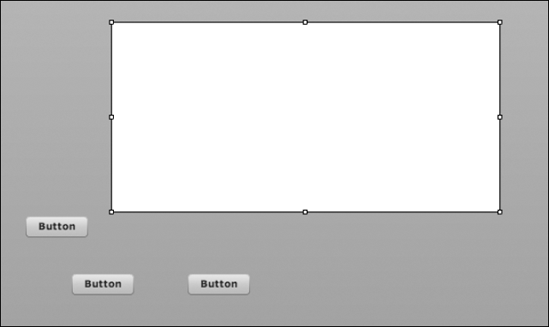
The next step is to align the components by dragging them together until the snap line appears, as shown in Figure 5.2, for graphics purposes. You can then assign unique ids to each component by using the Flex Properties panel.
Note
You can modify most of the component parameters in the Flex Properties panel or in the Code editor; they both create the same result.
You should now have the components and ids defined. The exact alignment of the elements isn't important for this example. The code in the Source view should look similar to the following block of text:
<?xml version="1.0" encoding="utf-8"?>

<mx:Application
     xmlns:mx="http://www.adobe.com/2006/mxml"
     layout="absolute"
>

     <mx:TextArea
           id="debugTxt"
           x="10"
           y="10"
width="406"
height="199"
/>
<mx:Button x="10" y="217" label="HTTPService Call" id="httpBtn"/>
<mx:Button x="137" y="217" label="ActionScript Call" id="asCall"/>
<mx:Button x="361" y="217" label="Clear" id="clearBtn"/>
</mx:Application>The next step is to add the HTTPService call, which — as you learned before — is achieved by adding a line (formatted as more than one here) of MXML code:
<mx:Application
     xmlns:mx="http://www.adobe.com/2006/mxml"
     layout="absolute"
>

     <mx:HTTPService
           id="httpService"
            url="http://localhost/app/getUser"
            method="POST"
            result="xmlResponse"
     />

     ...

</mx:Application>Now that the basic MXML code has been created, the next step is to begin adding the ActionScript, which is called whenever one of the Button components is clicked. Start by adding the Script tags, which contain the ActionScript:
<mx:Script>
     <![CDATA[

     ]]>
</mx:Script>
The first method, asCallHandler(), handles the ActionScripted version of the sending process. Start by creating a URLVariables instance and then attach that variable object to a new URLRequest instance.
A URLLoader is then set up to control the actual calling of the server. A more complete application uses a Java back end. But in this example, the server is nothing more than a simple HTML file:
private function asCallHandler():void
{
     var url:String = "http://localhost/app/getUser";

     var variables:URLVariables = new URLVariables();
     variables.userID = 2;

     var urlRequest:URLRequest = new URLRequest(url);
     urlRequest.data = variables;

     var loader:URLLoader = new URLLoader();
     loader.addEventListener(Event.COMPLETE, handleServerResponse);
     loader.load(urlRequest);
}
The second method, handleServerResponse(), is called when the data in the previous method is loaded.
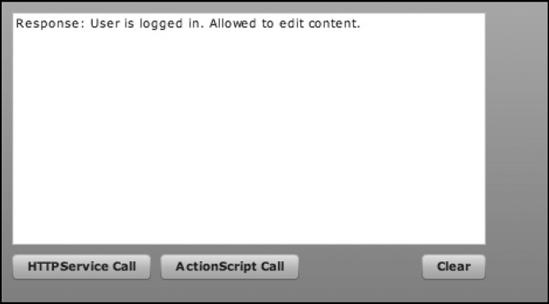
For this example, the response is captured and displayed in the TextField component that's located within the application:
private function handleServerResponse(e:Event):void
{
     trace("User data is loaded");
     debugTxt.text = e.currentTarget.response;
}
The third method, httpBtnHandler(), handles the call to the HTTPService request. A call to the send() method starts the process. This is to ensure that the calls aren't made when the application loads:
private function httpBtnHandler():void
{
     httpService.send({userID:2});
}
The last method, xmlResponse(), is called when the HTTPService returns a response. In this example, the response data is passed into the TextArea component. The response is XML:
public function xmlResponse(xml:*):void
{
debugTxt.text = xml.firstChild.attributes.response;
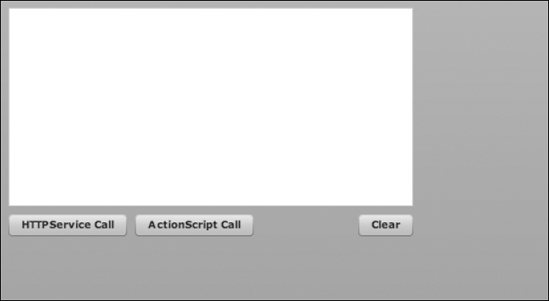
}At this point, you've completed the example. You can now load the application in your browser, which should look similar to Figure 5.3.
Here's the code for the completed application:
<?xml version="1.0" encoding="utf-8"?>
<mx:Application
     xmlns:mx="http://www.adobe.com/2006/mxml"
     layout="absolute"
>

     <mx:Script>
           <![CDATA[

            private function asCallHandler():void
            {
                   var url:String = "http://localhost/app/getUser";

                    var variables:URLVariables = new URLVariables();
                    variables.userID = 2;

                    var urlRequest:URLRequest = new URLRequest(url);
                    urlRequest.data = variables;

                    var loader:URLLoader = new URLLoader();
                    loader.addEventListener(Event.COMPLETE,
handleServerResponse);
loader.load(urlRequest);
}
private function handleServerResponse(e:Event):void
{
trace("User data is loaded");
debugTxt.text = e.currentTarget.response;
}
private function httpBtnHandler():void
{
httpService.send({userID:2});
}
public function xmlDecodeResponse(xml:*):void
{
debugTxt.text = xml.firstChild.attributes.response;
}
]]>
</mx:Script>
<mx:HTTPService
id="httpService"
url="http://localhost/app/getUser"
method="POST"
xmlDecode="xmlDecodeResponse"
/>
<mx:TextArea
x="10"
y="10"
width="406"
height="199"
id="debugTxt"
/>
<mx:Button
click="httpBtnHandler()"
x="10"
y="217"
label="HTTPService Call"
id="httpBtn"
/>
<mx:Button
click="asCallHandler()"
x="137"y="217"
label="ActionScript Call"
id="asCall"
/>
<mx:Button
x="361"
y="217"
label="Clear"
id="clearBtn"
/>
</mx:Application>In this chapter, you learned how to send data to Flex by using two different processes. The first process was an MXML version that used HTTPService tags. The second process used URLLoader and constructed a complete server handler made entirely of code.
You also created a complete sample application, allowing you to clearly see the differences between the two processes. You should now have a good understanding of how to send data with Flex, which you can use in your future Java development.