
3-5. Navigation Based Upon Conditions
Problem
Your JSF application contains multiple pages, and you want to set up navigation between them.
Solution
Utilize one of the following techniques for performing navigation within JSF applications:
- Utilize explicit navigation through the use of a JSF managed bean method along with a corresponding faces-config.xml configuration file to control the navigation for your application.
- Use implicit navigation for specifying the next view to render from within the managed bean.
- Use implicit navigation by specifying the name of the view to render as the action attribute of a component tag, bypassing the managed bean altogether.
The example in this recipe consists of four JSF views, and each one contains h:commandButton components that invoke navigation to another view. The h:commandButton components are linked to managed bean methods that are present within the view’s corresponding managed bean named NavigationController. The first view listed here contains two h:commandButton components, each of which invokes a method within the managed bean named NavigationController. The first button utilizes explicit JSF navigation, and the second uses implicit navigation.
<?xml version="1.0" encoding="UTF-8"?>
<!--
Book:  Java EE 7 Recipes
Recipe: 3-5
Author: J. Juneau
-->
<!DOCTYPE html PUBLIC "-//W3C//DTD XHTML 1.0 Strict//EN""http://www.w3.org/TR/xhtml1/DTD/xhtml1-strict.dtd">
<html xmlns="http://www.w3.org/1999/xhtml"
      xmlns:f="http://xmlns.jcp.org/jsf/core"
      xmlns:h="http://xmlns.jcp.org/jsf/html">
    <h:head>
        <meta http-equiv="Content-Type" content="text/html; charset=UTF-8"/>
        <title>Recipe 3-5</title>
    </h:head>
    <h:body>
        <h:form id="componentForm">
            <h1>JSF Navigation - Page 1</h1>
            <p>
                Clicking the submit button below will take you to Page #2.
            </p>

            <br/>
            <h:commandButton id="navButton" action="#{navigationController.pageTwo}"
                             value="Go To Page 2"/>
            <br/>
            <br/>
            <h:commandButton id="navButton2" action="#{navigationController.nextPage}"
                             value="Implicitly Navigate to Page 3"/>

        </h:form>
    </h:body>
</html>
The source for the second JSF view is very similar, except that a different managed bean method is specified within the action attribute of the view’s h:commandButton component.
<?xml version="1.0" encoding="UTF-8"?>
<!--
Book:  Java EE 7 Recipes
Recipe: 3-5
Author: J. Juneau
-->
<!DOCTYPE html PUBLIC "-//W3C//DTD XHTML 1.0 Strict//EN""http://www.w3.org/TR/xhtml1/DTD/xhtml1-strict.dtd">
<html xmlns="http://www.w3.org/1999/xhtml"
      xmlns:f="http://xmlns.jcp.org/jsf/core"
      xmlns:h="http://xmlns.jcp.org/jsf/html">
    <h:head>
        <meta http-equiv="Content-Type" content="text/html; charset=UTF-8"/>
        <title>Recipe 3-5: JSF Navigation</title>
    </h:head>
    <h:body>
        <h:form id="componentForm">
            <h1>JSF Navigation - Page 2</h1>
            <p>
                Clicking the submit button below will take you to Page #1.
            </p>

            <br/>
            <h:commandButton id="navButton" action="#{navigationController.pageOne}"
                             value="Go To Page 1"/>
        </h:form>
    </h:body>
</html>
The third JSF view contains an h:commandButton component that invokes a managed bean action and utilizes conditional navigation, rendering pages depending upon a conditional outcome within the faces-config.xml.
<?xml version="1.0" encoding="UTF-8"?>
<!--
Book:  Java EE 7 Recipes
Recipe: 3-5
Author: J. Juneau
-->
<!DOCTYPE html PUBLIC "-//W3C//DTD XHTML 1.0 Strict//EN""http://www.w3.org/TR/xhtml1/DTD/xhtml1-strict.dtd">
<html xmlns="http://www.w3.org/1999/xhtml"
      xmlns:f="http://xmlns.jcp.org/jsf/core"
      xmlns:h="http://xmlns.jcp.org/jsf/html">
    <h:head>
        <meta http-equiv="Content-Type" content="text/html; charset=UTF-8"/>
        <title>Recipe 3-5: JSF Navigation</title>
    </h:head>
    <h:body>
        <h:form id="componentForm">
            <h1>JSF Navigation - Page 3</h1>
            <p>
                The button below will utilize conditional navigation to take a user
                to the next page.
            </p>

            <br/>
            <h:commandButton id="loginButton" action="#{navigationController.login}"
                             value="Login Action"/>
        </h:form>
    </h:body>
</html>
Lastly, the fourth JSF view in the navigational example application contains an h:commandButton that invokes a method and uses implicit navigation to return to the third JSF view, specifying the view name within the action attribute directly and bypassing the managed bean altogether.
<?xml version="1.0" encoding="UTF-8"?>
<!--
Book:  Java EE 7 Recipes
Recipe: 3-5
Author: J. Juneau
-->
<!DOCTYPE html PUBLIC "-//W3C//DTD XHTML 1.0 Strict//EN""http://www.w3.org/TR/xhtml1/DTD/xhtml1-strict.dtd">
<html xmlns="http://www.w3.org/1999/xhtml"
      xmlns:f="http://xmlns.jcp.org/jsf/core"
      xmlns:h="http://xmlns.jcp.org/jsf/html">
    <h:head>
        <meta http-equiv="Content-Type" content="text/html; charset=UTF-8"/>
        <title>Recipe 3-5: JSF Navigation</title>
    </h:head>
    <h:body>
        <h:form id="componentForm">
            <h1>JSF Navigation - Page 4</h1>
            <p>
                Clicking the submit button below will take you to Page #1 using conditional
                navigation rules.
            </p>

            <br/>
            <h:commandButton id="navButton2" action="recipe03_05c"
                             value="Implicitly Navigate to Page 3"/>
        </h:form>
    </h:body>
</html>
Now let’s take a look at the source listing for NavigationController. It contains the methods that are specified within each page’s h:commandButton action attribute. Some of the methods return a String value, and others do not. However, after the methods are invoked, then the FacesServlet processes the request, and the faces-config.xml configuration file is traversed, if needed, to determine the next view to render.
package org.javaeerecipes.chapter03.recipe03_05;

import javax.faces.bean.Named;
import javax.faces.bean.RequestScoped;

/**
 * Recipe 3-5
 * @author juneau
 */
@ManagedBean(name = "navigationController")
@RequestScoped
public class NavigationController implements java.io.Serializable{

    private boolean authenticated = false;

    /**
     * Creates a new instance of NavigationController
     */
    public NavigationController() {
    }

    public String pageOne(){
        return "PAGE_1;
    }

    public String pageTwo(){
        return "PAGE_2;
    }

    /**
     * Utilizing implicit navigation, a page name can be returned from an
     * action method rather than listing a navigation-rule within faces-config.xml
     * @return
     */
    public String nextPage(){
        // Perform some task, then implicitly list a page to render

        return "recipe03_05c";
    }

    /**
     * Demonstrates the use of conditional navigation
     */
    public void login(){
        // Perform some task and then return boolean
        setAuthenticated(true);
        System.out.println("Here");
    }

    /**
     * @return the authenticated
     */
    public boolean isAuthenticated() {
        return authenticated;
    }

    /**
     * @param authenticated the authenticated to set
     */
    public void setAuthenticated(boolean authenticated) {
        this.authenticated = authenticated;
    }
}
At the heart of the navigation is the faces-config.xml file. It specifies which view should be displayed after a corresponding outcome. Two of the navigation-rules use standard JSF navigation, and the last navigation-rule makes use of conditional navigation.
<?xml version='1.0' encoding='UTF-8'?>

<!-- =========== FULL CONFIGURATION FILE ================================== -->

<faces-config version="2.0"
              xmlns="http://xmlns.jcp.org/xml/ns/javaee"
              xmlns:xsi="http://www.w3.org/2001/XMLSchema-instance"
              xsi:schemaLocation="http://xmlns.jcp.org/xml/ns/javaeehttp://xmlns.jcp.org/xml/ns/javaee/web-facesconfig_2_2.xsd">
    <navigation-rule>
        <from-view-id>/chapter03/recipe03_05a.xhtml</from-view-id>
        <navigation-case>
            <from-outcome>PAGE_2/from-outcome>
            <to-view-id>/chapter03/recipe03_05b.xhtml</to-view-id>
        </navigation-case>
    </navigation-rule>

    <navigation-rule>
        <from-view-id>/chapter03/recipe03_05b.xhtml</from-view-id>
        <navigation-case>
            <from-outcome>PAGE_1</from-outcome>
            <to-view-id>/chapter03/recipe03_05a.xhtml</to-view-id>
        </navigation-case>
    </navigation-rule>

    <navigation-rule>
        <navigation-case>
            <from-action>#{navigationController.login}</from-action>
            <if>#{navigationController.authenticated}</if>
            <to-view-id>/chapter03/recipe03_05d.xhtml</to-view-id>
            <redirect/>
        </navigation-case>
    </navigation-rule>
</faces-config>
How It Works
One of the most daunting tasks when building a web application is to determine the overall page navigation. Many web frameworks have instituted XML configuration files for organizing page navigation. This holds true for the JavaServer Faces web framework, and the navigational XML is placed within a JSF application’s faces-config.xml configuration file. When using standard navigation, JSF utilizes navigation rules to determine which view to render based upon the outcome of page actions. If using standard JSF navigation, when a page action occurs, the managed bean method that is associated with the action can return a String value. That value is then evaluated using the navigational rules that are defined within the faces-config.xml file and used to determine which page to render next.
The standard navigation infrastructure works well in most cases, but in some instances it makes more sense to directly list the next page to be rendered within the managed bean, rather than making a navigation rule in the configuration file. When a managed bean action is invoked, it can return the name of a view, without the .xhtml suffix. Such navigation was introduced with the release of JSF 2.0, and it is known as implicit navigation. As shown in the fourth example for the solution, you can also perform implicit navigation by specifying the name of a view without the suffix for an action attribute of the component tag.
Yet another type of navigation was introduced with JSF 2.0, taking navigation to the next level by allowing the use of JSF EL expressions within the faces-config.xml navigation rules. Conditional navigation allows for an <if> element to be specified within the navigational rule, which corresponds to a JSF EL condition. If the condition evaluates to true, then the specified view is rendered.
Navigation rules are constructed in XML residing within the faces-config.xml descriptor, and each rule has a root element of navigation-rule. Within each rule construct, the from-view-id element should contain the name of the view from which the action method was invoked. A series of navigation-cases should follow the from-view-id element. Each navigation-case contains a from-outcome element, which should be set to a String value corresponding to the String value that is returned from a subsequent action method. For instance, when the pageOne method is invoked in the example, the String "PAGE_1" is returned, and it should be specified within the from-outcome element within a navigation-case in the faces-config.xml file. Lastly, the to-view-id element should follow the from-outcome element within the navigation-case, and it should specify which view to render if the String in from-outcome is returned from the action method. The following excerpt shows the standard navigation rule that allows for navigation from page 1 to page 2 of the application:
<navigation-rule>
        <from-view-id>/chapter03/recipe03_05a.xhtml</from-view-id>
        <navigation-case>
            <from-outcome>PAGE_1</from-outcome>
            <to-view-id>/chapter03/recipe03_05b.xhtml</to-view-id>
        </navigation-case>
</navigation-rule>
Implicit navigation does not require any XML navigation rules to be declared. The action method that is invoked via an h:commandButton returns a String that is equal to the name of the view that should be rendered next. In the example, the second h:commandButton on view 1 invokes the nextPage managed bean method, which returns the name of the next view that should be rendered.
public String nextPage(){
        // Perform some task, then implicitly list a page to render

        return "recipe03_05c";
}
If you want to use implicit navigation, you can bypass the managed bean altogether and specify the name of the view that you want to render directly within the action attribute of h:commandButton or h:commandLink. The fourth JSF view in the example demonstrates this technique.
The third view in the example, named recipe03_05c.xhtml, demonstrates conditional navigation. Its h:commandButton action invokes the login method within the NavigationController managed bean. That method does not contain much business logic in this example, but it does set the bean’s authenticated field equal to true. Imagine that someone entered an incorrect password and failed to authenticate; in such a case, then the authenticated field would be set to false. After the login method is executed, the faces-config.xml file is parsed for the next view to render, and the conditional navigation rule utilizes JSF EL to specify the navigation condition. The from-action element is set equal to the JSF EL that is used to invoke the login method, and an <if> element is specified, referencing the navigationController.authenticated field via JSF EL. If that field is equal to true, then the view specified within the to-view-id element will be rendered. Note that the <redirect/> is required to tell JSF to redirect to the view listed in the <to-view-id> element since JSF uses a redirect rather than a forward.
<navigation-rule>
        <navigation-case>
            <from-action>#{navigationController.login}</from-action>
            <if>#{navigationController.authenticated}</if>
            <to-view-id>/chapter03/recipe03_05d.xhtml</to-view-id>
            <redirect/>
        </navigation-case>
    </navigation-rule>
</faces-config>
Standard JSF navigation allows enough flexibility for most cases, and its architecture is much more sophisticated than other web frameworks. However, in JSF 2.0, two new navigational techniques known as implicit and conditional navigation were introduced. With the addition of the new techniques, JSF navigation is more robust and easier to manage.
3-6. Updating Messages Without Recompiling
Problem
Rather than hard-coding messages into your managed bean classes, you want to specify the messages within a property file so that they can be edited on the fly.
Create a resource bundle, and specify your messages within it. Then retrieve the messages from the bundle and add them to the FacesMessages objects rather than hard-coding a String value. In the example that follows, a resource bundle is used to specify a message that is to be displayed on a page. If you need to change the message at any time, simply modify the resource bundle and reload the page in the browser.
The following code is for a JSF view that contains the h:messages component for displaying the message from a corresponding managed bean:
<?xml version="1.0" encoding="UTF-8"?>
<!--
Book:  Java EE 7 Recipes
Recipe: 3-6
Author: J. Juneau
-->
<!DOCTYPE html PUBLIC "-//W3C//DTD XHTML 1.0 Strict//EN" "http://www.w3.org/TR/xhtml1/DTD/xhtml1-strict.dtd">
<html xmlns="http://www.w3.org/1999/xhtml"
      xmlns:f="http://xmlns.jcp.org/jsf/core"
      xmlns:h="http://xmlns.jcp.org/jsf/html">
    <h:head>
        <meta http-equiv="Content-Type" content="text/html; charset=UTF-8"/>
        <title>Recipe 3-6: Specifying Updatable Messages</title>
    </h:head>
    <h:body>
        <h:form id="componentForm">
            <h1>Utilizing a resource bundle</h1>
            <p>
                The message below is displayed from a resource bundle.  The h:outputText
                component has been added to the page only to instantiate the bean for this
                example. To change
 the message, simply modify the corresponding message within                 the bundle and then refresh the page.
            </p>
            <h:outputText id="exampleProperty" value="#{exampleController.exampleProperty}"/>
            <br/>
            <h:messages errorStyle="color: red" infoStyle="color: green" globalOnly="true"/>
        </h:form>
    </h:body>
</html>
Next, the managed bean class is responsible for creating the message and sending it to the h:messages component via the FacesContext. The following source is for ExampleController, which is the managed bean for the JSF view in this example:
package org.javaeerecipes.chapter03.recipe03_06;

import java.util.ResourceBundle;
import javax.faces.bean.ManagedBean;
import javax.faces.bean.RequestScoped;
import javax.faces.application.FacesMessage;
import javax.faces.context.FacesContext;

@ManagedBean(name = "exampleController")
@RequestScoped
public class ExampleController {
    private String exampleProperty;

    /**
     * Creates a new instance of ExampleController
     */
    public ExampleController() {
        exampleProperty = "Used to instantiate the bean.";
        FacesMessage facesMsg = new FacesMessage(FacesMessage.SEVERITY_INFO,
                ResourceBundle.getBundle("/org/javaeerecipes/chapter03/Bundle").
                getString("ExampleMessage"), null);
        FacesContext.getCurrentInstance().addMessage(null, facesMsg);
    }

    /**
     * @return the exampleProperty
     */
    public String getExampleProperty() {
        return exampleProperty;
    }

    /**
     * @param exampleProperty the exampleProperty to set
     */
    public void setExampleProperty(String exampleProperty) {
        this.exampleProperty = exampleProperty;
    }
}
The resource bundle, which contains the message, is read by the managed bean to obtain the message. If you want to update the message, you can do so without recompiling any code.
# This file is an example resource bundle
ExampleMessage=This message can be changed by updating the message bundle!
When the page is loaded, the h:outputText component instantiates ExampleController, which in turn creates the FacesMessage objects that are used to display the message on the screen.
How It Works
Oftentimes it is useful to have the ability to update custom system or user messages rather than hard-coding them. This could be useful in the case that some custom information that is contained within a particular message may have the possibility of changing in the future. It’d be nice to simply update the message in text format rather than editing the code, recompiling, and redeploying your application. It is possible to create updateable messages using a resource bundle. A resource bundle is simply a properties file, which contains name-value pairs. When adding custom messages to a bundle, name the message appropriately and then add the custom message as the value portion of the property. An application can then look up the property by name and utilize its value. In this case, the value is a String that will be used to create a FacesMessage instance.
In the example, the bundle contains a property named ExampleMessage, along with a corresponding value. When the JSF view is loaded into the browser, the ExampleController managed bean is instantiated, causing its constructor to be executed. A FacesMessage instance is created, generating a message of type FacesMessage.SEVERITY_INFO, and it reads the resource bundle and obtains the value for the ExampleMessage property. The following excerpt demonstrates how to obtain a specified message value from the resource bundle:
ResourceBundle.getBundle("/org/javaeerecipes/chapter03/Bundle").getString("ExampleMessage"), null);
After the message is created, it is added to the current instance of FacesContext and, subsequently, displayed on the page when it is rendered. Using a resource bundle to specify your messages can make life much easier because you’ll no longer be required to recompile code in order to update such messages.
3-7. Validating User Input
Problem
You want to add the ability for your application to validate any data that is entered into a JSF form.
Solution
Register a JSF validator on any text field components or other input components that need to be validated. Use predefined JSF validators where applicable, and create custom validator classes when needed. The example for this recipe utilizes predefined validators for two h:inputText components in order to ensure that the values entered into them are of proper length. A custom validator is added to a third text field, and it is responsible for ensuring that the text contains a specified String. The three fields make up an employee input form, and when an employee is entered and the data validates successfully, a new Employee object is created and added to a list of employees. An h:dataTable element in the view is used to display the list of employees if there are any. This is perhaps not the most true-to-life example, but you can apply the basic philosophy to validate real-world needs within your own applications.
The following listing is for the JSF view that constructs the employee input form, including the validation tags for each input text field:
<?xml version="1.0" encoding="UTF-8"?>
<!--
Book:  Java EE 7 Recipes
Recipe: 3-7
Author: J. Juneau
-->
<!DOCTYPE html PUBLIC "-//W3C//DTD XHTML 1.0 Strict//EN" "http://www.w3.org/TR/xhtml1/DTD/xhtml1-strict.dtd">
<html xmlns="http://www.w3.org/1999/xhtml"
      xmlns:f="http://xmlns.jcp.org/jsf/core"
      xmlns:h="http://xmlns.jcp.org/jsf/html">
    <h:head>
        <meta http-equiv="Content-Type" content="text/html; charset=UTF-8"/>
        <title>Recipe 3-7: Validating Data</title>
    </h:head>
    <h:body>
        <h:form id="employeeForm">
            <h1>Java Developer Employee Information</h1>
            <br/>
            <h:messages globalOnly="true" errorStyle="color: red" infoStyle="color: green"/>
            <br/>
            <h:dataTable id="empTable" var="emp"
                         border="1" value="#{employeeController.employeeList}"
                         rendered="#{employeeController.employeeList.size() > 0}">
                <f:facet name="header">
                    Current Employees
                </f:facet>
                <h:column id="empNameCol">
                    <f:facet name="header">Employee</f:facet>
                    <h:outputText id="empName" value="#{emp.employeeFirst} #{emp.employeeLast}"/>
                </h:column>
                <h:column id="titleCol">
                    <f:facet name="header">Title</f:facet>
                    <h:outputText id="title" value="#{emp.employeeTitle}"/>
                </h:column>

            </h:dataTable>
            <p>
                Please use the form below to insert employee information.
            </p>
            <h:panelGrid columns="3">
                <h:outputLabel for="employeeFirst" value="First: />
                <h:inputText id="employeeFirst" value="#{employeeController.employeeFirst}">
                    <f:validateLength minimum="3" maximum="30"/>
                </h:inputText>
                <h:message for="employeeFirst" errorStyle="color:red"/>

                <h:outputLabel for="employeeLast" value="Last: " />
                <h:inputText id="employeeLast" value="#{employeeController.employeeLast}">
                    <f:validateLength minimum="3" maximum="30"/>
                </h:inputText>
                <h:message for="employeeLast" errorStyle="color:red"/>

                <h:outputLabel for="employeeTitle" value="Title (Must be a Java Position): " />
                <h:inputText id="employeeTitle" value="#{employeeController.employeeTitle}">
                    <f:validator validatorId="employeeTitleValidate" />
                </h:inputText>
                <h:message for="employeeTitle" errorStyle="color:red"/>

            </h:panelGrid>
            <h:commandButton id="employeeInsert" action="#{employeeController.insertEmployee}"
                             value="Insert Employee"/>
        </h:form>
    </h:body>
</html>
The third h:inputText component in the view utilizes a custom validator. The f:validator tag is used to specify a custom validator, and its validatorId attribute is used to specify a corresponding validator class. The following listing is the Java code for a class named EmployeeTitleValidate, the custom validation class for the text field:
package org.javaeerecipes.chapter03.recipe03_07;

import java.util.Date;
import java.util.Locale;
import java.util.ResourceBundle;
import javax.faces.application.FacesMessage;
import javax.faces.component.UIComponent;
import javax.faces.context.FacesContext;
import javax.faces.validator.FacesValidator;
import javax.faces.validator.Validator;
import javax.faces.validator.ValidatorException;

/**
 *
 * @author juneau
 */
@FacesValidator("employeeTitleValidate")
public class EmployeeTitleValidate implements Validator {

    @Override
    public void validate(FacesContext facesContext, UIComponent uiComponent, Object value)
            throws ValidatorException {

        checkTitle(value);

    }

    private void checkTitle(Object value) {
        String title = value.toString();
        if (!title.contains("Java")) {
            String messageText = "Title does not include the word Java";
            throw new ValidatorException(new FacesMessage(FacesMessage.SEVERITY_ERROR,
                    messageText, messageText));
        }
    }
}
Now let’s take a look at the JSF managed bean for the JSF view that contains the validation tags. The managed bean class is named EmployeeController, and the action method, insertEmployee, is used to add new Employee objects containing valid data to an ArrayList.
package org.javaeerecipes.chapter03.recipe03_07;

import java.io.Serializable;
import java.util.ArrayList;
import java.util.List;
import java.util.ResourceBundle;
import javax.faces.bean.SessionScoped;
import javax.faces.application.FacesMessage;
import javax.faces.context.FacesContext;
import javax.faces.bean.ManagedBean;

/**
 * Recipe 3-7
 * @author juneau
 */
@ManagedBean(name = "employeeController")
@SessionScoped
public class EmployeeController implements Serializable {

    private String employeeFirst;
    private String employeeLast;
    private String employeeTitle;

    private List <Employee> employeeList;

    public EmployeeController(){
        employeeFirst = null;
        employeeLast = null;
        employeeTitle = null;
        employeeList = new ArrayList();
    }

    public void insertEmployee(){
        Employee emp = new Employee(employeeFirst,
                                    employeeLast,
                                    employeeTitle);
        employeeList.add(emp);
        FacesMessage facesMsg = new FacesMessage(FacesMessage.SEVERITY_INFO, "Employee Successfully Added", null);
        FacesContext.getCurrentInstance().addMessage(null, facesMsg);
    }

    /**
     * @return the employeeFirst
     */
    public String getEmployeeFirst() {
        return employeeFirst;
    }

    /**
     * @param employeeFirst the employeeFirst to set
     */
    public void setEmployeeFirst(String employeeFirst) {
        this.employeeFirst = employeeFirst;
    }

    /**
     * @return the employeeLast
     */
    public String getEmployeeLast() {
        return employeeLast;
    }

    /**
     * @param employeeLast the employeeLast to set
     */
    public void setEmployeeLast(String employeeLast) {
        this.employeeLast = employeeLast;
    }

    /**
     * @return the employeeTitle
     */
    public String getEmployeeTitle() {
        return employeeTitle;
    }

    /**
     * @param employeeTitle the employeeTitle to set
     */
    public void setEmployeeTitle(String employeeTitle) {
        this.employeeTitle = employeeTitle;
    }

    /**
     * @return the employeeList
     */
    public List <Employee> getEmployeeList() {
        return employeeList;
    }

    /**
     * @param employeeList the employeeList to set
     */
    public void setEmployeeList(List <Employee> employeeList) {
        this.employeeList = employeeList;
    }
}
Finally, the Employee class is a POJO that declares three fields: employeeFirst, employeeLast, and employeeTitle. Each of these three fields is declared as private, and there are accessor methods that are used by the JSF view for accessing the fields.
package org.javaeerecipes.chapter03.recipe03_07;

import java.io.Serializable;

/**
 * Recipe 3-7
 * @author juneau
 */
public class Employee implements Serializable {
    private String employeeFirst;
    private String employeeLast;
    private String employeeTitle;

    /**
     * Creates a new instance of EmployeeController
     */
    public Employee() {
        employeeFirst = null;
        employeeLast = null;
        employeeTitle = null;
    }

    public Employee(String first, String last, String title){
        employeeFirst = first;
        employeeLast = last;
        employeeTitle = title;
    }
    /**
     * @return the employeeFirst
     */
    public String getEmployeeFirst() {
        return employeeFirst;
    }

    /**
     * @param employeeFirst the employeeFirst to set
     */
    public void setEmployeeFirst(String employeeFirst) {
        this.employeeFirst = employeeFirst;
    }

    /**
     * @return the employeeLast
     */
    public String getEmployeeLast() {
        return employeeLast;
    }

    /**
     * @param employeeLast the employeeLast to set
     */
    public void setEmployeeLast(String employeeLast) {
        this.employeeLast = employeeLast;
    }

    /**
     * @return the employeeTitle
     */
    public String getEmployeeTitle() {
        return employeeTitle;
    }

    /**
     * @param employeeTitle the employeeTitle to set
     */
    public void setEmployeeTitle(String employeeTitle) {
        this.employeeTitle = employeeTitle;
    }
}
In the end, the validators will raise exceptions if a user attempts to enter an employee first or last name using an invalid length or a title that does not contain the word Java. When user input validation fails, error messages are displayed next to the components containing the invalid entries.
How It Works
The JSF framework contains many features that make it more convenient for developers to customize their applications. Validators are one of those features, because they can be used to solidify application data and ensure data is correct before storing in a database or other data store. The JSF framework ships with a good deal of validators that are already implemented. To use these predefined validators, simply embed the appropriate validator tag within a component tag in a view to validate that component’s data values. Sometimes there are cases where the standard validators will not do the trick. In such cases, JSF provides a means for developing custom validator classes that can be used from within a view in the same manner as the predefined validators.
In the example for this recipe, two of the h:inputText components contain standard JSF validators used to validate the length of the values entered. The f:validateLength tag can be embedded into a component for String length validation, and the tag’s minimum and maximum attributes can be populated with the minimum and maximum String length, respectively. As mentioned previously, JSF ships with a good number of these predefined validators. All that the developer is required to do is embed the validator tags within the components that they want to validate. Table 3-3 lists all standard validator tags and what they do. For a detailed look at each of the validator attributes, please see the online documentation.
Table 3-3. Standard Validators
| Validator Tag | Description |
|---|---|
| validateLength | Checks the length of a String |
| validateLongRange | Checks the range of a numeric value |
| validateDoubleRange | Checks the range of a floating-point value |
| validateRequired | Ensures the input field is not empty (also an alternative to using the required attribute on an input field component tag) |
| validateRegex | Validates the component against a given regular expression pattern |
Oftentimes, there is a need for some other type of validation to take place for a specified component. In such cases, developing a custom validator class may be the best choice. Many developers shy away from writing their own validators, because it seems to be a daunting task at first glance. However, JSF 2.0 took great strides toward making custom validator classes easier to write and understand.
To create a custom validator class, implement the javax.faces.validator.Validator class. Annotate the validator class with the @FacesValidator annotation, specifying the string you want to use for registering your validator within the f:validator tag. In the example, the name used to reference the validator class is employeeTitleValidate. The only requirement is that the validator class overrides the validate method, which is where the custom validation takes place. The validate method contains the following signature:
public void validate(FacesContext facesContext, UIComponent uiComponent, Object value)
            throws ValidatorException
Utilizing the parameters that are passed into the method, you can obtain the current FacesContext, a handle on the component being validated, as well as the component’s value. In the example, a helper method is called from within the validate method, and it is used to check the component’s value and ensure that the word Java is contained somewhere within it. If it does not validate successfully, a ValidatorException is created and thrown. The message that is placed within the ValidatorException is what will appear next to the component being validated if the validation fails. The following excerpt from the validation class demonstrates creating and throwing a ValidatorException:
throw new ValidatorException(new FacesMessage(FacesMessage.SEVERITY_ERROR,
                    messageText, messageText));
So, when does the validation occur? That is the key to the validator, isn’t it? The answer is immediately, before the request is sent to the managed bean action method. Any validation occurs during the process validation phase, and if one or more components being validated within a view throw a ValidatorException, then the processing stops, and the request is not sent to the action method. When the user clicks the submit button, the validation takes place first, and if everything is OK, then the request is passed to the action method.
![]() Note A means of validating that an input component simply contains a value is to use the required attribute. The required attribute of input component tags can be set to true in order to force a value to be entered for that component.
Note A means of validating that an input component simply contains a value is to use the required attribute. The required attribute of input component tags can be set to true in order to force a value to be entered for that component.
The validation of components within a JSF view using standard validators can really save a developer some time and increase the usability and precision of an application. The ability to create custom validators allows validation to be performed for any scenario. Be constructive, use validation on all of your application’s input forms, and create custom validators to perform validation using unique techniques. Your application users will appreciate it!
3-8. Evaluation of Page Expressions Immediately
Problem
You want to have some of your JSF component values evaluated immediately, rather than waiting until the form is submitted.
Solution
Specify true for the component tag’s immediate attribute, and also specify the component’s onchange attribute and set it equal to submit(). This will cause the input form to be submitted immediately when the value for the component is changed, and JSF will skip the render response phase when doing so and will execute all components that specify an immediate attribute set to true during the Apply Request Values phase. The example for this recipe uses the same employee form that was demonstrated in Recipe 3-7. However, instead of waiting until the form is submitted, the first and last h:inputText components will be evaluated and validated during the Apply Request Values phase immediately when their values change. The following source is for the JSF view named recipe03_08.xhtml:
<?xml version="1.0" encoding="UTF-8"?>
<!--
Book:  Java EE 7 Recipes
Recipe: 3-8
Author: J. Juneau
-->
<!DOCTYPE html PUBLIC "-//W3C//DTD XHTML 1.0 Strict//EN""http://www.w3.org/TR/xhtml1/DTD/xhtml1-strict.dtd">
<html xmlns="http://www.w3.org/1999/xhtml"
      xmlns:f="http://xmlns.jcp.org/jsf/core"
      xmlns:h="http://xmlns.jcp.org/jsf/html">
    <h:head>
        <meta http-equiv="Content-Type" content="text/html; charset=UTF-8"/>
        <title>Recipe 3-8: Immediate View Evaluation</title>
    </h:head>
    <h:body>
        <h:form id="employeeForm">
            <h1>Java Developer Employee Information</h1>
            <br/>
            <h:messages globalOnly="true" errorStyle="color: red" infoStyle="color: green"/>
            <br/>
            <h:dataTable id="empTable" var="emp"
                         border="1" value="#{employeeController.employeeList}"
                         rendered="#{employeeController.employeeList.size() > 0}">
                <f:facet name="header">
                    Current Employees
                </f:facet>
                <h:column id="empNameCol">
                    <f:facet name="header">Employee</f:facet>
                    <h:outputText id="empName" value="#{emp.employeeFirst} #{emp.employeeLast}"/>
                </h:column>
                <h:column id="titleCol">
                    <f:facet name="header">Title</f:facet>
                    <h:outputText id="title" value="#{emp.employeeTitle}"/>
                </h:column>

            </h:dataTable>
            <p style="width: 40%;">
                Please use the form below to insert employee information. The first and
                last text fields will result in immediate evaluation during the apply request
                values phase, whereas the text field in the middle will result in standard
                 evaluation and be validated during the invoke application phase.
                <br/><br/>
                To test, try inserting just one character in the first text field
                and then tab to the next field.  You should see an immediate result.
            </p>
            <h:panelGrid columns="3">
                <h:outputLabel for="employeeFirst" value="First: " />
                <h:inputText id="employeeFirst" immediate="true" onchange="submit()"value="#{employeeController.employeeFirst}">
                    <f:validateLength minimum="3" maximum="30"/>
                </h:inputText>
                <h:message for="employeeFirst" errorStyle="color:red"/>

                <h:outputLabel for="employeeLast" value="Last: "  />
                <h:inputText id="employeeLast" value="#{employeeController.employeeLast}">
                    <f:validateLength minimum="3" maximum="30"/>
                </h:inputText>
                <h:message for="employeeLast" errorStyle="color:red"/>

                <h:outputLabel for="employeeTitle" value="Title (Must be a Java Position): " >
                <h:inputText id="employeeTitle" immediate="true" onchange="submit()"value="#{employeeController.employeeTitle}">
                    <f:validator validatorId="employeeTitleValidate" />
                </h:inputText>
                <h:message for="employeeTitle" errorStyle="color:red"/>

            </h:panelGrid>
            <h:commandButton id="employeeInsert" action="#{employeeController.insertEmployee}"
                             value="Insert Employee"/>
        </h:form>
    </h:body>
</html>
As you can see, the h:inputText components with ids of employeeFirst and employeeTitle specify both the immediate="true" and the onchange="submit()" attributes. These two attributes cause the components to be validated immediately rather than when the h:commandButton action is invoked.
How It Works
Event handling that occurs immediately can be useful in cases where you do not want to validate the entire form in order to process input but, rather, when you want chosen components to be validated immediately. As mentioned in Recipe 3-1, when a JSF view is processed, a number of phases are executed. As such, when a form is submitted, the Invoke Application phase initiates the event handlers for view components, and validation occurs. When the immediate attribute for a component is set to true, the event handlers for that component execute during the Apply Request Values phase, which occurs before the Process Validation phase, where component validation normally occurs. This allows for an immediate validation response for the specified components, resulting in immediate error messages if needed.
As mentioned previously, specify the immediate attribute for a component and set it to true if you want to have that component evaluated immediately. This will cause the component to be evaluated and validated during the Apply Request Values phase. The real fun comes into play when you also specify the onclick attribute and set it equal to submit(), causing the form to be submitted when the value for the component changes. Specifying attributes as such will cause any component within the view that has an immediate attribute set to true to be validated when the component value changes.
![]() Note The immediate attribute can also be useful when used on a commandButton component in such instances where you do not want any form processing to take place, such as if you want to set up a Cancel button or another button that bypasses form processing.
Note The immediate attribute can also be useful when used on a commandButton component in such instances where you do not want any form processing to take place, such as if you want to set up a Cancel button or another button that bypasses form processing.
3-9. Passing Page Parameters to Methods
Solution
Use a standard JSF EL expression to invoke a managed bean method, and enclose the parameters that you want to pass to the method within parentheses. In the example for this recipe, an h:dataTable component is used to display a list of Author objects in a view. Each row within the h:dataTable contains an h:commandLink component, which invokes a JSF managed bean method when selected. The h:commandLink displays the current row’s author name and invokes the AuthorController class displayAuthor method when clicked, passing the last name for the author being displayed in the current row. In the displayAuthor method, the list of authors is traversed, finding the element that contains the same last name as the parameter, which is passed into the method. The current author is then displayed in a subsequent page, which is rendered using implicit navigation.
The following source is for the JSF view entitled recipe03_09a.xhtml, which displays the list of authors using an h:dataTable component:
<?xml version="1.0" encoding="UTF-8"?>
<!--
Book:  Java EE 7 Recipes
Recipe: 3-9 Passing Page Parameters to Methods
Author: J. Juneau
-->
<!DOCTYPE html PUBLIC "-//W3C//DTD XHTML 1.0 Strict//EN""http://www.w3.org/TR/xhtml1/DTD/xhtml1-strict.dtd">
<html xmlns="http://www.w3.org/1999/xhtml"
      xmlns:f="http://xmlns.jcp.org/jsf/core"
      xmlns:h="http://xmlns.jcp.org/jsf/html">
    <h:head>
        <meta http-equiv="Content-Type" content="text/html; charset=UTF-8"/>
        <title>Recipe 3-9: Passing Page Parameters to Methods</title>
    </h:head>
    <h:body>
        <h:form id="componentForm">
            <h1>Author List</h1>
            <p>
                Below is the list of authors.  Click on the author's last name
                for more information regarding the author.
            </p>

            <h:graphicImage id="java7recipes" style="width: 10%; height: 20%"  library="image" name="java7recipes.png"/>
            <br/>
            <h:dataTable id="authorTable" border="1" value="#{authorTableController.authorList}"
                         var="author">
                <f:facet name="header">
                    Java 7 Recipes Authors
                </f:facet>
                <h:column>
                <h:commandLink id="authorName" action="#{authorTableController.displayAuthor(author.last)}"
                               value="#{author.first} #{author.last}"/>
                </h:column>
            </h:dataTable>
            <br/>
            <br/>


        </h:form>
    </h:body>
</html>
The next listing is that of the managed bean controller for the preceding JSF view. The managed bean populates an ArrayList with Author objects upon instantiation.
package org.javaeerecipes.chapter03.recipe03_09;

import java.io.Serializable;
import java.util.ArrayList;
import java.util.List;
import javax.faces.bean.ManagedBean;
import javax.faces.bean.SessionScoped;

/**
 * Recipe 3-9
 *
 * @author juneau
 */
@ManagedBean(name = "authorTableController")
@SessionScoped
public class AuthorController implements Serializable {

    private List<Author> authorList = null;
    private String juneauBio =
            "Josh Juneau has been developing software"
            + " since the mid-1990s. PL/SQL development and database programming"
            + " was the focus of his career in the beginning, but as his skills developed,"
            + " he began to use Java and later shifted to it as a primary base for his"
            + " application development. Josh has worked with Java in the form of graphical"
            + " user interface, web, and command-line programming for several years. "
            + "During his tenure as a Java developer, he has worked with many frameworks"
            + " such as JSF, EJB, and JBoss Seam. At the same time, Josh has extended his"
            + " knowledge of the Java Virtual Machine (JVM) by learning and developing applications"
            + " with other JVM languages such as Jython and Groovy. His interest in learning"
            + " new languages that run on the JVM led to his interest in Jython. Since 2006,"
            + " Josh has been the editor and publisher for the Jython Monthly newsletter. "
            + "In late 2008, he began a podcast dedicated to the Jython programming language.";

    private String deaBio = "This is Carl Dea's Bio";
    private String beatyBio = "This is Mark Beaty's Bio";
    private String oConnerBio = "This is John O'Connor's Bio";
    private String guimeBio = "This is Freddy Guime's Bio";
    private Author current;
    /**
     * Creates a new instance of RecipeController
     */
    public AuthorController() {
        populateAuthorList();
    }

    private void populateAuthorList() {

        if(authorList == null){
            System.out.println("initializng authors list");
            authorList = new ArrayList<Author>();
            authorList.add(new Author("Josh", "Juneau", juneauBio));
            authorList.add(new Author("Carl", "Dea", deaBio));
            authorList.add(new Author("Mark", "Beaty", beatyBio));
            authorList.add(new Author("John", "O'Conner", oConnerBio));
            authorList.add(new Author("Freddy", "Guime", guimeBio));
        }
    }

    public String displayAuthor(String last){
        for(Author author:authorList){
            if(author.getLast().equals(last)){
                current = author;
                break;
            }
        }
        return "recipe03_09b";
    }

    /**
     * @return the authorList
     */
    public List getAuthorList() {
        System.out.println("Getting the authorlist =>" + authorList.size());
        return authorList;
    }

    /**
     * @return the current
     */
    public Author getCurrent() {
        return current;
    }

    /**
     * @param current the current to set
     */
    public void setCurrent(Author current) {
        this.current = current;
    }
}
The Author class is the same Author POJO that was utilized in Recipe 3-3. For the source of the Author class, please refer to that recipe. Lastly, the following code is for a JSF view entitled recipe03_09b.xhtml, the detail view for each author. When an author name is clicked from the h:dataTable component in the first view, the component’s corresponding managed bean method is invoked, and then this view is rendered to display the selected author’s information.
<?xml version="1.0" encoding="UTF-8"?>
<!--
Book:  Java EE 7 Recipes
Recipe: 3-9 Passing Page Parameters to Methods
Author: J. Juneau
-->
<!DOCTYPE html PUBLIC "-//W3C//DTD XHTML 1.0 Strict//EN""http://www.w3.org/TR/xhtml1/DTD/xhtml1-strict.dtd">
<html xmlns="http://www.w3.org/1999/xhtml"
      xmlns:f="http://xmlns.jcp.org/jsf/core"
      xmlns:h="http://xmlns.jcp.org/jsf/html">
    <h:head>
        <meta http-equiv="Content-Type" content="text/html; charset=UTF-8"/>
        <title>Recipe 3-9: Passing Page Parameters to Methods</title>
    </h:head>
    <h:body>
        <h:form id="componentForm">
            <h1>#{authorTableController.current.first} #{authorTableController.current.last}</h1>
            <p>
                <h:graphicImage id="java7recipes" style="width: 10%; height: 20%" url="../images/java7recipes.png"/>
                <br/>
                #{authorTableController.current.bio}
            </p>

            <h:link value="Go Back to List" outcome="recipe03_09a"/>


        </h:form>
    </h:body>
</html>
How It Works
The release of JSF 2.0 contained many enhancements that made the life of JSF developers much easier than before. The ability to pass parameters to managed bean methods from within JSF views is one such enhancement. As you can see from the example for this recipe, it is possible to pass parameters to a method within a JSF EL construct in the same manner that you would call any method with parameters in Java: by enclosing the argument(s) within parentheses after the method name. It cannot get much simpler than that!
Let’s take a look at the lines of code that make this example hum. The first JSF view displays a table of author names, and each name is displayed using an h:commandLink component. The value attribute for the h:commandLink component is set to the author name, and the action attribute is set to the JSF EL, which invokes a managed bean action method named displayAuthor. Notice that within the call to the managed bean method, the EL for the author’s last name is passed as a String parameter.
<h:dataTable id="authorTable" border="1" value="#{authorTableController.authorList}"
                         var="author">
        <f:facet name="header">
                    Java 7 Recipes Authors
        </f:facet>
        <h:column>
                <h:commandLink id="authorName" action="#{authorTableController.displayAuthor(author.last)}"
                               value="#{author.first} #{author.last}"/>
        </h:column>
 </h:dataTable>
The displayAuthor method within the managed bean accepts a String parameter value, which is the author’s last name, and then finds an Author object within the list of authors that contains the same last name. When found, a class field named current is set equal to the Author object for the matching List element. The subsequent JSF view then displays content utilizing the current Author information.
Prior to JSF 2.0, developers were unable to pass parameters to managed bean methods from within a view. This made it a bit more difficult to perform such techniques and usually involved a bit more code.
3-10. Arithmetic and Reserved Words in Expressions
Problem
You want to perform some arithmetic and combine expressions within your JSF views.
JSF EL expressions can contain arithmetic using standard arithmetic operators. It is also possible to combine two or more expressions utilizing some of JSF ELs reserved words. In the following example, some JSF EL expressions are used to display mathematical results on a page. Both the usage of arithmetic and reserved words are used within the expressions.
<?xml version="1.0" encoding="UTF-8"?>
<!--
Book:  Java EE 7 Recipes
Recipe: 3-10 Arithmetic and Reserved Words
Author: J. Juneau
-->
<!DOCTYPE html PUBLIC "-//W3C//DTD XHTML 1.0 Strict//EN" "http://www.w3.org/TR/xhtml1/DTD/xhtml1-strict.dtd">
<html xmlns="http://www.w3.org/1999/xhtml"
      xmlns:f="http://xmlns.jcp.org/jsf/core"
      xmlns:h="http://xmlns.jcp.org/jsf/html"
      xmlns:c="http://java.sun.com/jsp/jstl/core">
    <h:head>
        <meta http-equiv="Content-Type" content="text/html; charset=UTF-8"/>
        <title>Recipe 3-10:  Arithmetic and Reserved Words</title>
    </h:head>
    <h:body>
        <h:form id="componentForm">
            <h1>JSF Arithmetic and Reserved Words in EL</h1>
            <p>
                The following examples use JSF EL to perform some arithmetic.
            </p>
            1 + 1 = #{1 + 1}
            <br/>
            <h:outputText value="20 / 5 = #{20 / 5}"/>
            <br/>

            <h:outputText rendered="#{1 + 1 eq 2}" value="1 + 1 DOES equal 2"/>
            <br/>
            <h:outputText rendered="#{5 * 4 ne 20}" value="Is 5 * 4 equal to 20?"/>
            <br/>
            <h:outputText rendered="#{5 * 5 eq 25 and 1 + 1 eq 2}" value="Combining some expressions"/>
            <br/>
            <c:if test="#{evaluationController.expr1()}">
                This will be displayed if expr1() evaluates to true.
            </c:if>
            <br/>
            <c:if test="#{evaluationController.expr2() or evaluationController.field1}">
                This will be displayed if expr2() or field1 evaluates to true.
            </c:if>
        </h:form>
    </h:body>
</html>
Some of the expressions contain managed bean references for a bean named EvaluationController. The listing for this managed bean is as follows:
package org.javaeerecipes.chapter03.recipe03_10;

import javax.faces.bean.Named;
import javax.faces.bean.RequestScoped;

/**
 * Recipe 3-10
 * @author juneau
 */
@ManagedBean(name = "evaluationController")
@RequestScoped
public class EvaluationController {

    private boolean field1 = true;

    /**
     * Creates a new instance of EvaluationController
     */
    public EvaluationController() {
    }

    public boolean expr1(){
        return true;
    }

    public boolean expr2(){
        return false;
    }

    /**
     * @return the field1
     */
    public boolean isField1() {
        return field1;
    }

    /**
     * @param field1 the field1 to set
     */
    public void setField1(boolean field1) {
        this.field1 = field1;
    }
}
The resulting page will look as follows:
The following examples use JSF EL to perform some arithmetic.
1 + 1 = 2
20 / 5 = 4.0
1 + 1 DOES equal 2

Combining some expressions
This will be displayed if expr1() evaluates to true.
This will be displayed if expr1() or field1 evaluates to true.
How It Works
It is possible to use standard arithmetic and combine expressions using reserved words within JSF EL expressions. All standard arithmetic operators are valid within EL, but a couple of things are different. For instance, instead of writing an expression such as #{1 + 1 = 2}, you could use the eq reserved characters so that the expression reads #{1 + 1 eq 2}. Similarly, the != symbol could be used to specify that some value is not equal to another value, but rather, in this example, the ne reserved word is used. Table 3-4 describes all such reserved words.
Table 3-4. JSF EL Reserved Words
| Reserved Word | Description |
|---|---|
| and | Combines two or more expressions |
| div | Used to divide |
| empty | Used to refer to an empty list |
| eq | Equal to |
| false | Boolean false |
| ge | Greater than or equal to |
| gt | Greater than |
| instanceof | Used to evaluate whether an object is an instance of another |
| le | Less than or equal |
| lt | Less than |
| mod | Modulus |
| ne | Not equal |
| not | Used for negation |
| null | Evaluates a null value |
| or | Combines two or more expressions |
| true | Boolean true |
Table 3-5 lists the available operators that can be used within JSF EL expressions, in order of precedence.
Table 3-5. Operators for Use in Expressions
| Operator | |
|---|---|
| [] | |
| () | |
| - (unary), not, !, empty | |
| *, /, div, %, mod | |
| +, - (binary) | |
| <, >, <=, >=, lt, gt, le, ge | |
| ==, !, eq, ne | |
| &&, and | |
| ||, or | |
| ?, : |
3-11. Creating Bookmarkable URLs
Problem
You want to enable your application to allow URLs that will be linked to display specific objects. For instance, you want to use a GET URL such as http://myserver.com/JavaEERecipes/chapter03/chapter03_11.xhtml?last=juneau in order to display a page containing information on the author with the specified last name.
Solution
Add view parameters to a JSF view for which you want to create a bookmarkable URL by defining the parameter in an f:viewParam tag, which is a subtag of the f:metadata tag. Doing so will allow a page to become accessible via a URL that contains request parameters that can be used for record identification. In this example, the view contains a view parameter, via the f:viewParam tag, that allows for the specification of an author’s last name when the view is requested. For the example, the managed bean that was created in Recipe 3-9 has been modified to include a new property named authorLast in order to accommodate the new view parameter.
The sources for the view named recipe03_11.xhtml are listed next. They are very similar to the view named recipe03_09b.xhtml, except that they include an f:viewParam element, which is enclosed between opening and closing f:metadata elements.
<?xml version="1.0" encoding="UTF-8"?>
<!--
Book:  Java EE 7 Recipes
Recipe: 3-11 Creating Bookmarkable URLs
Author: J. Juneau
-->
<!DOCTYPE html PUBLIC "-//W3C//DTD XHTML 1.0 Strict//EN""http://www.w3.org/TR/xhtml1/DTD/xhtml1-strict.dtd">
<html xmlns="http://www.w3.org/1999/xhtml"
      xmlns:f="http://xmlns.jcp.org/jsf/core"
      xmlns:h="http://xmlns.jcp.org/jsf/html">
    <h:head>
        <meta http-equiv="Content-Type" content="text/html; charset=UTF-8"/>
        <title>Recipe 3-11: Creating Bookmarkable URLs</title>

    </h:head>
    <h:body>

        <f:metadata>
            <f:viewParam name="authorLast" value="#{authorTableController.authorLast}"/>
        </f:metadata>
        <h:form id="componentForm">
            <h1>#{authorTableController.current.first} #{authorTableController.current.last}</h1>
            <p>
                <h:graphicImage id="java7recipes" style="width: 10%; height: 20%" url="../images/java7recipes.png"/>
                <br/>
                #{authorTableController.current.bio}
            </p>

            <h:link value="Go Back to List" outcome="recipe03_09a"/>


        </h:form>

    </h:body>
</html>
The updated code for the org.javaeerecipes.chapter03.recipe03_09.AuthorController managed bean class is listed next:
package org.javaeerecipes.chapter03.recipe03_09;

import java.io.Serializable;
import java.util.ArrayList;
import java.util.List;
import javax.faces.ManagedBean;
import javax.faces.bean.SessionScoped;

@ManagedBean(name = "authorTableController")
@SessionScoped
public class AuthorController implements Serializable {

    ...
    private String authorLast;
    ...

    /**
     * @return the authorLast
     */
    public String getAuthorLast() {
        return authorLast;
    }

    /**
     * @param authorLast the authorLast to set
     */
    public void setAuthorLast(String authorLast) {
        displayAuthor(authorLast);
    }
}
As mentioned previously, a property has been added to the bean named authorList. This property makes it possible for the JSF view listed in the example to accept a request parameter named authorList via a GET URL and pass it to the bean when the page is requested. In the end, the URL for accessing the view and requesting the details for the author Josh Juneau would be as follows:
http://my-server.com/JavaEERecipes/chapter03/chapter03_11.xhtml?authorLast=Juneau
How It Works
In the past, JSF applications had a weakness in that they used to require a launch view, which created an entry point for accessing the application. This gave the application a view that would set up an initial state for the application session. While this concept is nice because each user session would begin their session with an initialized application state, it prohibited the ability for records to be linked directly via a URL. Sometimes it is very useful to have the ability to link a view to a URL that contains request parameters so that record(s) matching the given parameters can be returned to the view without further user interaction; for instance, say a web site included information regarding a book and wanted to include a URL to find out more about the book’s author. It’s much nicer to directly link to a view containing that author’s information rather than redirecting the user to a web site that requires them to perform a manual search for the author. Such URLs are also known as bookmarkable URLs because the URL contains all of the state that is required to make the request. Therefore, they allow the user of a web application to bookmark the URL for direct access to a specific point within an application.
JSF 2.0 introduced the ability to include view parameters, adding the ability for views to accept request parameters. Utilizing a GET-based URL, a request parameter can be appended to the end along with its value, and a view containing the new view parameter can then pass the parameter to a managed bean before the response is rendered. The bean can then accept the parameter value and query a database or search through some other collection of data to find a record that matches the given value before rendering the response.
To include one or more view parameters within a view, you must add an opening and closing f:metadata element to the view and embed the number of f:viewParam elements between them. The f:viewParam element includes two attributes that must have values, those being the name and value attributes. The name attribute specifies the name of the request parameter as you would like it to appear within the bookmarkable URL, and the value attribute specifies the managed bean field that should be mapped to that request parameter. In the example for this recipe, the JSF view contains a view parameter named authorLast, and the associated authorLast field within the managed bean contains a setter method, which is invoked when the page is requested. The following excerpt from the view demonstrates the lines for adding the metadata and view parameter:
<f:metadata>
    <f:viewParam name="authorLast" value="#{authorTableController.authorLast}"/>
</f:metadata>
With the addition of the view parameter, the page can be requested with a URL containing the authorLast request parameter as follows:
http://my-server.com/JavaEERecipes/chapter03/chapter03_11.xhtml?authorLast=Juneau
When the page is requested, the view parameter’s value invokes the setAuthorLast method within the managed bean, which then searches for an author record that contains a last name equal to the given request parameter value.
...
public void setAuthorLast(String authorLast) {
        displayAuthor(authorLast);
    }
...
The addition of view parameters to JSF 2.0 has made it easy to create bookmarkable URLs. This allows applications to be more flexible and produce results immediately without requiring a user to navigate through several pages before producing a result.
3-12. Displaying Lists of Objects
Problem
You want to display a list of objects within your rendered JSF page.
Use a JSF h:dataTable component to display the list objects, iterating over each object in the list and displaying the specified values. The h:dataTable component is very customizable and can be configured to display content in a variety of layouts. The following JSF view contains two h:dataTable components that are used to display the authors for the Java 7 Recipes book using managed beans developed in previous recipes. The first table in the view is straightforward and displays the names of each author. It has been formatted to display alternating row colors. The second table contains two rows for each corresponding list element, displaying the author names on the first row and their bios on the second.
<?xml version="1.0" encoding="UTF-8"?>
<!--
Book:  Java EE 7 Recipes
Recipe: 3-12 Displaying Lists of Objects
Author: J. Juneau
-->
<!DOCTYPE html PUBLIC "-//W3C//DTD XHTML 1.0 Strict//EN""http://www.w3.org/TR/xhtml1/DTD/xhtml1-strict.dtd">
<html xmlns="http://www.w3.org/1999/xhtml"
      xmlns:f="http://xmlns.jcp.org/jsf/core"
      xmlns:h="http://xmlns.jcp.org/jsf/html">
    <h:head>
        <meta http-equiv="Content-Type" content="text/html; charset=UTF-8"/>
        <title>Recipe 3-12: Displaying Lists of Objects</title>

        <link href="#{facesContext.externalContext.requestContextPath}/css/styles.css"
              rel="stylesheet" type="text/css" />

    </h:head>
    <h:body>

        <h:form id="componentForm">
            <p>

                <h:graphicImage id="java7recipes" style="width: 10%; height: 20%" url="../images/java7recipes.png"/>
                <br/>
                #{authorTableController.current.bio}
            </p>

            <h:dataTable id="authorTable" border="1"
                         value="#{authorTableController.authorList}"
                         styleClass="authorTable"
                         rowClasses="authorTableOdd, authorTableEven"
                         var="author">
                <f:facet name="header">
                    Java 7 Recipes Authors
                </f:facet>
                <h:column>
                <h:outputText id="authorName" value="#{author.first} #{author.last}"/>
                </h:column>
            </h:dataTable>
            <br/><br/>
            <h:dataTable id="authorTable2" border="1" value="#{authorTableController.authorList}"
                         var="author" width="500px;">
                <f:facet name="header">
                    Java 7 Recipes Authors
                </f:facet>
                <h:column>
                    <h:panelGrid columns="2" border="1" width="100%">
                        <h:outputText id="authorFirst" value="#{author.first}" style="width: 50%"/>
                        <h:outputText id="authorLast" value="#{author.last}" style="width:50%"/>

                    </h:panelGrid>
                    <h:outputText id="authorBio" value="#{author.bio}"/>
                </h:column>
            </h:dataTable>


        </h:form>

    </h:body>
</html>
The example utilizes a cascading style sheet to help format the colors on the table. The source for the style sheet is as follows:
.authorTable{
        border-collapse:collapse;
}
.authorTableOdd{
        text-align:center;
        background:none repeat scroll 0 0 #CCFFFF;
        border-top:1px solid #BBBBBB;
}

.authorTableEven{
        text-align:center;
        background:none repeat scroll 0 0 #99CCFF;
        border-top:1px solid #BBBBBB;
}
The resulting page should look similar to Figure 3-4.
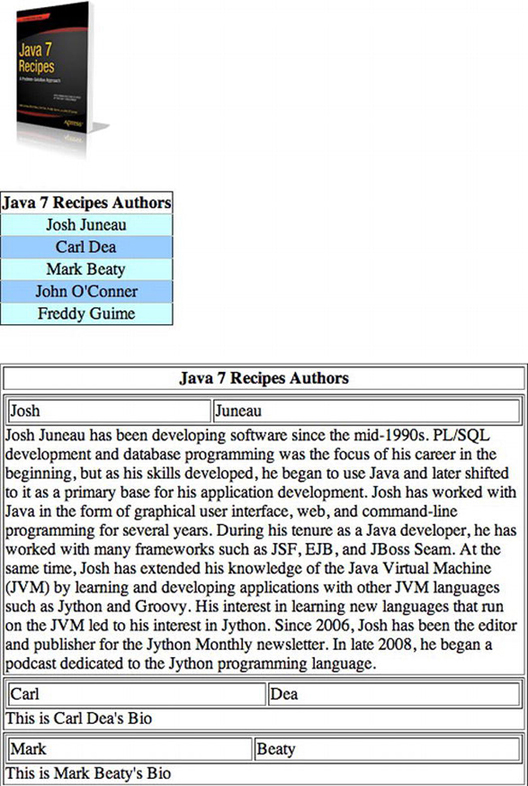
Figure 3-4. JSF DataTable component examples
How It Works
A JSF h:dataTable component can be used to display lists of objects within a page. When rendered, an HTML table is constructed, populating the cells of the table with the data for each list element or record of data. The h:dataTable can iterate over a collection of data, laying it out in a columnar format including column headers and the ability to customize the look using Cascading Style Sheets (CSS). The component contains a number of important attributes, as listed in Table 3-6. Perhaps the most important of them are the value and var attributes. The value attribute specifies the collection of data to iterate, and the var attribute lists a String that will be used to reference each individual row of the table. The collection usually comes from the managed bean, such as in the example for this recipe. The legal data types for the value attribute are Array, DataModel, List, and Result. The var attribute is used within each column to reference a specific field within an object for the corresponding row.
Table 3-6. DataTable Attributes
| Attribute | Description |
|---|---|
| id | ID for the component |
| border | An integer indicating border thickness; 0 is default |
| bgcolor | Background color of table |
| cellpadding | Padding between the cell wall and its contents |
| cellspacing | Spacing within the cells |
| width | Overall width of the table, specified in pixels or percentages |
| first | The first entry in the collection to display |
| rows | Total number of rows to display |
| styleClass, captionClass, headerClass, footerClass, rowClasses, columnClasses | CSS attributes |
| rendered | Boolean value indicating whether the component will be rendered |
The h:dataTable can contain any number of columns, and each is specified within the h:dataTable component in the JSF view. The h:column nested element encloses the output for each column. A column can contain just about any valid component or HTML, even embedded dataTables. An h:column normally does not have any attributes specified, but it always contains an expression or hard-coded value for display.
<h:column>my column value</h:column>
or
<h:column>#{myTable.myColValue}</h:column>
Normally, columns within an HTML table contain headers. You can add headers to the h:dataTable or individual columns by embedding an f:facet element within the h:dataTable and outside of the column specifications or within each h:column by specifying the name attribute as header. The f:facet element can also specify caption for the name attribute in order to add a caption to the table. The following excerpt from the example demonstrates an h:dataTable that includes each of these features:
<h:dataTable id="authorTable" border="1"
                         value="#{authorTableController.authorList}"
                         styleClass="authorTable"
                         rowClasses="authorTableOdd, authorTableEven"
                         var="author">
    <f:facet name="header">
        Java 7 Recipes Authors
    </f:facet>
    <h:column>
        <h:outputText id="authorName" value="#{author.first} #{author.last}"/>
    </h:column>
</h:dataTable>
In the example, you can see that the h:dataTable value attribute is listed as #{authorTableController.authorList}, a List of Author objects declared within the managed bean. The var attribute establishes a variable named author that refers to the current author who is being processed from the author list. The author variable can then be accessed from within each h:column, displaying the data associated with the current list element.
An important piece of the puzzle to help make tables easier to read and follow is the CSS that can be used to style the table. The h:dataTable supports various attributes that allow you to apply externally defined CSS classes to your table, specifically, the styleClass, captionClass, headerClass, footerClass, rowClasses, and columnClasses attributes. Each of them can contain a CSS class specification for formatting. The example demonstrates this feature.
3-13. Invoking Managed Bean Actions on Life-Cycle Phase Events
Problem
You want to automatically invoke a managed bean action when a specific JSF life-cycle phase event occurs. For instance, when a view is loading, you want to invoke a managed bean action that performs a conditional verification based upon the user who is visiting the page.
Solution
Utilize a JSF view action by adding the f:viewAction facet to the JSF view. Use the facet to specify the managed bean action to invoke, as well as when to invoke the action. In the following excerpt from the view chapter03/recipe03_13.xhtml, a managed bean method action named validateUser is invoked:
<f:metadata>
        <f:viewAction action="#{viewActionManagedBean.validateUser()}"/>
</f:metadata>
How It Works
In JSF 2.1 and prior, it was difficult to invoke action methods within a managed bean unless they were bound to a command component. Sometimes it makes sense to invoke a method when the page is loading, after the page has been fully loaded, and so on. In the past, this was done by using a preRenderView event listener, which invokes a method contained within a managed before the view is rendered. Utilization of the preRenderView event listener works, but it does not provide the level of control that is required to invoke a method during different phases of the view life cycle. The preRenderView also requires developers to programmatically check the request type and work with the navigation handler.
In the JSF 2.2 release, a new technique can be used to invoke action methods within a managed bean during specified life-cycle events that occur within the view. A new tag, f:viewAction, can be bound to a view, and it can be incorporated into the JSF life cycle in both non-JSF (initial) and JSF (postback) requests. To use the tag, it must be a child of the metadata facet. View parameters can be specified within the metadata facet as well, and they will become available from within the managed bean when the action method is invoked.
In the example, the action method named validateUser is invoked using the viewAction. In the example method, a String is returned, which enables implicit navigation based upon the action method results. If null is returned, the navigation handler is invoked, but the same view will be rendered again so long as there are no navigation condition expressions that change the navigation. If a String-based view name is returned, then the navigation handler will render that view once the method has completed. This can come in handy for situations such as authentication handling, where an action method is used to check the user’s role and then the appropriate view is rendered based upon the authenticated user role.
public String validateUser() {
        String viewName;
        System.out.println("Look in the server log to see this message");
        // Here we would perform validation based upon the user visiting the
        // site to ensure that they had the appropriate permissions to view
        // the selected view.  For the purposes of this example, this
        // conditional logic is just a prototype.
        if (visitor.isAdmin()){
            // visit the current page
            viewName = null;
            System.out.println("Current User is an Admin");
        } else {
            viewName = "notAdmin";
            System.out.println("Current User is NOT an Admin");
        }
        return viewName;
   }
As mentioned previously, f:viewAction facet can be customized to allow the action method to be invoked at different stages within the view life cycle. By default, the viewAction will be initiated before postback because the specified action method is expected to execute whether the request was Faces or non-Faces. However, this can be changed by setting the onPostback attribute of the f:viewAction tag to true.
<f:viewAction action="#{viewActionManagedBean.validateUser()}" onPostback="true"/>
If you need to get even more granular and invoke a view action during specified life-cycle phase, it is possible by setting the phase attribute to the phase required. Table 3-7 specifies the different phases along with their phase value.
Table 3-7. JSF Life-Cycle Phases
| Phase | Tag Value |
|---|---|
| Restore View | RESTORE_VIEW |
| Apply Request Values | APPLY_REQUEST_VALUES |
| Process Validations | PROCESS_VALIDATIONS |
| Update Model Values | UPDATE_MODEL_VALUES |
| Invoke Application | INVOKE_APPLICATION |
| Render Response | RENDER_RESPONSE |
The following example demonstrates the f:viewAction facet that will cause the action to be invoked during the Process Validations phase:
<f:viewAction action="#{viewActionManagedBean.validateUser()}"
                      phase="PROCESS_VALIDATIONS"/>