
![]()
Facelets
In the early days of web development, web pages consisted of many HTML tables for structuring layout and lots of redundancy across application pages. This made development of web pages cumbersome and difficult to maintain at best. Over the years, other technologies such as Cascading Style Sheets (CSS) have come along to help web developers organize and style their pages. Such technologies encouraged organization by allowing developers to encapsulate styles into separate files, leaving the markup within pages easier to follow. Other technologies such as Tiles came along to help reduce the amount of redundancy that was incurred by providing a similar layout to all pages of an application. Tiles allowed developers to construct a single layout and apply it to several different web pages. Facelets is a view definition language that was introduced to help organize JSF views. Facelets follows in the footsteps of Tiles, in that it allows developers to encapsulate layouts into separate files and apply them to different JSF views. . . and that functionality only scratches the surface! While Facelets can be used to create layouts and build templates for JSF applications, it also brings with it many other significant advantages.
Facelets became the default view definition language of JSF with the release of JSF 2.0. Prior to that, Facelets had to be applied to an application separately. Developers of JSF 2.0+ applications can begin to use Facelets out of the box, without any additional application configuration. In addition to helping build application templates, Facelets provides built-in components to facilitate iteration over collections of data, debugging, inserting view fragments into other views, and so forth.
This chapter will cover an array of recipes to help developers gain an understanding of some beginning, intermediate, and advanced Facelets techniques.
4-1. Creating a Page Template
Problem
You want to make each of the JSF views within your application follow the same structure. Moreover, you want to have the ability to reuse the same layout for each view.
Solution
Create a page template using the Facelets view definition language. Facelets ships as part of JavaServer Faces, and you can use it to create highly sophisticated layouts for your views in a proficient manner. The template demonstrated in this recipe will be used to define the standard layout for all pages within an application. The demo application for this chapter is for a bookstore web site. The site will display a number of book titles on the left side of the screen, a header at the top, a footer at the bottom, and a main view in the middle. When a book title is clicked in the left menu, the middle view changes, displaying the list of authors for the selected book.
To create a template, you must first develop a new XHTML view file and then add the appropriate HTML/JSF/XML markup to it. Content from other views will displace the ui:insert elements in the template once the template has been applied to one or more JSF views. The following source is that of a template named custom_template.xhtml; this is the template that will be used for all views within the application:
<?xml version='1.0' encoding='UTF-8' ?>
<!--
Book:  Java EE 7 Recipes
Recipe: 4-1
Author: J. Juneau
-->
<!DOCTYPE html PUBLIC "-//W3C//DTD XHTML 1.0 Transitional//EN" "http://www.w3.org/TR/xhtml1/DTD/xhtml1-transitional.dtd">
<html xmlns="http://www.w3.org/1999/xhtml"
      xmlns:ui="http://xmlns.jcp.org/jsf/facelets"
      xmlns:h="http://xmlns.jcp.org/jsf/html">

    <h:head>
        <meta http-equiv="Content-Type" content="text/html; charset=UTF-8" />
        <link href="./../../resources/css/default.css" rel="stylesheet" type="text/css" />
        <link href="./../../resources/css/cssLayout.css" rel="stylesheet" type="text/css" />
        <title>#{faceletsAuthorController.storeName}</title>
    </h:head>

    <h:body>

        <div id="top">
            <h2>#{faceletsAuthorController.storeName}</h2>
        </div>
        <div>
            <div id="left">
                <h:form id="navForm">
                    <h:commandLink action="#{faceletsAuthorController.populateJavaRecipesAuthorList}" >Java 7 Recipes</h:commandLink>
                    <br/>
                    <br/>
                    <h:commandLink action="#{faceletsAuthorController.populateJavaEERecipesAuthorList}">Java EE 7 Recipes </h:commandLink>
                </h:form>
            </div>
            <div id="content" class="left_content">
                <ui:insert name="content">Content</ui:insert>
            </div>
        </div>
        <div id="bottom">
            Written by Josh Juneau, Apress Author
        </div>

    </h:body>

</html>
The template defines the overall structure for the application views. However, it uses a CSS style sheet to declare the formatting for each of the <div> elements within the template. The style sheet, entitled default.css, should be contained within a resources directory in the application so that it will be accessible to the views.
There are also a couple of JSF EL expressions utilized within the template. The EL references a JSF managed bean by the name of AuthorController, which is referenced by faceletsAuthorController. While the source for this class is very important for the overall application, you’ll wait to look at that code until Recipe 4-2 since it does not play a role in the application template layout.
How It Works
To create a unified application experience, the views should be coherent in that they look similar and function in a uniform fashion. The idea of developing web page templates has been around for a number of years, but unfortunately many template implementations contain duplicate markup on every application page. While duplicating the same layout for every separate web page works, it creates a maintenance nightmare. What happens when there is a need to update a single link within the page header? Such a conundrum would cause a developer to visit and manually update every web page for an application if the template was duplicated on every page. The Facelets view definition language provides a robust solution for the development of view templates, and it is one of the major bonuses of working with the JSF technology.
Facelets provides the ability for a single template to be applied to one or more views within an application. This means a developer can create one view that constructs the header, footer, and other portions of the template, and then this view can be applied to any number of other views that are responsible for containing the main view content. This technique mitigates issues such as changing a single link within the page header, because now the template can be updated with the new link, and every other view within the application will automatically reflect the change.
To create a template using Facelets, create an XHTML view, declare the required namespaces, and then add HTML, JSF, and Facelets tags accordingly to design the layout you desire. The template can be thought of as an “outer shell” for a web view, in that it can contain any number of other views within it. Likewise, any number of JSF views can have the same template applied, so the overall look and feel of the application will remain constant. Figure 4-1 provides a visual demonstrating the concept of an application template.
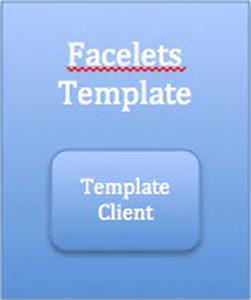
Figure 4-1. Visual representation of a Facelets template and client
You may have noticed from the view listing in the solution to this recipe that there are some tags toting the ui: prefix. Those are the Facelets tags that are responsible for controlling the view layout. To utilize these Facelets tags, you’ll need to declare the XML namespace for the Facelets tag library in the <html> element within the template. Note that the XML namespace for the standard JSF tag libraries is also specified here.
<html xmlns="http://www.w3.org/1999/xhtml"
      xmlns:ui="http://xmlns.jcp.org/jsf/facelets"
      xmlns:h="http://xmlns.jcp.org/jsf/html">
...
![]() Note The Facelets template must include the <html>, <head>, or <h:head>, and <body> or <h:body>, elements because they are what define the overall layout for each view that uses it. The <h:head> and <h:body> elements will be covered in detail in Chapter 5. Each view that makes use of a Facelets template is known as a composition. One template can be used by multiple compositions or views. In actuality, everything outside of the <ui:composition> opening and closing tags within a composition is ignored. You’ll learn more about that in Recipe 4-2!
Note The Facelets template must include the <html>, <head>, or <h:head>, and <body> or <h:body>, elements because they are what define the overall layout for each view that uses it. The <h:head> and <h:body> elements will be covered in detail in Chapter 5. Each view that makes use of a Facelets template is known as a composition. One template can be used by multiple compositions or views. In actuality, everything outside of the <ui:composition> opening and closing tags within a composition is ignored. You’ll learn more about that in Recipe 4-2!
Facelets contains a number of special tags that can be used to help control page flow and layout. Table 4-1 in Recipe 4-2 lists the Facelets tags that are useful for controlling page flow and layout. The only Facelets tag that is used within the template for this recipe example is ui:insert. The ui:insert tag contains a name attribute, which is set to the name of the corresponding ui:define element that will be included in the view. Taking a look at the source for this recipe, you can see the following ui:insert tag:
<ui:insert name="content">Content</ui:insert>
If a view that uses the template, a.k.a. template client, specifies a ui:define tag with the same name as the ui:insert name, then any content that is placed between the opening and closing ui:define tags will be inserted into the view in that location. However, if the template client does not contain a ui:define tag with the same name as the ui:insert tag, then the content between the opening and closing ui:insert tags within the template will be displayed.
Templates can be created via an IDE, such as NetBeans, to provide a more visual representation of the layout you are trying to achieve. To create a Facelets template from within NetBeans, right-click the project folder into which you want to place the template, and select New ![]() Other from the contextual menu to open the New File window. Once that’s open, select JavaServer Faces from the Category menu and then Facelets Template from within the file types, as shown in Figure 4-2.
Other from the contextual menu to open the New File window. Once that’s open, select JavaServer Faces from the Category menu and then Facelets Template from within the file types, as shown in Figure 4-2.
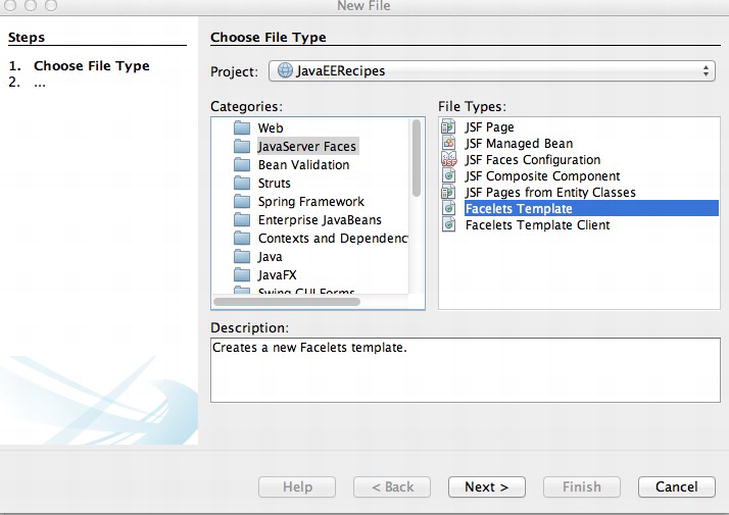
Figure 4-2. Creating a Facelets template from within NetBeans
After you’ve selected the Facelets Template file type, click the Next button to open the New Facelets Template window (Figure 4-3). This window will allow you to select the overall layout that you would like to compose for your application views, as well as choose the location and name for the template.
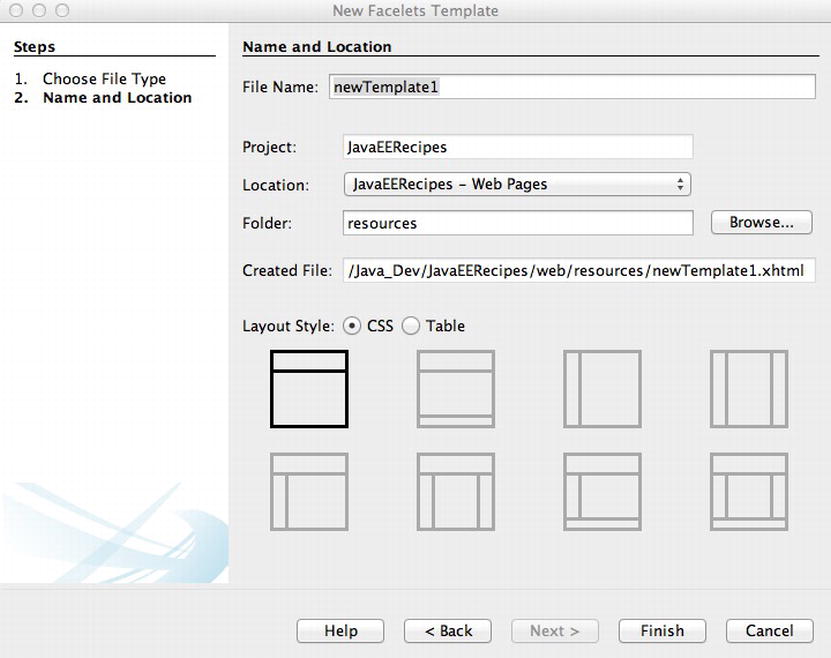
Figure 4-3. New Facelets Template window in NetBeans
After you’ve selected the layout of your choice and filled in the other options, the template will be opened within the NetBeans code editor, and you can begin to apply the template to JSF view clients (see Recipe 4-2). Using a wizard such as the one offered by NetBeans can help since a visual representation of the template can be chosen at creation time.
In summary, a Facelets template consists of HTML and JSF markup, and it is used to define a page layout. Sections of the template can specify where page content will be displayed through the usage of the ui:insert tag. Any areas within the template that contain a ui:insert tag can have content inserted into them from a template client. To learn more about applying a template to your views, please see Recipe 4-2.
4-2. Applying a Template to Your Views
Problem
You have created a template for use within your JSF web views and you want to apply it to the views of your application.
Solution
Use the ui:composition tag within each view that will utilize the template. The ui:composition tag should be used to invoke the template, and ui:define tags should be placed where content should be inserted. The following listings demonstrate how Facelets templates are applied to various views.
recipe04_01a.xhtml is the markup for a view within the bookstore application that is used to display the authors for the Java 7 Recipes book. The template that was created in Recipe 4-1 is applied to the view, and individual ui:define tags are used within the view to specify the content that should be inserted into the page/view.
<?xml version='1.0' encoding='UTF-8' ?>
<!--
Book:  Java EE 7 Recipes
Recipe: 4-1
Author: J. Juneau
-->
<!DOCTYPE html PUBLIC "-//W3C//DTD XHTML 1.0 Transitional//EN" "http://www.w3.org/TR/xhtml1/DTD/xhtml1-transitional.dtd">
<html xmlns="http://www.w3.org/1999/xhtml"
      xmlns:ui="http://xmlns.jcp.org/jsf/facelets"
      xmlns:f="http://xmlns.jcp.org/jsf/core"
      xmlns:h="http://xmlns.jcp.org/jsf/html">

    <body>

        <ui:composition template="./layout/custom_template.xhtml">
            <ui:define name="top">
            </ui:define>
            <ui:define name="left">
            </ui:define>

            <ui:define name="content">
                <h:form id="componentForm">
                    <h1>Author List for Java 7 Recipes</h1>
                    <p>
                        Below is the list of authors.  Click on the author's last name
                        for more information regarding the author.
                    </p>

                    <h:graphicImage id="javarecipes" style="width: 100px; height: 120px" library="image"
                                                name="java7recipes.png"/>
                    <br/>
                    <h:dataTable id="authorTable" border="1" value="#{faceletsAuthorController.authorList}"
                                 var="author">
                        <f:facet name="header">
                            Java 7 Recipes Authors
                        </f:facet>
                        <h:column>
                            <h:commandLink id="authorName" action="#{faceletsAuthorController.displayAuthor(author.last)}"
                                           value="#{author.first} #{author.last}"/>
                        </h:column>
                    </h:dataTable>
                    <br/>
                    <br/>


                </h:form>
            </ui:define>

            <ui:define name="bottom">
                bottom
            </ui:define>

        </ui:composition>
    </body>
</html>
recipe04_01b.xhtml contains the sources for the second view within the bookstore application. It is used to list the authors for the Java EE 7 Recipes book. Again, note that the template has been applied to the view by specifying the template attribute within the ui:composition tag.
<?xml version='1.0' encoding='UTF-8' ?>
<!--
Book:  Java EE 7 Recipes
Recipe: 4-1
Author: J. Juneau
-->
<!DOCTYPE html PUBLIC "-//W3C//DTD XHTML 1.0 Transitional//EN" "http://www.w3.org/TR/xhtml1/DTD/xhtml1-transitional.dtd">
<html xmlns="http://www.w3.org/1999/xhtml"
      xmlns:ui="http://xmlns.jcp.org/jsf/facelets"
      xmlns:f="http://xmlns.jcp.org/jsf/core"
      xmlns:h="http://xmlns.jcp.org/jsf/html">

    <body>

        <ui:composition template="./layout/custom_template.xhtml">

            <ui:define name="top">
            </ui:define>

            <ui:define name="left">
            </ui:define>

            <ui:define name="content">
                <h:form id="componentForm">
                    <h1>Author List for Java EE 7 Recipes</h1>
                    <p>
                        Below is the list of authors.  Click on the author's last name
                        for more information regarding the author.
                    </p>

                    <h:graphicImage id="javarecipes" style="width: 100px; height: 120px" library="image"
                                                name="java7recipes.png"/>
                    <br/>
                    <h:dataTable id="authorTable" border="1" value="#{faceletsAuthorController.authorList}"
                                 var="author">
                        <f:facet name="header">
                            Java 7 Recipes Authors
                        </f:facet>
                        <h:column>
                            <h:commandLink id="authorName" action="#{faceletsAuthorController.displayAuthor(author.last)}"
                                           value="#{author.first} #{author.last}"/>
                        </h:column>
                    </h:dataTable>
                    <br/>
                    <br/>


                </h:form>
            </ui:define>

            <ui:define name="bottom">
                bottom
            </ui:define>

        </ui:composition>
    </body>
</html>
recipe04_01c.xhtml contains the sources for another view listing that is part of the bookstore application. This view is responsible for displaying the individual author detail. Again, the template is applied to this page.
<?xml version="1.0" encoding="UTF-8"?>
<!--
Book:  Java EE 7 Recipes
Recipe: 4-1
Author: J. Juneau
-->
<!DOCTYPE html PUBLIC "-//W3C//DTD XHTML 1.0 Strict//EN" "http://www.w3.org/TR/xhtml1/DTD/xhtml1-strict.dtd">
<html xmlns="http://www.w3.org/1999/xhtml"
      xmlns:f="http://xmlns.jcp.org/jsf/core"
      xmlns:ui="http://xmlns.jcp.org/jsf/facelets"
      xmlns:h="http://xmlns.jcp.org/jsf/html">
    <h:head>
        <meta http-equiv="Content-Type" content="text/html; charset=UTF-8"/>
        <title>Recipe 4-1: Facelets Page Template</title>
    </h:head>
    <h:body>
        <ui:composition template="./layout/custom_template.xhtml">

            <ui:define name="top">
            </ui:define>

            <ui:define name="left">
            </ui:define>

            <ui:define name="content">
                <h:form id="componentForm">
                    <h1>#{faceletsAuthorController.current.first} #{faceletsAuthorController.current.last}</h1>
                    <p>
                        <h:graphicImage id="java7recipes" style="width: 10%; height: 20%" url="../images/java7recipes.png"/>
                        <br/>
                        #{faceletsAuthorController.current.bio}
                    </p>
                </h:form>
            </ui:define>

            <ui:define name="bottom">
                bottom
            </ui:define>

        </ui:composition>
    </h:body>
</html>
Managed Bean Controller: AuthorController
Of course, all the business logic and navigation is occurring from within a JSF managed bean. AuthorController is the bean that handles all the logic for the bookstore application. Note that the @ManagedBean annotation specifies a String value of faceletsAuthorController, which is used to reference the bean from within the views.
package org.javaeerecipes.chapter04.recipe04_01;

import java.io.Serializable;
import java.util.ArrayList;
import java.util.List;
import javax.faces.bean.ManagedBean;
import javax.faces.bean.SessionScoped;

/**
 * Recipe 4-1
 *
 * @author juneau
 */
@ManagedBean(name = "faceletsAuthorController")
@SessionScoped
public class AuthorController implements Serializable {

    private List <Author> authorList;
    private String storeName = "Acme Bookstore";

    private String juneauBio =
            "Josh Juneau has been developing software"
            + " since the mid-1990s. PL/SQL development and database programming"
            + " was the focus of his career in the beginning, but as his skills developed,"
            + " he began to use Java and later shifted to it as a primary base for his"
            + " application development. Josh has worked with Java in the form of graphical"
            + " user interface, web, and command-line programming for several years. "
            + "During his tenure as a Java developer, he has worked with many frameworks"
            + " such as JSF, EJB, and JBoss Seam. At the same time, Josh has extended his"
            + " knowledge of the Java Virtual Machine (JVM) by learning and developing applications"
            + " with other JVM languages such as Jython and Groovy. His interest in learning"
            + " new languages that run on the JVM led to his interest in Jython. Since 2006,"
            + " Josh has been the editor and publisher for the Jython Monthly newsletter. "
            + "In late 2008, he began a podcast dedicated to the Jython programming language.";
    private String deaBio = "This is Carl Dea's Bio";
    private String beatyBio = "This is Mark Beaty's Bio";
    private String oConnerBio = "This is John O'Connor's Bio";
    private String guimeBio = "This is Freddy Guime's Bio";
    private Author current;
    private String authorLast;

    /**
     * Creates a new instance of RecipeController
     */
    public AuthorController() {
        populateJavaRecipesAuthorList();
    }

    pubilc String populateJavaRecipesAuthorList() {


        authorList = new ArrayList<>();
        authorList.add(new Author("Josh", "Juneau", juneauBio));
        authorList.add(new Author("Carl", "Dea", deaBio));
        authorList.add(new Author("Mark", "Beaty", beatyBio));
        authorList.add(new Author("John", "O'Conner", oConnerBio));
        authorList.add(new Author("Freddy", "Guime", guimeBio));
        return "recipe04_01a";
    }

    public String populateJavaEERecipesAuthorList() {
        System.out.println("initializng authors list");
        authorList = new ArrayList<>();
        authorList.add(new Author("Josh", "Juneau", juneauBio));
        return "recipe04_01b";

    }

    public String displayAuthor(String last) {
        for (Author author : authorList) {
            if (author.getLast().equals(last)) {
                current = author;
            }
        }
        return "recipe04_01c";
    }

    /**
     * @return the authorList
     */
    public List getAuthorList() {
        return authorList;
    }

    /**
     * @return the current
     */
    public Author getCurrent() {
        return current;
    }

    /**
     * @param current the current to set
     */
    public void setCurrent(Author current) {
        this.current = current;
    }

    /**
     * @return the authorLast
     */
    public String getAuthorLast() {
        return authorLast;
    }

    /**
     * @param authorLast the authorLast to set
     */
    public void setAuthorLast(String authorLast) {
        this.authorLast = authorLast;
    }

    /**
     * @return the storeName
     */
    public String getStoreName() {
        return storeName;
    }

    /**
     * @param storeName the storeName to set
     */
    public void setStoreName(String storeName) {
        this.storeName = storeName;
    }
}
In the end, the overall application will look like Figure 4-4. To run the application from the sources, deploy the WAR file distribution to your application server, and then load the following URL into your browser: http://your-server:port_number/JavaEERecipes/faces/chapter04/chapter04_01a.xhtml.
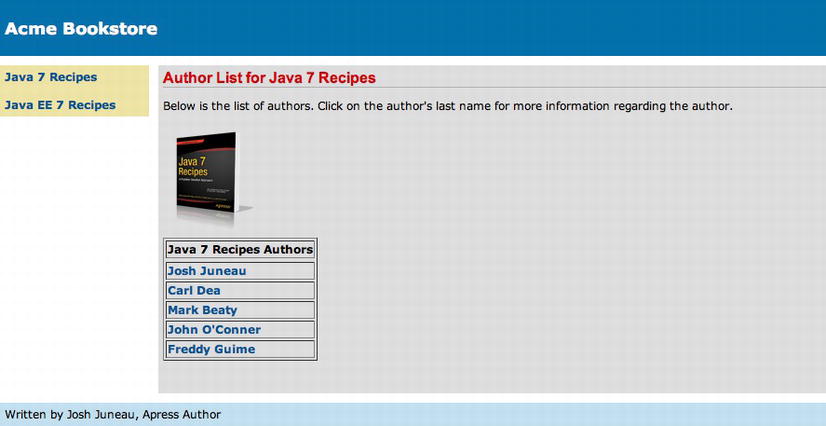
Figure 4-4. Application using Facelets template
How It Works
Applying a Facelets template to individual views within a JSF application is quite easy. Views that make use of a template are known as template clients. As mentioned in Recipe 4-1, a view template can specify individual ui:insert tags, along with the name attribute, in any location on the template where view content could be inserted. The name attribute within the ui:insert tag will pair up with the name attribute within the ui:define tag in the template client in order to determine what content is inserted.
![]() Note As noted in Recipe 4-1, each view that uses a Facelets template can be referred to as a composition. It can also be referred to as a template client. It is important to note that a template client, or composition, contains an opening and closing <ui:composition> tag. Everything outside of those tags is actually ignored at rendering time because the template body is used instead. You can also omit the <html> tags within a template client and just open and close the view using the <ui:composition> tags instead. Please see the “Opening/Closing Template Clients with <ui:composition>” sidebar for an example.
Note As noted in Recipe 4-1, each view that uses a Facelets template can be referred to as a composition. It can also be referred to as a template client. It is important to note that a template client, or composition, contains an opening and closing <ui:composition> tag. Everything outside of those tags is actually ignored at rendering time because the template body is used instead. You can also omit the <html> tags within a template client and just open and close the view using the <ui:composition> tags instead. Please see the “Opening/Closing Template Clients with <ui:composition>” sidebar for an example.
Opening/Closing Template Clients with <ui:composition>
It is common to see template client views using opening and closing <html> tags, as demonstrated with the example views in the solution to this recipe. However, since everything outside of the <ui:composition> tags is ignored at rendering time, you can omit those tags completely. It is sometimes useful to open and close a template client with the <ui:composition> tag. However, some page editors will be unable to work with the code or errors will be displayed because the view does not include the <html> element at its root. Here’s an example of using <ui:composition> as the opening and closing elements of a template client:
<ui:composition xmlns="http://www.w3.org/1999/xhtml"
      xmlns:ui="http://xmlns.jcp.org/jsf/facelets"
      xmlns:f="http://xmlns.jcp.org/jsf/core"
      xmlns:h=http://xmlns.jcp.org/jsf/html
      template="./layout/custom_template.xhtml">

<<same as code per the view samples in the solution to this recipe>>

</ui:composition>
Use the technique that suits your application the best! Remember, JSF and Facelets will treat each view the same, and you can save a few lines of code specifying <ui:composition> as the root.
Applying Templates
A template can be applied to a view by specifying it within the template attribute within the view’s ui:composition tag. For instance, all the views within this example specify the same template, as you can see in the following excerpt:
<ui:composition template="./layout/custom_template.xhtml">
The name of the template in the example is custom_template.xhtml, and the path to the template is ./layout/. The ui:composition tag should encapsulate all other markup within a Facelets view. All views that are to use the template must specify the ui:composition tag. A number of other useful Facelets template tags come along with Facelets, as described in Table 4-1.
Table 4-1. Facelets Page Control and Template Tags
| Tag | Description |
|---|---|
| ui:component | Defines a template component and specifies a file name for the component |
| ui:composition | Defines a page composition and encapsulates all other JSF markup |
| ui:debug | Creates a debug component, which captures debugging information, namely, the state of the component tree and the scoped variables in the application, when the component is rendered |
| ui:define | Defines content that is inserted into a page by a template |
| ui:decorate | Decorates pieces of a page |
| ui:fragment | Defines a template fragment, much like ui:component, except that all content outside of tag is not disregarded |
| ui:include | Allows another XHTML page to be encapsulated and reused within a view |
| ui:insert | Inserts content into a template |
| ui:param | Passes parameters to an included file or template |
| ui:repeat | Iterates over a collection of data |
| ui:remove | Removes content from a page |
The ui:define tag encloses content that will be inserted into the template at the location of the template’s ui:insert tags. The ui:define tag is matched to a template’s ui:insert tag based on the value of the name attribute that is common to each tag. As you can see from the first view listing in this example, the first ui:define tag specifies top for the name attribute, and this will correspond to the template ui:insert tag with a name attribute equal to top. But the template does not specify such a tag! That is OK; there does not have to be a one-to-one match between the ui:define and ui:insert tags. A view can specify any number of ui:define tags, and if they do not correspond to any of the ui:insert tags within the template, then they are ignored. Likewise, a template can specify any number of ui:insert tags, and if they do not correspond to a ui:define tag within the template client view, then the content that is defined within the template in that location will be displayed.
Looking at the same view, another ui:define tag contains a name attribute value equal to content, and this tag does correspond with a ui:insert tag within the template that also has a name attribute value of content. The following excerpt is taken from the template, and it shows the ui:insert tag that corresponds to the view’s ui:define tag with the same name attribute. You can see the full listing for the template in Recipe 4-1.
<div id="content" class="left_content">
        <ui:insert name="content">Content</ui:insert>
</div>
The following excerpt, taken from recipe04_01a.xhtml, is the corresponding ui:define tag that will be inserted into the template at this location:
<ui:define name="content">
                <h:form id="componentForm">
                    <h1>Author List for Java 7 Recipes</h1>
                    <p>
                        Below is the list of authors.  Click on the author's last name
                        for more information regarding the author.
                    </p>

                    <h:graphicImage id="javarecipes" style="width: 10%; height: 20%" library="image" name="java7recipes.png"/>
                    <br/>
                    <h:dataTable id="authorTable" border="1" value="#{faceletsAuthorController.authorList}"
                                 var="author">
                        <f:facet name="header">
                            Java 7 Recipes Authors
                        </f:facet>
                        <h:column>
                            <h:commandLink id="authorName" action="#{faceletsAuthorController.displayAuthor(author.last)}"
                                           value="#{author.first} #{author.last}"/>
                        </h:column>
                    </h:dataTable>
                    <br/>
                    <br/>


                </h:form>
            </ui:define>
As you can see, it can be very powerful to define a view template that can be applied to several views within an application. Facelets templating provides a very powerful solution for defining such a template, allowing for consistent page layout and reusable page code.
4-3. Ensuring Resource Availability from All Views
Problem
You want to include resources, such as CSS, images, and JavaScript code, within your views that are accessible for use from every view within your application. For instance, rather than hard-coding a URL to an image, you want to reference the image location and have the application dynamically create the URL to the image location at runtime.
Solution
Create a resource directory and, optionally, subfolders within the resources directory to contain the resources that your application will utilize. Any CSS files, images, and so on, that are placed within subdirectories in the resources folder can be referenced within a JSF view via a JSF component’s library attribute, rather than specifying the full path to the resource. In the following example, a cascading style sheet is used to style the table of authors within the application. For this recipe, you will use the styles.css sheet that was applied to the h:dataTable in Recipe 3-12. The style sheet declaration will reside within the custom_template.xhtml template, and you will use an h:outputStylesheet component rather than a <link> tag. As a matter of fact, all of the <link> tags will be removed and replaced with h:outputStylesheet components to take advantage of the resources folder. The directory structure should look like Figure 4-5 when set up correctly.

Figure 4-5. Utilizing the resources directory
The following listing is the updated custom_template.xhtml, because it now utilizes the h:outputStylesheet component rather than the <link> tag. Note that the library attribute is specified as css.
<?xml version='1.0' encoding='UTF-8' ?>
<!--
Book:  Java EE 7 Recipes
Recipe: 4-3
Author: J. Juneau
-->
<!DOCTYPE html PUBLIC "-//W3C//DTD XHTML 1.0 Transitional//EN" "http://www.w3.org/TR/xhtml1/DTD/xhtml1-transitional.dtd">
<html xmlns="http://www.w3.org/1999/xhtml"
      xmlns:ui="http://xmlns.jcp.org/jsf/facelets"
      xmlns:h="http://xmlns.jcp.org/jsf/html">

    <h:head>
        <meta http-equiv="Content-Type" content="text/html; charset=UTF-8" />
        <h:outputStylesheet library="css" name="default.css"/>
        <h:outputStylesheet library="css" name="cssLayout.css"/>
        <h:outputStylesheet library="css" name="styles.css"/>
        <title>#{faceletsAuthorController.storeName}</title>
    </h:head>

    <h:body>

        <div id="top">
            <h2>#{faceletsAuthorController.storeName}</h2>
        </div>
        <div>
            <div id="left">
                <h:form id="navForm">
                    <h:commandLink action="#{faceletsAuthorController.populateJavaRecipesAuthorList}" >Java 7 Recipes</h:commandLink>
                    <br/>
                    <br/>
                    <h:commandLink action="#{faceletsAuthorController.populateJavaEERecipesAuthorList}">Java EE 7 Recipes </h:commandLink>
                </h:form>
            </div>
            <div id="content" class="left_content">
                <ui:insert name="content">Content</ui:insert>
            </div>
        </div>
        <div id="bottom">
            Written by Josh Juneau, Apress Author
        </div>

    </h:body>

</html>
The h:dataTable component that is used to list the authors within the views of the Acme Bookstore application can now make use of the styles that are listed within styles.css. The following excerpt from the XHTML document named recipe04_03.xhtml demonstrates the h:dataTable component with the styles applied:
<h:dataTable id="authorTable" border="1" value="#{faceletsAuthorController.authorList}"
                                 styleClass="authorTable"
                                 rowClasses="authorTableOdd, authorTableEven"
                                 var="author">
        <f:facet name="header">
             Java 7 Recipes Authors
        </f:facet>
        <h:column>
                <h:commandLink id="authorName"
                    action="#{faceletsAuthorController.displayAuthor(author.last)}"
                     value="#{author.first} #{author.last}"/>
        </h:column>
    </h:dataTable>
The table should now look like Figure 4-6 when rendered on a page.
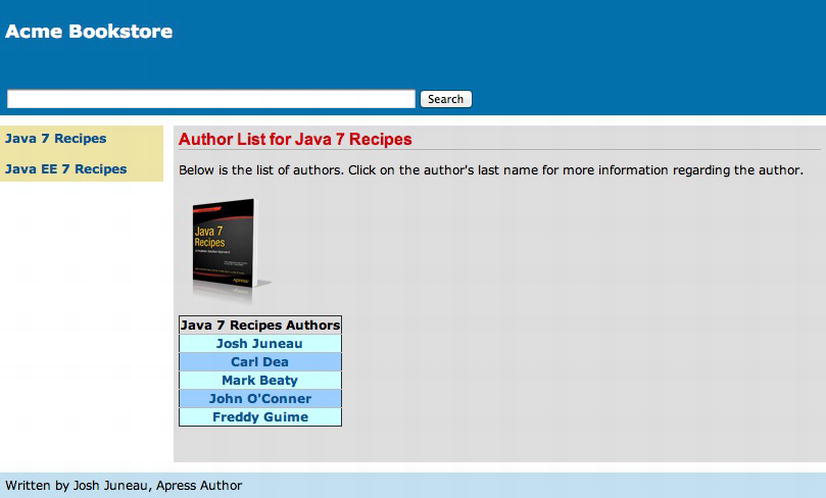
Figure 4-6. Author table with styles applied
How It Works
It is easy to add a resource to a JSF application because there is no need to worry about referring to a static path when declaring the resources. Since the release of JSF 2.0, the resources folder can be used to list subfolders, also known as libraries, into which the resources can be placed. The JSF components that can use resources now have the library attribute baked into them. This allows a specific library to be specified for such components so that the component will know where to find the resources that it requires.
To use the new resources folder, create a folder at the root of an application’s web directory and name it resources. That resources folder can then contain subfolders, which will become the libraries that can be utilized within the JSF components. For instance, subfolders can be named css and images, and then those names can be specified for the library attribute of JSF components that utilize such resources. In the example, cascading style sheets are placed into the resources/css folder, and then they are referenced utilizing the h:outputStylesheet component and specifying the css library as follows:
<h:outputStylesheet library="css" name="default.css"/>
Other resources can be placed within such libraries. The h:graphicImage component also contains the library attribute, so the images for the books can be moved into a folder named resources/image, and then the h:graphicImage tag can reference the image as such:
<h:graphicImage id="javarecipes"
                                    library="image" style="width: 100px; height: 120px"
                                    name="java7recipes.png"/>
It has always been a challenge referencing resource files from the pages of a web application. To do so, a developer needs to know the exact path to the resource, and sometimes the path can be broken if folder names are changed or if the application is deployed in a different server environment. The use of the resources folder in JSF 2.0 along with the new library attribute has greatly reduced the complexity of managing such resources.
4-4. Creating Reusable Templates That Act As Components
Problem
You want to encapsulate a component along with its validator and styling so that it can be reused in any JSF view within your application.
Solution
Create a new XHTML document that includes namespace declarations as required for use of the Facelets and JSF components, along with the Facelets tags required to create a composite component. The document can contain any valid JSF components or HTML markup needed to develop the component you desire. The Facelets tags that can be used to help develop composite components are <composite:interface> and <composite:implementation>. Any attributes that a component will accept will be declared within the <composite:interface> element, and the actual component implementation will be declared within the <composite:implementation> element. The component can then be used within another JSF view by declaring the namespace to the component XHTML document and then adding the component tag to the view. Let’s take a look at an example.
The example in this recipe contains a handful of source listings, each of which is required to construct and utilize the composite component. In this example, you’ll create a component that will act as a search mechanism for authors who have books within the Acme Bookstore. A user will be able to type the name of an author in order to search for their bio. The search component will include an h:inputText component for accepting the search text, an h:commandButton for submitting the search text to the managed bean, and an h:outputText component for displaying a message if the search is unsuccessful. The component will utilize its own JSF managed bean for providing the business logic that is required to perform the search activity. Once the component construction is completed, a simple JSF tag can be added to any page in order to include said search component.
Creating the Composite Component: search.xhtml
You’ll start by taking a look at the source for the composite component itself. The following code is for an XHTML document entitled search.xhtml, and it declares the composite component layout. The file should be saved into the resources folder within a JSF application, and for this example it is saved in the folder resources/components/util.
<?xml version='1.0' encoding='UTF-8' ?>
<!DOCTYPE html PUBLIC "-//W3C//DTD XHTML 1.0 Transitional//EN" "http://www.w3.org/TR/xhtml1/DTD/xhtml1-transitional.dtd">
<html xmlns="http://www.w3.org/1999/xhtml"
      xmlns:h="http://xmlns.jcp.org/jsf/html"
      xmlns:composite="http://xmlns.jcp.org/jsf/composite">

    <!—OPTIONAL INTERFACE -->
    < composite:interface>
        < composite:attribute name="searchAction" default="#{searchController.searchAuthors(completeAuthorController.completeAuthorList)}"
                      method-signature="java.lang.String action(java.util.List)"/>
    </ composite:interface>

    <!-- IMPLEMENTATION -->
    < composite:implementation>
        <h:form id="searchForm">
            <h:outputText id="error" value="#{searchController.errorText}"/>
            <br/>
            <h:inputText id="searchText" styleClass="searchBox" size="75" value="#{searchController.searchText}"/>

            <h:commandButton id="searchButton" value="Search" action="#{cc.attrs.searchAction}"/>

        </h:form>
    </ composite:implementation>
</html>
Managed Bean Controller for Composite Component: SearchController.java
Next, let’s look at the code for the JSF managed bean that is used for containing the business logic used for the component. The bean class is named SearchController.
package org.javaeerecipes.chapter04.recipe04_04;

import javax.faces.bean.RequestScoped;
import javax.faces.bean.ManagedBean;
import javax.faces.bean.ManagedProperty;
import org.javaeerecipes.chapter04.recipe04_01.Author;

/**
 * Recipe 4-4
 * @author juneau
 */
@ManagedBean(name = "searchController")
@RequestScoped
public class SearchController implements java.io.Serializable {

    private String searchText;
    private String errorText;

    @ManagedProperty(value="authorController")
    private AuthorController authorController;

    /**
     * Creates a new instance of SearchController
     */
    public SearchController() {

    }

    public String searchAuthors(List <Author> authorList){
        String fullName = null;
        String returnString = null;

        for (Author author: authorList){
            fullName = author.getFirst() + " " + author.getLast();
            if (author.getFirst().equalsIgnoreCase(searchText)){
                returnString = getAuthorController().displayAuthor(author.getLast());
            } else if (author.getLast().equalsIgnoreCase(searchText)){
                returnString = getAuthorController().displayAuthor(author.getLast());
            } else if (fullName.equalsIgnoreCase(searchText)){
                returnString = getAuthorController().displayAuthor(author.getLast());
            }
        }
        if(returnString == null){
            setErrorText("No Author Found");
            returnString = "recipe04_04a";
        }
        return returnString;
    }

    /**
     * @return the searchText
     */
    public String getSearchText() {
        return searchText;
    }

    /**
     * @param searchText the searchText to set
     */
    public void setSearchText(String searchText) {
        this.searchText = searchText;
    }

    /**
     * @return the authorController
     */
    public AuthorController getAuthorController() {
        return authorController;
    }

    /**
     * @param authorController the authorController to set
     */
    public void setAuthorController(AuthorController authorController) {
        this.authorController = authorController;
    }

    /**
     * @return the errorText
     */
    public String getErrorText() {
        return errorText;
    }

    /**
     * @param errorText the errorText to set
     */
    public void setErrorText(String errorText) {
        this.errorText = errorText;
    }
}
Managed Bean Controller: AuthorController.java
Note that the managed bean contains an annotation, @ManagedProperty, which has not yet been covered up to this point in the book. I’ll discuss that annotation a bit in the following section. Also note that in the composite component document, search.xhtml, another managed bean is referenced by the name of completeAuthorController. This managed bean is essentially the same as the JSF managed bean that was constructed in Recipe 4-1, with an added List declaration named completeAuthorList. This List is used to contain all of the Author objects for those who have books listed in the Acme Bookstore. The source listing for the updated AuthorContoller managed bean is as follows:
package org.javaeerecipes.chapter04.recipe04_04;

import org.javaeerecipes.chapter04.recipe04_01.*;
import java.io.Serializable;
import java.util.ArrayList;
import java.util.List;
import javax.annotation.ManagedBean;
import javax.enterprise.context.SessionScoped;
import javax.inject.Named;

/**
 * Recipe 4-4
 *
 * @author juneau
 */
@Named(value = "completeAuthorController")
@SessionScoped
@ManagedBean
public class AuthorController implements Serializable {

    private List <Author> authorList;
    private List <Author> completeAuthorList
    private String storeName = "Acme Bookstore";

    private String juneauBio =
            "Josh Juneau has been developing software"
            + " since the mid-1990s. PL/SQL development and database programming"
            + " was the focus of his career in the beginning, but as his skills developed,"
            + " he began to use Java and later shifted to it as a primary base for his"
            + " application development. Josh has worked with Java in the form of graphical"
            + " user interface, web, and command-line programming for several years. "
            + "During his tenure as a Java developer, he has worked with many frameworks"
            + " such as JSF, EJB, and JBoss Seam. At the same time, Josh has extended his"
            + " knowledge of the Java Virtual Machine (JVM) by learning and developing applications"
            + " with other JVM languages such as Jython and Groovy. His interest in learning"
            + " new languages that run on the JVM led to his interest in Jython. Since 2006,"
            + " Josh has been the editor and publisher for the Jython Monthly newsletter. "
            + "In late 2008, he began a podcast dedicated to the Jython programming language.";
    private String deaBio = "This is Carl Dea's Bio";
    private String beatyBio = "This is Mark Beaty's Bio";
    private String oConnerBio = "This is John O'Connor's Bio";
    private String guimeBio = "This is Freddy Guime's Bio";
    private Author current;
    private String authorLast;

    /**
     * Creates a new instance of RecipeController
     */
    public AuthorController() {
        populateJavaRecipesAuthorList();
        populateCompleteAuthorList();

    }

    public String populateJavaRecipesAuthorList() {

        authorList = new ArrayList <Author> ();
        authorList.add(new Author("Josh", "Juneau", juneauBio));
        authorList.add(new Author("Carl", "Dea", deaBio));
        authorList.add(new Author("Mark", "Beaty", beatyBio));
        authorList.add(new Author("John", "O'Conner", oConnerBio));
        authorList.add(new Author("Freddy", "Guime", guimeBio));
        return "recipe04_04a";
    }

    public String populateJavaEERecipesAuthorList() {
        System.out.println("initializng authors list");
        authorList = new ArrayList <Author>();
        authorList.add(new Author("Josh", "Juneau", juneauBio));
        return "recipe04_04b";

    }

    private String populateCompleteAuthorList() {

        setCompleteAuthorList(null);

        setCompleteAuthorList(new ArrayList <Author>());
        getCompleteAuthorList().add(new Author("Josh", "Juneau", juneauBio));
        getCompleteAuthorList().add(new Author("Carl", "Dea", deaBio));
        getCompleteAuthorList().add(new Author("Mark", "Beaty", beatyBio));
        getCompleteAuthorList().add(new Author("John", "O'Conner", oConnerBio));
        getCompleteAuthorList().add(new Author("Freddy", "Guime", guimeBio));
        return "recipe04_04a";
    }

    public String displayAuthor(String last) {
        for (Author author : authorList) {
            if (author.getLast().equals(last)) {
                current = author;
            }
        }
        return "recipe04_04c";
    }

    /**
     * @return the authorList
     */
    public List  <Author> getauthorList() {
        return authorList;
    }

    /**
     * @return the current
     */
    public Author getCurrent() {
        return current;
    }

    /**
     * @param current the current to set
     */
    public void setCurrent(Author current) {
        this.current = current;
    }

    /**
     * @return the authorLast
     */
    public String getAuthorLast() {
        return authorLast;
    }

    /**
     * @param authorLast the authorLast to set
     */
    public void setAuthorLast(String authorLast) {
        displayAuthor(authorLast);
    }

    /**
     * @return the storeName
     */
    public String getStoreName() {
        return storeName;
    }

    /**
     * @param storeName the storeName to set
     */
    public void setStoreName(String storeName) {
        this.storeName = storeName;
    }

    /**
     * @return the completeAuthorList
     */
    public List <Author> getCompleteAuthorList() {
        return completeAuthorList;
    }

    /**
     * @param completeAuthorList the completeAuthorList to set
     */
    public void setCompleteAuthorList(List <Author> completeAuthorList) {
        this.completeAuthorList = completeAuthorList;
    }
}
Utilizing the Composite Component: custom_template_search.xhtml
Now that all of the necessary sources have been written for the component, it can be utilized within a page. The Acme Bookstore would like to have the search component displayed at the top of each page, so you’ll add it to the site template that was created in Recipe 4-1. The following code shows the updated markup for the template, and it has been saved into an XHTML document named custom_template_search.xhtml in the same folder as the original template:
<?xml version='1.0' encoding='UTF-8' ?>
<!--
Book:  Java EE 7 Recipes
Recipe: 4-4
Author: J. Juneau
-->
<!DOCTYPE html PUBLIC "-//W3C//DTD XHTML 1.0 Transitional//EN" "http://www.w3.org/TR/xhtml1/DTD/xhtml1-transitional.dtd">
<html xmlns="http://www.w3.org/1999/xhtml"
      xmlns:ui="http://xmlns.jcp.org/jsf/facelets"
      xmlns:h="http://xmlns.jcp.org/jsf/html"
      xmlns:util="http://xmlns.jcp.org/jsf/composite/components/util">

    <h:head>
        <meta http-equiv="Content-Type" content="text/html; charset=UTF-8" />
        <h:outputStylesheet library="css" name="default.css"/>
        <h:outputStylesheet library="css" name="cssLayout.css"/>
        <h:outputStylesheet library="css" name="styles.css"/>
        <title>#{faceletsAuthorController.storeName}</title>
    </h:head>

    <h:body>

        <div id="top">
            <h2>#{faceletsAuthorController.storeName}</h2>
            <br/>
            <util:search id="searchAuthor"/>
        </div>
        <div>
            <div id="left">
                <h:form id="navForm">
                    <h:commandLink action="#{completeAuthorController.populateJavaRecipesAuthorList}" >Java 7 Recipes</h:commandLink>
                    <br/>
                    <br/>
                    <h:commandLink action="#{completeAuthorController.populateJavaEERecipesAuthorList}">Java EE 7 Recipes </h:commandLink>
                </h:form>
            </div>
            <div id="content" class="left_content">
                <ui:insert name="content">Content</ui:insert>
            </div>
        </div>
        <div id="bottom">
            Written by Josh Juneau, Apress Author
        </div>

    </h:body>

</html>
The search component is added to the template using the tag <s:search id="searchAuthor"/>, and it will now appear at the top of each page within the Acme Bookstore application. Figure 4-7 shows what the updated store application looks like.
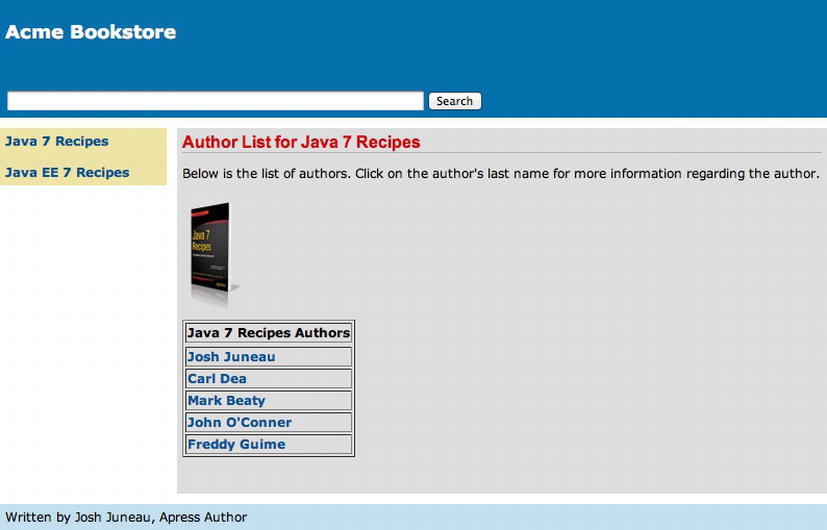
Figure 4-7. Acme bookstore layout with search component
![]() Note As of the release of JSF 2.2 with Java EE 7, it is possible to create composite components using Java code only with no markup.
Note As of the release of JSF 2.2 with Java EE 7, it is possible to create composite components using Java code only with no markup.
How It Works
Creating JSF components has been a boon for the JSF technology because it allows portions of web views to be saved and reused in many places. The problem is that creating JSF components has always been a bit of a daunting task because there is quite a bit of work required to develop custom JSF components. However, when JSF 2.0 came about, the Facelets view definition language was baked in, and it included the ability to save portions of JSF views into their own components by utilizing the Facelets ui:component tag. Such components are referred to as composite components. Composite components are easy to develop and include most of the functionality that is required for standard application use.
The development of composite components consists of the creation of a separate XHTML document to contain the composite component layout, as well as an optional managed bean controller for containing any business logic that the composite component requires. In the example, an XHTML document entitled search.xhtml contains the layout for the composite component. The Facelets view definition language contains a handful of tags that can be useful for developing composite components. To use them, the required namespace must be declared within the composite component XHTML document. The following code excerpt from the search.xhtml document shows the declaration:
<html xmlns="http://www.w3.org/1999/xhtml"
      xmlns:h="http://xmlns.jcp.org/jsf/html"
      xmlns:composite"http://xmlns.jcp.org/jsf/composite">
![]() Note JSF views that use composite components are referred to as using views.
Note JSF views that use composite components are referred to as using views.
As specified in the example namespace declaration, a prefix, such as composite, can be used to reference the Facelets tags for creating composite components by declaring the prefix in the namespace. As such, the composite:interface and composite:implementation tags are useful for developing composite components, and they are used in the example. The composite:interface tag is optional as of JSF 2.2, and it can be used to specify any attributes that the component should be able to accept. In the example, an attribute by the name of searchAction is declared within the composite:interface elements. This attribute contains a default value and a method-signature, and it can be specified within a using view to override the default implementation method for the search component. Since the attribute specifies a default value, it is not required for the component’s use within a view.
<composite:interface>
        <composite:attribute name="searchAction" default="#{searchController.searchAuthors(completeAuthorController.completeAuthorList)}"
                      method-signature="java.lang.String action(java.util.List)"/>
</cc:interface>
Any number of attributes can be declared for a component, and if the attribute is used to specify a value rather than a method, then the method-signature attribute for the composite:interface tag does not have to be present. For instance, to declare an attribute that accepts a particular value for the name of a label, you may include an attribute such as the following:
<composite:attribute name="searchLabel" default="searchComponent"/>
The implementation for a composite component should be defined between opening and closing composite:implementation tags. The composite component in the example includes an h:form that will be used to submit search text to the SearchController managed bean. The composite component implementation also includes three JSF components: h:inputText to accept the search text, h:commandButton to invoke the searchAuthors method, and h:outputText to display a message if the search fails.
<composite:implementation>
        <h:form id="searchForm">
            <h:outputText id="error" value="#{searchController.errorText}"/>
            <br/>
            <h:inputText id="searchText" styleClass="searchBox" size="75" value="#{searchController.searchText}"/>

            <h:commandButton id="searchButton" value="Search" action="#{cc.attrs.searchAction}"/>

        </h:form>
</composite:implementation>
The action that is specified for the h:commandButton is #{cc.attrs.searchAction}, and this corresponds to the searchAction attribute that was defined within the composite:interface element within the composite component view. Any attribute that is defined within the view can be referenced using the cc.attrs prefix. The word cc in JavaServer Faces is a reserved identifier for use with composite components. The cc.attrs identifier can be used to access composite component attributes. The default method that will be specified for the searchAction attribute in the example is #{searchController.searchAuthors}, but a using view can specify another method if needed. The value for both the h:inputText and h:outputText components within the composite component implementation are properties that are exposed from the SearchController managed bean class.
The SearchController managed bean class encapsulates the business logic for the search component. Within the class, an @ManagedProperty annotation is specified. The @ManagedProperty annotation is used to inject a value into the annotated property. In the example, the AuthorController managed bean is injected, so now any of the public fields or methods contained within AuthorController can be utilized from within the SearchController managed bean. The properties searchText and errorText are declared within the bean, and they are used within the component for setting the search text and displaying an error message, respectively. When the composite component’s h:commandButton is clicked, the searchAuthors method is invoked, passing the complete list of authors, completeAuthorList, from the AuthorController managed bean. Taking a look at the method, it goes through each Author object within the complete author list and evaluates whether the searchText matches either the first, last, or full name of any author. If so, the AuthorController’s displayAuthor method is invoked, passing the last field for the matching Author object, returning a String for the view name that should be rendered next. If the searchText does not match any of the Author objects, then the errorText property is populated with an error message, and the view named recipe04_04a.xhtml is displayed.
To use the composite component within a view, the XML namespace for the composite component must be declared and assigned a prefix. After doing so, the name of the composite component XHTML document should be specified as the tag name, followed by any attributes that are required. In the example, the namespace is declared as follows:
<html xmlns="http://www.w3.org/1999/xhtml"
      xmlns:ui="http://xmlns.jcp.org/jsf/facelets"
      xmlns:h="http://xmlns.jcp.org/jsf/html"
      xmlns:util"http://xmlns.jcp.org/jsf/composite/components/util">
The composite component can then be utilized within the page as follows:
<util:search id="searchAuthor"/>
Developing components for use within JSF applications has never been easier. The Facelets ui:component tag has certainly made component creation much easier on developers and allows for the reuse of view fragments throughout JSF applications.
4-5. Handling Variable-Length Data on a Page
Problem
You are interested in iterating over a collection of data using a technique other than an h:dataTable component because you want to use standard HTML table markup for each row and column of the table.
Solution
Use the Facelets ui:repeat tag for iterating over a collection of data rather than the h:dataTable component. Doing so allows for the same style of collection iteration, but it does not force the use of the h:dataTable component elements. For this recipe, the Acme Bookstore application has been rewritten so that it now contains the ability to list each author’s books separately on their bio page. When an author name is chosen from the book listing or when an author is searched, then the bio page will appear, and the author’s bio is displayed along with each of the books that the author has written.
![]() Note The example for this recipe has been rewritten to make the application more robust. A new Book class has been created so that each book is now its own object. The Author class has been rewritten so that one or more Book objects can now be added to each Author object. The AuthorController has been rewritten so that the new Book and Author objects can be used to populate the author listing tables, and a new method has been added that allows for the initialization of each Book and Author object. To use the new classes, the application template (custom_template_neworg.xhtml), search component (search_neworg.xhtml), and each of the application views (recipe04_05a.xhtml, recipe04_05b.xhtml, recipe04_05c.xhtml) have been rewritten. Please refer to the sources in the org.javaeerecipes.chapter04.recipe04_05 package and the recipe’s corresponding XHTML documents for complete listings.
Note The example for this recipe has been rewritten to make the application more robust. A new Book class has been created so that each book is now its own object. The Author class has been rewritten so that one or more Book objects can now be added to each Author object. The AuthorController has been rewritten so that the new Book and Author objects can be used to populate the author listing tables, and a new method has been added that allows for the initialization of each Book and Author object. To use the new classes, the application template (custom_template_neworg.xhtml), search component (search_neworg.xhtml), and each of the application views (recipe04_05a.xhtml, recipe04_05b.xhtml, recipe04_05c.xhtml) have been rewritten. Please refer to the sources in the org.javaeerecipes.chapter04.recipe04_05 package and the recipe’s corresponding XHTML documents for complete listings.
The ui:repeat tag is used to iterate over a collection of the selected author’s books within the author bio view, named recipe04_05c.xhtml. The author bio page can be reached by selecting an author from a listing of authors or searching for an author using the search component. The following code shows the view, recipe04_05c.xhtml, which is the bio view:
<?xml version="1.0" encoding="UTF-8"?>
<!--
Book:  Java EE 7 Recipes
Recipe: 4-5
Author: J. Juneau
-->
<!DOCTYPE html PUBLIC "-//W3C//DTD XHTML 1.0 Strict//EN" "http://www.w3.org/TR/xhtml1/DTD/xhtml1-strict.dtd">
<html xmlns="http://www.w3.org/1999/xhtml"
      xmlns:f="http://xmlns.jcp.org/jsf/core"
      xmlns:ui="http://xmlns.jcp.org/jsf/facelets"
      xmlns:h="http://xmlns.jcp.org/jsf/html">
    <h:head>
        <meta http-equiv="Content-Type" content="text/html; charset=UTF-8"/>
        <title>Recipe 4-5: Facelets Page Template</title>
    </h:head>
    <h:body>
        <ui:composition template="./layout/custom_template_search_neworg.xhtml">
            <ui:define name="content">
                <h:form id="componentForm">
                    <h1>#{uiRepeatAuthorController.current.first} #{uiRepeatAuthorController.current.last}</h1>
                    <p>
                        #{uiRepeatAuthorController.current.bio}
                    </p>

                    <br/>
                    <h1>Author's Books</h1>
                   <table>
                    <ui:repeat id="bookList" var="book" value="#{uiRepeatAuthorController.current.books}">
                        <tr>
                            <td>
                                <h:graphicImage id="bookImage"
                                                library="image"
                                                style="width: 100px; height: 120px" name="#{book.image}"/>
                            </td>
                        </tr>
                        <tr>
                            <td>
                                <strong>#{book.title}</strong>
                            </td>
                        </tr>
                    </ui:repeat>
                   </table>
                </h:form>
            </ui:define>

        </ui:composition>
    </h:body>
</html>
Each Author object contains a list of books that an author has written, and when the bio page is rendered, it looks like Figure 4-8, displaying the list of books that the author has written using the ui:repeat tag.
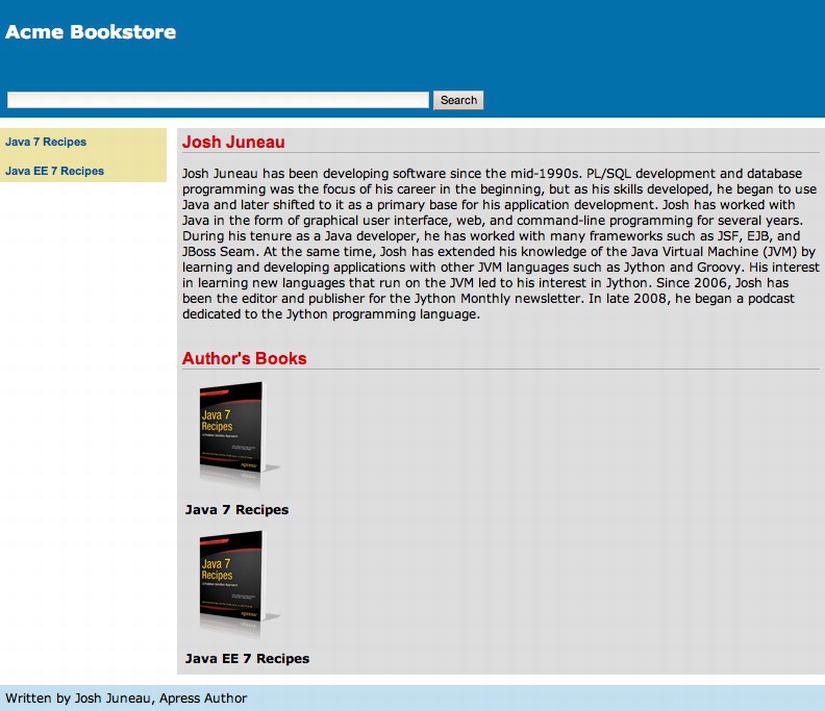
Figure 4-8. Displaying a collection of objects with ui:repeat
How It Works
The Facelets ui:repeat tag is a nice alternative to the h:dataTable component if you need to have more control over the HTML table that is rendered. The h:dataTable component is powerful in that it makes it easy to iterate over a collection of objects and display them within a page. However, sometimes it is useful to control the layout a bit more, and ui:repeat provides that level of control.
The ui:repeat tag has a handful of attributes that need to be specified in order to bind the tag to a collection of data within a managed bean. Specifically, the value and var attributes, much like those of the h:dataTable component, are used to specify the collection to iterate over and the variable that will be used to refer to a single object within the collection, respectively. In the example, the value attribute is set to #{uiRepeatAuthorController.current.books}, which is a collection of Book objects that is attached to the currently selected Author, and the var attribute is set to the value book.
The markup and JSF tags placed between the opening and closing ui:repeat tags will be processed for each iteration over the collection of objects. In the example, two table rows are placed inside ui:repeat; one row contains the book cover image, and the other contains the name of the book. The Book object fields are referenced within ui:repeat using the value of the var attribute, book.
In the example for this recipe, the views that display the complete author list for each of the books use a List named authorList. The authorList is declared within the AuthorController managed bean and populated with Author objects. When an author is selected from the list, the displayAuthor method within AuthorController is invoked, which populates the current Author object. Let’s take a look at the AuthorController for this recipe, which has been rewritten since its use within previous recipes.
package org.javaeerecipes.chapter04.recipe04_05;

import org.javaeerecipes.chapter04.recipe04_04.*;
import org.javaeerecipes.chapter04.recipe04_01.*;
import java.io.Serializable;
import java.util.ArrayList;
import java.util.List;
import javax.annotation.ManagedBean;
import javax.enterprise.context.SessionScoped;
import javax.inject.Named;

/**
 * Recipe 4-5
 *
 * @author juneau
 */
@Named(value = "uiRepeatAuthorController")
@SessionScoped
@ManagedBean
public class AuthorController implements Serializable {

    private List <Author> authorBookList;
    private List <Author> authorList;
    private List <Author> completeAuthorList;
    private String storeName = "Acme Bookstore";

    private String juneauBio =
            "Josh Juneau has been developing software"
            + " since the mid-1990s. PL/SQL development and database programming"
            + " was the focus of his career in the beginning, but as his skills developed,"
            + " he began to use Java and later shifted to it as a primary base for his"
            + " application development. Josh has worked with Java in the form of graphical"
            + " user interface, web, and command-line programming for several years. "
            + "During his tenure as a Java developer, he has worked with many frameworks"
            + " such as JSF, EJB, and JBoss Seam. At the same time, Josh has extended his"
            + " knowledge of the Java Virtual Machine (JVM) by learning and developing applications"
            + " with other JVM languages such as Jython and Groovy. His interest in learning"
            + " new languages that run on the JVM led to his interest in Jython. Since 2006,"
            + " Josh has been the editor and publisher for the Jython Monthly newsletter. "
            + "In late 2008, he began a podcast dedicated to the Jython programming language.";
    private String deaBio = "This is Carl Dea's Bio";
    private String beatyBio = "This is Mark Beaty's Bio";
    private String oConnerBio = "This is John O'Connor's Bio";
    private String guimeBio = "This is Freddy Guime's Bio";
    private Author current;
    private String authorLast;

    /**
     * Creates a new instance of RecipeController
     */
    public AuthorController() {
        populateAuthors();
        populateJavaRecipesAuthorList();
        populateCompleteAuthorList();
    }

    private void populateAuthors(){

        Book book1 = new Book("Java 7 Recipes", "java7recipes.png");
        Book book2 = new Book("Java EE 7 Recipes", "javaEE 7recipes.png");
        Book book3 = new Book("Java FX 2.0: Introduction By Example", "javafx.png");
        authorBookList = new ArrayList <Author>();

        Author author1 = new Author("Josh", "Juneau", juneauBio);
        author1.addBook(book1);
        author1.addBook(book2);
        authorBookList.add(author1);

        Author author2 = new Author("Carl", "Dea", deaBio);
        author2.addBook(book1);
        author2.addBook(book3);
        authorBookList.add(author2);

        Author author3 = new Author("Mark", "Beaty", beatyBio);
        author3.addBook(book1);
        authorBookList.add(author3);

        Author author4 = new Author("John", "O'Conner", oConnerBio);
        author4.addBook(book1);
        authorBookList.add(author4);

        Author author5 = new Author("Freddy", "Guime", guimeBio);
        author5.addBook(book1);
        authorBookList.add(author5);
    }

    /**
     * Searches through all Author objects and populates the authorList
     * with only those authors who were involved with the Java 7 Recipes book
     * @return
     */
    public String populateJavaRecipesAuthorList() {
        authorList = new ArrayList<>();
        for(Author author:authorBookList){
            List<Book>books = author.getBooks();
            for(Book book:books){
                if(book.getTitle().equals("Java 7 Recipes")){
                    authorList.add(author);
                }
            }
        }

        return "recipe04_05a";
    }

    /**
     * Searches through all Author objects and populates the authorList
     * with only those authors who were involved with the Java EE 7 Recipes book
     * @return
     */
    public String populateJavaEERecipesAuthorList() {
        authorList = new ArrayList<>();
        for(Author author:authorBookList){
            List<Book>books = author.getBooks();
            for(Book book:books){
                if(book.getTitle().equals("Java EE 7 Recipes")){
                    authorList.add(author);
                }
            }
        }
        return "recipe04_05b";

    }

    /**
     * Populates completeAuthorList with each existing Author object
     * @return
     */
    private void populateCompleteAuthorList() {
        completeAuthorList = new ArrayList();
        for(Author author:authorBookList){
            completeAuthorList.add(author);
        }

    }

    public String displayAuthor(String last) {
        for (Author author : authorList) {
            if (author.getLast().equals(last)) {
                current = author;
            }
        }
        return "recipe04_05c";
    }

    /**
     * @return the authorList
     */
    public List getauthorList() {
        return authorList;
    }

    /**
     * @return the current
     */
    public Author getCurrent() {
        return current;
    }

    /**
     * @param current the current to set
     */
    public void setCurrent(Author current) {
        this.current = current;
    }

    /**
     * @return the authorLast
     */
    public String getAuthorLast() {
        return authorLast;
    }

    /**
     * @param authorLast the authorLast to set
     */
    public void setAuthorLast(String authorLast) {
        displayAuthor(authorLast);
    }

    /**
     * @return the storeName
     */
    public String getStoreName() {
        return storeName;
    }

    /**
     * @param storeName the storeName to set
     */
    public void setStoreName(String storeName) {
        this.storeName = storeName;
    }

    /**
     * @return the completeAuthorList
     */
    public List <Author> getCompleteAuthorList() {
        return completeAuthorList;
    }

    /**
     * @param completeAuthorList the completeAuthorList to set
     */
    public void setCompleteAuthorList(List <Author> completeAuthorList) {
        this.completeAuthorList = completeAuthorList;
    }
}
When displayAuthor is invoked, the current Author object is populated with the currently selected author, and the bio page is rendered. The bio page source is listed in the solution to this recipe. Each Author object contains a List of Book objects that correspond to the books that particular author has written. The ui:repeat tag is used to iterate over this list of books.
The ui:repeat tag can be effective in various use cases. When deciding to use h:dataTable or ui:repeat, it is best to determine whether customization is going to be imperative. For those situations where more control is desired, ui:repeat is certainly the best choice.
Problem
You are running into view issues and want to perform some debugging on your view layout.
Solution
Insert the ui:debug tag into the JSF view that you want to debug. One of the JSF views for the Acme Bookstore has been rewritten to include the ui:debug tag. The source for the view is as follows:
<?xml version='1.0' encoding='UTF-8' ?>
<!--
Book:  Java EE 7 Recipes
Recipe: 4-6
Author: J. Juneau
-->
<!DOCTYPE html PUBLIC "-//W3C//DTD XHTML 1.0 Transitional//EN" "http://www.w3.org/TR/xhtml1/DTD/xhtml1-transitional.dtd">
<html xmlns="http://www.w3.org/1999/xhtml"
      xmlns:ui="http://xmlns.jcp.org/jsf/facelets"
      xmlns:f="http://xmlns.jcp.org/jsf/core"
      xmlns:h="http://xmlns.jcp.org/jsf/html">

    <body>

        <ui:composition template="./layout/custom_template_search_neworg.xhtml">
            <ui:define name="content">
                <ui:debug/>
                <h:form id="componentForm">
                    <h1>Author List for Java 7 Recipes</h1>
                    <p>
                        Below is the list of authors.  Click on the author's last name
                        for more information regarding the author.
                    </p>

                    <h:graphicImage id="javarecipes" style="width: 100px; height: 120px" url="../images/java7recipes.png"/>
                    <br/>
                    <h:dataTable id="authorTable" border="1" value="#{uiRepeatAuthorController.authorList}"
                                 var="author">
                        <f:facet name="header">
                            Java 7 Recipes Authors
                        </f:facet>
                        <h:column>
                            <h:commandLink id="authorName" action="#{uiRepeatAuthorController.displayAuthor(author.last)}"
                                           value="#{author.first} #{author.last}"/>
                        </h:column>
                    </h:dataTable>
                    <br/>
                    <br/>
                </h:form>
            </ui:define>
        </ui:composition>

    </body>
</html>
Once the view has been rendered in a browser, pressing the Ctrl+Shift+D keys will bring up a debug window for the page that looks like Figure 4-9.
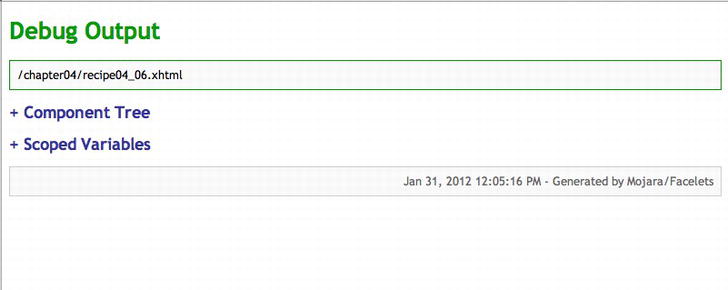
Figure 4-9. The ui:debug output window
How It Works
Debugging JSF views can sometimes prove to be frustrating, especially if there is an issue within some JSF EL within the view. Facelets provides a convenient tool known as ui:debug that helps satisfy the requirement of debugging troubled JSF views. To use the tool, add the ui:debug tag to the JSF view that you want to debug. In most environments, it can be most useful to add the tag to the application template so that each template client view inherits the tag. When the view is rendered in a browser, press the Ctrl+Shift+D keys to open the debug window for the view. The debug window contains a lot of information regarding the current state of the component tree, as well as the scoped variables within the application.
The ui:debug tag contains a rendered attribute that can be used to determine when the tag should be included in the view. For instance, an EL expression can be used for the rendered attribute to signify whether the environment is in development or production, returning a Boolean value that either renders the tag or not. The ui:debug tag also includes a hotkey attribute, which can be used to change the key that is pressed along with Ctrl+Shift in order to open the debug window. By default, the hot key is D, which stands for “debug.”
4-7. Writing a Custom Resolver for Locating Facelets Templates and Resources
Problem
You want to enable your application to have the ability to locate Facelets resource files from an external JAR. This would allow you to package all resources within a single JAR that could be used by a suite of your applications.
Solution
Package your resources into a JAR file or WAR file, and then write a custom ResourceResolver class to locate those resources. FacesServlet will then use the custom resolver class to find the Facelets files you request. The following source listing, for a class named FaceletsResourceResolver, can be used to resolve the URL to the resource you require rather than using the native Facelets ResourceResolver.
package org.javaeerecipes.chapter04.recipe04_07;


import java.net.URL;
import javax.faces.view.facelets.ResourceResolver;
/**
 * Recipe 4-7
 * @author juneau
 */
@FaceletsResourceResolver
public class FaceletsResourceResolver extends ResourceResolver {

    private ResourceResolver parent;

    public FaceletsResourceResolver(ResourceResolver parent) {
        this.parent = parent;
    }

    @Override
    public URL resolveUrl(String path) {
        System.out.println("Resolving URL " + path);
        URL url = parent.resolveUrl(path);
        if (url == null) {

            if (path.startsWith("/")) {
                path = path.substring(1);
            }
            url = Thread.currentThread().getContextClassLoader().
                    getResource(path);
        }
        return url;
    }

}
When the application is redeployed, the new FaceletsResourceResolver class will be used to resolve the URL for accessing resources, rather than the default resolver.
How It Works
Sometimes it makes sense to package resources into a JAR or WAR file so that they can be shared across multiple applications or with a number of different developers. The problem is that simply adding the JAR or WAR file to the application CLASSPATH will not allow for such resources to become accessible to the application. You must write a custom resource resolver in order to find the path to the custom resource, rather than relying upon the default resolver.
To write a resolver class, extend the ResourceResolver abstract class, and override the resolveUrl(String) method with the custom resolver implementation. The custom implementation should search the CLASSPATH for the resource and return a URL that corresponds to the resource’s location. To register the resolver with Facelets, you can annotate the class using the @FaceletsResourceResolver annotation or modify the web.xml deployment descriptor (as described in the following note).
![]() Note Prior to JSF 2.2, a Facelets ResourceResolver had to be manually configured within the web.xml deployment descriptor. The ability to annotate the class with the @FaceletsResourceResolver was a new feature of Java EE 7 and JSF 2.2. It is good to note that if you have a resource resolver defined via an annotation and also via web.xml, the resolver defined within the web.xml file will take precedence.
Note Prior to JSF 2.2, a Facelets ResourceResolver had to be manually configured within the web.xml deployment descriptor. The ability to annotate the class with the @FaceletsResourceResolver was a new feature of Java EE 7 and JSF 2.2. It is good to note that if you have a resource resolver defined via an annotation and also via web.xml, the resolver defined within the web.xml file will take precedence.
If you are using JSF 2.1 or earlier, then to manually configure the ResourceResolver for the example in this recipe, place the following lines of XML into the web.xml deployment descriptor:
<context-param>

   <param-name>facelets.RESOURCE_RESOLVER</param-name>

   <param-value>org.javaeerecipes.chapter04.recipe04_07.FaceletsResourceResolver</param-value>

</context-param>