
![]()
Oracle’s GlassFish
The Oracle GlassFish application server is the industry standard for Java EE. GlassFish is the reference implementation for Java EE, so it contains more up-to-date features than any other Java application server available. Although plenty of excellent application server choices are available, GlassFish is the best choice for those who want to utilize the most current implementations in the Java EE space. It is a fully featured and easy-to-manage application server, making it a powerful choice for deploying modern and robust Java EE applications.
This chapter will cover some basic features of Oracle’s GlassFish, such as installing and deploying applications. It also contains recipes covering some of the most widely used features, as well as a recipe or two geared toward security within GlassFish application deployments. After reading these recipes, you should be comfortable working with the server and utilizing some of its most important features.
11-1. Installing the GlassFish Application Server
Problem
You want to install Oracle’s GlassFish application server for Java EE 7 development on your machine.
Solution #1
Download a GlassFish v4 ZIP archive from the site http://glassfish.java.net, and unzip the contents of the archive onto your operating system. If you are looking for the most current development releases of GlassFish, visit the download section of the project page and see the Work In Progress project. For the purposes of this recipe example, let’s assume you are going to install the Glassfish v4 server into a directory named /JAVA_DEV/Glassfish on *nix systems or named C:JAVA_DEVGlassfish on Windows.
Once you have downloaded and unzipped the archive, you are ready to begin the installation process. The unzipped archive will be in a root directory named glassfish3. Copy the glassfish4 directory and all of its contents into the /JAVA_DEV/Glassfish directory. You are now ready to begin configuring your GlassFish application server.
Solution #2
Download a GlassFish v4 executable for the operating system of your choice from the site http://glassfish.java.net. If you are looking for the most current development releases of GlassFish, visit the download section of the project page and see the Work In Progress project. For the purposes of this recipe example, let’s assume you are going to install the GlassFish v4 server into a directory named /JAVA_DEV/Glassfish on *nix systems or named C:JAVA_DEVGlassfish on Windows.
Once you have downloaded the executable, you can double-click it to start the installation wizard. When the wizard launches, you will see a series of splash screens indicating that Java is extracting the installation files, and then you will be greeted with an Introduction screen. After reading the introduction, click the Next button to proceed. Upon clicking the button, the Installation Type screen will appear (Figure 11-1), giving you a choice between a typical or custom installation. At this point and for developmental purposes, it is best to choose Typical Installation.
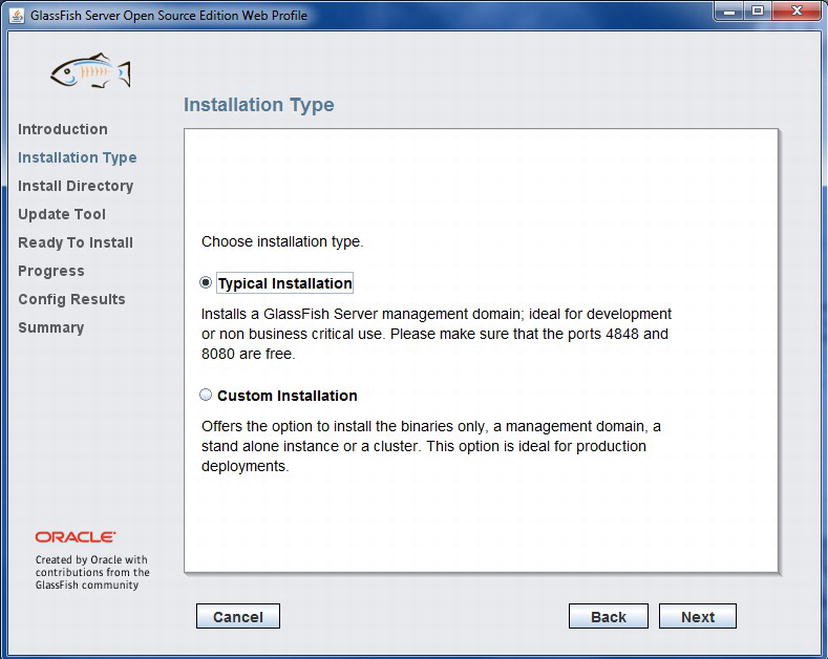
Figure 11-1 . Installation type selection
After choosing the installation type, click the Next button to advance to the Install Directory screen (Figure 11-2), which will allow you to choose a directory in which to install the application server.
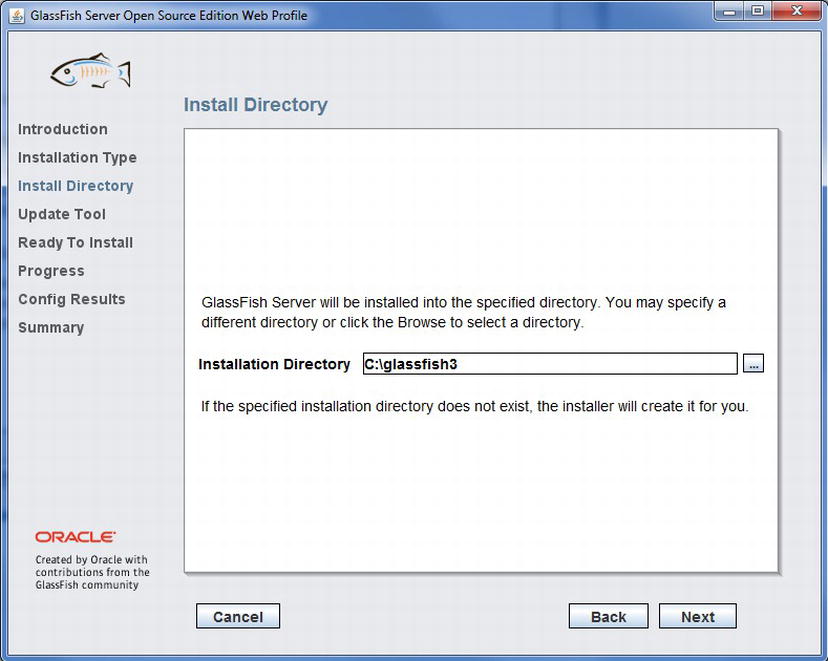
Figure 11-2 . Install Directory screen
Once you’ve specified the installation directory, click the Next button to proceed to the Update Tool screen (Figure 11-3). This screen provides you with the option to install the update tool, which periodically checks for GlassFish server updates on your behalf. You can optionally configure a proxy host and port on this screen.
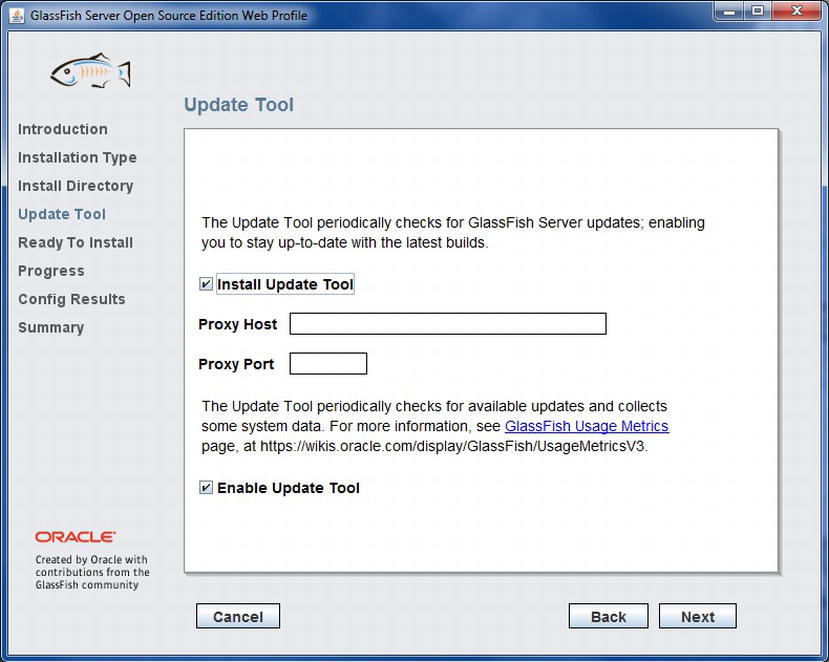
Figure 11-3 . Update Tool screen
After completing the update tool configuration, click the Next button to proceed to the installation. The Ready To Install screen will display all the options that will be installed when you click the Install button. If everything looks as expected, click the Install button to proceed. At this point, the installer screen will display the installation process, along with messages if any issues are encountered along the way. Once the installation is complete, the Config Results (Figure 11-4) screen will appear, displaying the domain configurations.
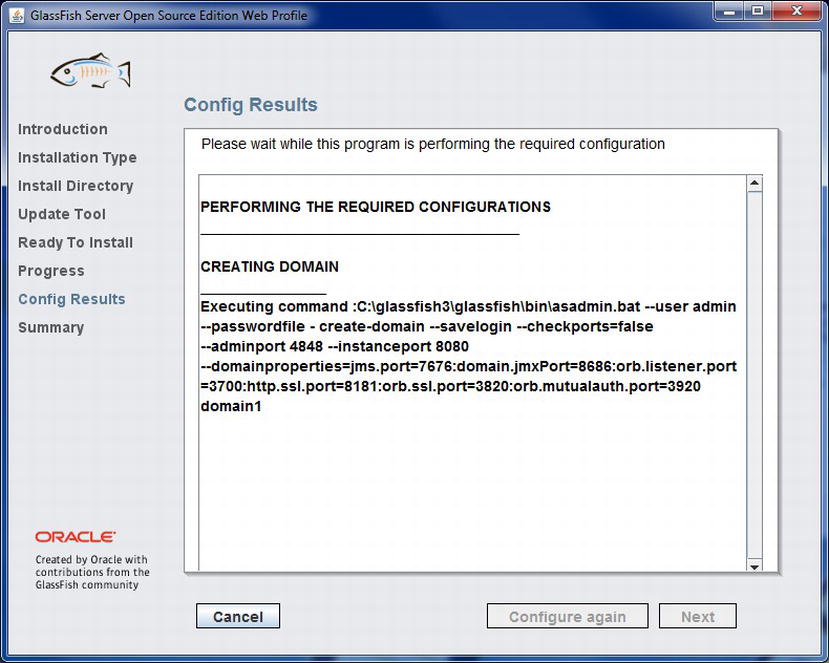
Figure 11-4 . Config Results screen
After clicking the Next button, a summary of the installation will be displayed. At this point, you will be ready to begin using your newly installed GlassFish application server.
How It Works
The GlassFish application server can be installed in a couple of ways. The easiest technique is to simply download the ZIP archive and unzip it into the directory of your choice, as covered in the first solution to this recipe. Once this is completed, you are ready to begin configuring your server environment. The first step of configuring your environment should be to change the default administrator password, which is outlined in Recipe 11-3. However, if you are anxious to test your environment, then you can traverse into the /JAVA_DEV/Glassfish/glassfish4/bin directory and start the server using the following command:
*nix and OS X:
./asadmin start-domain domain1
Windows:
asadmin start-domain domain1
![]() Note Do not start the application server without first changing the administrator password unless you are on an operating system with a firewall configuration. For more information on changing the administrator user password, please see Recipe 11-3.
Note Do not start the application server without first changing the administrator password unless you are on an operating system with a firewall configuration. For more information on changing the administrator user password, please see Recipe 11-3.
If you prefer to install the software using a graphical user interface, you can download an executable for any of the major OS platforms (Windows, Linux, Unix, OS X) from the GlassFish web site, as outlined in Solution #2 for this recipe. The installation wizard will walk you through some preliminary configurations and the installation process. One benefit of using the installation wizard is that you have an opportunity to configure certain aspects of your GlassFish application server, such as the update tool, without delving into any XML files before your server domain is started. If you perform the manual ZIP installation, then you must either work in the XML files to configure your server before starting it or start the server and log into the administrative console to start configuring.
11-2. Logging into the Administrative Console
Problem
You want to have the ability to configure your GlassFish v4 environment.
Solution
Start your GlassFish server and then point your browser to the administrative console URL. By default, the URL is http://localhost:4848, but if you changed the settings within the domain.xml configuration file or have more than one GlassFish server installed on your machine, then that port number may vary. Once you have opened the administrative console URL, you will be greeted with a login screen, as shown in Figure 11-5. Enter the user name and password of the GlassFish administrative user in order to log in. By default, the user name is admin, and the password is adminadmin. However, you should change this as soon as possible! See Recipe 11-3 for more details on how to change the administrative password.
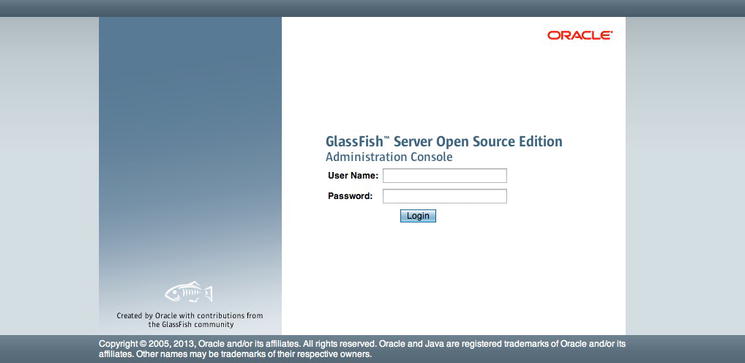
Figure 11-5 . GlassFish administrative console login
Once you’ve entered the correct user name and password combination, then you will be brought to the main GlassFish administrative console screen (Figure 11-6), where you can select the specific area of the application that you want to configure.
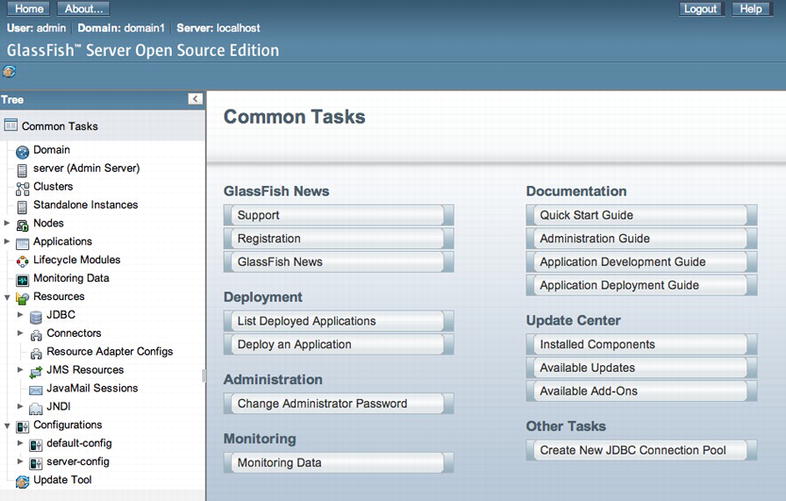
Figure 11-6 . GlassFish administrative console main screen
How It Works
The first step in setting up an application server environment is to install it. However, that is only the very beginning of the application server adventure. The very next step after installing the server environment should be to configure some basic settings, such as changing the administrative user password and setting up database connection pools for your applications. The GlassFish administration console is the hub of configuration for your GlassFish application server. Virtually all security, database, messaging, and application-specific configurations occur within the administration console. This section will provide you with a brief overview of the most commonly used screens within the GlassFish administrative console.
Once you log into the console, you will be greeted with a tree menu on the left side of the screen, which contains menu options for each of the console subsections. The right side of the screen will contain a Common Tasks panel, which displays links for support, registration, and news, along with links to some of the most commonly used subforms within the console. You’ll also see the option to view installed components and available updates and add-ons, which is a good panel to visit frequently to learn about possible updates and add-ons for the server. Of course, the documentation for GlassFish is extremely important, and you will also find links to the various pieces of documentation within the Common Tasks panel.
The Domain menu option opens a panel that contains tabbed forms for making domain-level changes, as shown in Figure 11-7. When you install GlassFish, the default domain is known as domain1, but you can create domains by different names if you’d like. Configurations for how applications are autodeployed, reloaded, and so on, can be found on the Applications Configuration tab of the Domain panel, and you can change the administrator password within that panel as well (see Recipe 11-3 for details).

Figure 11-7 . Domain panel
The “server (Admin Server)” menu option is one of the most important options available. Clicking that menu option will open a tabbed panel containing information regarding your server, the JVM, resources, and properties. You can stop or restart the application server instance from this panel, and you can also view and manage the server logs from here. Figure 11-8 displays the General Information panel, which is displayed when clicking the “server” menu option.
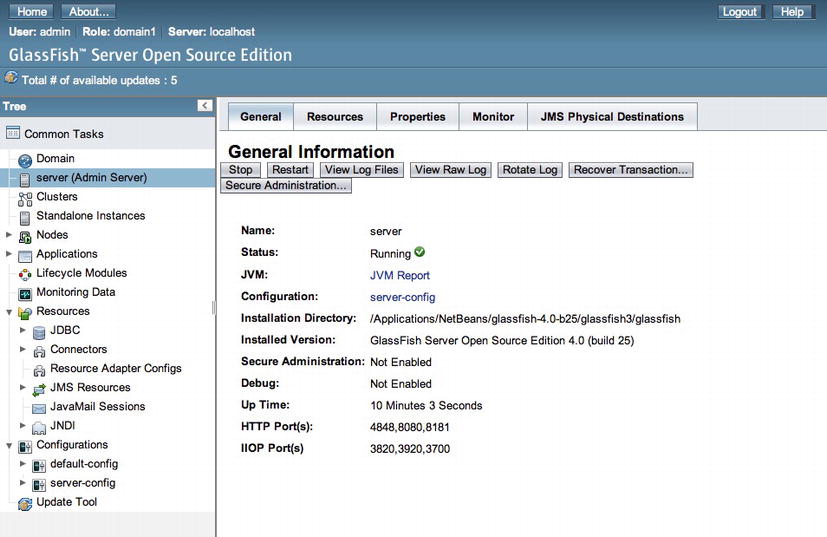
Figure 11-8 . General Information panel
The Applications menu option allows you to view any applications that are currently deployed to the server. You can also deploy new applications from this panel, as well as undeploy, enable, or disable existing applications. If there comes a need to redeploy or reload an existing application, the panel also provides easy access to perform those activities. The Applications panel (as shown in Figure 11-9) will most likely become one of the most commonly visited menu options as you work with GlassFish.
The Resources menu contains several submenu options that are useful for configuring resources that can be utilized by your applications. From database resources to Java Messaging and JavaMail sessions, the Resources section provides the ability to make enterprise features available to applications deployed within the server. You will learn more about configurations for these resources in later recipes.
The Configurations menu provides the ability to tweak the server’s JVM settings, logging, web and EJB containers, security, network services, and more. This is the area of the administration console that allows customization of the server itself in order to provide the best settings for your environment. For instance, if you want to implement special options for the application server’s JVM, this is the place to do that. If you want to set up authentication for your applications using JDBC or LDAP (Recipe 11-6), then this can be done in the Configurations section as well. GlassFish provides the ability to fine-tune the application server, making it truly conform to the environment, and the console makes it easy to apply the customizations.
Although any of the GlassFish features can be changed by manually updating XML configuration files, the GlassFish administration console provides developers and administrators with an easy way to see the server configurations and change pieces to suit the needs of the environment. It also provides a central location for viewing information about the server, its applications, and the resources available for use by the server applications. The GlassFish administration console is a one-stop shop for all of your GlassFish configuration and tuning.
11-3. Changing the Administrator User Password
Problem
You want to add security to your newly installed GlassFish environment by changing the administrative user password.
Solution #1
Traverse into the /JAVA_DEV/Glassfish/glassfish4/bin directory within your terminal or command prompt, and enter the following:
./asadmin change-admin-password
After issuing the command, follow the prompts accordingly to change the administrator password.
Solution #2
Log into the GlassFish administrative console, and change the administrative user password. To do so, first click the Domain menu option within the tree menu on the left. This will bring you to a screen that includes several tabs, allowing different configurations for your application server domain. One of those tabs is named Administrator Password, and this is the tab you want to use for changing the password. Once you’ve clicked the tab, you will be presented with a form that will allow you to change the administrative password accordingly.
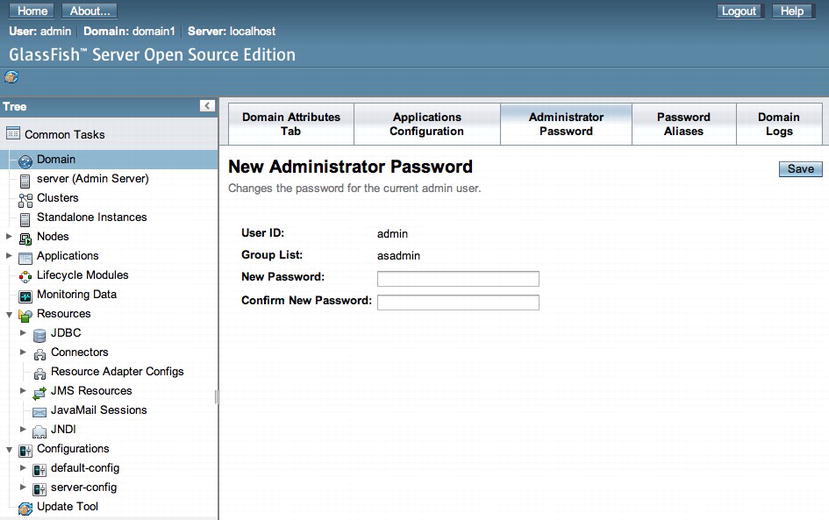
Figure 11-9 . The New Administrator Password form
![]() Note This should be your first configuration step after installing a new GlassFish application server environment! This is especially the case if you are running on an operating system that does not have a firewall installed, configured, and turned on. Leaving the default administrator password in place opens your server environment up to a major vulnerability.
Note This should be your first configuration step after installing a new GlassFish application server environment! This is especially the case if you are running on an operating system that does not have a firewall installed, configured, and turned on. Leaving the default administrator password in place opens your server environment up to a major vulnerability.
To that end, I recommend using Solution #1 to this recipe for changing the administrator password the first time. That way, your server doesn’t need to be started up before the password can be changed, making your server secure from the first start-up. The GlassFish New Administrator Password form is great for changing the password after you’ve already changed it from the default password.
How It Works
The most important configuration you can make to your newly installed GlassFish environment is to set the administrator password. If a default administrator password is left in place, it opens up a major vulnerability because a hacker could gain access to your administration console and gain full access. Changing the password is very easy to do, and there are a couple of ways to do it. First, there is a special command that can be used to change the password without even starting the server. As a matter of fact, as of GlassFish 3.1, you will be prompted to enter an administrator password the first time you start the default domain if you did not set a password via the installer.
![]() Note Although you will be prompted to enter an administrator password when the domain is started, it is still possible to leave the password as the default. That said, if the remote administration option is turned on, allowing you to log into the GlassFish administration console from a remote machine, you will be required to enter a password.
Note Although you will be prompted to enter an administrator password when the domain is started, it is still possible to leave the password as the default. That said, if the remote administration option is turned on, allowing you to log into the GlassFish administration console from a remote machine, you will be required to enter a password.
If you elect to not set a password during the installation wizard or if you used the manual installation method by unzipping the GlassFish archive, then you will need to use the change-admin-password utility to change the administrator password before domain start-up. Solution #1 demonstrates this technique, and the advantage of using it is that the domain does not have to be started in order to use it.
If you want to change the administrator password after you have already started the domain, you can do so by logging into the administration console and going to the Domain panel. Once there, you will see an Administrator Password tab, which will allow you to change the password. This technique is outlined in Solution #2 to this recipe. It is a straightforward procedure, and using the administration console for changing the password provides an easy means of doing so after the server is up and running.
11-4. Deploying a WAR File
Problem
You want to deploy a WAR archive to the application server so that your web application will be made available for use.
Solution #1
Log into the administrative console, and select the Applications menu option in the left menu, which will open the Applications panel (Figure 11-10). The list of deployed applications will be displayed within the right panel. Click the Deploy button above the application list in order to begin the deployment process.
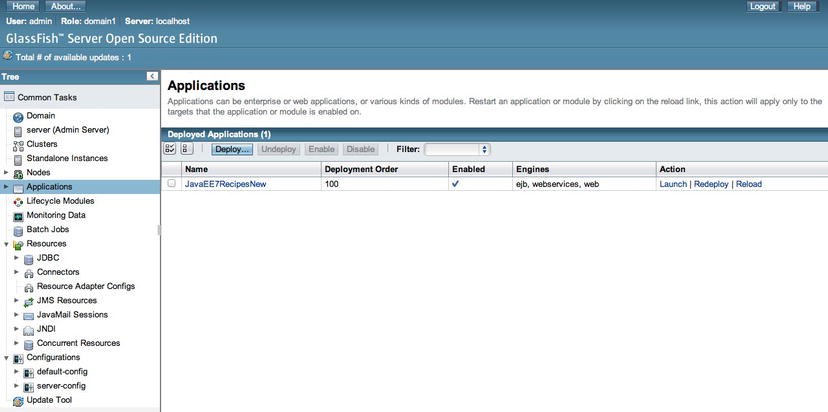
Figure 11-10 . GlassFish administrative console Applications panel
Once within the Deploy Applications or Modules (Figure 11-11) panel, find the WAR archive that you want to deploy by selecting the Browse button and locating the WAR archive of your choice. The application name and context path will be autopopulated, but you can change them if you want. Leave all of the other default options selected.
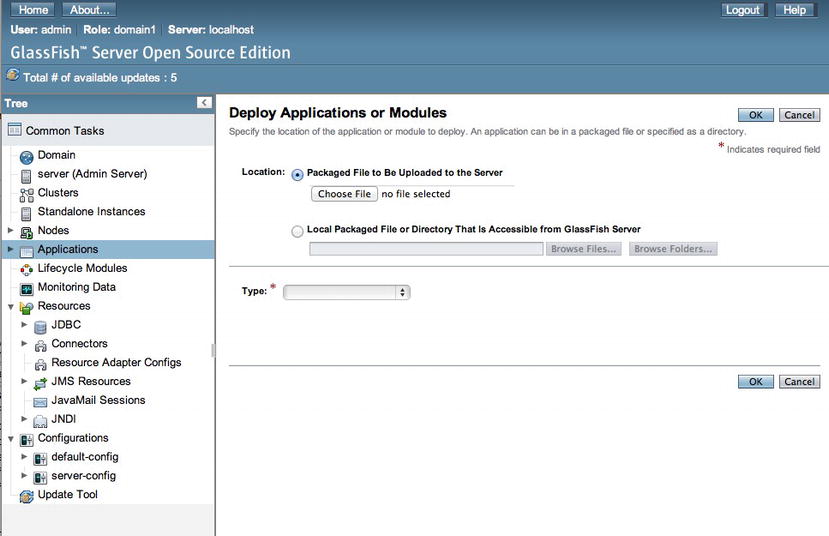
Figure 11-11 . GlassFish administrative console: Deploy Applications or Modules
Next, click the Deploy button to initiate the application deployment. The application server will complete the deployment, assuming that there are no configuration issues with the application archive.
Solution #2
Utilize the GlassFish application server’s autodeployment option by logging into the application server host machine if you haven’t done so already. Browse the file system to find the WAR file that you want to deploy. Copy the desired WAR file. Locate the GlassFish autodeployment directory (path), and paste the WAR file inside it. The application server will complete the deployment, assuming that there are no configuration issues with the application archive.
How It Works
To make a web application accessible to users on the Web, it must be deployed to the application server. GlassFish has a couple of very easy techniques for deploying applications for use. Java web applications can be packaged in a few different ways before deploying. To further understand the deployment process, it helps to take a look at the variety of possible deployment scenarios for a Java enterprise application.
In the early days of Java EE, the most common package structure was an enterprise archive (EAR) file. An EAR file is an archive that consists of one or more modules, usually in Java archive (JAR) file format, along with XML deployment descriptors. The standard EAR structure contains two JAR files along with XML deployment descriptors. One of those JAR files contains the web sources, including the HTML, JSP, JSF, JavaScript, the WEB-INF directory, and other files used for displaying web content. This JAR file is known as the web module, and it corresponds to a web application as defined within the Java Servlet specification. The second JAR file contains the Java sources that are packaged and used for the business logic of the application. Together, the two packages can be combined into an EAR file and deployed to a Java application server, in which case the application server takes on the task of using the XML deployment descriptors to place the different modules into their proper locations within the application server. EAR files are still in use today, and most applications written using Java EE 5 and older are deployed using an EAR file format. Until recently, EAR files were a common way to distribute and deploy Java EE applications.
Currently, the most common type of archive for Java web application deployment is the web archive (WAR). WAR files are archives that contain all of the web markup and Java sources together under the same archive module. Typically, those Java web applications that contained no enterprise application structures, such as EJBs, web services, or the like, could be deployed using the WAR file format. Since Java EE 6, all enterprise applications can be deployed in the WAR file format as well, which makes it much easier to package and deploy an application. Although if you’re using a Java IDE, the work is done for you, so deployment of WAR files is much faster than that of the EAR file, and it is much easier to work with all of an application’s source files within the same module, rather than using more than one.
Both the EAR and WAR file formats are simply ZIP files that contain either the .ear or .war extension. As a matter of fact, you can easily view the contents of these archives by renaming them with a .zip extension and unzipping them to your file system. The GlassFish application server makes it easy to deploy each file type, whether using the administration console or the autodeploy technique. When the application server is deploying the archives, it unpackages the contents of the archives into the deployment directory, which is located in the <GlassFish-Home>/glassfish4/glassfish/domains/domain1/applications directory.
![]() Note It is possible to make edits to web files after an application has been deployed by updating the files that exist in the deployment directory. Any XHTML, HTML, JS, or other code files that do not need to be compiled, along with JSPs that are compiled on the fly, can be updated in place while the application is up and running. This can sometimes prove useful for making minor layout or JavaScript changes while in production. However, remember that if the application is undeployed or another application is deployed in place of an existing application, then all sources within the deployment directory are deleted.
Note It is possible to make edits to web files after an application has been deployed by updating the files that exist in the deployment directory. Any XHTML, HTML, JS, or other code files that do not need to be compiled, along with JSPs that are compiled on the fly, can be updated in place while the application is up and running. This can sometimes prove useful for making minor layout or JavaScript changes while in production. However, remember that if the application is undeployed or another application is deployed in place of an existing application, then all sources within the deployment directory are deleted.
11-5. Adding a Database Resource
Problem
Your application utilizes an underlying RDBMS, and you want to configure a database resource for this purpose.
Solution
Create a connection pool resource for the database to which you want to connect. After the connection pool has been created, define a new JDBC resource, which will be used to provide applications with a means to connect to the database. To perform these tasks, first log into the GlassFish administration console and then expand the JDBC menu under the Resources option within the tree menu on the left, as shown in Figure 11-12.
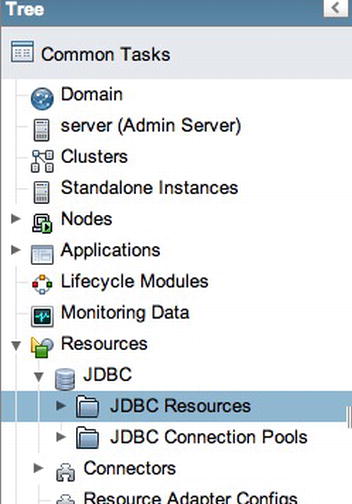
Figure 11-12 . GlassFish administration console: JDBC Resources
Next, click the JDBC Connection Pools menu option, which will open the JDBC Connection Pools panel on the right side of the screen. Here you will be provided with a list of the current connection pools, as well as buttons to add new pools or delete existing pools. Click the New… button to initiate the creation of a new connection pool. This will open the New JDBC Connection Pool (Step 1 of 2) panel, as shown in Figure 11-13. In this panel, specify the name of the pool you want to create, and then select a resource type and a database vendor from the selection lists.
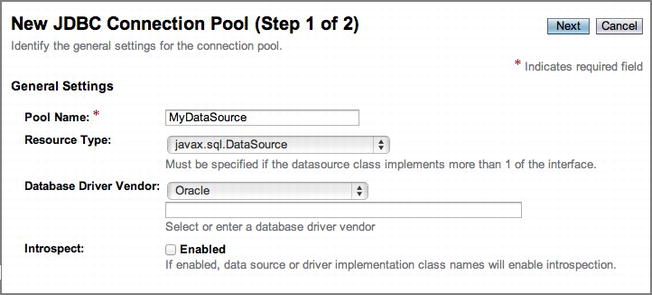
Figure 11-13 . New JDBC Connection Pool (Step 1 of 2) panel
After clicking the Next button to continue, the second screen for creating a new JDBC connection pool will be displayed (Figure 11-14), which contains a number of settings to help configure the connection pool. For instance, the data source class name can be selected, pool settings can be adjusted, and transaction management options can be tweaked. I recommend retaining all of the default configurations unless it has been determined that something needs to be adjusted in order for application functionality. You can always revisit the connection pool settings and adjust later if need be.

Figure 11-14 . New JDBC Connection Pool (Step 2 of 2) panel
At the bottom of the form you will find the Additional Properties table (Figure 11-15), which is where you will need to enter the specifics pertaining to the database connection you want to configure. While there are a number of properties listed in the table by default, you need to enter values only for a user, password, and URL in order to obtain a connection. Once you’ve entered this detail, you will be able to click the Finish button to create the pool.
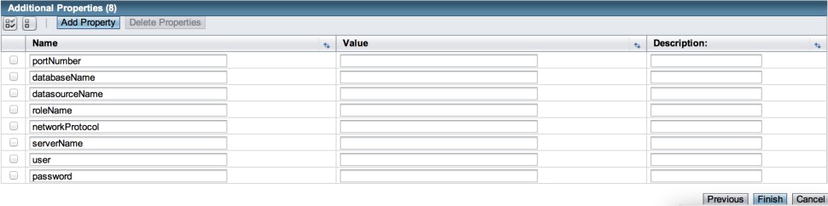
Figure 11-15 . Additional JDBC connection properties
![]() Note You must have the database driver (JAR file) for the database you want to use installed within the GlassFish application server. To do so, simply copy the JAR file into the <GlassFish-Home>/glassfish4/glassfish/domains/domain1/lib directory. For Oracle database, download the JDBC driver file called ojdbc6.jar, and use that.
Note You must have the database driver (JAR file) for the database you want to use installed within the GlassFish application server. To do so, simply copy the JAR file into the <GlassFish-Home>/glassfish4/glassfish/domains/domain1/lib directory. For Oracle database, download the JDBC driver file called ojdbc6.jar, and use that.
Once the pool has been created, you can generate a JDBC resource for use from within your applications. The JDBC resource is basically a string identifier that references your database connection pool, and it is used from within a Java web application’s persistence.xml unit to utilize an application server connection pool. To create the JDBC resource, click the JDBC Resources menu option from within the tree menu, which will open the JDBC Resources pane (Figure 11-16), listing each of the existing resources. Click New in order to configure a new resource.

Figure 11-16 . JDBC Resources pane
How It Works
Just about every enterprise application uses an underlying database to store and retrieve data. To connect to the database, you need to configure a database account for which to connect and code a connection utility that is responsible for opening and closing connections. Well, that is one way to do it; another way is to rely on the application server to manage the database connections. Utilizing an application server’s database connection pool can be very useful because it takes away the burden of handing connections within the application’s business logic, and it also helps the overall performance of an application by maintaining a number of open connections in a pool. When a process needs to work with the database, it grabs one of the open connection objects, uses it, and then places it back into the pool when finished. By maintaining this pool, the overhead of opening and closing connections for every single task is alleviated, helping your applications perform much faster. Another benefit to having the application server manage connections is that the user name and password used to obtain the connection is stored in only one place, the application server. User names and passwords do not need to be hard-coded into applications that use application server JDBC resources. This can be helpful not only from a security standpoint but also from a maintenance stance. Isn’t it much easier to change the password in one location when it expires, rather than fumbling around with each of the applications that use it?
Configuring a data source within the GlassFish application server is straightforward because you can manage everything from within the administration console. However, there are a number of configurations that can be altered in order to change the way in which your connection pool manages connections. On the first New JDBC Connection Pool panel of the connection pool configuration, you will need to determine which type of resource you want to create. Table 11-1 describes the different resource types.
Table 11-1 . JDBC Connection Pool Resource Types
| Resource Type | Description |
|---|---|
| javax.sql.DataSource | Suitable for local transactions |
| javax.sql.XADataSource | Suitable for global transactions |
| javax.sql.ConnectionPoolDataSource | Suitable for local transactions, possible performance improvements |
| java.sql.Driver | Standard driver |
The Pool Settings section of the second New JDBC Connection Pool panel allows you to configure the number of connections that will be available for application use. By default, the number of open connections at application server start-up will be eight. This means applications can grab and use eight connections from the pool without incurring any extra overhead, because the pool has already opened these connections.
The Maximum Pool Size option is set to 32 by default. When an application needs to use a connection, it goes to the pool and requests one. If there is a connection available in the pool, then it is given to the application. However, if no connection is available, then a new connection is made. The Maximum Pool Size value is the upper bound of connections that can possibly be made. So, by default, if there are 32 connections open and an application requests a new connection, then a database connection error will be thrown. Remember, when an application is finished using a connection, it is returned to the pool, so if an application is working properly, the maximum number of connections should be fairly difficult to reach in most environments.
A number of other configurations can be managed for your connection pool, such as determining when connections will time out and when to resize the pool. Adjust accordingly, if needed, after your application has been using the connection pool for a period of time. The transaction configuration for the pool makes it possible to set up an isolation level. It is recommended by Oracle to try to leave the isolation level alone if possible. If not, consider setting Isolation Level Guaranteed to false and make sure applications do not alter a connection’s isolation level. The different isolation levels are listed in the following bullets, from best performing on top to worst-performing on bottom:
- READ_UNCOMMITTED
- READ_COMMITTED
- REPEATABLE_READ
- SERIALIZABLE
11-6. Adding Forms-Based Authentication
Problem
You want to configure authentication for your applications by utilizing a database table to hold user names and passwords, along with user groups for different access privileges.
Solution
Set up forms-based authentication within your GlassFish application server by creating the necessary database tables to contain user accounts and groups and then configuring the application server to use those tables for authentication. The first step to setting up forms-based authentication is to create the necessary database artifacts to support the authentication. To do so, create two database tables. One of the tables will be used to contain the user names and passwords, and the second table will be used to contain the groups, along with the users who have access to those groups. The following lines of SQL can be used to generate these tables (Oracle syntax), along with the database sequences that will be used to populate the table primary key values:
create table users(
id number,
username varchar(150) not null,
password varchar(50) not null,
primary key (id));

create table groups(
id number,
username varchar2(150) not null,
groupname varchar2(100) not null,
primary key(id));

create sequence users_s
start with 1
increment by 1;

create sequence groups_s
start with 1
increment by 1;
For testing purposes, let’s create a couple of user accounts along with a couple of different access groups. The following lines of SQL will insert these records:
insert into users values(
users_s.nextval,
'admin',
dbms_obfuscation_toolkit.md5(input=>utl_raw.cast_to_raw('javaeerecipes')));

insert into users values(
users_s.nextval,
'juneau',
dbms_obfuscation_toolkit.md5(input=>utl_raw.cast_to_raw('testpass')));

insert into groups values(
groups_s.nextval,
'admin', 'administrator'),

insert into groups values(
groups_s.nextval,
'juneau','reader'),
Now that the database has been set up for authentication, it is time to configure the database to use these tables for authentication purposes. To do so, log into the GlassFish administrative console, navigate to the Configuration ![]() server-config
server-config ![]() Security
Security ![]() Realms menu option, and click the New button. Doing so will open the New Realm panel, which is shown in Figure 11-17.
Realms menu option, and click the New button. Doing so will open the New Realm panel, which is shown in Figure 11-17.
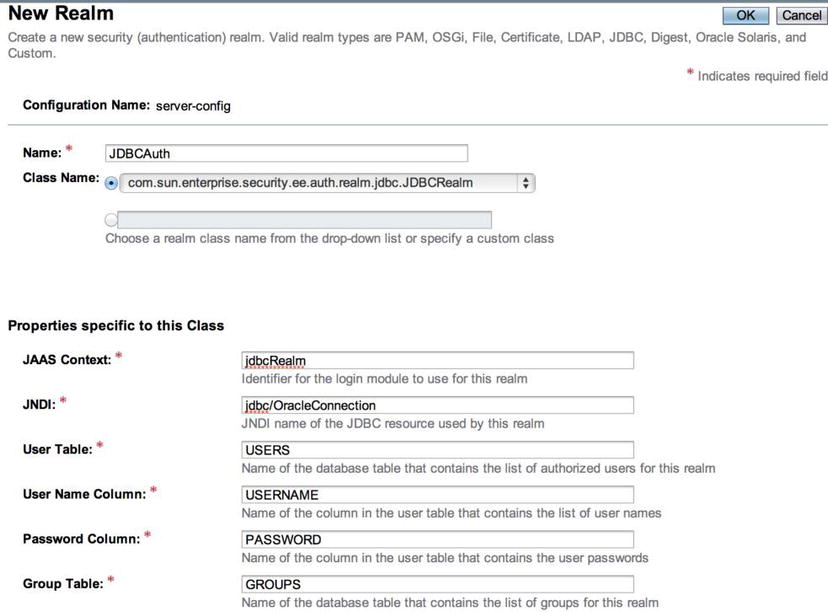
Figure 11-17 . Creating a new security realm
Within the New Realm form, enter a name for the realm, which you will call JDBCAuth for this example. Next, for the class name, choose com.sun.enterprise.security.auth.realm.jdbc.JDBCRealm from the drop-down menu. Once you’ve completed this first section of the form, it is time to fill out the properties specific to the class. For this example, use values shown in Table 11-2 to complete this form.
Table 11-2. Properties Specific to JDBC Security Realm Class
| Property | Value |
|---|---|
| JAAS | jdbcAuth |
| JNDI | jdbc/OracleConnection |
| User Table | users |
| User Name Column | username |
| Password Column | password |
| Group Table | groups |
| Group Name Column | groupname |
| Password Encryption Algorithm | MD5 (algorithm used in SQL insert statement) |
Once finished, click OK to save the values and create the realm. The newly created realm should now appear in the Realm listing, as shown in Figure 11-18.
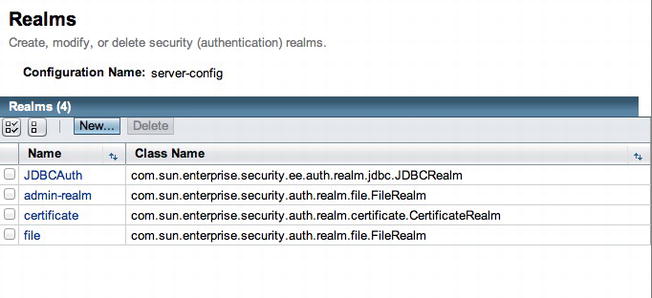
Figure 11-18 . Realm listing
That does it for the application server configuration. Now how do you actually use the new security realm? You need to create a login view and make some configuration changes to your application’s web.xml file in order to implement the authentication within your application. To begin, let’s look at the changes that will need to be made to web.xml in order to configure the forms authentication. The following excerpt, taken from the web.xml configuration file in the JavaEERecipes sources, demonstrates the updates that need to be made:
<security-constraint>
        <display-name>Admin</display-name>
        <web-resource-collection>
            <web-resource-name>Admin Tools</web-resource-name>
            <description/>
            <url-pattern>/faces/admin/*</url-pattern>
            <http-method>GET</http-method>
            <http-method>POST</http-method>
            <http-method>HEAD</http-method>
            <http-method>PUT</http-method>
            <http-method>OPTIONS</http-method>
            <http-method>TRACE</http-method>
            <http-method>DELETE</http-method>
        </web-resource-collection>
        <auth-constraint>
            <description/>
            <role-name>admin</role-name>
        </auth-constraint>
    </security-constraint>
    <security-constraint>
        <display-name>User</display-name>
        <web-resource-collection>
            <web-resource-name>Protected Users Area</web-resource-name>
            <description/>
            <url-pattern>/faces/users/*</url-pattern>
            <http-method>GET</http-method>
            <http-method>POST</http-method>
            <http-method>HEAD</http-method>
            <http-method>PUT</http-method>
            <http-method>OPTIONS</http-method>
            <http-method>TRACE</http-method>
            <http-method>DELETE</http-method>
        </web-resource-collection>
        <auth-constraint>
            <description/>
            <role-name>user</role-name>
        </auth-constraint>
    </security-constraint>

<login-config>
        <realm-name>JDBCRealm</realm-name>
        <form-login-config>
            <form-login-page>/faces/loginForm.xhtml</form-login-page>
            <form-error-page>/faces/loginError.xhtml</form-error-page>
        </form-login-config>
    </login-config>
Next, the GlassFish server security role mapping needs to be added to the sun-web.xml configuration file, which maps application roles to database groups. The following excerpt demonstrates the mapping configuration:
<security-role-mapping>
<role-name>admin</role-name>
<group-name>administrator</group-name>
</security-role-mapping>
<security-role-mapping>
<role-name>user</role-name>
<group-name>reader</group-name>
</security-role-mapping>
Lastly, the views that the user will see must contain specific names for the user name and password input text fields, and the form action must be set to j_security_check, which will cause control to be passed to the application server for handling the authentication. The following login form demonstrates this process. You can see the sources within the login.xhtml form contained within the JavaEERecipes project.
<?xml version="1.0" encoding="UTF-8"?>

<!DOCTYPE html PUBLIC "-//W3C//DTD XHTML 1.0 Strict//EN" "http://www.w3.org/TR/xhtml1/DTD/xhtml1-strict.dtd">
<html xmlns="http://www.w3.org/1999/xhtml"
      xmlns:f="http://xmlns.jcp.org/jsf/core"
      xmlns:h="http://xmlns.jcp.org/jsf/html">
    <h:head>
        <meta http-equiv="Content-Type" content="text/html; charset=UTF-8"/>
        <title>TODO supply a title</title>

    </h:head>
    <h:body>
        <p>
            <form method="POST" action="j_security_check">
                Username: <input type="text" name="j_username" />
                Password: <input type="password" name="j_password" />
                <br />
                <input type="submit" value="Login" />
                <input type="reset" value="Reset" />
            </form>
        </p>
    </h:body>
</html>
When a user points the browser to the login.xhtml view, they will be prompted to log into the application.
How It Works
Securing an application is a vital step for any enterprise application. Adding the security of a user name and login is one of the most basic forms of security that can be put into place. The combination of GlassFish application server, the underlying database, and some basic Java EE application configurations make securing applications via user name and password an easy task. The solution to this recipe demonstrates how to configure a security realm within the GlassFish application server that will utilize a database table for storing user name and password combinations. While some of the database code in the solution is specific to Oracle Database, the same technique can be applied to most RDBMSs with only minor modifications made to the code for securing the password within the database.
The first step toward configuring the security realm within GlassFish is to set up the underlying database table that will be used to contain the security credentials. It is of utmost importance to ensure that password stored within the table are encrypted; otherwise, they can be seen by anyone who has read-only access to the security table that is created for this solution. In the solution to this recipe, the Oracle database dbms_obfuscation_toolkit.md5 function is used in order to hash the passwords. However, if using another database system, there should be similar tools to use for encryption purposes. When configuring the database, a table should be created to hold the user names and passwords, and another should be created to hold the groups, or security roles. This will allow applications using the realm to contain a high level of security configuration in that various levels of access can be granted to different users based upon role.
Once the database objects have been created, the GlassFish server must be configured to utilize the database for authentication purposes. This is done by logging into the GlassFish administrative console and setting up a new security realm. There are several pieces of information to fill out on the New Realm form that are used to map the realm to the appropriate database tables and columns. The name given to the realm can be any valid String, and the class name should be com.sun.enterprise.security.auth.realm.jdbc.JDBCRealm, since there are a number of different types of security realms that can be created, including LDAP realms, and so on. The remaining information on the form should be filled out according to the directions for each text field. It is important to be sure that the JDBC resource has been configured already and the name given for the JDBC resource matches the one that is provided for the JNDI field on the form.
To configure an application for use with a security realm, the security constraints and login configuration must be specified within the web.xml configuration file for the application. Security constraints are used to map designated web folders to different user roles for an application. This means that all of the administrative pages for an application can be placed into a folder, and a security constraint can be set up within the web.xml file to limit access to that folder, based upon security credentials. If you take a look at the configuration example in the solution, you can see that there has been a security constraint configured with a display name of Admin. Any valid String identifier can be given to the display-name, web-resource-name, or description elements of the security constraint. The url-pattern element designates which folder should be protected by the constraint, and anything placed within that folder will be protected from unauthorized users. Each of the http-method elements lists the different HTTP methods that pertain to the resources within the given folder. The auth-constraint subelement contains the role mapping, which can be given a description along with the role-name that should be used for limiting access. The specified role-name should match one of the group values that was placed within the database table that was created to contain groups. Any user names that correspond to the given group or role will have access to the resources contained within the protected folder, provided that they are able to log into the application successfully. The sun-web.xml configuration file must be updated to contain the mapping of roles to groups if you are deploying to GlassFish. This is done by adding security-role-mapping elements to the sun-web.xml file, and each of the elements must contain a role-name element along with a corresponding group-name element.
The final piece of the puzzle is to create a login form. The form must contain an action by the name of j_security_check because this will pass control of the authentication to the application server. The user name and password elements must contain the names of j_username and j_password, respectively. Doing so will allow these elements to be passed to the authentication mechanism properly. When the form is submitted, the user name and password are sent to the authentication mechanism, which is handled by the application server via the security realm you created. If an appropriate user name and password combination is used, the session is granted access to whichever resources have been designated for the authenticated user’s role. If the given user’s role does not permit access to certain areas of the application via the security-constraints that have been set up within the web.xml file, the user is denied access.
Configuring forms-based authentication is a good means of controlling access to an application. It allows each application to contain its own security infrastructure, providing the ability to limit certain areas of an application to designated roles. The only downside to the use of the JDBC realm is that the password must be stored within the database table. So long as a good encryption algorithm is used to obfuscate the password, this should be a minimal risk.
![]() Note To use LDAP authentication instead, set up a security realm using the com.sun.enterprise.security.auth.realm.ldap.LDAPRealm class. Specify a String value for the JAAS context, which will be used to reference the realm. Directory should be set to the URL for the LDAP server that you want to use for authentication. Base DN must be set to the base DN for the user who will be used for authenticating to the LDAP server (use a separate LDAP account for authentication that has read access to the LDAP directory). Additional properties that may be required for your LDAP configuration include search-bind-password, search-bind-dn, and/or search-filter. To learn more about LDAP configuration, please reference the online documentation.
Note To use LDAP authentication instead, set up a security realm using the com.sun.enterprise.security.auth.realm.ldap.LDAPRealm class. Specify a String value for the JAAS context, which will be used to reference the realm. Directory should be set to the URL for the LDAP server that you want to use for authentication. Base DN must be set to the base DN for the user who will be used for authenticating to the LDAP server (use a separate LDAP account for authentication that has read access to the LDAP directory). Additional properties that may be required for your LDAP configuration include search-bind-password, search-bind-dn, and/or search-filter. To learn more about LDAP configuration, please reference the online documentation.
11-7. Configuring and Using JavaMail
Problem
You want to send e-mail from your applications, and you want to centrally manage your e-mail sessions, rather than configuring JavaMail separately for each application.
Solution
Log into the GlassFish administrative console, and expand the Resources menu option. Next, click the JavaMail Sessions menu option to create a new JavaMail session. Specify the following information within the form:
- JNDI Name: This is the name used to reference the resource; for this example, you’ll use mail/EERecipesMail.
- Typically the JNDI name uses the mail/email-username format.
- Mail Host: This is the SMTP server name.
- Default Username: This is the user name for authenticating to SMTP server.
- Default Address: This is the address from which the e-mail will be sent.
After entering this information, add an additional property to specify the password for authenticating to the SMTP server, as well as a property for specifying the SMTP port. The New JavaMail Session form looks like Figure 11-19.
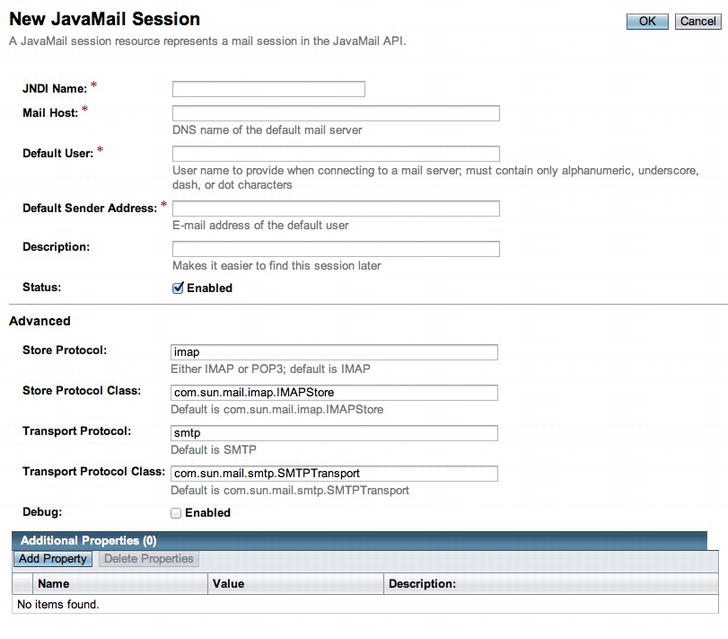
Figure 11-19 . New JavaMail session
![]() Note A valid SMTP host must already exist to handle your email. Use the appropriate host name, port number, and secure protocols, as needed, for configuration.
Note A valid SMTP host must already exist to handle your email. Use the appropriate host name, port number, and secure protocols, as needed, for configuration.
To use the resource within application code, you must inject a session resource, specifying the name that has been configured for the JavaMail session to the @Resource annotation. You can then set up a Message object using the session that has been created and send the message using the Transport.send method. The following lines of code demonstrate this concept:
public class MyMailController {
    @Resource(name="mail/EERecipesMail")
    private Session mailSession;

    public void sendMsg(String to, String subject, String msg){
        Message msg = new MimeMessage(mailSession);
        try {
            msg.setSubject(subject);
            msg.setRecipient(RecipientType.TO, new InternetAddress(to));
            msg.setText(message);
            Transport.send(msg);
        } catch (MessagingException | UnsupportedEncodingException ex ){
            System.out.println(ex);
        }
        . . .
How It Works
The ability to configure JavaMail sessions within the application server can provide a huge benefit to an organization. This is especially the case if there is more than one application deployed to the server and each of the applications requires the ability to send mail. Rather than recoding the JavaMail configuration within each application, simply provide an enterprise JavaMail session that any application on the server can tap into in order to easily set up a session.
A JavaMail session resource can be set up using any e-mail account that has access to send mail via an SMTP service. Therefore, if you have access to a hosted e-mail account, such as Gmail, a JavaMail session can be configured on the application server to send e-mail from that account. Once the JavaMail session has been configured as per the instructions outlined in the solution to this recipe, the process for sending an e-mail is the same as if a JavaMail session were established via Java code. The only difference is that rather than setting up the session within the Java code itself, the session is injected into a class by specifying the JavaMail session using the @Resource annotation.