
![]()
The Basics of JavaServer Faces
In 2004 Sun Microsystems introduced a Java web framework called JavaServer Faces (JSF) in an effort to help simplify web application development. It is an evolution of the JavaServer Pages (JSP) framework, adding a more organized development life cycle and the ability to more easily utilize modern web technologies. JSF uses XML files for view construction and Java classes for application logic, making it adhere to the MVC architecture. JSF is request-driven, and each request is processed by a special servlet named the FacesServlet. The FacesServlet is responsible for building the component trees, processing events, determining which view to process next, and rendering the response. JSF 1.x used a special resource file named the faces-config.xml file for specifying application details such as navigation rules, registering listeners, and so on. While the faces-config.xml file can still be used in JSF 2.x, the more modern releases of JSF have focused on being easy to use, minimizing the amount of XML configuration, and utilizing annotations in place of XML where possible.
The framework is very powerful, including easy integration with technologies such as Ajax and making it effortless to develop dynamic content. JSF works well with databases, using either JDBC or EJB technology to work with the back end. JavaBeans, known as JSF managed beans, are used for application logic and support the dynamic content within each view. They can adhere to different life spans depending upon the scope that is used. Views can invoke methods within the beans to perform actions such as data manipulation and form processing. Properties can also be declared within the beans and exposed within the views, providing a convenient way to pass request values. JSF allows developers to customize their applications with preexisting validation and conversion tags that can be used on components with the view. It is also easy to build custom validators, as well as custom components, that can be applied to components in a view.
This chapter includes recipes that will be useful for those who are getting started with JSF and also those who are looking to beef up their basic knowledge of the framework. You will learn how to create managed beans, work with standard components, and handle page navigation. There are also recipes that cover useful techniques such as building custom validators and creating bookmarkable URLs. The recipes are refined to include the most current techniques and provide the most useful methodologies for using them. After studying the recipes in this chapter, you will be ready to build standard JSF applications, sprinkling in some custom features as well.
![]() Note Many people prefer to work within an integrated development environment (IDE) for increased productivity. To get started with learning how to create a new JSF project and manage it with the NetBeans IDE, please see the appendix of this book.
Note Many people prefer to work within an integrated development environment (IDE) for increased productivity. To get started with learning how to create a new JSF project and manage it with the NetBeans IDE, please see the appendix of this book.
3-1. Writing a Simple JSF Application
Solution #1
Create a simple JSF web application that is comprised of a single XHTML page and a single JSF managed bean, along with the other required JSF configuration files. The application in this recipe simply displays a message that is initialized within a JSF managed bean.
![]() Note It is recommended that you utilize a Java IDE to make life easier. If you have not yet created a JSF application and are interested in learning how to create one from scratch with an IDE, then please see Solution #2 to this recipe. This book features the NetBeans IDE, a cutting-edge Java development environment that is usually the first to support new Java features. However, there are many excellent IDE choices. You can choose the IDE you want and follow along with its instructions for working with JSF.
Note It is recommended that you utilize a Java IDE to make life easier. If you have not yet created a JSF application and are interested in learning how to create one from scratch with an IDE, then please see Solution #2 to this recipe. This book features the NetBeans IDE, a cutting-edge Java development environment that is usually the first to support new Java features. However, there are many excellent IDE choices. You can choose the IDE you want and follow along with its instructions for working with JSF.
Displaying a JSF Managed Bean Field Value
The following code makes up the XHTML view that will be used to display the JSF managed bean field value:
<?xml version="1.0" encoding="UTF-8"?>
<!--
Book:  Java EE 7 Recipes
Recipe: 3-1 A Simple JSF Application
Author: J. Juneau
Filename: chapter03/recipe03_01.xhtml
-->
<!DOCTYPE html PUBLIC "-//W3C//DTD XHTML 1.0 Strict//EN""http://www.w3.org/TR/xhtml1/DTD/xhtml1-strict.dtd">
<html xmlns="http://www.w3.org/1999/xhtml"
      xmlns:f="http://xmlns.jcp.org/jsf/core"
      xmlns:h="http://xmlns.jcp.org/jsf/html">
    <h:head>
        <meta http-equiv="Content-Type" content="text/html; charset=UTF-8"/>
        <title>Recipe 3-1:  A Simple JSF Application</title>
    </h:head>
    <h:body>
        <p>
            This simple application utilizes a request-scoped JSF managed bean
            to display the message below.  If you change the "hello" variable value within the
            managed bean's constructor and then recompile and run the application, the
            new message appears.
            <br/>
            <br/>
            #{helloWorldController.hello}
            <br/>
            or
            <br/>
            <h:outputText id="helloMessage" value="#{helloWorldController.hello}"/>
        </p>
    </h:body>
</html>
As you can see, the JSF page utilizes a JSF expression, #{helloWorldController.hello}. Much like JSP technology, a backing JavaBean, otherwise known as a JSF managed bean, is referenced in the expression along with the field to expose.
Examining the JSF Managed Bean
The following code is that of HelloWorldController, the JSF managed bean for this recipe example:
import java.io.Serializable;
import javax.faces.bean.ManagedBean;
import javax.faces.bean.RequestScoped;

/**
 * Recipe 3-1:  A Simple JSF Application
 * @author juneau
 */
@ManagedBean(name = "helloWorldController")
@RequestScoped
public class HelloWorldController implements Serializable {
    private String hello;

    /**
     * Creates a new instance of HelloWorldController
     */
    public HelloWorldController() {
        hello = "Hello World";
    }

    /**
     * @return the hello
     */
    public String getHello() {
        return hello;
    }

    /**
     * @param hello the hello to set
     */
    public void setHello(String hello) {
        this.hello = hello;
    }
}
![]() Note Prior to JSF 2.0, in order to enable the JSF servlet to translate the XHTML page, you needed to ensure that the web.xml file contained a servlet element indicating the javax.faces.webapp.FacesServlet class and its associated servlet-mapping URL. Since the release of JSF 2.0, if using a Servlet 3.x container, the FacesServlet is automatically mapped for you, so there is no requirement to adjust the web.xml configuration.
Note Prior to JSF 2.0, in order to enable the JSF servlet to translate the XHTML page, you needed to ensure that the web.xml file contained a servlet element indicating the javax.faces.webapp.FacesServlet class and its associated servlet-mapping URL. Since the release of JSF 2.0, if using a Servlet 3.x container, the FacesServlet is automatically mapped for you, so there is no requirement to adjust the web.xml configuration.
Ensuring the JSF Application Functions Properly in a Pre-JSF 2.0 Environment
The listing that follows is an excerpt taken from the web.xml file for the sources to this book, and it demonstrates the features that must be added to the web.xml file in order to make the JSF application function properly.
...
<servlet>
    <servlet-name>Faces Servlet</servlet-name>
    <servlet-class>javax.faces.webapp.FacesServlet</servlet-class>
    <load-on-startup>1</load-on-startup>
  </servlet>
  ...
  <servlet-mapping>
    <servlet-name>Faces Servlet</servlet-name>
    <url-pattern>/faces/*</url-pattern>
  </servlet-mapping>
...
  <welcome-file-list>
    <welcome-file>faces/index.xhtml</welcome-file>
  </welcome-file-list>
Let’s take a deeper look at the web.xml configuration for a JSF application. It is not very complex, but a few elements could use some explanation. The javax.faces.webapp.FacesServlet servlet must be declared within the web.xml file. The declaration must contain a servlet-name; the servlet-class element, which lists the fully qualified class name; and a load-on-startup value of 1 to ensure that the servlet is loaded when the application is started up by the container. The web.xml file must then map that servlet to a given URL within a servlet-mapping element. The servlet-mapping element must include the servlet-name, which is the same value as the servlet-name element that is contained in the servlet declaration, and a url-pattern element, which specifies the URL that will be used to map JSF pages with the servlet. When a URL is specified that contains the /faces/ mapping, the FacesServlet will be used to translate the view.
To load the application in your browser, visit http://localhost:8080/JavaEERecipes/faces/chapter03/recipe03_01.xhtml, and you will see the following text:
This simple application utilizes a request-scoped JSF managed bean to display the message below. If you change the “hello” variable within the managed bean’s constructor and then recompile and run the application, the new message appears.
Hello World
or
Hello World
Solution #2
Use an IDE, such as NetBeans, to create a JSF application. To get started with NetBeans, first download the most recent release of NetBeans from the Netbeans.org web site. The examples in this solution make use of NetBeans 7.3. For more information about downloading and installing NetBeans, please see the appendix to this book. Once installed, create a new project by clicking the File ![]() New Project menu option.
New Project menu option.
Follow the directions in the book’s appendix (in the “Creating a NetBeans Java Web Project” section). Once completed, the index.xhtml file will open in the editor, which will be the default landing page for your application. Modify the index.xhtml file by making the page the same as the JSF view that is listed in Solution #1’s “Displaying JSF Managed Bean Field Value” section. Once done, add the managed bean to your application that will be used to supply the business logic for the index.xhtml page. To create the managed bean, right-click the Source Packages navigation menu for your project, and choose New ![]() JSF Managed Bean from the context menu. This will open the New JSF Managed Bean dialog (Figure 3-1), which will allow you to specify several options for your managed bean, including the name, location, and scope.
JSF Managed Bean from the context menu. This will open the New JSF Managed Bean dialog (Figure 3-1), which will allow you to specify several options for your managed bean, including the name, location, and scope.

Figure 3-1. New JSF managed bean
For the purposes of this recipe, change the name of the bean to HelloWorldController, and leave the rest of the options at their defaults; then click Finish. Copy and paste the code from Solution #1’s “Examining the JSF Managed Bean” section into the newly created managed bean class. Once finished, right-click the application project from the Project navigation menu and choose Deploy to deploy your application.
To load the application in your browser, visit http://localhost:8080/WebApplication1/faces/index.xhtml, and you will see the following text:
This simple application utilizes a request-scoped JSF managed bean to display the message below. If you change the “hello” variable within the managed bean’s constructor and then recompile and run the application, the new message appears.

Hello World
or
Hello World
How It Works
This recipe merely scratches the surface of JSF, but it is meant as a starting point to guide you along the path of becoming a JSF expert. The example in this recipe demonstrates how closely related JSF and JSP technologies are. In fact, the only difference in the two view pages is the use of the JSF expression #{} rather than the standard JSP value expression ${}. Thanks to the JSP 2.0 unified expression language, Java web developers now have an easy transition between the two technologies, and they now share many of the same expression language features.
![]() Note JSF 2.x can make use of Facelets view technology to produce even more sophisticated and organized designs. To learn more about Facelets view technology, please refer to Chapter 4.
Note JSF 2.x can make use of Facelets view technology to produce even more sophisticated and organized designs. To learn more about Facelets view technology, please refer to Chapter 4.
Breaking Down a JSF Application
Now for the real reason you are reading this recipe…the explanation for building a JSF application! A JSF application is comprised of the following parts:
- If using or maintaining JSF applications written using JSF 1.x, the web.xml deployment descriptor that is responsible for mapping the FacesServlet instance to a URL path
- One or more web pages on which JSF components are used to provide the page layout (may or may not utilize Facelets view technology)
- JSF component tags
- One or more managed beans, which are simple, lightweight container-managed objects that are responsible for supporting page constructs and basic services
- Optionally, one or more configuration files such as faces-config.xml that can be used to define navigation rules and configure beans and other custom objects
- Optionally, supporting objects such as listeners, converters, or custom component
- Optionally, custom tags for use on a JSF view
LIFE CYCLE OF A JSF APPLICATION
The JSF view processing life cycle contains six stages. These stages are as follows:
- Restore View
- Apply Request Values
- Process Validations
- Update Model Values
- Invoke Application
- Render Response
The example in this recipe uses the minimum number of these parts. To run the example, you will need to ensure that the web.xml file contains the proper JSF configuration if running in a pre-JSF 2.x environment. You will need to have a managed bean declaring the field that is exposed on the JSF view along with the necessary accessor methods to make it work properly. And lastly, you will need to have the XHTML JSF view page containing the JSF expression that exposes the field that is declared within the managed bean.
A JSF managed bean is a lightweight, container-managed object that is associated with a JSF page. The managed bean is much like a JSP JavaBean in that it provides the application logic for a particular page so that Java code does not need to be embedded into the view code. Components (a.k.a. JSF tags) that are used within a JSF view are mapped to server-side fields and methods contained within the JSF managed bean. Oftentimes, JSF managed beans contain Controller within their name because they are indeed the controllers for the page logic. In the example, the JSF managed bean is named HelloWorldController, and a field named hello is declared, exposing itself to the public via the getHello and setHello methods. The JSF managed bean is instantiated and initialized when a page that contains a reference to the bean is requested, and the managed bean scope determines the life span of the bean. In the case of this example, the managed bean contains a request scope, via the @RequestScoped annotation. Therefore, its life span is that of a single request, and it is re-instantiated each time the page in the example is reloaded. To learn more about the scope and annotations that are available for a managed bean, please see Recipe 3-2.
JSF technology utilizes a web view declaration framework known as Facelets. Facelets uses a special set of XML tags, similar in style to the standard JSF tags, to help build componentized web views. To learn more about Facelets, please see Chapter 4. While this example does not use Facelets, it is a vital part of JSF view technology. Facelets pages typically use XHTML, which is an HTML page that is comprised of well-formed XML components. The example JSF view in this recipe is well-structured, and it contains two JSF EL expressions that are responsible for instantiating the managed bean and displaying the content for the hello field. When the EL expression #{helloWorldBean.hello} is translated by the FacesServlet, it makes the call to the HelloBeanController’s getHello() method.
Lots of information was thrown at you within this introductory recipe. The simple example in this recipe provides a good starting point for working with JSF technology. Continue with the recipes in this chapter to gain a broader knowledge of each component that is used for developing JavaServer Faces web applications.
3-2. Writing a Managed Bean
Solution
Develop a JSF managed bean, a lightweight container-managed component, which will provide the application logic for use within your JSF application web pages. The example in this recipe is comprised of a JSF view and a JSF managed bean. The application calculates two numbers that are entered by the user and then adds, subtracts, multiplies, or divides them depending upon the user’s selection. The following code is the managed bean that is responsible for declaring fields for each of the numbers that will be entered by the user, as well as a field for the result of the calculation. The managed bean is also responsible for creating a list of Strings that will be displayed within an h:selectOneMenu element within the JSF view and retaining the value that is chosen by the user.
Although it may seem as though this managed bean is doing a lot of work, it actually is very simple to make it happen! The managed bean is really a beefed-up Plain Old Java Object (POJO) that includes some methods that can be called from JSF view components.
Managed Bean
The following code is for the managed bean that is used for the calculation example. The bean is named CalculationController, and it is referenced as calculationController from within the JSF view. JSF uses convention over configuration for its naming conventions. By default, JSF views can contain EL that references a managed bean by specifying the class name with the first character in lowercase.
package org.javaeerecipes.chapter03.recipe03_02;

import java.io.Serializable;
import java.util.ArrayList;
import java.util.List;
import javax.faces.bean.ManagedBean;
import javax.faces.application.FacesMessage;
import javax.faces.bean.SessionScoped;
import javax.faces.context.FacesContext;
import javax.faces.model.SelectItem;

/**
 * Recipe 3-2:  Writing a JSF Managed Bean
 * @author juneau
 */

@SessionScoped
@ManagedBean(name="calculationController")
public class CalculationController implements Serializable {

    private int num1;
    private int num2;
    private int result;
    private String calculationType;
    private static String ADDITION = "Addition";
    private static String SUBTRACTION = "Subtraction";
    private static String MULTIPLICATION = "Multiplication";
    private static String DIVISION = "Division";
    List<SelectItem> calculationList;

    /**
     * Creates a new instance of CalculationController
     */
    public CalculationController() {
        // Initialize variables
        num1 = 0;
        num2 = 0;
        result = 0;
        calculationType = null;
        // Initialize the list of values for the SelectOneMenu
        populateCalculationList();
    }

    /**
     * @return the num1
     */
    public int getNum1() {
        return num1;
    }

    /**
     * @param num1 the num1 to set
     */
    public void setNum1(int num1) {
        this.num1 = num1;
    }

    /**
     * @return the num2
     */
    public int getNum2() {
        return num2;
    }

    /**
     * @param num2 the num2 to set
     */
    public void setNum2(int num2) {
        this.num2 = num2;
    }

     /**
     * @return the result
     */
    public int getResult() {
        return result;
    }

    /**
     * @param result the result to set
     */
    public void setResult(int result) {
        this.result = result;
    }

    /**
     * @return the calculationType
     */
    public String getCalculationType() {
        return calculationType;
    }

    /**
     * @param calculationType the calculationType to set
     */
    public void setCalculationType(String calculationType) {
        this.calculationType = calculationType;
    }

    public List<SelectItem> getCalculationList(){
        return calculationList;
    }

    private void populateCalculationList(){
        calculationList = new ArrayList<SelectItem>();
        calculationList.add(new SelectItem(ADDITION));
        calculationList.add(new SelectItem(SUBTRACTION));
        calculationList.add(new SelectItem(MULTIPLICATION));
        calculationList.add(new SelectItem(DIVISION));
    }

    public void performCalculation() {
        if (getCalculationType().equals(ADDITION)){
            setResult(num1 + num2);
        } else if (getCalculationType().equals(SUBTRACTION)){
            setResult(num1 - num2);
        } else if (getCalculationType().equals(MULTIPLICATION)){
            setResult(num1 * num2);
        } else if (getCalculationType().equals(DIVISION)){
            try{
                setResult(num1 / num2);
            } catch (Exception ex){
                FacesMessage facesMsg = new FacesMessage(FacesMessage.SEVERITY_ERROR, "Invalid Calculation", "Invalid Calculation");
                FacesContext.getCurrentInstance().addMessage(null, facesMsg);
            }
        }
    }
}
Next is the view that composes the web page, which is displayed to the user. The view is composed within an XHTML document and is well-formed XML.
JSF View
The view contains JSF components that are displayed as text boxes into which the user can enter information, a pick-list of different calculation types for the user to choose from, a component responsible for displaying the result of the calculation, and an h:commandButton component for submitting the form values.
<?xml version="1.0" encoding="UTF-8"?>
<!--
Book:  Java EE 7 Recipes
Recipe: 3-2 Writing a JSF Managed Bean
Author: J. Juneau
-->
<!DOCTYPE html PUBLIC "-//W3C//DTD XHTML 1.0 Strict//EN""http://www.w3.org/TR/xhtml1/DTD/xhtml1-strict.dtd">
<html xmlns="http://www.w3.org/1999/xhtml"
      xmlns:f="http://xmlns.jcp.org/jsf/core"
      xmlns:h="http://xmlns.jcp.org/jsf/html">
    <h:head>
        <meta http-equiv="Content-Type" content="text/html; charset=UTF-8"/>
        <title>Recipe 3-2:  Writing a JSF Managed Bean</title>
    </h:head>
    <h:body>
        <f:view>

            <h2>Perform a Calculation</h2>
            <p>
                Use the following form to perform a calculation on two numbers.
                <br/>
                Enter the numbers in the two text fields below, and select a calculation to
                <br/>
                perform, then hit the "Calculate" button.
                <br/>
                <br/>
                <h:messages errorStyle="color: red" infoStyle="color: green" globalOnly="true"/>
                <br/>
                <h:form id="calulationForm">
                    Number1:
                    <h:inputText id="num1" value="#{calculationController.num1}"/>
                    <br/>
                    Number2:
                    <h:inputText id="num2" value="#{calculationController.num2}"/>
                    <br/>
                    <br/>
                    Calculation Type:
                    <h:selectOneMenu id="calculationType"
                     value="#{calculationController.calculationType}">
                        <f:selectItems value="#{calculationController.calculationList}"/>
                    </h:selectOneMenu>
                    <br/>
                    <br/>
                    Result:
                    <h:outputText id="result" value="#{calculationController.result}"/>
                    <br/>
                    <br/>
                    <h:commandButton action="#{calculationController.performCalculation()}"
                           value="Calculate"/>
                </h:form>
            </p>
        </f:view>
    </h:body>
</html>
The resulting JSF view looks like Figure 3-2 when displayed to the user.
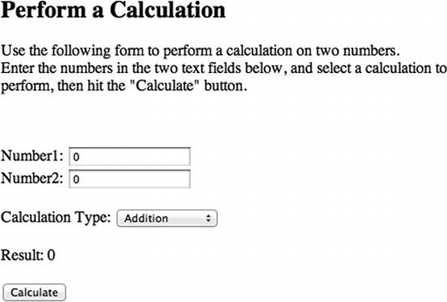
Figure 3-2. Resulting JSF view page
How It Works
The JSF managed bean is responsible for providing the application logic for a JSF-based web application. Much like the JavaBean is to a JSP, the managed bean is the backbone for a JSF view. They are also referred to as backing beans, because there is typically one JSF managed bean per each JSF view. Managed beans have changed a bit since the JSF technology was first introduced. There used to be configuration required for each managed bean within a faces-config.xml configuration file and also within the web.xml file for use with some application servers. Starting with the release of JSF 2.0, managed beans became easier to use, and coding powerful JSF applications is easier than ever. This recipe focuses on newer managed bean technology.
The example for this recipe demonstrates many of the most important features of a JSF managed bean. The view components refer to the managed bean as calculationController. By default, a JSF managed bean can be referred to within a JSF view using the name of the bean class with a lowercase first letter. However, using the @ManagedBean annotation, the string that is used to reference the bean from within a view can be changed. In the example, calculationController is also used as the name passed to the @ManagedBean annotation, but it could have easily been some other string. The @ManagedBean annotation should be placed before the class declaration.
@ManagedBean(name = "calculationController")
The bean in the example will be initialized when it is first accessed by a session and destroyed when the session is destroyed. It is a managed bean that “lives” with the session. The scope of the bean is configured by an annotation on the class, just before the class declaration. There are different annotations that can be used for each available scope. In this case, the annotation is @SessionScoped, denoting that the managed bean is session-scoped. All of the possible managed bean scopes are listed within Table 3-1.
Table 3-1.Managed Bean Scopes
| Scope Annotation | Description |
|---|---|
| @ApplicationScoped | Specifies that a bean is application scoped. Initialized when the application is started up. Destroyed when the application is shut down. Managed beans with this scope are available to all application constructs in the same application throughout the life of a session. |
| @ConversationScoped | Specifies that a bean is conversation scoped. Initialized when a conversation is started and destroyed when the conversation ends. Managed beans with this scope are available throughout the life cycle of a conversation, and belong to a single HTTP session. If the HTTP session ends, all conversation contexts that were created during the session are destroyed. |
| @CustomScoped | Specifies that the runtime must act as if a <managed-bean-scope>VALUE<managed-bean-scope> element was declared for the corresponding managed bean, where VALUE is the value of the value() attribute, which must be an EL expression that evaluates to a String. This allows the scope to be customized depending upon code-based values. |
| @Dependent | Specifies that a bean belongs to a dependent pseudo-scope. Beans that use this scope behave differently than managed beans containing any of the other scopes. To learn more about using this scope, please see Recipe 6-20. |
| @NoneScoped | Specifies that the runtime must act as if a <managed-bean-scope>none<managed-bean-scope> element was declared for the corresponding managed bean. This implies that there is no scope for the managed bean. This causes the bean to be instantiated each time it is referenced. This is useful in situations where beans reference each other and the referenced bean should not maintain a state. |
| @RequestScoped | Specifies that a bean is request scoped. Initialized when a request to the bean is made and destroyed when the request is complete. |
| @SessionScoped | Specifies that a bean is session scoped. Initialized when first accessed within a session. Destroyed when the session ends. Available to all servlet requests that are made within the same session. |
| @ViewScoped | Specifies that the runtime must act as if a <managed-bean-scope>view<managed-bean-scope> element was declared for the corresponding managed bean. In this case, the scope persists for a single web page (view) of an application within a user session. |
The @ManagedBean annotation specifies to the application server container that the class is a JSF managed bean. Prior to JSF 2.0, a managed bean had to be declared within the faces-config.xml file. The addition of annotations has made JSF managed beans XML configuration-free. It is important to note that the managed bean implements java.io.Serializable; all managed beans should be specified as serializable so that they can be persisted to disk by the container if necessary.
Fields declared within a managed bean should be specified as private in order to adhere to object-oriented methodology. To make a field accessible to the public and usable from JSF views, accessor methods should be declared for it. Any field that has a corresponding “getter” and “setter” is known as a JSF managed bean property. Properties are available for use within JSF views by utilizing lvalue JSF EL expressions, meaning that the expression is contained within the #{ and } character sequences and that it is readable and writable. For instance, to access the field num1 that is declared within the managed bean, the JSF view can use the #{calculationController.num1} expression, as you can see in the JSF view code for the example.
Any pubic method contained within a JSF managed bean is accessible from within a JSF view using the same EL expression syntax, that is, by specifying #{beanName.methodName} as the expression. In the example to this recipe, the performCalculation method of the managed bean is invoked from within the JSF view using an h:commandButton JSF component. The component action is equal to the EL expression that will invoke the JSF managed bean method. To learn more about JSF components and how to use them in view, please see Recipe 3-3 and Chapter 5.
<h:commandButton action="#{calculationController.performCalculation()}" value="Calculate"/>
![]() Note The input form for this example contains no action attribute. JSF forms do not contain action attributes since JSF components within the view are responsible for specifying the action method, rather than the form itself.
Note The input form for this example contains no action attribute. JSF forms do not contain action attributes since JSF components within the view are responsible for specifying the action method, rather than the form itself.
JSF managed beans are a fundamental part of the JSF web framework. They provide the means for developing dynamic, robust, and sophisticated web applications with the Java platform.
3-3. Building Sophisticated JSF Views with Components
Solution
Make use of bundled JSF components within your JSF views. JSF components contain bundled application logic and view constructs that can be used within applications by merely adding tags to a view. In the following example, several JSF components are used to create a view that displays the authors for an Apress book and allows for a new author to be added to the list. The following code is the XHTML for the JSF view:
<?xml version="1.0" encoding="UTF-8"?>
<!--
Book:  Java EE 7 Recipes
Recipe: 3-3 Organizing the Presentation for a JSF View
Author: J. Juneau
-->
<!DOCTYPE html PUBLIC "-//W3C//DTD XHTML 1.0 Strict//EN""http://www.w3.org/TR/xhtml1/DTD/xhtml1-strict.dtd">
<html xmlns="http://www.w3.org/1999/xhtml"
      xmlns:f="http://xmlns.jcp.org/jsf/core"
      xmlns:h="http://xmlns.jcp.org/jsf/html">
    <h:head>
        <meta http-equiv="Content-Type" content="text/html; charset=UTF-8"/>
        <title>Recipe 3-3: Building Sophisticated JSF Views with Components</title>
    </h:head>
    <h:body>
        <h:form id="componentForm">
            <h1>JSF Components, Creating a Sophisticated Page</h1>
            <p>
                The view for this page is made up entirely of JSF standard components.
                <br/>As you can see, there are many useful components bundled with JSF out of the box.
                <br/>
            </p>
            <p>Book Recommendation:  Java 7 Recipes
                <br/>
                <h:graphicImage id="java7recipes" library="image" name="java7recipes.png"/>
                <br/>

                <p>
                    Use the following form to add an author to the list.
                </p>
                <h:outputLabel for="newAuthorFirst" value="New Author First Name: "/>
                <h:inputText id="newAuthorFirst" value="#{authorController.newAuthorFirst}"/>
                <br/>
                <h:outputLabel for="newAuthorLast" value="New Author Last Name: "/>
                <h:inputText id="newAuthorLast" value="#{authorController.newAuthorLast}"/>
                <br/>
                <h:outputLabel for="bio" value="Bio:"/>
                <br/>
                <h:inputTextarea id="bio" cols="20" rows="5"
                                 value="#{authorController.bio}"/>
                <br/>
                <br/>
                <h:commandButton id="addAuthor" action="#{authorController.addAuthor}"
                                 value="Add Author"/>
                <br/>
                <br/>
                <h:dataTable id="authorTable" value="#{authorController.authorList}"
                             var="author">
                    <f:facet name="header">
                        Java 7 Recipes Authors
                    </f:facet>
             <h:column>
                    <h:outputText id="authorName" value="#{author.first} #{author.last}"/>
             </h:column>
                </h:dataTable>
                <br/>
                <br/>
            </p>
        </h:form>
    </h:body>
</html>
This example utilizes a JSF managed bean named AuthorController. The managed bean declares a handful of properties that are exposed in the view, and it also declares and populates a list of authors that is displayed on the page within a JSF h:dataTable component.
package org.javaeerecipes.chapter03.recipe03_03;

import java.io.Serializable;
import java.util.ArrayList;
import java.util.List;
import javax.faces.bean.ManagedBean;
import javax.faces.bean.SessionScoped;
import javax.inject.Named;

/**
 * Recipe 3-3
 * @author juneau
 */
@ManagedBean(name = "authorController")
@SessionScoped
public class AuthorController implements Serializable {

    private String newAuthorFirst;
    private String newAuthorLast;
    private String bio;
    private List<Author> authorList;

    /**
     * Creates a new instance of RecipeController
     */
    public AuthorController() {
        populateAuthorList();
    }

    private void populateAuthorList(){
        System.out.println("initializng authors");
        authorList = new ArrayList<>();
        authorList.add(new Author("Josh", "Juneau", null));
        authorList.add(new Author("Carl", "Dea", null));
        authorList.add(new Author("Mark", "Beaty", null));
        authorList.add(new Author("John", "O'Conner", null));
        authorList.add(new Author("Freddy", "Guime", null));


    }

    public void addAuthor() {
        getAuthorList().add(
                new Author(this.getNewAuthorFirst(),
                           this.getNewAuthorLast(),
                           this.getBio()));
    }

    /**
     * @return the authorList
     */
    public List<Author> getAuthorList() {
        return authorList;
    }

    /**
     * @param authorList the authorList to set
     */
    public void setAuthorList(List<Author> authorList) {
        this.authorList = authorList;
    }

    /**
     * @return the newAuthorFirst
     */
    public String getNewAuthorFirst() {
        return newAuthorFirst;
    }

    /**
     * @param newAuthorFirst the newAuthorFirst to set
     */
    public void setNewAuthorFirst(String newAuthorFirst) {
        this.newAuthorFirst = newAuthorFirst;
    }

    /**
     * @return the newAuthorLast
     */
    public String getNewAuthorLast() {
        return newAuthorLast;
    }

    /**
     * @param newAuthorLast the newAuthorLast to set
     */
    public void setNewAuthorLast(String newAuthorLast) {
        this.newAuthorLast = newAuthorLast;
    }

    /**
     * @return the bio
     */
    public String getBio() {
        return bio;
    }

    /**
     * @param bio the bio to set
     */
    public void setBio(String bio) {
        this.bio = bio;
    }
}
Finally, the Author class is used to hold instances of Author objects that are loaded into the authorList. The following code is for the Author class:
package org.javaeerecipes.chapter03.recipe03_03;

/**
 * Recipe 3-3
 * @author juneau
 */
public class Author implements java.io.Serializable {
    private String first;
    private String last;
    private String bio;

    public Author(){
        this.first = null;
        this.last = null;
        this.bio = null;
    }

    public Author(String first, String last, String bio){
        this.first = first;
        this.last = last;
        this.bio = bio;
    }
    /**
     * @return the first
     */
    public String getFirst() {
        return first;
    }

    /**
     * @param first the first to set
     */
    public void setFirst(String first) {
        this.first = first;
    }

    /**
     * @return the last
     */
    public String getLast() {
        return last;
    }

    /**
     * @param last the last to set
     */
    public void setLast(String last) {
        this.last = last;
    }

    /**
     * @return the bio
     */
    public String getBio() {
        return bio;
    }

    /**
     * @param bio the bio to set
     */
    public void setBio(String bio) {
        this.bio = bio;
    }
}
The resulting web page would resemble the page shown in Figure 3-3.
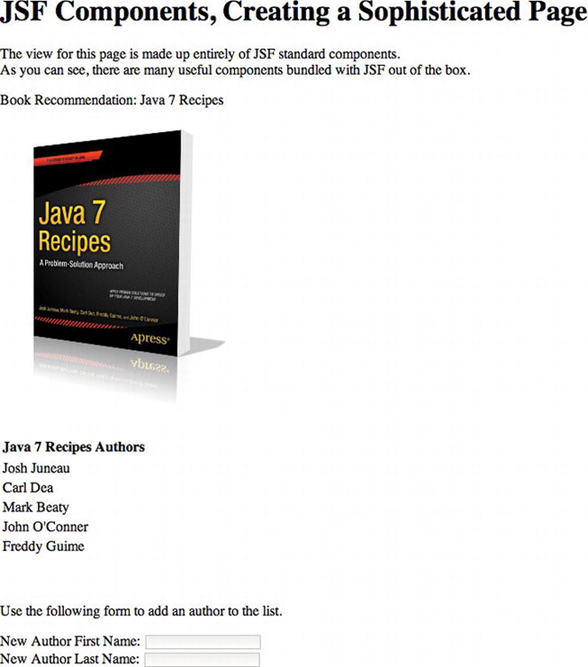
Figure 3-3. Sophisticated JSF view example
How It Works
JSF views are comprised of well-formed XML, being a mixture of HTML and JSF component tags. Any well-formed HTML can be used within a JSF view, but the components are the means by which JSF communicates with managed bean instances. There are components shipped with JSF that can be used for adding images to views, text areas, buttons, checkboxes, and much more. Moreover, there are several very good component libraries that include additional JSF components, which can be used within your applications. This recipe is meant to give you an overall understanding of JSF components and how they work. You can learn more details regarding JSF components and the use of external component libraries by reading the recipes in Chapter 5.
The first step toward using a component within a JSF view is to declare the tag library on the page. This is done within the HTML element at the top of the page. The example in this recipe declares both the JSF core component library and the JSF HTML component library within the HTML element near the top of the page. These two libraries are standard JSF component libraries that should be declared in every JSF view.
...
<html xmlns="http://www.w3.org/1999/xhtml"
      xmlns:f="http://xmlns.jcp.org/jsf/core"
      xmlns:h="http://xmlns.jcp.org/jsf/html">
...
Once a library is declared, a component from within that library can be used in the view by specifying the library namespace, along with the component you want to use. For instance, to specify an HTML element for displaying text, use the JSF h:outputText component tag, along with the various component attributes.
Prior to JSF 2.0, it was important to enclose a JSF view along with all of the components within the f:view tag. As of JSF 2.0, the tag is no longer required because the underlying Facelets view technology is part of every JSF view by default, so it takes care of specifying the view automatically. However, the f:view element can still be useful for specifying locale, content type, or encoding. Please see the online documentation for more information regarding the use of those features: http://docs.oracle.com/cd/E17802_01/j2ee/javaee/javaserverfaces/2.0/docs/pdldocs/facelets/index.html.
The <h:head> and <h:body> tags can be used to specify the header and body for a JSF web view. However, using the standard HTML <head> and <body> tags is fine also. Some Java IDEs will automatically use <h:head> and <h:body> in place of the standard HTML tags when writing JSF views. An important note is that you must enclose any content that will be treated as an HTML input form with the <h:form> JSF tag. This tag encloses a JSF form and renders an HTML form using a POST method if none is specified. No action attribute is required for a JSF form tag because the JSF managed bean action is invoked using one of the JSF action components such as h:commandButton or h:commandLink.
![]() Tip Always specify an id for the h:form tag because the form id is added as a prefix to all JSF component tag ids when the page is rendered. For instance, if a form id of myform contained a component tag with an id of mytag, the component id will be rendered as myform:mytag. If you do not specify an id, then one will be generated for you automatically. If you want to use JavaScript to work with any of the page components, you will need to have an id specified for h:form, or you will never be able to access them.
Tip Always specify an id for the h:form tag because the form id is added as a prefix to all JSF component tag ids when the page is rendered. For instance, if a form id of myform contained a component tag with an id of mytag, the component id will be rendered as myform:mytag. If you do not specify an id, then one will be generated for you automatically. If you want to use JavaScript to work with any of the page components, you will need to have an id specified for h:form, or you will never be able to access them.
![]() Note This recipe provides a quick overview of a handful of the standard JSF components. For an in-depth explanation of JSF components and their usage, please see Chapter 5.
Note This recipe provides a quick overview of a handful of the standard JSF components. For an in-depth explanation of JSF components and their usage, please see Chapter 5.
The standard JSF component library contains a variety of components, and a few of them are utilized in the example. The h:graphicImage tag can be used to place an image on the page and utilize a JSF managed bean if needed. The h:graphicImage tag is rendered into an HTML component, and as with all of the other JSF components, it accepts JSF EL expressions within its attributes, which allows for the rendering of dynamic images. In this recipe, a static image is specified with the url attribute, but an expression could also be used, making use of a JSF managed bean field. The library attribute is used to specify the directory in which the resource, in this case an image, resides.
<h:graphicImage id="java7recipes" library="image" name="java7recipes.png"/>
The h:outputLabel tag is useful for reading managed bean properties and displaying their values when the view is rendered. They are rendered as a label for a corresponding field within the view. The example utilizes static values for the h:outputLabel component, but they could include JSF expressions if needed. The h:outputText component is also useful for reading managed bean properties and displaying their values. This component renders basic text on the page. The difference between h:outputLabel and h:outputText is that they are rendered into different HTML tags. Both components can accept JSF managed bean expressions for their value attributes.
In the example, a couple of text fields are displayed on the page using the h:inputText component, which renders an input field. The value attribute for h:inputText can be set to a JSF managed bean field, which binds the text field to the corresponding managed bean property. For instance, the example includes an h:inputText component with a value of #{authorController.newAuthorFirst}, which binds the component to the newAuthorFirst property within the AuthorController class. If the field contains a value, then a value will be present within a text field when the page is rendered. If a value is entered into the corresponding text field and the form is submitted, the value will be set into the newAuthorFirst field using its setter method. The h:inputText tag allows for both reading and writing of managed bean properties because it uses lvalue JSF EL expressions. The h:inputTextarea tag is very similar to h:inputText in that it works the same way, but it renders a text area rather than a text field.
The h:commandButton component is used to render a submit button on a page. Its action attribute can be set to a JSF managed bean method. When the button is pressed, the corresponding managed bean method will be executed, and the form will be submitted. The request will be sent to the FacesServlet controller, and any properties on the page will be set. Please see Recipe 3-1 for more details regarding the JSF life cycle. The h:commandButton used in the example has an action attribute of #{authorController.addAuthor}, which will invoke the addAuthor method within the AuthorController managed bean. As you can see from the method, when invoked it will add a new Author object to the authorList, utilizing the values that were populated within the corresponding h:inputText components for the newAuthorFirst, newAuthorLast, and bio fields. The following excerpt from the example’s JSF view lists the h:commandButton component:
<h:commandButton id="addAuthor" action="#{authorController.addAuthor}"
                                 value="Add Author"/>
The last component in the example that bears some explanation is the h:dataTable. This JSF component is rendered into an HTML table, and it enables developers to dynamically populate tables with collections of data from a managed bean. In the example, the h:dataTable value attribute is set to the managed bean property of #{authorController.authorList}, which maps to an instance of ArrayList that is populated with Author objects. The dataTable var attribute contains a String that will be used to reference the different objects contained within each row of the table. In the example, the var attribute is set to author, so referencing #{author.first} within the dataTable will return the value for the current Author object’s first property. The dataTable in the example effectively prints out the first and last names of each Author object within the authorList. This is just a quick overview of how the JSF dataTable component works. For more details, please refer to Recipe 3-12.
As you work more with constructing JSF views, you will become very familiar with the component library. The tags will become second nature, and you will be able to construct highly sophisticated views for your application. Adding external JSF component libraries into the mix along with using Ajax for updating components is the real icing on the cake! You will learn more about spreading the icing on the cake and creating beautiful and user-friendly views in Chapter 5!
3-4. Displaying Messages in JSF Pages
Problem
You have the requirement to display an information message on the screen for your application users.
Solution
Add the h:messages component to your JSF view and create messages as needed within the view’s managed bean using FacesMessage objects. The following JSF view contains an h:messages component tag that will render any messages that were registered with FacesContext within the corresponding page’s managed bean. It also includes an h:message component that is bound to an h:inputText field. The h:message component can display messages that are specific to the corresponding text field.
<?xml version="1.0" encoding="UTF-8"?>
<!--
Book:  Java EE 7 Recipes
Recipe: 3-4 Displaying Messages in JSF Pages
Author: J. Juneau
-->
<!DOCTYPE html PUBLIC "-//W3C//DTD XHTML 1.0 Strict//EN""http://www.w3.org/TR/xhtml1/DTD/xhtml1-strict.dtd">
<html xmlns="http://www.w3.org/1999/xhtml"
      xmlns:f="http://xmlns.jcp.org/jsf/core"
      xmlns:h="http://xmlns.jcp.org/jsf/html">
    <h:head>
        <meta http-equiv="Content-Type" content="text/html; charset=UTF-8"/>
        <title>Recipe 3-4: Displaying Messages in JSF Pages</title>
    </h:head>
    <h:body>
        <h:form id="componentForm">
            <h1>JSF Messages</h1>
            <p>
                This page contains a JSF message component below. It will display
                messages from a JSF managed bean once the bean has been initialized.
            </p>
            <h:messages errorStyle="color: red" infoStyle="color: green" globalOnly="true"/>
            <br/>
            <br/>
            Enter the word Java here:
            <h:inputText id="javaText" value="#{messageController.javaText}"/>
            <h:message for="javaText" errorStyle="color: red" infoStyle="color: green"/>
            <br/><br/>
            <h:commandButton id="addMessage" action="#{messageController.newMessage}"
                             value="New Message"/>

        </h:form>
    </h:body>
</html>
The managed bean in this example is named MessageController. It will create a JSF message upon initialization, and then each time the newMessage method is invoked, another message will be displayed. Also, if the text java is entered into the text field that corresponds to the h:inputText tag, then a success message will be displayed for that component. Otherwise, if a different value is entered into that field or if the field is left blank, then an error message will be displayed. The following listing is that of MessageController:
package org.javaeerecipes.chapter03.recipe03_04;

import java.util.Date;
import javax.annotation.ManagedBean;
import javax.faces.bean.SessionScoped;
import javax.faces.application.FacesMessage;
import javax.faces.context.FacesContext;
/**
 * Recipe 3-4
 * @author juneau
 */
@SessionScoped
@ManagedBean
public class MessageController implements java.io.Serializable {
    int hitCounter = 0;
    private String javaText;

    /**
     * Creates a new instance of MessageController
     */
    public MessageController() {
        javaText = null;
        FacesMessage facesMsg = new FacesMessage(FacesMessage.SEVERITY_INFO, "Managed Bean Initialized", null);

        FacesContext.getCurrentInstance().addMessage(null, facesMsg);
    }

    public void newMessage(){
        String hitMessage = null;
        hitCounter++;
        if(hitCounter > 1){
            hitMessage = hitCounter + " times";
        } else {
            hitMessage = hitCounter + " time";
        }

        Date currDate = new Date();
        FacesMessage facesMsg = new FacesMessage(FacesMessage.SEVERITY_ERROR,
                "You've pressed that button " + hitMessage + "!  The current date and time: "
                + currDate, null);
        FacesContext.getCurrentInstance().addMessage(null, facesMsg);

        if (getJavaText().equalsIgnoreCase("java")){
            FacesMessage javaTextMsg = new FacesMessage(FacesMessage.SEVERITY_INFO,
                "Good Job, that is the correct text!", null);
            FacesContext.getCurrentInstance().addMessage("componentForm:javaText", javaTextMsg);
        } else {
            FacesMessage javaTextMsg = new FacesMessage(FacesMessage.SEVERITY_ERROR,
                "Sorry, that is NOT the correct text!", null);
            FacesContext.getCurrentInstance().addMessage("componentForm:javaText", javaTextMsg);
        }
    }

    /**
     * @return the javaText
     */
    public String getJavaText() {
        return javaText;
    }

    /**
     * @param javaText the javaText to set
     */
    public void setJavaText(String javaText) {
        this.javaText = javaText;
    }
}
The message will be displayed on the page in red text if it is an error message and in green text if it is an informational message. In this example, the initialization message is printed green, and the update message is printed in red.
How It Works
It is always a good idea to relay messages to application users, especially in the event that some action needs to be taken by the user. The JSF framework provides an easy façade that allows messages to be added to a view from the JSF managed bean. To use the façade, add the h:message component to a view for displaying messages that are bound to specific components, and add the h:messages component to a view for displaying messages that are not bound to specific components. The h:message component contains a number of attributes that can be used to customize message output and other things. It can be bound to a component within the same view by specifying that component’s id in the for attribute of h:message. The most important attributes for the h:message component are as follows:
- id: Specifies a unique identifier for the component
- rendered: Specifies whether the message is rendered
- errorStyle: Specifies the CSS styles to be applied to error messages
- errorClass: Indicates the CSS class to apply to error messages
- infoStyle: Specifies the CSS styles to be applied to informational messages
- infoClass: Indicates the CSS class to apply to informational messages
- for: Specifies the component for which the message belongs
For a list of all attributes available for the h:message component, please refer to the online documentation. In the example for this recipe, the h:message component is bound to the h:inputText component with an id of javaText. When the page is submitted, the newMessage method within the MessageController class is invoked. That method is used in this example for generating messages to display on the page. If the text entered within the javaText property matches Java, then a successful message will be printed on the page. To create a message, an instance of the javax.faces.application.FacesMessage class is generated, passing three parameters that correspond to message severity, message summary, and message detail. A FacesMessage object can be created without passing any parameters, but usually it is more productive to pass the message into the constructor at the time of instantiation. The general format for creating a FacesMessage object is as follows:
new FacesMessage(FacesMessage.severity severity, String summary, String detail)
Passing a static field from the FacesMessage class specifies the message severity. Table 3-2 shows the possible message severity values along with their descriptions.
Table 3-2. FacesMessage Severity Values
| Severity | Description |
|---|---|
| SEVERITY_ERROR | Indicates that an error has occurred |
| SEVERITY_FATAL | Indicates that a serious error has occurred |
| SEVERITY_INFO | Indicates an informational message rather than an error |
| SEVERITY_WARN | Indicates that an error may have occurred |
In the example, if the value entered for the javaText property equals Java, then an informational message is created. Otherwise, an error message is created. In either case, once the message is created, then it needs to be passed into the current context using FacesContext.getCurrentInstance().addMessage(String componentId, FacesMessage message). In the example, the method is called, passing a component ID of componentForm:javaText. This refers to the component within the JSF view that has an ID of javaText (h:inputText component). The componentForm identifier belongs to the form (h:form component) that contains the h:inputText component, so in reality the h:inputText component is nested within the h:form component. To reference a nested component, combine component IDs using a colon as a delimiter. The following is an excerpt from the example, demonstrating how to create a message and send it to the h:message component:
FacesMessage javaTextMsg = new FacesMessage(FacesMessage.SEVERITY_ERROR,
                "Sorry, that is NOT the correct text!", null);
FacesContext.getCurrentInstance().addMessage("componentForm:javaText", javaTextMsg);
The h:messages component can be used for displaying all messages that pertain to a view, or it can be used for displaying only non-component-related messages by using the globalOnly attribute. All other attributes for h:messages are very similar to the h:message component. By indicating a true value for the globalOnly attribute, you are telling the component to ignore any component-specific messages. Therefore, any FacesMessage that is sent to a specific component will not be displayed by h:messages. In the example, the message that is displayed by h:messages is generated in the same manner as the component-specific message, with the exception of specifying a specific component to which the message belongs. The following excerpt demonstrates sending an error message to the h:messages component. Note that the last argument that is sent to the FacesMessage call is a null value. This argument should be the clientId specification, and by setting it to null, you are indicating that there is no specified client identifier. Therefore, the message should be a global message rather than tied to a specific component.
FacesMessage facesMsg = new FacesMessage(FacesMessage.SEVERITY_ERROR,
                "You've pressed that button " + hitMessage + "!  The current date and time: "
                + currDate, null);
FacesContext.getCurrentInstance().addMessage(null, facesMsg);
Displaying the appropriate message at the right time within an application is very important. By utilizing FacesMessages objects and displaying them using either the h:message or h:messages component, you can ensure that your application users will be well informed of the application state.