
![]()
Java Message Service
The Java Message Service is an API that allows software to create, edit, read, and send messages between other software applications or components. The API allows resources to be created within an application server that facilitates messaging capability in various contexts. The application server houses connection factory and destination resources, and these resources are created and maintained by the application server. That said, different application server implementations might have minor differences in their JMS implementations.
In addition to the basic messaging facilities, JMS also provides the ability to send messages to destinations and publish messages to subscriptions. This chapter contains recipes that focus on basic concepts of JMS, as well as some advanced techniques and new additions to Java EE 7. When following along with the examples in this recipe, it should be noted that JMS could be used in various situations for creating many different types of messages. For brevity, this chapter will cover essential concepts and make use of TextMessage objects only. The examples will be invoked using JSF view actions, although in real-life applications, there are many different ways to implement the sending and receiving of messages. From internal message invocation, to scheduled tasks via an EJB timer, and even implementation of JMS messaging with EJB message driven beans, JMS can be utilized in many different contexts. After reading through the recipes, you should be able to apply the strategies utilized within the recipes in order to create the messaging system of your needs.
New to JMS 2.0 is a simplified API for sending and receiving messages. In this chapter, you will see both the standard API and the simplified API so that the differences can be compared. The updated API also includes enhancements to message subscriptions, delivery delay, and more. The breadth of JMS 2.0 is far too large for complete coverage in this single chapter. To learn about all of the new features, please refer to the JMS 2.0 specification.
![]() Note The examples in this chapter focus on working with JMS resources within a GlassFish application server environment. Some of the recipes demonstrate the use of NetBeans IDE for producing and working with JMS resources. However, although the focus is on GlassFish, the main concepts and techniques can be carried forth for just about every application server environment. For more specific details on working with another application server or IDE, please see the documentation that is specific to your environment.
Note The examples in this chapter focus on working with JMS resources within a GlassFish application server environment. Some of the recipes demonstrate the use of NetBeans IDE for producing and working with JMS resources. However, although the focus is on GlassFish, the main concepts and techniques can be carried forth for just about every application server environment. For more specific details on working with another application server or IDE, please see the documentation that is specific to your environment.
13-1. Creating JMS Resources
Problem
You would like to provide the ability to create a JMS resource to deploy within a GlassFish application server environment.
Solution #1
The easiest technique for creating JMS resources is to utilize an IDE, such as NetBeans. In this example, a standard JMS connection factory will be created for an application project utilizing the NetBeans IDE.
- Right-click the project within the NetBeans Projects navigator menu, choose New and then Other. The New File wizard will open, from which you will select the GlassFish menu option from the Categories select list, followed by the JMS Resource file type (see Figure 13-1).
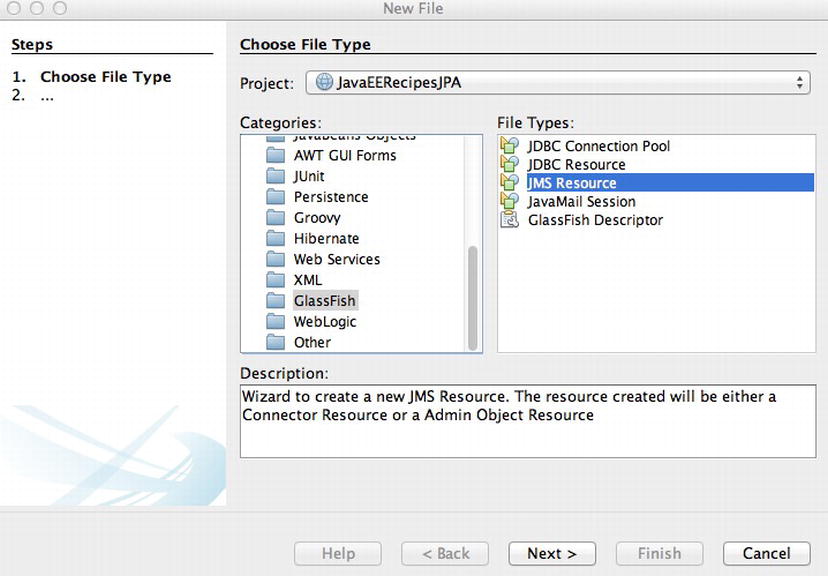
Figure 13-1. Create JMS Resource file from within NetBeans
- Within the New JMS Resource wizard, enter a JNDI Name (using jms/ prefix), and a description. If you would like to enable the resource, be sure to do so within this wizard screen as well. Next, select the resource type that you wish to create. In this example, we will demonstrate the creation of a connection factory, as seen in Figure 13-2.
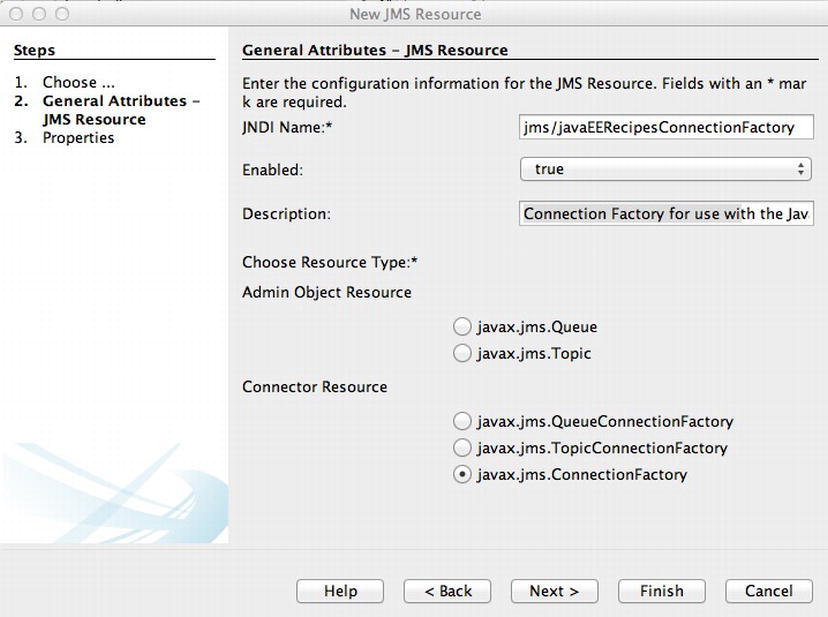
Figure 13-2. New JMS Resource wizard
- Click Finish, and a file named glassfish-resources.xml will be created within your project if it does not already exist. When you deploy the application project to the server, the resource will be automatically created for you, as shown in Figure 13-3.
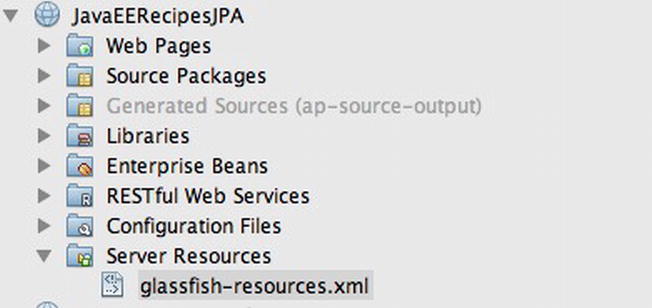
Figure 13-3. glassfish-resources.xml file within a NetBeans project
![]() Note You can utilize the same steps to create javax.jms.TopicConnectionFactory and javax.jms.QueueConnectionFactory resources.
Note You can utilize the same steps to create javax.jms.TopicConnectionFactory and javax.jms.QueueConnectionFactory resources.
Solution #2
Create a new JMS resource from within the GlassFish application server administrative console. In this recipe example, we will create a JMS destination resource. Specifically, we will walk through the creation of a javax.jms.Queue resource. Follow these steps to create the resource:
- Log into the GlassFish administrative console. Expand the Resources
 JMS Resources menu in the navigation tree to expose the Destination Resources menu option (see Figure 13-4).
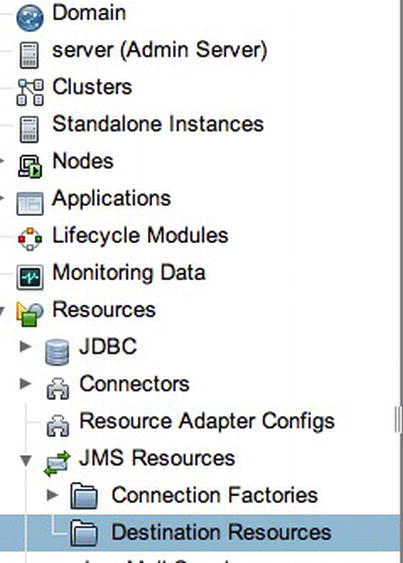
Figure 13-4. GlassFish administration console Destination Resource menu
- Click the New button within the JMS Destination Resource window to open the New JMS Destination Resource window (see Figure 13-5). Enter a JNDI name (beginning with jms/), followed by a unique name for the Physical Destination Name field. Finally, choose the Resource Type that you wish to create.
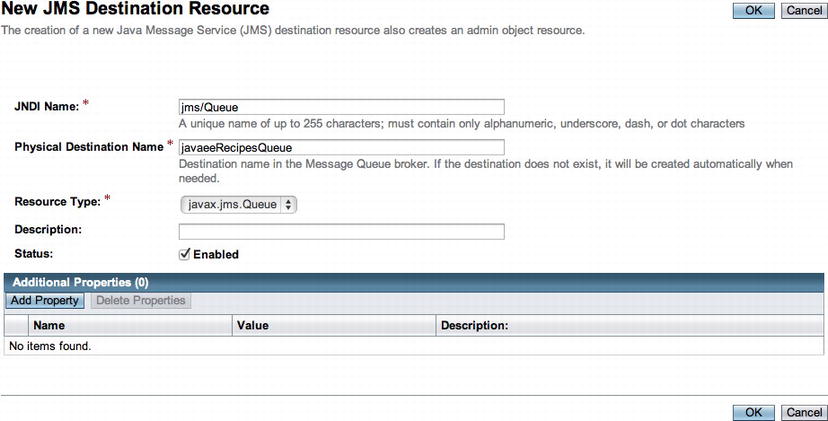
Figure 13-5. GlassFish administration console for new JMS destination resource
- Click OK to create the destination.
![]() Note The GlassFish asadmin create-jms-resource command can also be used to create JMS-administered objects from the command line. The asadmin tool can also be used to perform other tasks. For more information, please refer to the documentation at http://docs.oracle.com/cd/E26576_01/doc.312/e24928/asadmin-subcommands.htm.
Note The GlassFish asadmin create-jms-resource command can also be used to create JMS-administered objects from the command line. The asadmin tool can also be used to perform other tasks. For more information, please refer to the documentation at http://docs.oracle.com/cd/E26576_01/doc.312/e24928/asadmin-subcommands.htm.
How It Works
The JMS API utilizes administrative resources in order to create and consume messages. We refer to these resources as JMS resources. There are a couple of different types of JMS resources that can be created—connection resources and destination resources. The connection resources are used to create connections to a provider. There are three types of connection resources that can be created:
- ConnectionFactory: Instance of javax.jms.ConnectionFactory interface. Can be used to create JMS Topics and JMS Queue types
- TopicConnectionFactory: Instance of javax.jms.TopicConnectionFactory interface
- QueueConnectionFactory: Instance of javax.jms.QueueConnectionFactory interface
JMS connection factory resources are very similar to JDBC connection factories in that they provide a pool of connections that an application can use in order to connect and produce a session. There are many attributes that can be provided when creating connection factory resources:
- Initial and Minimum Pool Size: The initial and minimum number of connections that will be created and maintained by the connection pool.
- Maximum Pool Size: The maximum number of connections that can be created within the pool.
- Pool Resize Quantity: The number of connections that will be removed when the pool idle timeout expires.
- Idle Timeout: The maximum amount of time that connections can remain in the pool if they are idle. (Seconds)
- Max Wait Time: The maximum amount of time that a caller will wait before a connection timeout is sent. (Milliseconds)
- On Any Failure: If set to true (checked), all connections would be closed and reconnected on failure.
- Transaction Support: The level of transaction support (XATransaction, LocalTransaction, NoTransaction). The default is empty.
- Connection Validation: If set to true, then connections will need to be validated.
Solution #1 to this recipe demonstrates how to create a connection factory resource using the NetBeans IDE. This step-by-step procedure makes it easy to create such objects and deploy them to your GlassFish application server for use. You can also create connection factory objects using the GlassFish administrative console by following the steps that are provided in Solution #2 to this recipe and choosing the Connection Factories submenu rather than the Destination Resources submenu in step 1. ConnectionFactory objects are registered automatically with JNDI once created, and they can then be injected into Java classes and used. The following lines of code demonstrate how to inject a ConnectionFactory resource into a class:
@Resource(name = "jms/MyConnectionFactory")
private static ConnectionFactory connectionFactory;
Destination resources can also be created in a similar fashion to connection resources. Destination resources act as targets that receive or consume messages that are produced. Destination resources can be one of two types: javax.jms.Queue (Queue) or javax.jms.Topic (Topic). A Queue is a destination resource that consumes messages in a point-to-point (PTP) manner, much like a one-way line of traffic. When a producer sends a message to a queue, the message will stay in the queue until it is consumed. A topic is a destination that is used in a pub/sub scenario, whereas messages sent to a Topic may be consumed by multiple receivers. One or more receivers can subscribe to a Topic.
Solution #2 demonstrates how to create a destination resource within a GlassFish application server, using the GlassFish administrative console. The console provides a wizard that can be used to easily create a destination resource. The most important piece of information to provide when creating a destination is the name. As with any JMS resource, the JNDI name should begin with the jms/ prefix. When creating a destination resource, a unique name must also be provided for the Destination Resource Name, although other Java EE application servers may or may not make this a mandatory specification. Destination resources can be injected into Java classes in the same manner as ConnectionFactory resources. The following lines of code demonstrate the injection of a Topic resource.
@Resource(name="jms/myTopic")
private Topic myTopic;
13-2. Creating a Session
Problem
You would like to create a JMS session so that you can send or consume messages.
Solution
Create a connection so that you can subsequently create one or more sessions, which in turn, can send messages to destinations or consume messages. In order to create a connection, obtain a ConnectionFactory object by injection via the @Resource annotation, and call its createConnection method as demonstrated in the following line of code:
Connection connection = connectionFactory.createConnection();
After you have created a connection, you need to start a session. In order to do so, call the connection objects createSession method as follows:
Session session = connection.createSession(false,
     Session.AUTO_ACKNOWLEDGE);
![]() Note if you are using the simplified JMS API, which is covered in more detail in Recipe 13-3, you do not need to manually create a JMS session. The creation of a JMS session is only required when utilizing the standard API.
Note if you are using the simplified JMS API, which is covered in more detail in Recipe 13-3, you do not need to manually create a JMS session. The creation of a JMS session is only required when utilizing the standard API.
If you take a look at the sources that can be found in the JavaEERecipes project within the org.javaeerecipes.chapter13 package, you can see a full demonstration for creating a JMS session. To see the example in action, deploy the JavaEERecipes project to your GlassFish application server after setting up a JMS connection factory (see Recipe 13-1), and visit the following URL:
http://localhost:8080/JavaEERecipes/faces/chapter13/recipe13_02.xhtml
How It Works
Before you can begin to send or consume messages, you must obtain a JMS connection so that you can start a session. A session can be used to create JMS resources such as Message Consumers, Message Producers, Messages, Queue Browsers, and Temporary Queues and Topics. A session can be created using a Connection object. To create a session, call a Connection object’s createSession method, and pass the appropriate arguments depending upon your application’s needs. The createSession syntax is as follows:
createSession(boolean isTransacted, int acknowledgementType)
The first argument to the createSession method is a Boolean value to indicate if transactions should take place within the session. If a session is created as transacted (set to true for the first argument to createSession), acknowledgment occurs once the entire transaction is successfully committed. If for some reason the transaction is not committed, the entire transaction is rolled back, and all messages are redelivered. However, if a session is not transacted, one must indicate which type of acknowledgment must be received to consider a message successfully sent. The second argument to the createSession method indicates the acknowledgment type. Table 13-1 lists the different acknowledgment types along with a description of each.
Table 13-1. JMS Session Message Acknowledgment
| Acknowledgment Type | Description |
|---|---|
| Session.AUTO_ACKNOWLEDGE | The session automatically acknowledges a client’s receipt of a message, either when the client has successfully returned from a call to receive or when the MessageListener it has called to process the message has successfully returned. |
| Session.CLIENT_ACKNOWLEDGE | The client acknowledges the receipt of a message by calling the message’s acknowledge method. |
| Session.DUPS_OK_ACKNOWLEDGE | Lazy acknowledgment of messages, allowing duplicates to be received. |
In the solution to this recipe, the session that is created is nontransactional, and the receipt type is Session.AUTO_ACKNOWLEDGE. This is the most common type of JMS session that is created. Once the session has been created, then it can be used to create JMS resources.
13-3. Creating and Sending a Message
Problem
You wish to create and send a JMS message.
Solution #1
Make use of the standard API to create and send a message. To do so, create a Message object with respect to the type of message you wish to send, and then create and use a message producer in order to send messages to a destination. To create a message, first decide upon the type of message that you wish to send. Once decided, create the appropriate message object from the JMS session. In this example, we’ll demonstrate the creation of a text message. The following lines of code demonstrate how to create a text message including a String.
TextMessage message = session.createTextMessage();
message.setText("Java EE 7 Is the Best!");
Next, to create a MessageProducer and send the message, call a JMS session’s createProducer method, and pass the object type of the destination to which you wish to send a message. The following lines of code demonstrate how to create a message producer and send the text message that was created in the previous lines. The first lines of code demonstrate how to inject the destination resource, and then the actual creation of the message producer and sending of the message follows.
@Resource(name="jms/javaEERecipesQueue")
private Queue myQueue;
...
    public void sendMessage() {
        if (connection != null) {
            System.out.println("Creating Session");
            try(Session session = connection.createSession(false, Session.AUTO_ACKNOWLEDGE);
                ) {
                myQueue = (Queue) getContext().lookup("jms/javaEERecipesQueue");
                MessageProducer producer = session.createProducer(myQueue);
                TextMessage message = session.createTextMessage();
                message.setText("Java EE 7 Is the Best!");

                producer.send(message);
                producer.close();
                setConnectionString("Message Successfully Sent to Queue");

            } catch (NamingException | JMSException ex) {
                System.out.println(ex);
                setConnectionString("Session not created and message not sent");
            }
        } else {
            setConnectionString("No connection available");
        }
    }
Solution #2
Make use of the simplified API to create and send a message. To utilize the simplified API, create a JMSContext object, and then utilize it to create a MessageProducer and send the message to the appropriate destination. In the following example, a simple String-based message is sent to a Queue using the simplified API. This technique provides the same result as Solution #1.
@Resource(name = "jms/javaEERecipesConnectionFactory")
    private ConnectionFactory connectionFactory;
    @Resource(lookup = "jms/javaEERecipesQueue")
    Queue inboundQueue;
...
    public void sendMessageNew() {
        try (JMSContext context = connectionFactory.createContext();) {
            StringBuilder message = new StringBuilder();
            message.append("Java EE 7 Is the Best!");
            context.createProducer().send(inboundQueue, message.toString());
        }
    }
An example that can be run from within a JSF view has been created for this recipe. The code found at org.javaeerecipes.chapter13.Example13_03.java contains a managed bean that includes a sendMessage method that utilizes the standard API implementation, and a sendMessageNew method that utilizes the simplified API. Both methods are responsible for creating a message and sending it to a destination Queue. By running the example, you can look at the server log to see the output from the method. Deploy the JavaEERecipes project and visit the following URL to run the example: http://localhost:8080/JavaEERecipes/faces/chapter13/recipe13_03.xhtml.
How It Works
The reason that any application makes use of JMS is to incorporate the ability to send or receive messages. Therefore, it is no surprise that the JMS API has been developed to make these tasks very easy for the developer. In Java EE 7, things get even easier using the simplified JMS API. Let’s begin by discussing the steps that are needed to utilize the standard API for sending a JMS message. To send a JMS message using the standard API, you need to create a resource destination for your message, and obtain a connection and a JMS session, as seen in Recipes 13-1 and 13-2. Once you have obtained a JMS session, the next step is to create a MessageProducer using the Session createProducer method, passing the destination as an argument. After this legwork has been completed, the message can be constructed. You can create a message by calling the javax.jms.Session method that corresponds to the type of message that you wish to create. To see all of the available methods, please refer to the online documentation at http://docs.oracle.com/javaee/6/api/javax/jms/Session.html. In the example for this recipe, a text message is created by calling the session.createTextMessage() method. The text is then set by calling the TextMessage object’s setText method.
Once a message has been created, a MessageProducer must be created in order to facilitate the sending of the message. Again, javax.jms.Session comes to the rescue here as we can call its createProducer method, passing the destination resource for which we’d like to create the MessageProducer. Once created, the producer’s sendMessage method can be invoked, passing the message that you wish to send.
As mentioned previously, the javax.jms.Session can be used to generate different message types. Table 13-2 lists the different message types that can be created, along with a description.
Table 13-2. JMS Message Types
When utilizing the simplified API that was introduced with Java EE 7, there are a few shortcuts that can be made. To compare Solution #1 with Solution #2, you can see that there are fewer lines of code in the second solution. The simplified API enables developers to produce the same results as the standard API with much less code. A JMSContext object is obtained via a call to the ConnectionFactory’s createContext method, and it can be used to begin a chain of method invocations that will result in the sending of a message in just one line of code. To break it down a bit, after the JMSContext has been obtained, its createProducer method can be called, chaining a call to the send method, passing the Queue and the message to be sent.
JMS message implementations may vary between the different application server products. However, all JMS messages types share some common characteristics. For instance, all JMS messages implement the javax.jms.Message interface. Messages are composed of a header, properties, and a body. The header of a message contains values that are utilized by clients and providers for routing and identification purposes, properties provide message filtering, and the body portion of the message carries the actual message content. The message header is used for linking messages to one another, and a field named the JMSCorrelationID contains this content. Message objects contain the ability to support application-defined property values. The properties can be set via a construct known as message selectors, and they are responsible for filtering messages. For more-detailed information regarding message properties, please see the online documentation at http://docs.oracle.com/javaee/6/api/javax/jms/Message.html. The body varies across the different message types, as listed in Table 13-2.
It can be useful to add properties and headers to a particular message in order to allow message consumers to have filtering capabilities via JMS message selectors. To learn more about using JMS message selectors, please refer to Recipe 13-5.
13-4. Receiving Messages
Problem
You would like to receive messages that have just been sent by a JMS producer.
Solution #1
Make use of the standard JMS API to create a message consumer. Using the JMS session, create the message consumer by calling the createConsumer method, passing the type of message consumer that you would like to create. Once the message consumer object has been created, invoke the start method on the JMS connection object, and then call the consumer objects receive method to receive a message. In the following example managed bean controller, a message consumer will be created and set up to receive the message that was sent by the producer in Recipe 13-3.
The following code excerpt is taken from the org.javaeerecipes.chapter13.recipe13_04.Example13_04.java source file. The method named receiveMessage is responsible for consuming messages from a specified destination point Queue.
public void receiveMessage() {
        boolean stopReceivingMessages = false;
        if(connection == null){
            createConnection();
        }
        try(Session session = connection.createSession(false, Session.AUTO_ACKNOWLEDGE);) {
            createConnection();
            myQueue = (Queue) getContext().lookup("jms/javaEERecipesQueue");
            try (MessageConsumer consumer = session.createConsumer(myQueue)) {
                connection.start();

                while (!stopReceivingMessages) {
                    Message inMessage = consumer.receive();
                    if (inMessage != null) {
                        if (inMessage instanceof TextMessage) {
                            String messageStr = ((TextMessage) inMessage).getText();
                            setDisplayMessage(messageStr);
                        } else {
                            setDisplayMessage("Message was of another type");
                        }
                    } else {
                        stopReceivingMessages = true;
                    }
                }
                connection.stop();
            }
        } catch (NamingException | JMSException ex) {
            Logger.getLogger(Example13_04.class.getName()).log(Level.SEVERE, null, ex);
        } finally {
            if (connection != null){
                closeConnection();
            }
        }
    }
Solution #2
Utilize the simplified API to create a message consumer. Utilize a JMSContext object to create the JMSConsumer in an efficient and simplified manner. The following example method resides within a managed bean controller. The message consumer in this example will be created and set up to receive the message that was sent by the producer in Recipe 13-3.
public String receiveMessageNew() {
    try (JMSContext context = connectionFactory.createContext()) {
        JMSConsumer consumer = context.createConsumer(myQueue);
        return consumer.receiveBody(String.class);
    }
}
The JavaEERecipes project contains a working example for this recipe that demonstrates the sending and receiving of JMS messages. To view the example, you will need to deploy the project to your GlassFish application server and then visit the following URL:
http://localhost:8080/JavaEERecipes/faces/chapter13/recipe13_04.xhtml
How It Works
The receiving client of a message is also known as the message consumer. Message consumers can be created using the standard or the simplified JMS API. We will compare these two approaches in this section to give you an idea of the differences between the two.
Using the standard API, a consumer is created from JMS Session objects in the same manner that producers are created (see Recipe 13-3), calling the createConsumer method of JMS Session and passing the destination object from which the consumer will listen for and accept messages. Message consumers have the ability to consume messages that are waiting within a queue, and they listen indefinitely for new incoming messages.
To set up a consumer, call the JMS Session object’s createConsumer method, and pass the destination object that you wish to consume from. The next step is to call the JMS Connection start method. This will tell JMS that the consumer is ready to begin receiving messages. After invoking the connection.start() method, a consumer can receive a message by calling the Consumer object’s receive method, optionally passing time in milliseconds for the consumer to listen for messages. If no time limit is specified, the consumer will listen indefinitely.
As you can see from the example in this recipe, once the receive method is called, a Message object is retrieved. Once the message is received, the application can glean whatever it needs by calling the Message object’s getter methods accordingly.
Now let’s take a look at using the simplified API. As you can see from Solution #2, there are fewer lines of code required to produce the same result achieved from Solution #1. The JMSContext object aids in producing less code by calling its createConsumer method and passing the resource from which the application will need to consume messages. This method call will return a JMSConsumer, which has a similar API to MessageConsumer, with the ability to receive messages both synchronously and asynchronously. In the example, a String message is consumed synchronously.
![]() Note It is possible to create an asynchronous consumer by registering a MessageListener with the MessageConsumer. After a listener has been registered for the consumer, the listener’s onMessage() method will be called each time a message has been delivered. For instance, the following code could be used to register a listener to the consumer that was created within the example for this recipe.
Note It is possible to create an asynchronous consumer by registering a MessageListener with the MessageConsumer. After a listener has been registered for the consumer, the listener’s onMessage() method will be called each time a message has been delivered. For instance, the following code could be used to register a listener to the consumer that was created within the example for this recipe.
javax.jms.MessageListener javaEERecipesListener = new MyMessageListener();
consumer.setMessageListener(javaEERecipesListener);
13-5. Filtering Messages
Problem
You would like to provide properties for your messages that will make it easier for consumers to filter through and find messages of their choice.
Solution
Utilize message selectors in order to filter the messages that are being consumed. Message selectors are String-based expressions that can be assigned to consumers upon creation, and they are generally used to filter the types of messages that a consumer will receive. In the following example, both the sendMessage1 and sendMessage2 methods create JMS messages. The sendMessage1 method sets a property named TYPE with a value of JAVAEE on the message. After setting this property, a MessageProducer is created and the message is sent. The sendMessage2 method sets a property named TYPE with a value of JAVASE on the message. Just like sendMessage1, the sendMessage2 method then creates a MessageProducer and sends the message. The receiveMessage method sets up a MessageConsumer with a selector specified to only consume messages with a property of TYPE that include a value of JAVAEE.
The following excerpt has been taken from the class named org.javaeerecipes.chapter13.recipe13_05.Example13_05.java.
public void sendMessage1() {
        if (connection != null) {
            try (Session session = connection.createSession(false, Session.AUTO_ACKNOWLEDGE);
                    MessageProducer producer = session.createProducer(myQueue);) {
                TextMessage message = session.createTextMessage();
                message.setText("Java EE 7 Is the Best!");
                message.setStringProperty("TYPE", "JAVAEE");
                producer.send(message);

            } catch (JMSException ex) {
                System.out.println(ex);

            }
        }

    }

    public void sendMessage2() {
        if (connection != null) {
            try (Session session = connection.createSession(false, Session.AUTO_ACKNOWLEDGE);
                    MessageProducer producer = session.createProducer(myQueue);) {

                System.out.println("Creating message");
                TextMessage message2 = session.createTextMessage();
                message2.setText("Java SE 7 Is Great!");
                message2.setStringProperty("TYPE", "JAVASE");
                producer.send(message2);

            } catch (JMSException ex) {
                System.out.println(ex);

            }
        }

    }

    public void receiveMessage() {
        boolean stopReceivingMessages = false;
        String selector = "TYPE = 'JAVAEE'";
        try(Connection connection = connectionFactory.createConnection();
            Session session = connection.createSession(false, Session.AUTO_ACKNOWLEDGE);
            MessageConsumer consumer = session.createConsumer(myQueue, selector);) {

            connection.start();

            while (!stopReceivingMessages) {
                Message inMessage = consumer.receive();
                if (inMessage != null) {
                    if (inMessage instanceof TextMessage) {
                        String messageStr = ((TextMessage) inMessage).getText();
                        setDisplayMessage(messageStr);
                    } else {
                        setDisplayMessage("Message was of another type");
                    }
                } else {
                    stopReceivingMessages = true;
                }

            }
            connection.stop();

        } catch (JMSException ex) {
            System.out.println(ex);
        }
    }
If you deploy the JavaEERecipes project, you can run the example by pointing your browser to the following URL: http://localhost:8080/JavaEERecipes/faces/chapter13/recipe13_05.xhtml. You can click the Receive Messages button to start the consumer. Then click on the “Send EE Message” and “Send SE Message” buttons to send messages, which contain different property values. Watch the server log to see output pertaining to the browsed messages.
How It Works
Message selectors are String-based expressions that can be assigned to consumers upon creation. To create a selector, form a String that contains an expression with syntax based on a subset of the SQL 92 conditional expression syntax. The expression String should formulate the filter that you wish to use when consuming messages. An expression will look very much like the WHERE clause of a database query. In the example for this recipe, the selector is set to the following String:
TYPE = 'JAVAEE'
This selector causes the consumer to filter all messages that are received and only consume those messages containing a property named TYPE that is assigned a value of JAVAEE. Standard SQL 92 can be used to combine filters and build an expression that will provide the filtering capability that is required by the consumer.
To assign the selector to a consumer, pass it to the JMS session createConsumer method. After doing so, any messages received by the created consumer will be filtered based upon the selector expression.
13-6. Inspecting Message Queues
Problem
Your application makes use of a JMS queue and you would like to browse through each of the messages within the queue without removing them.
Solution
Create a QueueBrowser object and use it to browse through each of the messages that are contained within the queue.
In the following excerpt from Java class org.javaeerecipes.chapter13.Example13_06.java, the browseMessages() method connects to a JMS session, creates a browser queue, and traverses the messages within the queue.
public void browseMessages() {

        try(Connection connection = connectionFactory.createConnection();
            Session session = connection.createSession(false, Session.AUTO_ACKNOWLEDGE);
            QueueBrowser browser = session.createBrowser(myQueue);) {

            Enumeration msgs = browser.getEnumeration();

            if(!msgs.hasMoreElements()){
                System.out.println("No more messages within the queue...");
            } else {
                while(msgs.hasMoreElements()){
                    Message currMsg = (Message)msgs.nextElement();
                    System.out.println("Message ID: " + currMsg.getJMSMessageID());
                }
            }

        } catch (JMSException ex) {
            System.out.println(ex);
        }
    }
If you deploy the JavaEERecipes project, you can run the example by pointing your browser to the following URL: http://localhost:8080/JavaEERecipes/faces/chapter13/recipe13_06.xhtml. You can click the Send Message button within the view several times, and then click on the Browse Through Messages button, and watch the server log to see output pertaining to the browsed messages.
How It Works
There are times when it is important to have the ability to search through messages in order to find the one that you would like to read. In circumstances such as these, message queue browsers come to the rescue. A QueueBrowser object provides the ability for an application to search through each message within a queue and display the header values for each of them. This capability can be important if the message header contains important information that helps to differentiate each type of message that is sent by a particular application. The JMS QueueBrowser object makes it easy to sift through messages in order to find the one you would like, using similar semantics as those that are used to create other JMS objects.
To create a QueueBrowser, you must first have an open JMS session object. You can then call the Session object’s createBrowser method, passing the JMS destination type as an argument. Therefore, if you wish to browse messages in a queue that is named jms/myQueue, you would pass the injected resource for jms/myQueue to the createBrowser method. Once you have created a browser object, simply iterate over the messages and browse through them using the Enumeration that is returned from the call to the browser.getEnumeration() method.
13-7. Creating Durable Message Subscribers
Problem
You would like to ensure that an application receives all published messages, even when the subscriber is not active.
Solution
Create a durable subscriber for the Topic destination that will be used to send and receive messages. Once created, messages can be published to the topic using the standard message publishing techniques, as demonstrated within Recipe 13-3, sending to the Topic destination that contains the subscription. The messages can then be consumed via a message consumer that has been created using said Topic and subscription.
In this example, a durable message subscriber is created, the message is created and published to the Topic destination, and finally, the message is consumed.
Topic connections are a bit different than Queue connections in that they utilize an object named TopicConnection, rather than a standard Connection object. Moreover, a TopicConnectionFactory must be injected into an object in order to create a TopicConnection. The following lines of code demonstrate how to create a connection factory to generate TopicConnections for working with subscriptions.
@Resource(name = "jms/javaEERecipesConnectionFactory")
    private TopicConnectionFactory connectionFactory;
TopicConnection connection = (TopicConnection) connectionFactory.createConnection();
connection.setClientID("durable");
Creating the Initial Durable Subscriber
When creating a durable subscriber, an initial durable subscriber must be created prior to sending any messages to the Topic. This initial subscriber will initialize the subscription and make it available for publishing and receiving purposes. The following code excerpt, taken from org.javaeerecipes.chapter13.recipe13_07.Example13_07.java, demonstrates the creation of a durable subscriber.
public void createTopicSubscriber(){
        try {
            createConnection();
            TopicSession session = connection.createTopicSession(false, Session.AUTO_ACKNOWLEDGE);
            myTopic = (Topic) getContext().lookup("jms/javaEERecipesTopic");
            TopicSubscriber subscriber = session.createDurableSubscriber(myTopic, "javaEERecipesSub");
            connection.close();
        } catch (javax.naming.NamingException | JMSException ex) {
            Logger.getLogger(Example13_07.class.getName()).log(Level.SEVERE, null, ex);
        }
    }
For the demonstration application, a JSF h:commandButton component invokes this method so that you can watch the output occurring within the server log.
Creating and Publishing a Message
Creating and publishing a message to a Topic is much like publishing messages to a Queue. However, instead of creating a Producer, a Publisher is generated. The following code excerpt, taken from org.javaeerecipes.chapter13.recipe13_07.Example13_07.java, demonstrates the creation of a Message and then it is published to the durable subscriber.
public void sendMessage() {
        try {
            createConnection();
                System.out.println("Creating session");
                TopicSession session = connection.createTopicSession(false, Session.AUTO_ACKNOWLEDGE);
                System.out.println("Creating message");
                TextMessage message = session.createTextMessage();
                message.setText("Java EE 7 Is the Best!");
                message.setStringProperty("TYPE", "JAVAEE");

                System.out.println("Creating producer");
                myTopic = (Topic) getContext().lookup("jms/javaEERecipesTopic");
                TopicPublisher publisher = session.createPublisher(myTopic);
                System.out.println("Sending message");
                publisher.publish(message);

                System.out.println("Message sent, closing session");
                publisher.close();
                session.close();
                connection.close();

        } catch (NamingException | JMSException ex) {
            Logger.getLogger(Example13_07.class.getName()).log(Level.SEVERE, null, ex);

        }
This method is also bound to an h:commandButton component for our example view, and you can see more output generated from the actions that take place within the method.
Each message created and published to the Topic is later consumed by subscriber(s) to the Topic. The method demonstrates how to create a durable subscriber and receive messages from it.
public void receiveMessage() {
        boolean stopReceivingMessages = false;
        try {
            createConnection();
            System.out.println("Creating session to receive message");
            TopicSession session = connection.createTopicSession(false, Session.AUTO_ACKNOWLEDGE);
            myTopic = (Topic) getContext().lookup("jms/javaEERecipesTopic");
            System.out.println("Setting up consumer");

            String selector = "TYPE = 'JAVAEE'";
            TopicSubscriber subscriber = session.createDurableSubscriber(myTopic, "javaEERecipesSub");
            connection.start();

            while (!stopReceivingMessages) {
                System.out.println("Receiving message");
                Message inMessage = subscriber.receive();
                if (inMessage != null) {
                    System.out.println(inMessage);
                    if (inMessage instanceof TextMessage) {
                        String messageStr = ((TextMessage) inMessage).getText();
                        System.out.println(messageStr);
                        setDisplayMessage(messageStr);
                    } else {
                        System.out.println("Message was of another type");
                        setDisplayMessage("Message was of another type");
                    }
                } else {
                    stopReceivingMessages = true;
                }

            }
            connection.stop();
            subscriber.close();

            session.close();
            closeConnection();
        } catch (NamingException | JMSException ex) {
            Logger.getLogger(Example13_07.class.getName()).log(Level.SEVERE, null, ex);
        }
    }
The receiveMessage method is bound to an h:commandButton component within the JSF view in the example program, and you can follow along with the output that can be seen in the server log.
Unsubscribing from the Subscription
It is important to unsubscribe from a subscriber when finished using it because subscribers use up additional resources, as discussed in the How it Works section. The following method demonstrates how to unsubscribe.
public void unsubscribe(){
        try {
            createConnection();
            TopicSession session = connection.createTopicSession(false, Session.AUTO_ACKNOWLEDGE);
            // close subscriber if open, then unsubscribe
            session.unsubscribe("javaEERecipesSub");
            connection.close();
        } catch (JMSException ex) {
            Logger.getLogger(Example13_07.class.getName()).log(Level.SEVERE, null, ex);
        }
    }
An example that binds all the methods shown in this recipe to JSF views can be executed by deploying the JavaEERecipes project to your GlassFish server, and visiting the following URL:
http://localhost:8080/JavaEERecipes/faces/chapter13/recipe13_7.xhtml
How It Works
A message subscription is a JMS consumer that retains a durable connection to a specified topic destination. Message subscriptions cannot be made for Queue destinations, only for Topics because they utilize publish/subscribe messaging. By default, a durable subscriber remains persistent, because the delivery mode is PERSISTENT by default. Subscriptions are stored in a server cache so that they can be retrieved in the event of a server failure. Because durable message subscribers retain messages in a cache, they take up a larger memory footprint. Therefore, it is important that subscribers remain subscribed only as long as necessary, and then unsubscribe to release the memory.
![]() Note Durable subscriptions can only have one subscriber at a time.
Note Durable subscriptions can only have one subscriber at a time.
To work with message subscribers, a special set of connection and session objects must be used. To start, you must inject a TopicConnectionFactory into any object that will make use of Topics. A TopicConnection can be created by calling the createTopicConnection method. A TopicSession must be created, in turn, form the TopicConnection. The TopicSession object can be used to create durable message subscribers and message publishers.
When creating a subscriber, one must invoke the JMS session method, createDurableSubscriber, and pass the Topic destination, along with a String that is used to identify the subscriber. The String identifier is important because this is the identifier that will be used by consumers to subscribe to the messages being published to the Topic. A TopicSubscriber object is generated from the createDurableSubscriber method, and it is important to create the initial durable subscriber in order to create the Topic subscription. Once the initial durable subscriber has been created, messages can be sent to the subscription, and consumers can subscribe to it.
To create a message and send it to a subscription, the JMS session createPublisher method must be invoked, passing the Topic destination object as an argument. The call to createPublisher will generate a TopicPublisher object, which can be utilized for publishing messages to a Topic subscription. Any type of message can be sent to a Topic. To learn more about the different types of messages that can be sent, please refer to Recipe 13-3. Any number of messages can be sent to a topic, and if a consumer has subscribed to the subscriber, it will receive the messages. New subscribers will begin receiving messages that are sent to the subscription after the time when they’ve subscribed.
In order to subscribe to a Topic, a TopicSubscriber object should be created by calling the JMS session createDurableSubscriber method, passing the Topic destination object and the String-based identifier that was originally used to establish the subscriber. Once the TopicSubscriber has been created, messages can be consumed as usual, invoking the TopicSubscriber receive method for each message that will be consumed. Typically, an application will set a boundary limit to the number of messages that will be consumed, and perform a loop to receive that number of messages from a subscribed Topic.
Since a durable subscription creates a memory footprint, it is essential for consumers to unsubscribe when finished with the Topic. If a consumer does not unsubscribe, the application server will starve other subscriber resources, and will eventually run out of usable memory. To unsubscribe a consumer, invoke the JMS session unsubscribe method, passing the String-based name of the subscriber. I told you that the String you use for identifying the subscriber was important!
It is sometimes useful to create message subscriptions for certain circumstances. Pertinent situations for using a subscriber may include a subscription for client consumers to receive messages regarding application errors, or for an alert system so that administrators can subscribe to alerts that they wish to receive. In any case, durable subscriptions can be useful, so long as they are used sparingly and maintained in an appropriate manner.
13-8. Delaying Message Delivery
Problem
You would like to delay a message that is being sent.
Solution
Set the time of delay in milliseconds by calling the producer’s setDeliveryDelay(long) method. In the following example, the message sending will be delayed by 1000 milliseconds.
TopicPublisher publisher = session.createPublisher(myTopic);
publisher.setDeliveryDelay(1000);
How it Works
In JMS 2.0, it is possible to delay the delivery of a message. The JMS API provides a method, setDeliveryDelay, for producers. This method can be called, passing the delay time in milliseconds, prior to sending the message. Once the delay has been set, this will cause all subsequent message deliveries by that producer to be delayed.