
Chapter 13
Creating Web Applications
This chapter covers Tomcat and Jetty, two of the main applications used to serve web pages, and it also covers a more recent framework, Play. Both Tomcat and Jetty implement the Java Servlet API. This API is part of Java Enterprise Edition, a platform covering many applications and services often used in developing software for the enterprise. As well as the Servlet API, this includes topics such as Java’s Messaging Service and some advanced topics around database transaction management and persistence.
Tomcat and Jetty are quite similar, in that they both follow the Servlet API. In fact, some teams often use both within their development cycle for creating a single application: using Jetty for active day-to-day development, and using Tomcat for deployment for use with multiple users, whether that’s a QA for testing or live production deployment.
The relevant sections in this chapter try to differentiate between Tomcat and Jetty, and where they can be appropriately used.
Play is a newer application server inspired by other frameworks, such as Rails, that concentrates on rapid prototyping and fast development, iterating development on top of a barebones, but functional, application.
Tomcat and the Servlet API
Java’s Servlet API defines a set of interfaces and file definitions for building web applications for use on the JVM.
How are web applications defined within the Servlet API?
The Servlet API defines that a web application uses a deployment descriptor named web.xml, which is located on the classpath at /webapp/WEB-INF/web.xml. This file defines the servlets, and how they are configured and served by a servlet container.
The web.xml file is used to determine which servlet handles a certain request, based on the path of the request. Listing 13-1 shows an example deployment descriptor holding multiple servlets.
Listing 13-1: An example web.xml deployment descriptor
<?xml version="1.0" encoding="ISO-8859-1"?>
<web-app
        xmlns="http://java.sun.com/xml/ns/javaee"
        xmlns:xsi="http://www.w3.org/2001/XMLSchema-instance"
        xsi:schemaLocation=
                "http://java.sun.com/xml/ns/javaee
                http://java.sun.com/xml/ns/javaee/web-app_3_0.xsd"
        metadata-complete="false"
        version="3.0">

    <filter>
        <filter-name>HeaderFilter</filter-name>
        <filter-class>com.example.HeaderFilter</filter-class>
    </filter>
    <filter-mapping>
        <filter-name>HeaderFilter</filter-name>
        <servlet-name>AdminConsole</servlet-name>
    </filter-mapping>

    <servlet>
        <servlet-name>Application</servlet-name>
        <servlet-class>com.example.ApplicationServlet</servlet-class>
    </servlet>
    <servlet>
        <servlet-name>AdminConsole</servlet-name>
        <servlet-class>com.example.AdminConsoleServlet</servlet-class>
    </servlet>
    <servlet-mapping>
        <servlet-name>AdminConsole</servlet-name>
        <url-pattern>/admin/*</url-pattern>
    </servlet-mapping>
    <servlet-mapping>
        <servlet-name>Application</servlet-name>
        <url-pattern>/*</url-pattern>
    </servlet-mapping>

</web-app>
This descriptor has two main parts: the filter definitions and mappings, and the servlet definitions and mappings.
Examining the servlet definitions and mappings first, this descriptor has two servlets, the classes com.example.ApplicationServlet and com.example.AdminConsoleServlet. These classes are implementations of javax.servlet.http.HttpServlet.
These servlets are mapped to URL patterns. If a client makes a request to anything on /admin, that request will be handled by the AdminConsoleServlet. The ApplicationServlet handles any other request.
Listing 13-2 defines a very simple implementation of HttpServlet.
Listing 13-2: An example HTTP servlet
public class TimeServlet extends HttpServlet {

    @Override
    protected void doGet(HttpServletRequest request, HttpServletResponse response)
            throws ServletException, IOException {
        final String now = new Date().toString();

        response.setContentType("text/html");
        response.setStatus(HttpServletResponse.SC_OK);

        final String responseString = String.format("<html>" +
                "<head>" +
                "<title>Time</title>" +
                "</head>" +
                "<body>The time is %s</body>" +
                "</html>", now);

        response.getWriter().print(responseString);
    }

    @Override
    protected void doPost(HttpServletRequest request, HttpServletResponse response)
            throws ServletException, IOException {
        doGet(request, response);
    }
}
HttpServlet provides Java methods to be called for the corresponding HTTP methods. If a GET request is forwarded to this servlet, the doGet method will be called. Similarly, a POST request would be forwarded to doPost. The servlet in Listing 13-2 has been defined to handle POSTs and GETs in the same way. If you were to make a request using a different HTTP method, say, PUT, the response code would be a HTTP 405 – Method Not Allowed, or HTTP 400 – Bad Request. These codes are the default behavior on HttpServlet if you do not override the appropriate doXXX method.
How can requests to a particular servlet be securely managed?
The deployment descriptor from Listing 13-1 also defines a filter, and it maps this filter to the AdminConsole servlet. Classes defined inside a filter-class tag implement the javax.servlet.Filter class. Listing 13-3 is such an implementation.
Listing 13-3: Filtering HTTP requests
public class HeaderFilter implements Filter {
    @Override
    public void init(FilterConfig filterConfig) throws ServletException {
        // do nothing
    }

    @Override
    public void doFilter(ServletRequest request,
                         ServletResponse response,
                         FilterChain chain) throws IOException, ServletException {
        if (request.getParameter("requiredParameter") != null) {
            chain.doFilter(request, response);
        } else {
            ((HttpServletResponse) response).sendError(
                    HttpServletResponse.SC_UNAUTHORIZED);
        }

    }

    @Override
    public void destroy() {
        // do nothing
    }
}
The Filter class defines three methods—init, doFilter and destroy—and these methods are called at appropriate times during the lifetime of the application server. init is called when the filter is first initialized, doFilter is called before every request, and destroy is called when the server is shutting down.
For this example, no additional setup is needed once the class is instantiated, so the init method does nothing. The FilterConfig parameter holds additional metadata such as the name for this filter in the deployment descriptor (in the filter-name tag).
The destroy method gives the filter the opportunity to do any necessary housekeeping, such as closing connections and cleaning file systems, before it is destroyed for good.
The doFilter is called on every request, and it gives the filter the opportunity to inspect the request, and decide whether to reject the request or allow it to pass before it is forwarded to the servlet for execution.
It is possible to have more than one filter defined for a servlet, known as a filter chain; the order of the filter-mapping tags in the deployment descriptor defines the order of the chain for execution.
When a filter has finished processing the request, it should forward the request to the next filter in the chain. Calling doFilter on the FilterChain object parameter does this. Omission of this call inside your filter means the request will not be processed by the servlet. Figure 13-1 illustrates the filter chain.
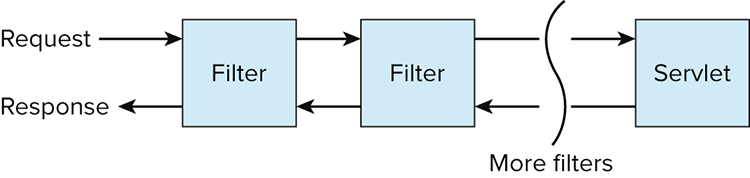
The example in Listing 13-3 inspects the request’s query parameters, and if requiredParameter is not set, the client is returned the status code HTTP 401 – Unauthorized and the request is not forwarded to the servlet. Naturally, checking the existence of a required parameter is not a secure approach to authenticating clients of a web application, but it should serve to explain how the filter is operating.
Note that the Filter interface is not part of the javax.servlet.http package, and the request and response parameters passed to doFilter are ServletRequest and ServletResponse, not the HttpServletRequest and HttpServletResponse subclasses. This Filter interface has been designed for use with any kind of request/response servlet, not just HTTP servlet containers. The sendError method is only on the HttpServletResponse class, which is why a cast is necessary to return an error to the client.
It is safe to perform this cast here, because this filter is only going to be used inside an HTTP servlet container for servicing HTTP requests.
Filters are not just for determining if a request is to be handled. They can provide additional value to requests. Some examples of filter use include:
- Logging all requests—The filter logs the request and immediately passes the request to the next filter in the chain.
- Authentication—A stronger form than that described in Listing 13-3: If a user is not authenticated, the request could be redirected to a login page first.
- Serving static content—Images or other content such as JavaScript or CSS files could be loaded without the servlet needing to be called.
What is a WAR file?
A Web Archive file, or WAR, file is built in the same way as Java’s JAR files. It is specifically used for bundling up web applications. It contains all the compiled class files needed to run the application, as well as any provided properties and other configuration files.
Most importantly, a WAR file contains the deployment descriptor—the web.xml file—which is the main definition of how the web application is set up. It serves as instructions to the application server of how to deploy and serve the application.
Most IDEs such as IntelliJ and Eclipse can create WAR files within a couple of clicks for a given project. If you want to automatically build and deploy WARs, you will need your build tool to create them for you. For Maven, setting the top-level packaging tag to war will instruct your build to create a WAR artifact over a JAR. If Maven is new to you, it may help to fast-forward to Chapter 19 on build tools to understand how to build Java projects using Maven.
How are web applications managed within Tomcat?
Tomcat is designed to run more than one web application at a time. A web application is defined as a WAR file that contains a deployment descriptor, web.xml.
Usually a server will be running one Tomcat instance, and the relevant WAR files are installed under the webapps directory of the Tomcat instance. Naturally, this is a default choice, and it is possible to configure this location.
By default, a running Tomcat instance is listening for any changes to the webapps directory. Should a new WAR file be saved to this directory, Tomcat will extract it into a directory matching the WAR filename, and serve the application on the context matching that name.
For example, if you deployed a WAR file called BookingApplication.war to the webapps directory, this would be extracted to a directory called BookingApplication. Tomcat would then read the web.xml hosted under WEB-INF and serve the application from this definition. The application would be served as /BookingApplication to clients.
This approach is extremely useful for rapid turnarounds on development. You can include the deployment in a continuous delivery pipeline, automatically deploying a built and unit-tested WAR file to an accessible server, ready to be integration tested. You could even deploy it automatically to a live environment, if your test coverage is good enough and your team’s development process allows it.
How do you handle request parameters with the Servlet API?
The HttpServletRequest class has a method, getParameterMap. This method returns a map of each pair of parameters that formed the request.
Given the key may appear more than once on an HTTP request, the type of the map is Map<String, String[]>. That is, each key has an array for all the values that were part of the request with that same key.
Consider the following code:
final StringBuffer output = new StringBuffer();

final Map<String, String[]> parameterMap = request.getParameterMap();
for (String parameterName : parameterMap.keySet()) {
    output.append(
            String.format("%s: %s<br/>",
                    parameterName,
                    Arrays.asList(parameterMap.get(parameterName))));
}

IOUtils.write(output, response.getOutputStream());
If you were to send a request with the query string a=123&b=asdf&a=456, then this would produce the output:
b: [asdf]<br/>a: [123, 456]<br/>Notice how the values for the a key were collated, as that key appeared more than once.
As this functionality is part of the Servlet API, it is available to any application container that supports the Servlet API. This includes Tomcat, and Jetty.
Jetty
Jetty has been designed to be lightweight and easy to use. You can even create and run servers purely in Java code, with no configuration.
How can you create a running web application inside a Java class?
You can configure Jetty to run in several lines of code. Listing 13-4 shows two classes: one to start a server and the other to define how that server responds to requests.
Listing 13-4: Defining a Jetty server in code
public class JettyExample {

    public static void main(String args[]) throws Exception {
        final Server jettyServer = new Server(8080);
        jettyServer.setHandler(new EchoHandler());
        jettyServer.start();
        jettyServer.join();
    }
}

class EchoHandler extends AbstractHandler {

    @Override
    public void handle(String target,
                       Request baseRequest,
                       HttpServletRequest request,
                       HttpServletResponse response)
            throws IOException, ServletException {
        response.setContentType("text/plain");
        response.setStatus(HttpServletResponse.SC_OK);
        baseRequest.setHandled(true);

        final ServletInputStream requestInputStream =
                request.getInputStream();
        final ServletOutputStream responseOutputStream =
                response.getOutputStream();

        IOUtils.copy(requestInputStream, responseOutputStream);
    }
}
This code configures a server to respond to any client with the same body of the request. The HTTP POST and PUT methods have bodies, so requests with these methods will respond appropriately.
> curl -X PUT -d "Hello World" http://localhost:8080The final line of the handle method in the EchoHandler is a utility method from the Apache Commons IO library for connecting InputStreams to OutputStreams. The Apache Commons library is covered in Chapter 18.
Extending the AbstractHandler class is a Jetty-specific implementation, and though this may be fine for your needs, it also ties your code to the Jetty platform. Rather than using Jetty’s handlers, you can implement your specific behavior as a servlet. Listing 13-5 shows two classes: the Jetty configuration in code and the implementation of the HttpServlet class.
Listing 13-5: Using Jetty with the Servlet API
public class JettyServletExample {

    public static void main(String[] args) throws Exception {
        final Server jettyServer = new Server(8080);
        final ServletHandler servletHandler = new ServletHandler();
        jettyServer.setHandler(servletHandler);
        servletHandler.addServletWithMapping(EchoServlet.class, "/*");
        jettyServer.start();
        jettyServer.join();
    }
}

public class EchoServlet extends HttpServlet {

    @Override
    protected void doPost(HttpServletRequest request, HttpServletResponse response)
            throws ServletException, IOException {
        response.setContentType("text/plain");
        response.setStatus(HttpServletResponse.SC_OK);

        final ServletInputStream requestInputStream =
                request.getInputStream();
        final ServletOutputStream responseOutputStream =
                response.getOutputStream();

        IOUtils.copy(requestInputStream, responseOutputStream);
    }
}
Jetty’s API has a specific handler for dealing with servlets. This means that it is possible to use both Jetty-specific handlers and servlet implementations in the same code. The following snippet shows an example:
final HandlerList handlers = new HandlerList();
handlers.setHandlers(new Handler[] { jettyHandler, servletHandler });
jettyServer.setHandler(handlers);
Note that this implementation of the same functionality is more restricted than the implementation using only Jetty’s handlers: it will only respond to POST requests. To perform the same action for another method, say PUT, the doPut method should be overridden too:
@Override
protected void doPut(HttpServletRequest request, HttpServletResponse response)
        throws ServletException, IOException {
    doPost(request, response);
}
You can see from the main method that different servlets can be mapped to different contexts, much like you would do inside a web.xml deployment descriptor:
servletHandler.addServletWithMapping(AppServlet.class, "/app");
servletHandler.addServletWithMapping(AdminServlet.class, "/admin");
The simplicity and flexibility of Jetty and its capability to configure and run within Java code makes it an ideal candidate as a server for use within integration tests, even if your production servlet container is different. Listing 13-6 is a JUnit test running against the EchoServlet defined in Listing 13-5.
Listing 13-6: Testing servlets with Jetty and JUnit
public class JettyJUnitTest {

    private static Server jettyServer;

    @BeforeClass
    public static void startJetty() throws Exception {
        jettyServer = new Server(8080);
        final ServletHandler servletHandler = new ServletHandler();
        jettyServer.setHandler(servletHandler);
        servletHandler.addServletWithMapping(EchoServlet.class, "/echo/*");
        jettyServer.start();
    }

    @Test
    public void postRequestWithData() throws IOException {
        final HttpClient httpClient = new DefaultHttpClient();
        final HttpPost post = new HttpPost("http://localhost:8080/echo/");
        final String requestBody = "Hello World";
        post.setEntity(new StringEntity(requestBody));

        final HttpResponse response = httpClient.execute(post);
        final int statusCode = response.getStatusLine().getStatusCode();

        final InputStream responseBodyStream = response.getEntity().getContent();
        final StringWriter stringWriter = new StringWriter();

        IOUtils.copy(responseBodyStream, stringWriter);
        final String receivedBody = stringWriter.toString();

        assertEquals(200, statusCode);
        assertEquals(requestBody, receivedBody);
    }

    @AfterClass
    public static void stopJetty() throws Exception {
        jettyServer.stop();
    }
}
A new server is started when this test suite is created, and the server is stopped once all the tests are run. For this implementation, the server holds no state, so it is not necessary to create a new server for each test run. Should you require a new server for each test run, the server could be started in a @Before annotated method.
Note that inside the test method, there are no references to Jetty, nor any code related to the server implementation; this is only testing the behavior of the server over the HTTP protocol. Apache’s HTTP client API is used here, and again, Apache’s Commons IO API simplifies reading the response InputStream and converting to a string.
Although only one test has been defined here, you can certainly think of more test cases for this servlet, such as different HTTP methods, or making requests with no data.
Jetty has a Maven plug-in, which allows for easy running of web applications built from a Maven project.
You can set the Maven Jetty plug-in for the project by adding the plug-in to the project’s POM:
<plugin>
    <groupId>org.eclipse.jetty</groupId>
    <artifactId>jetty-maven-plugin</artifactId>
    <version>9.0.3.v20130506</version>
</plugin>
You invoke the plug-in by running mvn jetty:run. This will compile and package the project first. By Maven’s main rule of following convention over configuration, the plug-in will look in the default location for the deployment descriptor: /src/main/webapp/WEB-INF/web.xml. Aside from defining the plug-in in your POM, you do not need any Jetty-specific configuration; the presence of this file will be enough for Maven to load a Jetty server with the configured servlets. Listing 13-7 loads the previous EchoServlet.
Listing 13-7: Running Jetty through Maven
<?xml version="1.0" encoding="ISO-8859-1"?>
<web-app
        xmlns="http://java.sun.com/xml/ns/javaee"
        xmlns:xsi="http://www.w3.org/2001/XMLSchema-instance"
        xsi:schemaLocation=
                "http://java.sun.com/xml/ns/javaee
                http://java.sun.com/xml/ns/javaee/web-app_3_0.xsd"
        metadata-complete="false"
        version="3.0">

    <servlet>
        <servlet-name>Echo</servlet-name>
        <servlet-class>
            com.wiley.javainterviewsexposed.chapter13.EchoServlet
        </servlet-class>
    </servlet>
    <servlet-mapping>
        <servlet-name>Echo</servlet-name>
        <url-pattern>/echo/*</url-pattern>
    </servlet-mapping>

</web-app>
Running mvn jetty:run loads the server on your local host, on port 8080 by default. The port configuration is not part of the web.xml deployment descriptor, so if you require your server to run on a different port, this is specified by the jetty.port property: Running mvn -Djetty.port=8089 jetty:run starts it on port 8089.
Another huge advantage to this approach is that you need no bespoke software to get a fully functional application server running locally. Aside from Java and Maven, you do not need to download and install any other applications from the Internet. Any newcomers to your team can simply check out your code, and run mvn jetty:run.
Any specific application settings are set inside the plugin tag in your POM. For example, to set some specific system properties, the configuration in your POM would look like Listing 13-8.
Listing 13-8: Setting specific properties for the maven-jetty-plugin
<plugin>
    <groupId>org.eclipse.jetty</groupId>
    <artifactId>jetty-maven-plugin</artifactId>
    <version>9.0.3.v20130506</version>
    <configuration>
        <systemProperties>
            <systemProperty>
                <name>environment</name>
                <value>development</value>
            </systemProperty>
        </systemProperties>
    </configuration>
</plugin>
Using the Maven Jetty plug-in in this fashion is often a popular choice for active development. You can have a local web server running quickly with minimal setup needed, and the server is running with the same deployment configuration inside the web.xml, which will be deployed to the live production environment, perhaps even on a different application server, such as Tomcat.
The use of system properties to determine which environment you are running against enables you to provide different configurations for different environments at run time, with no code changes needed to switch between the environments.
Play Framework
Play is a relatively new player in the web application space. It takes a fresh approach to developing web applications, and does not make use of Java’s Servlet API.
How do you create a new Play application?
Play has a different approach to developing web applications. Rather than creating a new project yourself, using Maven or similar, you ask Play to create it for you.
After downloading and unzipping Play, you run the play UNIX script or play.bat Windows batch file from a fresh empty directory, instructing it to create a new project. You also provide the name of the project:
> play new echo-serverThis will take you through a very short process to create the project for you. Play asks you for the name of the project. You can keep it as echo-server for this project:
What is the application name?
> echo-server
You then have the option of creating a new Java or Scala project, or a completely blank project. Choose the Java project:
Which template do you want to use for this new application?

  1 - Create a simple Scala application
  2 - Create a simple Java application
  3 - Create an empty project

> 2
This has created a skeleton project for you, in a directory called echo-server.
Before inspecting the code, you can check that the application actually runs. The play application works slightly differently compared to more traditional applications you may have come across, such as Maven or Ant. Inside the echo-server directory, running play with no parameters takes you to a console, which enables you to interactively specify build steps you want to run. On execution, you should see a prompt and some welcoming text similar to the following:
> play
[info] Loading global plugins from /Users/noel/.sbt/plugins
[info] Loading project definition from /playProjects/echo-server/project
[info] Set current project to echo-server (in build file:/playProjects/echo-server)
       _            _
 _ __ | | __ _ _  _| |
| '_ | |/ _' | || |_|
|  __/|_|\____|\__ (_)
|_|            |__/

play! 2.0, http://www.playframework.org

> Type "help play" or "license" for more information.
> Type "exit" or use Ctrl+D to leave this console.

[echo-server] $
At this prompt, you can type run. This may take some time while Play downloads dependencies, but eventually you should see confirmation that the application is running:
[info] play - Listening for HTTP on port 9000...

(Server started, use Ctrl+D to stop and go back to the console...)
At this point, you can visit http://localhost:9000 in your favorite web browser. The page displayed should be a boilerplate page informing you that the server is up and running, with some links for next steps.
Pressing Ctrl+D in your Play console stops the server and takes you back to the command prompt.
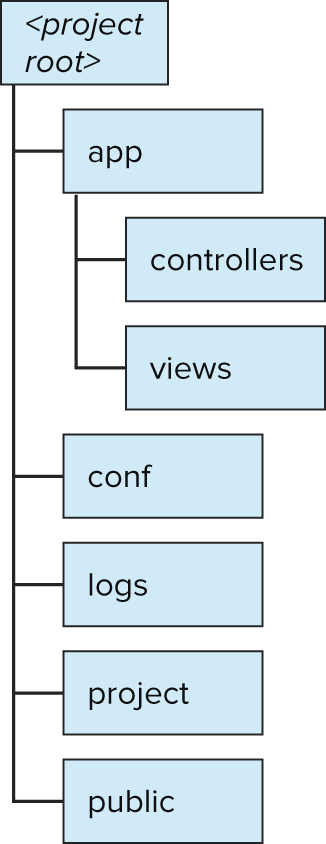
Figure-13-2 shows the default layout of a Play application.
The app directory contains two subdirectories: controllers and views. This should be familiar if you are aware of the Model-View-Controller pattern. The controllers directory is where you will place Java classes for dealing with processing incoming requests. The views directory holds templates for displaying the results of requests.
The conf directory is where you store configuration for your web application: application.conf is a traditional Java properties file, containing key-value pairs. This is where you would configure any logging for your application, as well as database configuration. You can also specify your own properties here, which will be available to the running application.
The routes file instructs Play what to do with incoming requests. The file contains three columns. The first defines the HTTP method. The second is the path of the request. If Play receives a request that matches these two entries, it will execute the method defined in the third column. Listing 13-9 shows an example entry in a routes file.
Figure 13-2
Listing 13-9: An example entry in Play’s routes file
GET /time controllers.Application.time()When a client makes a GET request to the /time path, the time() method on the Application class will be called.
The logs directory contains any logging output from your application. You have the ability to control the logging from the conf/application.conf file. The setup is the same as the standard Log4J format.
The project directory contains any build-specific setup, such as any necessary library dependencies, or specific build steps, such as deploying builds to an artifact server like Nexus or Artifactory.
The public directory contains any static files to be served, such as images, JavaScript, or CSS. Note that access to these assets is still controlled through the routes file, and is included in the default project setup.
Remember, Play applications are not designed to work with Java’s Servlet API; Play does not create WAR files. When your project is complete and ready to be run outside of the play console, you can run the dist command. This will create a new top-level directory called dist, and put a zipped build of your application there. Inside the zip is a start script. Running this script will start your server in the same fashion as calling run inside the play console.
The controllers directory underneath app is where any Java classes will be placed. This is actually a top-level package, so if you are more comfortable with your organization’s package structure here, you use that here.
For the new application created earlier in this section, you will need a small amount of code to mimic an echo server. Create a new class, called Echo, which extends play.mvc.Controller. This class will have one method, echoReply, which takes no parameters. Listing 13-10 contains this method.
Listing 13-10: The Play controller for an echo service
public class Echo extends Controller {

    public static Result echoReply() {
        RequestBody messageBody = request().body();
        return ok(messageBody.asText());
    }
 }
The Result object generated by the ok method contains all the necessary metadata for Play to understand how to respond to the client. The ok method specifies the HTTP 200 – OK response code. It is a static import from the Results.Status class, and as you would expect, this contains methods for most response codes: notFound() for HTTP 404, internalServerError() for HTTP 500, and so on.
This method is extracting the message body as text, due to the messageBody.asText() method call. This expects the request to have the Content-Type: text/plain HTTP header set. This RequestBody object can create different types for the message body depending on the Content-Type header, such as a rich JSON object for requests coming in as application/json, or even an XML DOM Document for those requests received as text/xml.
You need to instruct Play to call this method when a valid request comes in. Listing 13-11 instructs the server to respond with this echo whenever a POST or PUT is called on /echo.
Listing 13-11: The routes for the echo service
POST    /echo                       controllers.Echo.echoReply()
PUT     /echo                       controllers.Echo.echoReply()
As you are executing plain Java code, you do not need to do anything special to test it: You can simply write unit and integration tests as usual, using JUnit or something similar.
The echo service created is an extremely useful approach for creating applications like Web Services and REST APIs, though if you are creating web pages to be viewed by a human being in a web browser, you will still need an approach to make them legible.
Rather than generating an HTML response by hand, Play has tight integration with its own template framework. You can do the hard processing inside the regular Java class, and then hand off to the template to display your response in a pleasing way.
Extend the Echo class to process requests containing query parameters. These parameters will be parsed by the controller, and then passed to the template to generate the HTML. Listing 13-12 shows the new method on the Echo class, Listing 13-13 shows the new entry in the routes file, and Listing 13-14 is the template for displaying the output as HTML.
Listing 13-12: The echo service controller for displaying request parameters
public static Result echoParameters() {
    final Map<String, String[]> queryString = request().queryString();

    final String timestamp = new Date().toString();

    return ok(paramPrintout.render(queryString, timestamp));
}
Listing 13-13: The new routes entry
GET /echo/parameters controllers.Echo.echoParameters()Listing 13-14: The template for displaying the request parameters
@(queryString: Map[String, Array[String]])(timestamp: String)

<html>
  <head><title>Query Parameters</title></head>
  <body>
    <h1>The request parameters for this page:</h1>
    <ul>
    @for((param, values) <- queryString) {
      <li>
        @param : @for(value <- values) { @value }
      </li>
    }
    </ul>
  This page was generated at: @timestamp
  </body>
</html>
The template file is called paramPrintout.scala.html. This name is important, because during the process of building the site, Play will convert this template into compiled Scala code, an instance called paramPrintout.
Scala code is used here, because the Play Framework itself is written in Scala. Don’t be alarmed if you’ve not seen any Scala code before, this template language is similar to many of the other template languages in use, such as Freemarker or Velocity.
If you launch this application using the run command from within the play console, and you visit the URL http://localhost:9000/echo/parameters?a=123&b=456&a=abc, then hopefully you can see how this request fits into the human-readable response.
If you are particularly skilled with HTML, JavaScript, and CSS, you can see how Play would make a useful back end allowing rapid turnaround for development.
Inside the application.conf file, you configure a set of properties for working with a database. For simplicity, this setup is with an in-memory database, which was covered in Chapter 12.
The properties db.default.driver and db.default.url should be set if you use a database:
db.default.driver=org.h2.Driver
db.default.url="jdbc:h2:mem:testDatabase"
Inside your controller, you can get a regular JDBC connection with the static method call play.db.DB.getConnection(). Once you have a reference to the java.sql.Connection object, which this method returns, the code for accessing and manipulating database objects is exactly the same, as shown in Listing 13-15.
Listing 13-15: Accessing a JDBC database inside a Play application
final Connection conn = play.db.DB.getConnection();
final Statement stmt = conn.createStatement();
stmt.executeQuery("select * from ...")
Remember, this is just a regular Java class, so you can use any libraries that you are comfortable with to help with database access, such as Spring’s JDBCTemplate (covered in Chapter 16) or even something more advanced, such as an object-relational mapper like Hibernate (covered in Chapter 17).
Summary
This chapter has provided a tour of the different flavors of HTTP servers available to Java developers. The Java Servlet API has been in existence almost as long as Java itself, just as the Internet and applications on the World Wide Web were starting to take off.
By looking at the Play framework as well, this should show that using Java servlets is not the only way to create web servers on the JVM. The uses of libraries and technologies is always changing, and hopefully by taking a look at Play, you should understand that staying on top of the current trends and applications in use is imperative to staying competitive in the job market.
A large number, if not the majority, of jobs available to Java developers will include some kind of web component. Companies tend toward developing products for their clients with a web interface, and every desktop has a web browser: Companies can get their product to their clients without the need for creating custom installers, or creating and delivering a boxed product. Be aware that if you are going to have an interview with a company that has any kind of presence on the Internet—for instance, an online shopping site, or even a social gaming company—any reputable employer will test you on your understanding of how a Java application communicates with the outside world.
The next chapter continues using Play for servicing HTTP requests, taking a deeper look at the HTTP methods and how they relate to the popular REST services, as well as how to call out as a client to other HTTP services.