
Chapter 19
Developing with Build Tools
There is much more to creating a usable application than writing Java source code. Applications comprise many different artifacts, XML configuration, and environment-specific properties, and even images or embedded code for other languages.
This chapter looks at two applications that focus on pulling all your project’s resources together into a coherent bundle. Maven and Ant are possibly the two most-used and best-understood build tools for Java projects.
Any non-trivial professional application will need something other than the Java compiler to create distributable applications—sometimes you can use a simple shell script—but the chances are that something will be Maven or Ant.
Building Applications with Maven
What is Maven?
Maven is an all-encompassing build tool. It is used to compile, test, and deploy Java projects.
It has been designed to favor convention over configuration. For the most part, builds for Java applications can be defined in a very similar manner, and if you define the layout of your source code in the same way, Maven knows where to find all the resources it needs and can perform many different build tasks.
Maven has built-in defaults for most settings, so whether your application will be deployed as a Web Archive (WAR) file or as a JAR file, Maven has defined tasks for how to build these properly.
A non-trivial Java application will have dependencies on many other libraries, such as unit-testing frameworks like JUnit or TestNG, or utility libraries such as Apache Commons or Google’s Guava. Maven provides a facility for defining these dependencies, and you can download these JARs directly from a repository such as www.maven.org on the Internet, or perhaps from a repository set up local to your organization such as Artifactory or Nexus.
Maven’s plug-in system enables you to add some more specific operations to your build. Similar to the dependency setup, these plug-ins are served remotely, and Maven has the capability to find these at build time and perform whatever operation the plug-in provides. An example of a common plug-in is maven-jetty-plugin, which runs the current build as a web application. This plug-in finds the appropriate web.xml file by assuming your project is following the convention that the file lives in the src/main/webapp/WEB-INF directory. Another such plug-in is the maven-release-plugin, which performs complex operations in conjunction with source control such as Subversion and Git to cut code for a release build and change the version number of the application, ready for the next development iteration.
A specific unit of work to run is called a goal. Specific goals are bound to the phases of the build life cycle, such as compile, test, and install. For example, when you run mvn compile, you are actually running the compile phase of the compiler plug-in. If your project has not changed the default behavior of the compile phase, you can achieve exactly the same effect by running mvn compiler:compile.
How do you structure your project for use in Maven?
Figure 19-1 displays the default directory structure for a Maven build.
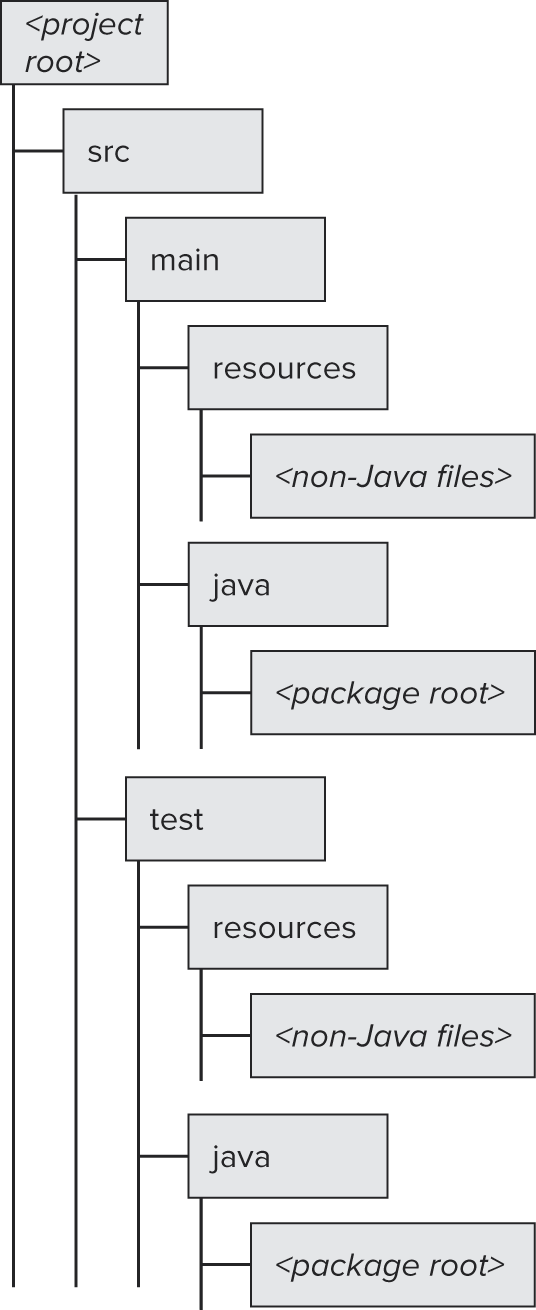
If you are new to Maven, what might surprise you here is that there are several source roots in the project. All of your production package structure lives under the src/main/java directory (if you have other languages, such as Scala, these would be housed in src/main/scala). Any classes living in this structure will be on your classpath at run time.
You also have the opportunity to add other files to the classpath; these live in the src/main/resources directory. Typically you would place any configuration here, such as your Spring application context configuration, as well as any properties files.
You can access any files in either of these directories at run time by calling getClass().getResource(name).
You also can add test code, such as unit tests and test-specific configuration. These are held in test/main/java and test/main/resources, respectively. When Maven runs any tests as part of its build, the classes and files in these locations are also added to the classpath. These are kept separate so that they are not bundled with any built artifact for production deployment.
What is the life cycle of a Maven build?
A Maven build consists of a chain of phases, called the life cycle. Each phase is bound to a specific goal. Each phase is dependent on the ones before—should a specific goal fail for whatever reason, the whole build fails. Figure 19-2 shows the basic phases for a build.
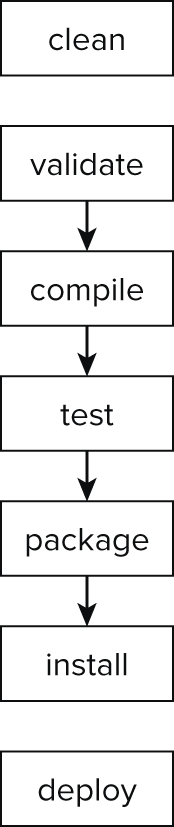
Any built artifacts are put in a directory called target, at the project root. The clean goal removes any files from a previous build by deleting this target directory. This is not run before any subsequent phases, unless you specifically initiate this build phase with mvn clean or define it to run always in your Project Object Model (POM).
The validate phase checks that the pom.xml file is a correct build file, checking that it conforms to the XML specification for Maven’s build files. If your pom.xml is not even correct XML—for instance, if you are missing any closing tags, or your tags are not properly nested—then your build will fail before the Maven application is even properly initialized, displaying an error about a non-parseable POM or something similar.
The compile phase pulls in any defined dependencies and performs compilation of your code, building any class files into the target/classes directory.
The next phase is test. This compiles the classes under the test directory and runs any tests code here, such as unit or integration tests. By default, any failing unit tests will cause the build to fail.
The package phase is run after a successful test phase. This creates an artifact, such as a WAR or JAR file. This file is stored in the root of your target directory. Note that this is not a standalone file; by default it does not have any dependent libraries built in, so the dependencies still need to be included on the classpath. The goal that is bound to this phase is dependent on the packaging tag: If it is set to jar, the jar:jar goal is run; if it is set to war, the war:war goal is run.
The install step publishes the built artifact to your local maven repository. This is usually held in the directory $HOME/.m2/repository. If you have more than one Maven build running locally, your new artifact is now available to those builds.
The final step is deploy. This step usually needs a small amount of extra configuration, defining exactly where to deploy the finished artifact. This deployment is usually to an artifact repository such as Artifactory or Nexus.
These repositories are typically where you would download dependent artifacts for your own build, but these repositories often act as a holding place for installing builds onto full test environments or a live environment.
The life-cycle phases here are the most basic steps; several more, such as generate-test-sources, pre-integration-test, and post-integration-test, can be used to provide more granularity to a build.
How is a specific application build defined in Maven?
The definition of a Maven build is held in a file called pom.xml, which lives in the root directory of the project. Maven uses this file as the instructions for how to build your application. Listing 19-1 shows a very simple example.
Listing 19-1: A simple Maven build file
<project>
    <modelVersion>4.0.0</modelVersion>
    <groupId>com.wiley</groupId>
    <artifactId>acing-java-interview-example-pom</artifactId>
    <version>1.0</version>
    <packaging>jar</packaging>

    <dependencies>
        <dependency>
            <groupId>commons-io</groupId>
            <artifactId>commons-io</artifactId>
            <version>1.4</version>
        </dependency>
        <dependency>
            <groupId>org.springframework</groupId>
            <artifactId>spring-core</artifactId>
            <version>3.0.0.RELEASE</version>
        </dependency>

        <dependency>
            <groupId>junit</groupId>
            <artifactId>junit</artifactId>
            <version>4.8.2</version>
            <scope>test</scope>
        </dependency>
        <dependency>
            <groupId>org.mockito</groupId>
            <artifactId>mockito-core</artifactId>
            <version>1.9.0</version>
            <scope>test</scope>
        </dependency>
    </dependencies>

    <build>
        <plugins>
            <plugin>
                <groupId>org.apache.maven.plugins</groupId>
                <artifactId>maven-compiler-plugin</artifactId>
                <configuration>
                    <source>1.7</source>
                    <target>1.7</target>
                    <showDeprecation>true</showDeprecation>
                    <showWarnings>true</showWarnings>
                    <fork>true</fork>
                </configuration>
            </plugin>
        </plugins>
    </build>
</project>
The POM can be broadly split into three sections: the project definition, the dependencies for a build, and any build-specific plug-ins.
An exact artifact can be specified by the groupId, artifactId, and version. These are called coordinates, or often casually referred to as GAV. If your project is a library for use in other projects, those other projects will use these attributes to define their dependency on this build. The build tag here informs Maven what type of artifact to build in the package life-cycle step. Valid steps include war and jar, or even maven-plugin if you write your own extension to Maven. The groupId usually refers to your own organization, and the artifactId is your application name.
The dependencies tag is where you would define any dependent libraries for your build. This can often be other libraries built by your own organization, perhaps available on an intranet repository, or a third-party library. The exact groupId, artifactId, and version are usually found in the project’s documentation, usually on the project website. Alternatively, a Google search for popular libraries or Maven repository search engines such as mvnrepository.com can be useful, though the usual caveats should be clear for downloading any unknown executable code from the Internet.
Dependent artifacts can have different scopes. These define how they are used within the project, and when they are pulled into the build. Listing 19-1 had the scopes for junit and mockito-core as test. This means they are available while building the test source, which is by default any code under the src/test root, and also for running the tests. The test scoped dependencies are not available to the main source, by default under src/main.
That is, test scoped artifacts are specific for testing, and are not necessary for the main code of the application.
Not providing a specific scope defaults to compile. For this scope, an artifact is resolved for the compilation step, and is also provided to the classpath as a runtime dependency.
If a library is needed at compile time, but not at run time, this has the scope provided. The Servlet API JAR is a common example of this: At run time, the JAR is not provided by Maven but by the application container, but you still need the class definitions to compile your source in the first place.
If you have a specific library that is not available through a Maven repository, you can provide local filesystem libraries with the system scope. You should use this only as a last resort; the use of Maven repositories means that your build should be reproducible across any number of machines—yours, your colleague’s, your build server, and so on. Having local-only libraries can lead to a confusing dependency nightmare later on in your build cycle.
The build tag of the POM defines any build plug-ins, and any specific configuration for those plug-ins. Listing 19-1 defined some specific configuration for the maven-compiler-plugin, used in the compile stage, defining that the compiler should expect Java 7 source, and can output Java 7–specific class files.
As with the maven-compiler-plugin, any of the build defaults can be altered using this build section to define how a particular step should behave. One common pattern is to separate the tests: The unit tests are run as part of the test step, and the expensive, slow integration tests are run later after the package step, during the integration-test step. Some projects use a naming convention to differentiate unit and integration tests:Any class ending in IntegrationTest.java will be filtered out of the test step and run in the integration-test step instead. Listing 19-2 shows how you can do this.
Listing 19-2: Separating unit and integration tests
<plugin>
    <groupId>org.apache.maven.plugins</groupId>
    <artifactId>maven-surefire-plugin</artifactId>
    <configuration>
        <excludes>
            <exclude>**/*IntegrationTest.java</exclude>
        </excludes>
    </configuration>
    <executions>
        <execution>
            <id>integration-test</id>
            <goals>
                <goal>test</goal>
            </goals>
            <phase>integration-test</phase>
            <configuration>
                <excludes>
                    <exclude>none</exclude>
                </excludes>
                <includes>
                    <include>**/*IntegrationTest.java</include>
                </includes>
            </configuration>
        </execution>
    </executions>
</plugin>
The maven-surefire-plugin is the default plug-in for running unit tests; this is providing specific configuration to the plug-in, instructing it what to run and when.
If you do not need any specific configuration when using a particular plug-in, you do not need to define the plug-in at all. For example, when you run mvn jetty:run using the maven-jetty-plugin, this plug-in will look in src/main/webapp/WEB-INF for the web.xml file, and start a web application with that configuration. Of course, if your application holds the web.xml file somewhere else, you would need to provide the appropriate configuration to allow the plug-in to find it.
How can you share built artifacts between applications?
If you were to create a reusable component, you may want to reuse that component between projects. One such example would be to provide a high-level API to connect to a specific service within your organization, such as an API for connecting to a high-score service for several games, or providing real-time trading prices across several applications.
If you have a Maven repository configured for your organization, you need to configure your POM to check this repository for when it resolves dependencies, and also for publishing your successful builds. Listing 19-3 shows a snippet of a pom.xml file configured for a custom Maven repository. This is a top-level tag within the <project> tag.
Listing 19-3: Configuring a repository for deployment
<distributionManagement>
    <repository>
        <id>deployment</id>
        <name>Internal Releases</name>
        <url>
            http://intranet.repo.com/content/repositories/releases/
        </url>
    </repository>
    <snapshotRepository>
        <id>deployment</id>
        <name>Internal Snapshots</name>
        <url>
            http://intranet.repo.com/content/repositories/snapshots/
        </url>
    </snapshotRepository>
</distributionManagement>
Note that two endpoints are configured: one for releases and one for snapshots. The differentiation between the two is important. For active development, the version tag will have a -SNAPSHOT suffix. This indicates that the artifact is still under development and may not be stable. When the deploy goal is run, if the build is a snapshot build, this will be deployed to the snapshotRepository URL.
For more stable builds, which are feature complete and pass your application’s full testing criteria, such as User Acceptance Testing or exploratory QA testing, the version will have the -SNAPSHOT suffix removed, so when the deploy goal is run, this will be deployed to the URL inside the repository tag.
Some continuous delivery systems are set up to automatically release any new artifacts deployed to this URL. The releases URL usually defines that an artifact is ready for release.
Of course, you need to make sure your organization’s local Maven repository has the correct permissions configured so you can deploy artifacts to these URLs.
How can you bind different goals to a specific Maven phase?
Although the default build model may be enough for your application, for a significantly advanced project, you will probably find that you want to do something different than the usual.
For example, in the package phase when the packaging tag is set to jar, this, by default, creates a JAR containing only the code from your project and no dependencies. If you had a class with a main method inside this JAR, you would need to create a command-line application manually, with reference to all dependent library JARs to run your application.
Luckily, this problem is so common that a plug-in has been made for this situation. The maven-assembly-plugin has the capability to create a JAR with dependencies. The resultant artifact will be much larger because it contains all the class files from your dependent JARs, but will be runnable as a single file. This is especially useful as a solution for technical interviews or tests, where you may be asked to write some Java code to solve a particular problem and submit a runnable application as well as source code. This Maven plug-in is a particularly neat and professional way to submit any runnable application to a potential employer; they will not have to waste any time getting your application to run because all the dependencies are built in. Listing 19-4 shows some sample configuration for using this plug-in.
Listing 19-4: Changing the behavior of a specific phase
<plugin>
    <artifactId>maven-assembly-plugin</artifactId>
    <version>2.4</version>
    <configuration>
        <finalName>standalone-application</finalName>
        <descriptorRefs>
            <descriptorRef>jar-with-dependencies</descriptorRef>
        </descriptorRefs>
        <archive>
            <manifest>
                <mainClass>
                    com.wiley.javainterviewsexposed.chapter19.MainClass
                </mainClass>
            </manifest>
        </archive>
    </configuration>
    <executions>
        <execution>
            <id>make-assembly</id>
            <phase>package</phase>
            <goals>
                <goal>single</goal>
            </goals>
        </execution>
    </executions>
</plugin>
The plug-in has some configuration that is specific to making it work for your needs. The finalName tag defines exactly how your final JAR will be named.
The executions section defines what exactly to run and when to run it. The <goal>single</goal> tag defines that the single goal defined in the maven-assembly-plugin is to be run. The single goal creates a JAR that can be run as a command-line application. This is bound to the package phase. This could easily have been a different phase, perhaps post-integration-test, when you know that your packaged artifact has passed all of your integration tests.
With this plug-in defined in your pom.xml, if you run mvn package, you will find two JARs in your target directory: the original JAR as part of the default Maven build, and a second, called standalone-application-with-dependencies.jar. It should be possible to run the class defined as mainClass with this command:
java –jar standalone-application-with-dependencies.jarAnt
How do you set up a build with Ant?
Ant does not follow the same model of convention over configuration like Maven does. As such, you need to explicitly specify every step of your build. There is no default directory structure. Although this may appear to be more work, and often it is, you have ultimate flexibility for how your build operates and what exactly needs to happen for your application to be built successfully.
Ant works with two main concepts, targets and tasks. A target is quite similar to Maven’s idea of a goal: It is a high-level action that your build performs, such as compiling code, running tests, or packaging your application into a JAR.
Tasks are the actual actions that comprise a target. For instance, there is a javac task to compile your code, a java task to run an application, and even a zip task to bundle a selection of files into a zip file. You can even create your own tasks.
When you run an Ant build from the command line, the tool automatically looks for a build.xml file. You do have the opportunity to specify a different name if you want. Listing 19-5 shows an example build.xml file, which compiles the project and then bundles the files into a JAR.
Listing 19-5: An example Ant build file
<project name="ExampleAntBuildFile" default="package-jar" basedir=".">

    <target name="init">
        <mkdir dir="ant-output"/>
        <mkdir dir="ant-test-output"/>
    </target>

    <target name="compile" depends="init">
        <javac srcdir="src/main/java" destdir="ant-output"/>
        <javac srcdir="src/test/java" destdir="ant-test-output"/>
    </target>

    <target name="package-jar" depends="compile">
        <jar jarfile="Example.jar" basedir="ant-output"/>
    </target>

</project>
This build has three targets, which correspond to the high-level tasks required for this application. You can run this build by simply typing ant on the command line. This will attempt to run the build for the default target (the target package-jar) to build the JAR.
Notice that each task can specify a dependency. If one or more dependencies are specified, Ant will execute those targets before continuing. If a target fails, such as on a compilation error or a unit test failure, the build will stop.
A target can constitute many different tasks. The compile task contains two executions of the javac task—one for the production code and one for test code. Each compilation is given a separate output because only the production classes are needed for the package-jar target.
When you run an Ant build, you can explicitly specify the target you want to run. The build will stop when this target and any targets it depends on are finished. Running ant compile stops after creating the output directories and compiling the source files.
Is it possible to integrate Ant and Maven together?
Within a Maven build is a plug-in called the maven-antrun-plugin, which enables you to run Ant tasks as part of a Maven build. One common use for this is to run an operating system command or shell script using Ant’s exec target. There is no equivalent within the Maven world to do this. Listing 19-6 is an example of how this works.
Listing 19-6: Using Ant tasks within Maven
<plugin>
    <artifactId>maven-antrun-plugin</artifactId>
    <version>1.7</version>
    <executions>
        <execution>
            <phase>deploy</phase>
            <configuration>
                <tasks>
                    <exec dir="scripts"
                         executable="scripts/notify-chat-application.sh"
                         failonerror="false">
                    </exec>
                </tasks>
            </configuration>
            <goals>
                <goal>run</goal>
            </goals>
        </execution>
    </executions>
</plugin>
This has been attached to Maven’s deploy phase, and you can imagine that this script could send an alert to the team’s chat server that a deployment is about to happen.
Summary
Java has several mature and stable products for helping you turn your source code into a useful, executable binary artifact. For anything more than a simple program, using a build tool such as Maven or Ant will help you produce professional, standard builds in a relatively short amount of time.
Maven is a fantastic way to get a project running very quickly. By following convention, you need very little input to get a build working. It also has the added benefit that any new colleagues or team members who are already experienced with Maven can get up to speed with your project very quickly, because the build will work in the same way as other projects.
Ant has the ultimate flexibility. For projects that do not or cannot follow convention, Maven can often be problematic to get working. Although an Ant build may need more supervision, your builds will often be faster and much better understood, because the build will only be performing tasks that are relevant to your application.
Whichever build technology you decide to use, making the decision to actually use a build tool is the best decision of all. Many projects are often blighted with bespoke operating system scripts, which maybe only one or very few team members understand properly. Both Maven and Ant are well supported within the Java community.
The final chapter on the book focuses on the use of Java in writing mobile phone applications for the Android operating system.