
We all have heard many times the WORA slogan (“write once, run anywhere”), and while it is true that Java runs anywhere you have a JVM, that’s not the case on modern mobile devices. While the latest trends confirm that smartphones are taking over computers, why can’t we target that huge market yet? Luckily, the open source project JavaFXPorts was born to allow all Java developers to deploy their projects on mobile (Android and iOS).
In this chapter, you learn about the JavaFXPorts project, and how this led to Gluon Mobile, a library created to enhance the mobile experience of the JavaFX desktop design.
As a full example, in this chapter, you will see how to create a simple JavaFX application with Gluon Mobile: BasketStats. It is a simple app to track the annotation during a basketball game, and you will deploy it to Android and iOS.
Before getting into the example, let’s get started with JavaFXPorts and Gluon Mobile.
JavaFXPorts: The Port to Mobile
JavaFXPorts is the open source project that brings Java and JavaFX to mobile and embedded hardware. This includes iPhone, iPad, Android devices, and even the Raspberry Pi. The different projects that make possible this miracle can be found here: https://bitbucket.org/javafxports .
This adventure started at the end of 2013, when Johan Vos and his team started the work on porting JavaFX to Android, based on the OpenJFX project. In parallel, RoboVM started as a similar open source project to port Java to iOS. In February 2015, LodgOn and Trillian Mobile, the companies behind those projects, announced a joint effort to combine the best of both projects into a single plug-in, called jfxmobile-plugin. The one and only Gradle JavaFX plug-in for mobile was created and freely available through the JavaFXPorts repository.
A few weeks later, the Gluon company (see http://gluonhq.com ) was created to gather all the efforts around the JavaFXPorts project and to deliver Gluon Mobile, a lightweight application framework and a set of mobile controls to enhance the mobile experience.
JavaFXPorts Under the Hood
When we create and compile a Java application, the result is Java bytecode. To run it, you need the JRE, containing native libraries specific for each platform. Since there is no JRE for mobile devices, a different approach is required.
On Android, the Google’s Android SDK contains tools for bundling applications, resources, and libraries into an Android package (APK). The jfxmobile plug-in will use these tools to create and install the Java mobile app, on top of the Android’s Dalvik/Art VMs, relatively similar to the Java VM.
On iOS, the JRE needs to be packaged inside the app. The RoboVM ahead-of-time compiler is used to translate the Java code into native iOS code, linking the required runtime libraries with the application.
Both the Android runtime and the iOS AOT compiler currently use the Apache Harmony implementation of the Java class libraries, which is only a partial implementation of Java 7, and the project is officially abandoned. Adding to this, the RoboVM project has been stopped after Microsoft acquired Xamarin, which acquired RoboVM in the first place.
At this moment, this means that JavaFXPorts supports most of the Java 7 SE APIs, and a few Java 8 APIs are supported as well (like lambda expressions, but not streams).
Because of these limitations, Gluon is working on GluonVM, a high-performance Java 8/9 VM that will leverage the OpenJDK class libraries and provide full Java 9 functionality on mobile devices. It is expected to be available at the time Java 9 is released.
Note
Until GluonVM is released and given the mentioned limitations, to run JavaFX on Mobile we can’t use Java 9 nor the modular system. That is why the examples in this chapter use the existing implementation (Java 7 and some features of Java 8).
Getting Started with JavaFXPorts
The documentation to get started creating Java mobile applications with JavaFXPorts can be found here: http://docs.gluonhq.com/javafxports/ .
The Gradle plug-in jfxmobile-plugin does almost all the required work. By including this plug-in in your regular JavaFX application, it will automatically create a number of tasks for you, and it will package your application as a native iOS or a native Android package.
These are the prerequisites before starting a Java mobile project. On your machine:
Install the latest JDK 8 version for your development machine. Get it from here: http://www.oracle.com/technetwork/java/javase/downloads/index.html .
Install Gradle 2.2 or higher from https://gradle.org/install . It is required to build applications with the jfxmobile plug-in.
If you want to deploy on Android:
Install the Android SDK from https://developer.android.com/studio/index.html . You can download Android Studio, which bundles the SDK and the required Android tools, or you can just download and install the SDK tools at the end of the link.
Run the Android SDK Manager (Android Studio -> Tools -> Android -> SDK Manager or the command line <android sdk>/tools/android) and then install at least version 23.0.1 of Build-tools, the SDK Platform for APIs 21 up to 25, from Extras the Android Support Repository.
Create a properties file in <Users>/<User>/.gradle/gradle.properties and add the ANDROID_HOME=<path.to.Android.sdk> property.
Before deploying to an Android device, you need to follow these steps on the device:
Go to Settings -> About phone -> Build Number and tap seven times on it to enable developer mode.
Go to Settings -> Development Options -> USB Debugging and select enable.
Go to Settings -> Security -> Unknown sources and enable installing apps from unknown sources.
If you want to deploy on iOS:
You need a Mac with MacOS X 10.11.5 or higher
You need Xcode 8.x or higher, available from the Mac App Store
Before deploying to an iOS device, you need to get a provisioning profile from the Apple Developer portal. See this link on how to get a free one to deploy to your own device: http://docs.gluonhq.com/javafxports/#_ios_3 .
Hello Mobile World Example
With all the prerequisites in place, let’s create a Hello Mobile World example that you can run on desktop and mobile platforms.
On your favorite IDE, you can create a new Gradle project. Give it a name (HelloMobile), a location, and a main class, such as org.jfxbe.chap13.HelloMobile.
Edit the build.gradle file and add the content from Listing 13-1. It will apply the jfxmobile plug-in to the project. Save and reload the project to update the project. The first time this is done, the plug-in will download an install some internal dependencies, so it may take a while.
Listing 13-1. The build.gradle File
buildscript {repositories {jcenter()}dependencies {classpath 'org.javafxports:jfxmobile-plugin:1.3.5'}}apply plugin: 'org.javafxports.jfxmobile'repositories {jcenter()}mainClassName = 'org.jfxbe.chap13.HelloMobile'jfxmobile {android {}ios {forceLinkClasses = [ 'org.jfxbe.chap13.**.*' ]}}
Note that the version of the plug-in at the time of this writing was 1.3.5. To keep it updated, check out https://bitbucket.org/javafxports/javafxmobile-plugin .
Now in the main class, extend Application and create a JavaFX Scene with some content, as shown in Listing 13-2.
Listing 13-2. Hello Mobile Main Class
package org.jfxbe.chap13;import javafx.application.Application;import javafx.geometry.Rectangle2D;import javafx.scene.Scene;import javafx.scene.control.Button;import javafx.scene.layout.StackPane;import javafx.stage.Screen;import javafx.stage.Stage;public class HelloMobile extends Application {@Overridepublic void start(Stage primaryStage) throws Exception {Rectangle2D bounds = Screen.getPrimary().getVisualBounds();final Button button = new Button("Hello Mobile World!");button.setStyle("-fx-font-size: 20pt;");button.setOnAction(e -> button.setRotate(button.getRotate() - 30));final StackPane stackPane = new StackPane(button);Scene scene = new Scene(stackPane, bounds.getWidth(), bounds.getHeight());primaryStage.setScene(scene);primaryStage.show();}public static void main(String[] args) {launch(args);}}
Finally, you can build the application and run it on your platforms. To run a Gradle build, just type gradle followed by the desired task name, e.g. gradle build will build the project. Run gradle run to run it on your developer machine, gradle androidInstall to deploy it on an Android device, or gradle launchIOSDevice to an iOS device. Figure 13-1 shows a screenshot of the app running on Android.
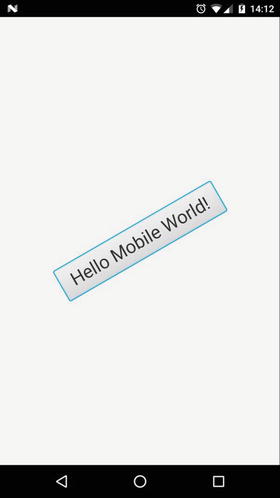
Figure 13-1. Hello Mobile World deployed on Android
How Does It Work?
The jfxmobile plug-in adds a number of tasks to your Java application that allow you to create packages that can be uploaded to the Apple App Store and the Android Play Store.
The jfxmobile plug-in downloads and installs the required JavaFX SDKs:
Dalvik SDK for Android: The plug-in currently depends on org.javafxports:dalvik-sdk:8.60.9 and org.javafxports:jfxdvk:8.60.9.
Retrolambda plug-in: Transforms the code to Java 6 compatible bytecode and currently depends on net.orfjackal.retrolambda:retrolambda:2.5.1.
iOS SDK: The plug-in currently depends on org.javafxports:ios-sdk:8.60.9.
MobiDevelop: The fork of RoboVM 1.8.0 that’s used to compile the code to iOS compatible bytecode. Currently depends on com.mobidevelop.robovm:robovm-dist:tar.gz:nocompiler:2.3.0.
The source code for the mentioned SDKs is available here: http://bitbucket.org/javafxports/8u-dev-rt .
On Android, the plug-in will then execute a number of commands that will lead to the creation of an Android package (APK) in the directory build/javafxports/android. The package will be deployed and installed in the device. Listing 13-3 shows the output of a successful deploy in Android, where all the involved tasks are listed.
Note
When running Gradle tasks, use --info, --debug, or --stracktrace to get a more verbose output that may help you ping pointing errors and issues, such as gradle --info androidInstall.
Listing 13-3. Output When Running androidInstall
$ gradle androidInstall:validateManifest:collectMultiDexComponents:compileJava:processResources UP-TO-DATE:classes:compileAndroidJava UP-TO-DATE:copyClassesForRetrolambda:applyRetrolambdaRetrolambda 2.5.1:mergeClassesIntoJar:shrinkMultiDexComponents:createMainDexList:writeInputListFile:dex:mergeAndroidAssets:mergeAndroidResources:processAndroidResources UP-TO-DATE:processAndroidResourcesDebug:validateSigningDebug:apkDebug:zipalignDebug:androidInstallInstalled on device.BUILD SUCCESSFULTotal time: 41.168 secs
On iOS, the situation is internally different, but the Gradle commands are similar. The plug-in will download and install the RoboVM compiler, and it will use RoboVM compiler commands to create an iOS application in build/javafxports/ios.
Note
When running the app on your mobile device, the standard output can be accessed on Android devices by running <path.to.android skd>/platform-tools/adb logcat. On the Mac, open Xcode ➤ Windows ➤ Devices on iOS to access the output.
Finally, Gradle uses convention over configuration, and the default configuration applied to the plug-in makes the build.gradle file extremely simple. You can modify this configuration when required. Check the documentation at http://docs.gluonhq.com/javafxports/#anchor-3 for a full list of modifiable properties for Android and iOS.
Submitting the App to the Stores
When you have finished testing the app on your mobile devices, you can proceed to upload it to the Apple App Store and the Android Play Store. To do so, the plug-in already includes the required tasks.
On Android, you need to provide valid icon images (under /src/android/res) and you have to disable the debugging options in the AndroidManifest file: Under the application tag, add android:debuggable="false". And finally you have to sign the app, as explained at https://developer.android.com/studio/publish/app-signing.html . You can add the signing configuration to your build.gradle file, as shown in Listing 13-4.
Listing 13-4. Signing Configuration on Android
jfxmobile {android {signingConfig {storeFile file("path/to/my-release-key.keystore")storePassword 'STORE_PASSWORD'keyAlias 'KEY_ALIAS'keyPassword 'KEY_PASSWORD'}manifest = 'lib/android/AndroidManifest.xml'}}
If everything is set, run gradle androidRelease to generate the APK under /build/javafxports/android. To upload it to the store, you’ll have to enroll with Google Play Developers ( https://play.google.com/apps/publish/signup/ ) and fill in the required forms.
On iOS, provide the icons for the app, and once you have enrolled to the Apple Developer program, you need to sign the app with a provisioning profile for production, as shown in Listing 13-5. Run gradle createIpa and submit the app at /build/javafxports/ios through Xcode ➤ Open Developer Tool ➤ Application Loader. Fixing the initial requirements that the tool reveals as missing can be done by adding the proper keys to the plist file under /src/ios/Default-Info.plist. When this is done, go to iTunes Connect ( https://itunesconnect.apple.com ) to prepare the app for release. As with any other regular iOS app, it usually takes a few iterations to get the app approved for submission, until you fulfill all the requirements from the reviewers.
Listing 13-5. Signing Configuration on iOS
jfxmobile {ios {arch = "arm64"infoPList = file('src/ios/Default-Info.plist')forceLinkClasses = ['your.package.**.*',...]iosProvisioningProfile = 'MyApp'iosSignIdentity = 'iPhone Distribution: ******'}}
Gluon Mobile
The Gluon Mobile library is designed to help developers create high performance, great looking, and cloud connected mobile apps from a single Java codebase, for iOS and Android. It improves time-to-market for applications, by providing APIs for modern material design user interfaces, accessing mobile device features, connecting to web services, and synchronizing state across many devices.
Gluon Mobile is the client-side library and development tool that:
Provides UI controls for the client application, using Glisten, the UI component that provides a native look and feel, with JavaFX controls and specific layouts.
Handles communication with the server-side Gluon CloudLink, using Connect, an open source project that allows communications with the Gluon CloudLink itself and other web services. Find out more at http://gluonhq.com/products/mobile/connect/ .
Abstracts (parts of) the platform-specific APIs by using Charm Down, an open source project that offers a collection of services like filesystem, local or push notifications, GPS, sensors, camera,… More details can be found at http://gluonhq.com/products/mobile/charm-down/ .
To get started using Gluon Mobile, you can create a Gradle project from the scratch, modify any an existing samples ( http://gluonhq.com/support/samples/ ), or install and use the Gluon plug-in for your IDE.
The Gluon IDE Plug-Ins
The Gluon plug-in for your IDE aids in creating a Gluon application project inside your IDE: there are plug-ins for:
NetBeans. See instructions: http://docs.gluonhq.com/charm/latest/#netbeans-plugin .
IntelliJ IDEA. Follow: http://docs.gluonhq.com/charm/latest/#intellij-plugin .
Eclipse. See: http://docs.gluonhq.com/charm/latest/#eclipse-plugin .
Once you have installed the plug-in, select New Project, go to the Gluon category, and pick one of the different templates available (see Figure 13-2). You create a project that you can easily modify and adapt to create your own app.
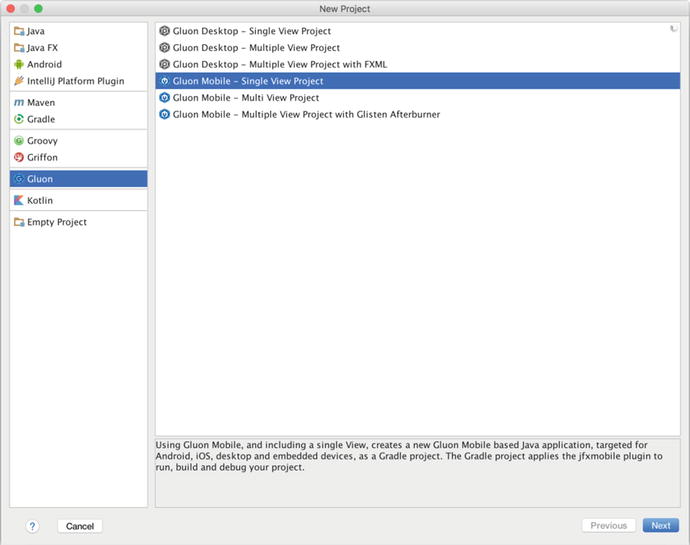
Figure 13-2. Gluon plug-in for IntelliJ and available templates
Charm Glisten
The base class is MobileApplication, and it extends from Application. It does not require any specific methods to be implemented, but typically init can be overridden to register the different views, and postInit can access the scene and apply an style sheet, for instance.
Glisten user interfaces are built using views. A view is a Glisten container that allows you to add nodes to its top, center, and bottom.
Usually a View instance is created by providing a name for the view and the node for its content. This instance is added to a factory of views so the Glisten UI can load and unload them on demand.
By default, the first view displayed when the stage is shown is called Home View. It has no predefined content, so this view has to be designed by the developer, but its name is already assigned: MobileApplication.HOME_VIEW. The short snippet in Listing 13-6 will create a very simple mobile application with a single view, as shown in Figure 13-3.

Figure 13-3. MyApp running on the desktop
By default, glisten.css is the style sheet added to a Gluon Mobile application. It is based on Material Design from Google ( https://material.io ).
See the documentation at http://docs.gluonhq.com/charm/latest/#_charm_glisten to find out more about the Glisten controls.
Listing 13-6. Creating a Home View
import com.gluonhq.charm.glisten.application.MobileApplication;import com.gluonhq.charm.glisten.mvc.View;import com.gluonhq.charm.glisten.visual.Swatch;import javafx.scene.Scene;import javafx.scene.control.Button;public class MyApp extends MobileApplication {public static final String BASIC_VIEW = HOME_VIEW;@Overridepublic void init() {addViewFactory(BASIC_VIEW, () -> new View(new Button("Hello Glisten!")));}@Overridepublic void postInit(Scene scene) {Swatch.BLUE.assignTo(scene);}}
License
While JavaFXPorts, Charm Down, or Charm Connect are fully open source projects, Gluon Mobile is a commercial project and requires a license. As you can see at http://gluonhq.com/products/mobile/buy , there is a free tier and the library can be used for testing with the 100% of its features, without a license.
Example: The BasketStats App
This example shows you how to create, step by step, a full Java mobile app that you can deploy to your mobile devices. You can use it to keep track of the annotation during the basketball games of your kids, for instance.
In this case, you’ll use NetBeans and the Gluon plug-in for NetBeans.
Creating the Project
Let’s create a new project using the Gluon plug-in . In NetBeans, choose File ➤ New Project and select Gluon on the left. Select Gluon Mobile – Glisten -Afterburner Project from the list of available projects, as shown in Figure 13-4.
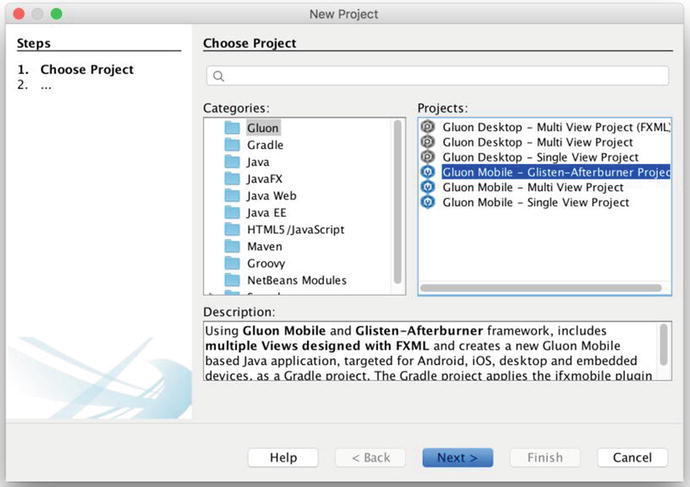
Figure 13-4. New project: Choose project
Add a proper name to the application (BasketStats), find a proper location, add the package name, and change the main class name if required, as shown in Figure 13-5.
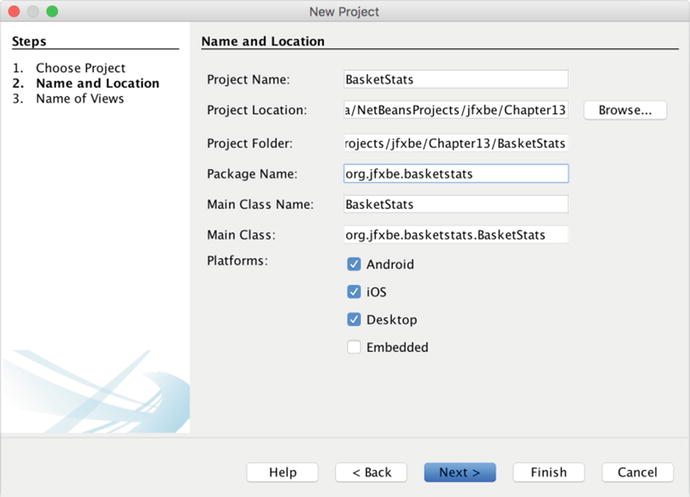
Figure 13-5. New project: Set name and location
Click Next and set these names—Main for the primary view and Board for the secondary view—as shown in Figure 13-6. Click Finish and the project will be created.
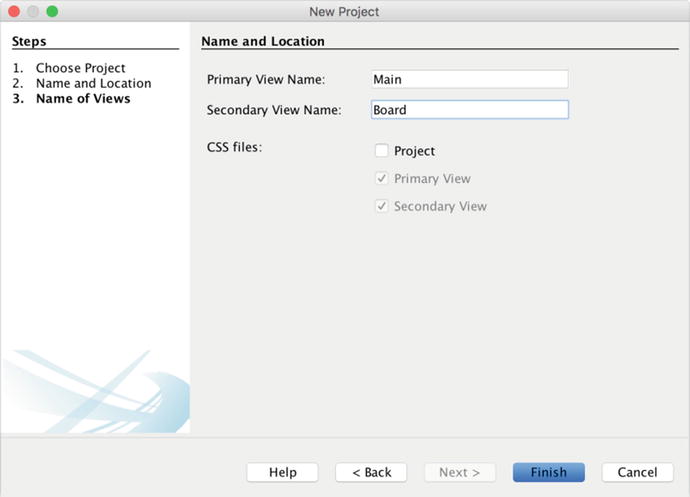
Figure 13-6. New project: Set views names
The full structure of the project can be seen in Figure 13-7. Listing 13-7 contains the build.gradle file, showing the versions available at the time of this writing.
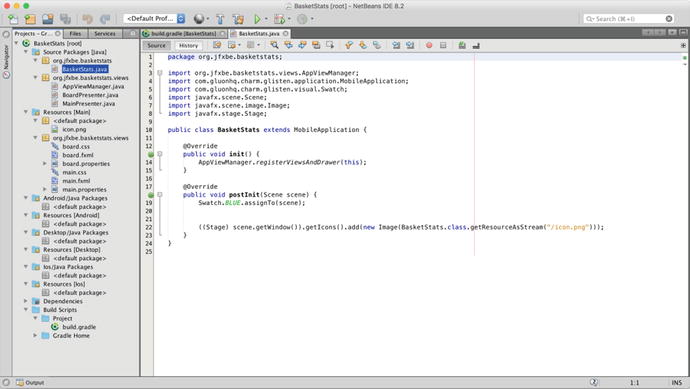
Figure 13-7. Project created: The MobileApplication class
Listing 13-7. Default build.gradle File
buildscript {repositories {jcenter()}dependencies {classpath 'org.javafxports:jfxmobile-plugin:1.3.5'}}apply plugin: 'org.javafxports.jfxmobile'repositories {jcenter()maven {url 'http://nexus.gluonhq.com/nexus/content/repositories/releases'}}mainClassName = 'org.jfxbe.basketstats.BasketStats'dependencies {compile 'com.gluonhq:glisten-afterburner:1.2.0'compile 'com.gluonhq:charm-glisten:4.3.5'}jfxmobile {downConfig {version = '3.3.0'plugins 'display', 'lifecycle', 'statusbar', 'storage'}android {manifest = 'src/android/AndroidManifest.xml'}ios {infoPList = file('src/ios/Default-Info.plist')forceLinkClasses = ['org.jfxbe.basketstats.**.*','com.gluonhq.**.*','javax.annotations.**.*','javax.inject.**.*','javax.json.**.*','org.glassfish.json.**.*']}}
In the application class, the init method is overridden to create and register the views. Listing 13-8 contains the AppViewManager class that takes care of adding the views to an AppViewRegistry instance. The views are created with FXML with the AppView class, using the Afterburner framework ( https://github.com/AdamBien/afterburner.fx ). A NavigationDrawer control is also created and registered. Figure 13-8 shows this layer when you run the project.
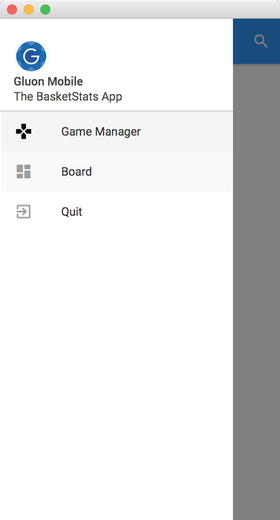
Figure 13-8. Running the project on desktop
Listing 13-8. The AppViewManager Class
package org.jfxbe.basketstats.views;import com.gluonhq.charm.glisten.afterburner.AppView;import static com.gluonhq.charm.glisten.afterburner.AppView.Flag.HOME_VIEW;import static com.gluonhq.charm.glisten.afterburner.AppView.Flag.SHOW_IN_DRAWER;import static com.gluonhq.charm.glisten.afterburner.AppView.Flag.SKIP_VIEW_STACK;import com.gluonhq.charm.glisten.afterburner.AppViewRegistry;import com.gluonhq.charm.glisten.afterburner.GluonPresenter;import com.gluonhq.charm.glisten.afterburner.DefaultDrawerManager;import com.gluonhq.charm.glisten.application.MobileApplication;import com.gluonhq.charm.glisten.control.Avatar;import com.gluonhq.charm.glisten.control.NavigationDrawer;import com.gluonhq.charm.glisten.visual.MaterialDesignIcon;import javafx.scene.image.Image;import java.util.Locale;import org.jfxbe.basketstats.BasketStats;public class AppViewManager {public static final AppViewRegistry REGISTRY = new AppViewRegistry();public static final AppView MAIN_VIEW = view("Game Manager", MainPresenter.class,MaterialDesignIcon.GAMES, SHOW_IN_DRAWER, HOME_VIEW, SKIP_VIEW_STACK);public static final AppView BOARD_VIEW = view("Board", BoardPresenter.class,MaterialDesignIcon.DASHBOARD, SHOW_IN_DRAWER);private static AppView view(String title,Class<? extends GluonPresenter<?>> presenterClass,MaterialDesignIcon menuIcon, AppView.Flag... flags ) {return REGISTRY.createView(name(presenterClass), title, presenterClass,menuIcon, flags);}private static String name(Class<? extends GluonPresenter<?>> presenterClass) {return presenterClass.getSimpleName().toUpperCase(Locale.ROOT).replace("PRESENTER", "");}public static void registerViewsAndDrawer(MobileApplication app) {for (AppView view : REGISTRY.getViews()) {view.registerView(app);}NavigationDrawer.Header header = new NavigationDrawer.Header("Gluon Mobile","The BasketStats App",new Avatar(21,new Image(BasketStats.class.getResourceAsStream("/icon.png"))));DefaultDrawerManager drawerManager = new DefaultDrawerManager(app,header, REGISTRY.getViews());drawerManager.installDrawer();}}
Adding the Model
Let’s add the model now. First, you define a GameEvent class with some primitives like the annotated score, the date time of the event, the number of periods, and the number of the team. See Listing 13-9.
Listing 13-9. The GameEvent Class
package org.jfxbe.basketstats.model;import java.time.LocalDateTime;import java.time.ZoneOffset;public class GameEvent {private int score;private long dateTime;private int period;private int team;private String partialScore;/*** Game event when a team scores* @param score 0, 1, 2, 3. 0 means other game event* @param dateTime* @param period 1 to 4, 5 means game ended* @param team 1 for team A, 2 for team B, 0 for other game event*/public GameEvent(int score, long dateTime, int period, int team) {this.score = score;this.dateTime = dateTime;this.period = period;this.team = team;}/*** Game event when the game starts a period or ends* @param dateTime* @param period*/public GameEvent(LocalDateTime dateTime, int period) {this(0, dateTime.toInstant(ZoneOffset.UTC).getEpochSecond(), period, 0);}public GameEvent() {this(0, 0, 0, 0);}public int getScore() {return score;}public void setScore(int score) {this.score = score;}public long getDateTime() {return dateTime;}public LocalDateTime getLocalDateTime() {return LocalDateTime.ofEpochSecond(dateTime, 0, ZoneOffset.UTC);}public void setDateTime(long dateTime) {this.dateTime = dateTime;}public int getPeriod() {return period;}public void setPeriod(int period) {this.period = period;}public int getTeam() {return team;}public void setTeam(int team) {this.team = team;}public String getPartialScore() {return partialScore;}public void setPartialScore(String partialScore) {this.partialScore = partialScore;}}
Now you’ll have a Game class with some JavaFX properties like the name and score of the teams, the local date and time of the game, and a list of game events. See Listing 13-10.
Listing 13-10. The Game Class
package org.jfxbe.basketstats.model;import java.time.LocalDateTime;import javafx.beans.property.IntegerProperty;import javafx.beans.property.ListProperty;import javafx.beans.property.ObjectProperty;import javafx.beans.property.SimpleIntegerProperty;import javafx.beans.property.SimpleListProperty;import javafx.beans.property.SimpleObjectProperty;import javafx.beans.property.SimpleStringProperty;import javafx.beans.property.StringProperty;import javafx.collections.FXCollections;import javafx.collections.ObservableList;public class Game {private final ListProperty<GameEvent> gameEvents;public Game() {gameEvents = new SimpleListProperty<>(FXCollections.observableArrayList());}private final IntegerProperty scoreA = new SimpleIntegerProperty(this, "scoreA", 0);public final IntegerProperty scoreAProperty() { return scoreA; }public final int getScoreA() { return scoreA.get(); }public final void setScoreA(int value) { scoreA.set(value); }private final IntegerProperty scoreB = new SimpleIntegerProperty(this, "scoreB", 0);public final IntegerProperty scoreBProperty() { return scoreB; }public final int getScoreB() { return scoreB.get(); }public final void setScoreB(int value) { scoreB.set(value); }private final StringProperty teamA = new SimpleStringProperty(this, "teamA", "");public final StringProperty teamAProperty() { return teamA; }public final String getTeamA() { return teamA.get(); }public final void setTeamA(String teamA) { this.teamA.set(teamA); }private final StringProperty teamB = new SimpleStringProperty(this, "teamB", "");public final StringProperty teamBProperty() { return teamB; }public final String getTeamB() { return teamB.get(); }public final void setTeamB(String teamB) { this.teamB.set(teamB); }private final ObjectProperty<LocalDateTime> localDateTime =new SimpleObjectProperty<>(this, "localDate", LocalDateTime.now());public final ObjectProperty<LocalDateTime> localDateTimeProperty() {return localDateTime; }public final LocalDateTime getLocalDateTime() { return localDateTime.get(); }public final void setLocalDateTime(LocalDateTime localDateTime) {this.localDateTime.set(localDateTime); }public ListProperty<GameEvent> gameEventsProperty() { return gameEvents; }public ObservableList<GameEvent> getGameEvents() { return gameEvents.get(); }public void setGameEvents(ObservableList<GameEvent> gluonGame) {gameEvents.set(gluonGame); }public final String getGameName() {return "Game-" + teamA.get() + "-" + teamB.get() + "-" +localDateTime.get().toLocalDate().toEpochDay() + "-" +localDateTime.get().toLocalTime().toSecondOfDay() + ".gam";}}
Adding the Service
This app will store the games locally, using a file for each game. Now you need to define a Service class to manage this. While you could use any regular file read/file write approach, you’ll use Gluon CloudLink Client to persist the games you create in the local storage of the device. While its main purpose is to allow communications with the cloud, you can use it locally as well.
For this, you need a dependency, as shown in Listing 13-11.
Listing 13-11. Required Dependencies
dependencies {compile 'com.gluonhq:glisten-afterburner:1.2.0'compile 'com.gluonhq:charm-glisten:4.3.5'compile 'com.gluonhq:charm-cloudlink-client:4.3.5'}
As seen in Listing 13-12, the service will create Game and DataClient instances upon initialization. The latter will use OperationMode.LOCAL_ONLY to indicate only local operations.
The DataClient instance calls the createListDataReader() method with the following arguments—an identifier (the unique name of the game), the object class to be read (GameEvent.class), and the synchronization flags:
SyncFlag.LIST_WRITE_THROUGH, so changes in the list of game events are automatically stored locally.
SyncFlag.OBJECT_WRITE_THROUGH, so changes in the properties of any game event in the list are also stored locally.
It returns a ListDataReader object. Use the static method DataProvider.retrieveList with that data reader to obtain a GluonObservableList<GameEvents>, which is an observable list of game events that can be used in the different views to get or add new gameEvents. These events are immediately added to the local file.
Listing 13-12. The Game Service.
package org.jfxbe.basketstats.service;import com.gluonhq.cloudlink.client.data.DataClient;import com.gluonhq.cloudlink.client.data.DataClientBuilder;import com.gluonhq.cloudlink.client.data.OperationMode;import com.gluonhq.cloudlink.client.data.SyncFlag;import com.gluonhq.connect.GluonObservableList;import com.gluonhq.connect.provider.DataProvider;import javafx.beans.property.ListProperty;import javax.annotation.PostConstruct;import org.jfxbe.basketstats.model.Game;import org.jfxbe.basketstats.model.GameEvent;public class Service {private DataClient dataClient;private Game game;@PostConstructpublic void postConstruct() {dataClient = DataClientBuilder.create().operationMode(OperationMode.LOCAL_ONLY).build();game = new Game();}public GluonObservableList<GameEvent> retrieveGame(String nameGame) {game.setGameEvents(null);return DataProvider.retrieveList(dataClient.createListDataReader(nameGame,GameEvent.class,SyncFlag.LIST_WRITE_THROUGH, SyncFlag.OBJECT_WRITE_THROUGH));}public void addGameEvent(GameEvent gameEvent) {updateScore(gameEvent);gameEvent.setPartialScore("" + game.getScoreA() + " :: " + game.getScoreB());game.getGameEvents().add(gameEvent);}public Game getGame() {return game;}public final ListProperty<GameEvent> gameEventsProperty() {return game.gameEventsProperty();}public void updateScore(GameEvent event) {switch (event.getTeam()) {case 0:if (event.getPeriod() == 1) {game.setScoreA(0);game.setScoreB(0);}break;case 1:game.setScoreA(game.getScoreA() + event.getScore());break;case 2:game.setScoreB(game.getScoreB() + event.getScore());break;}}}
You can check the “Data Storage” section of the Gluon CloudLink documentation at http://docs.gluonhq.com/cloudlink/#_data_storage to learn about the DataClient and GluonObservableList concepts in more detail.
Modifying the Main View
It’s now time to modify the default views. Their FXML files can be edited with Scene Builder. Since version 8.3.0, which can be downloaded and installed from http://gluonhq.com/products/scene-builder/ , the required dependencies are included, and you can easily design Gluon Mobile views. See Figure 13-9.
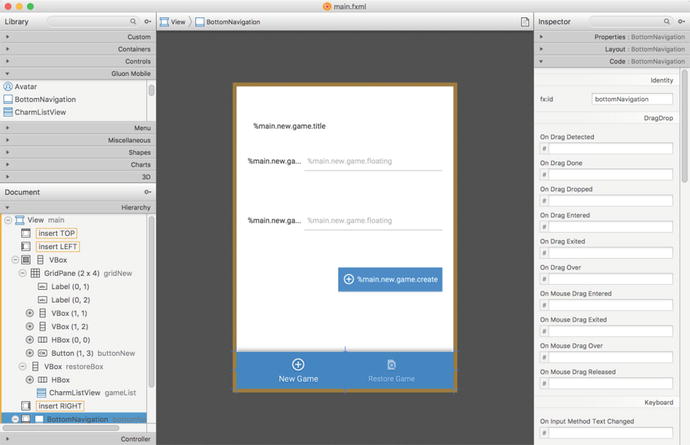
Figure 13-9. Main view edited with Scene Builder
First, open the main view (main.fxml). To preview the Gluon style, select Preview ➤ JavaFX Theme ➤ Gluon Mobile. Remove the default content and add a BottomNavigation control to the bottom of the view with two buttons: one to create a new game and one to retrieve an existing game.
Now you add a VBox container that will hold a GridPane with two TextField controls from Gluon Mobile, so the user can set the name of the teams. It will be visible when the New Game button is selected. And a second VBox that will hold a CharmListView control, an enhanced list with headers, to show the different games available. It will be visible when the Restore button is selected. Note that for every control added, you assign an fx:id tag, so those can be referenced from the controller class. Figure 13-9 shows the main view once the changes have been added.
The edited FXML file, as the rest of the source code of this example, can be found in the repository of this book.
Now add all the tagged controls to the presenter, as shown in Listing 13-13.
Listing 13-13. The Main Presenter
package org.jfxbe.basketstats.views;import static com.gluonhq.charm.glisten.afterburner.DefaultDrawerManager.DRAWER_LAYER;import com.gluonhq.charm.glisten.afterburner.GluonPresenter;import com.gluonhq.charm.glisten.control.*;import com.gluonhq.charm.glisten.mvc.View;import com.gluonhq.charm.glisten.visual.MaterialDesignIcon;import java.time.*;import java.util.ResourceBundle;import javafx.collections.FXCollections;import javafx.fxml.FXML;import javafx.scene.control.*;import javafx.scene.layout.*;import javax.inject.Inject;import org.jfxbe.basketstats.BasketStats;import org.jfxbe.basketstats.service.Service;import org.jfxbe.basketstats.utils.GameUtils;import org.jfxbe.basketstats.views.cells.*;public class MainPresenter extends GluonPresenter<BasketStats> {@Inject private Service service;@FXML private View main;@FXML private GridPane gridNew;@FXML private TextField textNameA, textNameB;@FXML private Button buttonNew;@FXML private VBox restoreBox;@FXML private CharmListView<String, LocalDate> gameList;@FXML private ToggleButton newToggle, restoreToggle;@FXML private ResourceBundle resources;public void initialize() {main.showingProperty().addListener((obs, oldValue, newValue) -> {if (newValue) {AppBar appBar = getApp().getAppBar();appBar.setNavIcon(MaterialDesignIcon.MENU.button(e ->getApp().showLayer(DRAWER_LAYER)));appBar.setTitleText(resources.getString("main.app.title"));}});buttonNew.disableProperty().bind(textNameA.textProperty().isEmpty().or(textNameB.textProperty().isEmpty()).or(textNameA.textProperty().isEqualTo(textNameB.textProperty())));buttonNew.setOnAction(e -> {service.getGame().setTeamA(textNameA.getText());service.getGame().setTeamB(textNameB.getText());service.getGame().setLocalDateTime(LocalDateTime.now());GameUtils.restoreGame(service.getGame().getGameName());});restoreBox.managedProperty().bind(restoreBox.visibleProperty());gridNew.managedProperty().bind(gridNew.visibleProperty());gameList.setPlaceholder(new Label(resources.getString("main.listview.noitems")));gameList.setHeadersFunction(GameUtils::getLocalDateFromGame);gameList.setHeaderCellFactory(p -> new HeaderGameListCell());gameList.setHeaderComparator((l1, l2) -> l2.compareTo(l1));gameList.setCellFactory(p -> new GameListCell(resources));restoreToggle.selectedProperty().addListener((obs, ov, nv) -> {if (nv) {gridNew.setVisible(false);restoreBox.setVisible(true);gameList.setItems(FXCollections.observableArrayList(GameUtils.retrieveGames()));}});newToggle.selectedProperty().addListener((obs, ov, nv) -> {if (nv) {restoreBox.setVisible(false);gridNew.setVisible(true);}});newToggle.setSelected(true);}}
The presenter adds the required listeners to the controls and cell factories for the header and regular cells of the CharmListView control upon initialization (both cell factory classes can be found in the repository of this book). Using injection, the service instance is added to the presenter. To learn more about the Gluon Mobile controls, check out the documentation at http://docs.gluonhq.com/charm/javadoc/latest/ .
When the New Game toggle is clicked, the grid is visible and the list view is hidden, as shown in Figure 13-10a. When the Restore Game toggle is selected, the grid will be hidden, and the list view will present all the existing games so far, as shown in Figure 13-10b. Note that the stored games have a name and extension like Game-Bears-Tigers-17328-70904.gam, as defined in the Game class.
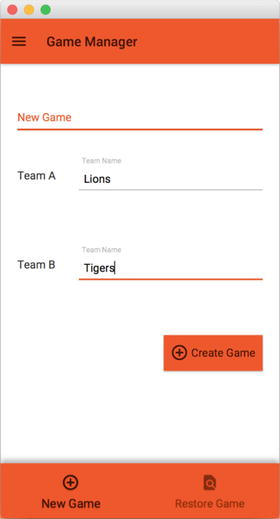
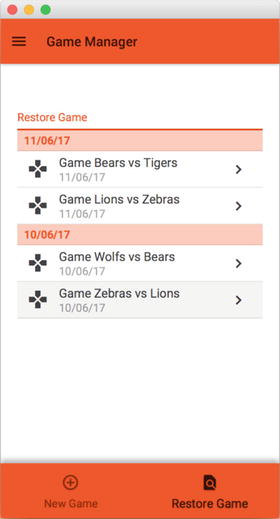
Figure 13-10. Main view: a) New Game view, b) Restore Game view
Note the use of the Storage service from Charm Down to retrieve the files available in the local folder. In the case of iOS or Android, the returned directory is private and accessible only from the app, as shown in Listing 13-14.
Listing 13-14. Using the Storage Service
package org.jfxbe.basketstats.utils;public class GameUtils {public static List<String> retrieveGames() {File root = Services.get(StorageService.class).flatMap(storage -> storage.getPrivateStorage()).orElseThrow(() -> new RuntimeException("No storage found"));List<String> list = new ArrayList<>();for (File file : root.listFiles((dir, name) -> name.startsWith("Game")&& name.endsWith(".gam"))) {list.add(file.getName());}return list;}}
Modifying the Board View
Now you’ll see how to modify the board view. Open board.fxml with Scene Builder, remove the default content, and add to the center of the view a Gluon Mobile ExpansionPanelContainer control with three ExpansionPanel controls :
In the first one, its ExpandedPanel will hold a GridPane with the current annotation and period and the buttons to annotate one, two, or three points for each team. CollapsedPanel will hold a label with the current period and score.
The second one will have in the expanded panel a CharmListView control with the game events: a period started, one team score, and some points. The CollapsedPanel will hold a label.
The third one will have in the expanded panel a LinearChart control with the game evolution. The CollapsedPanel will hold a label.
Figure 13-11 shows the modified view in Scene Builder. Note that every control required in the presenter has to define an fx:id tag. The edited FXML file can be found in the repository of this book.
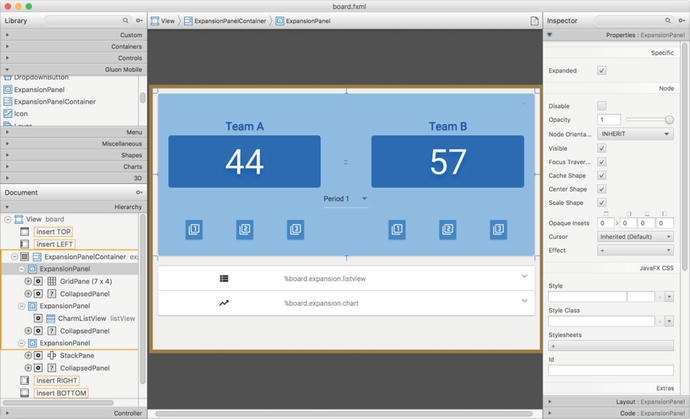
Figure 13-11. Board view edited with Scene Builder
Now you’ll add all the tagged controls to the presenter, as shown in Listing 13-15. The factory cells classes can be found in the repository of this book. You’ll find a link to that repository from the book’s catalog page on the apress.com web site.
Listing 13-15. The Board Presenter
package org.jfxbe.basketstats.views;import static com.gluonhq.charm.glisten.afterburner.DefaultDrawerManager.DRAWER_LAYER;import com.gluonhq.charm.glisten.afterburner.GluonPresenter;import com.gluonhq.charm.glisten.control.*;import com.gluonhq.charm.glisten.mvc.View;import com.gluonhq.charm.glisten.visual.MaterialDesignIcon;import com.gluonhq.connect.GluonObservableList;import java.text.MessageFormat;import java.time.*;import java.time.format.*;import java.util.Arrays;import java.util.List;import java.util.ResourceBundle;import javafx.beans.binding.Bindings;import javafx.beans.property.*;import javafx.fxml.FXML;import javafx.scene.chart.*;import javafx.scene.chart.XYChart.Series;import javafx.scene.control.*;import javafx.util.StringConverter;import javax.inject.Inject;import org.jfxbe.basketstats.BasketStats;import org.jfxbe.basketstats.model.GameEvent;import org.jfxbe.basketstats.service.Service;import org.jfxbe.basketstats.views.cells.*;public class BoardPresenter extends GluonPresenter<BasketStats> {@Inject private Service service;@FXML private View board;@FXML private ExpansionPanelContainer expansion;@FXML private Label labelTeamA, labelTeamB;@FXML private Label scoreTeamA, scoreTeamB, globalScore;@FXML private Button plusOneTeamA, plusTwoTeamA, plusThreeTeamA;@FXML private Button plusOneTeamB, plusTwoTeamB, plusThreeTeamB;@FXML private DropdownButton dropdown;@FXML private MenuItem period1, period2, period3, period4;@FXML private CharmListView<GameEvent, Integer> listView;@FXML private LineChart<Number, Number> chart;@FXML private NumberAxis xAxis, yAxis;@FXML private ResourceBundle resources;private Button buttonStart, buttonStop;private List<Button> buttons;private List<MenuItem> periods;private final IntegerProperty period = new SimpleIntegerProperty();private Series<Number, Number> teamASeries, teamBSeries;public void initialize() {buttons = Arrays.asList(plusOneTeamA, plusTwoTeamA, plusThreeTeamA,plusOneTeamB, plusTwoTeamB, plusThreeTeamB);periods = Arrays.asList(period1, period2, period3, period4);enableGame(false);buttonStart = MaterialDesignIcon.PLAY_CIRCLE_OUTLINE.button(e -> startGame());buttonStop = MaterialDesignIcon.STOP.button(e -> stopGame());buttonStart.setDisable(true);buttonStop.setDisable(true);board.showingProperty().addListener((obs, oldValue, newValue) -> {if (newValue) {AppBar appBar = getApp().getAppBar();appBar.setNavIcon(MaterialDesignIcon.MENU.button(e ->getApp().showLayer(DRAWER_LAYER)));appBar.setTitleText(resources.getString("board.app.title"));appBar.getActionItems().addAll(buttonStart, buttonStop);}});for (ExpansionPanel panel : expansion.getItems()) {panel.expandedProperty().addListener((obs, ov, nv) -> {if (nv) {for (ExpansionPanel otherPanel : expansion.getItems()) {if (!otherPanel.equals(panel)) {otherPanel.setExpanded(false);}}}});}period2.setOnAction(e -> addPeriodEvent(2));period3.setOnAction(e -> addPeriodEvent(3));period4.setOnAction(e -> addPeriodEvent(4));plusOneTeamA.setOnAction(e -> addScoreEvent(1, 1));plusTwoTeamA.setOnAction(e -> addScoreEvent(2, 1));plusThreeTeamA.setOnAction(e -> addScoreEvent(3, 1));plusOneTeamB.setOnAction(e -> addScoreEvent(1, 2));plusTwoTeamB.setOnAction(e -> addScoreEvent(2, 2));plusThreeTeamB.setOnAction(e -> addScoreEvent(3, 2));labelTeamA.textProperty().bind(service.getGame().teamAProperty());labelTeamB.textProperty().bind(service.getGame().teamBProperty());scoreTeamA.textProperty().bind(service.getGame().scoreAProperty().asString());scoreTeamB.textProperty().bind(service.getGame().scoreBProperty().asString());globalScore.textProperty().bind(Bindings.createStringBinding(() -> {String p;if (period.get() < 5) {p = MessageFormat.format(resources.getString("board.expansion.score"),period.get());} else {p = resources.getString("board.listview.end");}return String.format("(%s) %s :: %s", p, scoreTeamA.getText(),scoreTeamB.getText());}, period, scoreTeamA.textProperty(), scoreTeamB.textProperty()));// CharmListViewlistView.setHeadersFunction(GameEvent::getPeriod);listView.setPlaceholder(new Label(resources.getString("board.listview.noitems")));listView.setComparator((GameEvent e1, GameEvent e2) ->Long.compare(e1.getDateTime(), e2.getDateTime()));listView.setHeaderCellFactory(p -> new HeaderGameEventListCell(resources));listView.setCellFactory(p -> new GameEventListCell(resources));listView.setItems(service.gameEventsProperty());// ChartxAxis.setAutoRanging(true);xAxis.setForceZeroInRange(false);xAxis.setTickLabelFormatter(new StringConverter<Number>() {@Overridepublic String toString(Number t) {return DateTimeFormatter.ofLocalizedTime(FormatStyle.MEDIUM).format(LocalDateTime.ofEpochSecond(t.longValue(), 0,ZoneOffset.UTC));}@Overridepublic Number fromString(String string) {throw new UnsupportedOperationException("Not supported yet.");}});teamASeries = new Series<>();teamASeries.setName(service.getGame().getTeamA());teamBSeries = new Series<>();teamBSeries.setName(service.getGame().getTeamB());chart.getData().addAll(teamASeries, teamBSeries);}private void startGame() {buttonStart.setDisable(true);buttonStop.setDisable(false);enableGame(true);addPeriodEvent(1);}private void stopGame() {buttonStop.setDisable(true);enableGame(false);addPeriodEvent(5);}private void addPeriodEvent(int period) {addPeriodEvent(period, LocalDateTime.now());}private void addPeriodEvent(int period, LocalDateTime time) {this.period.set(period);service.addGameEvent(new GameEvent(time, period));for (int i = 0; i < 4; i++) {periods.get(i).setDisable(i != period);}}private void addScoreEvent(int score, int team) {addScoreEvent(score, team, LocalDateTime.now());}private void addScoreEvent(int score, int team, LocalDateTime time) {final GameEvent gameEvent = new GameEvent(score,time.toInstant(ZoneOffset.UTC).getEpochSecond(), period.get(), team);service.addGameEvent(gameEvent);if (team == 1) {teamASeries.getData().add(new XYChart.Data<>(gameEvent.getDateTime(),service.getGame().getScoreA()));} else {teamBSeries.getData().add(new XYChart.Data<>(gameEvent.getDateTime(),service.getGame().getScoreB()));}}private void enableGame(boolean value) {dropdown.setDisable(!value);for (Button button : buttons) {button.setDisable(!value);}}public void restoreGame(String gameName) {teamASeries.getData().clear();teamBSeries.getData().clear();final String[] split = gameName.split("-");service.getGame().setTeamA(split[1]);service.getGame().setTeamB(split[2]);service.getGame().setScoreA(0);service.getGame().setScoreB(0);period.set(1);dropdown.setSelectedItem(period1);final GluonObservableList<GameEvent> retrievedGame = service.retrieveGame(gameName);enableGame(false);buttonStart.setDisable(false);buttonStop.setDisable(true);retrievedGame.initializedProperty().addListener((obs, ov, nv) -> {if (nv) {teamASeries.setName(service.getGame().getTeamA());teamBSeries.setName(service.getGame().getTeamB());service.getGame().setGameEvents(retrievedGame);for (GameEvent event : retrievedGame) {service.updateScore(event);if (event.getScore() == 0) {final int gamePeriod = event.getPeriod();period.set(gamePeriod);if (gamePeriod == 5) {buttonStop.setDisable(true);enableGame(false);} else {buttonStart.setDisable(true);buttonStop.setDisable(false);enableGame(true);if (gamePeriod - 2 >= 0) {periods.get(gamePeriod - 2).setDisable(true);}dropdown.setSelectedItem(periods.get(gamePeriod - 1));}} else {if (event.getTeam() == 1) {teamASeries.getData().add(new XYChart.Data<>(event.getDateTime(),service.getGame().getScoreA()));} else {teamBSeries.getData().add(new XYChart.Data<>(event.getDateTime(),service.getGame().getScoreB()));}}}}});}}
The presenter adds the required listeners to the controls and cell factories for the header and regular cells of the CharmListView control upon initialization (the cell factory classes are available in the book’s repository ).
When the Start button is clicked, the grid is enabled, period 1 is set, and the game starts. Now the user can click on the 1, 2, 3 buttons from team A or B whenever there is a basket from any of the teams, or select the next period. Finally, when the user clicks the Stop button, the game ends, as shown in Figure 13-12a.
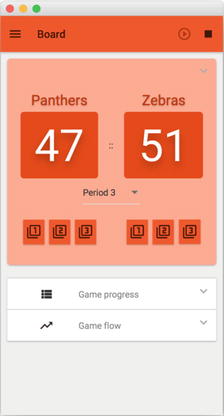
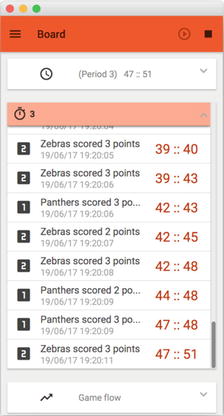
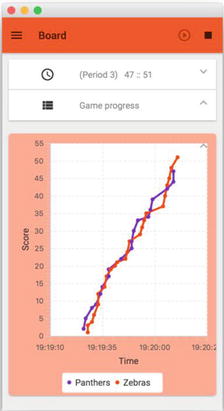
Figure 13-12. Board view: a) Game annotation view , b) Game events view , c) Game evolution view
At any moment, the user can expand any of the other two expansion panels to see a list of events (see Figure 13-12b) or a chart with the evolution of the game (see Figure 13-12c).
Deploy to Mobile
Once you have accomplished all the previous steps, it is time to build the app and deploy it on your mobile devices, to test it and check its performance.
Right-click on the root project, and from the context menu, select Tasks ➤ Android ➤ androidInstall to deploy on Android or or Tasks ➤ Launch ➤ launchIOSDevice to deploy on iOS devices. Figure 13-13 shows the app deployed on an iPad.

Figure 13-13. App deployed on an iPad
More Examples
For more examples of using JavaFX on mobile with Gluon Mobile, go to:
For any questions related to the development of mobile apps with JavaFXPorts or Gluon Mobile, go to the StackOverflow forums:
Summary
In the first part of this chapter, you were introduced to JavaFXPorts, an open source project that allows Java/JavaFX developers to port their applications to Android and iOS.
In the second part of this chapter, you discovered the Gluon Mobile library. Starting from a default project created by the Gluon plug-in for your IDE, the BasketStats app was developed. With the same codebase and running on desktop, Android, and iOS devices, it showed how to deal with FXML views using Scene Builder, or how to create and inject a service that deals with local storage. Different JavaFX and Gluon Mobile controls were used throughout the example, showing how easy it is to use the library, and how fast the development of mobile apps can be. The use of other open source projects, such as Charm Down, make it easy to use native services on the device (storage device in this example) with a platform-agnostic API.