
The Document Object Model (DOM) is about much more than finding particular elements in the page. Remember that JavaScript's purpose in web development is to provide a higher level of interactivity with the user, and there will be times when you want to add elements dynamically to the web page according to the user's input.
The DOM allows you to create new HTML elements and add them to the page on-the-fly. You can do this in one of two ways: with creation methods provided by the DOM standard, and with the innerHTML property. The results of these two methods look identical on the surface, but which one you should choose depends on the final result you want to achieve.
The document object is an instance of the DOM data type called Document. Its members provide many useful methods allowing you to create other DOM objects like elements and text nodes. Here you'll look at how to create these types of objects, starting with HTML elements.
Before you begin, however, the following code shows the HTML document this lesson works with:
<html>
<head>
    <title>Sample Page</title>
</head>
<body>
    <script type="text/javascript">

    </script>
</body>
</html>
It is a simple web page with a sole <script/> element in the body. The script covered in this lesson will go inside the <script/> element.
The Document data type specifies a method called createElement(). It accepts one argument, a string containing the tag name of the element you want to create. It creates an element outside of the currently loaded document and returns an element object. You use it like this:
var el = document.createElement("div");Here you create a <div/> element by calling the createElement() method and passing it the tag name of div. You do not include any angle brackets — simply the tag name of the element. The resulting element object is saved in the el variable.
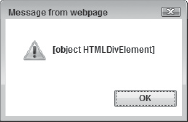
This new object is an instance of the HTMLElement data type (another data type included with the DOM), and, more specifically, of an HTMLDivElement. You can see this by calling alert(el) in any browser except Internet Explorer 8 and previous versions. Figure 14-1 shows the result of alert(el) in Internet Explorer 9.
The fact that this element is an HTMLDivElement isn't necessarily important for the sake of this discussion. But it is important to understand that every HTML element in the HTML specification has a corresponding data type in the DOM specification. This means there are many new data types included with the DOM. For the sake of simplicity, however, you will be introduced to them only when they're relevant.
In the DOM, all HTML element objects are instances of the HTMLElement and Element data types, and because of this all element objects have a certain set of properties and methods you can use to add attributes to the element. The following table lists some of these members:
Useful HTMLElement and Element Members
MEMBER NAME | DESCRIPTION |
|---|---|
| Gets or sets the value of the |
| Gets or sets the value of the |
| Sets an attribute on the element with the specified value |
| Gets the value of the specified attribute; returns |
| Removes the specified attribute from the element |
So, by using a few of these members, you can add more content to an element. The bold lines in the following code do just that:
var el = document.createElement("div");

el.id = "myDiv";
el.setAttribute("align", "center");
In this code, the new <div/> element is given an id of myDiv, and an align property is added to the element with the setAttribute() method. If you were to write the HTML that this code generates, it would look like this:
<div id="myDiv" align="center"></div>
Keep in mind, however, that this element is not yet loaded into the document. You have created the element by using the createElement() method of the document, but it currently exists outside the document. To load it into the document, you need to use the appendChild() method or other insertion methods.
The appendChild() method is a member of the Node data type, the same data type that you looked at in the previous lesson. You see, each HTML element object is an instance of a variety of data types. Not only is an element an instance of HTMLElement and Element, but it is an instance of the Node data type as well. So if you wanted to add this <div/> element to the web page's <body/> element, you could do so by finding the <body/> element's object and using its appendChild() method. Finding <body/> in the DOM is very easy: It's a property of the document object. The bold line in the following code adds the <div/> element created earlier to the page:
var el = document.createElement("div");

el.id = "myDiv";
el.setAttribute("align", "center");

document.body.appendChild(el);
The page's structure looks like Figure 14-2 after this code executes.
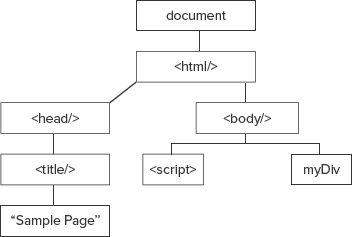
The appendChild() method appends the provided child node to the calling node. So this code places the new element as the last child in the page's body.
Sometimes you will want to append a new node, but not in every case. The insertBefore() method exists for this reason. It too adds a new node as a child of an existing node, but it gives you the ability to decide where, in the list of children, to place it.
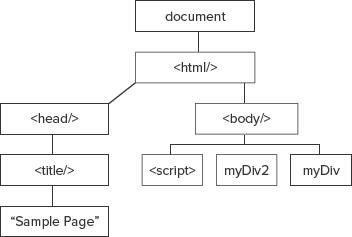
The insertBefore() method accepts two arguments. The first is the new node to insert, and the second is a reference node to place the new node in front of. The bold lines in the following code create a new <div/> element and insert it before el from the previous example:
var el = document.createElement("div");

el.id = "myDiv";
el.setAttribute("align", "center");
document.body.appendChild(el);
var el2 = document.createElement("div");
el2.id = "myDiv2";
el2.setAttribute("align", "center");
document.body.insertBefore(el2, el);Figure 14-3 shows what the DOM structure looks like after this code is executed.
The elements don't contain any data at the moment, so seeing the results of this code requires tools that can give us an idea of what the DOM currently looks like. I'll save the introduction to those tools until later in the book; now let's add some text to these elements so you can physically see them in the browser.
In the DOM, pieces of text are organized into individual nodes. So it's no surprise that the DOM method to create text actually creates a text node. The method to create a text node is aptly named createTextNode(). It accepts only one argument: the text that is contained within the node. Its usage looks like this:
var text = document.createTextNode("Hello, DOM methods!");Here a text node containing the text Hello, DOM methods! is created and assigned to the text variable. Text nodes inherit from the Node data type as well, so they can be passed to the appendChild() method like this:
var el = document.createElement("div");
var text = document.createTextNode("Hello, DOM methods!");

el.id = "myDiv";
el.setAttribute("align", "center");

el.appendChild(text);
document.body.appendChild(el);
In this code, the bold lines create and append a text node to the el element from the previous examples.
One thing you might notice in this code is that the text node is appended to the <div/> element before the element is added to the body. Technically, it doesn't matter in what order you append nodes to elements and the document. But remember this: The DOM is a liability as far as performance is concerned. Every time you make a change to the document, the browser has to redraw the page. So, the goal is to limit the amount of times you change the document.
In the example provided here, the text node is added to the <div/> element while both nodes are outside the document itself. This is ideal, as adding the <div/> element to the document (complete with a child text node) requires only one write operation to the document.
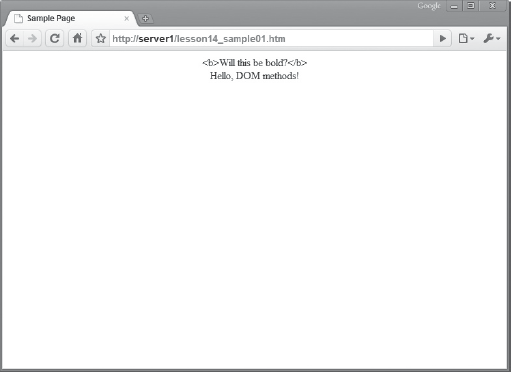
Also, as the name of the method implies, createTextNode() creates text, not HTML. The createTextNode() method converts less-than and greater-than signs (< and >) to their HTML entity equivalents (< and >). To demonstrate this, let's return to our ongoing example and add a text node containing the < and > symbols with the following code:
var el = document.createElement("div");
var text = document.createTextNode("Hello, DOM methods!");

el.id = "myDiv";
el.setAttribute("align", "center");

el.appendChild(text);
document.body.appendChild(el);

var el2 = document.createElement("div");
var text2 = document.createTextNode("<b>Will this be bold?</b>");

el2.id = "myDiv2";
el2.setAttribute("align", "center");

el2.appendChild(text2);
document.body.insertBefore(el2, el);
The new lines of code are in bold. The first new line creates a text node containing HTML markup, which will be converted to HTML entities. The second new line adds that node to the <div/> element in el2. You can see the results of this code in Figure 14-4.
Using DOM methods to create elements is verbose and time-consuming. The payoff, however, is that you have references to the objects you create — you don't have to search the DOM for them. Making modifications to the <div/> element contained within the el variable is as easy as using that variable. So, DOM creation methods are ideal if you plan on modifying those same objects later on, but there is a faster and easier way to add HTML to a page if all you want to do is display it and forget it.
The innerHTML property is a property all HTML elements have, and it provides a simple and effective means of adding HTML to the page. It is an invention of Microsoft that debuted in Internet Explorer 4 in 1997. It became so popular that developers clamored for other browser makers to include the property. Today, all major browsers support innerHTML.
The innerHTML property gets or sets the HTML contained within a given element. You can assign it a string containing HTML, and that HTML will be displayed in the browser. The following code shows an example:
var el = document.getElementById("someElement");
el.innerHTML = "<b>This is my new HTML!</b>";
Here the HTML contained within the el element is changed to some bolded text. In the case of this code, any preexisting HTML is removed from el and replaced with the HTML assigned to the innerHTML property. It is possible to keep any preexisting HTML by doing something like what you see in the following code:
el.innerHTML = el.innerHTML + "<b>This is my new HTML!</b>";
Here the existing HTML is preserved and some new HTML is appended.
The innerHTML property is really that simple, but it is surrounded by controversy. Type "innerHTML" into Google, and you'll find many articles for and against its use. Despite the ongoing debate, it is an incredibly useful tool. When it is used to update only the contents of an element, its speed and simplicity cannot be beat.
In this lesson, you learn how to add content to the page using JavaScript, the DOM creation methods, and the innerHTML property.
For this lesson, you need a text editor; any plain text editor will do. For Microsoft Windows users, Notepad is available by default on your system or you can download Microsoft's free Visual Web Developer Express (www.microsoft.com/express/web/) or Web Matrix (www.asp.net/webmatrix/). Mac OS X users can use TextMate, which comes as part of OS X, or they can download a trial for Coda (www.panic.com/coda/). Linux users can use the built-in VIM.
You also need a modern web browser. Choose any of the following:
Internet Explorer 8+
Google Chrome
Firefox 3.5+
Apple Safari 4+
Opera 10+
Create a subfolder called Lesson14 in the JS24Hour folder you created in Lesson 1. Store the files you create in this lesson in the Lesson14 folder.
You will write a web page and its content, a shopping list, using the DOM creation methods and innerHTML.
Open your text editor and type the following code:
<html>
<head>
    <title>Lesson 14 Example 1</title>
</head>
<body>
    <script type="text/javascript">

    </script>
</body>
</html>
Save this file as
lesson14_example01.htm.Now add the following bold code:
<html> <head> <title>Lesson 14 Example 1</title> </head> <body> <script type="text/javascript">var shoppingList = ["Eggs","Milk","Juice","Diapers","Bread"];for (var i = 0; i < shoppingList.length; i++) {}</script> </body> </html>This adds an array called
shoppingList. Each element contains an item to purchase at the store. After the array definition is aforloop to iterate over each item in the shopping list.Add the following bold code:
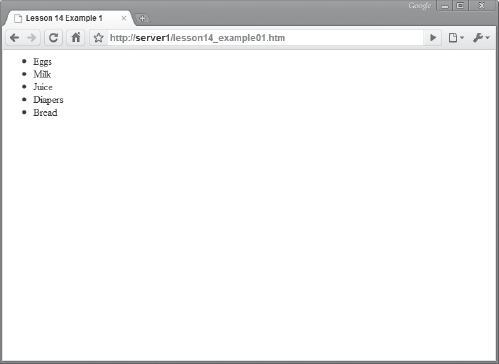
<html> <head> <title>Lesson 14 Example 1</title> </head> <body> <script type="text/javascript"> var shoppingList = [ "Eggs", "Milk", "Juice", "Diapers", "Bread" ];var ul = document.createElement("ul");for (var i = 0; i < shoppingList.length; i++) {ul.innerHTML = ul.innerHTML + "<li>" + shoppingList[i] + "</li>";}document.body.appendChild(ul);</script> </body> </html>This new code creates an unordered list element (
<ul/>) outside of theforloop. Its list item elements(<li/>) are generated withinnerHTMLinside the loop, so that the existing HTML is preserved with each iteration of the loop. When the loop exists, the<ul/>element is appended to the<body/>element. The browser renders the HTML as seen in Figure 14-5.
To get the sample code files, you can download Lesson 14 from the book's website at www.wrox.com.
Note
Please select Lesson 14 on the DVD to view the video that accompanies this lesson.