Chapter 5. Database
When I was a kid, I obsessively collected sports cards of all types. A big part of collecting the cards was organizing them. I kept the star players in one box, basketball superstar Michael Jordan had an entire box dedicated to his cards, and the rest of my cards were kept organized by sport, and suborganized by team. This organization method enabled me to store the cards safely and easily find the card that I was looking for at any given time. Little did I know, but a storage system like this is the tangible equivalent to a database. At its core, a database allows us to store information and retrieve it later.
When I first started out with web development, I found databases intimidating. I would see instructions for running a database and entering obscure SQL commands, and it felt like an additional level of abstraction that I couldn’t wrap my head around. Thankfully, I was eventually able to scale the wall and am no longer intimidated by a SQL table join, so if you are where I was, I want you to know that it is possible to navigate the world of databases.
In this book we’ll be using MongoDB as our database of choice. I’ve chosen Mongo because it is a popular choice in the Node.js ecosystem and is a great database to get started with for anyone who is new to the topic. Mongo stores our data in “documents” that work like JavaScript objects. This means that we will be able to write and retrieve information in a format that is familiar to any JavaScript developer. However, if you have a database that you strongly prefer, such as PostgreSQL, the topics covered in this book are transferable to any type of system with a little work.
Before we can work with Mongo, we will need to ensure that the MongoDB server is running locally. This is something that is required throughout development. To do so, follow the instructions for your system in Chapter 1.
Getting Started with MongoDB
With Mongo running, let’s explore how we can interact with Mongo directly from our terminal, using the Mongo shell. Begin by opening the MongoDB shell by typing the mongo command:
$ mongoAfter running this command, you should see information about your MongoDB
shell, the local server connection, and some additional
information printed to the terminal. We can now interact
directly with MongoDB from within the terminal application. We can create
a database as well as switch to a new database with the use command.
Let’s create a database called learning:
$ use learningIn my card collection, described at the beginning of the chapter, I kept my cards organized in separate boxes. MongoDB brings with it the same concept, called collections. A collection is how we group similar documents together. For example, a blog application may have a collection for posts, another for users, and a third for comments. If we were to compare a collection to a JavaScript object, it would be the top-level object, while documents are the individual objects within. We can visualize it like so:
collection:{document:{},document:{},document:{}....}
With this information in hand, let’s create a document within a
collection in our learning database. We’ll create a pizza collection
where we will store documents with a pizza type. Enter the following into the MongoDB shell:
$db.pizza.save({type:"Cheese"})
If this is successful, we should see a returned result that reads:
WriteResult({"nInserted":1})
We can also write multiple entries into the database at once:
$db.pizza.save([{type:"Veggie"},{type:"Olive"}])
Now that we’ve written some documents to our database, let’s retrieve
them. To do so, we’ll use MongoDB’s find method. To see
all of the documents in the collection, run a find command with empty parameters:
$db.pizza.find()
We should now see all three entries in the database. In addition to storing the data, MongoDB automatically assigns a unique ID to each entry. The results should look something like this:
{"_id":ObjectId("5c7528b223ab40938c7dc536"),"type":"Cheese"}{"_id":ObjectId("5c7529fa23ab40938c7dc53e"),"type":"Veggie"}{"_id":ObjectId("5c7529fa23ab40938c7dc53f"),"type":"Olive"}
We can also find individual documents, both by property values as well as with Mongo’s assigned ID:
$db.pizza.find({type:"Cheese"})$db.pizza.find({_id:ObjectId("A DOCUMENT ID HERE")})
Not only do we want to be able to find documents, but it’s also useful
to be able to update them. We can do so by using Mongo’s update
method, which accepts a first parameter of a document to change and a
second parameter of the change to the document. Let’s update our
Veggie pizza to be a Mushroom pizza:
$db.pizza.update({type:"Veggie"},{type:"Mushroom"})
Now, if we run db.pizza.find(), we should see that your document
has been updated:
{"_id":ObjectId("5c7528b223ab40938c7dc536"),"type":"Cheese"}{"_id":ObjectId("5c7529fa23ab40938c7dc53e"),"type":"Mushroom"}{"_id":ObjectId("5c7529fa23ab40938c7dc53f"),"type":"Olive"}
As with updating a document, we can also remove one using Mongo’s
remove method. Let’s remove the mushroom pizza from our
database:
$db.pizza.remove({type:"Mushroom"})
Now if we perform a db.pizza.find() query, we will see only two
entries within our collection. If we decided that we no longer wanted to
include any of the data, we could run the remove method without an empty
object parameter, which will wipe out our entire collection:
$db.pizza.remove({})
We’ve now successfully used the MongoDB shell to create a database, add documents to a collection, update those documents, and remove them. These fundamental database operations will provide a solid footing as we integrate a database into our project. In development, we can also access our database using the MongoDB shell. This can prove helpful for tasks such as debugging and manually removing or updating entries.
Connecting MongoDB to Our Application
Now that you’ve learned a bit about using MongoDB from the shell, let’s connect it to our API application. To do this, we’ll be using the Mongoose Object Document Mapper (ODM). Mongoose is a library that simplifies working with MongoDB in Node.js applications by reducing and streamlining boilerplate code, through the use of its schema-based modeling solution. Yes, you read that right—another schema! As you’ll see, once we’ve defined our database schema, working with MongoDB via Mongoose is similar to the types of commands we wrote within the Mongo shell.
We will first need to update our .env file with the URL of our local
database. This will allow us to set the database URL in whatever
environment we are working (such as local development and production).
The default URL of a local MongoDB server is
mongodb://localhost:27017, to which we’ll add the name of
our database. So, within our .env file, we will set a DB_HOST variable
with the URL of our Mongo database instance as follows:
DB_HOST=mongodb://localhost:27017/notedly
The next step in working with a database in our application is to
connect to it. Let’s write some code that will connect our
application to our database at startup. To do this, we’ll first create
a new file within the src directory, named db.js. Within db.js
we’ll write our database connection code. We’ll also include a function
to close our database connection, which will prove useful for testing
the application.
In src/db.js, enter the following:
// Require the mongoose libraryconstmongoose=require('mongoose');module.exports={connect:DB_HOST=>{// Use the Mongo driver's updated URL string parsermongoose.set('useNewUrlParser',true);// Use findOneAndUpdate() in place of findAndModify()mongoose.set('useFindAndModify',false);// Use createIndex() in place of ensureIndex()mongoose.set('useCreateIndex',true);// Use the new server discovery and monitoring enginemongoose.set('useUnifiedTopology',true);// Connect to the DBmongoose.connect(DB_HOST);// Log an error if we fail to connectmongoose.connection.on('error',err=>{console.error(err);console.log('MongoDB connection error. Please make sure MongoDB is running.');process.exit();});},close:()=>{mongoose.connection.close();}};
Now we’ll update our src/index.js to call this connection. To do so, we will first import our .env configuration as well as the db.js file. Within the imports, at the top of the file, add these imports:
require('dotenv').config();constdb=require('./db');
I like to store the DB_HOST value that is defined in the .env
file as a variable. Add this variable directly below the port
variable definition:
constDB_HOST=process.env.DB_HOST;
We can then call our connection, by adding the following to the src/index.js file:
db.connect(DB_HOST);
The src/index.js file will now read as follows:
constexpress=require('express');const{ApolloServer,gql}=require('apollo-server-express');require('dotenv').config();constdb=require('./db');// Run the server on a port specified in our .env file or port 4000constport=process.env.PORT||4000;// Store the DB_HOST value as a variableconstDB_HOST=process.env.DB_HOST;letnotes=[{id:'1',content:'This is a note',author:'Adam Scott'},{id:'2',content:'This is another note',author:'Harlow Everly'},{id:'3',content:'Oh hey look, another note!',author:'Riley Harrison'}];// Construct a schema, using GraphQL's schema languageconsttypeDefs=gql`type Note {id: IDcontent: Stringauthor: String}type Query {hello: Stringnotes: [Note]note(id: ID): Note}type Mutation {newNote(content: String!): Note}`;// Provide resolver functions for our schema fieldsconstresolvers={Query:{hello:()=>'Hello world!',notes:()=>notes,note:(parent,args)=>{returnnotes.find(note=>note.id===args.id);}},Mutation:{newNote:(parent,args)=>{letnoteValue={id:notes.length+1,content:args.content,author:'Adam Scott'};notes.push(noteValue);returnnoteValue;}}};constapp=express();// Connect to the databasedb.connect(DB_HOST);// Apollo Server setupconstserver=newApolloServer({typeDefs,resolvers});// Apply the Apollo GraphQL middleware and set the path to /apiserver.applyMiddleware({app,path:'/api'});app.listen({port},()=>console.log(`GraphQL Server running at http://localhost:${port}${server.graphqlPath}`));
Though the actual functionality has not changed, if you run
npm run dev, the application should successfully connect to the
database and run without errors.
Reading and Writing Data from Our Application
Now that we can connect to our database, let’s write the code needed to read and write data to it from within the application. Mongoose allows us to define how the data will be stored in our database as a JavaScript object, and we can then store and act upon data that fits that model structure. With this in mind, let’s create our object, referred to as a Mongoose schema.
First, create a folder within our src directory called models to house this schema file. In this folder, create a file named note.js. Within src/models/note.js, we’ll start by defining the basic setup of the file:
// Require the mongoose libraryconstmongoose=require('mongoose');// Define the note's database schemaconstnoteSchema=newmongoose.Schema();// Define the 'Note' model with the schemaconstNote=mongoose.model('Note',noteSchema);// Export the modulemodule.exports=Note;
Next, we will define our schema, within the noteSchema variable. Similar
to the in-memory data example, our current schema will, for now, include
the content of the note as well as a hardcoded string representing the
author. We’ll also include the option to include timestamps for our
notes, which will be automatically stored when a note is created or
edited. We’ll be adding functionality to our note schema as
we go.
Our Mongoose schema will be structured as follows:
// Define the note's database schemaconstnoteSchema=newmongoose.Schema({content:{type:String,required:true},author:{type:String,required:true}},{// Assigns createdAt and updatedAt fields with a Date typetimestamps:true});
Data Permanence
We’ll be updating and changing our data model throughout development, at times removing all of the data from our database. As a result, I wouldn’t recommend using this API to store important things like class notes, a list of your friends’ birthdays, or the directions to your favorite pizza place.
Our overall src/models/note.js file should now read as follows:
// Require the mongoose libraryconstmongoose=require('mongoose');// Define the note's database schemaconstnoteSchema=newmongoose.Schema({content:{type:String,required:true},author:{type:String,required:true}},{// Assigns createdAt and updatedAt fields with a Date typetimestamps:true});// Define the 'Note' model with the schemaconstNote=mongoose.model('Note',noteSchema);// Export the modulemodule.exports=Note;
To simplify importing our models into our Apollo Server Express
application, we’ll add an index.js file to the src/models directory. This will combine our models into a single JavaScript module. While this isn’t strictly necessary, I find it to be a good pattern to follow as applications and database models grow. In src/models/index.js we’ll import our note model and
add it to a models object to be exported:
constNote=require('./note');constmodels={Note};module.exports=models;
We can now incorporate our database models into our Apollo Server Express application code by importing our models into the src/index.js file:
constmodels=require('./models');
With our database model code imported, we can adapt our resolvers to
save and read from the database, rather than an in-memory variable. To
do this, we’ll rewrite the notes query to pull the notes from the
database by using the MongoDB find method:
notes:async()=>{returnawaitmodels.Note.find();},
With our server running, we can visit the GraphQL Playground in our
browser and run our notes query:
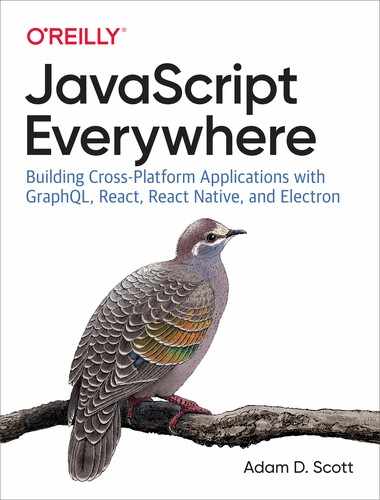
query{notes{contentidauthor}}
The expected result will be an empty array, since we have yet to add any data to our database (Figure 5-1):
{"data":{"notes":[]}}
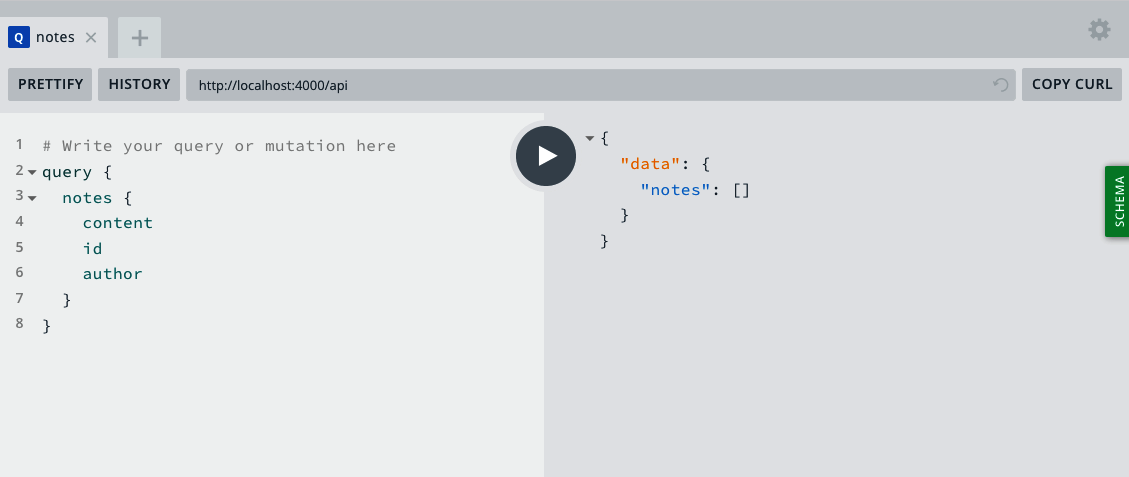
Figure 5-1. A notes query
To update our newNote mutation to add a note to our database, we’ll
use our MongoDB model’s create method, which we’ll accept an object.
For now, we will continue to hardcode the author’s name:
newNote:async(parent,args)=>{returnawaitmodels.Note.create({content:args.content,author:'Adam Scott'});}
We can now visit the GraphQL Playground and write a mutation that will add a note to our database:
mutation{newNote(content:"This is a note in our database!"){contentauthorid}}
Our mutation will return a new note, which contains the content we placed in our argument, the author’s name, as well as a MongoDB-generated ID (Figure 5-2).
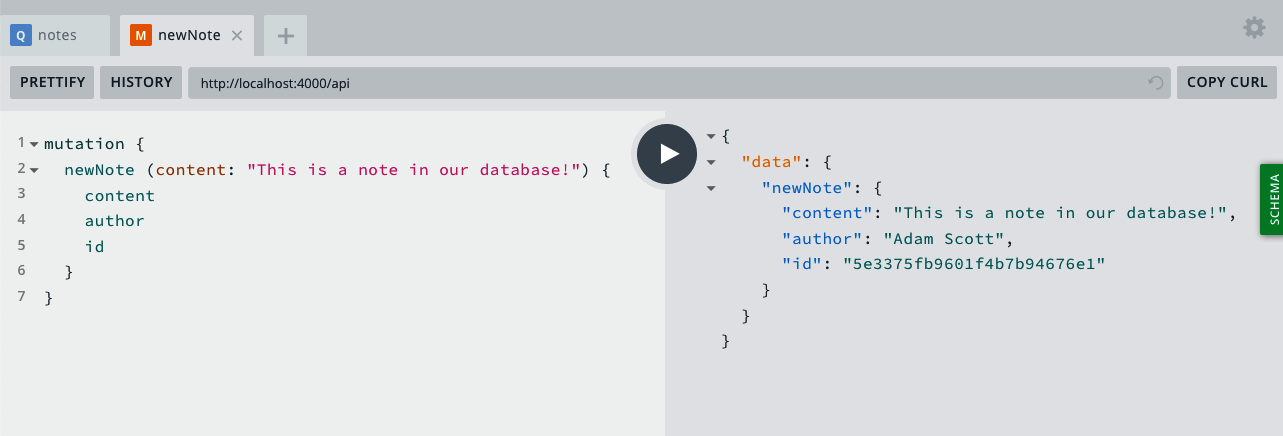
Figure 5-2. A mutation creates a new note in the database
If we now rerun our notes query, we should see our note retrieved from
the database! (See Figure 5-3.)
Figure 5-3. Our notes query returns the data from the database
The last step is to rewrite our notes query to pull a specific note
from our database, using the unique ID that MongoDB assigns to each
entry. To do so, we’ll use Mongoose’s findbyId method:
note:async(parent,args)=>{returnawaitmodels.Note.findById(args.id);}
We can now write a query, using the unique ID we see in our notes
query or newNote mutation, to retrieve an individual note from our
database. To do so, we’ll write a note query with an id argument (Figure 5-4):
query{note(id:"5c7bff794d66461e1e970ed3"){idcontentauthor}}
Your Note ID
The ID used in the previous example is unique to my local database. Be sure to copy an ID from your own query or mutation results.
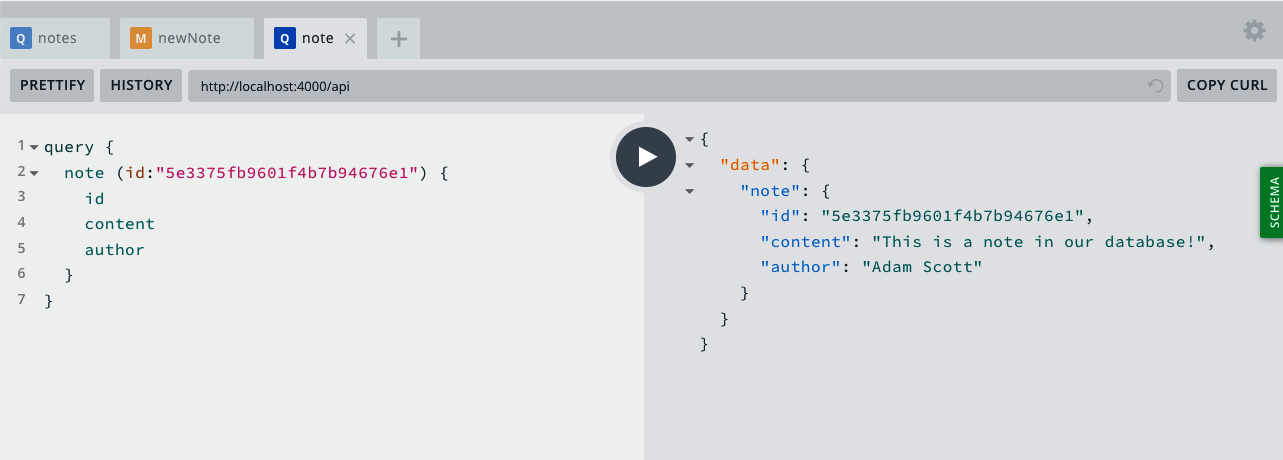
Figure 5-4. A query for an individual note
Our final src/index.js file will look as follows:
constexpress=require('express');const{ApolloServer,gql}=require('apollo-server-express');require('dotenv').config();constdb=require('./db');constmodels=require('./models');// Run our server on a port specified in our .env file or port 4000constport=process.env.PORT||4000;constDB_HOST=process.env.DB_HOST;// Construct a schema, using GraphQL's schema languageconsttypeDefs=gql`type Note {id: IDcontent: Stringauthor: String}type Query {hello: Stringnotes: [Note]note(id: ID): Note}type Mutation {newNote(content: String!): Note}`;// Provide resolver functions for our schema fieldsconstresolvers={Query:{hello:()=>'Hello world!',notes:async()=>{returnawaitmodels.Note.find();},note:async(parent,args)=>{returnawaitmodels.Note.findById(args.id);}},Mutation:{newNote:async(parent,args)=>{returnawaitmodels.Note.create({content:args.content,author:'Adam Scott'});}}};constapp=express();db.connect(DB_HOST);// Apollo Server setupconstserver=newApolloServer({typeDefs,resolvers});// Apply the Apollo GraphQL middleware and set the path to /apiserver.applyMiddleware({app,path:'/api'});app.listen({port},()=>console.log(`GraphQL Server running at http://localhost:${port}${server.graphqlPath}`));
We can now read and write data from our database with our GraphQL API!
Try adding more notes, viewing the full list of notes using the notes
query, and viewing the content of individual notes by utilizing the
note query.
Conclusion
In this chapter you learned to use MongoDB and the Mongoose library with our API. A database, such as MongoDB, allows us to securely store and retrieve our application’s data. An object modeling library, such as Mongoose, simplifies working with a database by providing tools for database queries and data validation. In the next chapter, we’ll update our API to have full CRUD (create, read, update, and delete) functionality with our database content.