Chapter 19. Integrating an Existing Web Application with Electron
I tend to accumulate web browser tabs like a child at the beach collects shells. I don’t necessarily set out to collect them, but by the end of the day, I have dozens of tabs open across a few browser windows. I’m not proud of this, but I suspect that I’m not alone. As a result, I use desktop versions of some of my most commonly used web applications. Often, these applications offer no advantage over the web, but the convenience of an independent app makes them easy to access, find, and switch to throughout the day.
In this chapter, we’ll look at how we can take an existing web application and wrap it in an Electron shell. Before proceeding, you will need a local copy of our example API and web applications. If you haven’t been following along through the whole book, visit Appendixes A and B to run these.
Integrating Our Web Application
In the previous chapter, we set up our Electron application to load an index.html file. Alternately, we can load a specific URL. In our case, we’ll begin by loading the URL of our locally running web application. First, be sure that your web application and API are running locally. Then we can update our src/index.js file, first by updating the nodeIntegration setting in the BrowserWindow to false. This will avoid the security risks of a locally running node application accessing an external site.
webPreferences:{nodeIntegration:false},
Now, replace the window.loadFile('index.html'); line with the following:
window.loadURL('http://localhost:1234');
Running the Web Application
A local instance of your web application will need to be running on the 1234 port. If you’ve been following along with the book, run npm start from the root of your web application’s directory to start the development server.
This will instruct Electron to load a URL, rather than a file. Now if you run the app with npm start, you’ll see it loaded in an Electron window, with some caveats.
Warnings and Errors
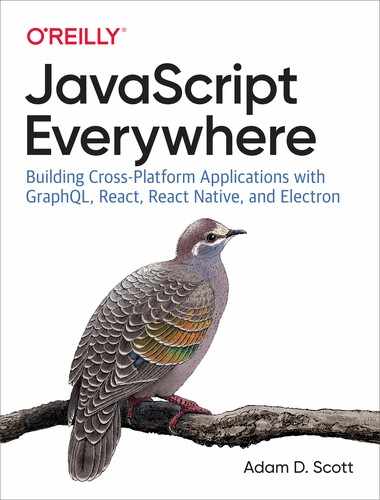
The Electron browser developer tools and our terminal currently display a large number of warnings and errors. Let’s look at each of these (see Figure 19-1).
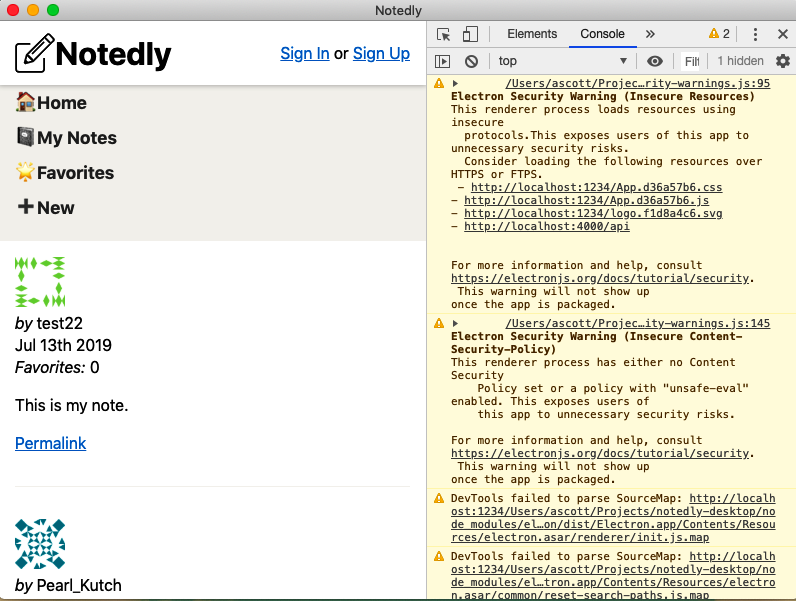
Figure 19-1. Our application is running, but displays a large number of errors and warnings
First, our terminal displays a large number of SyntaxError: Unexpected Token errors. Additionally, our developer tools show several corresponding warnings stating DevTools failed to parse SourceMap. These two errors are related to the way in which Parcel generates source maps and Electron reads them. Unfortunately, with the combination of technologies that we are using, there does not seem to be a reasonable fix for this issue. Our best option is to disable JavaScript source maps. In the application window’s developer tools, click “Settings” and then uncheck “Enable JavaScript source maps” (see Figure 19-2).
Figure 19-2. Disabling source maps will reduce the number of errors and warnings
Now, if you quit and restart the application you’ll no longer see the source map–related issues. This does come with the tradeoff that debugging our client-side JavaScript within Electron may be more difficult, but thankfully we can still access this feature and our application in our web browser.
The final two warnings are related to Electron’s security. We will address these before bundling our application for production, but it’s worth exploring now what these warnings are.
Electron Security Warning (Insecure Resources)-
This warning notifies us that we are loading web resources over an http connection. In production, we should always load resources over https to ensure privacy and security. In development, loading our localhost over http is not a problem, as we will be referencing our hosted website, which uses https in the bundled application.
Electron Security Warning (Insecure Content-Security-Policy)-
This warning informs us that we have not yet set a Content Security Policy (CSP). A CSP allows us to specify which domains our application is permitted to load resources from, greatly reducing the risk of a cross-site scripting (XSS) attack. Again, this is not a concern during local development, but it’s important in production. We’ll be implementing a CSP later in the chapter.
With our errors addressed, we’re ready to set up our application’s configuration file.
Configuration
When developing locally, we want to be able to run the local version of our web application, but when bundling the app to be used by others, we want it to reference the publicly available URL. We can set up a simple configuration file to handle this.
In our ./src directory, we will add a config.js file where we can store application-specific properties. I’ve included a config.example.js file, which you can easily copy from the terminal:
cp src/config.example.js src/config.js
Now we can fill in the properties of our application:
constconfig={LOCAL_WEB_URL:'http://localhost:1234/',PRODUCTION_WEB_URL:'https://YOUR_DEPLOYED_WEB_APP_URL',PRODUCTION_API_URL:'https://YOUR_DEPLOYED_API_URL'};module.exports=config;
Why Not .env?
In our previous environments, we’ve used .env files to manage environment-specific settings. In this instance, we’re using a JavaScript configuration file because of the way that Electron apps bundle their dependencies.
Now in our Electron application’s main process, we can use the configuration file to specify which URL we would like to load in development and production. In src/index.js, first import the config.js file:
constconfig=require('./config');
Now, we can update the loadURL functionality to load different URLs for each environment:
// load the URLif(is.development){window.loadURL(config.LOCAL_WEB_URL);}else{window.loadURL(config.PRODUCTION_WEB_URL);}
By using a configuration file, we can easily provide Electron with environment-specific settings.
Content Security Policy
As stated earlier in the chapter, a CSP allows us to limit the domains that our application has permission to load resources from. This helps to limit potential XSS and data injection attacks. In Electron, we can specify our CSP settings to help improve the security of the application. To learn more about CSP for both your Electron and web applications, I recommend the MDN article on the subject.
Electron provides a built-in API for CSP, but the electron-util library offers a simpler and cleaner syntax. At the top of our src/index.js file, update the electron-util import statement to include setContentSecurityPolicy:
const{is,setContentSecurityPolicy}=require('electron-util');
Now we can set our CSP for the production version of the application:
// set the CSP in production modeif(!is.development){setContentSecurityPolicy(`default-src 'none';script-src 'self';img-src 'self' https://www.gravatar.com;style-src 'self' 'unsafe-inline';font-src 'self';connect-src 'self'${config.PRODUCTION_API_URL};base-uri 'none';form-action 'none';frame-ancestors 'none';`);}
With our CSP written, we can check for errors using the CSP Evaluator tool. If we are intentionally accessing resources at additional URLs, we could add them to our CSP rule set.
Our final src/index.js file will read as follows:
const{app,BrowserWindow}=require('electron');const{is,setContentSecurityPolicy}=require('electron-util');constconfig=require('./config');// to avoid garbage collection, declare the window as a variableletwindow;// specify the details of the browser windowfunctioncreateWindow(){window=newBrowserWindow({width:800,height:600,webPreferences:{nodeIntegration:false}});// load the URLif(is.development){window.loadURL(config.LOCAL_WEB_URL);}else{window.loadURL(config.PRODUCTION_WEB_URL);}// if in development mode, open the browser dev toolsif(is.development){window.webContents.openDevTools();}// set the CSP in production modeif(!is.development){setContentSecurityPolicy(`default-src 'none';script-src 'self';img-src 'self' https://www.gravatar.com;style-src 'self' 'unsafe-inline';font-src 'self';connect-src 'self'${config.PRODUCTION_API_URL};base-uri 'none';form-action 'none';frame-ancestors 'none';`);}// when the window is closed, dereference the window objectwindow.on('closed',()=>{window=null;});}// when electron is ready, create the application windowapp.on('ready',createWindow);// quit when all windows are closed.app.on('window-all-closed',()=>{// On macOS only quit when a user explicitly quits the applicationif(process.platform!=='darwin'){app.quit();}});app.on('activate',()=>{// on macOS, re-create the window when the icon is clicked in the dockif(window===null){createWindow();}});
With this, we have a working implementation of our web application running within an Electron shell (shown in Figure 19-3).

Figure 19-3. Our web application running within an Electron application shell
Conclusion
In this chapter we integrated an existing web app into an Electron desktop application, which enables us to get a desktop application to market quickly. It’s worth noting that there are tradeoffs to this approach, however, as it offers limited desktop-specific benefits and requires an internet connection to access the full features of the application. For those of us looking to get a desktop application to market soon, these downsides may be worthwhile. In the next chapter, we’ll look at how we can build and distribute an Electron app.