
Now that you know the nuts and bolts of the iPhone and how to sync your computer and buy or get the apps, you’re ready to take killer photos.
In this section you’ll learn how to focus and expose your iPhone photographs as well as how to use the tap focus on the iPhone 3GS. Don’t miss a section, either, because there are all kinds of things to note and numerous tips to getting the results you want from your iPhone camera.
Taking a picture with an iPhone is easy. The first thing you have to remember is that the lens of the camera is on the left-hand corner on the back of the phone (as you’re looking at the back). You can take pictures in portrait or landscape mode (see Figures 2.1 and 2.2).


To take a picture in portrait mode, turn on and unlock the camera and tap on the Camera icon on the home screen. Hold up the camera so that the touch screen is facing you with the Home button at the bottom of the camera. The camera will automatically show you whatever the lens is picking up. To take a picture, frame it and then tap on the Camera button on the bottom of the touch screen. The camera will take the picture after your finger is released from the button, not when it first touches it. If you want, you can touch the button for a period of time while you focus, and the shutter will not be released. It is only released when you take your finger off of the button.
To take a picture in landscape mode, turn the camera 90 degrees counterclockwise (with the touch screen facing you), and it will automatically orient your framing to a landscape. When you’ve turned the camera around to take a picture in landscape mode, it’s easy for your fingers to block the lens. To avoid that, just hold the camera on the right side.
If you’re using an iPhone 3GS, you can take a picture using the steps just outlined. But, you can do one more thing before you tap on the Camera button. You can touch anywhere on the screen to focus on that point. The camera will automatically take that spot and make it the sharpest spot in your photo. For more information about the tap focus, see iPhone 3GS Tap Focus later in this chapter.
To view photos, just tap on the Photos icon on the home screen. You’ll be taken to your Photo Albums screen. If you have no albums, all of your images will be in the Camera Roll. If you tap on Camera Roll or an album, you’ll be taken to a grid of thumbnails of your pictures. You can swipe the screen up or down to see more of your images. Figure 2.3 shows the part of the grid in which images are displayed from a Camera Roll or album.
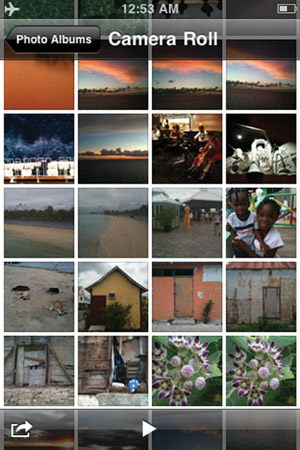
You can tap on any of the images on the touch screen to see it at full size. You can also swipe across the screen to see image after image in consecutive order. When you’re in Camera mode, you can tap in the lower-left corner to get to your Camera Roll.
Note
If you want to delete an image, tap on it in the Camera Roll and then tap on the trash can icon. A Delete Photo button and a Cancel button will pop up. Tap on Delete Photo to put the picture in the trash.
When viewing photos, webpages, email, or maps, you can zoom in and out. Pinch your fingers apart to zoom in; pinch your fingers together to zoom out. You can also double-tap (tap twice quickly) to zoom in all the way and then double-tap again to zoom back out.
The iPhone 3G uses an area in the center of the touch screen to both focus and determine exposure. The way it focuses is determined in the same way the iPhone 3GS focuses without tapping. It will use the entire frame to focus and expose your image.
Since the focus point on the iPhone 3G is fixed, most of the time the entire image is either in or out of focus because the camera focuses on the entire frame. In other words, you’re not likely to get a blurred background when you take a portrait.
Figure 2.4 shows two girls posing in the portico of a church in Tapachula, Mexico. Note that the background is sharp in that picture. The background is sharp because the lens is very short, so you always get a large depth of field (a large part of the frame is in focus).

The iPhone 3GS has a tap focus, which lets you focus anywhere on the touch screen when you are framing an image by tapping on the spot where you want the camera to focus.
How much of the frame is sharp depends upon where you select your autofocus point (the part of the screen you are tapping) and how far the point you chose is from the lens. If the point you chose is far from the lens, you’re not likely to get much softness in part of your image.
You can, however, get part of your image sharp and part of it soft if your lens (and focus point) is close to what you are shooting.
Figure 2.5 shows you two of the possibilities for creating a small depth of field with the iPhone 3GS camera. (See the upcoming “What Is Depth of Field” sidebar.) In both images, the lens and focus point are close to the object, so you have more leeway in making part of your image sharp and part of it soft. When you tap on a spot on the camera, you’ll see a square grid come up, like the ones shown in the images. You can see where in the image the focus takes place (upon tapping the screen when the shot was taken). In the figures, the square grid also shows you the location of the part of the frame that was tapped. You can see the difference in focus between both images, which was the result of them being tapped in different places.

What is Depth of Field?
On a dSLR camera, there’s a setting called Aperture Priority mode. When that camera is in Av (or A) mode, it determines the shutter speed according to what aperture you’ve chosen to give you the best exposure. The iPhone 3G and 3GS work as if they were in Aperture Priority mode with the aperture set to 2.8. This value means that the lens on both types of iPhone cameras is open wide when the shutter release button is pressed.
This also means that sometimes you’ll only get part of your image sharp, like that seen in Figure 2.6. In this picture, the first lamp at the top of the image is sharp, and the rest of them are not. You have more control over the depth of field with the iPhone 3GS because of the tap focus. I tapped on the first lamp to get only that part of the image sharp, thus making the depth of field small in the image. In Figure 2.7, the focus point was set on the boat, which is far away from the lens and which is in the middle of the frame—both of these factors cause the entire frame to be sharp.


Not only does the camera focus on a selected spot on the image (contained on a square that appears on the screen when you are framing your shot), it also uses that spot to calculate an exposure. The exposure is figured from the amount of light that is contained in the square that shows up on the touch screen when you tap on it.
Note
If you don’t tap the screen at all when you are framing your image, the camera is set to an Automatic mode, where it will focus the whole frame.
Much like a dSLR camera, the iPhone 3GS camera determines an exposure based upon the light around the spot upon which you are focusing. Expose on a dark spot, and your picture will become lighter. Expose on a light spot, and your picture will become darker.
You risk overexposing your sky if you tap on a darker area of land when framing your image. If you want your sky to be filled with details, tap on a light area of it.
When you use touch focus, you can add more light to your frame (overexpose) by tapping on a darker spot within it (see Figure 2.8). If you want to take away light from your frame (underexpose), tap on a lighter spot (see Figure 2.9).


Figure 2.8 shows a scene in Guatemala. The exposure is lighter because the darker area of the scene (the plants in the foreground) was the point of focus (and exposure). In Figure 2.9, the light area of the image, a point in the sky, was the point of focus (and exposure). If you’re a person who likes detail in your sky, as I do, than you’ll opt for the latter method of exposure.
With the macro lens on the iPhone 3GS, you can get a sharp shot up close (up to 10 cm). Figure 2.10 shows what you can do with a good subject. This conch shell was one of dozens cemented around a fountain. The trick to getting a good shot of one of the shells was finding a conch shell that had direct sunlight cast upon it. To take the shot, I held the iPhone camera about four inches from the shell.

There are two things that you can do to ensure a sharp shot with an iPhone. One is holding the camera correctly, and the other is getting sufficient light.
The best advice for getting a sharp shot is to hold the camera with both hands. Figure 2.11 shows a sharp subject without blur from camera shake (shaking the camera when you shoot). The iPhone camera absolutely needs good light. When the light is good, the automatic ISO speed is adjusted downward. For more about ISO speed, see the upcoming “Getting the Lowest ISO Speeds Should Be Your Primary Goal When Shooting” sidebar. With the iPhone 3G, which has no touch focus/exposure, the only way you can control the light coming through the lens is by moving the camera around. If you’re framing a shot, don’t be afraid to move things around until the camera has a nice focus on it. If this isn’t possible, tilt and angle the camera to get the most light inside the frame.

Using a camera without a zoom lens requires that you be creative when working with settings and subjects/objects. For example, if you are a candid photographer who shoots people without them knowing it, a zoom lens works well because you can shoot people from a distance. You’d think that if you take a picture without having a zoom lens, it would be kind of hard to photograph people without them knowing it, but the opposite is true. When you hold up your iPhone camera in front of someone to photograph them, it can appear that you are texting someone or just playing with your phone. Most of the time, they won’t even notice you. Whether you decide to photograph people without their permission is up to you. It’s not always the best thing to do; however, some of the most famous photographers have done it.
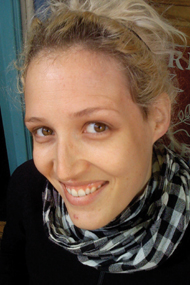
Now, if people know you are photographing them and you get them in good light without any distracting background, you’ll get a really good portrait on the iPhone without zooming in from farther away. Figure 2.12 shows what you can get when your subject is close to the lens. Note how the face fills the frame completely so that there is no distracting background, taking away from the subject in the photograph.
If you don’t frame your subject tightly in the frame, you risk getting a distracting background. Figure 2.13 shows a woman in front of a distracting background—the huge trunk of the tree. If she was cropped tightly into the frame by holding the camera closer to her face, that background could be eliminated.