There are dozens of apps to help you tweak your photos after you’ve shot them. Some are free and some are not. Some offer sliders that make saturation, contrast, and brightness tweaks, and others offer numerous filters that do everything from dating your photo (making it look like a vintage photograph) to performing umpteen sepia conversions. One—Brushes—will let you color in your photos so that they look as if they could be on the cover of a magazine. (One such work was on the cover of The New Yorker.) Here’s the skinny on some of them.
One of the most popular apps out there is the PS Mobile photo-editing app. You can’t beat the price on this one, because it’s free. In Chapter 5 we discussed the Sketch option in a sidebar. The nice thing about running a photo through PS Mobile is that it comes out at the same resolution after saving as you started with, unlike most other apps, which lower the resolution of the saved photo that you tweaked.
To use the program, tap on the app’s icon. You’ll then be asked to either Select Photo or Take Photo. If you tap Select Photo, you’ll be taken to your Camera Roll, where you can choose a photo.
Your photo will be put on a screen with icons for the different tools in a row at the top of the screen. For each icon (see Figure 9.2), there are drop-down menus. The following subsections describe the icons along with the drop-down menu options and how to use each one.
Figure 9.1. A photo tweaked with the Sketch, Sharpen, Exposure, Saturation, and Contrast options in PS Mobile.
You can crop, straighten, rotate, or flip your image by selecting the option from the drop-down menu. For detailed directions on how to do this, refer to Chapter 8.
The menu options for this icon are:
Exposure. Slide your finger (or tap) right across the screen to increase the exposure; slide left to decrease it. Values from – 100 to 100 are displayed at the top of the screen.
Saturation. Slide your finger (or tap) right across the screen to increase the saturation; slide left to decrease it. Values from – 100 to 100 are displayed at the top of the screen.
Tint. With this option, the image changes to sepia tones. Slide your finger (or tap) right or left to change the frame tint color to the color indicated on the color strip at the top of the screen.
Black & White. This option changes the photo to black and white.
Contrast. Slide your finger (or tap) right across the screen to increase contrast; slide left to decrease it. Values from – 100 to 100 are displayed at the top of the screen.
The menu options for this icon are:
Sketch. This option makes the image look like a sketch. Slide your finger (or tap) right across the screen to increase the Sketch value; slide left to decrease it. Values from 0 to 42 are displayed at the top of the screen.
Soft Focus. This option blurs the image. Slide your finger (or tap) right across the screen to increase the soft focus; slide left to decrease it. Values from 0 to 42 are displayed at the top of the screen.
Sharpen. This option sharpens the image. Slide your finger (or tap) right across the screen to increase the sharpness; slide left to decrease it. Values from 0 to 42 are displayed at the top of the screen.
The menu options for this icon are:
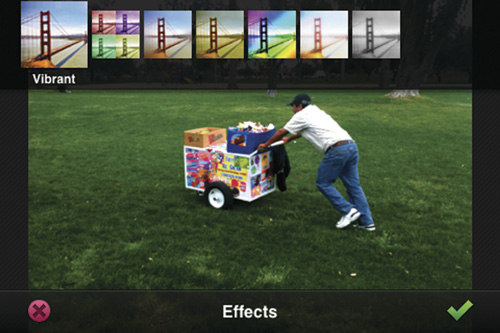
Effects. Tap the Golden Gate Bridge icon to choose from the following effects: Vibrant, Pop, Vignette Blur, Warm Vintage, Rainbow, White Glow, Soft Black & White. Figure 9.3 shows the location of the icons for different effects with the Vibrant effect chosen.
Borders. For information about borders, see the Chapter 8.
After you’re finished editing, you tap the green checkmark at the bottom of the screen. If you don’t like what you’ve done, you can clear the screen by tapping the red X. Once you tap the green checkmark, you’re taken back to the editing screen, where you can do the following things with the icons on the bottom of the screen. The red circle with an X in it is to exit editing, the left-pointing red arrow is to undo, the right-pointing green arrow is to redo, and the green down arrow is to either Save and Exit or Save and Upload.
The Brushes app has become so well known because it was used to make the cover of the June 2009 New Yorker scream with color.
Although the app is notable in the features it provides, it does have some limitations—the biggest being that it does not have a feature to select and then cut and paste parts of your image into other parts. Not having this feature means this app requires touch-painting skills that you can learn by following the upcoming directions. Although the directions might seem cumbersome, once you get the idea, you can zoom through painting on top of photos in a flash (well, maybe not a flash, but in a half hour or so).
Note
At brushesapp.com, you can download the user’s guide to the app.
Here are some detailed directions to get you started using Brushes.
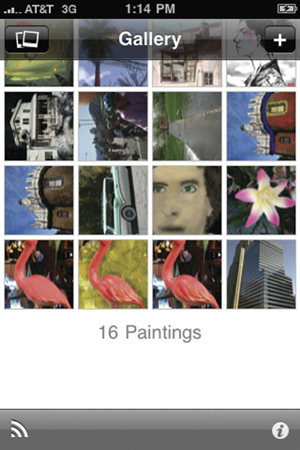
When you tap the icon for the program, you are taken to the Gallery of Images. You’ll find some sample images there that have been tweaked using the program. If you’ve already worked on some images, those will be included too. Figure 9.4 shows what the Gallery looks like.
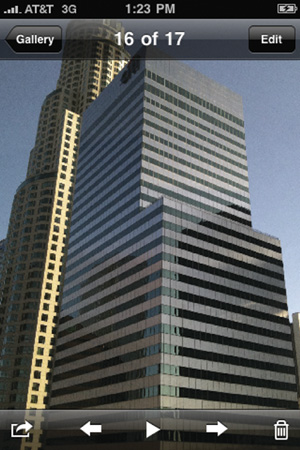
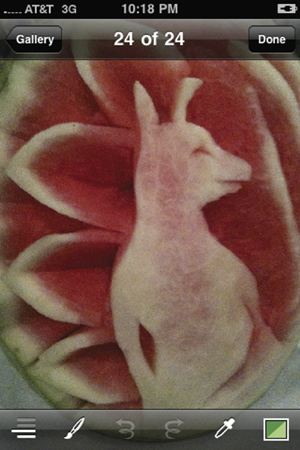
To view a photo in the Gallery, tap it. The photo will appear full-screen in Viewing mode (see Figure 9.5).
There are several icons at the bottom of the screen in Viewing mode.
Tap the arrow inside the rectangle (the leftmost icon), and a pop-up menu will appear, giving you the following choices: Duplicate Painting, Add to Photos, Email Painting. When you tap on Add to Photos, it saves the image into your Camera Roll.
Tap the left-pointing arrow, and you’re taken to the previous photo in your Gallery. Tap the right-pointing arrow, and you’re taken to the next image in your Gallery.
Tap the big arrow in the middle, and a slideshow will start that runs from the image you are on to the last one in the Gallery.
Tap the trash can icon to delete a photo.
Note
You should make a duplicate after you bring your image into the app. Then, if you mess up and want to go back to the original, all you have to do is go back to the Gallery and tap on the duplicate copy you made. To make a duplicate, tap the arrow inside the rectangle (the leftmost icon) in Viewing mode, and a pop-up menu will appear. Tap Duplicate Painting, and your image will appear as a duplicate in the Gallery.
If you tap the Edit button at the top-right of the screen in Viewing mode, you’ll be brought to Painting mode. To get back to Viewing mode, tap Done.
If you don’t want to use a photo in the Gallery, and you want to start working on a new image, tap the double-rectangle icon in the Gallery. Choose a photo from your Camera Roll, and it will automatically show up on the screen in Painting mode.
The tools in Painting mode are as follows. They are shown in Figure 9.6.
Tap the lines icon to activate the Layers panel. (The Layers panel is detailed later in this section.)
Tap the paintbrush icon to activate the Paintbrush. (The Paintbrush panel is detailed later in this section.)
Tap the curlicue to the left icon to undo an action.
Tap the curlicue to the right icon to redo an action.
Tap the Eyedropper tool to pick up a color from any area of the image. (The Eyedropper tool is detailed later in this section.)
Tap the square icon to choose a paint color from the Color Picker. The Color Picker is detailed later in this section.
Note
To effectively paint a picture, you have to zoom into it. To zoom, spread your fingers apart on the screen. To move the image around, slide two fingers on the screen. To go back to 100-percent zoom level, double-tap on the screen.
So what are the details for each of the options in Painting mode? Undo and Redo are easy. All you do is tap the curlicue to the left icon to undo your last action, tap it again to undo the action before that, and so on. The Redo function brings back the action.
I’ll describe the rest of the tools one by one as they are displayed in Painting mode: Layers, Paintbrush, Eyedropper, and Color Picker.
The Layers panel has six icons at the bottom of the screen (see Figure 9.7). Starting from the left, the paint can icon allows you to paint the layer you are working on with a color. The down arrow is used to merge the layer you are working on with the one below it. The curlicue to the left is to undo an action, and the curlicue to the right is to redo an action. The trash can is to delete the layer you are working on, and the plus sign is to add a new transparent layer.
You can switch the two layers at the bottom by sliding your finger over them.
When you bring in a photograph from your Camera Roll, the Layers panel will look like what you see in Figure 9.8.
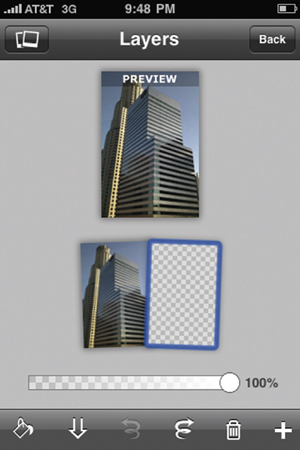
Figure 9.8. The Layers panel showing a preview of the image, the image in a layer, and a transparent layer.
To select a layer to work on, you tap it, and a blue border will appear around it. To trash it, tap the trash can icon. To bring in a new transparent layer, tap the plus sign.
If you’re going to color something in, it’s best to color on a transparent layer, because you can delete it if it’s bad. To color on a transparent layer, all you do is double-tap it on the Layers panel.
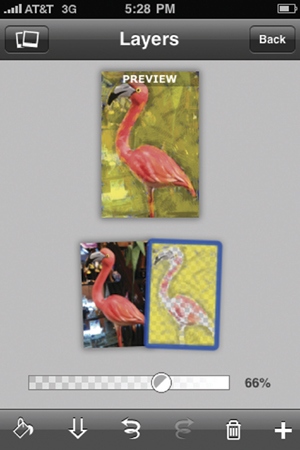
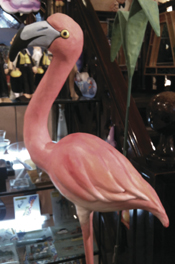
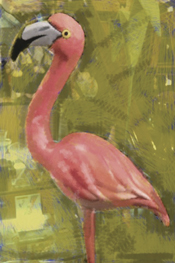
Take, for example, the image in Figure 9.9. I thought that might be a good photo to convert to this new Brushes media, so I went to work. I double-tapped the transparent layer and colored in the background yellow with an Impressionist brush. It looked too flat, so I tried lowering the opacity of the colored-in layer in the Layers panel. This caused a little of what was there for the background in the original photo to meld in with the yellow, producing the image you see in Figure 9.10.
To save the image, merge your layers by tapping the down arrow icon, then tap the Back button, and then tap Done. (This will put you in Viewing mode.) Then tap the rectangle with the arrow on it. Finally, tap Add to Photos and then Export.
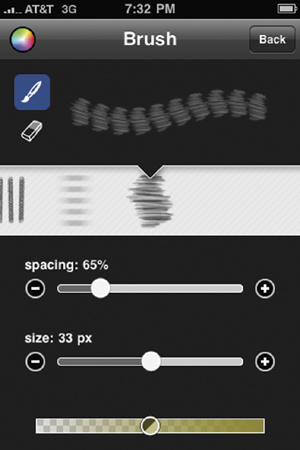
The Brush panel is actually two tools—a paintbrush and an eraser. You just tap the icon for either to select it. You’ll see a selection of brushes—you can either tap the one you want or stroke to one. There are sliders to adjust the brush (eraser) spacing, the brush (eraser) size, and the opacity (or the eraser transparency). The top of the panel shows the resulting brush stroke from the choices you make. Figure 9.11 shows each of these options.
The Eyedropper lets you choose for the brush any color that exists in your frame. After you tap it, a circle will show up with a cross in the middle. The center of the cross is the location in the frame where the color is being picked up. To move the circle, just drag it around the frame. When you do, you’ll see the color vary as a result of moving over the different colors of your image. As soon as you lift your finger off of the circle, it will vanish, and you’ll be left with the color of the last spot where it was located. You can get it back anywhere in your frame by touching the screen for half a second. Figure 9.12 shows the circle that appears after you tap the Eyedropper icon. The pink inside the circle is representative of the color in the image where the center of the cross is.
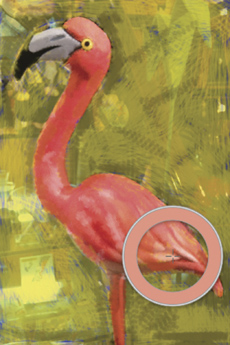
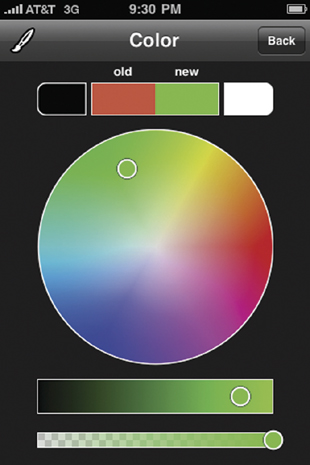
Figure 9.13 shows the contents of the Color Picker panel. The large circle in the Color Picker allows you to change the hue and saturation of the brush. The slider below can be used to adjust the brightness of the color, and the opacity slider below that changes the opacity of the color.
In 2009, a New York Times article said, “If you buy just one filter app, make it CameraBag.” The effects produced by applying the filters in CameraBag are nothing less than spectacular.
CameraBag is a filter application that gives you a choice of filters through which you can run your photos to give them a distinct effect. The effects are Helga, Lolo, Instant, Mono, 1974, Infrared, Colorcross, Magazine, Silver, 1962, Cinema, and Fisheye. The app not only changes the color and light in your image, it also changes the image’s shape. Some filters will convert your image to a square reminiscent of the 1950s Kodak days of film photography. Some filters will add a white border to your photo. Do keep in mind, though, that after processing with the filter, the resolution is taken down a bit.
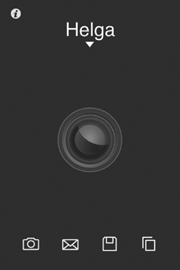
To use the program, tap its icon. You’ll be taken to the screen shown in Figure 9.14. You have a choice of four options.
Tap the camera icon to take a picture with the effect.
Tap the envelope icon to send the picture. (This only works if you have a picture on the screen.)
Tap the disk icon to save your image onto the Camera Roll. (This only works if you have a picture on the screen.)
Tap the double square to get a photo from the Camera Roll.
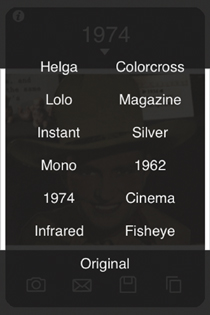
If you tap the word Helga (a type of filter), you’ll be taken to a screen that lists all the filters available in the app. Figure 9.15 shows them listed.
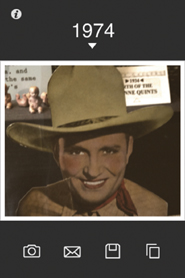
Now, if you tap one of those filter names—say, 1974—you’ll be taken to a blank screen with 1974 written on the top and the above-named icons on the bottom. To bring in a picture, tap the double squares at the bottom right of the screen. From there, you’re taken to your Camera Roll, where you can select a picture. The picture will come up after it’s processed with the filter you have chosen (1974, in this case). Figure 9.16 shows an image of Gene Autry converted with the 1974 filter using the app.
To save the image, you just tap the disk icon.
Following are examples of what each filter does.
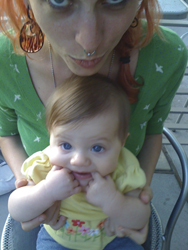
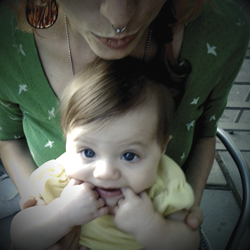
The Helga filter offers color fading and vignetting. The vignetting you get is the same as you would get if you took the photo with a fisheye lens. Figure 9.17 shows a photo of a baby before being tweaked with the Helga filter. Figure 9.18 shows the photo after the tweak. You can see how the proportions changed in the later figure.
The Infrared filter simulates an infrared filter that you would put on your camera. The effect produces a glowing black-and-white image. The proportion of the image is not changed. Figures 9.19 and 9.20 show a picture before and after tweaking using the Infrared filter.
If you want to increase your color saturation and contrast as well as make your photo square, then the Lolo filter is for you. Be aware that this filter takes your resolution down quite a bit. It’s definitely not an image you’re going to want to blow up. Figures 9.21 and 9.22 show a picture before and after tweaking using the Lolo filter.

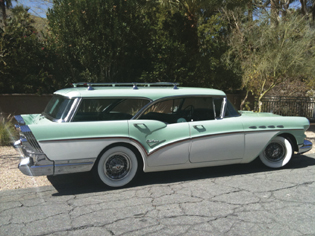
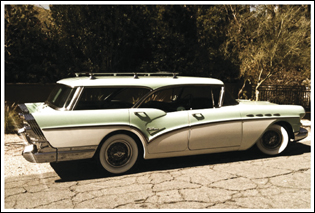
I find that the Magazine filter makes the photo look as if it was taken straight from an old issue of Life. The tweaked image shown in Figure 9.24 (Figure 9.23 shows the image before tweaking) was very well received when I posted it to Facebook and Twitter—although no one realized that Cadillac made station wagons. Everyone who commented on the picture agreed that it was a Buick when really it wasn’t!
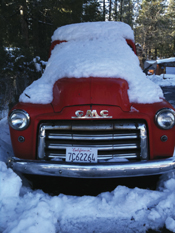
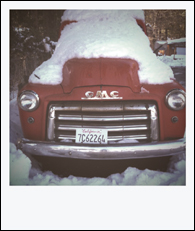
Fans of the bleached-out Polaroid colors that can be had with an old Polaroid Instamatic camera will be happy, because the effect is easy to get with CameraBag’s Instant effect. Figure 9.25 shows a truck with snow on it before tweaking in CameraBag. Figure 9.26 shows that even the shape and the white space fit the original Polaroid style to the shot.
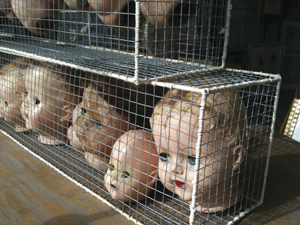
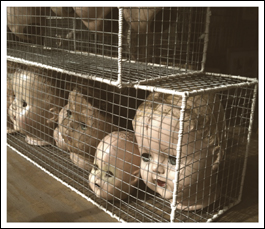
What’s nice about the 1974 filter is that, indeed, it makes your photos look as if they were shot during that year. It helps if you have some old, retro subject matter in your original photograph, like the old doll heads shown in Figure 9.27. The after-tweaks image in Figure 9.28 not only looks as if it were shot in the ’70s, but its weirdness (doll heads in a cage) will earn the photo an extended gaze.
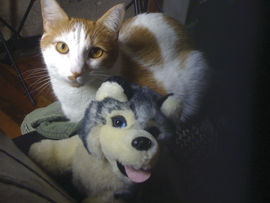
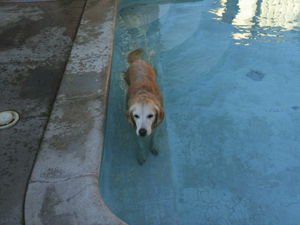
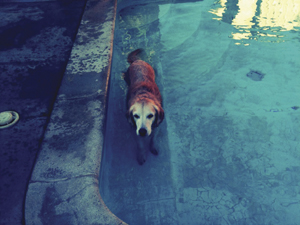
If you want some cool blue tones added to everything in your frame, then the Colorcross filter is for you. Although the dog doesn’t look especially cold in Figure 9.30, the pool sure does. Figure 9.29 shows the dog in the pool before the tweak.
Although there are many more apps that turn photos to black and white, the Mono filter not only does that, but it also adds a white border and trims down the resolution for easy emailing. The black-and-white conversion that is a result of this filter doesn’t lose sharpness and has nice gray tonal ranges, as shown in Figure 9.32. (Figure 9.31 shows the image before the tweak.)
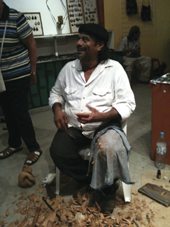
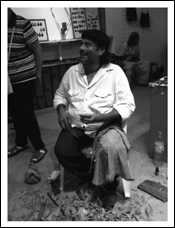
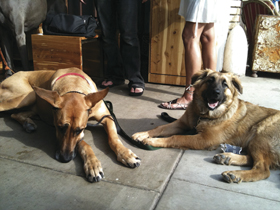
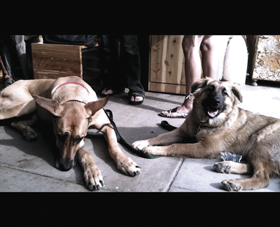
Cinema has to be my favorite filter. You can’t do better at getting a cinematic look to your photos in a wide-screen format than by using this CameraBag filter. Figure 9.34 shows that while the dogs don’t appear to be any bigger using this filter, the faded image looks bigger because of its display in wide-screen format. Figure 9.33 shows the image before the tweak, and Figure 9.34 shows it after.
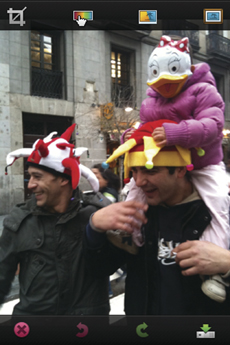
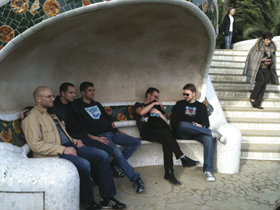
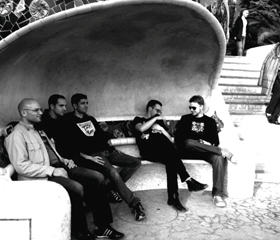
Although the 1962 filter tends to blow highlights and darken blacks, it does give a retro prehippie feel to the image. Figure 9.36 shows some guys hanging out in Park Güell in Barcelona—it looks like it could be 1962. Figure 9.35 shows the image before the tweak.
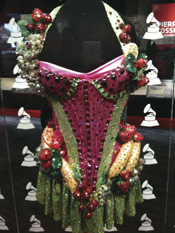
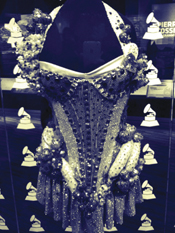
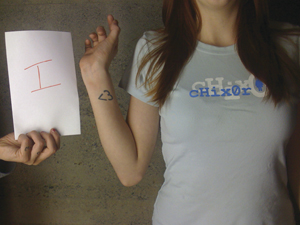
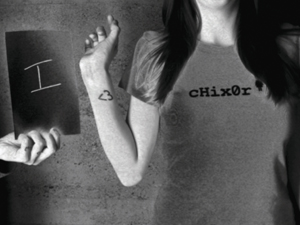
The Silver filter brings a certain glamour to some shots. The outfit in Figure 9.38 appears more glamorous than it does in color (Figure 9.37). The silver tint lets you focus more on the rhinestones.