Your dream has finally come true: You’ve got a new iPhone (or you’ve had one for a while), and you’re ready to use the camera to take killer photos in what has become a new kind of contemporary art—the iPhone photo.
This chapter starts at the very beginning, with turning the phone on and off. Beyond that section is the brave new world of the iPhone camera. Don’t miss a bit, because everything there will help you not only to take killer photos, but also to learn all there is to know about getting your iPhone photos from one place (such as your iPhone) to another (such as your computer). It also covers how to buy those great apps and install them on your iPhone, so you can use them with the help of this book. Using the apps is discussed in a later chapter.
The iPhone comes with easy-to-use buttons and a touch-screen interface that takes no time to learn to operate.
As soon as you get your iPhone home, you’ll want to turn it on. To do so, you hold down the Sleep/Wake button (the button on the top right of the phone) until you see the white apple on the screen.
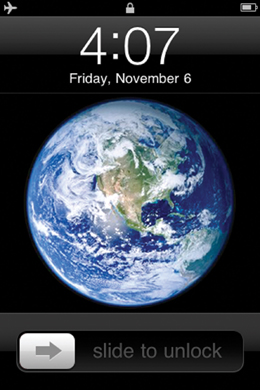
After a few seconds, the screen will change to show a big picture of the Earth with the current local time on top and a message that reads Slide to Unlock, as shown in Figure 1.1.
Note
If you don’t interact with the phone for several seconds, the screen will go blank. It will be in Sleep mode. To get it back, press the button on the top of the phone again or hit the big button in the bottom center of the phone (the Home button).
Using your index finger, touch the screen at the right-pointing arrow and move your finger horizontally across the text that reads Slide to Unlock.
To shut down your iPhone, press and hold the button on the top of the phone for a few seconds.
After you’ve unlocked your phone, you’ll be taken to the home screen, where there is a list of applications that are available to you. One of those applications is the camera, and another is for your photos. You can see the Camera and Photos icons in the first row of icons in Figure 1.2. These two applications are standard with all iPhones.
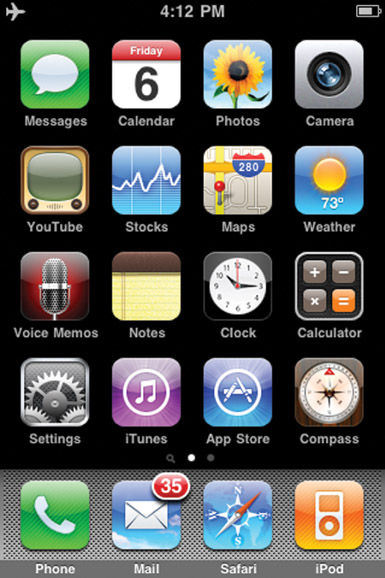
Figure 1.2. Tap Photos to see your photo albums or touch Camera to be brought to the camera interface.
The iPhone 3G and iPhone 3GS have internal flash drives with the following capacities:
iPhone 3G: 16 GB
iPhone 3GS: 16 GB or 32 GB
Without anything else in the 16-GB internal flash drive, an iPhone 3GS can hold about 1,500 images. The 32-GB iPhone 3GS can hold about 3,000 images. Since the files of the 3G are smaller, its 16-GB internal flash drive can hold more photos than that of the 3GS—more than 2,000.
The iPhone 3G has a fixed-focus 2-MP camera. The iPhone 3GS has an auto-focus 3-MP camera with touch-screen focus.
To use the touch-screen focus, all you do is frame your shot and then touch the screen on the subject/object on which you want to focus. There are different effects you can achieve using this built-in app. (To learn what effects you can get, see Chapter 2, “Using the iPhone Camera.”)
The lens on both types of iPhone is located on the back (the white or black part, depending on the phone) on the left side as you’re looking at the back of the phone.
There are two different kinds of iPhones: the iPhone 3G and the iPhone 3GS. The former comes with a 2-MP camera, and the latter with a 3-MP camera. Although that might not seem like much, the technology of the iPhone is so fine-tuned that you get pretty good image quality at these low resolutions.
The image size for a 2-MP photo is 1200×1600 pixels, or 16.667×22.222 inches at 72 dpi. This size photo is more than adequate for publishing your iPhone photos on the web. They’ll remain sharp even when they appear large on a website. If you want to consider blowing up your images, you have to look at print resolutions that are about 300 dpi. At 300 dpi, 2-MP iPhone images are 4×5.333, which means you can print that size photo and get sharp results. Probably the biggest photo size to which you could blow up an iPhone photo from a 2-MP camera is 6×8 inches. Anything bigger than that, and you’ll find yourself with a print that contains pixelization, or tiny colored dots all over the image.
Another way to examine the image you get from an iPhone is to look at it on your computer screen. When a photo is open on your computer screen, you usually view it at a size smaller than its actual size. To see exactly what’s going on with your photo in terms of sharpness, you have to view it at 100-percent resolution on your computer screen. To do this in Photoshop or Elements, you just type in 100 for the value in the box in the lower-left part of the window in which the image is displayed. Figure 1.3 shows how you’ll see an image taken with a 2-MP iPhone camera on your computer screen. The image looks incredibly sharp—much sharper than images taken with other types of cell-phone cameras. Blow up that same image to 100-percent resolution, and you’ll begin to see pixelization like that which shows up in the hair of the model in Figure 1.4. However, there is only a small amount of sharpness lost at full resolution (100 percent).


Note
When pixelization appears in an image, you’ll see tiny colored dots that make up the contents of the frame.
You can see the various sizes of iPhone files in Table 1.1. The image size for a 3-MP file is 2048×1536 pixels, or 28.444×21.333 inches at 72 dpi. Just as the images from the 2-MP model are perfectly good for publishing your images to the web, so are those from a 3-MP camera. At 300 dpi, 3-MP iPhone images are 5.12×6.83 inches. In Figures 1.5 and 1.6, the images are relatively sharp with little pixelization. The image at 100-percent resolution has less pixelization than the image in Figure 1.4.


There are several variables at play when you take a picture with an iPhone. As you look at these specs and settings, you’ll find that the iPhone is in a league of its own. The camera’s sensor, aperture, shutter speeds, ISO speeds, and focal lengths work in the same way as they do on any camera in that there are specified values/measurements for each. It’s just that with an iPhone, some of these values remain constant, whereas others constantly and automatically change according to what the camera sees through its lens.
As you would probably expect, the sensor of the iPhone camera is very small. It is only 0.25 inch wide. That would be about 6.35mm. When you consider that a strip of negative film and the sensor of a full-frame camera is 35mm, you roughly have one-sixth the space of the full-frame sensor to imprint the image. You’d think that this sensor size combined with a reduced number of megapixels could not produce a good picture with an iPhone camera. For many images this is true if you consider the images in terms of traditional photography.
iPhone specs at a glance:
An iPhone 3G sensor is 0.25 inch CMOS.
An iPhone 3GS sensor is 0.25 inch CMOS.
The iPhone 3GS has a focal length of 3.9mm, which is 28mm (35mm equivalent).
iPhone aperture is f/2.8.
So what does the iPhone use for an aperture and shutter speed setting? You can find this out in the image capture program when you download your photographs from your camera to your computer. (See the “Transferring Photos” section later in this chapter.) Both the iPhone 3G and the 3GS shoot with a wide aperture of f/2.8.
The iPhone 3G has a fixed focus point, which means it will focus at a point in the middle of the frame. (For more about shooting with the fixed focus and the tap focus of the 3GS, see Chapter 2.)
The iPhone 3GS has a Tap to Focus feature, which means you can have the lens focus on any point you tap on the screen. It also exposes the photo using the light available from that point, which brings up a host of capabilities in terms of how bright or dark your photo is. (See Chapter 3, “Better Photos on an iPhone.”)
The iPhone 3GS shoots in Aperture Priority mode.
Note
Aperture Priority mode is when the camera uses a set aperture (lens opening) to take a shot and decides, based upon the light available, how long to open the shutter for (shutter speed).
The iPhone automatically determines a shutter speed and an ISO speed according to the light available in the shot at a fixed aperture of f/2.8. This makes a big determination in the results you get when you shoot in different lighting conditions.
You can easily determine the ISO speed of shots taken with the iPhone 3GS in Photoshop’s Bridge or when you download your pictures in Image Capture (on a Mac) onto your computer. If you’re using a PC, Windows will automatically detect your iPhone, and you can access your photo properties with a simple right-click. (See the “Transferring Photos” section later in the chapter.)
If you take a look at some of the shutter speeds and ISO values for different images, you can get an idea of what shutter speeds and ISO speeds work best for an image.
Take a look at the images in Figures 1.9 through 1.12 and the settings that the iPhone 3GS automatically set the camera to when they were shot.


Figure 1.9 shows that photos can be very sharp. This is because the iPhone uses very low ISO speeds when there is adequate, even light. Figure 1.10, a close-up shot of a ceramic sculpture, shows that the iPhone 3GS does fairly well in terms of sharpness and reduced noise at medium ISO speeds. Figure 1.11 shows that at high ISO speeds (over 500), shots from a distance (long shots) result in blown highlights, softness, and noise indoors, which can be interesting effects. Finally, Figure 1.12 shows the poor results of a shot at a high shutter speed (over 1016, the highest it goes). For more information about ISO speeds, see the “Getting the Lowest ISO Speeds Should be Your Primary Goal When Shooting” sidebar in Chapter 2.


Even though there’s no way to get camera settings for the iPhone 3G, you get similar results in terms of shooting in different light situations to what you get with the iPhone 3GS.
In Figure 1.13, you can tell the camera shot at a high ISO speed, because the picture contains some noise. (See the bottom of the image.) When there is little light available, the iPhone will compensate by shooting at very high ISO speeds, resulting in a fairly sharp shot but with a lot of noise (see Figure 1.14).


One thing is for sure: Image size affects the look of your photograph. For Internet purposes, you’ll want to resize your iPhone image to send it to others, to display on a website, to use it to sell something on eBay, to upload it via a social networking site, and/or to use it on a blog.
You can change image sizes directly on your iPhone using an app. One app for this purpose is Resizer.
You can also use almost any image processing program on your computer to change the size of your image. When you change your image size, make sure you don’t write over it by saving it with the same file name. Always rename the file so the original high-res image stays intact.
The original sizes of your iPhone 3G photos are 9×6.5 at 177.8 pixels/inch, and those for the 3GS are 9×6.5 at 227.5. A good size to reduce the image size for the Internet to is 9×6.5 at 72 pixels/inch, or 648×486 pixels. This should reduce the file size of your image to about 100 KB.
You can transfer your photos from your iPhone to your computer or from your computer to your iPhone by following some simple steps.
To get your images from your iPhone to your computer on a Mac, follow these steps. (The steps for Windows are given after those for the Mac.)
Insert the USB cable from your iPhone into your computer.
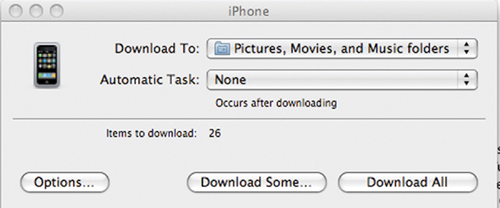
A prompt will come up like that shown in Figure 1.15. (This will come up if your computer is configured to automatically download images using Image Capture.)
If you want your photos to go to a folder other than your Pictures folder, use the Download To drop-down menu to navigate to it.
In the next window, navigate to the folder in which you want to put your pictures.
If you want to delete the photos from your camera after downloading them, click on the Options button. In the window that appears, click on Delete Items from Camera after Downloading. You can also choose options to Create Custom Icons, Add Item Info to File Finder Comments, or Embed ColorSync profile. Finally, you have the Connection Options, which is set to Automatically Download All Items.
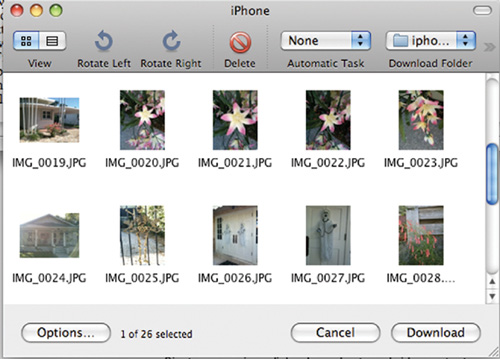
If you click Download Some, you’ll see your images come up in a window like the one shown in Figure 1.16.
If you want to download one photo, just click on it. If you want to download a group of consecutive photos, hold the Shift key down while you click on the first image and keep it held down while you click on the last photo of the group that you want. If you want to download photos that are not consecutive, just hold down the Command key while you are clicking on them.
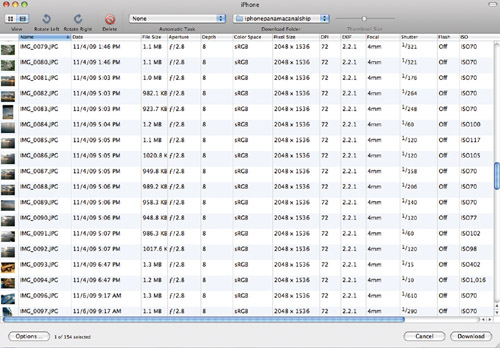
If you want to see the camera settings and file sizes of your images on a Mac, all you do is click on the Lines icon at the top of the window (next to the Squares or Thumbnails icon) in Figure 1.16. The screen will switch to that shown in Figure 1.17.
Note
Depending on how you have your computer configured, the program that manages your photo downloads may be different than the one described a moment ago. It may be iPhoto or some other program that manages your computer downloads. If so, the process is similar to the one described here.
If you’re working in Windows, the system will automatically detect your iPhone after you connect it using your USB cord.
A window will appear, giving you the following three options: Import Pictures, Open Device to View Files, and Microsoft Office Document Scanning. The first two options are the important ones.
If you click on Open Device to View Files, you can view them without downloading them. To access the images in the window that comes up (see Figure 1.18), all you do is click on one of the folders in the left frame in the window. You can save them one at a time by right-clicking on each image and clicking on Open in the drop-down menu that appears. The image will be displayed in the Windows Photo Gallery. To save it, click on Copy to Gallery in the list of menu items at the top of the window (see Figure 1.19). The image will be copied into the Windows Photo Gallery. To view the file size and camera settings, navigate to File > Properties. In the pop-up window that appears (see Figure 1.19), you’ll see the information.

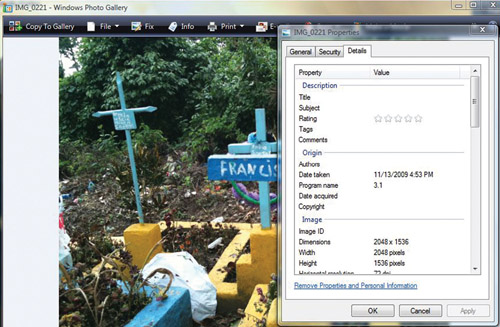
Figure 1.19. You can save your images one at a time as well as view the image’s properties in Windows Photo Gallery.
If you click on Import Pictures, Windows will import them from your iPhone into a new folder (with the date you download as the name) inside of your Pictures folder. The first thing it will ask you is to tag them. You can skip that step (if you want) and just go ahead and click on the Import button. Your photos will then be imported, but be warned that the downloading is slow.
To get your images from your computer to your iPhone, follow these steps:
Connect your computer to your iPhone using the cable provided with your iPhone.
Open iTunes.
Drag the folder you want to copy onto the iPhone to your Pictures folder.
In iTunes, navigate to File > Sync your name’s iPhone.
In iTunes, click on your phone’s name under where it says Devices.
Click on the Photos tab in the iTunes window that comes up.
In the Photos tab, there is a check box for Sync Photos—click on it. Then navigate to your Pictures folder. Do not click on the Include Videos option that comes after it. The folders you have in your Pictures folder will be listed under Folders (see Figure 1.20).
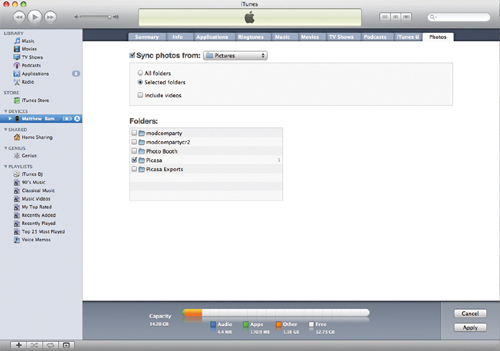
Click on any of those that you want to transfer to your iPhone. Then click on Apply. If you want to remove any of those folders of photos, click on the check box next to Synch Photos From. You’ll get a message asking whether you want to remove photos previously copied to your iPhone. Click on Remove Photos. Then click on Apply (Synch in Windows). The photos will be removed.
Note
If you’re transferring images from your computer to your iPhone via a USB cable, the iPhone will automatically downsize your photo to a very low resolution (5×6.667 at 72 dpi). If you want to move a photo at high resolution from your computer to your iPhone, you need to email it to yourself from your computer and then access and download it from an email on your iPhone. To do this, you just tap the photo after it appears on the iPhone screen and follow the saving prompts.
Resizing Photos for Computer-to-iPhone Transfer
At some point in your work with iPhone photos, you’ll want to make a picture you have on your computer smaller so you can transfer it to your iPhone to manipulate it with the many apps iPhones have to offer.
A good size to make a picture for the Internet is from 50 to 150 KB (as a JPEG file). The Internet only handles JPEG, GIF, and PNG files; most of the time, JPEGs are the name of the game for uploading files to websites. If you’re going to email high-resolution photos, make them about 1 MB to 3 MB.
For the purposes of this book, we’ll work in inches when thinking about resizing a photo. To resize in Photoshop, you navigate to Image > Image Size. (If you’re working in Photoshop Elements, you navigate to File > Resize > Image Size.)
The most important box to check or uncheck in this dialog box is Resample Image (see Figure 1.21). When Resample Image isn’t checked, you can change the values of Width, Height, or Resolution, and Photoshop/Elements will proportion the photo accordingly without changing the file size (the number you see right next to where it says Pixel Dimensions at the top of the box).
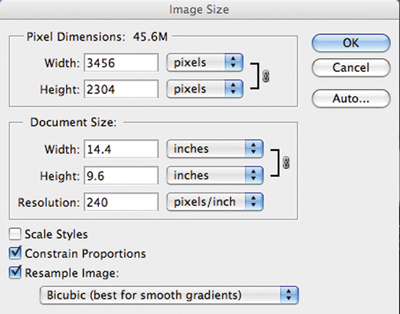
When Resample Image is checked, Photoshop will resize the image according to the values that you’ve put in for the width and height of the document size. When Resample is checked, the photo’s file size will change. Because most of the time you’ll want to make a file smaller, you’ll choose Bicubic Sharper. (Bicubic Sharper is the most efficient way for Photoshop to interpolate the photo’s pixels so that it remains sharp when you downsize it.) The values will be up to you. Just remember that the resolution for most web photographs is 72 pixels/inch. For most print jobs, you’ll want a resolution from 200 to 300 pixels/inch.
Finally, Scale Styles has to do with layer styles. This setting, checked or unchecked, will have no effect on your resizing.
When you’re working with programs other than Photoshop/Elements, resizing is a similar process. For example, to resize photos in iPhoto, you navigate to File > Export. The Export Photos dialog box will come up. If you open the Kind drop-down menu, you’ll have a choice of photo formats. Navigate to JPEG and choose Small if you’re going to use the images on the Internet or Full Size if you are going to print them. You have choices for the quality and size for exporting your files. The smallest file you can make is about 8 KB—that’s if you choose a small, low-quality photo. The sizes go up from there.
After you’ve taken some pictures using your iPhone, you’ll probably want to play around with some apps. Apps are kind of like mini image processing programs that you can tweak your photos with. They are written about in detail later in this book.
In this section, you’ll learn how to sync what you’ve got on your computer with your iPhone. Because we are only dealing with images here, that’s all we’ll use the synching for.
It’s best to have the newest version of iTunes to synch your iPhone to your computer.
To synch your iPhone to your computer, connect the two using the USB cable that came with your iPhone. Next, open iTunes. In the frame to the left in the iTunes window, click on the name of your iPhone in the Devices tab.
A window will come up in which you’ll see all the info about your iPhone, along with tabs at the top to perform specific operations. Figure 1.22 shows the window.
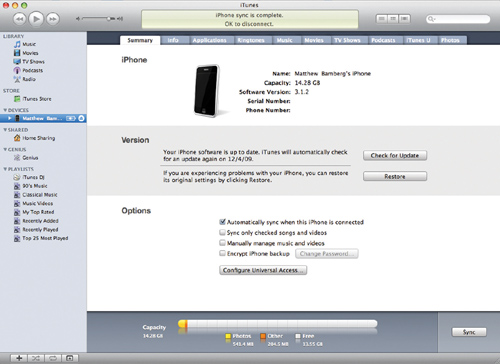
Your iPhone should automatically sync with your computer once you’ve opened iTunes. If it doesn’t navigate to File > Sync your name’s iPhone.
If you want to get a free app or buy a cheap one (most are cheap), follow these steps if you’re shopping on your computer. (You can also buy apps from your iPhone, which we’ll discuss in Chapter 7.)
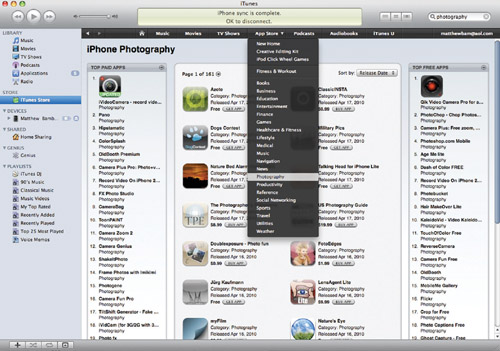
Click on iTunes Store and click on Browse. (If you ever get a screen other than the iTunes Store during your shopping, just click on iTunes Store in the left frame again to get back to the store.)
To see a list of all the photography apps, navigate to App Store > Photography. Figure 1.23 shows the window that will show up after you navigate to the Photography section of the App Store.
To find a specific app, just type in that app’s name in the Search box. (Try photoshop, for example.)
Click on the app from those listed to read about it and then click where it says Get App (for free apps) or Buy App (for low-cost apps).
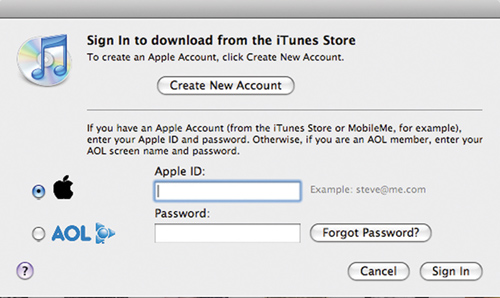
Next, you’ll be prompted to sign in or to create a new account. If it’s the latter, click on the Create New Account button. If it’s the former, sign in to get or buy the app.
After you create a new account, a window will come up welcoming you to the iTunes Store. Click Continue, then accept the Terms and Conditions, and then click Continue again.
Next, you’ll have to sign in (see Figure 1.24).
In the sign-in boxes, enter your email address and password. A window will come up, saying your sign in was successful. Or, if it’s your first time signing in, a prompt will come up, asking you for security info. Make sure you fill in the additional information that allows you to reset your password.
Next go to iTunes App Store.
Sign into your account.
If you haven’t used iTunes before, provide the information requested in the window and click Continue. Your iTunes store will then be created.
You can get descriptions of an app by clicking on it in the list in the left or right frame.
Click on the Get App or Buy App button to download. It will seem like nothing’s happening but the app is downloading for sure. To find out how you get charged for buying an app see the sidebar below.
To get the app to your iPhone, navigate to File > Sync your name’s iPhone.
Finding and Paying for Apps
You can find apps by searching for them or by browsing the Top Apps sections in the iTunes Photography Store. Note that if you click on any app in the Top Paid Apps or Top Free Apps list, you’ll get a description of that app. On the description page, there will be a Buy App or Get App button to download the app. If you click on any of the Buy App or Get App application buttons anywhere in the store, the apps will be downloaded immediately.
When you choose to buy an app by clicking on Buy App, iTunes will ask you “Are you sure you want to buy and download (the name of the app)?” Below that, it will say, “Your credit card will be charged for this purpose and your application will be downloaded immediately.”
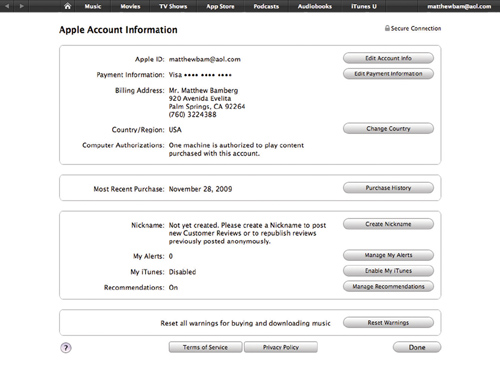
You might ask, “What credit card?” Because when you registered for iTunes, you never gave them a credit card number. Well, it’s the credit card you used to pay for your iPhone if you bought it at an AT&T Store.
You can check which credit card is being charged or enter/change your account info by navigating to Store > View My Account. You’ll get a prompt to sign in again. After you sign in, you’ll get a window like the one shown in Figure 1.25, with all of your account information and buttons to change anything you want, including the credit card you use to pay for your apps.