Putting It Together
By this point you’ve become a confident knitter who can make scarves, shawls, hats, and more. But what if you want to make something that is the combination of more than one piece? This chapter will teach you how to add a band of knitting to an existing item by picking up stitches. You’ll also learn how join two pieces of knitting with a seam.

Directional Blocks Scarf
The unique characteristics of self-striping yarn are used create a scarf with directional blocks. This scarf is made by knitting a narrow center panel and then adding long strips along the sides and finishing with small strips at each narrow end. The technique is somewhat like making a quilt and it can be used with self striping yarns as shown, but it would also be very effective with different colors.

Skills and Useful Information
PICK UP AND KNIT STITCHES
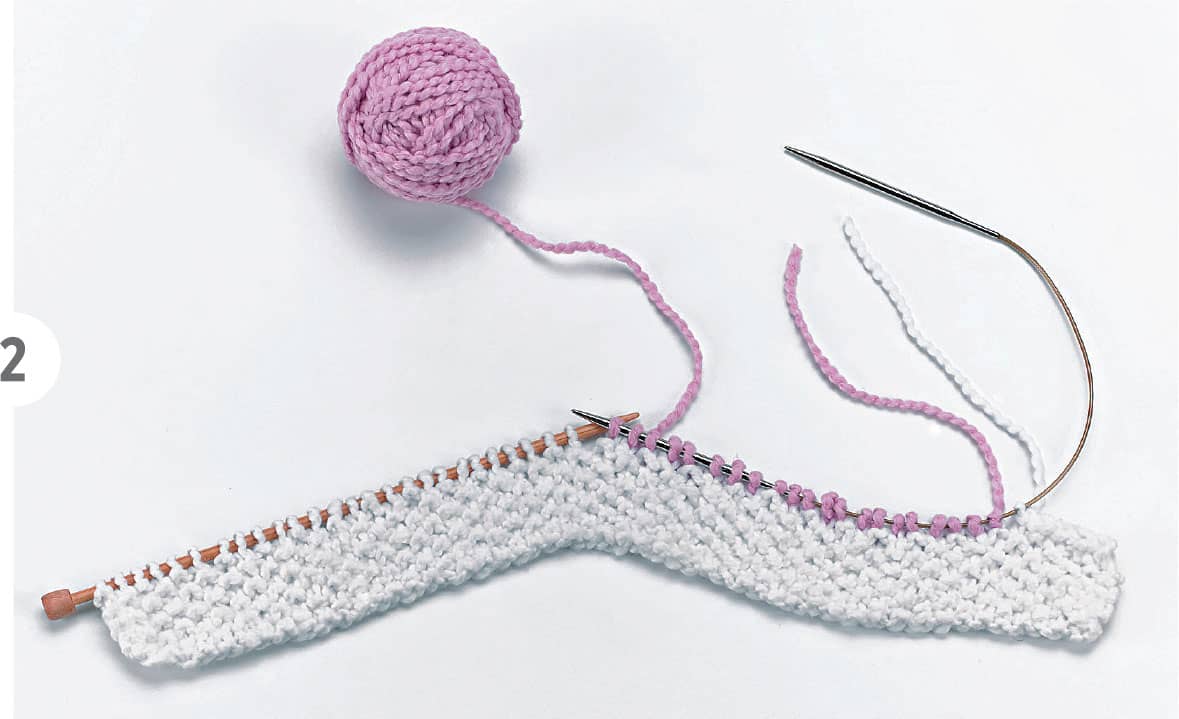
As your knitting progresses, you will often need to add a border or extra section to a piece of knitting that has already been finished. The stitches can be added on the bound-off edge or along the sides, such as a button band on a sweater. Borders and edges are normally worked in stitches that don’t curl, such as ribbing, seed stitch, or garter stitch. For the directional block scarf, the technique is used to add the long bands to side of the center panel as well as the two short end bands.
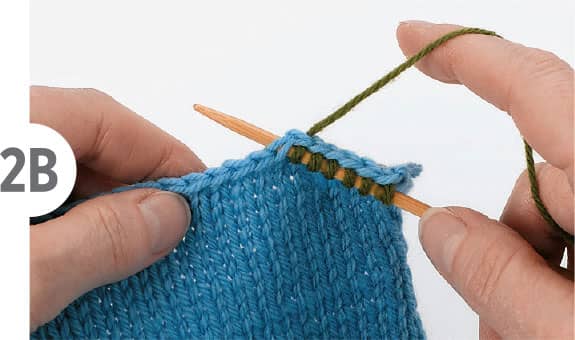
You will most often hear this technique referred to as “pick up and knit stitches,” but the words can be confusing. The stitch isn’t actually knit as it’s being picked up; rather, it is picked up knitwise onto the right needle to be knit (or purled) on the next row. Stitches are picked up with the right side of the work facing and using a separate ball of yarn.
1 When picking up stitches along a cast on or bound off edge, insert the right needle from the front to the back, going under two strands along the edge.
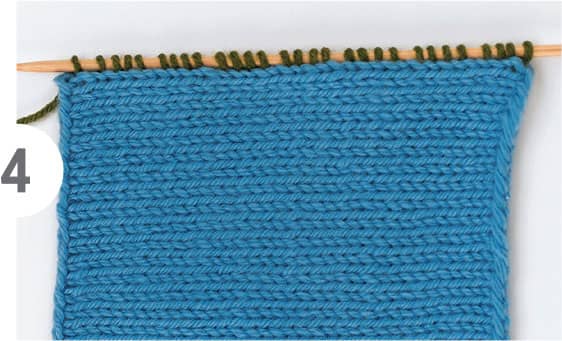
2 Wrap the yarn around the needle as if you were knitting and pull a loop through and onto the right needle (2A). You have picked up one stitch. Continue in this manner until the required number of stitches has been added (2B).

The number of stitches to be picked up varies depending on the edge from which you will be working. Typically, if stitches are being picked up from a cast-on or bound-off edge, then 1 stitch should be picked up for each stitch on the edge. After the desired number of stitches have been picked up, then turn the work to the wrong side and continue with the directions (knit, rib, etc.).
3 When picking up stitches along a side edge (or selvedge edge) insert the needle into the space between the first and second stitch. Wrap the yarn around the needle as if you were knitting and pull a loop through onto the right needle.
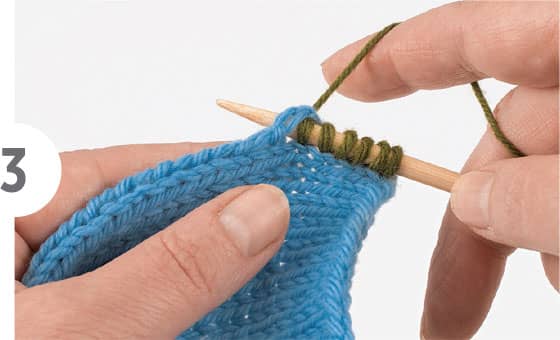
4 If you are working along a side edge (or selvedge edge) of a scarf or sweater front, then you should not pick up a stitch for every row. Knit stitches are wider than they are tall, so stitches should be picked up in a ratio of about 3 stitches for every 4 rows or 5 stitches for every 7 rows. Don’t worry about the space created by skipping a row; it won’t be visible after the first row of knit or purl stitches is made. After the desired number of stitches have been picked up, then turn the work to the wrong side and continue with the directions (knit, rib etc.).
WORKING WITH SELF-STRIPING YARN
Self striping yarn is dyed with intervals of changing colors that make stripes when knit. Because the intervals are fixed, for instance, 20 yards of one color connected to 20 yards of the next color, then the height of the stripe remains fairly consistent as long as the width of the knit object remains the same. The scarf in this pattern has a narrow central panel with tall stripes composed of many rows of the same color. Attached to either side of the center panel are two strips that are knit the long way. Because this section is very wide (thirteen times more stitches than the center panel), it has very short stripes, sometimes 2 rows or less of a color.
When working with self-striping yarn, it is important to remember that the number of stitches in the row will dictate the height of the stripe. If you make a cardigan sweater from self-striping yarn, then you can expect that the back, front, and sleeves will have stripes of differing heights because the width of each of those pieces is different. The scarf also combines stockinette stitch with garter stitch, and you’ll notice how different self-striping yarn can look depending on the choice of stitch.
How to Knit the Directional Blocks Scarf
FINISHED DIMENSIONS |
• 6" (15 cm) wide by 51" (130 cm) long |
1 Knit center panel
Using larger needle, cast on 17 sts.
Row 1 (RS): Knit.
Row 2: Purl.
Repeat rows 1 and 2 (stockinette stitch) until length from cast-on edge is approximately 46" (117 cm). Bind off stitches.
2 Pick up stitches for first side block using the smaller needle. Position the center panel with the right side facing you and the length running from side to side. Starting from the right corner and using the smaller needle, pick up and knit 3 stitches for every 4 rows of knitting. Work across the entire long edge; you should have about 225 stitches. Don’t worry if your stitch count varies by a few stitches. Your goal should be to pick up somewhere in the neighborhood of 225 stitches.

3 Knit side band. After picking up the stitches for the side band, work 16 rows in garter stitch (knit every row). Bind off from the wrong side. If you have a tendency to bind off tightly (your bound-off edges tend to curve), then use a needle one or two sizes larger for the bind-off needle.
4 Repeat steps 2 and 3 for other side of center panel.
5 Pick up stitches for end bands. Position the scarf with the right side facing you and the short edge up. Starting from the right corner of the short edge of the side band, pick up and knit 8 stitches from the side band, 15 stitches from the center panel, and 8 stitches from the other side band. There should be a total of 31 stitches. When picking up stitches from the side bands, pick up 1 stitch from each garter ridge.

6 Knit end band. After picking up the stitches for the end band, work 16 rows in garter stitch (knit every row). Bind off from the wrong side.
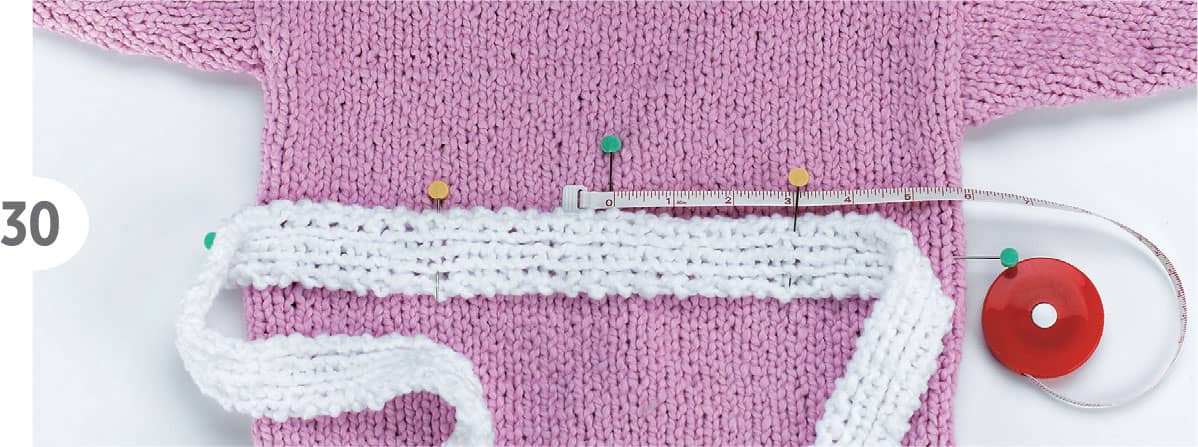
7 Repeat steps 5 and 6 for other end.
8 Finish scarf by weaving in all loose ends and steam blocking following general directions shown here.
Baby Bath Robe
Baby items make a terrific first garment. The knitting and finishing are quickly accomplished so the project isn’t overwhelming. The other appeal is that the little pieces are always just so cute! This baby bath robe would be the ultimate shower gift—useful yet unusual. It’s made from bulky organic cotton that’s both soft and absorbent. Instructions begin shown here.

Skills and Useful Information
MAKING SEAMS—MATTRESS STITCH
Many knit garments require a seam of some sort; typically shoulders, sides, and sleeves are seamed. The quality of the seams and finishing on a garment are very important for its overall appeal. It’s worth the time to learn how seam neatly and securely. This is a skill that really must be practiced on swatches before sewing the seams on the garment you spent such a long time knitting.
Before seaming, the garment pieces should be blocked to make sure the size and shape match the pattern and also to make the sides smooth and even for easier seaming. In general, the same yarn that was used to knit the pieces should be used to make the seam. Exceptions would be highly textured or very thick yarn, in which case use a thinner yarn of the same fiber type in a matching color. The type of seam taught here is often referred to as the mattress stitch. It’s a method of invisibly seaming by weaving the yarn back and forth between the two sides.
To aid in learning the technique use a contrasting yarn for making the practice seams, but remember that when you sew a garment together you want to use matching yarn. You should work on a flat table with adequate light and a comfortable chair.
USING A ROW COUNTER
The easiest way to make sure the pieces have exactly the same number or rows for seaming is to use a row counter. Keep track of the number of rows used to make the back using a row counter. When you make the two fronts, be certain they have the same number of rows as the back. You will have an area after the last decrease for the neck shaping to knit even (without increasing or decreasing) where you can adjust the row count to be equal to the back. Likewise, keep track of the number of rows completed to make the first sleeve and make certain the second sleeve matches.
How to Make the Baby Bath Robe
Sizes and Finished Dimensions |
|||
|
Size 1 |
Size 2 |
Size 3 |
To Fit Size |
12 month |
18 month |
24 month |
To Fit Chest Size |
20" (51 cm) |
21" (53 cm) |
22" (56 cm) |
Actual Garment Chest Measurement |
24" (61 cm) |
25" (63.5 cm) |
26" (66 cm) |
Length |
17" (43 cm) |
19" (48 cm) |
21" (53 cm) |
Yardage Required Yarn A |
275 yd (251 m) |
320 yd (292 m) |
365 yd (334 m) |
Yardage Required Yarn B |
110 yd (101 m) |
130 yd (119 m) |
145 yd (133 m) |
• Directions are shown as Size 1 (Size 2, Size 3). Note that the size numbers (1, 2, and 3) are not the same as children’s clothing sizes. This numbering system is used to make the patterns easier to read. |
|||
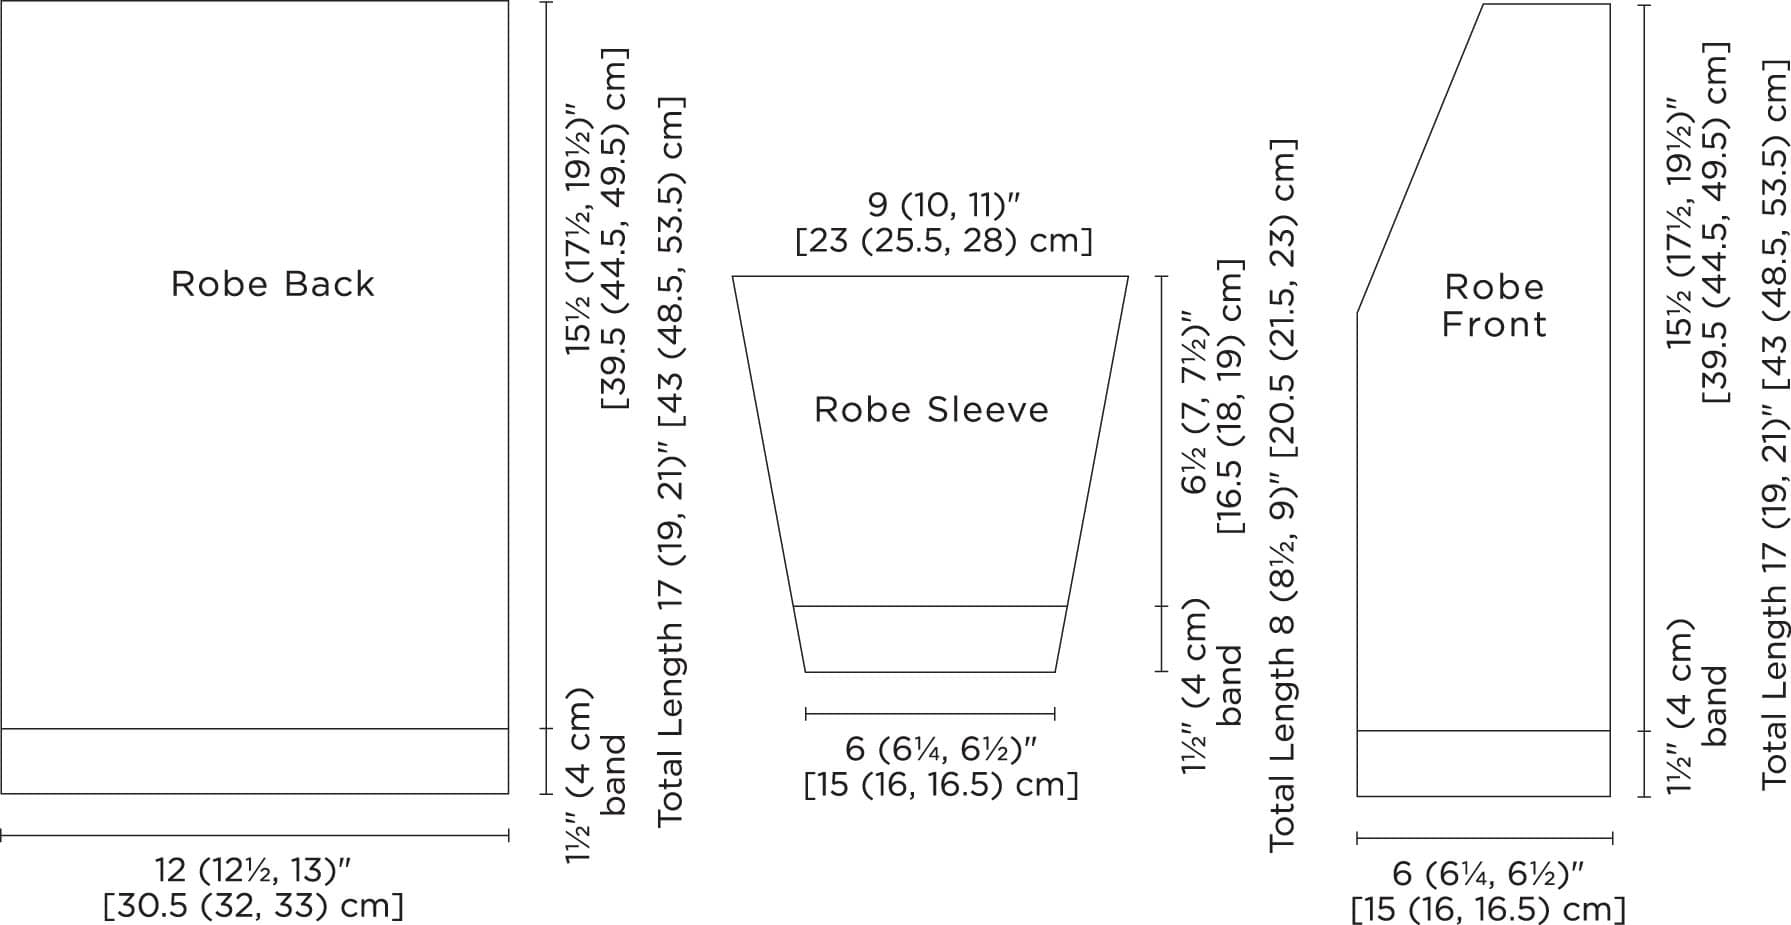
Above is a schematic of the individual pieces showing the finished dimensions of each piece. The measurements use the same organization as the directions: Size 1 (Size 2, Size 3)
PATTERN SIZING
Clothing items are usually made with some ease, which is the difference between the actual measurements of the garment compared to the measurement of the body it is designed to fit. The baby bathrobe has an ease of 4" (10 cm); the actual garment chest measurement of the 12 month size is 24" (61 cm) even though the average chest measurement of a 12-month-old baby is 20" (51 cm).
This pattern is written for a range of sizes, so it will be necessary to determine which directions apply to the size you are making. The chart shown here defines the dimensions of a particular size. The chart not only suggests the size (12 months, for instance) but also states the average chest size of a 12-month-old baby (20" [51 cm]). Please take note that the size numbers (1, 2, and 3) used in the chart and pattern are not the same as children’s clothing sizes. This numbering system is used to make the patterns easier to read.
Back
1 Using larger needle and yarn A cast on 42 (44, 46) sts. Purl the next row. See note shown here about using a row counter.
2 Work remainder of body in stockinette stitch as follows:
Row 1: Knit.
Row 2: Purl.
Repeat rows 1 and 2 until the length from the cast-on row is 151/2" (171/2", 191/2") [39.5 cm (44.5 cm, 49.5 cm)]. Bind off and cut the yarn, leaving a tail at least 8" (20 cm) long.

Right Front
(You are making the right front as worn on the body.)
3 Using larger needle and yarn A cast on 21 (22, 23) sts. Purl the next row.
4 Work body in stockinette stitch as follows:
Row 1: Knit.
Row 2: Purl.
Repeat rows 1 and 2 until the length from the cast-on row is 11" (121/2", 14") [28 cm (32 cm, 35.5 cm]). Before beginning the neckline decreases below, be certain that you have just finished a purl row.
5 Decrease along neck edge. Note: rows 11 and 12 are skipped for size 1 because of its fewer number of stitches.
Row 1: K1, ssk, knit to end of row—20 (21, 22) sts remain.
Row 2: Purl.
Row 3: K1, ssk, knit to end of row—19 (20, 21) sts remain.
Row 4: Purl.
Row 5: K1, ssk, knit to end of row—18 (19, 20) sts remain.
Row 6: Purl.
Row 7: K1, ssk, knit to end of row—17 (18, 19) sts remain.
Row 8: Purl.
Row 9: K1, ssk, knit to end of row—16 (17, 18) sts remain.
Row 10: Purl.
Row 11 for sizes 2 and 3 only (Skip this row for size 1): K1, ssk, knit to end of row—(16, 17) sts remain.
Row 12 for sizes 2 and 3 only (Skip this row for size 1): Purl.
Row 13: Knit.
Row 14: Purl.
Row 15: K1, ssk, knit to end of row—15 (15, 16) sts remain.
Row 16: Purl.
Row 17: Knit.
Row 18: Purl.
6 Repeat rows 17 and 18 until the length from the cast-on edge is 151/2" (171/2", 191/2") [39.5 cm (44.5 cm, 49.5 cm]). Bind off and cut the yarn, leaving a tail at least 8" (20 cm) long.

Left Front
(You are making the left front as worn on the body.)
7 Using larger needle and yarn A cast on 21 (22, 23) sts. Purl the next row.
8 Work body as follows:
Row 1: Knit.
Row 2: Purl.
Repeat rows 1 and 2 until the length from the cast-on row is 11" (121/2", 14") [28 cm (32 cm, 35.5 cm]). Before beginning the neckline decreases below, be certain that you have just finished a purl row.
9 Decrease along neck edge. Note: rows 11 and 12 are skipped for size 1 because of its fewer number of stitches.
Row 1: Knit until 3 sts remain, k2tog, k1—20 (21, 22) sts remain.
Row 2: Purl.
Row 3: Knit until 3 sts remain, k2tog, k1—19 (20, 21) sts remain.
Row 4: Purl.
Row 5: Knit until 3 sts remain, k2tog, k1—18 (19, 20) sts remain.
Row 6: Purl.
Row 7: Knit until 3 sts remain, k2tog, k1—17 (18, 19) sts remain.
Row 8: Purl.
Row 9: Knit until 3 sts remain, k2tog, k1—16 (17, 18) sts remain.
Row 10: Purl.
Row 11 for sizes 2 and 3 only (Skip this row for size 1): Knit until 3 sts remain, k2tog, k1—(16, 17) sts remain.
Row 12 for sizes 2 and 3 only (Skip this row for size 1): Purl.
Row 13: Knit.
Row 14: Purl.
Row 15: Knit until 3 sts remain, k2tog, k1—15 (15, 16) sts remain.
Row 16: Purl.
Row 17: Knit.
Row 18: Purl.
10 Repeat rows 17 and 18 until the length from the cast-on edge is 151/2" (171/2", 191/2") [39.5 cm (44.5 cm, 49.5 cm]). Bind off and cut the yarn leaving a tail at least 8" (20 cm) long.
Sleeves (make two)
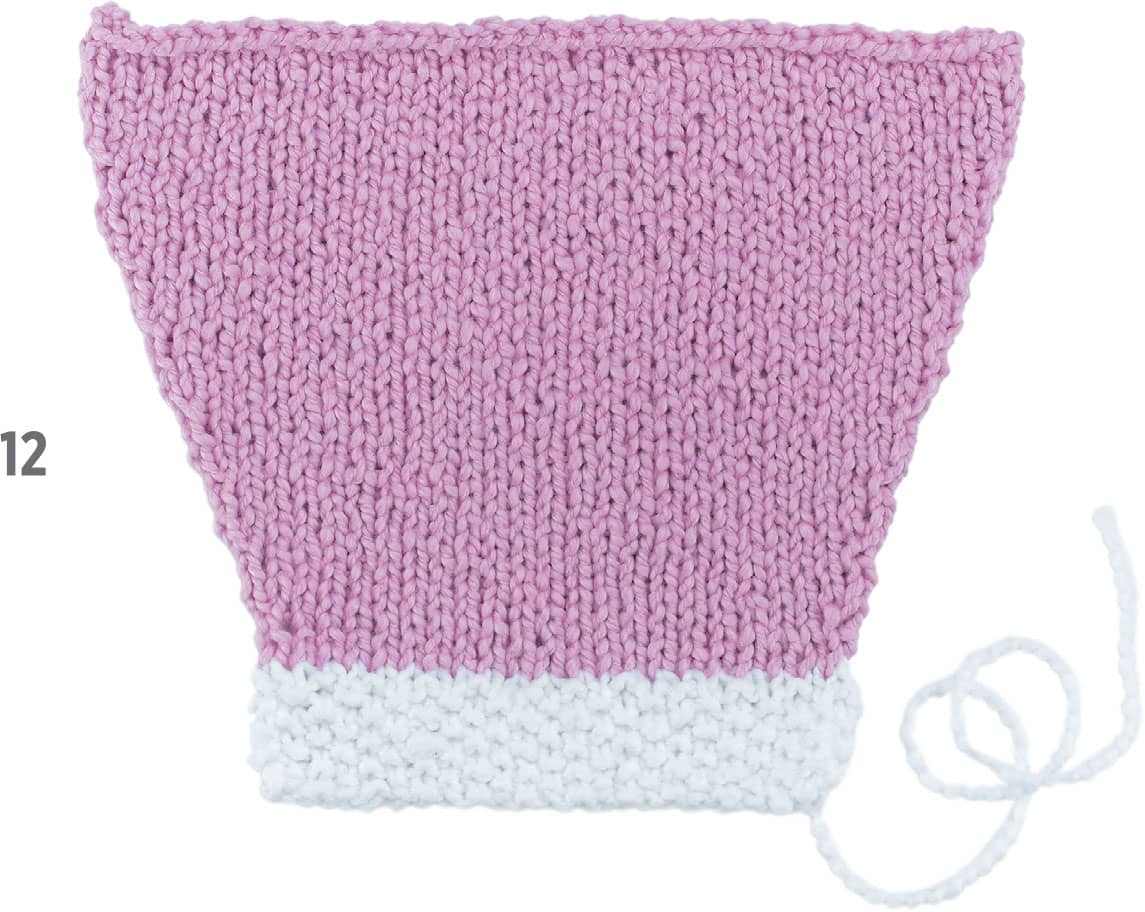
11 Cuff: using smaller needle and yarn B, cast on 23 (23, 25) sts. When making cast-on row, leave a tail at least 10" (25.5 cm) long that will later be used to seam the cuff. Work cuff in seed stitch as follows:
Row 1: *K1, p1*; repeat from * to * until 1 st remains, k1.
Repeat row 1 eight more times for a total of 9 rows.
12 Sleeve shaping: shape sleeves by working increases along each edge. From this point, each sleeve has a unique set of directions. Follow the directions for the size you are making.
Size 1
Change to larger needles and yarn A.
Row 1: K11, k2tog, k10—22 sts remain.
Row 2: Purl.
Row 3: Knit.
Row 4: Purl.
Row 5: K1, M1R, knit until 1 st remains, M1L, k1—24 sts.
Row 6: Purl.
Row 7: Knit.
Row 8: Purl.
Row 9: K1, M1R, knit until 1 st remains, M1L, k1—26 sts.
Row 10: Purl.
Row 11: Knit.
Row 12: Purl.
Row 13: Knit.
Row 14: Purl.
Row 15: K1, M1R, knit until 1 st remains, M1L, k1—28 sts.
Rows 16 to 21: Repeat rows 11 to 15—30 sts after completing row 21.
Rows 22 to 27: Repeat rows 11 to 15—32 sts after completing row 27.
After completing row 32, the length from the cast-on row should be 8" (20 cm). If necessary, add or subtract rows after the last increase (row 27) in order to reach the correct length.
Row 28: Purl.
Row 29: Knit.
Row 30: Purl.
Row 31: Knit.
Row 32: Purl.
Bind off and cut the yarn, leaving a tail at least 8" (20 cm) long.
Size 2
Change to larger needles and yarn A.
Row 1: K11, k2tog, k10—22 sts remain.
Row 2: Purl.
Row 3: Knit.
Row 4: Purl.
Row 5: K1, M1R, knit until 1 st remains, M1L, k1—24 sts.
Row 6: Purl.
Row 7: Knit.
Row 8: Purl.
Row 9: K1, M1R, knit until 1 st remains, M1L, k1—26 sts.
Rows 10 to 13: Repeat rows 6 to 9—28 sts after completing row 13.
Rows 14 to 17: Repeat rows 6 to 9—30 sts after completing row 17.
Rows 18 to 21: Repeat rows 6 to 9—32 sts after completing row 21.
Rows 22 to 25: Repeat rows 6 to 9—34 sts after completing row 25.
Row 26: Purl.
Row 27: Knit.
Row 28: Purl.
Row 29: Knit.
Row 30: Purl.
Row 31: K1, M1R, knit until 1 st remains, M1L, k1—36 sts.
After completing row 36, length from the cast-on row should be 81/2" (21.5 cm). If necessary, add or subtract rows after the last increase (row 31) in order to reach the correct length.
Row 32: Purl.
Row 33: Knit.
Row 34: Purl.
Row 35: Knit.
Row 36: Purl.
Bind off and cut the yarn, leaving a tail at least 8" (20 cm) long.
Size 3
Change to larger needles and yarn A.
Row 1: K11, k2tog, k10—24 sts remain.
Row 2: Purl.
Row 3: Knit.
Row 4: Purl.
Row 5: K1, M1R, knit until 1 st remains, M1L, k1—26 sts.
Row 6: Purl.
Row 7: Knit.
Row 8: Purl.
Row 9: K1, M1R, knit until 1 st remains, M1L, k1—28 sts.
Rows 10 to 13: Repeat rows 6 to 9—30 sts after completing row 13.
Rows 14 to 17: Repeat rows 6 to 9—32 sts after completing row 17.
Rows 18 to 21: Repeat rows 6 to 9—34 sts after completing row 21.
Row 22: Purl.
Row 23: Knit.
Row 24: Purl.
Row 25: Knit.
Row 26: Purl.
Row 27: K1, M1R, knit until 1 st remains, M1L, k1—36 sts.
Rows 28 to 33: Repeat rows 22 to 27—38 sts after completing row 21.
After completing row 38, the length from the cast-on row should be 9" (23 cm). If necessary, add or subtract rows after the last increase (row 33) in order to reach the correct length.
Row 34: Purl.
Row 35: Knit.
Row 36: Purl.
Row 37: Knit.
Row 38: Purl.
Bind off and cut the yarn, leaving a tail at least 8" (20 cm) long.
Lightly steam all pieces following directions shown here. The pieces should be as smooth and flat as possible and the measurements should conform to those shown in the schematics shown here.
HOW TO ASSEMBLE THE ROBE
13 The robe pieces will be joined in stages. After each seam is completed, steam it lightly to ensure that it lies as flat as possible before the next piece is joined.
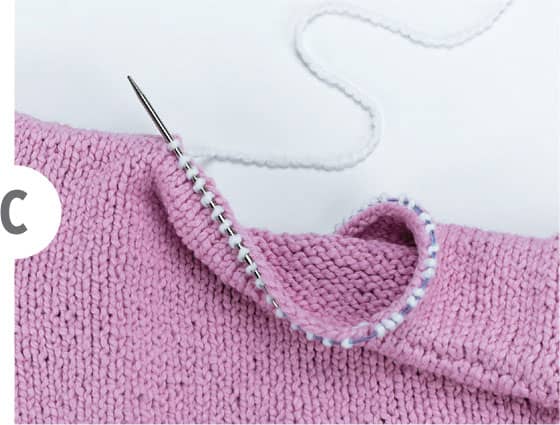
14 Begin by joining the fronts to the back at the shoulder seam. Align the left front so that the bound-off edge adjoins the bound-off edge of the shoulder and pin to secure with locking stitch markers or straight pins. The selvedge edges should be lined up on the right side and the neck shaping should face to the left.

15 Cut a length of yarn A about 18" (45.5 cm) long and thread onto a yarn needle. Sew the shoulder seam together using the mattress stitch for bound-off edges (shown here). Leave a tail at least 8" (20 cm) long at the beginning and remove pins as you work. When the seam is finished weave, in the ends to secure.
16 Align the right front to mirror the left front and join the shoulder seam.

17 Mark the center point of the bound-off top edge of the sleeve.
18 Align the center with the shoulder seam. Pin the sleeve to the front and back sides. The distance from the sleeve center point to the sleeve side edge should be 41/2" (5", 53/8") [11.5 cm (12.5 cm, 13.5 cm).

19 Cut a length of yarn A about 18" (45.5 cm) long and thread on to a yarn needle. Join the sleeve to the body using the mattress stitch for bound-off edges to side edges (shown here). Leave a tail at least 8" (20 cm) long at the beginning and remove pins as you work. When the seam is finished, weave in the ends to secure.
20 Repeat for other sleeve.
21 Working one side at a time, pin the front to the back to make a seam and pin the sleeve edges to make a seam. The underarm and side will be sewn as one continuous seam.

22 Cut a length of yarn A about 30" (76 cm) long and thread on to a yarn needle. Sew the seam using the mattress stitch for side edges (shown here). Begin sewing on the sleeve seam above the cuff. Leave a tail at least 8" (20 cm) long at the beginning and remove pins as you work. When the seam is finished, weave in the ends to secure.
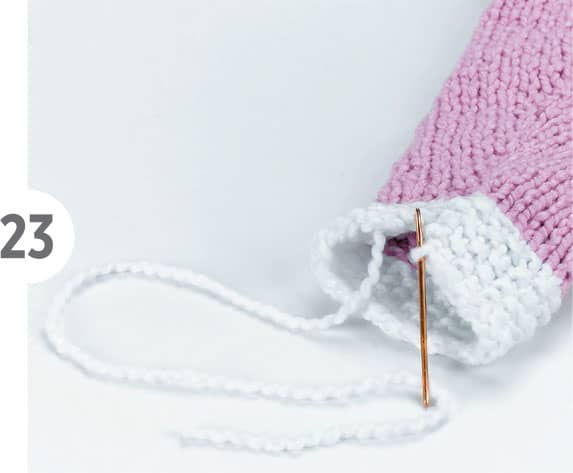
23 Using the long tail from the cast-on of the cuff, join the short cuff seam. Work from side to side in a modified mattress stitch: catching the purl bumps that are on the selvedge edge, which gives a flatter seam that won’t be seen when the cuffs are turned up. When the seam is finished, weave in the ends to secure.
CONTRAST BORDER
24 To make bottom contrast border, pick up stitches from the cast-on edge beginning with the center edge of the left front. As a basic guide, pick up approximately 1 stitch for each cast-on stitch on the edge. It isn’t necessary to pick up exactly the same number as shown in the guide below. Just be certain you have an odd number of stitches after all the stitches have been picked up. If not, simply adjust the spacing between the last few stitches (either one stitch closer or further away). Pick up stitches as follows:
Size 1: Total of 81 sts: 20 from left front, 41 from back, 20 from right front.
Size 2: Total of 85 sts: 21 from left front, 43 from back, 21 from right front.
Size 3: Total of 89 sts: 22 from left front, 45 from back, 22 from right front.

25 Work band in seed stitch as follows:
Row 1: *K1, p1*; repeat from * to * until 1 st remains, k1.
Repeat row 1 seven more times for a total of 8 rows. Bind off in pattern. Cut yarn, leaving a tail at least 8" (20 cm) long.
26 Stitches are picked up for the continuous band that is attached to the center front and neck edges. It isn’t necessary to pick up exactly the same number as shown in the guide below. Just be certain you have an odd number of stitches after all the stitches have been picked up. If not, simply adjust the spacing between the last few stitches (either 1 row closer or further away).
When making the center front and neck edge border, pick up stitches from the side (selvedge edge) beginning with the bottom corner of the right center front (A). As a general guide, pick up about 5 stitches for every 8 rows along the center front. The best way to determine the spacing of the picked up stitches along the angled portion of the neck shaping is to divide the distance in half (or even quarters) and mark with pins. When picking up stitches along this edge, divide the number to be picked up among the sections marked with the pins. The neck edge includes the space taken up by the shoulder seams (B). Along the back of the neck, pick up approximately 1 stitch for each bound-off stitch (C). Pick up stitches as follows:


Size 1: Total of 141 sts: 45 from right center front, 19 from right angled neck line, 14 from center back, 19 from left angled neck line, and 44 from left center front.
Size 2: Total of 157 sts: 49 from right center front, 22 from right angled neck line, 16 from center back, 22 from left angled neck line, and 48 from left center front.
Size 3: Total of 171 sts: 54 from right center front, 24 from right angled neck line, 16 from center back, 24 from left angled neck line, and 53 from left center front.
27 Work band in seed stitch as follows:
Row 1: *K1, p1*; repeat from * to * until 1 st remains, k1.
Repeat row 1 seven more times for a total of 8 rows. Bind off in pattern. Cut yarn leaving a tail at least 8" (20 cm) long.
28 Make the belt. Using the smaller single-pointed needles and yarn B, cast on 6 sts. Work the belt in rib stitch as follows:
Row 1: *K1, p1*; repeat from * to * to end of row.
Repeat row 1 until the belt is 36" (37", 38") [91.5 cm (94 cm, 96.5 cm]) long. Bind off in pattern and cut yarn, leaving a tail at least 8" (20 cm) long. Weave in all ends.
29 Lay the robe out so the back is flat and smooth. With a straight pin, mark a distance on each side seam that is 7" (71/2", 8") [18 cm (19 cm, 20 cm]) down from the shoulder seam. Measuring between these two marks, find the center back and mark it with a straight pin.

30 Position the center of the belt on the center back and be certain that the belt is parallel to the bottom and centered widthwise over the marks on the side seam. Pin the center and then pin 3" (7.5 cm) to each side of center.
31 Thread about 18" (45.5 cm) of yarn A on yarn needle. Knot the yarn and use a running stitch to attach the belt securely at each position which is marked 3" (7.5 cm) to the side of the center back.
32 Use sewing thread and needle to attach buttons.
33 Gently steam all bands and seams a final time. Sew in all loose ends.
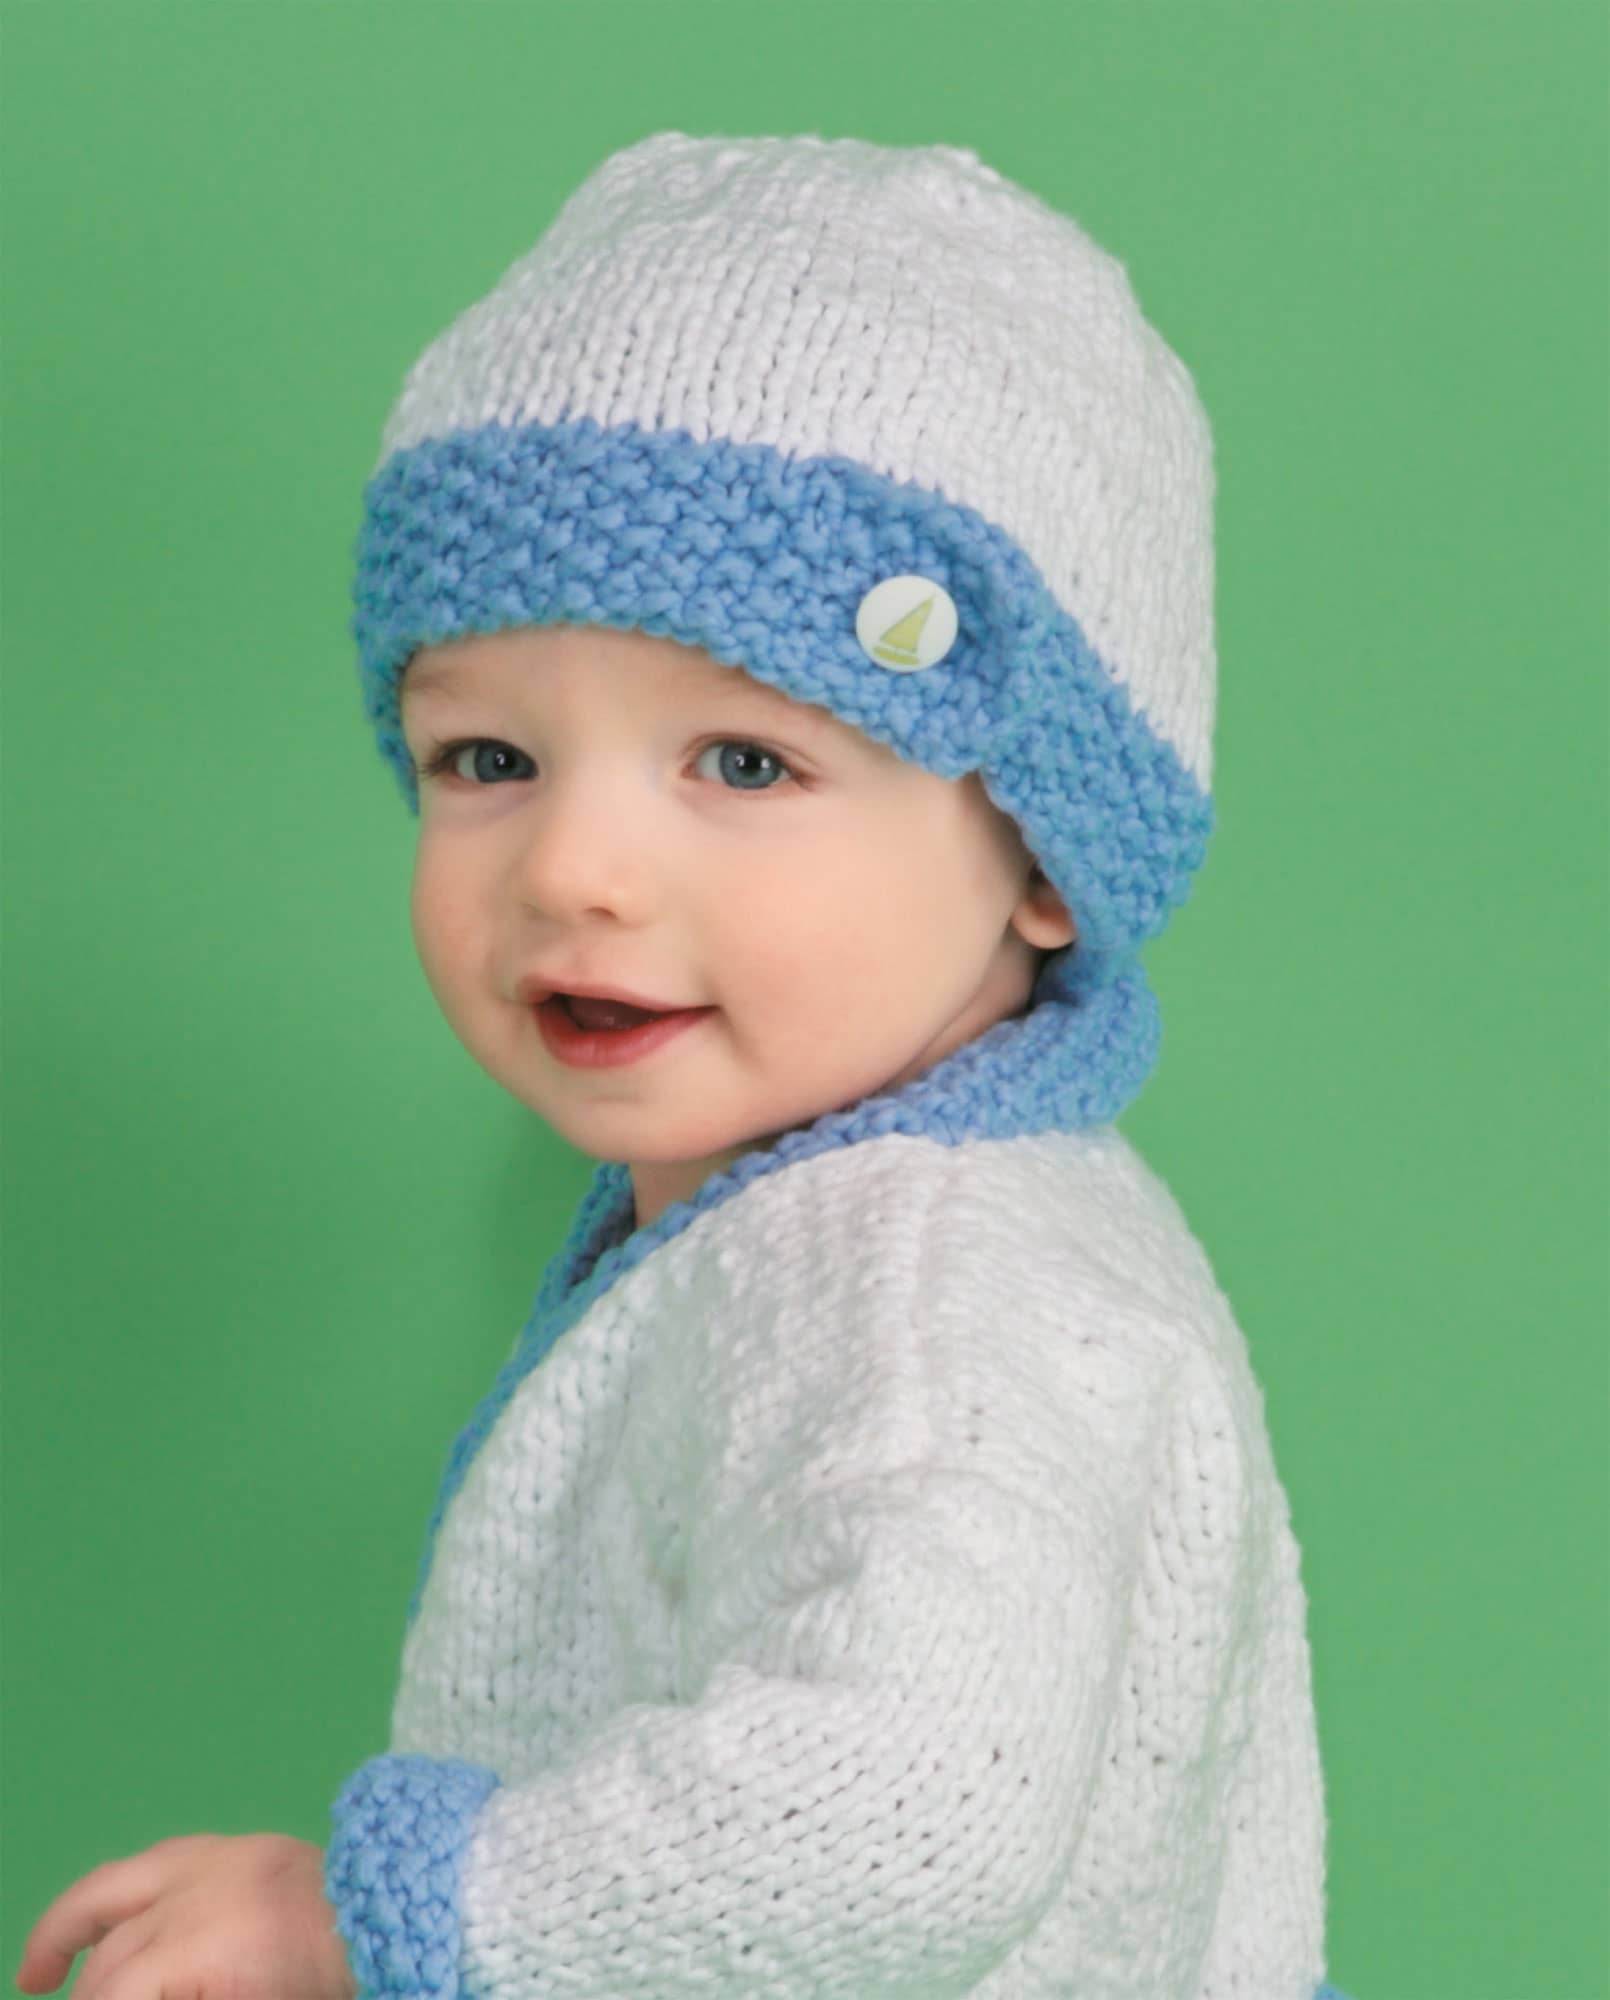
Baby Hat with Button Band
Why not use the leftover yarn from the baby bath robe to make an adorable hat? Or make the hat by itself; you couldn’t find a softer or cuter gift for a little person.
How to Knit the Baby Hat
Size and Finished Dimensions |
|||
|
Size 1 |
Size 2 |
Size 3 |
To Fit Size |
12 month |
18 month |
24 month |
Hat Circumference |
133/4" (35 cm) |
16" (40.5 cm) |
171/4" (44 cm) |
Hat Height |
6" (15 cm) |
7" (18 cm) |
8" (20.5 cm) |
Yardage Required Yarn A |
17 yd (15 m) |
20 yd (18 m) |
21 yd (19 m) |
Yardage Required Yarn B |
39 yd (36 m) |
45 yd (41.5 m) |
49 yd (45 m) |
• Directions are shown as Size 1 (Size 2, Size 3). Note that the size numbers (1, 2, and 3) are not the same as children’s clothing sizes. This numbering system is used to make the patterns easier to read. |
|||
1 The button band is knit as a flat piece working back and forth in rows instead of joining in the round.
Using yarn B and the smaller needle, cast on 53 (61, 65) sts.
Row 1: K1, *p1, k1* until 1 st remains, k1.
Repeat row 1 seven more times for a total of 8 rows.
2 Bind off 5 sts. Cut yarn A and change to yarn B, leaving tails at least 8" (20 cm) long. Transfer single stitch (left from the bind off) on right needle to the circular needle and then continue across the row, working all stitches in knit stitch. As you work across the row, the stitches will be knit off the single-point needle onto the circular needle—48 (56, 60) sts remain on needle.
3 Bring the tips of the circular needle together, keeping the bound-off button tab free. The stitch with the working yarn attached should be on the right. Slip a BOR marker on the right needle. Insert the right needle into the first stitch on the left needle and make a stitch using the working yarn, thereby joining the hat in the round.

4 Continue working stockinette stitch in the round (knit every stitch), slipping the BOR marker as you work until the height from the cast-on row is 41/2" (5", 51/2") [11.5 cm (12.5 cm, 14 cm]).
5 Begin decreases to shape the crown of the hat. The larger the size, the more stitches in the hat. So, the larger sizes will require more rounds to decrease their greater number of stitches. If you are making one of the smaller sizes, then skip the rounds that don’t apply to your hat. Change to double-pointed needles when the stitches will no longer fit comfortably around the circular needle.
Round 1 for size 3 only: *K13, k2tog*; repeat from * to * to end of round—56 sts remain. Skip this round for other sizes.
Round 2 for size 3 only: Knit. Skip this round for other sizes.
Round 3 for sizes 2 and 3 only: *K5, k2tog*; repeat from * to * to end of round—48 sts remain. Skip this round for size 1.
Round 4 for sizes 2 and 3 only: Knit. Skip this round for size 1.
From this point on all sizes are worked the same.
Round 5: *K4, k2tog*; repeat from * to * to end of round—40 sts remain.
Round 6: Knit.
Round 7: *K3, k2tog*; repeat from * to * to end of round—32 sts remain.
Round 8: Knit.
Round 9: *K2, k2tog*; repeat from * to * to end of round—24 sts remain.
Round 10: Knit.
Round 11: *K1, k2tog*; repeat from * to * to end of round—16 sts remain.
Round 12: Knit.
Round 13: *K2tog*; repeat from * to * to end of round—8 sts remain.
6 Cut the yarn leaving a tail at least 8" (20 cm) long. Using a yarn needle, thread the tail through the remaining stitches and pass it through the hole in the top of the hat to the inside. Pull the tail firmly to close the hole and weave the ends into the stitches on the inside to secure. Weave in all other ends.
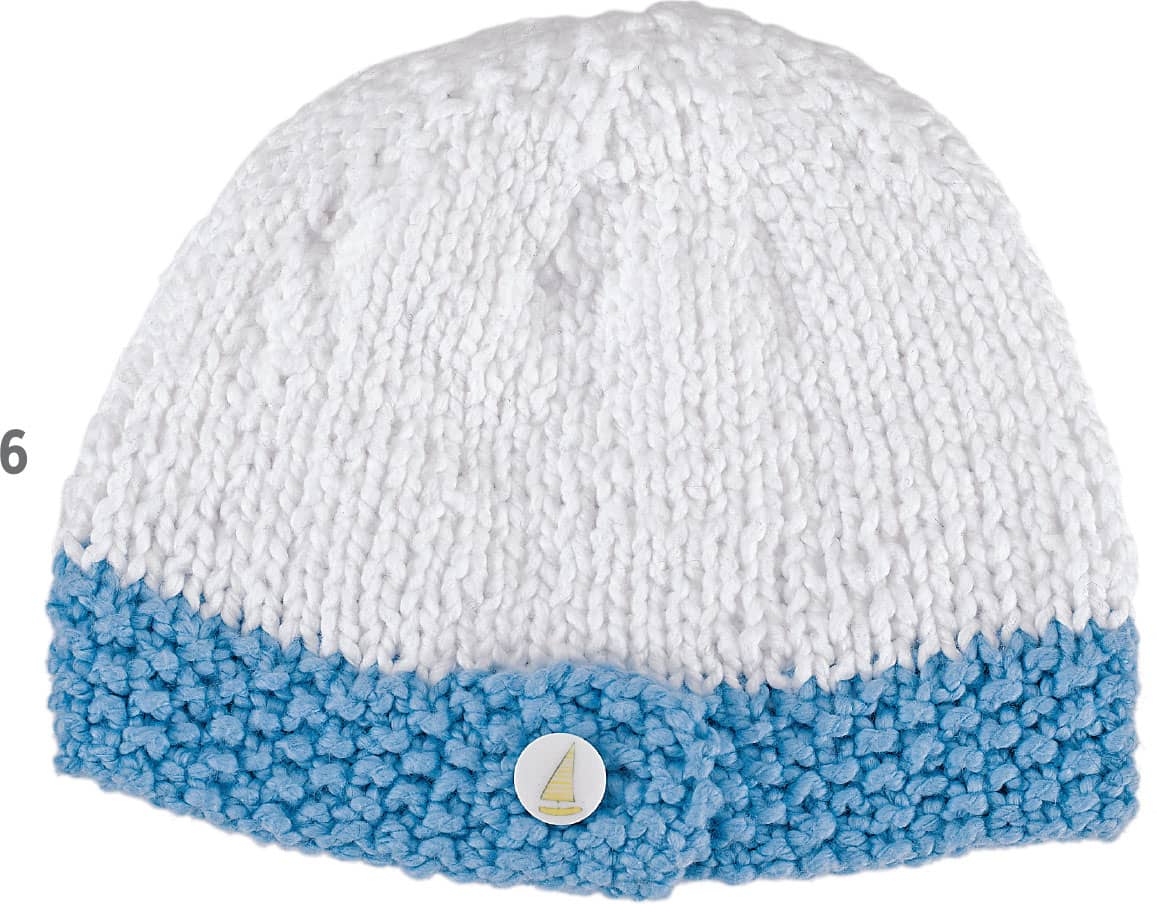
7 To finish the hat band, overlap the button tab and pin into place. Use sewing needle and thread to attach the button and secure the button tab in place. Lightly steam following directions shown here.