Shaping
One of the reasons knitting is so versatile is that it’s easy to shape an item by either increasing or decreasing the number of stitches. In this section you will learn different methods for increasing and decreasing, the effect and appearance of each method, and which methods to use for different situations.

Felted Christmas Tree
What could be a better way to learn about increases and decreases than making a felted fir tree? Perhaps you’ve felted wool accidently by putting a sweater in the washer. You know that the sweater shrank dramatically and assumed the texture of thick felt. You’ll be felting this tree on purpose in your home washer once the basic knitting is completed. One of the advantages of felting for a new knitter is the fact that the individual stitches can no longer be seen once the process is completed. That means that irregularities and uneven stitches disappear! So, don’t be a perfectionist, learn some new skills and have some fun. To decorate your tree for Christmas, you can add bobble ornaments and yarn garlands after the felting is completed. Pattern begins shown here.

Skills and Useful Information
INCREASES AND DECREASES
A very simple increase can be accomplished by knitting into the same stitch twice, thereby adding 1 stitch (knit front and back—kf&b). By knitting 2 stitches together at the same time (knit 2 together—k2tog) the number of stitches can be decreased by 1. There are actually many ways to increase and decrease in knitting, and each method results in a different look. The primary distinction is the direction in which the stitches slant—either to the right or to the left—after the increase or decrease. For example, the direction of the stitch slant is important if you are making the neck opening in a V-neck sweater. The stitches on the right side of the “V” should point to the right and the stitches on the left side of the “V” should point to the left.
Before starting the projects in this chapter there are some basic increases and decreases to be learned. Although knit front and back (kf&b) and knit two together (k2tog) were covered briefly in the Texture section, it’s a good idea to review because these techniques will be used extensively in the two patterns that follow. Master all of the shaping techniques on the practice swatch before you jump into the projects. Please note the increases and decreases for both projects are included in this section so they can all be practiced on the same Swatch.
INCREASES
Knit Front and Back (kf&b)
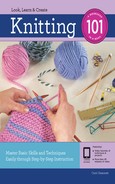
This is the most simple and easily learned increase. It is often referred to as the bar increase because a small bar is formed on the right side of the knitting.
1 First knit in the usual way but don’t take the new stitch off your needle.
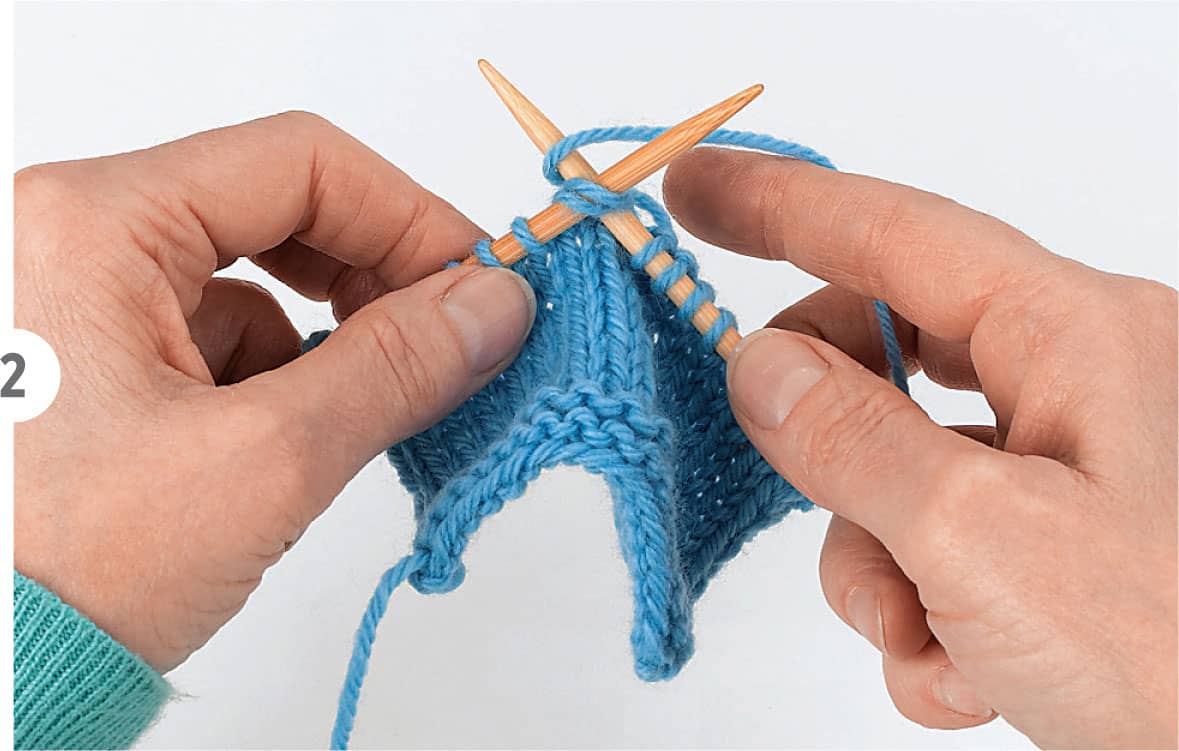
2 Pivot the right needle to the back of the left needle and insert it knitwise (from front to back) into the back loop of the same stitch just worked.

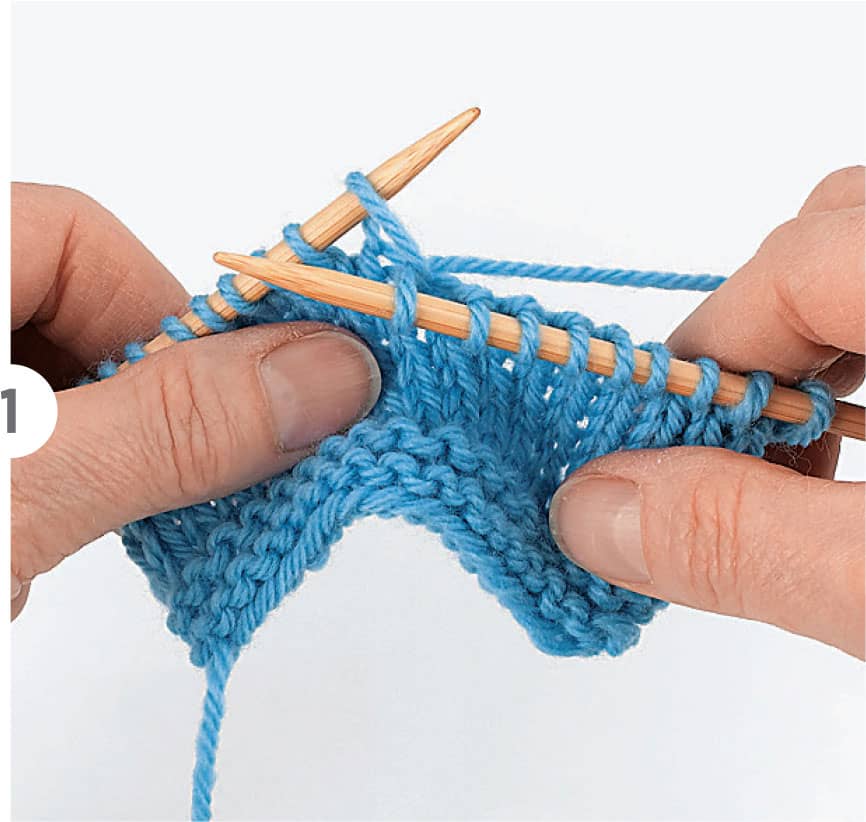
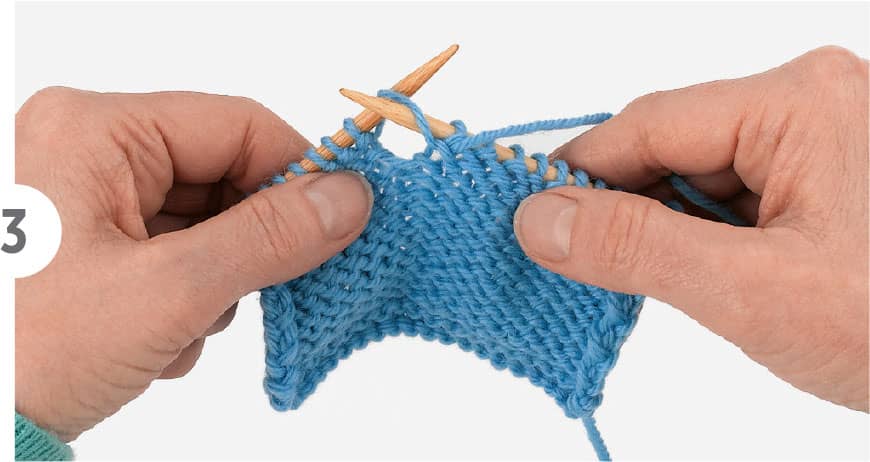
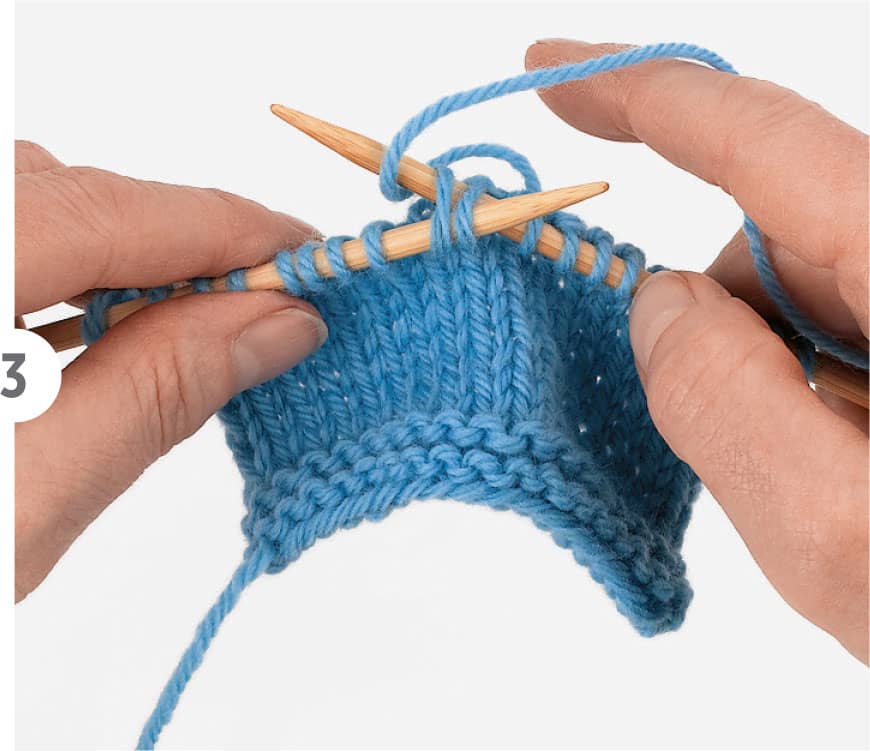
3 Make another stitch into the back loop and pull the new loop through to the front of the knitting.
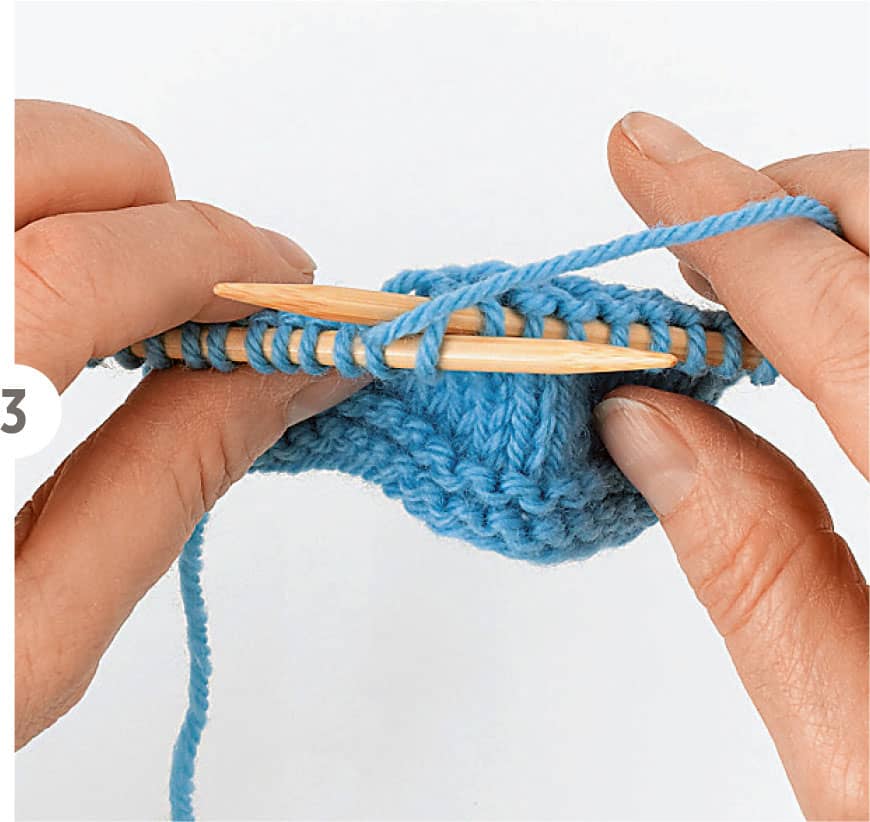
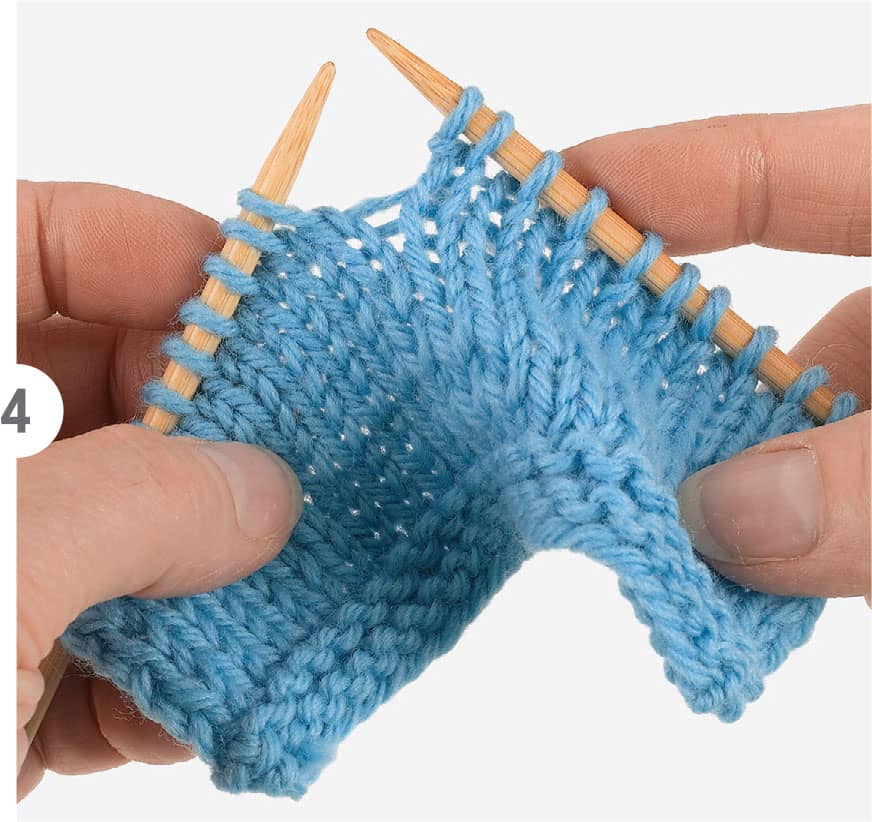
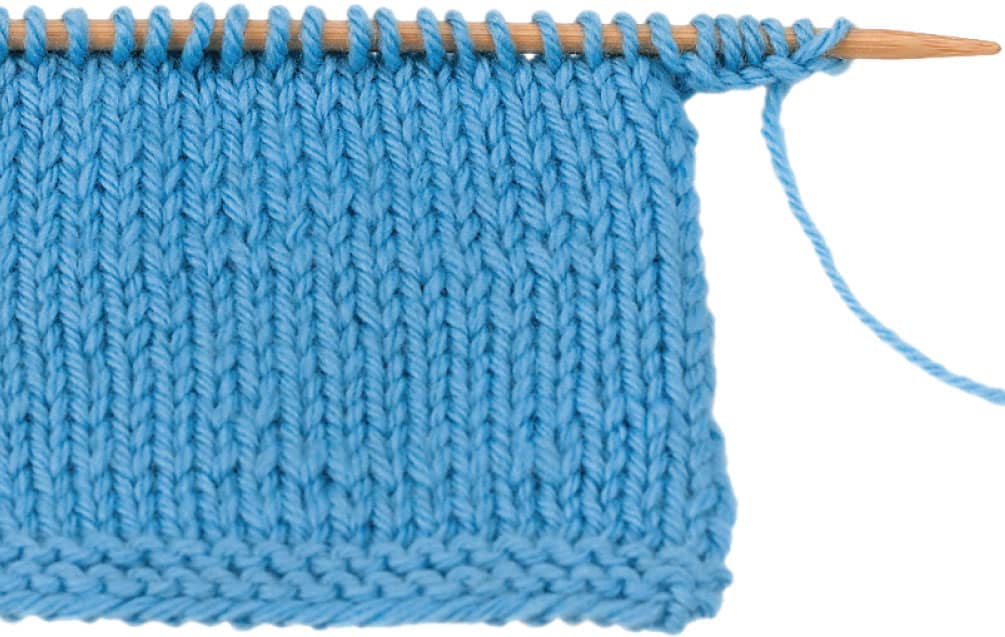
4 Slip the old stitch off the left needle along with the 2 stitches just made on the right needle. There are now 2 stitches in place of 1.
Purl Front and Back (pf&b)
1 First purl in the usual way but don’t take the new stitch off the needle.

2 Keeping the working yarn in front, pivot the right needle to the back of the left needle.

3 Insert right needle purlwise (from back to front) into the back loop of the same stitch just worked.

4 Now make another purl stitch in the back loop.

5 Pull the new loop to the back of the knitting. Slip the old stitch off the left needle along with the 2 stitches just made on the right needle. There are now 2 stitches in place of 1.
Make One (M1)
The make one (M1) increases can slant to either the right or the left, but both increases have in common the fact that they make a stitch out of the horizontal bar or “ladder” that extends between every 2 stitches. The horizontal bar is picked up onto the left needle and then worked as a knit stitch. When working the new stitch the bar is given a twist to avoid a large hole in the knitting. The directional slant of the increase is caused by how the bar is picked up, either from the front or the back. This increase is sometimes referred to as a lifted increase.
Make One Right (M1R)—slants to the right
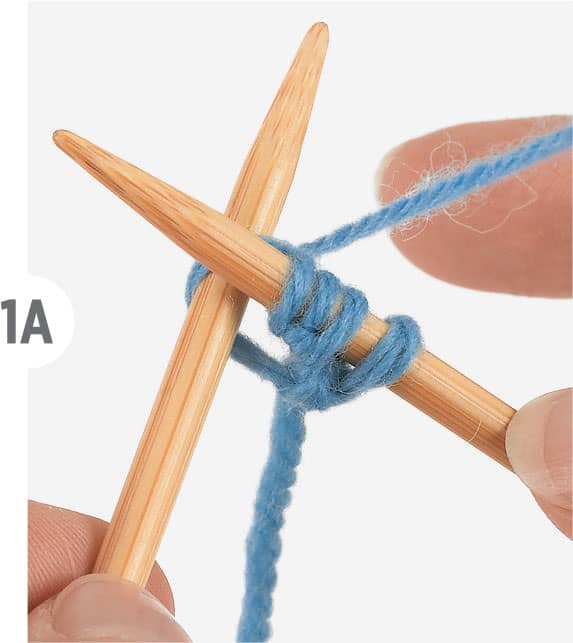
1 Working from back to front, insert left needle under the horizontal bar between the stitch on the right needle and the stitch on the left needle.

2 Insert right needle from the left (A) to the right (B) under the strand on the front of the left needle, thereby twisting it and preventing a hole.
3 Wrap the yarn around the right needle to form a new stitch and slip the new stitch and the picked-up strand off the left needle. One new stitch has been added.

Make One Left (M1L)—slants to the left
1 Working from front to back, insert left needle under the horizontal bar between the stitch on the right needle and the stitch on the left needle.
2 Insert the right needle from the right to the left under the strand on the back of the left needle thereby twisting it and preventing a hole.


3 Wrap the yarn around the right needle to form a new stitch and slip the new stitch and the picked-up strand off the left needle. One new stitch has been added.
Yarnover (yo)
A yarnover is a very fast increase to work but keep in mind that it leaves a visible hole in your knitting.
1 Bring yarn forward between needles.

2 Lay the yarn over the right needle in a counterclockwise direction ending behind the needle. One new stitch has been added.
3 Knit the next stitch. Notice that the yarnover has made an extra loop on the right needle that is worked as a stitch on the next row. The yarnover loop can be worked as a knit stitch or purl stitch (shown).
DECREASES
All decreases are accomplished by working 2 stitches together at the same time. The slant is created by working either through the front of the loops or the back of the loops.
Knit Two Together (k2tog)—slants to the right
This is the easiest decrease to make and is easily remembered.
1 Insert the right needle knitwise into the next 2 stitches on the left needle.

2 Wrap the yarn around the right needle.
3 Knit these 2 stitches at the same time as if they were 1 stitch. There is now 1 stitch in the place of 2 stitches.

Purl Two Together (p2tog)—slants to the right on the knit side
This is very similar to the k2tog but rarely used (you’ll see it in the directions for the knit bobbles)
Insert the right needle purlwise into the next 2 stitches on the left needle. Wrap the yarn around the needle and purl these 2 stitches at the same time as if they were 1 stitch. There is now 1 stitch in the place of 2.

Slip, Slip, Knit (ssk)—slants to the left
1 This decrease is very similar to the k2tog except that the decrease is worked through the back loops of 2 stitches at a time. Working one at a time, slip the next 2 stitches knitwise to right needle.

2 Insert the tip of the left needle into the front loops of these 2 stitches.

3 Knit these stitches at the same time through the back loops as if they were 1 stitch.
CABLE CAST-ON
As you learned in the Texture section, this method of casting on can be used in place of a standard long-tail cast-on, but it’s also very useful for adding stitches at the beginning of an existing row or even in the middle of a row, for instance, when making a wide buttonhole. Insert the needle between the first and second stitch on the left needle and add as many stitches as required by the pattern following the step-by-step directions shown here. When adding stitches at the beginning of a row it is not necessary to turn the needle in order to begin the next row of knitting.
FELTING IN A WASHING MACHINE
The felting process requires three elements: agitation, soap, and heat. Agitation comes from your washer set to the lowest water level. Also, put in some old jeans or tennis shoes or any other lint-free washable item to help bash your knitting around. A little bit of soap is essential. Use a special wool wash soap that doesn’t need to be rinsed so you don’t have to worry about too many suds (baby laundry detergent also works well). You need the hottest water your washer will provide. The best felting results will be obtained in a top-loading machine. If you have a front-loading machine it might take several cycles to obtain the desired amount of felting. If you want a smooth surface without too much fuzz, then put the item to be felted into a mesh laundry or lingerie bag before placing it in the washer.
Once you start the felting process, monitor the results every few minutes. If an item hasn’t felted enough you can always put it back into your washer, but you can’t reverse the process. If something becomes too small or heavily felted, you will be stuck with the result.
The hardest part of felting is putting your knit “baby” into the washer for the first time. Go ahead and throw it in. The stitches will begin to become less distinct, and eventually the surface will assume an all-over fuzzy or bumpy texture depending on how much you felt your item and the type of yarn you used. Stop the washer after just a few minutes and remove the item. Squeeze out the excess water and check the texture. If you can still see individual stitches, then return it to the washer for some more felting. Every time you pull an item out of the washer to check its progress, pull it from side to side as necessary to encourage it to assume its final shape, even if it’s too big at this point. Sometimes the item you are felting appears to get bigger at first before the stitches begin to lose definition and the item begins to shrink.
Don’t spin your item dry in the washer as this could cause permanent creases. Remove it and rinse in cool water in the sink. Wrap it in towels to remove excess moisture, pull it from side to side as necessary to establish correct shape, and then lay it flat to dry on a towel or a drying rack.
MAKING A CROCHET CHAIN
Practice the crochet chain using the same yarn specified for the practice swatches and a US size G (4 mm) crochet hook.
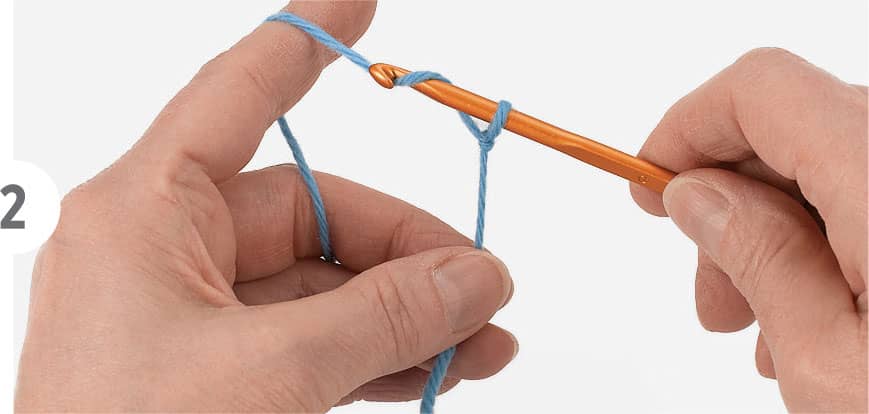
1 Make a slip knot (shown here) about 8" (20 cm) from the end of the yarn and place it on the crochet hook. Grasp the hook with your right hand. With your left hand, twine the working yarn over and under your fingers to create tension, and pinch the tail of the yarn (coming from the slip knot on the hook) between your thumb and middle finger.

2 Pass the hook under the tensioned strand coming from your left hand and rotate the hook a quarter turn to the left so you can grab a loop with the hook.
3 Pull the new loop through the existing loop on the hook. You now have a new loop on the hook. Continue in this manner, each time grabbing a loop from the yarn and pulling it through the loop on the hook. As you work, the chain will grow longer. Reposition your left hand as necessary, moving your fingers up the chain.

I-CORD
The modern version of this knit cord was named I-cord by Elizabeth Zimmerman. The “I” stood for “idiot” because Elizabeth felt any idiot ought to able to make it. After knitting a few rows you’ll understand what she meant.
1 Using a double-pointed needle, start by casting on 4 stitches and knit 1 row (when casting on leave a tail at least 8" (20 cm) long). At the end of the row, instead of turning the needle to start a new row, push stitches from left side of needle to right side of needle. Start the new row, pulling the yarn across the back of stitches to work the first stitch.

2 Knit all 4 stitches. Continue in the same fashion, pushing the stitches back across the needle at the end of each row.
3 Within a few rows the knitting will begin to form into a tube. Work I-cord for approximately 6" (15 cm). Bind off stitches and cut yarn, leaving a tail at least 8" (20 cm) long.
BOBBLES
Bobbles are little spheres that can either be knit into a pattern as a decoration or made separately with long ends that are used to attach them to an item. When knit separately the bobble can be used as a button or, as in the case of the Christmas tree, an ornament.
Cast on 2 stitches (be sure to leave a tail at least 8" (20 cm) long when casting on).
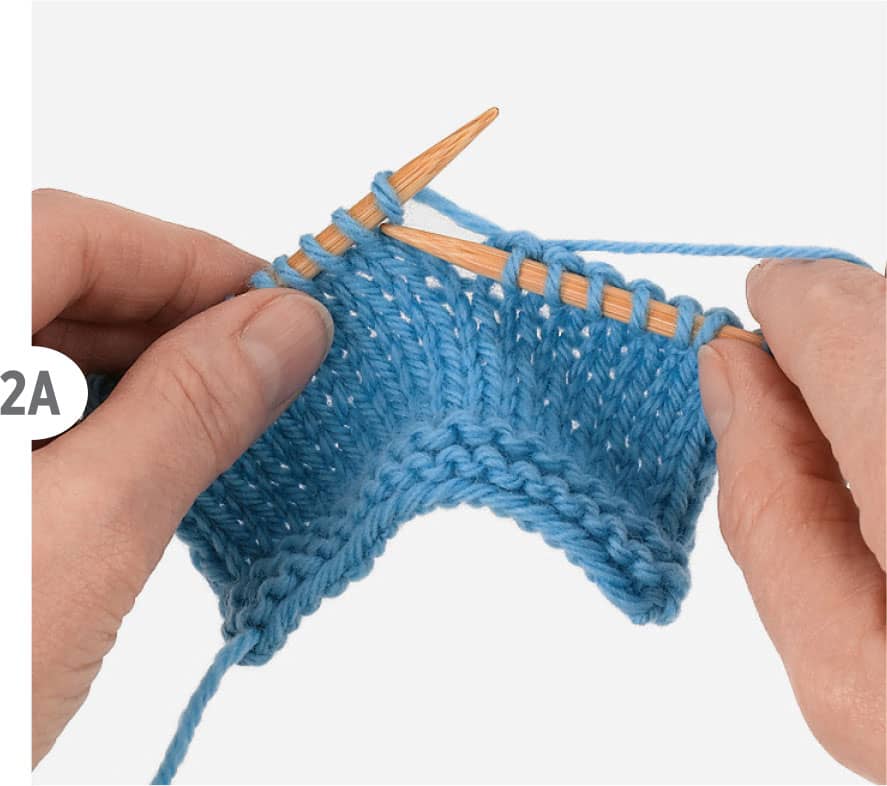
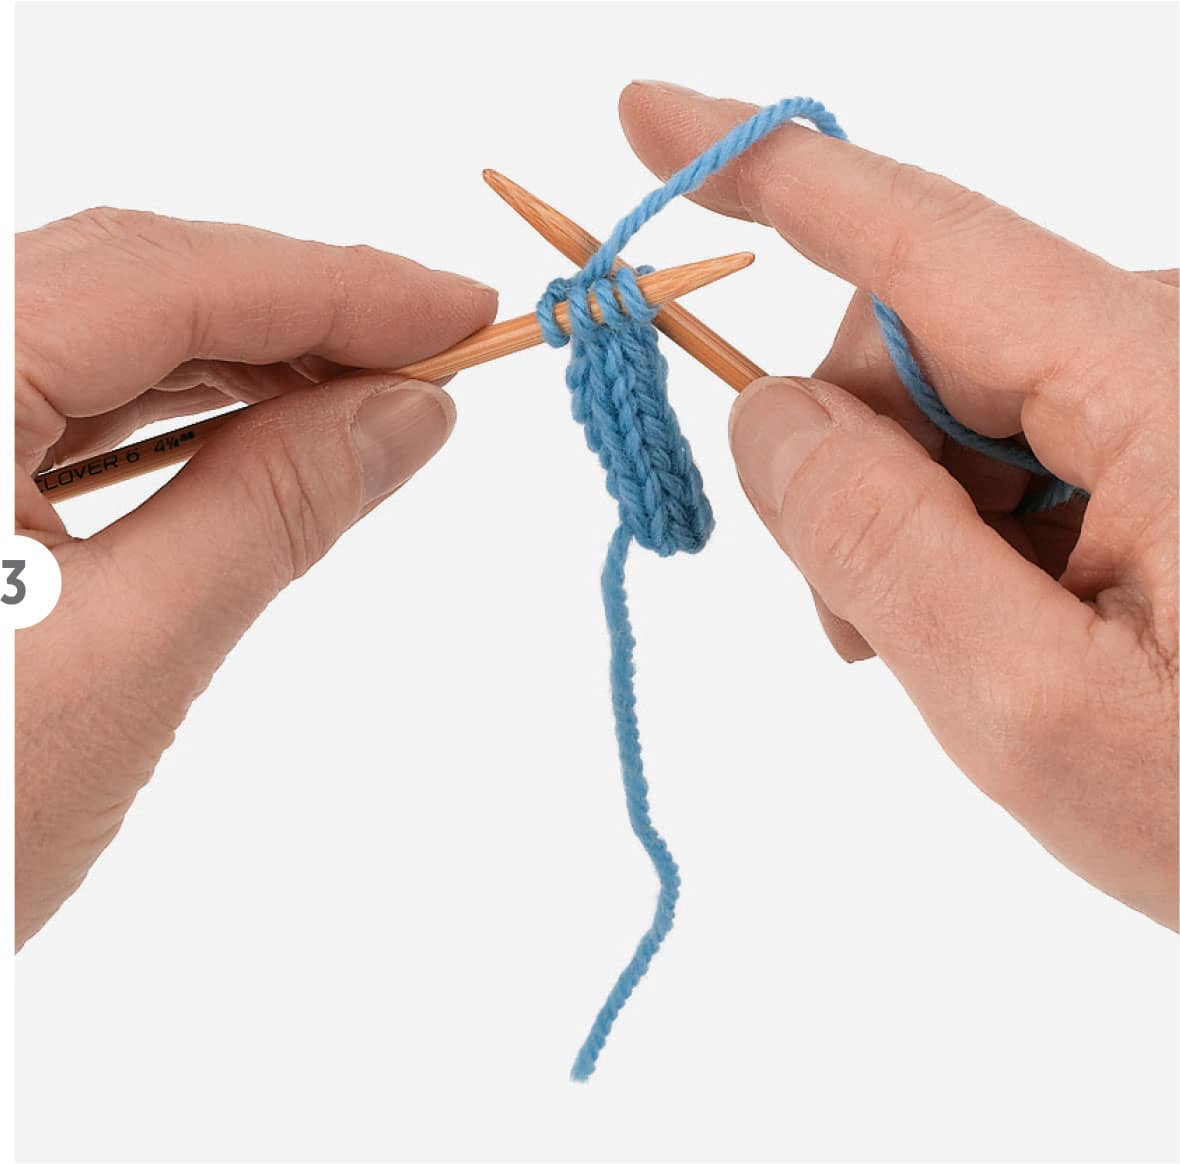
1 Row 1: K1, [k1, yo, k1, yo, k1] all into the next stitch—6 sts.
The picture on the left (A) shows row 1 after making the first 3 stitches into the second stitch on the needle (k, yo, k). The right picture (B) shows row 1 completed.

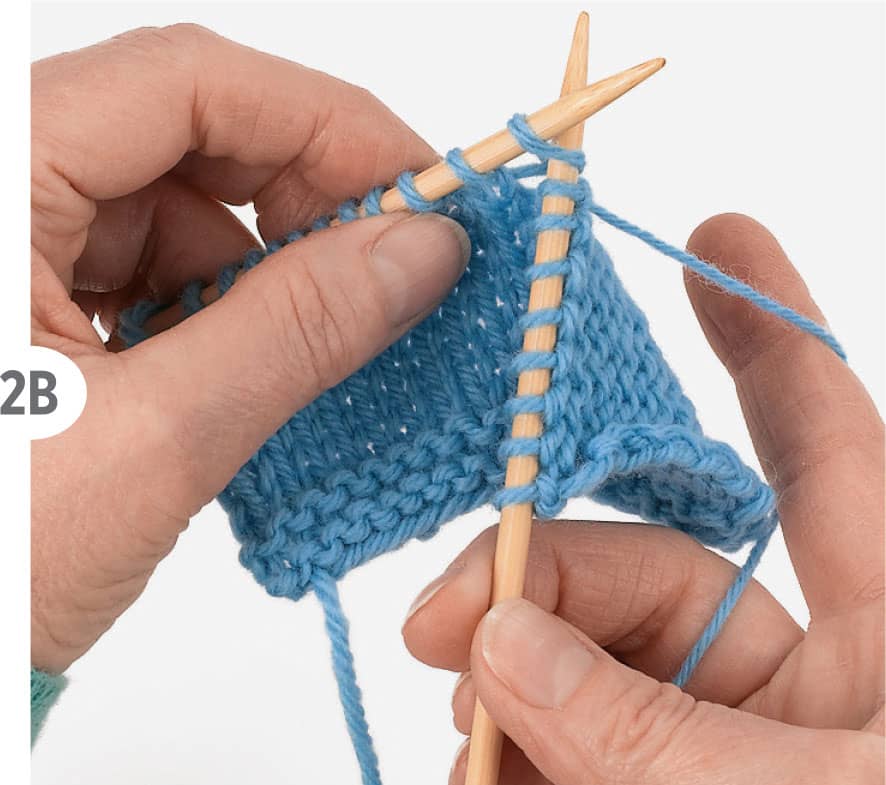
2 Using just the five stitches that have been made from one, work the following 4 rows:
Row 2: Purl 5 sts.
Row 3: Knit 5 sts.
Row 4: Purl 5 sts.
Row 5: Knit 5 sts.

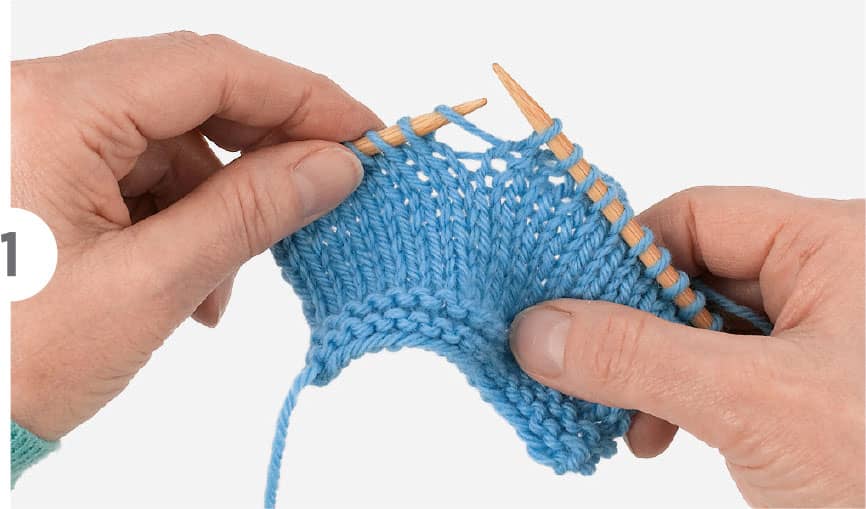
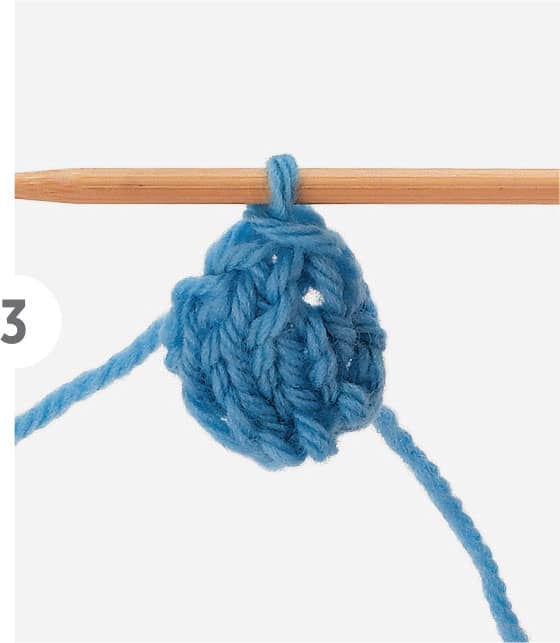
3 Row 6: Now using all 6 stitches, [p2tog] three times.
Row 7: Slip 1, k2tog, pass the slip stitch over as if you were binding off. Cut yarn leaving tail at least 8" (20 cm).
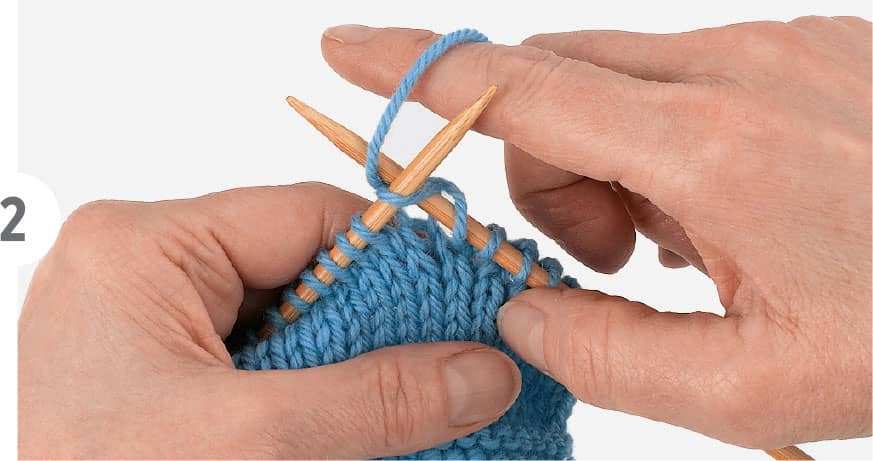
4 Thread one strand of yarn from the tail on a yarn needle and work a running stitch around the open edge of the bobble (the purl side should be facing you) (A). Pull the running stitch tight and then tie both strands into a tight knot (B).


How to Knit the Felted Christmas Tree
FINISHED DIMENSIONS |
• Before felting: 40" (102 cm) length (not including loop) and 24" (61 cm) width at widest portion Finished Dimensions • After felting: 29" (74 cm) length (not including loop) and 20" (51 cm) width at widest portion of tree |
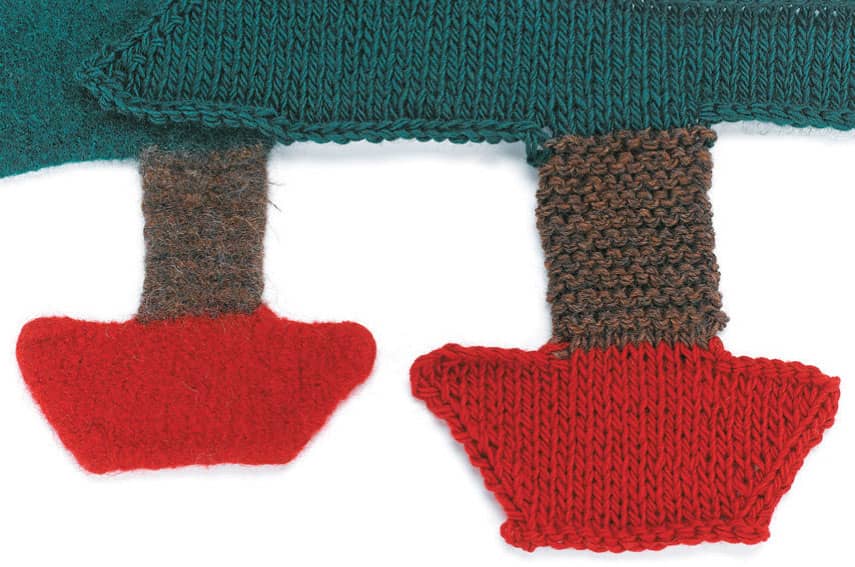
It is very important that your stitches be somewhat loose before the item is felted. The stitches need to move and agitate against each other in order to felt. If your stitches aren’t loose enough, then switch to a larger needle. As you can see from the photo above, the tree will shrink after felting, which is why two different gauges are shown.
CHRISTMAS TREE
The entire Christmas tree is worked with two strands of wool yarn held together (see here for information about knitting with two strands of yarn at once). This pattern has a lot of rows, and as the tree gets taller the shaping order changes. You may find it helpful to use a pencil to make a tick mark next to each row as you complete it. At the end of the directions for each row in which the stitch count changes, you will find stated the number of stitches you should have after completing the row. It’s a good idea to count your stitches and make sure your count is the same as the directions.
To help you keep track of your place you will often see the pattern specify whether you are on a right side (RS) row or a wrong side (WS) row. In this pattern, the right side rows are knit and the wrong side rows are purled.
To accommodate the large number of stitches as the tree gets bigger, switch to using a circular needle (see here for information about knitting back and forth on a flat item using circular needles).
In the skills section shown here you learned about how to make increases and decreases that slant either right or left. Since the tree will be felted the individual stitches will not be visible so it isn’t necessary to strictly adhere to the use of slanted shaping. Instead the simpler stitches are used.
Tree Top
1 Starting from just a few stitches, a triangular shape is formed by increasing at the beginning and end of every other row. After the triangle has reached the desired width it is decreased by binding off a partial number of stitches at the beginning of the last 2 rows.
Using larger needles and two strands of green wool yarn, cast on 2 sts.
Row 1 (WS): Purl.
Row 2 (RS): Kf&b, kf&b—4 sts.
Row 3: Purl.
Row 4: K1, kf&b, Kf&b, k1—6 sts.
Row 5: Purl.
Row 6: K1, kf&b, knit until 2 sts remain, kf&b, k1—8 sts.
Row 7: Purl.
Row 8: K1, kf&b, knit until 2 sts remain, kf&b, k1—10 sts.
Row 9: Purl.
Row 10: K1, kf&b, knit until 2 sts remain, kf&b, k1—12 sts.
Row 11: Purl.
Row 12: K1, kf&b, knit until 2 sts remain, kf&b, k1—14 sts.
Row 13: Purl.
Row 14: K1, kf&b, knit until 2 sts remain, kf&b, k1—16 sts.
Row 15: Purl.
Row 16: K1, kf&b, knit until 2 sts remain, kf&b, k1—18 sts.
Row 17: Purl.
Row 18: K1, kf&b, knit until 2 sts remain, kf&b, k1—20 sts.
Row 19: Purl.
Row 20: K1, kf&b, knit until 2 sts remain, kf&b, k1—22 sts.
Row 21: Purl.
Row 22: K1, kf&b, knit until 2 sts remain, kf&b, k1—24 sts.
Row 23: Purl.
Row 24: K1, kf&b, knit until 2 sts remain, kf&b, k1—26 sts.
Row 25: Purl.
Row 26: K1, kf&b, knit until 2 sts remain, kf&b, k1—28 sts.
Row 27: Purl.
Row 28: K1, kf&b, knit until 2 sts remain, kf&b, k1—30 sts.
Row 29: Purl.
Row 30: K1, kf&b, knit until 2 sts remain, kf&b, k1—32 sts.
2 After the triangle has reached the desired width it is decreased by binding off a partial number of stitches at the beginning of the next 2 rows:
Row 31 (WS): Bind off 6 sts, purl to end of row—26 sts remain.
Row 32 (RS): Bind off 6, sts, knit to end of row—20 sts remain. Tree top is complete

Tree Middle
3 The middle and bottom sections of the tree are work in the same manner as the top. To elongate the shape, more rows are worked between the increase rows. Be sure to keep track of your progress by making a mark next to every row after it has been completed. Note that some of the increases are worked on purl (WS) rows using a purl front and back (pf&b) increase.
Row 33 (WS): Purl.
Row 34 (RS): K1, kf&b, knit until 2 sts remain, kf&b, k1—22 sts.
Row 35: Purl.
Row 36: K1, kf&b, knit until 2 sts remain, kf&b, k1—24 sts.
Row 37: Purl.
Row 38: Knit.
Row 39: P1, pf&b, purl until 2 sts remain, pf&b, p1—26 sts.
Row 40: Knit.
Row 41: P1, pf&b, purl until 2 sts remain, pf&b, p1—28 sts.
Row 42: Knit.
Row 43: Purl.
Row 44: K1, kf&b, knit until 2 sts remain, kf&b, k1—30 sts.
Row 45: Purl.
Row 46: K1, kf&b, knit until 2 sts remain, kf&b, k1—32 sts.
Row 47: Purl.
Row 48: Knit.
Row 49: P1, pf&b, purl until 2 sts remain, pf&b, p1—34 sts.
Row 50: Knit.
Row 51: P1, pf&b, purl until 2 sts remain, pf&b, p1—36 sts.
Row 52: Knit.
Row 53: Purl.
Row 54: K1, kf&b, knit until 2 sts remain, kf&b, k1—38 sts.
Row 55: Purl.
Row 56: K1, kf&b, knit until 2 sts remain, kf&b, k1—40 sts.
Row 57: Purl.
Row 58: Knit.
Row 59: P1, pf&b, purl until 2 sts remain, pf&b, p1—42 sts.
Row 60: Knit.
Row 61: P1, pf&b, purl until 2 sts remain, pf&b, p1—44 sts.
Row 62: Knit.
Row 63: Purl.
Row 64: K1, kf&b, knit until 2 sts remain, kf&b, k1—46 sts.
Row 65: Purl.
Row 66: K1, kf&b, knit until 2 sts remain, kf&b, k1—48 sts.
Row 67: Bind off 8 sts, purl to end of row—40 sts remain.
Row 68: Bind off 8 sts, knit to end of row—32 sts remain. Tree middle is complete
Tree Bottom
Row 69 (WS): Purl.
Row 70 (RS): Knit.
Row 71: P1, pf&b, purl until 2 sts remain, pf&b, p1—34 sts.
Row 72: Knit.
Row 73: Purl.
Row 74: K1, kf&b, knit until 2 sts remain, kf&b, k1—36 sts.
Row 75: Purl.
Row 76: Knit.
Row 77: P1, pf&b, purl until 2 sts remain, pf&b, p1—38 sts.
Row 78: Knit.
Row 79: Purl.
Row 80: K1, kf&b, knit until 2 sts remain, kf&b, k1—40 sts.
Row 81: Purl.
Row 82: Knit.
Row 83: P1, pf&b, purl until 2 sts remain, pf&b, p1—42 sts.
Row 84: Knit.
Row 85: Purl.
Row 86: K1, kf&b, knit until 2 sts remain, kf&b, k1—44 sts.
Row 87: Purl.
Row 88: Knit.
Row 89: P1, pf&b, purl until 2 sts remain, pf&b, p1—46 sts.
Row 90: Knit.
Row 91: Purl.
Row 92: K1, kf&b, knit until 2 sts remain, kf&b, k1—48 sts.
Row 93: Purl.
Row 94: Knit.
Row 95: P1, pf&b, purl until 2 sts remain, pf&b, p1—50 sts.
Row 96: Knit.
Row 97: Purl.
Row 98: K1, kf&b, knit until 2 sts remain, kf&b, k1—52 sts.
Row 99: Purl.
Row 100: Knit.
Row 101: P1, pf&b, purl until 2 sts remain, pf&b, p1—54 sts.
Row 102: Knit.
Row 103: Purl.
Row 104: K1, kf&b, knit until 2 sts remain, kf&b, k1—56 sts.
Row 105: Purl.
Row 106: Knit.
Row 107: P1, pf&b, purl until 2 sts remain, pf&b, p1—58 sts.
Row 108: Knit.
Row 109: Purl.
Row 110: K1, kf&b, knit until 2 sts remain, kf&b, k1—60 sts.
Row 111: Purl.
Row 112: Knit.
Row 113: P1, pf&b, purl until 2 sts remain, pf&b, p1—62 sts.
Row 114: Knit.
Row 115: Bind off 26 sts, purl to end of row—36 sts remain.
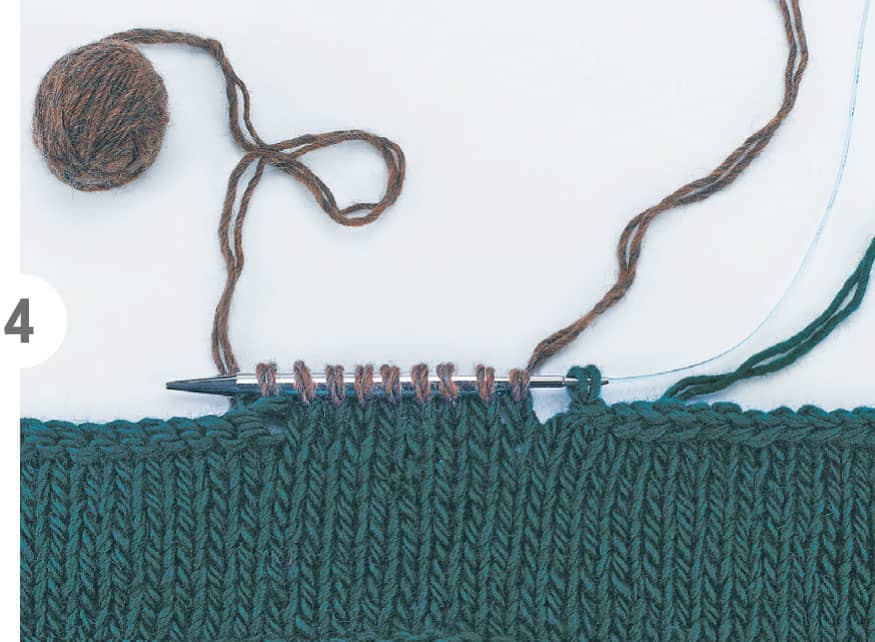
4 In the middle of the final row of the tree you will change to the brown yarn for the trunk.
Row 116: Bind off 26 sts
Cut green wool yarn and change to brown wool yarn (double stranded) and knit to end of row working last 9 stitches in brown—10 sts remain.
For both colors, leave a tail at least 8" (20 cm) long to weave in later. The tree bottom is now complete.
Tree Trunk
5 The tree trunk doesn’t have any increases or decreases. Continuing with two strands of brown wool yarn, work as follows:
Rows 117 to 136: Knit.
Tree trunk is now complete and brown yarn can be cut, leaving a tail at least 8" (20 cm) long to weave in later.

Tree Base
6 Now it’s time to use the cable cast-on to add stitches at the beginning of the next two rows to form the top of the red base.
Change to red wool yarn, double stranded, leaving tails at least 8" (20 cm) long to weave in later. Work as follows:
Row 137 (WS): Purl 10 sts. At end of row turn work so right side is facing and add 8 sts using cable cast-on method; now there will be 18 sts. After the cable cast-on is completed don’t turn work, you are already oriented to begin row 138.
Row 138 (RS): Knit 18 sts. At end of row turn work so wrong side is facing and add 8 sts using cable cast-on method—26 sts. After the cable cast-on is completed don’t turn work, you are already oriented to begin row 139.
Row 139: Purl.
Row 140: K1, k2tog, knit until 3 sts. remain, k2tog, k1—24 sts remain.
Row 141: Purl.
Row 142: K1, k2tog, knit until 3 sts. remain, k2tog, k1—22 sts remain.
Row 143: Purl.
Row 144: K1, k2tog, knit until 3 sts. remain, k2tog, k1—20 sts remain.
Row 145: Purl.
Row 146: K1, k2tog, knit until 3 sts. remain, k2tog, k1—18 sts remain.
Row 147: Purl.
Row 148: K1, k2tog, knit until 3 sts. remain, k2tog, k1—16 sts remain.
Bind-off all sts loosely and evenly. Weave in all ends.
Loop for Top (optional)
7 Using two double-pointed needles and two strands of green yarn cast on 3 stitches, leaving a tail at least 8" (20 cm) long. Make 6" (15 cm) of I-cord following guidelines above. Bind off stitches and cut yarn leaving a tail at least 8" (20 cm) long.
8 Fold I-cord in half and sew ends securely to the wrong side of the tree at the top to form a loop. Use the tails that were left from casting on and binding off. It is not necessary to be meticulous when attaching the loop, because individual stitches will disappear once the tree is felted. Weave in the loose ends.

Felting
9 Felt the tree in a washer according to the directions shown here.
Bobble Ornaments
10 Using two strands of metallic yarn held together and the smaller single-point needles, make 15 red bobbles and 15 gold bobbles.

Tinsel Garland Trim
11 Making the tinsel garland trim will require a bit of trial and error on your part. The basic technique involves making a crochet chain using one or more strands of novelty yarn. The garland shown on the tree was made using a size K (6.5 mm) crochet hook and four strands of novelty yarn held together (two strands of ivory and two strands of green). If you’ve never made a crochet chain before, take a moment to practice using smooth yarn following the directions shown here.

Once you are comfortable with making a crochet chain with smooth yarn, then begin making chains using the novelty yarn. The chain should be as long as desired plus about 1" (2.5 cm) to be folded to the back side for sewing. Make the desired number of chains for your tree tinsel. Each chain will be a different length depending on how close to the top you will be placing it.
Finishing
12 First attach the tinsel to the tree using green sewing thread and a running stitch. The extra length should be wrapped around to the wrong side and secured with a few stitches. The ends from the crochet chain can be pulled through the felt and knotted or simply cut off.

13 Next attach the bobbles by threading two ends at a time on a yarn needle and passing the ends from the right side to the wrong side of the tree. Repeat with the remaining two ends and then knot all four ends tightly on the wrong side of the tree. Trim the ends to about 1" (2.5 cm) in length. If the bobble yarn is fraying then apply a drop of Fray Check to each end after it is cut.

14 The final touch is attaching a gold star to the top of the tree using sewing thread.
Leaf Edge Shawl
This lovely shawl has a treasure trove of increases and decreases. The basic triangular shape in the center is formed by increasing on each edge of the triangle on every other row. The leaf design is shaped using right and left slanting increases and decreases. The eyelet edging is created using a yarnover increase paired with a decrease. It sounds complicated here but once you follow the step-by-step directions you’ll see how simple it really is to use increases and decreases to shape your knitting and add visual appeal.
How to Knit the Shawl
FINISHED DIMENSIONS |
• 53" (135 cm) at widest point by 26" (66 cm) depth |
1 To begin, you will cast on stitches and work a few increase rows to establish the basic triangle shape. Use the smaller sized circular needle. At the end of each row, you will find stated the number of stitches you should have after completing the row. It’s a good idea to count your stitches and make sure your count is the same as the directions. See the note about working back and forth on a circular needle shown here.
Cast on 3 sts.
Row 1: Kf&b, k1, kf&b—5 sts.
Row 2: Kf&b, k3, kf&b—7 sts.
Row 3: Kf&b, k1, p1, k1, p1, k1, kf&b—9 sts.

2 Make one increases (M1) are used on either side of the three center stitches to widen the leaves. It can be difficult on these beginning rows to find the bar used to work the increase. Firmly stretch the stitches between the right and left needle to find the bar. Also, beginning on row 4, you will start the eyelet edging that is made with the first and last 3 stitches of the row.
Row 4: K1, yo, k2tog, M1R, k3, M1L, ssk, yo, k1—11 sts.
Row 5: K3, p2, k1, p2, k3.
Row 6: K1, yo, k2tog, k1, M1R, k3, M1L, k1, ssk, yo, k1—13 sts.
Row 7: K3, p3, k1, p3, k3.
Row 8: K1, yo, k2tog, k2, M1R, k3, M1L, k2, ssk, yo, k1—15 sts.
Row 9: K3, p4, k1, p4, k3.

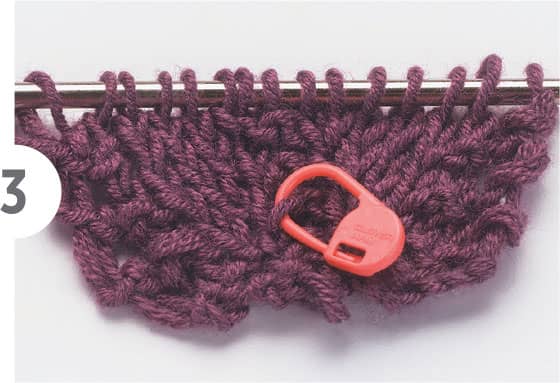
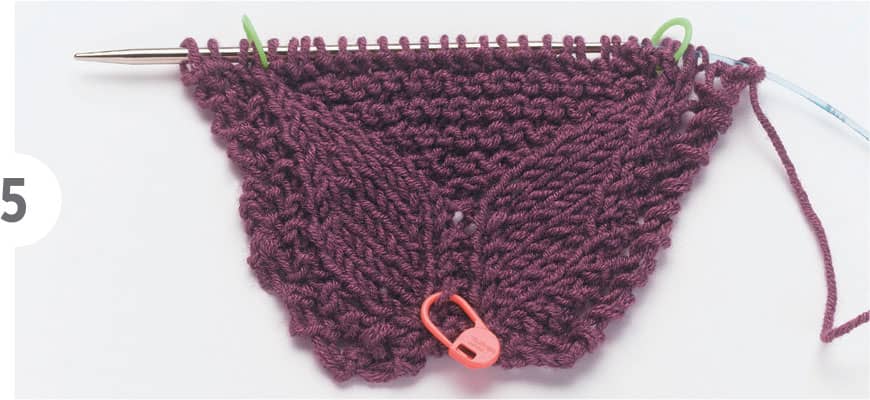
3 Mark the right side (RS) of the shawl with an open stitch marker or a safety pin now (sufficient rows have been worked to allow the space). The right-side rows are even numbered, and they are also the rows in which all the increases and decreases are made.
Row 10 (RS): K1, yo, k2tog, k3, M1R, k3, M1L, k3, ssk, yo, k1—17 sts.
Row 11: K3, p5, k1, p5, k3.
Row 12: K1, yo, k2tog, k4, M1R, k3, M1L, k4, ssk, yo, k1—19 sts.
4 Stitch markers are added (pm—place marker) to delineate the center triangular section from this point forward. As your shawl progresses, more and more stitches will be added between the markers. When you reach a marker, slip it from the left needle to the right needle (sm—slip marker) and continue with the directions.
Row 13: K3, p6, pm, kf&b, pm, p6, k3—20 sts.

5 The increases for the leaf shape are complete and now decreases will be worked to taper the leaf to a single stitch. On right side rows (even numbered), a kf&b increase is worked to offset the decrease made to the leaf shape but the total number of stitches will not change on the row. For this section, the stitch count will increase on wrong side (odd-numbered) rows. So, on both right-side and wrong-side rows, a stitch adjacent to each marker will be worked with a kf&b increase. After completing the first 23 rows, you can see that the shawl is beginning to form a triangular shape and the first set of leaf edging stitches are complete.
Row 14: K1, yo, k2tog, ssk, k4, sm, kf&b, kf&b, sm, k4, k2tog, ssk, yo, k1.
Row 15: K3, p5, sm, kf&b, knit until 1 st remains before marker, kf&b, sm, p5, k3—22 sts.
Row 16: K1, yo, k2tog, ssk, k3, sm, kf&b, knit until 1 st remains before marker, kf&b, sm, k3, k2tog, ssk, yo, k1.
Row 17: K3, p4, sm, kf&b, knit until 1 st remains before marker, kf&b, sm, p4, k3—24 sts.
Row 18: K1, yo, k2tog, ssk, k2, sm, kf&b, knit until 1 st remains before marker, kf&b, sm, k2, k2tog, ssk, yo, k1.
Row 19: K3, p3, sm, kf&b, knit until 1 st remains before marker, kf&b, sm, p3, k3—26 sts.
Row 20: K1, yo, k2tog, ssk, k1, sm, kf&b, knit until 1 st remains before marker, kf&b, sm, k1, k2tog, ssk, yo, k1.
Row 21: K3, p2, sm, kf&b, knit until 1 st remains before marker, kf&b, sm, p2, k3—28 sts.
Row 22: K1, yo, k2tog, ssk, sm, kf&b, knit until 1 st remains before marker, kf&b, sm, k2tog, ssk, yo, k1.
Row 23: K3, p1, sm, kf&b, knit until 1 st remains before marker, kf&b, sm, p1, k3—30 sts.
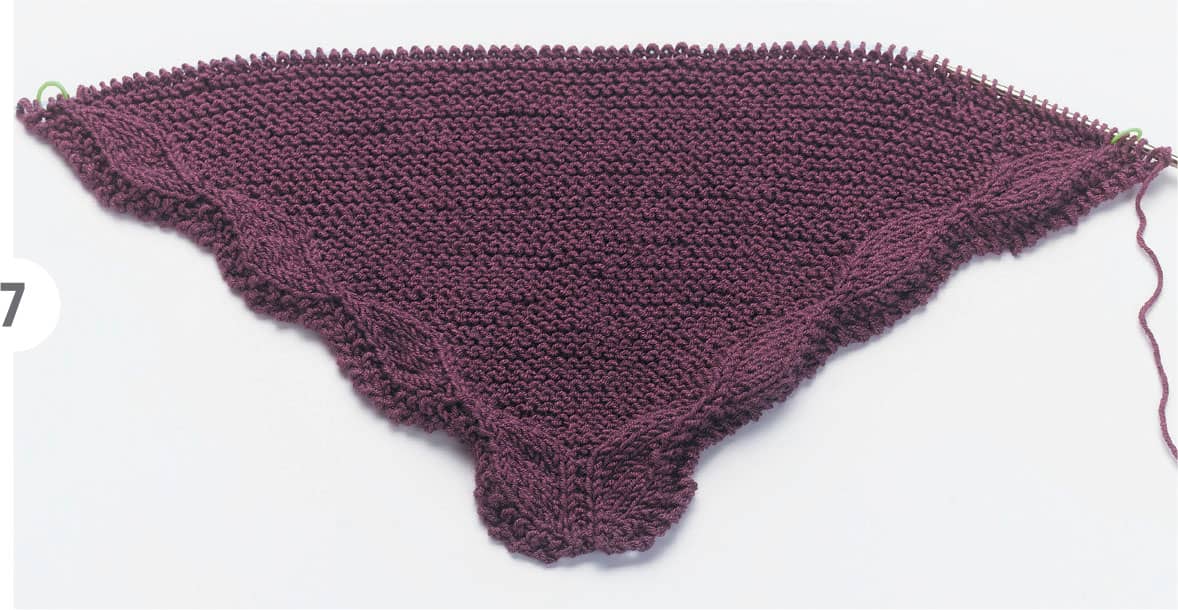
6 The next 20 rows will establish the basic directions that will be repeated over and over until the shawl reaches the desired width and is ready to be finished off on the top (or widest) edge. From this point forward, the stitch count will not be shown at the end of the row. Instead you will be given a reminder at the end of the rows in which the total stitch count increases. Just remember that the stitch count will increase by two on every right side (even-numbered) row as the leaf shape gets wider. As the leaf is being tapered down to 1 stitch, the stitch count will increase on every wrong-side (odd-numbered) row. This is where the pin that you used to mark the right side rows will come in handy. Every 20-row repeat of the basic directions will increase the total stitch count by 20 stitches. The picture below shows the shawl after completion of row 43.
Row 24: K1, yo, k2tog, M1R, k1, sm, knit to next marker, sm, k1 M1L, ssk, yo, k1—2 sts increased.
Row 25: K3, p2, sm, knit to next marker, sm, p2, k3.
Row 26: K1, yo, k2tog, k1, M1R, k1, sm, knit to next marker, sm, k1, M1L, k1, ssk, yo, k1—2 sts increased.
Row 27: K3, p3, sm, knit to next marker, sm, p3, k3.
Row 28: K1, yo, k2tog, k2, M1R, k1, sm, knit to next marker, sm, k1, M1L, k2, ssk, yo, k1—2 sts increased.
Row 29: K3, p4, sm, knit to next marker, sm, p4, k3.

Row 30: K1, yo, k2tog, k3, M1R, k1, sm, knit to next marker, sm, k1, M1L, k3, ssk, yo, k1—2 sts increased.
Row 31: K3, p5, sm, knit to next marker, sm, p5, k3.
Row 32: K1, yo, k2tog, k4, M1R, k1, sm, knit to next marker, sm, k1, M1L, k4, ssk, yo, k1—2 sts increased.
Row 33: K3, p6, sm, knit to next marker, sm, p6, k3.
Row 34: K1, yo, k2tog, ssk, k4, sm, knit to next marker, sm, k4, k2tog, ssk, yo, k1.
Row 35: K3, p5, sm, kf&b, knit until 1 st remains before marker, kf&b, sm, p5, k3—2 sts increased.
Row 36: K1, yo, k2tog, ssk, k3, sm, kf&b, knit until 1 st remains before marker, kf&b, sm, k3, k2tog, ssk, yo, k1.
Row 37: K3, p4, sm, kf&b, knit until 1 st remains before marker, kf&b, sm, p4, k3—2 sts increased.
Row 38: K1, yo, k2tog, ssk, k2, sm, kf&b, knit until 1 st remains before marker, kf&b, sm, k2, k2tog, ssk, yo, k1.
Row 39: K3, p3, sm, kf&b, knit until 1 st remains before marker, kf&b, sm, p3, k3—2 sts increased.
Row 40: K1, yo, k2tog, ssk, k1, sm, kf&b, knit until 1 st remains before marker, kf&b, sm, k1, k2tog, ssk, yo, k1.
Row 41: K3, p2, sm, kf&b, knit until 1 st remains before marker, kf&b, sm, p2, k3—2 sts increased.
Row 42: K1, yo, k2tog, ssk, sm, kf&b, knit until 1 st remains before marker, kf&b, sm, k2tog, ssk, yo, k1.
Row 43: K3, p1, sm, kf&b, knit until 1 st remains before marker, kf&b, sm, p1, k3—2 sts increased.
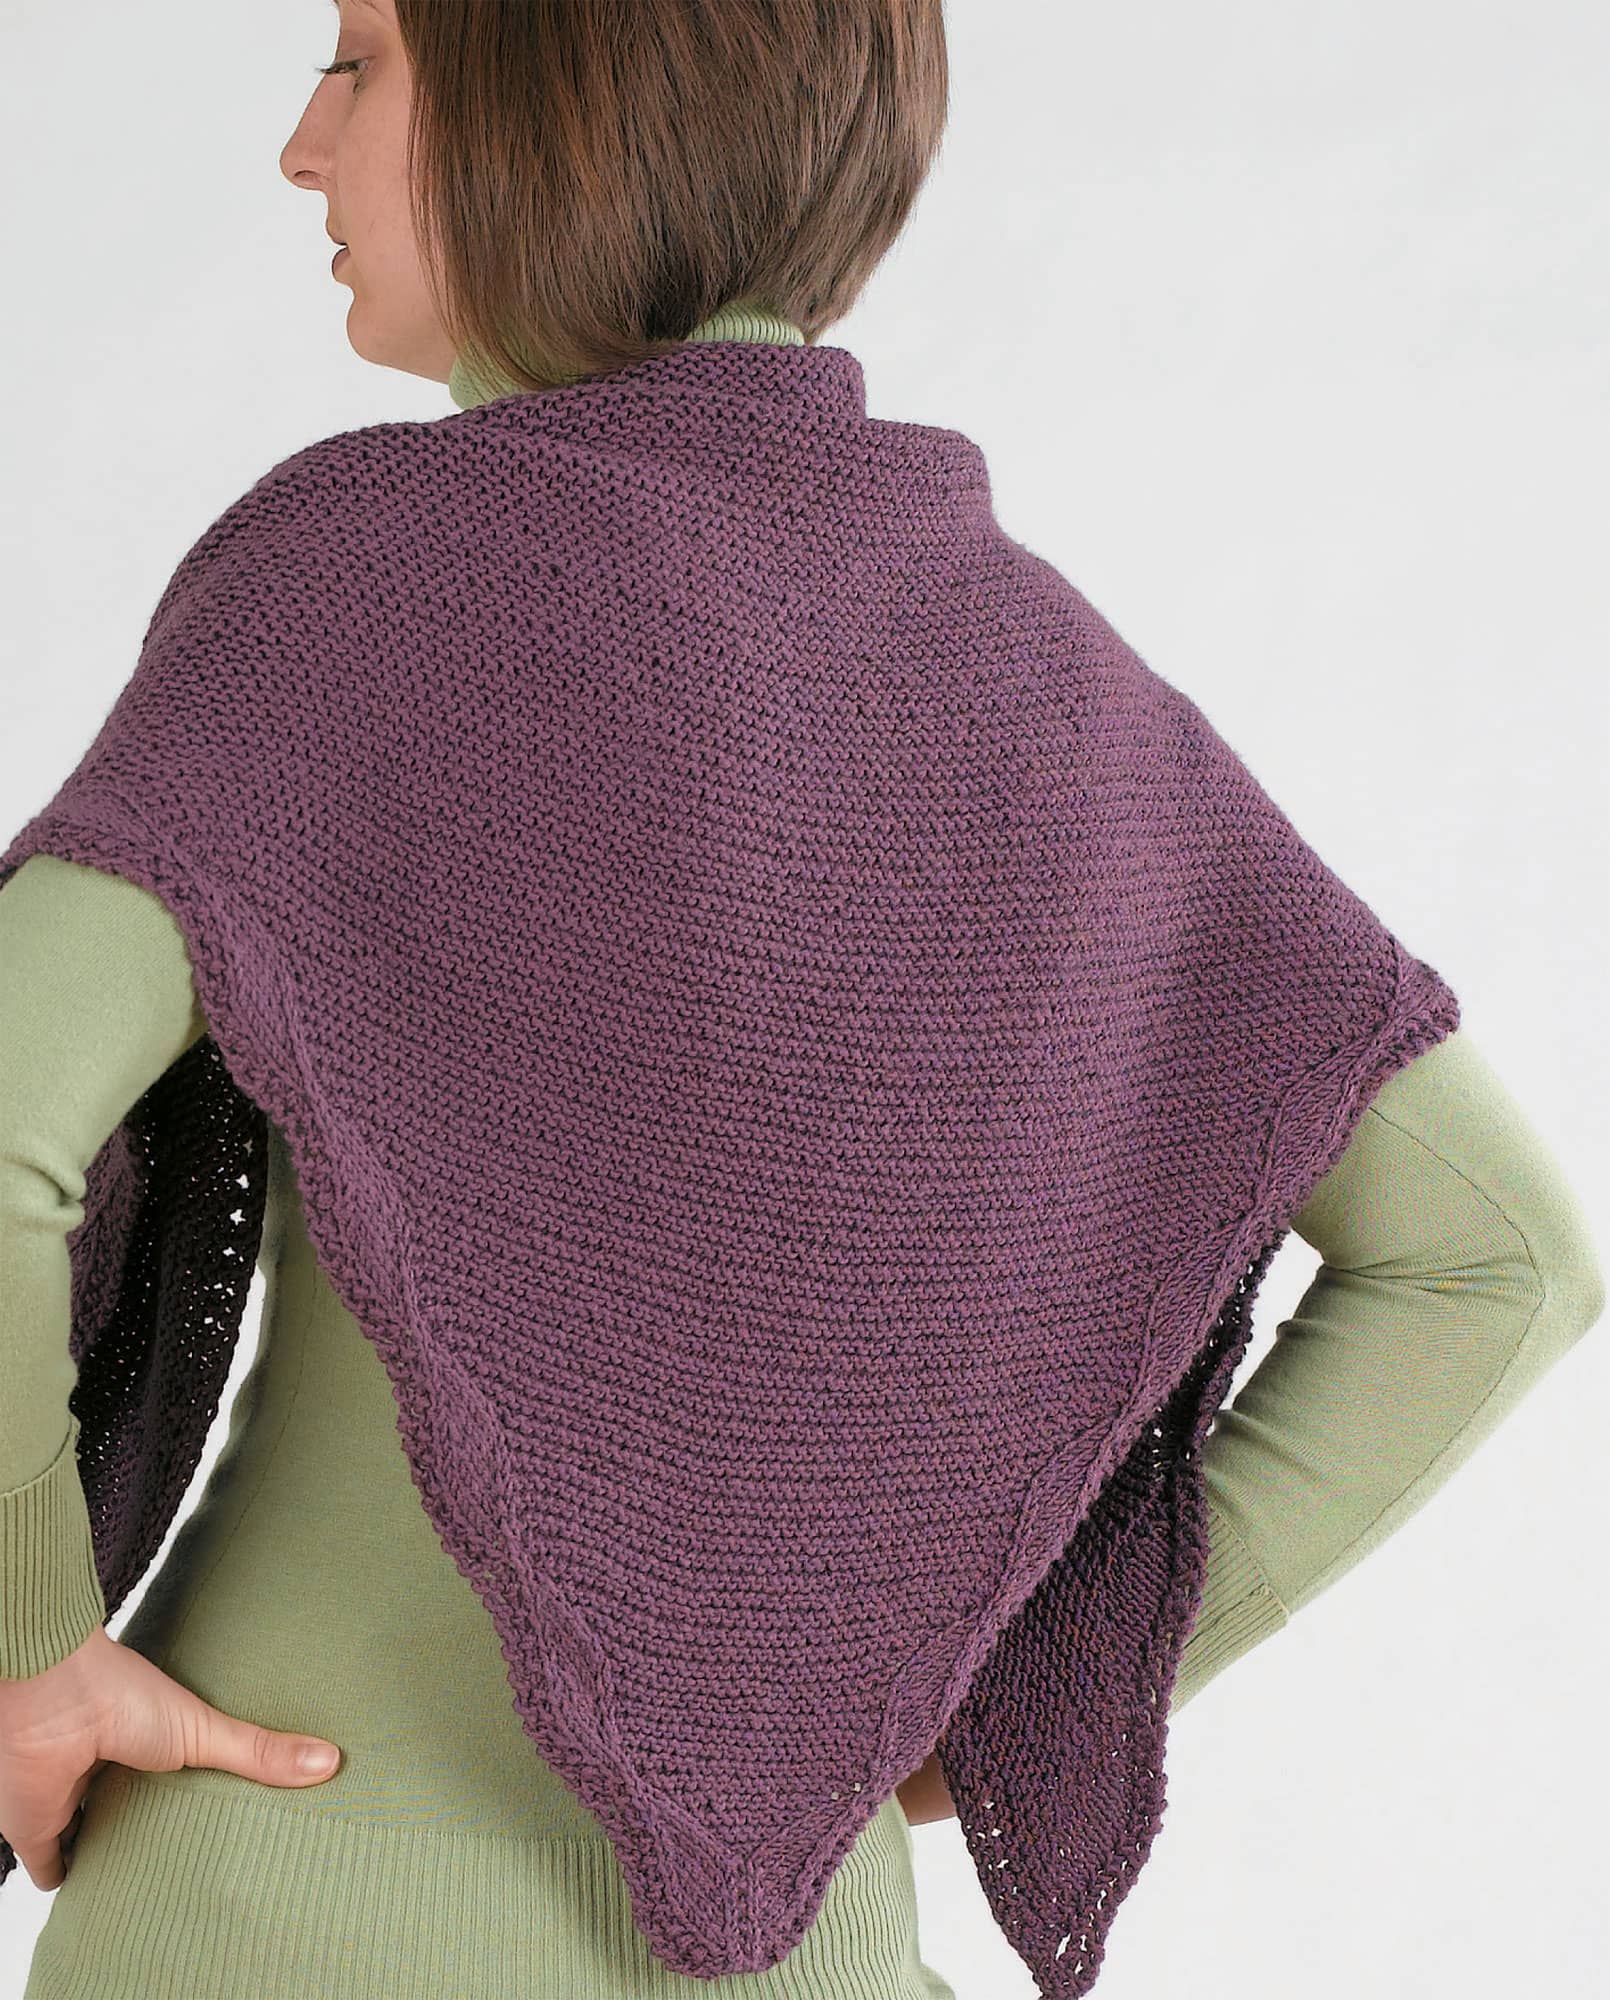
7 Repeat rows 24 to 43 (a total of 20 rows) over and over until 11 leaf shapes have been completed (223 rows in total). You can make the shawl smaller or bigger by changing the number of times rows 24 to 43 are repeated. For a smaller shawl, complete fewer repeats; for a larger shawl, add a few repeats more. If you follow the directions exactly, completing a total of 11 leaf shapes, then the total stitch count will be 230 stitches. Shown below is the shawl after the completion of the beginning 23 rows plus three repeats of the 20-row leaf sequence.
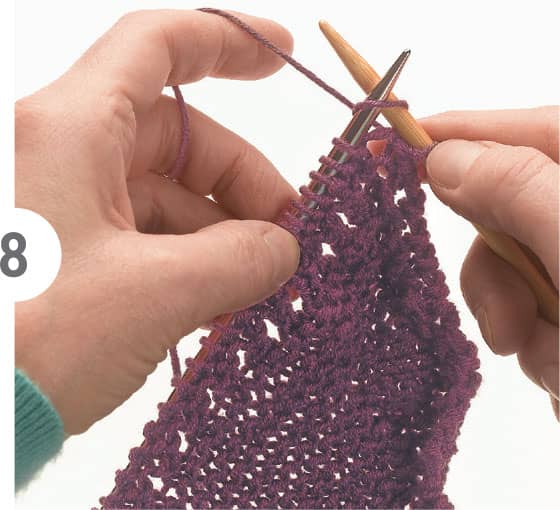
8 Once the desired number of rows have been completed for the body of the shawl, three additional rows are worked to finish the top edge. The edging rows should only be worked after the completion of a row 41; the wrong-side (odd-numbered) row that is made after the leaf shape has been tapered to 1 stitch. The stitch count will increase by one on the first edge row but after that will remain the same. It is very important that the top edge be bound off loosely; if it’s too tight then the edge will curl. To bind off loosely, use a larger needle for just the right-hand needle when binding off. Since the right-hand needle will only have 2 stitches at any time in does not need to be a circular needle; a straight needle works just as well.
Row 1 (RS): K1, *yo, k2tog*; repeat from * to * until 1 st remains, yo, k1—1 st increased.
Row 2: Purl all sts.
Row 3: Knit all sts.
Bind off all stitches loosely and evenly using a needle two sizes bigger than the needle used to knit the shawl.
Using the yarn needle, weave in all ends.
HOW TO FINISH THE SHAWL
9 After the knitting is finished, you will find that the leaf edging tends to curl under. This is remedied by steaming the edge using a steam iron. At no point should the steam iron actually touch the knitting. Hold the iron 1" (2.5cm) above. Lay the shawl on your ironing board and, working in sections, hold the iron above the shawl and allow the steam to penetrate the shawl.

10 Set the iron aside. Using your hands, gently stretch and smooth the leaf shape until it lies flat.

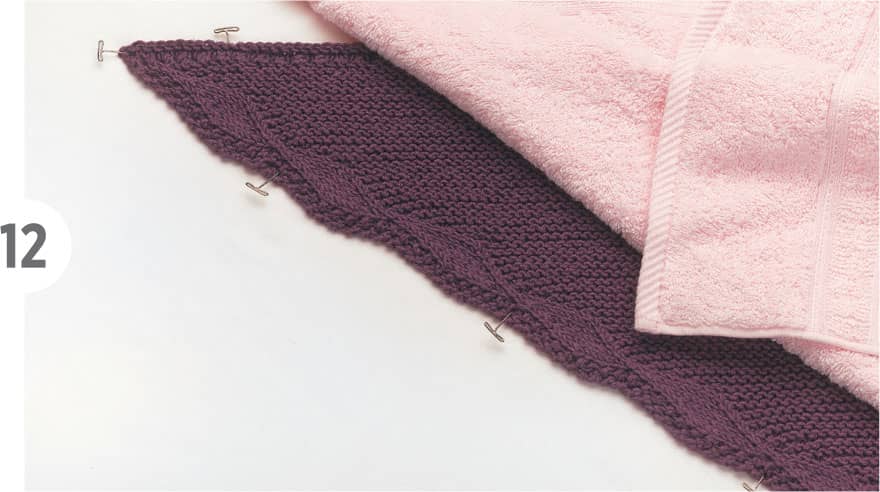
11 Once all the edges have been steamed, lay the shawl on a blocking board or carpeted floor and pin all three edges, placing a pin about every 5" (13 cm). The top edge should be pinned so that it is straight and even. The leaf edges are fluted so don’t try to straighten the edge; rather, make sure the leaves lie flat and the triangle shape is consistent from side to side.

12 Cover the entire shawl with a towel that is just barely wet (wet the towel in the washer and then spin it dry). If necessary, use more than one towel. Leave the towel in place for at least four hours; it can actually be left on the shawl until it’s completely dry. Once blocking is finished, your shawl is ready to wear.
HOW TO CARE FOR THE SHAWL
The center of the portion of the shawl is worked in garter stitch, which has a tendency to stretch. Your shawl should not be stored hanging. Instead, fold it and keep it on a shelf.