Introduction
Welcome to the world of knitting! Knitting is so much more than just a way to make something. You’ll soon discover that the process of knitting is relaxing and even therapeutic. The rhythmic and repetitive motion is very calming and restful. Many knitters look forward to their quiet time with needles and yarn as the best part of their day. Knitters also love to share their craft, and knitting groups, social networking sites, knitting conventions, and, yes, knitting books are abounding.

It doesn’t require a big investment to learn how to knit. You’ll need a good instructional book (like this one!), yarn, and needles. Your time investment isn’t huge either. It only takes a few hours to learn the basic skills needed to make a simple scarf. Once you become hooked by knitting you’ll find that you’re eager to add new skills and make items with more complexity.
How to Use This Book
This book teaches you a wide range of knitting skills from the most simple, basic ones to more advanced techniques that will launch you confidently into the full spectrum of knitting options. There are seven chapters, and each one begins by teaching the skills needed to make the projects in that chapter. Each project provides a list of What You’ll Learn and also What You’ll Need.
PRACTICE SWATCHES
Especially in the beginning chapters, you will be encouraged to make practice swatches so you can learn a skill before you use it on expensive yarn in the finished project. Buy a skein of high-quality, worsted weight, wool yarn that knits at a gauge of 20 stitches = 4" (10 cm) (or 5 stitches to 1" [2.5 cm]). (See here for details about yarn). Choose a solid color that is a medium value (not too dark or too light to see details). The yarn used in all the practice swatches shown in this book is Cascade 220 Wool. You will also need a pair of single-point US size 8 (5 mm) knitting needles no longer than 9" (23 cm). (See here for details about needles.)
If you’re a new knitter, then the best approach is to start with the first chapter and work your way through the book. You don’t have to make every project, but spend time learning the skills and in particular making the practice swatches. The first three chapters—Basic Knitting, Texture, and Shaping—will give you a solid skill set that will prepare you for the remaining chapters, which can be read in any order. Throughout the book, each new chapter builds on the skills that were presented earlier. So, if you read the chapters out of order, be sure to use the index to locate and learn any information you might have missed in a prior chapter.
The online content associated with this book will show you the skills in action and serve as an additional learning tool. If you need elaboration or clarification then consult the online videos. To access the online content, go to www.qbookshop.com/pages/knitting101.
Yarn and Tools
Of all the handcrafts, knitting is the easiest one to bring along with you. That’s because the tools and materials are so simple; to get started you really only need yarn and knitting needles.
YARN
Yarn is simply a continuous strand of twisted fiber. The fiber can be anything from naturals like wool or cotton to luxury fibers such as cashmere and silk. You’ll also find more unusual fibers such as bamboo, Tencel®, and linen and, of course, less expensive synthetic fibers such as nylon and acrylic. In addition, an abundance of yarns exist that are combinations of all the fibers available such as cotton/bamboo, wool/silk, or linen/acrylic. The selection can be mind boggling, so it may be helpful to find a good, independent yarn shop in your area. The local yarn shop (affectionately nicknamed LYS) is the perfect place to learn about yarn and find reinforcement for the skills that are taught in this book. Yarn shops are typically staffed by expert knitters who are eager to guide your success when you venture beyond what you’ve learned in this book. Good craft or hobby stores and comprehensive online shops also carry a wide assortment of yarns, needles, and instructional materials.
Texture
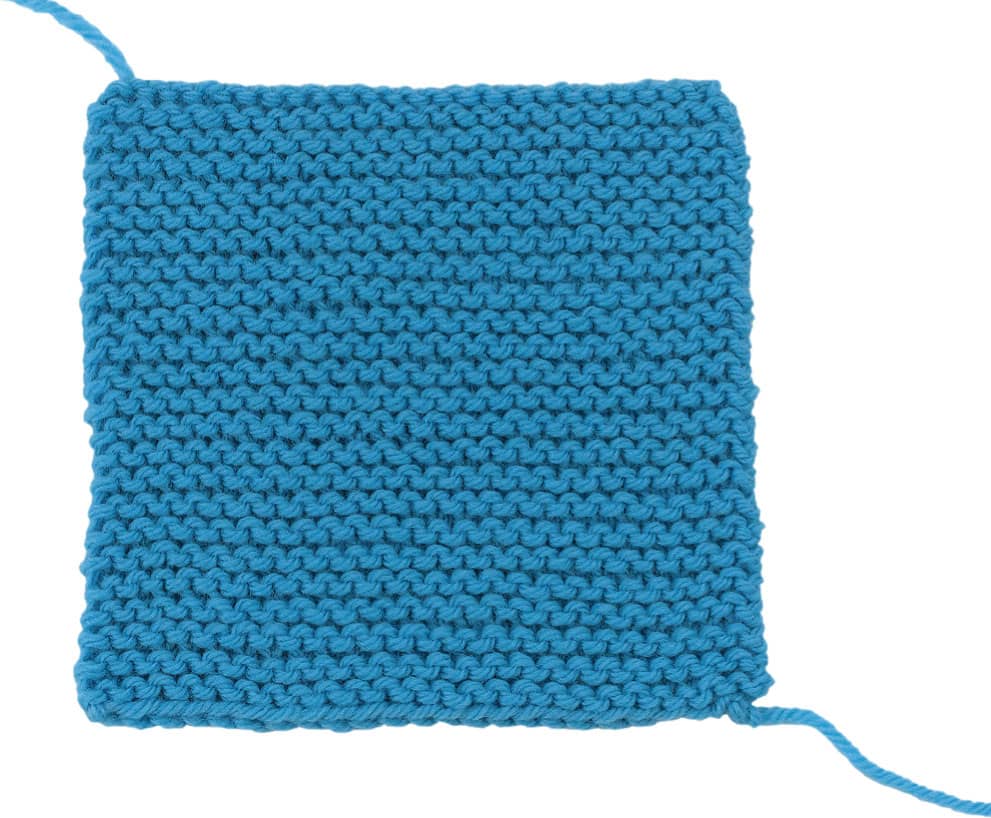
Yarn for handknitting comes in a variety of textures and different weights. In terms of texture, you’ll find a wide range from smooth to wildly eclectic and bumpy. The photo below shows a range from left to right of smooth (merino wool), bumpy (cotton), boucle (alpaca/nylon), thick and thin (wool), fuzzy (mohair), chenille (rayon), eyelash (nylon), slub (nylon/metallic), and ribbon (nylon). The projects in this book use yarns that are primarily smooth or just a little bumpy because those are the ones that are most manageable for a new knitter.

Weight
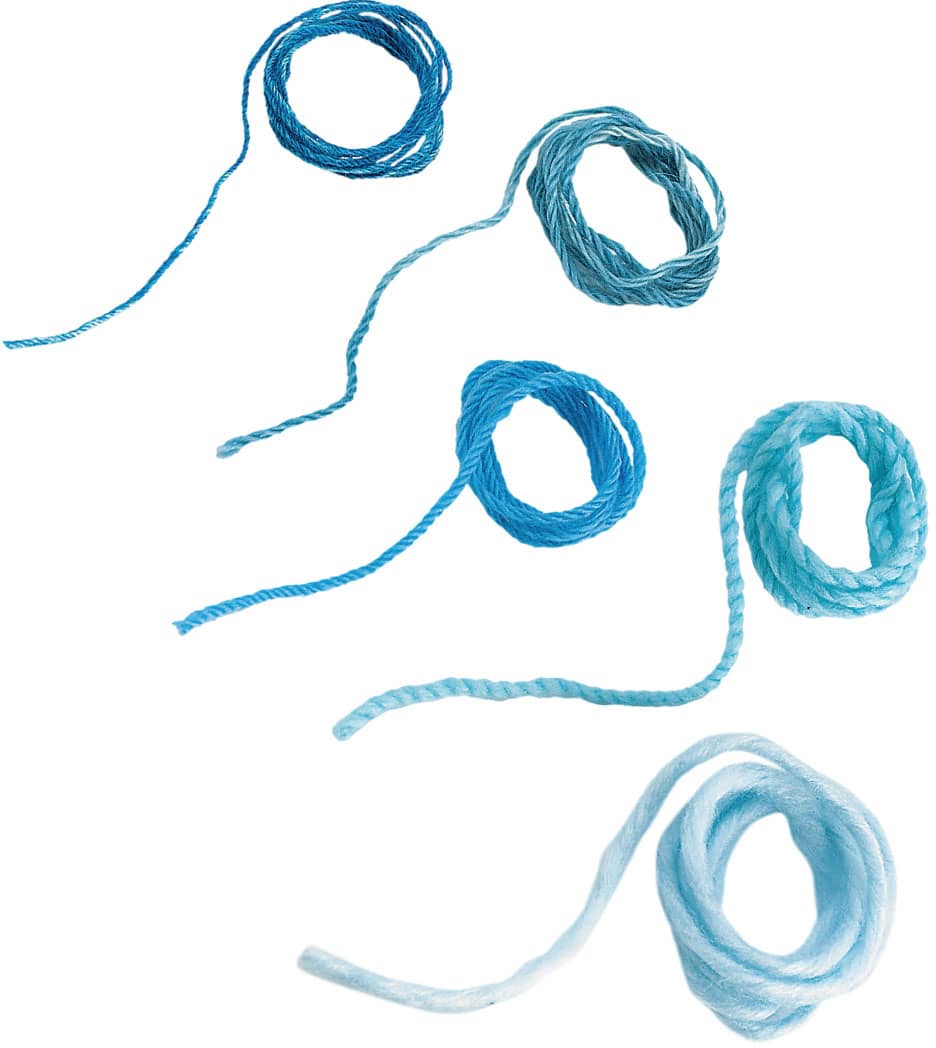
Yarn is classified by the thickness or diameter of the strand and this classification is commonly referred to as weight. The thinner the yarn; the lighter the weight. The photo above shows a range of weights from super fine (fingering) to super bulky. Shown here you will find an in-depth discussion of yarn weight and how to combine yarns for more variety in your knitting.
Yarn Packaging
Yarn packaging (sometimes referred to as put-up) comes in a variety of forms. There are balls (they look like a doughnut) and skeins, which are densely wound and wrapped around the middle with a ball band (label). Both balls and skeins are ready to be used; simply pull the end out of the center. Another common put-up is a hank which looks like a loosely twisted braid. It’s very important to wind the yarn from the hank into a ball before you begin knitting, otherwise it will become tangled. Your LYS will often wind the yarn for you or let you use their equipment. If not, untwist or unfold the hank; you’ll find it in a loose circle. Put both hands inside the circle and give a few good snaps outward, then drape it over the back of a chair or ask a friend to hold it. The yarn may be tied in two or three places to keep the hank from tangling. Find the ends and cut or untie the knots. Working with one end, wind the yarn into a ball (like your grandma made or your kitty would play with).

Yarn Label
Learn to read and interpret the information on a yarn label (also known as a ball band). You’ll find some basic and predictable information such as the manufacturer, the country of origin, and fiber content. You’ll also see the color number and/or name as well as the dye lot, which refers to the batch the yarn was dyed in. It’s important to buy enough yarn to make your project, plus a margin for error, from the same dye lot. If you run out and have to purchase yarn from a different dye lot, then the color may not match, leaving a distinct line where the new dye lot starts.
Most yarn labels also include a distinctive square that gives information about the recommended gauge (number of stitches and rows per inch) and recommended needle size (shown here). Sometimes the square is omitted but you will always find needle and gauge information. The number of stitches per inch is an important number because it defines the weight of the yarn and lets you know whether the yarn is appropriate for the pattern you are using.

Finally, you will see care information for the yarn expressed using a collection of symbols specifying how a garment made from the yarn can be washed and whether it can be ironed or dry cleaned.
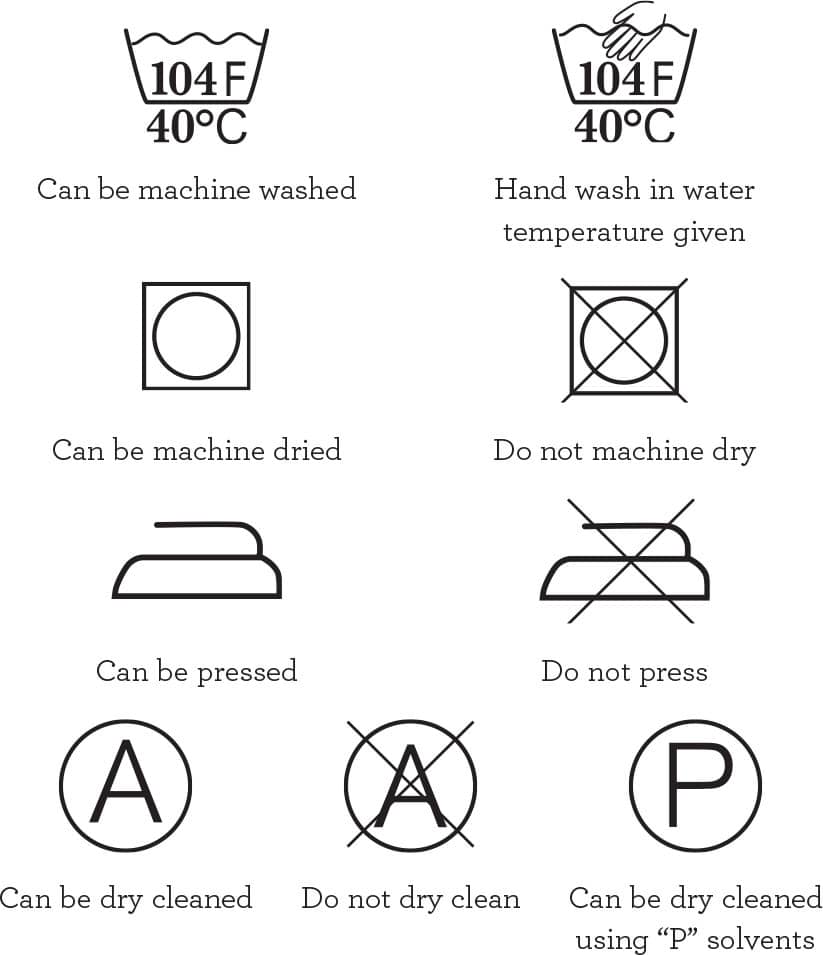
TIP Keep a journal of your knitting projects, and attach a yarn label and small yarn sample to each project page. You’ll always have this vital information at your fingertips.
TOOLS
Knitting Needles
Knitting needles come in three forms: single point (straight), circular, and double pointed. Needles are sized according to the diameter of the needle shaft, which is the same size regardless of the form (single point, circular, or double pointed). The patterns in the book will specify which type is required. The same advice that applied to purchasing high-quality yarn applies to needles. Don’t buy the cheapest needles in the store, and don’t use the long, heavy metal needles that were left to you by your great aunt. Follow these guidelines:
Single-point needles: As a new knitter you should use bamboo or wood needles no longer than 9" (23 cm) to 12" (30 cm). Old-fashioned metal needles can be very slippery and heavy and you might find your stitches slipping right off the end. Don’t use long needles; they are unwieldly and can cause repetitive motion injuries. If your knitting won’t fit on a shorter needle, then you should use a circular needle and knit back and forth (see page 00 or more information on this technique).
Circular needles: At first you may find bamboo circular needles easier to use because they aren’t as slippery. But as soon as you feel confident (and can afford them), switch to new, superior quality metal needles with supple cables. You’ll find that the cable connecting bamboo needles is often in a stubborn, tight circle. Don’t worry about this; the cable will loosen up as you knit.
Double-pointed needles: Look for bamboo or wood double-pointed needles that are 7" (18 cm) long because this is the easiest size for a new knitter to handle.

Needle Sizing
As mentioned before, needles are sized according to the diameter of the shaft measured in millimeters (mm). Since needles are made and sold internationally, the markings can be confusing. Most commonly you will find the millimeter size and the equivalent US size. The most common US sizes range from 0 (2 mm) to 19 (16 mm). The other measurement is the length of the needle. The needle length is critical for circular needles and is measured from tip to tip (see here for more information about common circular needle lengths).
Knitting Needle Sizes |
|
US Size Range |
Millimeter Range |
1 |
2.25 mm |
2 |
2.75 mm |
3 |
3.25 mm |
4 |
3.5 mm |
5 |
3.75 mm |
6 |
4 mm |
7 |
4.5 mm |
8 |
5 mm |
9 |
5.5 mm |
10 |
6 mm |
101/2 |
6.5 mm |
11 |
8 mm |
13 |
9 mm |
15 |
10 mm |
17 |
12.75 mm |
19 |
15 mm |
Essential Extras
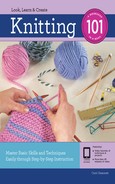
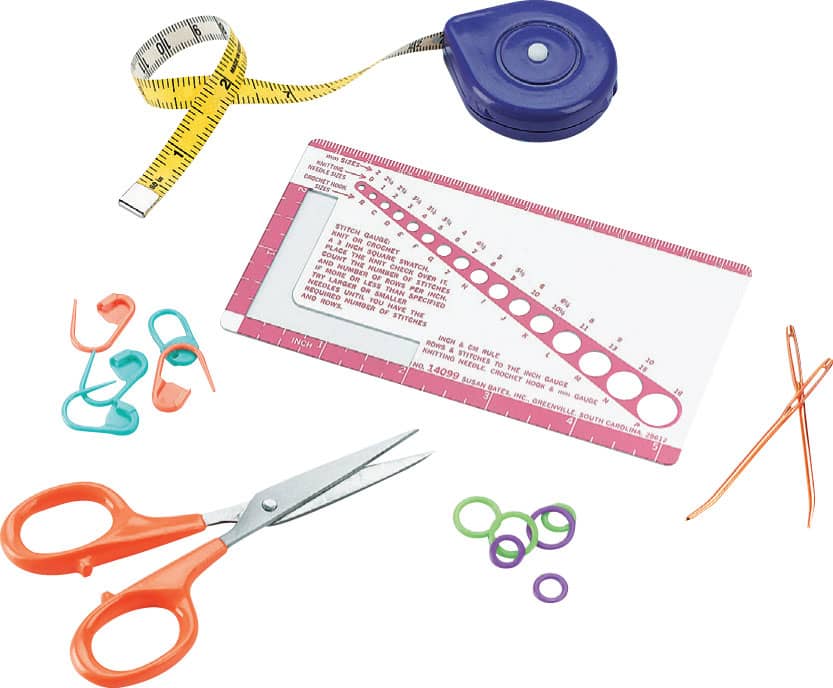
There are a few other tools that every knitter should have: a tape measure, a yarn needle (distinguished by its curved point), stitch markers (both closed and locking), a needle/stitch gauge, and scissors.
Handy Extras
As you progress with your knitting skill you’ll find that you have more information to keep track of, which is where a row counter, calculator, and notebook come in handy. Stitch holders, cable needles, straight pins, and crochet hooks in multiple sizes are also useful tools.
