
Chapter 4. Time Remapping and Tracking
Chapter Objectives
Chapter Learning Objectives
 Relink missing media.
- Use proxies for more responsive editing.
- Import an image sequence.
- Pre-compose a layer.
- Manipulate the playback speed of a layer using time remapping, including playing a layer backward.
- Apply multiple effects to a layer and manage them.
- Generate motion tracking keyframes for a layer, and use them to control the motion of another layer.
- Create a null object and use it as a motion tracking parent.
- Create a track matte.
- Archive a project using Collect Files.
- Export multiple items at once.
Chapter ACA Objectives
For more information on ACA Objectives, see pages 294–299.
DOMAIN 1.0 Working in the Visual Effects and Motion Graphics Industry
1.3
DOMAIN 2.0 Project Setup and Interface
2.1, 2.4
DOMAIN 3.0 Organizing Video Projects
3.2
DOMAIN 4.0 Creating and Modifying Visual Elements
4.2, 4.4, 4.5, 4.6
DOMAIN 5.0 Publishing Digital Media
5.2
Being able to efficiently produce a cohesive set of videos is an increasingly valuable skill. In this chapter, you’ll learn several useful techniques for creating a consistent group of videos for use as short introductory videos for a sports-oriented social media channel. Each video represents a different sport.
One challenge with creating action highlight videos is that a peak moment can go by too quickly to watch clearly. This chapter shows you several ways to focus on a peak moment, including manipulating time to slow, freeze, or repeat a moment and using motion tracking to visually highlight a key part of a video frame.
![]() ACA Objective 2.4
ACA Objective 2.4
Starting the Action Sports Logo Project
The videos for this chapter lead you through creating a set of short animated introductions of the type you might see at the beginning of videos posted on social media channels. The examples you create in this chapter use a 1:1 (square) aspect ratio, which is used on some social media platforms.
![]() Video 4.1
Video 4.1
Learning Time Remapping and Motion Tracking
You’ll make several variations on the same animated design (Figure 4.1) in slightly different ways, but with a consistent overall design. This will give you the opportunity to learn some valuable techniques for reusing animations you’ve already created. Becoming familiar with these techniques will help you work efficiently so that you can meet deadlines easily.

Figure 4.1 Three of the social media intro videos you’ll create in this chapter
![]() Video 4.2
Video 4.2
Setting Up the Action Sports Logo Project
The techniques you learn in this chapter focus on manipulating time. You’ll see how to slow down, speed up, and freeze playback of a video layer.
Setting Up the Project
You’ll start this chapter by creating a project and importing footage.
Create a new project using one of the methods you learned in previous chapters.
Note
As demonstrated in Video 4.2, if you want to import files by dragging and dropping, make sure the Project panel is visible in After Effects as the drop target.
On the desktop, find the three video files in the lesson files folder for Chapter 4 and import them into the Project panel in Adobe After Effects CC.
Remember to keep your files organized as you build this project. You can start by moving the three video files into their own folder in the Project panel; Video 4.2 names the folder Media.
Select one of the three video clips, and examine the information displayed for it at the top of the Project panel. Repeat for the other two video clips (Figure 4.2).

Figure 4.2 Video clips imported into the project and organized
Save the project into the ch4 folder; name it sports action.
Preparing the Footage by Trimming
In “Trimming Footage” in Chapter 3, you learned how to refine the duration of a footage item to just the most important part by setting the In and Out points in the Footage panel.
Do the same for the three video files you just imported. The animated logos you’re creating are just quick introductions, so they need to be no longer than five seconds long. This is not a problem for the paddle-board.mp4 and snowboard.mp4 clips. However, the best part of the rallycar.mp4 clip is less than two seconds long. That’s OK; go ahead and trim it down to the best part because you’ll slow down the footage later in this lesson. Slowing down footage extends its duration, so after you finish slowing it down later, it will be at least five seconds long.
Keep the following techniques in mind when trimming in the Footage panel:
 You’ll open each footage item into the Footage panel by double-clicking it.
- You’ll set the In point and Out point of each footage item by changing the current time and then clicking the Set In Point or Set Out Point button in the Footage panel (Figure 4.3).

Figure 4.3 Trimmed video in the Footage panel
- You can change the current time by dragging the Current Time Indicator, by manually typing in the time, or by clicking the Current Time value.
- The trimmed duration is indicated by both the colored bar under the footage preview and the last time value displayed next to a delta symbol (
 ).
). - You can shift the duration by dragging the colored bar.
- You can change the duration by dragging the ends of the colored bar or by setting a new In point or Out point.
- Remember that it’s better to trim to slightly more time than you might need.
![]() ACA Objective 2.4
ACA Objective 2.4
Relinking to Missing Files
In “Linking to Files Instead of Embedding Them” in Chapter 1, you read about how files imported into After Effects are not copied into an After Effects project. Instead, After Effects stores just the folder path to the imported file and reads it when it needs to be previewed. You also learned how After Effects can lose track of a file if you move it to a folder or drive that’s different from the folder path that After Effects recorded when the file was originally imported into the project.
![]() Video 4.3
Video 4.3
Relinking to Missing File
There are a few lessons to remember about how After Effects links to files:
- Before you import files into After Effects, make sure the file is stored in the folder where it will stay until you complete the project. Avoid importing files from camera cards or other removable media; instead, first copy those files to a location where they won’t be moved or deleted.
- Changing the name of a file also breaks a link, because the filename is part of the stored file path. If you think you’ll need to rename files, it’s best to do that before you import the files into a project.
- If a file is moved from the location where After Effects expects it to be, you can either move it back, or you can relink it, as shown in Video 4.3.
How Moving Files Breaks Links
You can experiment with the effects of linking, as shown in Video 4.3.
To see how links break when imported files are moved:
On the desktop, move any of the files imported into the sports action project into a different folder. In Video 4.3, a new folder called Sport Clips is created for this purpose.
Return to After Effects. After Effects displays an alert that there is at least one file it can no longer find, and it lists the folder paths where After Effects expected to find the missing files.
Click OK. All missing files now display a color bar placeholder image if you try to view or preview them (Figure 4.4). Also, in the Project panel, the names of missing footage items are shown in italic type.

Figure 4.4 Missing files are indicated in the Project panel and in an alert message.
Relinking to Missing Files
Linking to files (instead of embedding) is standard practice for video editing applications such as After Effects, as well as in web design and page layout applications. For this reason, it’s important to be aware of not only how links can become broken, but also how to resolve missing links.
Tip
Another way to update a link is to double-click a missing file in the Project panel.
To relink a file:
Choose File > Replace Footage > File.
Navigate to the new location of any of the missing files, and select a missing file.
Click Import (Windows) or Open (macOS).
After Effects updates the link it recorded for the selected file. If any other missing files are in the same folder, their paths are also brought up to date.
If additional missing files are stored in other folders or under new names, you will need to relink them separately until all are resolved.
![]() ACA Objective 2.4
ACA Objective 2.4
Working Faster Using Proxies
Visual effects work demands high performance from every part of a computer system, especially the CPU, the graphics hardware, and the storage drives. It doesn’t take long for a project to become complex enough that an average computer might start to struggle to smoothly play back a timeline without taking the time to render previews first. These issues are magnified when editing 4K video timelines, which can strain even expensive high-performance computers.
![]() Video 4.4
Video 4.4
Using a Proxy Workflow
After Effects can create a proxy (a simpler copy) of a footage item so that a timeline can play it back more smoothly. As you edit, you can use the Program panel to switch to proxies for faster editing, or switch to the original clips for maximum image quality.
A proxy can be useful any time the data rate of the original video is too high relative to the processing ability of the computer. For this reason, proxies are popular for editing 4K video on powerful computers. But proxies can be just as useful editing 2K (1080p) video on less powerful computers.
When you reconnect a proxy layer to its original footage item, any edits you made using the proxy are applied to the full resolution original. When you export, After Effects can use the original full-quality clips, but you can export using proxies if you just need a quick draft for review.
With proxies, you should use the same good file management practices that you use for all other media files used in the project. You should know where the proxies are stored in case you have to relink to them, and because you may want to discard them after you’re done editing the project.
You might be wondering why a video editing application would have difficulty playing 2K (1080p) or 4K video when those resolutions play back smoothly on a smartphone or on a simple streaming box for a television. The answer is that it is not difficult to simply play back one finished video file, but when a clip is in an editing timeline with other clips, there is significant additional processing involved in keeping clips ready for editing and previewing unrendered effects—especially when you start piling on tracks, transitions, and more effects that add to the calculations needed to display each frame.
One useful solution is the proxy workflow. There is a trade-off; the much lower data rate means that a proxy has lower image quality than the original. You should set the quality level of a proxy to be enough for sequencing clips and timing edits and transitions. When it’s time to use the originals for detail-oriented work or critical color correction and grading, it’s easy to switch from a proxy to an original clip in After Effects.
When a project bogs down and won’t play back smoothly, and you know you’ve done the best you can to get the most performance out of your system, using proxies may make it possible to edit with less lag and maybe even play back a timeline in real time.
Creating proxies does not guarantee smooth editing and playback. It’s still possible that the combined load of processing proxies, tracks, transitions, and effects may be too much for smooth playback, especially on a less powerful computer. If this happens, experiment with different proxy formats and presets until you find one that works best on your system. Less powerful computers may require proxies that use lower bitrates, smaller frame sizes, and codecs that impose a lower burden on the CPU.
Preparing to Create Proxies
Before you begin creating a proxy, there are a few things to think about:
- Where do you want to store the proxy? It should be a different folder than the one containing the original footage, and it should be a location accessible while editing. Video 4.4 demonstrates one way that meets both of those requirements: a proxy folder created inside the project folder (on the desktop, not in the Project panel).
- How do you want to create the proxies? You can create them using the After Effects Render Queue, but it’s probably easier in Adobe Media Encoder.
- What form should the proxy take? The entire point of creating a proxy is to lower the amount of information that your computer has to process, so the render settings for the proxy need to produce a file with a much lower playback bitrate than the original. It’s also common to lower the frame dimensions. You should know where to adjust these settings during export. For more details, see “Creating a Proxy Preset for Adobe Media Encoder” later in this lesson.
You can create a proxy in After Effects or in Adobe Media Encoder, whichever you find more convenient. If you also want to create proxies for Adobe Premiere Pro, you should render them in Adobe Media Encoder, because you can create a Media Encoder proxy preset that works for both applications. You’ll probably find that it’s generally easier to control proxy settings in Adobe Media Encoder.
Creating a Proxy Using the Render Queue
In After Effects, you can use the Render Queue to create proxies.
To create a proxy in After Effects:
In the Project panel, select a footage item. Video 4.4 shows creating a proxy using the paddle-board.mp4 footage.
Choose File > Create Proxy > Movie.
Tip
It’s a good idea to keep proxy files in a different folder than the original files and to give the folder and files names that indicate that they are proxies and not originals.
If asked, navigate to the folder where you want to save the proxy, and click Save.
In Video 4.4, the proxy is saved to a new folder named Proxies, which was created in the Chapter 4 lesson files folder. Before rendering, you can always change the location or filename by clicking the blue text for Output To.
The Render Queue panel should now appear at the bottom of the workspace, containing a new render job representing the proxy you’re about to create. You worked with these controls before, in “Exporting a Composition” in Chapter 1.
Notice that in the Render Queue panel, the Render Settings for the proxy job are set to Draft Settings. You can click the blue Draft Settings text to edit the settings. One thing that makes them draft settings (and therefore useful as proxy settings) is being set to a lower resolution than Full.
Tip
You can edit the settings for any unrendered Render Queue item to view or edit those settings.
Click the blue text for Output Module.
In the Output Module Settings dialog box (Figure 4.5), note that the setting for Post-Render Action is Set Proxy. This will automatically set the rendered file as a proxy in the After Effects project after rendering.
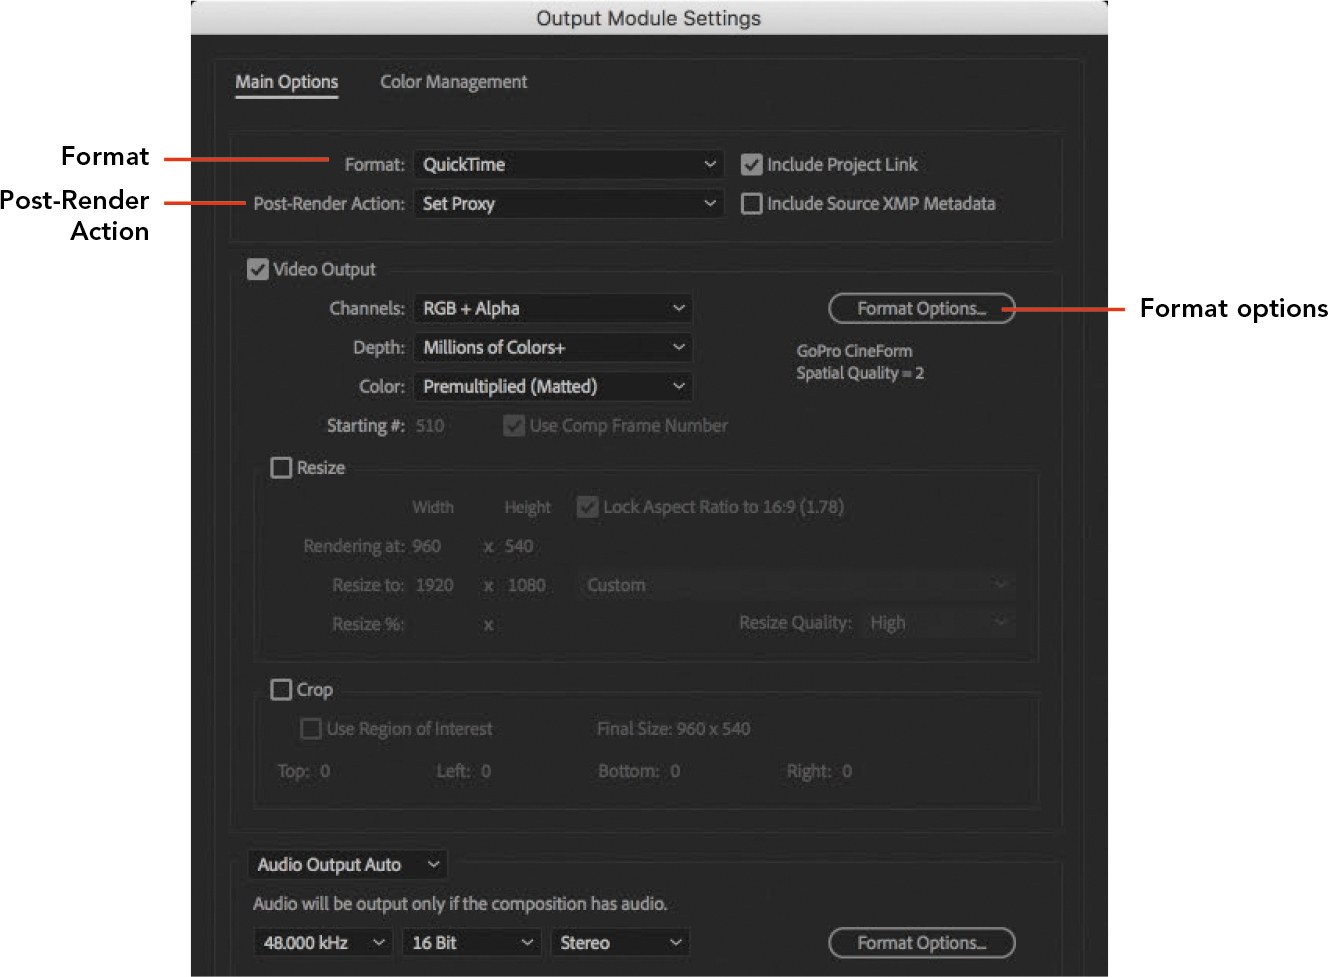
Figure 4.5 Setting up Output Module settings to generate a proxy on macOS. In Windows, Format is typically set to AVI instead of QuickTime.
For Format, choose a video format such as AVI (Windows) or QuickTime (macOS).
Make sure Video Output is enabled, then click the Format Options button.
In Format Options, choose a codec from the Video Codec menu. The format options available vary depending on the format you selected in step 5.
Specify lower values for Quality and/or Bitrate, as available. The options available vary depending on the codec you chose in step 7.
Tip
You’ll generally find that lowering the quality or bitrate drops the file size much more than lowering the frame dimensions.
Click OK to close the Format Options dialog box, and click OK to close the Output Module Settings dialog box.
Tip
Another way to create a proxy in After Effects is to right-click (Windows) or Control-click (macOS) a footage item and choose a command from the Create Proxy submenu.
In the Render Queue panel, click the Render button.
When the render is complete, check the file size of the proxy that was exported. If it isn’t significantly smaller than the original, delete the proxy and try again after lowering the Quality and/or Bitrate settings in the Format Options dialog box in step 8. It may even be necessary to try a different format or codec.
Tip
Once you arrive at proxy Output Module settings that create a proxy that plays back smoothly in your project, you can save those settings as a template. When a Render Queue job has not been rendered, you can click the down-facing arrow to the left of the blue Output Module text, choose Make Template, and save the current Output Module settings for easy selection later.
Video and image files can be so large that you should understand and estimate storage needs accurately so that you have enough storage space available. But it’s easy to become confused about how much space a file actually needs.
A common source of confusion is understanding the many units of measure for data sizes. For example, sometimes a megabit is confused with a megabyte, but because there are 8 bits in a byte, accidentally saying “20 megabits” instead of “20 megabytes” can cause you to understate the true size by 8 times.
This extends to abbreviations. For example, “Mb” means “megabit” and “MB” means “megabyte,” but sometimes the wrong case is used, causing confusion and potentially causing production errors. Be mindful of both the term you use and its abbreviation.
If you have any doubt about the terms used for data size, definitions and calculators are readily available through a web search. For example, you can easily find an online file size calculator that tells you how many megabytes are in 6 gigabits.
It’s easy to become confused when editing video, because different units may be used in various areas. For example, file sizes tend to be in bytes (such as a 50-megabyte video file), whereas video playback data rates tend to be expressed in bits (such as setting a 16 megabits per second data rate in the Export dialog box).
Keep in mind that for units of measure that go up by an order of magnitude, some define those as having 1000 units and other define those as having 1024 units. For example, some say a megabyte is 1000 kilobytes, but others say a megabyte is 1024 kilobytes. The latter definition is based on counting using binary units instead of decimal units.
In brief:
There are 8 bits in a byte.
There are 1000 (or 1024) bytes in a kilobyte (KB).
There are 1000 (or 1024) kilobytes in a megabyte (MB).
There are 1000 (or 1024) megabytes in a gigabyte (GB).
There are 1000 (or 1024) gigabytes in a terabyte (TB).
Creating a Proxy in Adobe Media Encoder
To create a proxy in Adobe Media Encoder:
Import a video file into Adobe Media Encoder. As in After Effects, there’s more than one way to do this. Do one of the following:
- Drag a video file from the desktop, and drop it into the Queue panel in Adobe Media Encoder.
- In Adobe Media Encoder, choose File > Add Source, select the video file, and click Open.
In the Queue panel, click the blue text in the Preset column for the item you just imported. This opens the Export Settings dialog box (Figure 4.6).
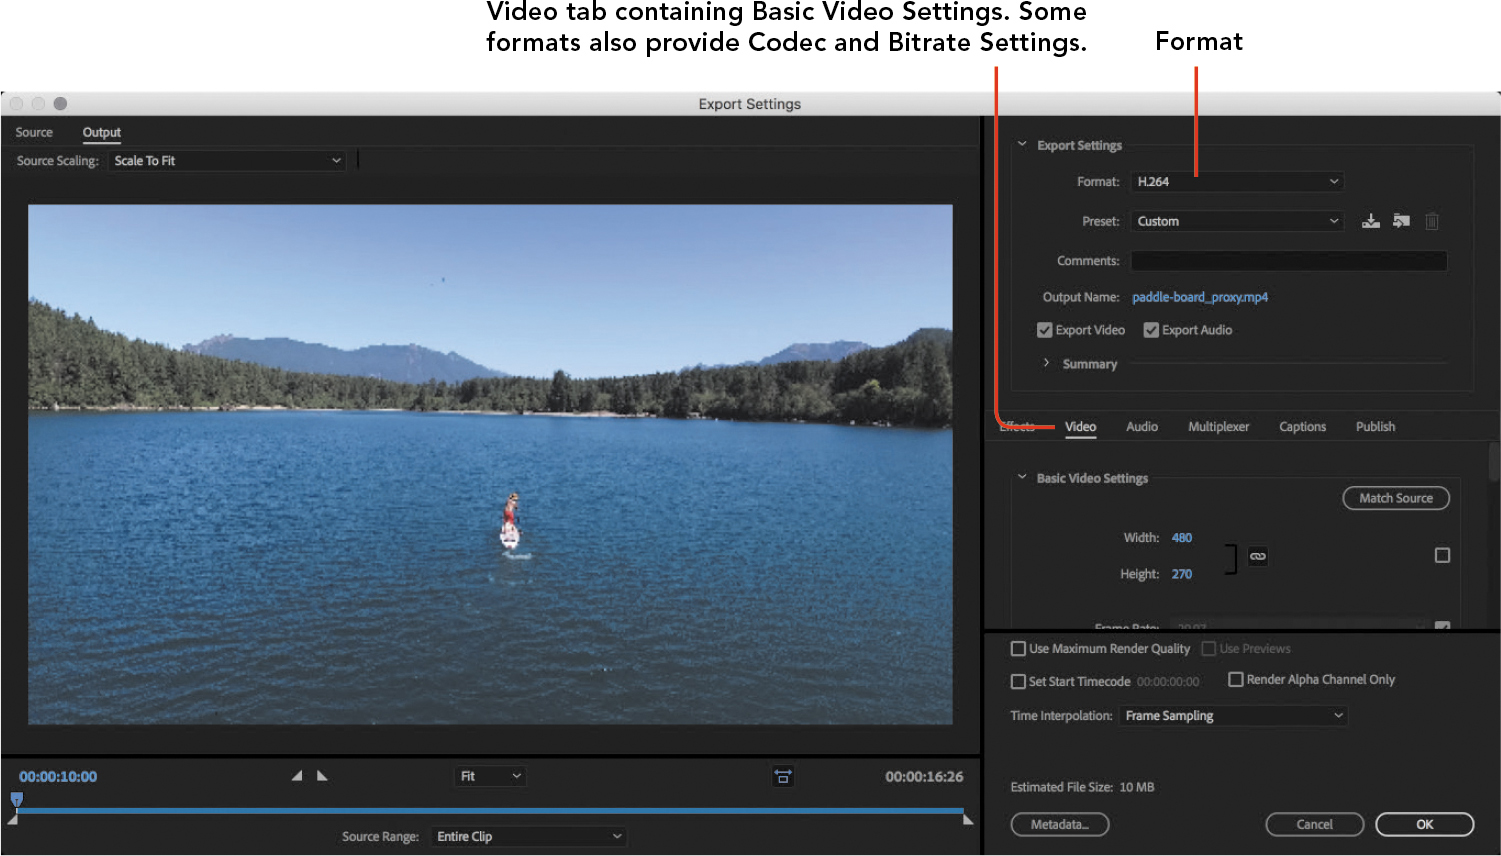
Figure 4.6 Export Settings dialog box
From the Format menu, choose a format.
Common choices for a proxy format include GoPro Cineform, DNxHD, Apple ProRes 422 (Proxy), and H.264. For proxies, test these options to see which works best on your specific system configuration. Some codecs are easy on your CPU (part of the point of making a proxy) but create files that are larger than the original; others create small files that actually make your CPU work harder. You want to use the format and codec that results in less lag than editing with the original files.
Click the Video tab. If there is a Video Codec option, select that.
Note
If the aspect ratio of Width and Height does not match the original footage, you may see black bars, and you won’t be able to use Position values accurately.
Under Basic Video Settings, lower the Width and Height values, but take care to ensure that they preserve the aspect ratio of the original footage. You can also lower the Quality value if available.
Note
For some codecs, either Quality or Bitrate Settings are available, but not both.
Under Bitrate Settings, specify a bitrate that’s significantly lower than that of the original footage. If you’re not sure what to enter, try setting the bitrate to between 5 and 8 megabits per second (Mbps).
If available, check the Estimated File Size setting at the bottom of the Export Settings dialog box. It’s more convenient if Estimated File Size is smaller than the original, but some codecs produce files that are larger than the original but play back more easily (because they’re less compressed).
Tip
Remember, the way you know that you’re using the right proxy settings is when the proxies play smoothly as you edit a composition. You can’t tell just by looking at the file size and bitrate, because it also depends on the computer you’re using.
Click the blue text for Output File, and make sure that both the specified folder and filename are correct.
Click OK, and then click the Start Queue button (
 ).
).
When it’s done, you’ll still need to set the file as a proxy in After Effects; in the next section, you’ll learn how.
Attaching a Proxy to Its Original File
If you create a proxy outside After Effects, such as in Adobe Media Encoder, you need to associate it with its original file in your After Effects project so that you can easily switch between them as you edit.
To attach a proxy to its original file:
In the Project panel, select the original file and choose File > Set Proxy > File.
Navigate to and select the proxy file you rendered and click Import (Windows) or Open (macOS).
Creating a Proxy Preset for Adobe Media Encoder
You can create your own custom proxy presets using Adobe Media Encoder so that when you want to create proxies, you simply choose a preset you’ve already made instead of having to change all the settings manually. For more information, see
https://helpx.adobe.com/after-effects/using/footage-items.html# placeholders_and_proxies
Tip
Although it’s generally good for a proxy to have a smaller file size than the original, it’s more important for a proxy to provide smoother playback during editing.
Managing Proxies While Editing
If a proxy is already available and set as a proxy, the Project panel indicates this for you. Look for a small square to the left of the Name column in the Project panel (Figure 4.7). If the square is empty, the original is in use; if the square is filled, the proxy is in use.
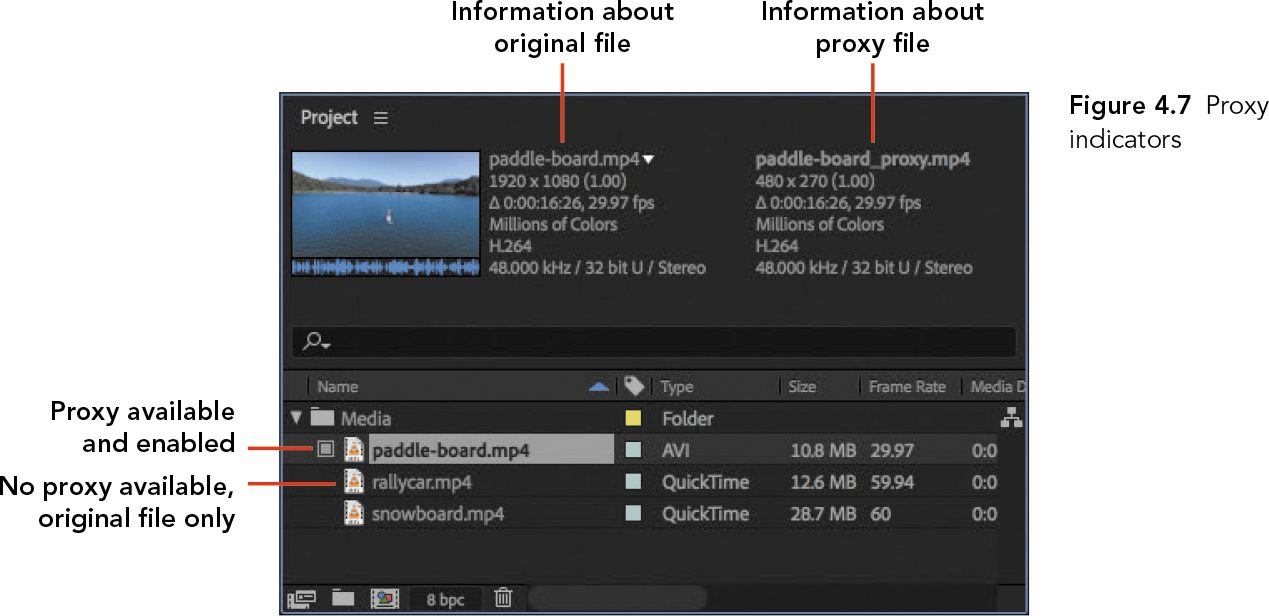
Figure 4.7 Proxy indicators
To switch between using an original footage icon and its proxy:
- In the Project panel, click the proxy icon for the item.
Managing Proxies During Render Queue Output
When you export a composition through Adobe Media Encoder, original footage is always used. When you export through After Effects, you can control whether the exported video includes original footage or proxy footage. For example, if you’re rendering a draft, you can use proxies so that the draft renders more quickly.
To use proxies for Render Queue output:
Add the composition to the Render Queue.
Click the blue text for Render Settings to open the Render Settings dialog box.
For Proxy Use, choose Use All Proxies (Figure 4.8).
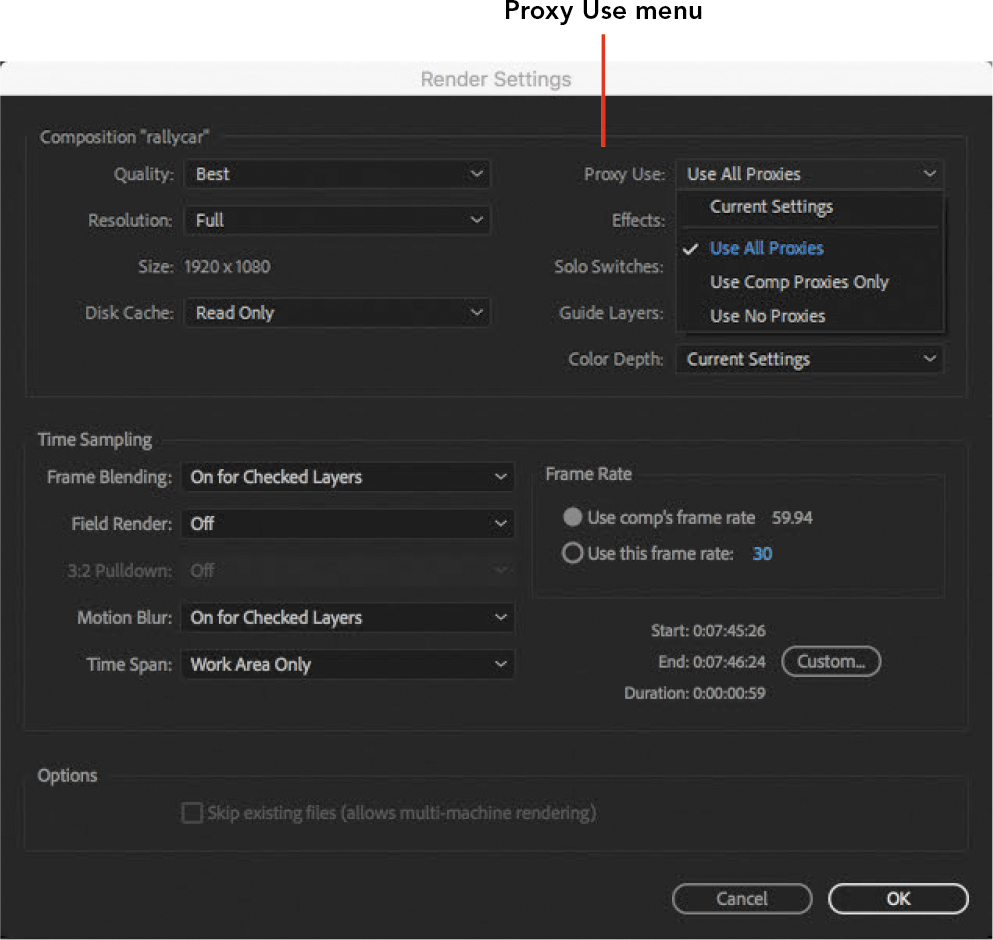
Figure 4.8 Choosing Proxy Use settings
If you were rendering final video, you’d choose Use No Proxies so that only the full-quality original footage would be used. Current Settings refers to the proxy settings in the Project panel.
Click OK, and continue setting up the render.
Importing an Image Sequence
You can import a series of still images into After Effects so that they are available as a single video file. This is useful for processing time-lapse sequences of still images, or when you’re working with a special effects sequence that’s been exported as a folder of still images.
![]() ACA Objective 2.4
ACA Objective 2.4
![]() Video 4.5
Video 4.5
Importing an Image Sequence
To import JPEG still images as an image sequence:
Make sure all of the images are in the same folder, with sequentially numbered filenames.
Choose File > Import > File.
Navigate to the folder containing the images, and select the first image in the numbered sequence. For this chapter, navigate to the Climbing folder and select Rainier Sunrise-1.jpg.
Make sure Import As is set to Footage.
Select ImporterJPEG Sequence (Figure 4.9).

Figure 4.9 The Import dialog box when importing a folder of sequentially numbered still images
You can import still image sequences using other formats such as TIFF; if so, the option may display a slightly different name such as TIFF Sequence. All still images in a sequence must use the same file format.
If there are gaps in the sequence numbers in the filenames, do one of the following:
- To ignore missing numbered files while maintaining the overall sequence, select Force Alphabetical Order.
- To replace missing numbered files with placeholders, deselect Force Alphabetical Order.
Click Open.
Tip
If the default video settings for the image sequence are not useful, such as the frame rate, select the sequence, choose File > Interpret Footage > Main, and change the settings.
After the sequence imports, note that in the Project panel the icon for a still image sequence is different from that of a video file or a still image (Figure 4.10).
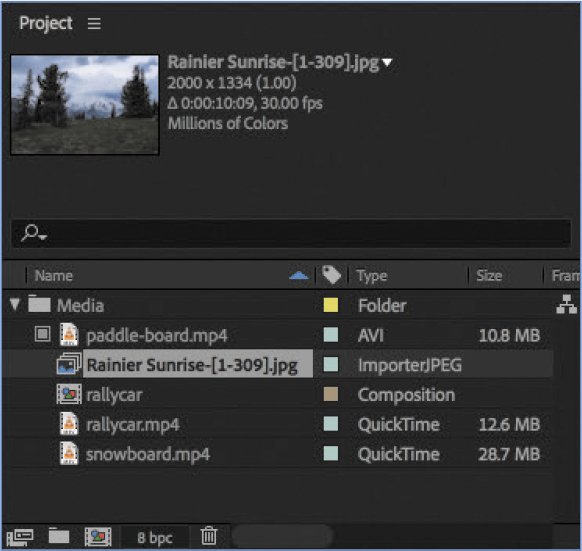
Figure 4.10 An imported still image sequence selected in the Project panel
![]() ACA Objective 1.3
ACA Objective 1.3
Copyright and Permissions
Video 4.6 discusses examples of content that requires legal permission for use in a video production.
![]() Video 4.6
Video 4.6
Copyright and Permissions
Three examples are discussed:
- The person in the paddle board.mp4 video, requiring a model release for the visible person.
- Video footage of a mountain that was recorded and copyrighted by someone else, requiring a license for use by someone else.
- Video footage of a car at a specific venue, requiring a property release for the location.
Anticipating the releases and licenses that will be needed for a production is part of the planning phase of a project. These issues are best handled by an attorney familiar with intellectual property law, because the specific laws requiring releases and licenses vary depending on where you live.
For example, just because a release was required for the paddle boarder does not mean a release is always required for every person in every video; there are specific legal criteria for requiring a release. Similarly, if the mountain video was made available under a different license than copyright (such as a form of Creative Commons), a license might not be needed.
For a more complete discussion of copyrights, licenses, and releases, see “Licenses, Rights, and Releases” in Chapter 7, “Working in the Industry.”
Setting Up a Composition for Social Media
It’s time to start creating the compositions for the different versions of the animated logo.
![]() ACA Objective 2.1
ACA Objective 2.1
The first composition you’ll create will be the basis for a preset that you’ll create to save time later.
![]() Video 4.7
Video 4.7
Choosing Settings for a New Composition
Creating a New Composition
You’ll create a composition that doesn’t quite match any existing preset, so you’ll need to specify some options manually. The composition will be square, because it’s intended for videos that will be shown on square-format social media channels such as Instagram.
To set up the composition:
Create a new composition using any of the techniques you’ve used earlier. Name it Climbing, and leave the Composition Settings dialog box open.
In the Settings tab in the Composition Settings dialog box (Figure 4.11), make sure Lock Aspect Ratio is deselected, and specify a width and height of 600 by 600 pixels.

Figure 4.11 Composition settings for the social media intro videos, with Lock Aspect Ratio deselected
The preset that’s applied by default will typically be whatever was last applied to a composition. As soon as you change a setting, the preset will change to Custom because the settings no longer match the last applied preset. That’s OK, because we don’t intend to use the last preset.
Tip
If you’re creating a video for a specific social media platform, look up the pixel dimensions for the platform you’re targeting. The optimal values tend to change over time, usually increasing.
For Pixel Aspect Ratio, choose Square Pixels.
Make sure Frame Rate is set to 29.97 frames per second.
Set Duration to 5 seconds (5:00).
Leave the Composition Settings dialog box open for now.
Creating a Composition Settings Preset
The composition you’re currently setting up is the first of several that will use the same settings. Save the current composition settings as a preset so that the next time you want to create a composition with the same settings, you can simply choose the preset you created. You create presets in the Composition Settings dialog box.
To create a preset:
In the Composition Settings dialog box, click the New Preset button (
 ), which is to the right of the Preset menu.
In the Choose Name dialog box, type the name of the preset (Figure 4.12). For this project, you can name the preset Social 600x600.
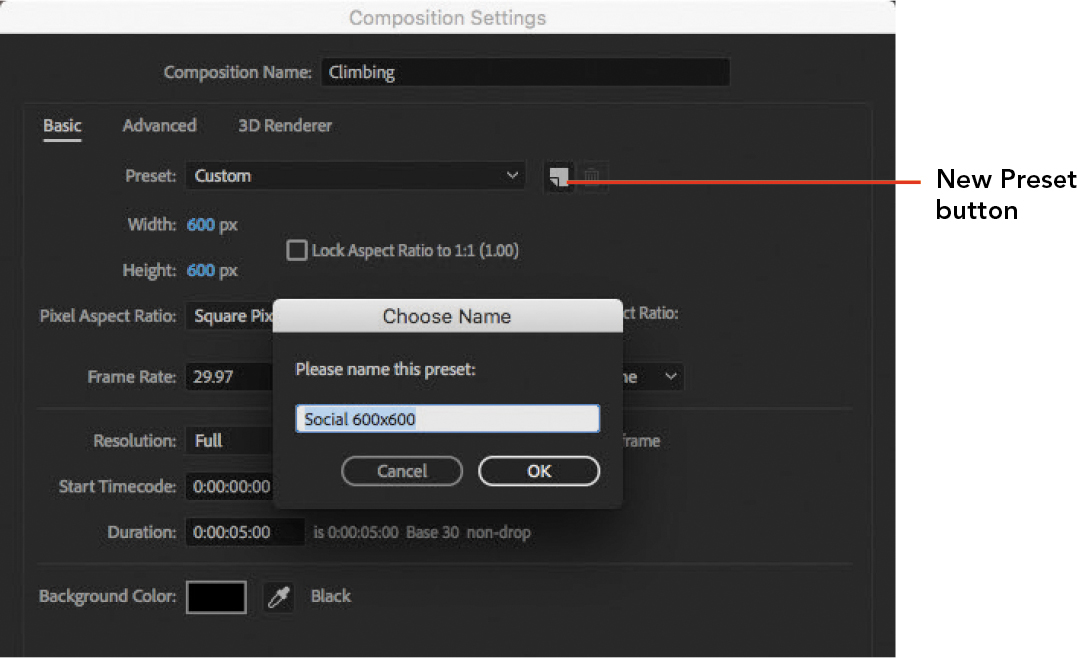
Figure 4.12 Creating a new Composition Settings preset
Click OK to close the Choose Name dialog box, and click OK to close the Composition Settings dialog box.
The new composition named Climbing appears in the Project window; organize it in a Comps folder.
Scaling an Oversized Layer
Original video footage may be larger than social media frame dimensions, so you may need to scale down a video layer to fit within the frame. That will definitely be needed in this composition, where the composition is only 600x600 pixels.
You can scale manually, or you can use one of the commands that automatically fit a layer to a composition. To try this:
Add the Rainier Sunrise-[1-309].jpg image sequence footage to the Climbing composition.
Reduce the magnification of the Composition panel until you can see the entire bounding box of the layer you just added.
The image sequence layer has much larger frame dimensions than the composition, so only the center of the layer is visible in the Composition panel; you should be able to see the bounding box of the selected layer extending beyond the composition dimensions.
Do one of the following:
- To fit the layer automatically, choose Layer > Transform > Fit To Comp Height (Figure 4.13).

Figure 4.13 Before and after applying the Fit To Comp Height command
- To fit the layer manually by dragging, Shift-drag any corner handle of the selected layer’s bounding box. You can scale from the center by also pressing the Alt key (Windows) or the Option key (macOS).
Of course, you could also fit the layer numerically by adjusting its Scale property.
Because the layer is wider than the composition, you have the option of adjusting its horizontal position (sliding it sideways) in the Composition panel to improve the position of the mountain within the frame.
Note
Regardless of how you scale down an oversized layer, check your work at 100% magnification or higher to ensure that you don’t leave a space around any side of the layer, such as black bars.
Tip
The automatic fitting commands are also available on the context menu that appears when you right-click (Windows) or Control-click (macOS) the layer. Choose a Fit To command from the Transform submenu.
Sliding a Layer Along the Timeline
As you learned in “Animating Flashing Lights” in Chapter 2, an alternative to trimming with In and Out points is dragging to slide a layer in the Timeline so that it starts earlier or later within the composition duration. That’s also done in this composition, as shown at the end of Video 4.7.
Creating an Animated Shape for a Logo
The composition created in Video 4.7 is the first of several versions of introduction videos. You’ll use it as a background for designing an animated logo that will appear in all of the intro videos.
![]() ACA Objective 4.2
ACA Objective 4.2
![]() ACA Objective 4.6
ACA Objective 4.6
The animated logo you’re going to create will consist of just two simple elements: a circle shape and a text layer. You’ve worked with both kinds of elements before, and you’ll apply the same techniques you used to create shapes and text layers in earlier chapters.
![]() Video 4.8
Video 4.8
Creating an Animated Shape for a Logo
First, you’ll create a circle layer for the logo. To match the logo created in Video 4.8, create your circle with the following attributes (Figure 4.14):
Tip
As you drag the Star tool in the Composition panel, pressing arrow keys changes the number of star points and point roundness
- Create the circle by Shift-dragging the Ellipse tool (
 ) with no layer selected.
 - Apply a white stroke of 12 pixels and a fill of None.
- Name the new shape layer circle.
- Add a Bevel and Emboss layer style (this is demonstrated later in Video 4.8) by choosing Layer > Layer Styles > Bevel And Emboss when the layer is selected.
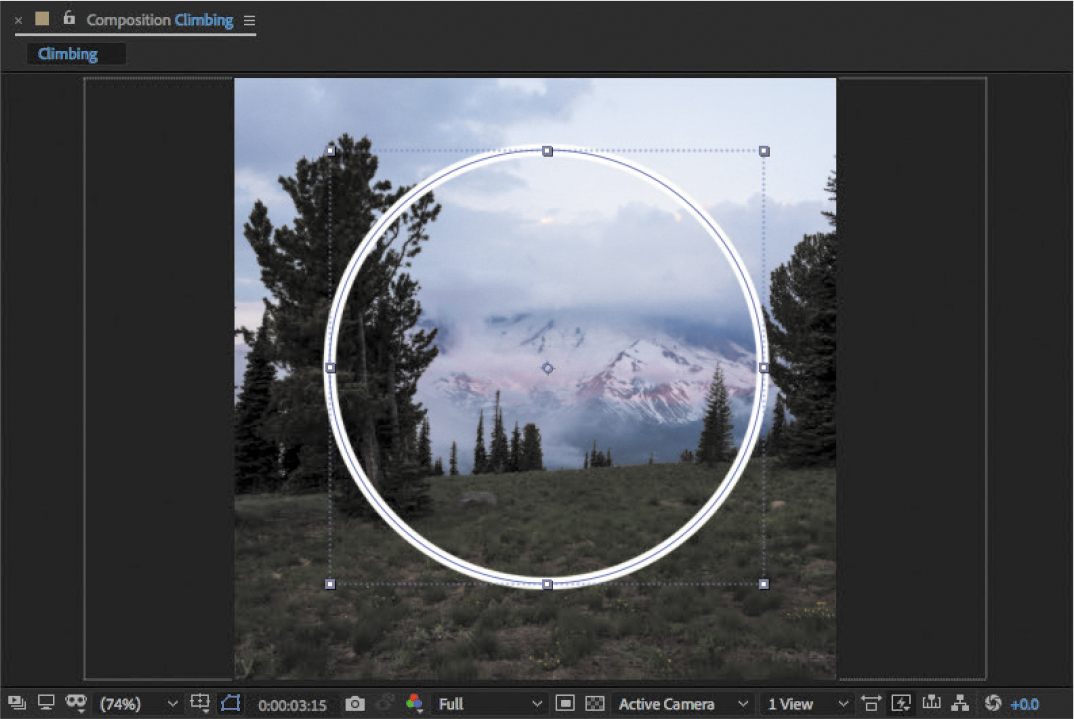
Figure 4.14 The circle created for the log
Animating a Stroke
Part of the concept for the logo is to have the circle draw itself over time. You can do this in After Effects by animating the Trim Paths property for a shape. It works like it sounds: You can set how much of the visible stroke of the path is trimmed from the start or end of the path.
Tip
A quick way to choose the Easy Ease option is by right-clicking a keyframe. The change will affect all selected keyframes.
Adding the Trim Paths property is similar to adding a text animator.
Tip
To see where the shape path starts and ends, and to get a sense of how to animate it before setting keyframes, scrub the Trim Paths values.
To add the Trim Paths property and animate it:
Click the Add menu for the Circle layer and choose Trim Paths. The Trim Paths properties are added to the Contents group of properties for the Circle layer (Figure 4.15).
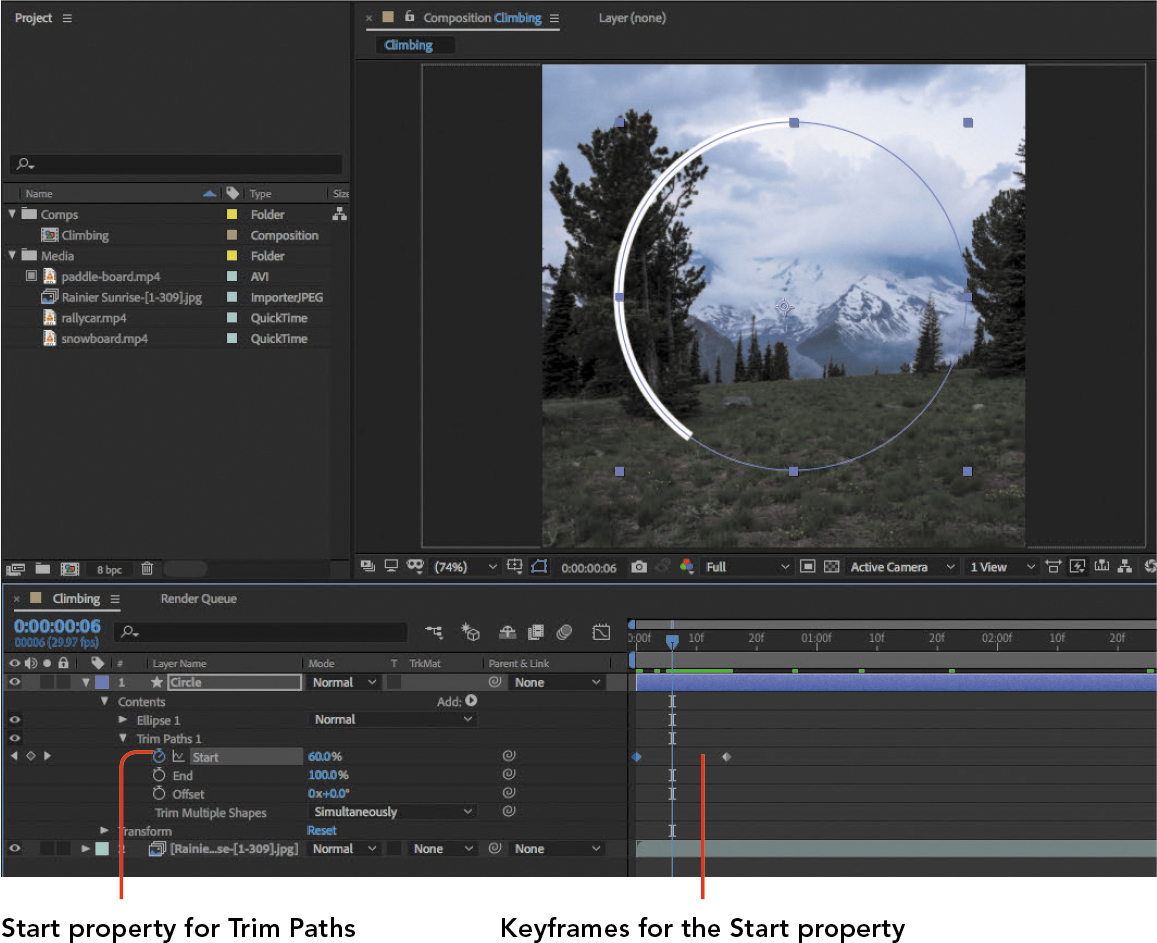
Figure 4.15 Animating the Trim Paths properties to make the circle appear to draw itself onto the frame
Expand the Trim Paths properties and animate the Start property by setting keyframes as needed. (For this logo it is not necessary to animate the Offset property.)
Don’t forget to apply motion blur and easing!
Adding Text to the Action Sports Logo
After you complete the circular part of the logo, it’s time to add the logo text.
![]() ACA Objective 4.2
ACA Objective 4.2
![]() ACA Objective 4.6
ACA Objective 4.6
You’ll add the text Action Sports, which is the name of the fictional client.
As always, typing new text will create a new text layer in the composition(Figure 4.16).

Figure 4.16 The Action Sports text layer created, with two keyframes to animate its path.
![]() Video 4.9
Video 4.9
Editing Text for the Action Sports Logo
Create the text using the same techniques you’ve used in earlier chapters, this time with the following attributes:
- When creating the text, enter the words Action Sports on two lines.
- The font used in Video 4.9 is Impact.
- Adjust other type specifications as needed so that the text fits.
- Apply options in the Align panel so that the text and circle are aligned to each other and centered within the composition, as demonstrated in Video 4.9. You may want to review the topic “Aligning Layers” in Chapter 2.
- Apply the Bevel And Emboss layer style to the text, using the same settings that you used for the circle.
Animating the Logo Text
Video 4.9 demonstrates how each letter of the Action Sports logo can slide into the composition individually. You can do this by adding a Position text animator property to the text layer and creating keyframes for it. If you need to review how to use a text animator and a range selector, see the topic “Using a Text Animator” in chapter 2
Remember that creating animation keyframes for a text animator property is different than animating a text layer property:
- Creating animation keyframes for a text animator can move parts of the text layer, such as individual characters or lines of text. Remember to set Range Selector keyframes, and also Position and Rotation starting points.
- Creating animation keyframes for a property of a text layer moves the entire layer.
This is demonstrated in Video 4.9. The text layer uses both a Rotation text animator and a Rotation layer property (Figure 4.17):
- The Rotation text animator is set up so that each letter enters the frame rotated but ends matching the other letters in the text layer. (Note that the Advanced properties let you animate other ways, such as animating entire words.)
- In addition, the Rotation property of the entire text layer is changed (but not animated) so that the whole text layer is rotated –10 degrees.

Figure 4.17 Working with the Animator text animator and Rotation layer property
If you have a great creative idea for making the Action Sports logo even more eye-catching, go ahead and try it out.
Pre-Composing for Easy Reuse
In Chapter 2, you learned how to pre-compose one or more layers to convert them into their own composition, nested in the composition you were working in. You’ll want to do this for the Action Sports logo.
A common reason for pre-composing is that you’d like to reuse some layers of a composition as a unit in other compositions. The composition you’ve been working on is an example of this: You’ve created the Action Sports logo inside the Climbing composition, but you’ll need to reuse the logo in other compositions.
One way to reuse the Action Sports logo would be to copy and paste its two layers to other compositions. Although this is possible, it isn’t the most efficient way to reuse the logo. For one thing, this method becomes cumbersome when the design you want to reuse consists of many layers. Also, if you ever need to update the logo, you would have to manually update its layers in every composition it was used in—potentially hundreds of them, depending on how widely it was used.
If you keep the Action Sports logo in its own composition, everything becomes easier:
- To reuse the logo, you simply drag one logo composition to any other composition that needs it. No matter how many layers are in the logo, you only have to drag one item, the logo composition.
- To edit the logo as a single unit, such as scaling the entire logo, you have to select only the logo composition instead of having to select every layer making up the logo.
- To update the logo, you simply update the logo composition. It will then update in any other composition containing the logo composition. Being able to update any number of compositions with a single edit will save you a large amount of time.
To pre-compose the logo into its own composition (Figure 4.18):
Select the Action Sports and Circle layers.
Choose Layer > Pre-Compose.
In the Pre-Compose dialog box, name the new composition Logo Animation.
Select Move All Attributes Into The New Composition.
Select Adjust Composition Duration To The Time Span Of The Selected Layers.
Click OK.
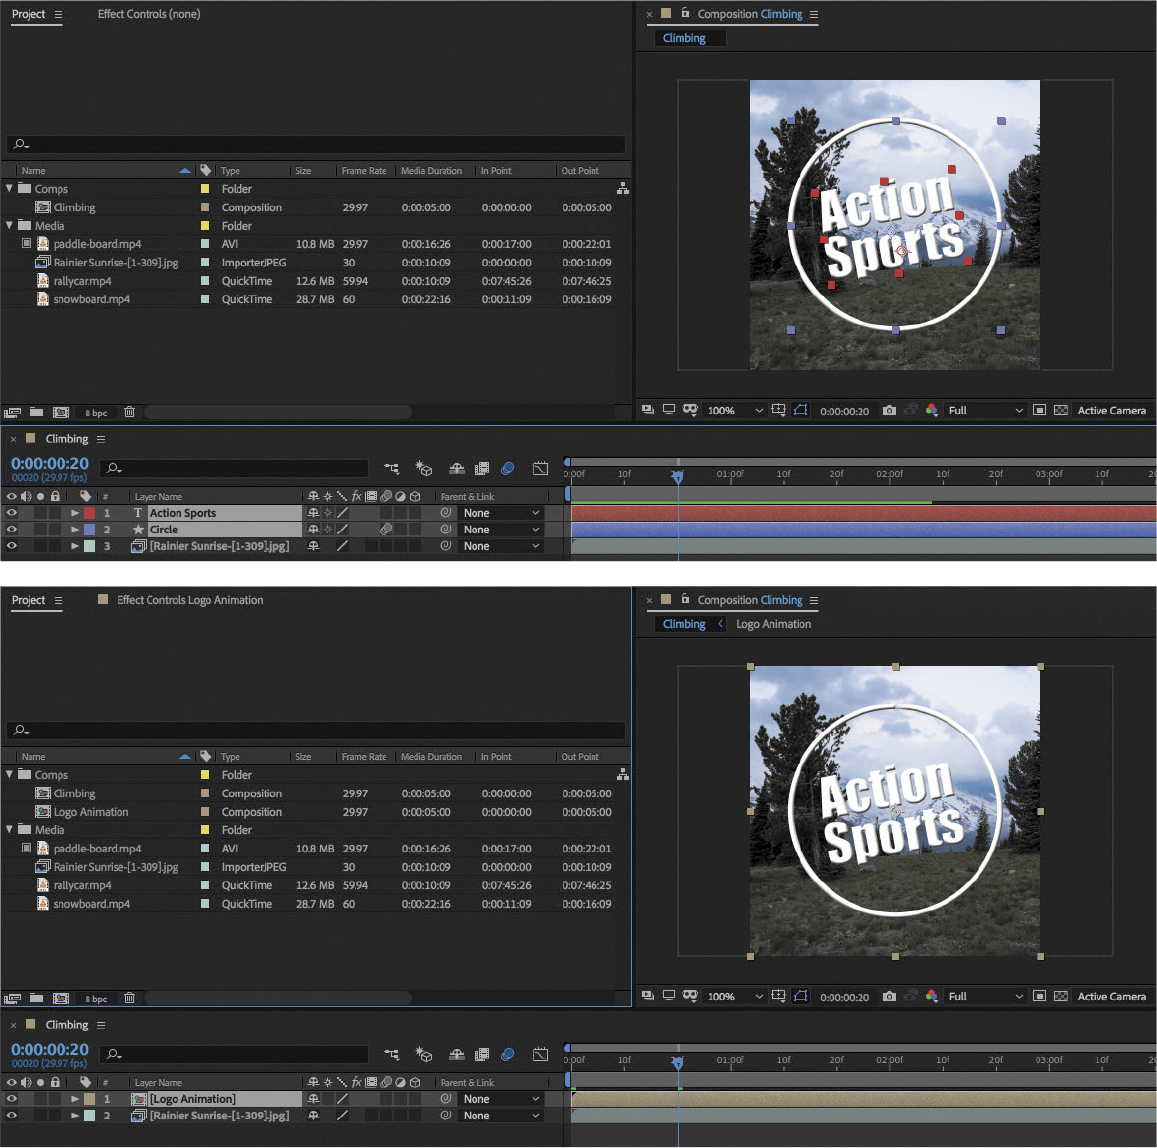
Figure 4.18 Before and after pre-composing the layers of the animated logo
The pre-composed layers become a new Logo Animation composition nested in the Climbing composition, and the new composition also appears in the Project panel.
Tip
Another way to pre-compose selected layers is to right-click (Windows) or Control-click (macOS) a layer and choose Pre-Compose.
Editing a Pre-Comp and Animating More Text
There are a couple of things that need to be done to finish up the Climbing composition: Adjust the logo animation to make room for composition elements that appear later, and add the text for the Climbing composition.
![]() ACA Objective 4.5
ACA Objective 4.5
![]() Video 4.10
Video 4.10
Editing a Pre-Comp
Editing the Logo Animation
The logo currently occupies most of the composition. But because it’s supposed to be added to other compositions with their own text appearing on the bottom, it would be good to have the logo appear, then shrink to the top of the frame, as demonstrated in Video 4.10.
Because the logo animation has been pre-composed into its own composition, making the necessary adjustments involves opening that composition. You can open it as you would any composition, by double-clicking it in the Project panel. Or, if the Climbing composition is open, you can also double-click the Logo Animation layer there to open its composition.
Centering Anchor Points to Layers
Video 4.10 shows the Logo Animation composition being edited, including scaling the circle and text layers from a common center. But in the beginning, their anchor points are not aligned; that would end up scaling them differently. (You learned about anchor points in Chapter 2.) It would be nice to center both of the anchor points.
To center the anchor points of specific layers:
- Select the layers and choose Layer > Transform > Center Anchor Point In Layer Content (Figure 4.19).

Figure 4.19 Before and after centering the anchor points of both layers
Tip
Another way to pre-compose selected layers is to right-click (Windows) or Control-click (macOS) a layer and choose Transform > Center Anchor Point in Layer Content.
Animating Multiple Layers Simultaneously
If you want to create the same animation for multiple layers, select them before you begin creating your animation. In Video 4.10, the Scale and Position properties of the two layers of the Action Sports logo are animated, and the only difference from the way you’ve animated properties before is that two layers are selected instead of one. The keyframe changes apply to both selected layers.
Tip
Remember the single-key shortcuts for revealing properties for selected layers: P reveals Position, S reveals Scale, and holding down Shift lets you display another property without hiding the previous ones.
To make the changes to the Action Sports logo (Figure 4.20):
Open the Logo Animation composition, if it isn’t already open.
In the Timeline panel, select both the Logo Animation and Rainier Sunrise [1-309].jpg layers.
At 1:10, enable animation (click the stopwatch icon) and add keyframes for Position and Scale properties to either selected layer. The keyframes will appear on both selected layers.
On either selected layer, enable the stopwatch icon for the Position and Scale properties. This will enable stopwatch icons for both selected layers.
At 2:00, add another set of Position and Scale keyframes.
Adjust the Scale property to 40% and change the Position Y value to move the layer up near the top of the frame.
Select all the keyframes you created and apply Easy Ease. To save time, remember that you can select all of the keyframes for a property by clicking the property name.

Figure 4.20 Editing with two layers’ keyframes selected
At each step, changes to keyframes apply to both selected layers. The logo animation is now ready to be used with each version of the intro video.
Adding Animated Text for the Climbing Video
Now you’ll switch back to working on the Climbing intro video, as demonstrated in Video 4.10.
Each of the intro videos you create in this chapter will work the same way; after the Action Sports logo moves up and out of the way, the text for the specific intro video will appear at the bottom of the frame.
To add the intro text (Figure 4.21):
Switch back to the Climbing composition.
Change the current time to just after the Action Sports logo stops near the top of the frame.
Add a new text layer and enter the text Climbing.
Use the Align panel to center the Climbing text layer in the composition frame.
Add a Tracking text animator property and animate it so that the individual letters of the word Climbing enter the frame by moving closer together.
Check your work by previewing the composition. Add any additional polish that improves the animation, such as easing and motion blur.
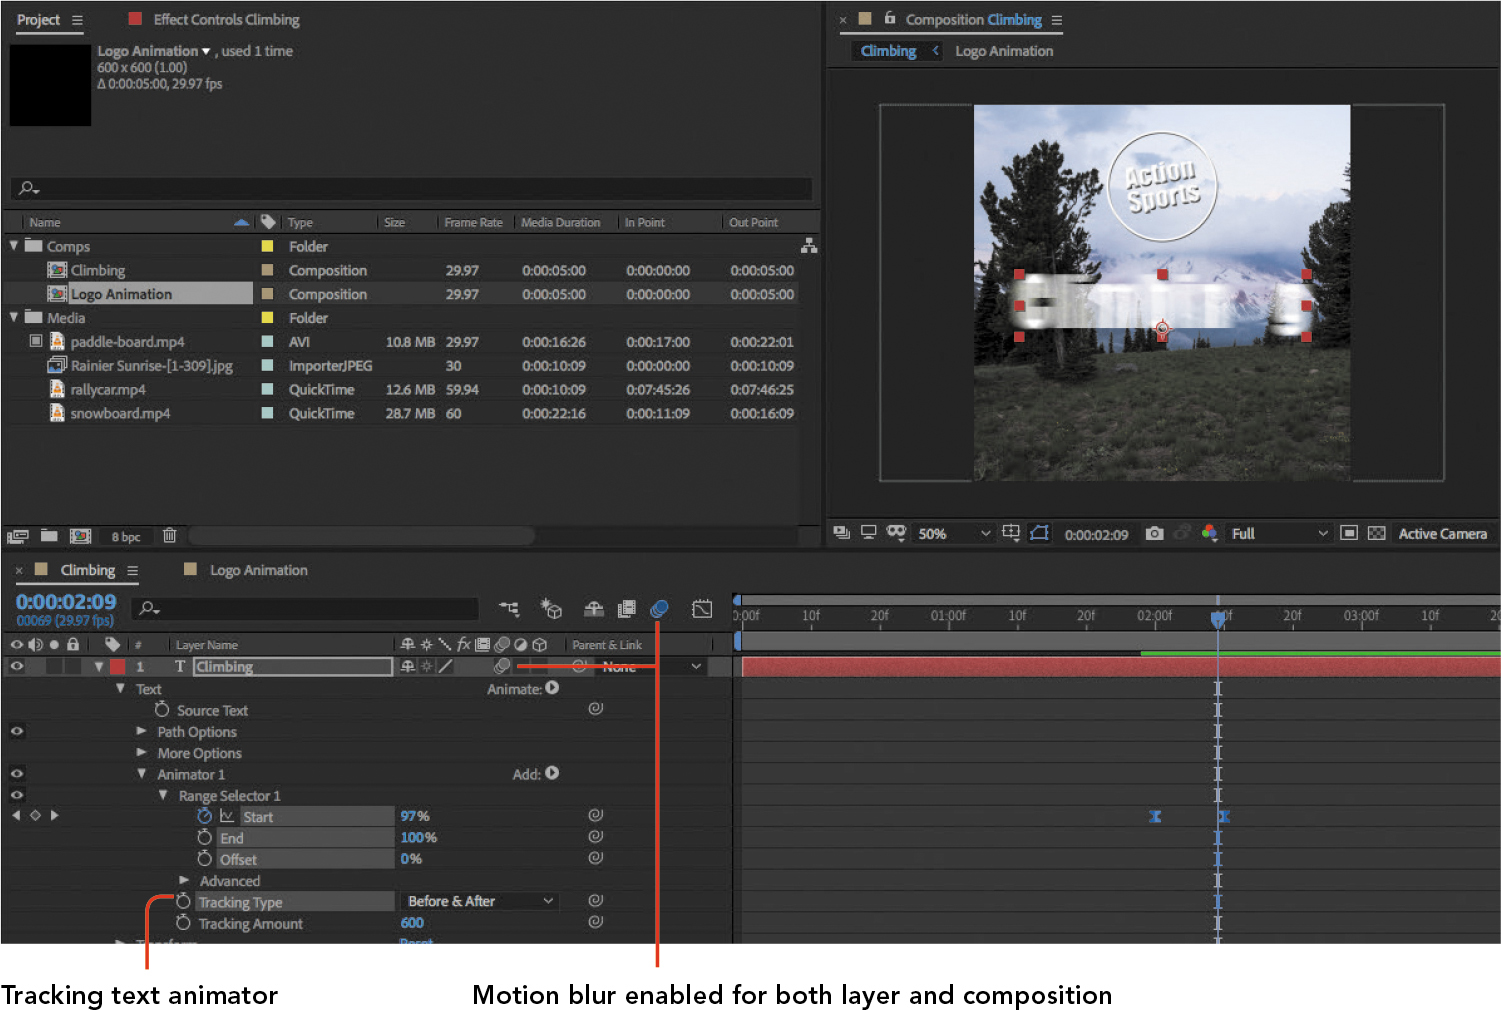
Figure 4.21 The Climbing text using the Tracking text animator to appear in the frame with motion blur
Tip
Remember that there’s more than one way to edit the value of a property. You can type it in, scrub the value, or sometimes drag the layer itself in the Composition panel.
Notice how this composition brings together all the elements you have prepared: a nested composition for the animated Action Sports logo, a time-lapse background video created from a still image sequence, and animated text.
![]() ACA Objective 2.1
ACA Objective 2.1
![]() ACA Objective 4.6
ACA Objective 4.6
Creating the Rally Car Intro Composition
You’re about to create a second variation of the intro video. Fortunately, you don’t have to start from scratch, because earlier you created elements that you can reuse. This intro video will be labeled Racing, and it will use a different background video.
![]() Video 4.11
Video 4.11
Creating the Rally Car Intro Composition
Creating the Composition with a Preset
Create a new composition for this new intro video. But before you start making changes in the Composition Settings dialog box, remember that you created a preset for the intro videos, and now is the time to apply it.
To set up the rally car composition using a preset:
Create a new empty composition using any of the methods you have learned, and name it Rally Car.
In the Composition Settings dialog box, click the Preset menu and choose the Social 600x600 preset you created earlier. Presets you create are at the bottom of the Preset menu.
The options in the Composition Settings dialog box change, using the settings from the preset you chose (Figure 4.22). You just saved a lot of steps!

Figure 4.22 Setting up the new Rally Car composition in the Composition Settings dialog box
Make sure Duration is set to 5 seconds and click OK.
In the Project panel, drag the Rally Car composition into the Comps folder.
Adding the Background Video
This intro video needs its own background video, and it’s the rallycar.mp4 video you imported earlier. You’ll bring it into this composition now.
To set up the background video:
Drag the rallycar.mp4 video from the Project panel into the Rally Car timeline.
As with the video for the Climbing composition, this video is much larger than the composition frame.
Scale down the video to match the height of the composition frame, using the same techniques you used earlier to scale down the background time-lapse video to fit the Climbing composition (Figure 4.23).

Figure 4.23 The rallycar.mp4 layer scaled and positioned within the Rally Car composition frame
Tip
When positioning a layer in a composition, remember to check layer positioning over the entire duration of the layer, not just at one frame in the beginning or middle.
Applying a Basic Image Correction Effect
When you need to make a correction to the color or tone to a video, you can apply an image correction effect. You’ve applied effects before, so the important thing to know here is which effect to add. Video 4.11 demonstrates applying the Levels effect, which is in the Color Correction category.
The Levels effect is just one of many possible color correction effects available in After Effects. You don’t always have to use Levels; sometimes a different correction effect will be more effective or easier for a given footage item. If you have experience with the commonly used Levels feature in image editing software such as Adobe Photoshop, this effect will be familiar to you.
Tip
While image correction effects exist in more than one category, you’ll find many of the more useful ones in the Color Correction category.
Remember that you can apply an effect in more than one way:
- Drag an effect from the Effects panel, and drop it on a layer in the Timeline or Composition panel.
- Select a layer, and then choose a command from the Effect menu.
After applying the Levels effect to a layer, make sure the layer is still selected, and open the Effect Controls panel to see the Levels effect and its options.
The Levels effect has five properties arranged along two rows under a histogram (Figure 4.24). The top row contains the Input Black, Gamma, and Input White properties, and the bottom row contains the Output Black and Output White properties. That’s a lot to understand, but you often don’t need to adjust them all. You can take this general approach:
- To adjust brightness, change the Gamma value. This will primarily affect the midtones. The other four values also affect brightness indirectly.
- To add contrast, increase Input Black, decrease Input White, or do both, but be careful not to lose important shadow and highlight detail.
- To lower contrast, increase Output Black, decrease Output White, or both.
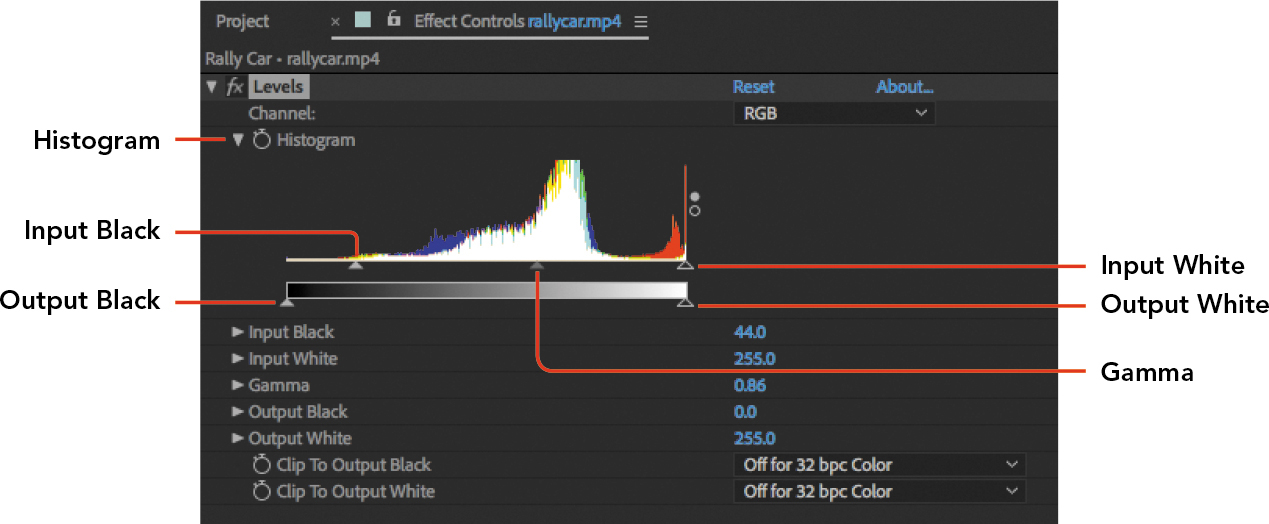
Figure 4.24 Levels effect
Time Remapping the Rally Car Layer
There’s a problem with the rallycar.mp4 layer: It’s too short. The intro videos are set up to be five seconds long, but the trimmed rallycar.mp4 video is less than one second long. One solution might be to edit the footage In and Out points so that it’s longer, but if you try that, you’ll find that the car is not inside the frame at those times. What can you do? The solution demonstrated in Video 4.12. is to slow down the video playback speed and then freeze it so that the car appears to come to a stop and then starts moving again. You just have to slow it down enough that it becomes five seconds long.
![]() ACA Objective 4.4
ACA Objective 4.4
![]() Video 4.12
Video 4.12
Working with Time Remapping
To achieve this, you can use the Time Remapping feature. When you play a video layer at normal speed, each video frame plays back with each composition frame. When you change the speed, the video becomes shorter or longer than its original duration.
But that isn’t time remapping, because the frames play at a constant rate. Time remapping lets you not only change the playback speed, but also vary it over time. You can use time remapping to continuously increase or decrease in speed during its duration, forward and backward, changing speed and direction at any times.
To use time remapping to slow the car to a stop and resume:
Change the current time to where the car is in the middle of the frame. Video 4.12 uses 0:19.
Choose Layer > Time > Enable Time Remapping. The Time Remap property appears in the Timeline panel, and its time-vary stopwatch is on.
Click the Add or Remove Keyframe button (
 ) to add a Time Remap keyframe at the current time.
Copy the keyframe (for example, select it and choose Edit > Copy).
Change the current time to when you’d like playback to resume (Video 4.12 uses 4:20), then paste the keyframe.
The first keyframe and the second keyframe are set to play back the same frame of the layer, so during the time between those keyframes, the video is stuck at the same frame and the car appears to be stopped. It’s really stopped in playback time.
At this point the layer duration has been extended by the time interval between the two keyframes, but you aren’t seeing the extended duration because the layer Out point has not changed. Drag the layer Out point to the end of the composition in the Timeline panel, and you’ll see that there are now five seconds of video (Figure 4.25), thanks to the time that the video was frozen on the same frame.

Figure 4.25 Completed animation after extending layer duration
Preview the composition, and then add finishing touches such as easing and motion blur.
Note
To nudge the current time along the Timeline, press the Ctrl (Windows) or Command (macOS) key along with the Left Arrow or Right Arrow key. Don’t try to navigate thetimeline with the Left Arrow or Right Arrow keys as in video editing applications, because inAfter Effects those keys nudge a layer in space, similar to how arrow keys work in graphics applications.
![]() ACA Objective 3.2
ACA Objective 3.2
![]() ACA Objective 4.6
ACA Objective 4.6
Applying Multiple Effects to a Layer
When you apply an effect, you aren’t limited to just one. Feel free to stack multiple effects on a single layer; it’s a great way to get exactly the look you want.
![]() Video 4.13
Video 4.13
Stacking Multiple Effects on a Layer
For the rally car intro video, the Levels effect is already applied to the video layer. Because the intro video text will later be added over the car, adding a blur will make the text easier to read over the car. This won’t be a problem; it’s only a matter of adding a second effect (a blur) to the same layer.
To do this, simply add a blur effect to the rallycar.mp4 layer using any of the techniques you’ve learned (dragging an effect from the Effects panel, or choosing a command from the Effects menu). Video 4.12 applies the Gaussian Blur effect, starting at the time the car video is frozen. On top of that, the 4-Color Gradient effect is applied, for a total of three effects on one layer.
The 4-Color Gradient effect is easy to use. You can apply four colors to a layer at four different locations, and the effect will create color blends among them. You can set the location of each point visually by using the position icon (you used it before in “Applying a Lightning Animation Preset” in Chapter 3). You can set each color by using the color swatches or by sampling with the eyedropper icon that you’ve also used before (in “Editing Composition Settings” in chapter 1).
You can add the same three effects shown in the videos or combine any number of effects you choose.
After you add more than one effect to the rallycar.mp4 layer, look at the Effect Controls panel (Figure 4.26). If you followed the steps in Videos 4.12 and 4.13, you will now see three effects there: Levels, Gaussian Blur, and 4-Color Gradient. The Effect Controls panel has several features you can take advantage of:
- There’s an fx icon to the left of the effect name, which you can click to disable the effect without removing it or its settings.
- To the left of the fx icon is a triangle that you can click to collapse or expand the settings for an effect. This is especially useful when a long list of effects is applied to a layer.
- You can rearrange the effects by dragging the effect name up or down in the list. Changing the order in which effects are applied can produce a different result.
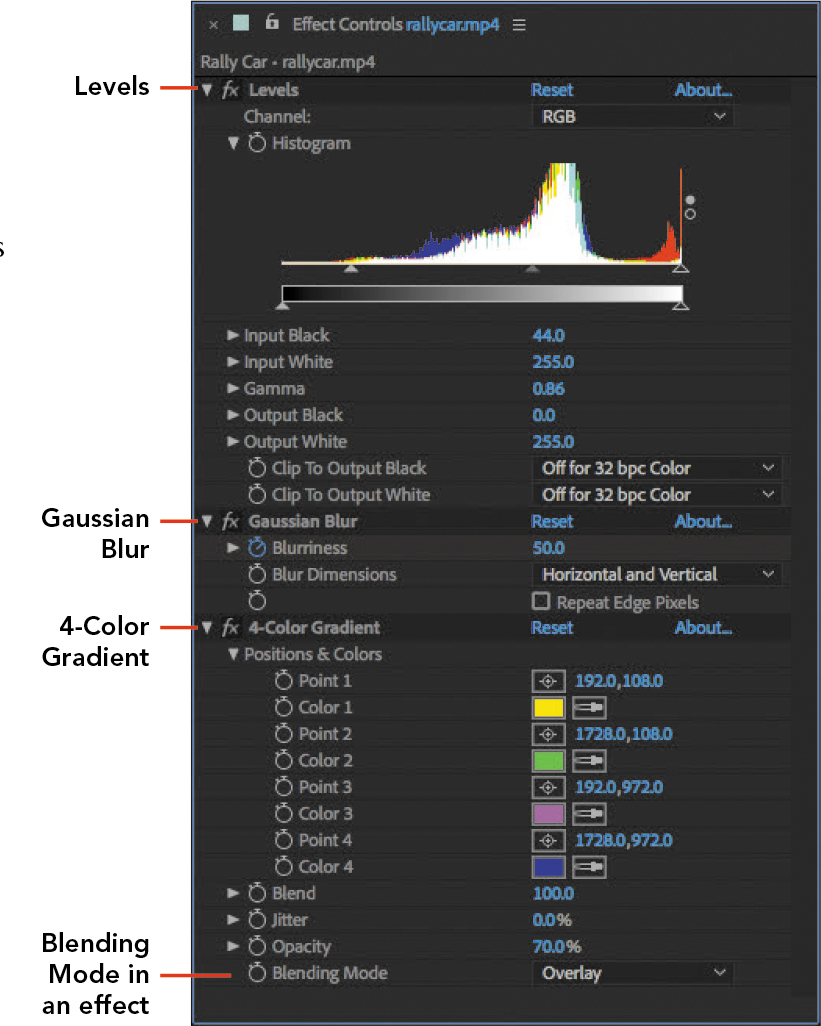
Figure 4.26 Multiple effects applied to the rallycar.mp4 layer
Many effects have a Blending Mode property. In Chapter 3, blending modes were used to alter how multiple layers were visually combined. For effects, the Blending Mode property alters how multiple effects are visually combined on one layer. The same thinking applies to how you use the Opacity property at the layer level compared to adjusting Opacity at the effect level.
Finishing the Rally Car Video
Because the rally car intro video is part of the same series as the Climbing video, you’ll finish it the same way: by adding the Action Sports logo and some text.
![]() ACA Objective 4.2
ACA Objective 4.2
![]() Video 4.14
Video 4.14
Adding and Animating Text
Because you’ve already created the Logo Animation composition, all you have to do is drag it into the Rally Car composition. But remember to first change the current time to when you want the logo to appear, which should be when the car is stopped and blurred. By pressing the U key, you reveal the keyframes already set for other layers so that you can make sure the new keyframes you set are perfectly aligned with existing keyframes in time.
Next, add a text layer and enter the text Racing. Apply the same Character panel settings that you used for the text in the Climbing video. Then animate the Racing text in the same way as well. Because you’ve done it all before, this should now be additional practice for you. You should be becoming increasingly familiar with the techniques and how they are used on content that’s different but similar. These are valuable techniques to know whenever you need to create a family of related content with a consistent look, such as social media channel branding, or an ad campaign.
The end of Video 4.14 demonstrates how to set the work area bar at the top of the Timeline panel to limit the time range that’s previewed or exported, which is useful when you need to test only part of the composition (Figure 4.27).
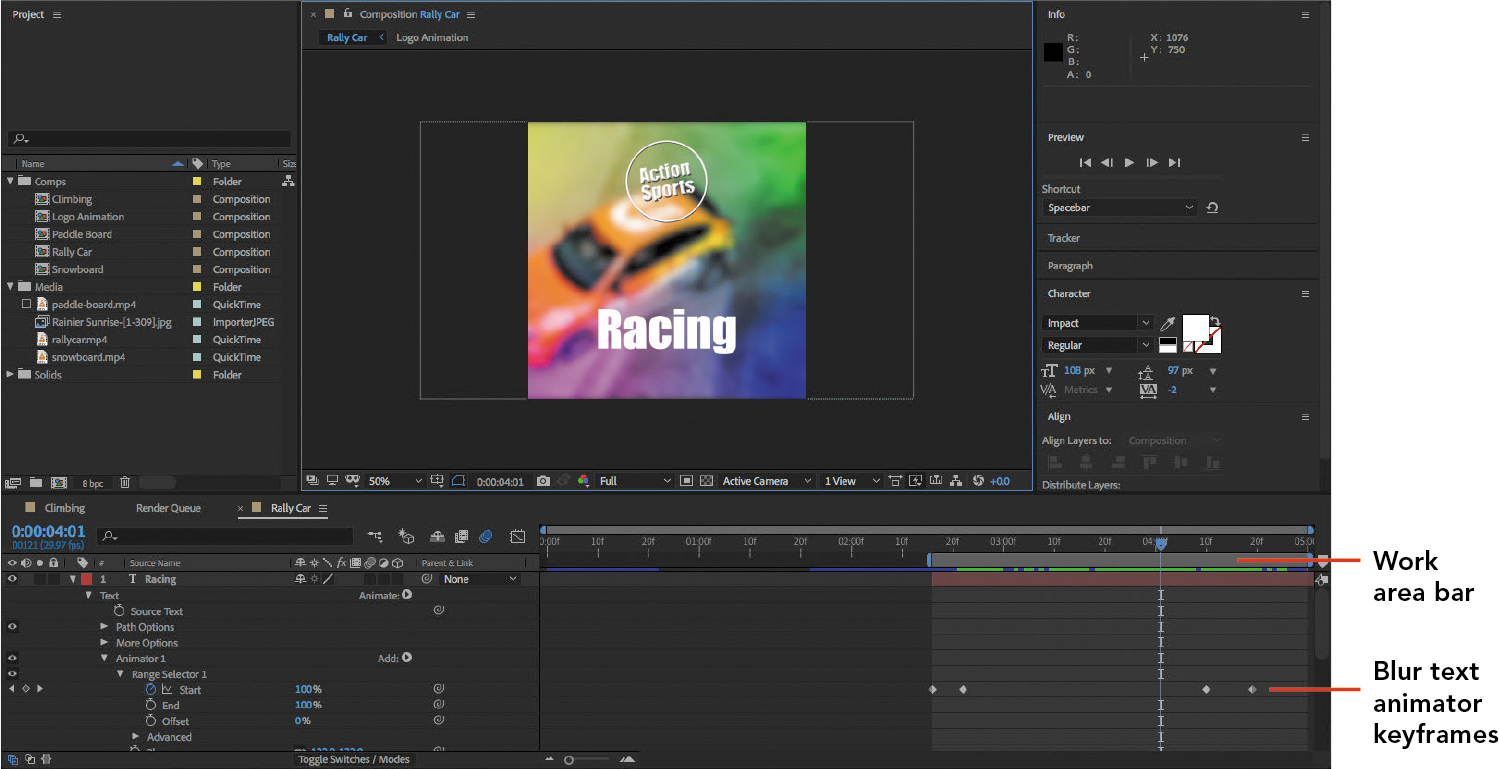
Figure 4.27 Completed Racing video with the work area bar adjusted
Creating the Snowboard Intro Composition
Now it’s time to create the third intro video, which is about snowboarding. As with the previous two videos, though the general requirement is to create a five-second video with an animated logo, the details of how it’s created are slightly different.
![]() ACA Objective 2.1
ACA Objective 2.1
![]() Video 4.15
Video 4.15
Adjusting Composition Settings
The first difference is how the composition is created. You’ve learned that you can quickly create a composition from a footage item by dragging it onto the Create A New Composition button in the Project panel, and that’s how the snowboard composition is first created in Video 4.15, creating a composition named after the footage item.
Of course, this method bases composition settings on the footage item, but the settings of the footage item do not match the requirements for the square intro videos. How can you make this composition match the square intro video specifications?
Two facts will save you: You can change composition settings at any time, and you’ve created a composition preset that applies the settings you need. All you have to do is open the Composition Settings dialog box (choose Composition > Composition Settings or click Ctrl+K on Windows or Command+K on macOS), and apply the preset by choosing its name (Social 600x600) from the Preset menu.
Even though you applied a preset, it’s still a good idea to take a quick look through the settings to check them. In Video 4.15, the Start Timecode option is set to 0, and Duration is set to 5 seconds to match the other videos.
After you click OK to close the Composition Settings dialog box, adjust the position and scaling of the snowboard movie in the composition frame, paying special attention to where the snowboarder flips around on the tip of the snowboard; the intro video will focus on that moment.
Applying Automatic Effects
You might have noticed that many effects have a long list of options, which can make some effects challenging to learn or intimidating to use, especially if you don’t have a lot of time. Fortunately, some effects have an automatic (or Auto) option that can produce good results in a step or two.
![]() ACA Objective 4.5
ACA Objective 4.5
![]() Video 4.16
Video 4.16
Applying Automatic Effects
You may encounter automatic options in different ways:
- An effect may provide an Auto button as an alternative to setting all the options manually.
- The effect itself might have the word Auto in its name to show that it’s a simplified version of the effect. For example, you applied the Levels effect to the rallycar.mp4 video in the Racing intro video, but you’ll apply an Auto Levels effect to the snowboard.mp4 effect in this composition.
- An automatic effect may have default settings that work well in many situations. But be prepared to override default settings if they don’t work well for a specific composition.
Using Auto Levels
Find and apply the Auto Levels effect to the snowboard.mp4 layer in the same way that you’ve applied other effects before. If you’re not satisfied with the way Auto Levels handles the shadows or highlights in the layer, adjust the Black Clip and White Clip options. Auto Levels may not work well with footage shot under unusual lighting conditions; in that case, apply Levels instead and use your own adjustments.
Using Broadcast Colors
The Broadcast Colors effect is applied in Video 4.16. The purpose of Broadcast Colors is to conform the colors of a layer to broadcast standards. If colors don’t meet the standard, footage may appear incorrect, or the video might even be rejected by the broadcaster.
Broadcast Colors is an automatic effect because there isn’t much for you to adjust. However, some options affect how the layer is adjusted; the correct settings for those options depend on the broadcast standard you want to conform to. If you’re not sure how which settings you should use, ask the broadcast facility that will receive your video.
After Effects also includes more precise ways, such as the Color Finesse plug-in, of evaluating and tuning colors for broadcast standards. For more information, see helpx.adobe.com/in/after-effects/using//color-correction-effects.html#broadcast_colors_effect.
Again, all effects you’ve applied to a layer will appear as a stack in the Effect Controls panel (Figure 4.28).

Figure 4.28 The Auto Levels and Broadcast Colors effects applied to the snowboard.mp4 layer
Using Warp Stabilizer
Video 4.16 mentions the Warp Stabilizer effect, although it isn’t applied to the final video. When you have video footage that looks shaky because it was taken with a handheld camera, the Warp Stabilizer effect can help smooth it out. You can use it as an automatic effect because the default settings should work well for many types of video. But it does have a number of options that you can use to tune the stabilization for specific needs. For example, you can set the Stabilization > Result property to No Motion if you want footage taken in one spot to appear locked down on a tripod.
One quirk about Warp Stabilizer is that it won’t work on a layer that has certain adjustments, such as Time Remapping or a speed change, applied. You can still get it done, but you’ll first need to pre-compose the layer and apply the time adjustment to the layer inside the new composition.
Playing a Layer Backward and Forward
Time Remapping is used on the Snowboard video, but in a different way than on the Rally Car video. In the Rally Car video, you used Time Remapping to slow layer playback to a stop. In the Snowboard video, you’ll use Time Remapping to play a video backward and forward.
![]() ACA Objective 4.4
ACA Objective 4.4
![]() Video 4.17
Video 4.17
Playing a Layer Backward and Forward
After Effects includes the Layer > Time > Time Reverse Layer command. This command is convenient when all you want to do is play the entire layer in reverse at a constant speed. Why would you use Time Remapping instead? Time Remapping lets you control exactly when and how fast any part of a layer plays forward or backward at any time—you have complete control with keyframes.
To control forward and backward playback with Time Remapping:
Note
If the times when you add keyframes don’t match how the video looks, it’s probably because the footage was trimmed to slightly different In and Out points than in the video. To reproduce the results in the video, you can compensate for the time difference by shifting something in time, such as the In point, the keyframes, or the layer itself.
Change the current time to where the car is in the middle of the frame. Video 4.17 uses 1:10.
Choose Layer > Time > Enable Time Remapping. The Time Remap property appears in the Timeline panel, and its time-vary stopwatch is on.
Click the Add Or Remove Keyframe button to add a Time Remap keyframe at the current time. This marks the point where the forward-reverse-forward segment will begin.
Scrub through to find the right frame to start reversing the action (Video 4.17 uses 1:25), then click the Add Or Remove Keyframe button to add another keyframe.
Copy the first keyframe (for example, select it and choose Edit > Copy).
Scrub through to find the right frame at which to start reversing the action (Video 4.17 uses 2:17), then paste the keyframe (choose Edit > Paste) that you just copied (Figure 4.29).

Figure 4.29 The Timeline panel after copying the first Time Remapping keyframe and pasting it as the third keyframe
You just added a keyframe that marked a certain time, and a second keyframe that marked another time later in the layer, and then you created a third keyframe by pasting the first keyframe again, which marks the earlier time. Because the third keyframe is an earlier layer frame than the second, the layer starts playing backward at the second keyframe, and starts playing forward again at the third keyframe.
Tip
Applying the Layer > Time > Time Reverse Layer command is the same as choosing Layer > Time > Time Stretch and entering a duration of –100.
That’s the basic idea behind time remapping: Each keyframe tells the composition which frame to play in the layer, and After Effects interpolates to play back the indicated motion in the frames between the keyframes.
As in the rally car video, you’ll need to extend the Out point of the layer since time remapping extended the layer duration.
Changing the Duration of a Series of Keyframes
There are times when a series of keyframes is well paced but plays back too quickly or too slowly. How can you adjust the overall duration of the keyframes without altering their positions relative to each other? Video 4.17 demonstrates a handy shortcut that lets you do this easily.
To change the duration of a series of keyframes:
Select at least three keyframes to adjust.
Hold down the Alt key (Windows) or the Option key (macOS), and drag the keyframe at either end of the series:
- To make the animation play more slowly (extend its duration), drag the end keyframe to make the series wider (more time between keyframes).
- To make the animation play more quickly (shorten its duration), drag the end keyframe to make the series narrower (less time between keyframes).
Finishing the Snowboard Logo
All of the adjustments to the background snowboarding video are complete, so you can guess what’s left to do for this intro video: Add the Action Sports logo, and add the text for this specific video.
![]() ACA Objective 4.2
ACA Objective 4.2
![]() Video 4.18
Video 4.18
Adding the Logo Animation
Because you’ve already created the Logo Animation composition, all you have to do is add it to this composition. First, change the current time to a good moment to add the Action Sports logo, and then drag it into the composition. Then add a text layer and enter the text Snowboard. Apply the same Character panel settings that you used for the text in the previous videos.
The one thing that’s different about this video is that white text does not show up well against the snowy background. Video 4.18 changes the text color to something darker and more legible (Figure 4.30). You can do this too, or you can choose a different method that improves legibility, such as adding a stroke (outline), drop shadow effect, or bevel and emboss effect to the text.

Figure 4.30 The completed Snowboard intro video
And don’t forget to animate the appearance of the text. Video 4.18 animates opacity, but you can animate a text property as the other videos did.
Creating the Paddleboard Intro Composition
Now it’s time to create the fourth intro video, which is about paddle boarding. This one will involve even more advanced effects than the ones you’ve seen so far.
![]() ACA Objective 2.1
ACA Objective 2.1
![]() Video 4.19
Video 4.19
Creating the Paddleboard Intro
Start by creating a new composition based on the Social 600x600 composition preset; name it Paddle Board and make sure its duration is five seconds. If the composition isn’t already in the Comps folder in the Project panel, move it there.
Add the paddle-board.mp4 video. Play the composition all the way through to check its scaling and positioning. Make any scaling and positioning adjustments that are needed to compose the paddle boarder effectively within the frame for the entire duration of the composition.
If you created a proxy for this composition, you can try editing with the proxy enabled and disabled to see if editing is more responsive when the proxy is in use (Figure 4.31). The proxy may not make much difference if your computer is powerful enough to smoothly preview a composition and all of its layers and effects. But the speed benefits of using a proxy will be more obvious if you are using a less powerful computer, or if you’re editing high-resolution layers with many effects applied.
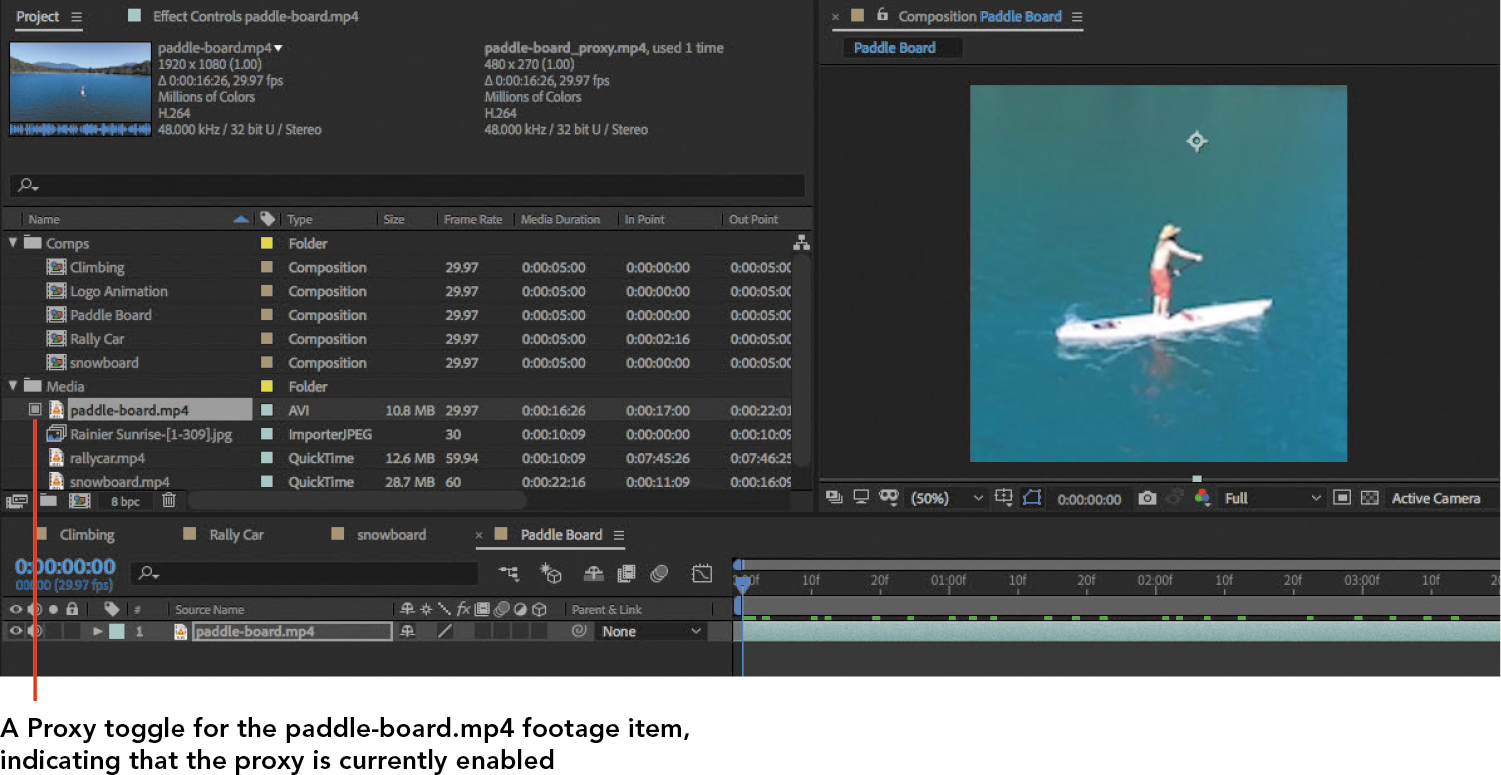
Figure 4.31 Paddle Board composition created
Motion Tracking a Layer
A goal for the paddle board video is to have another layer follow a paddle boarder moving across the frame in a video footage layer. This is something you can easily achieve using the Motion Tracking feature.
![]() ACA Objective 4.6
ACA Objective 4.6
![]() Video 4.20
Video 4.20
Motion Tracking a Layer
To track the paddle boarder:
Do one of the following so that the Motion Tracker panel is open:
- Choose Window > Tracker to open the Motion Tracker panel in your current workspace.
- Choose Window > Workspace > Motion Tracking to switch to the Motion Tracking workspace.
Select the layer you want to track; in this case, select the paddle-board.mp4 layer.
Note
If you see a Proxy Enabled message at the bottom of the Layers panel, you may want to disable the proxy so that the tracker can work from the full-quality original footage. But if your computer is slow and the results from tracking the proxy are good enough, you can leave the proxy enabled.
In the Tracker panel, click the Track Motion button (Figure 4.32).
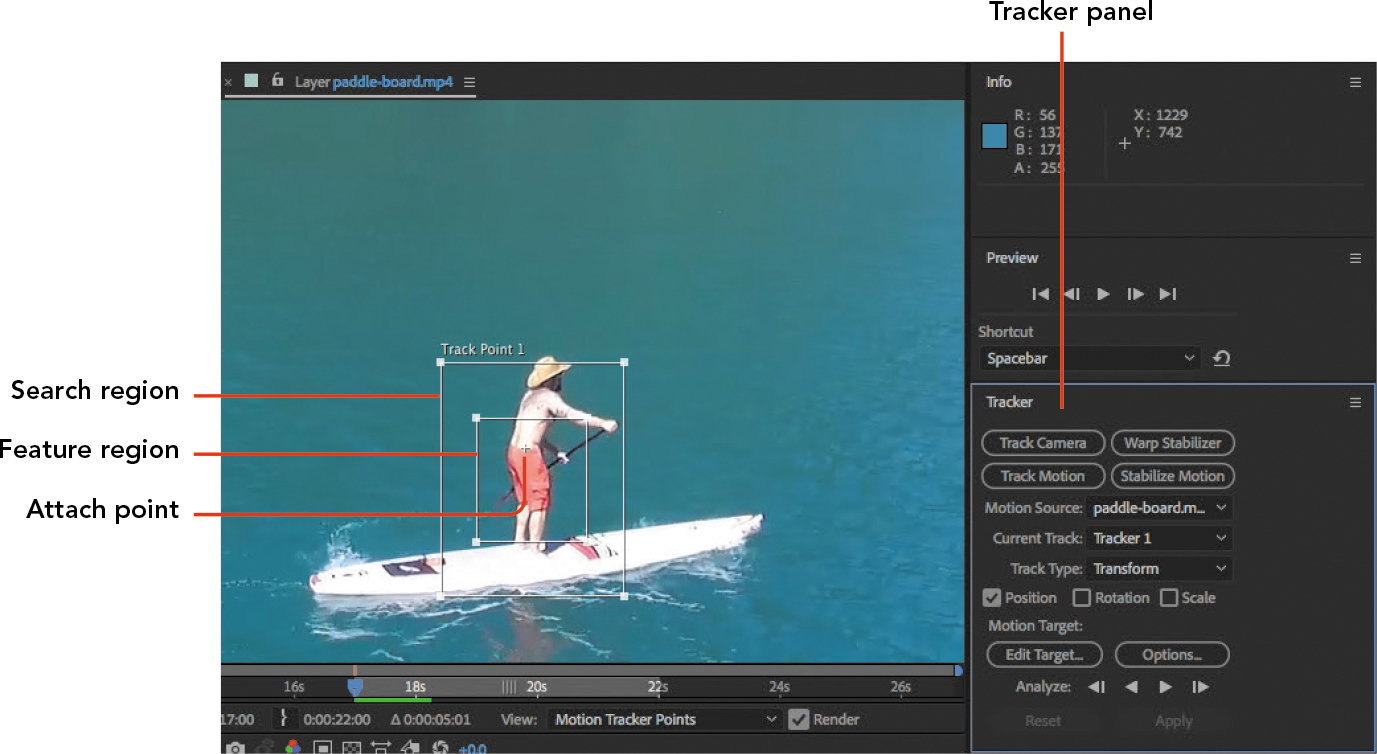
Figure 4.32 Motion Tracker with tracking regions set up in the Layers panel
Clicking the Track Motion button opens the Layer panel and displays the tracking search box, feature area box, and attach point. To record the motion data, clicking the Track Motion button also creates a new layer property called Track Point 1.
Click the Options button, set the following options, and click OK (Figure 4.33):
- For Channel, click RGB, because the easiest content to visually track is the brightly colored pair of swim trunks.
- From the menu at the bottom of the Motion Tracker Options dialog box, make sure Adapt Feature is selected, and make sure If Confidence Is Below is set to 80%. This tells the motion tracker to automatically adjust the feature box if it isn’t sufficiently confident that it’s still tracking the right thing.
The options work well for the paddle board video. If you were using motion tracking with a different video, different settings might be more appropriate.

Figure 4.33 The Motion Tracker Options dialog box
In the Tracker panel, click the Analyze Forward button (
 ).
).
The motion tracker goes through the image frame by frame and creates tracking points based on its analysis of the content in the frame (Figure 4.34). You can use the other Analyze buttons if you are starting from the middle of the layer duration. Each tracking point is actually a set of keyframes for a Track Point property; you can see them by pressing the U key.

Figure 4.34 Motion tracking completed, with the layer’s generated keyframes displayed in the Timeline panel
Motion tracking requires analysis that takes a lot of computation, so it may take a while on a slower computer.
For simple motion as is needed for this video, a single track point is enough. Additional track points can be added when, for example, you want to track how a rectangular phone screen moves and rotates so that you can attach a synthetic screen image to it and match perspective at all times.
If this is the first time you’ve seen the Layer panel, you should know a little more about it.
The Layer panel isn’t just used during motion tracking. It’s always available when a composition is open, and it’s useful for seeing the contents of a layer independent of the composition settings and other elements.
The Layer panel opens when you double-click a layer that isn’t a nested composition. (If you double-click a layer that’s a nested composition, it opens in another Composition window tab.) This is similar to how the Footage panel opens when you open a media item in the Project window. The difference is that after footage has been added to a composition, it’s a layer. Edits you make to that layer affect it within its containing composition only.
It’s important to understand the difference between motion tracking and the parenting technique you learned earlier, which can also follow another layer. Parenting can track the value of a layer’s property, such as Position, as it changes over time. But when you have a video where none of its properties are changing over time, and you want to track content that’s part of the video frame, you need a way of detecting how that content changes. That’s what Motion Tracker analyzes.
Creating a Null Object as a Motion Tracking Parent
Just having the tracking points isn’t enough. You need to attach the points to something else as a target for the motion path. After Effects provides a special layer type called a null object that often serves this role.
![]() ACA Objective 3.2
ACA Objective 3.2
![]() Video 4.21
Video 4.21
Adding a Motion Tracking Parent
A null object is an invisible layer that other layers can use as a parent for various motion tracking purposes.
To set up a null object as a motion target:
Choose Layer > New > Null Object.
The new null object appears as a new layer in the composition; you’ll see it in the Timeline panel.
Rename the null object Paddle Tracker.
Make sure you’re viewing the paddle-board.mp4 layer in the Layer panel, not the Composition panel. If you’re not seeing the Layer panel, double-click it in the Timeline panel.
Select the paddle-board.mp4 layer, and then in the Tracker panel, click Edit Target.
In the Motion Target dialog box, select the Paddle Tracker layer (Figure 4.35), and click OK.
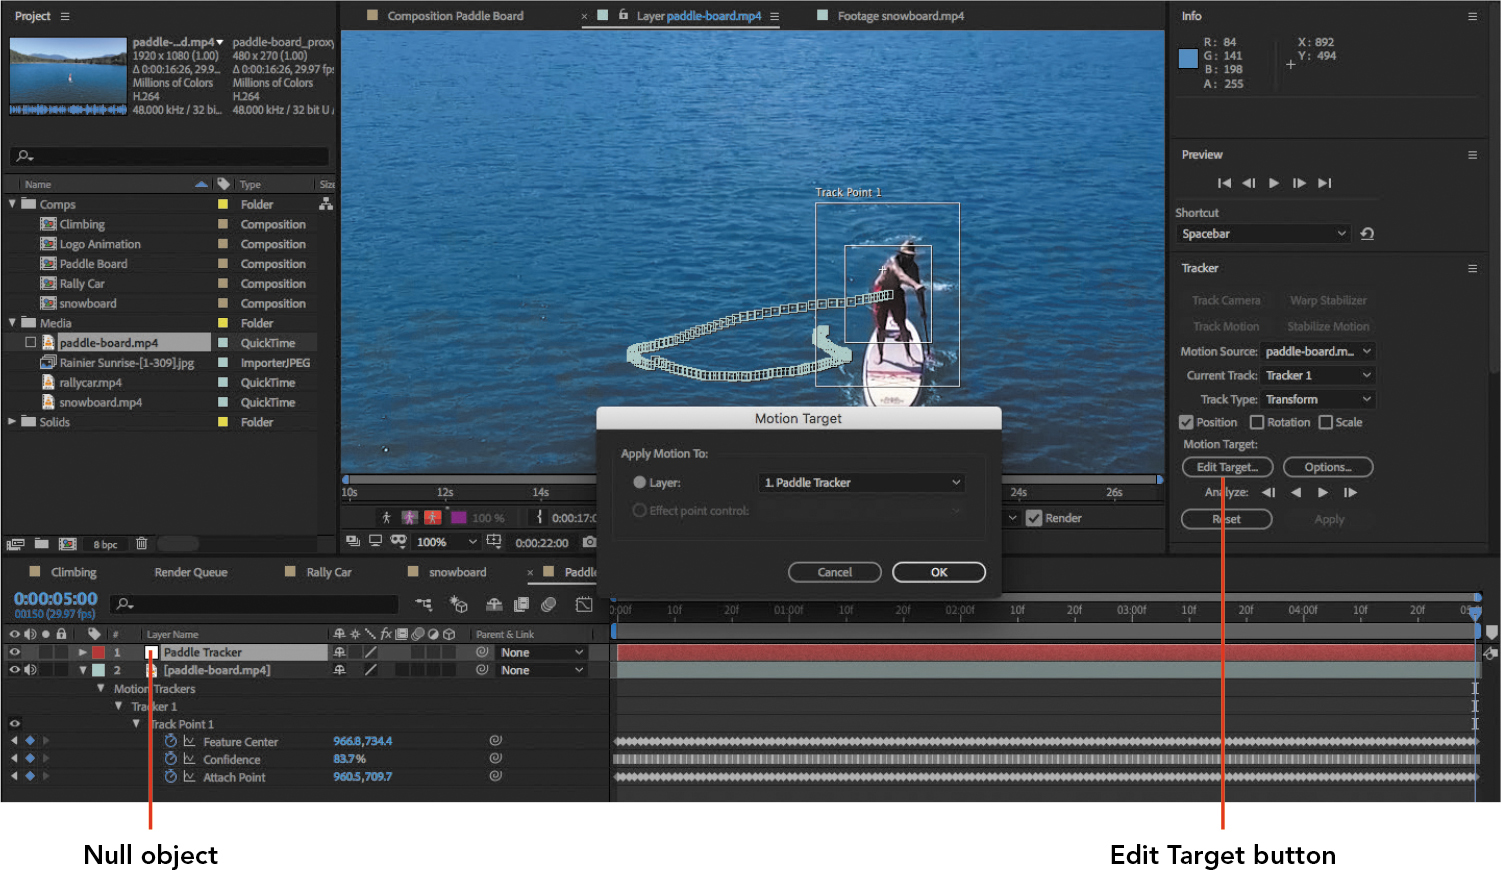
Figure 4.35 Setting up the Motion Target
In the Tracker panel, click Apply.
In the Motion Tracker Apply options, choose Apply X and Y from the Apply Dimensions menu.
The null object is now ready for other layers to parent to it.
Tip
When you create a null object, After Effects automatically organizes it in the Project Window into the Solids folder.
Parenting the Shape to The Null Object
At this point you need to create a layer that will follow the paddle boarder around the frame. For this exercise, you’ll create a simple ellipse first, and then parent it to the null object.
You need to make sure the ellipse is a shape, not a mask. Do you remember how to ensure this? You want to make sure no layers are selected, so that will be the first step.
Tip
A quick way to go to the start or end of a composition is to press the Home key or End key, respectively.
Change the current time to the first frame in the composition.
Choose Edit > Deselect All.
With the Ellipse tool, hold down Shift to draw a circle as you drag over the paddle boarder.
Use the Fill and Stroke options in the Tools panel to adjust the fill and stroke of the circle (Figure 4.36). You’ve used these options before in “Adding a Gradient to a Shape” in Chapter 1.

Figure 4.36 Setting up a circle that will track the paddle boarder
If you want the circle to appear as it does in Video 4.21, apply the same Bevel and Emboss layer style you applied to the stroke.
Tip
Remember that clicking the Fill or Stroke text in the Tools panel sets options, whereas clicking the Fill or Stroke swatches sets color.
You’re done setting up the layer, but let’s create a duplicate of the circle layer for use near the end of this exercise:
With Shape Layer 1 selected, choose Edit > Duplicate.
Rename the first circle layer (Shape Layer 1) to Effect.
Click the eye icon of Shape Layer 2 to hide that layer, because you don’t need it yet.
Tip
The keyboard shortcut for the Edit > Duplicate command is Ctrl+D (Windows) or Command+D (macOS).
Now that you have the circle layer Effect, it’s easy to parent it to the null object; it works the same way as the layer parenting you did in “Parenting to Coordinate Two Layers” in Chapter 2.
To parent the circle shape to the null object:
- Click the Parent & Link menu for the Effect layer, and select Paddle Tracker (Figure 4.37).
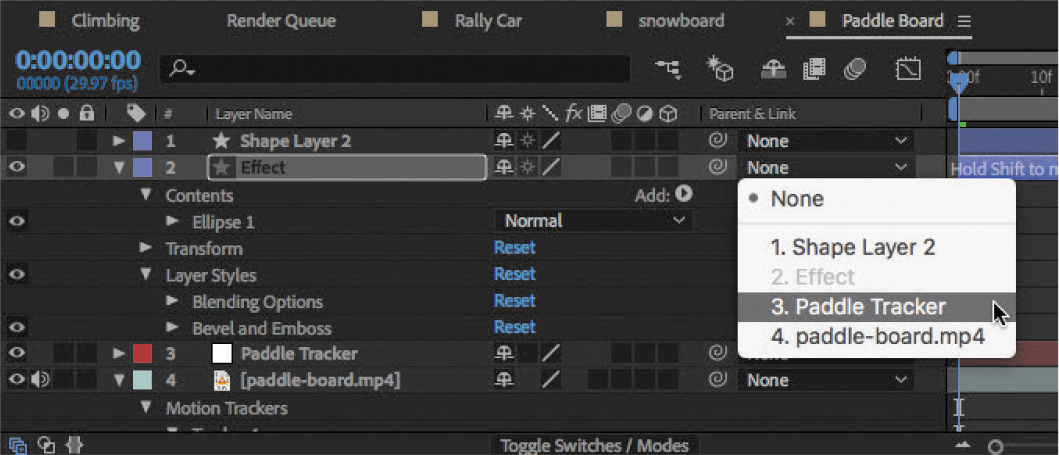
Figure 4.37 Parenting the Effect layer to the Paddle Tracker
Tip
In Video 4.21, the opacity of the blue circle fill was set inside the Fill option in the Tools panel, affecting just the circle’s fill. To control the opacity of the entire layer, use the layer Opacity property in the Timeline.
Now when you play back the composition, the circle matches the movement of the paddle boarder.
Setting Up Text as a Track Matte
Remember the extra circle you duplicated and then hid? You’re about to use it to create an effect involving a mask that follows another layer.
![]() ACA Objective 4.6
ACA Objective 4.6
![]() Video 4.22
Video 4.22
Setting Up Text as a Track Matte
But before you do that, add the logo and descriptive text just as you did for the other intro videos:
- Add the Logo Animation composition.
- Add a text layer with the text Paddle Boarding. Format and animate it as you did for the text in the other intro videos.
Now it’s time to use the other circle as a track matte, which is a layer that acts as a mask for another layer. This can solve a different set of problems than a mask that is attached to a layer.
Tip
When a track matte travels around the frame, such as the circle example in this exercise, it’s called a traveling matte.
To set up a track matte:
Rename Shape Layer 2 to Text Mask.
Make sure the Text Mask layer is the next layer above the Paddle Boarding layer in the composition.
The Paddle Boarding text layer will need to be able to use the Text Mask layer as a track matte, but it can do so only if the Text Mask layer is directly above it in the layer list.
Make sure the Text Mask layer is set to use the Paddle Tracker layer as its parent, as you did for the Effect layer.
This ensures that the circular mask layer follows the paddle boarder, just as the visible circular layer already does.
If the TrkMat column isn’t visible in the Timeline panel, click Modes/Switches at the bottom of the Timeline panel to toggle the display of switches.
Click the TrkMat menu for the Paddle Boarding text layer, and choose Alpha Matte “Text Mask” (Figure 4.38).
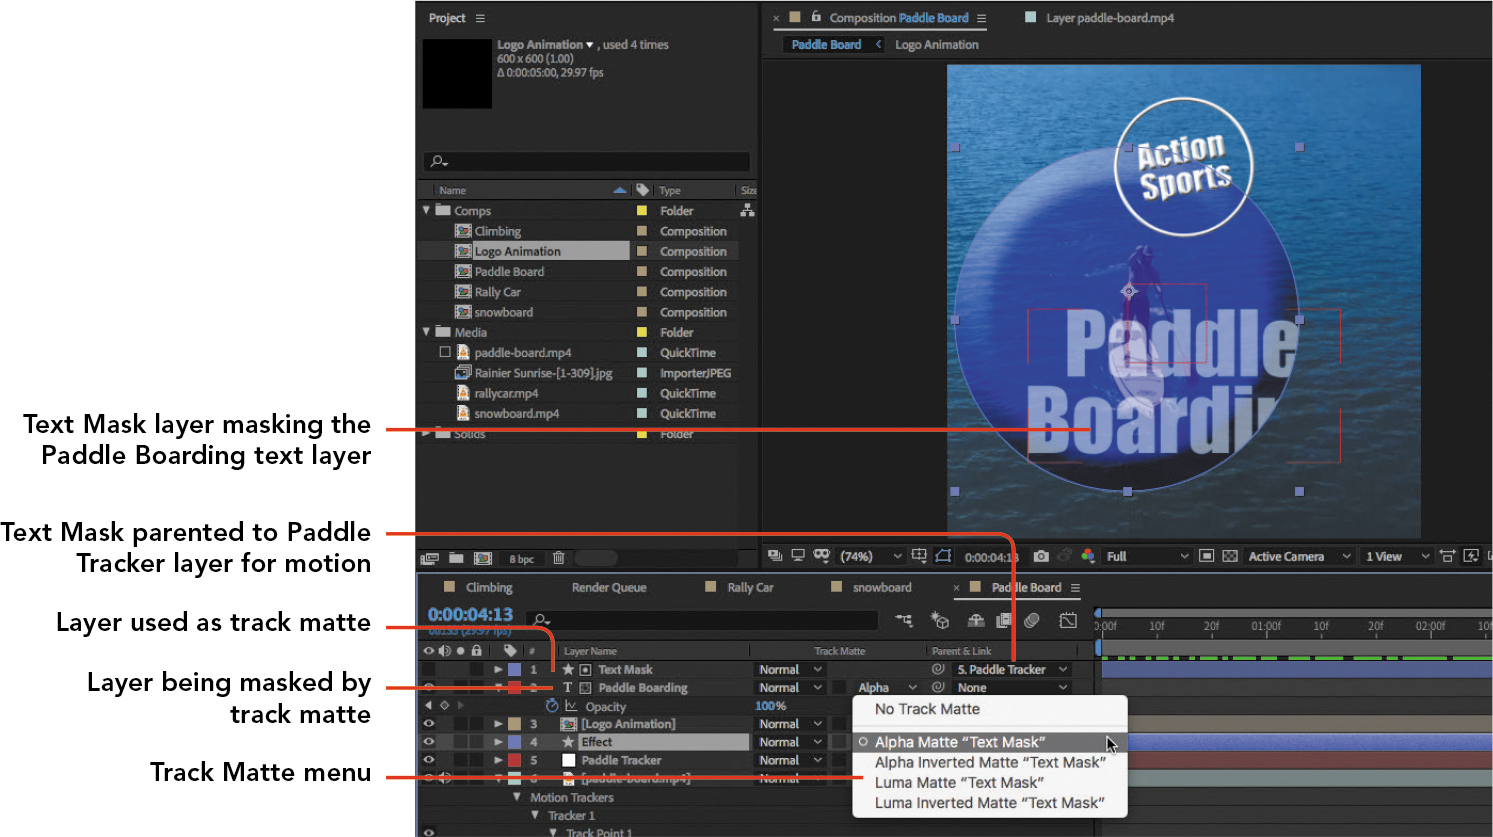
Figure 4.38 Setting up the Text Mask layer as the track matte for the Paddle Boarding text layer
This ensures that the circular mask layer follows the paddle boarder, just as the visible circular layer already does.
Play back the composition to make sure it’s all working as demonstrated in Video 4.22.
There’s a lot going on in this intro video, so let’s review all the new things you tried out:
- The Text Mask layer reveals only the part of the Paddle Boarding text layer that’s under its circle because it’s set as a track matte.
- The Text Mask layer follows the paddle boarder around the frame because its motion is parented to the Paddle Tracker null object.
- The Paddle Tracker null object uses the motion track created from the paddle-board.mp4 layer.
- When you set up one layer as a track matte for another layer, the layer set as a track matte is hidden, and track matte icons appear in the layer list to show you which layer is acting as the mask and which one is the masked layer.
If you’ve gotten this working, congratulations! You’ve tackled several powerful After Effects features in a single exercise.
Archiving a Project
When you’re done editing a project, you’ll want to archive it to a different storage drive to free up space on your working drives. You may think you can just copy the project file, but remember how After Effects imports every footage item: as a link. That means you need to account for the actual location of every imported file, and make sure all the files get copied to the archive location too.
![]() ACA Objective 5.2
ACA Objective 5.2
![]() Video 4.23
Video 4.23
Archiving a Project
That might be easy if all the media you imported is already stored in one folder. But if imported media is scattered among several folders or storage drives, it would be a tedious task to track them all down and copy them to your archive individually.
The Collect Files feature can help you gather the project along with all of the media files you used. It can also optionally leave out any media not actually used in a composition so that you don’t archive anything more than you need to.
To archive a project using Collect Files (Figure 4.39):
Choose File > Dependencies > Collect Files.
Click the Collect Source Files menu, and select the scope of compositions for which you’d like to collect files.
Enable any of the checkbox options that you’d like to use.
Examine the number of files and estimated total storage size of the archive near the bottom of the Collect Files dialog box. If it’s significantly larger or smaller than you expected, make sure that you’ve correctly made the selections you wanted.
If you want to add comments to be included in a report that will be saved in the archive folder, click Comments, type your comments, and click OK.
Note
If you selected Generate Report Only in the Collect File dialog box, the Collect button will say Save instead. This is because that option saves only one text file containing the report.
Click Collect, specify a name and location for the archive folder that’s about to be created, and click Save.

Figure 4.39 Archiving a project using the Collect Files dialog box
Exporting Multiple Items at Once
When you’re working on an entire set of videos, such as a campaign for a client or a group of social media videos like the ones you worked on in this chapter, it’s convenient to be able to render multiple videos in one step. Adobe Premiere Pro and Adobe Media Encoder make this easy.
![]() ACA Objective 5.2
ACA Objective 5.2
![]() Video 4.24
Video 4.24
Exporting Multiple Compositions
The basic idea behind bulk rendering is multiple selection. In Premiere Pro, selecting multiple items in the Project panel lets you send them all to Media Encoder at once. And in Media Encoder, when multiple items are selected in the Queue panel, changes you make affect all selected items.
To export multiple items to Adobe Media Encoder:
In the Project panel, select multiple compositions or footage items using the standard multiple selection techniques that you use on your computer in general. For example, hold down Ctrl (Windows) or Command (macOS) as you click each of the items you want to select.
Choose File > Export > Add to Adobe Media Encoder Queue.
To adjust rendering settings for multiple items in Adobe Media Encoder:
In the Queue panel, make sure the multiple items you want to edit are all selected.
Click the blue text for any settings you want to adjust. For example, to change the preset for all selected items, click the blue text in the Preset column for any selected item (Figure 4.40).
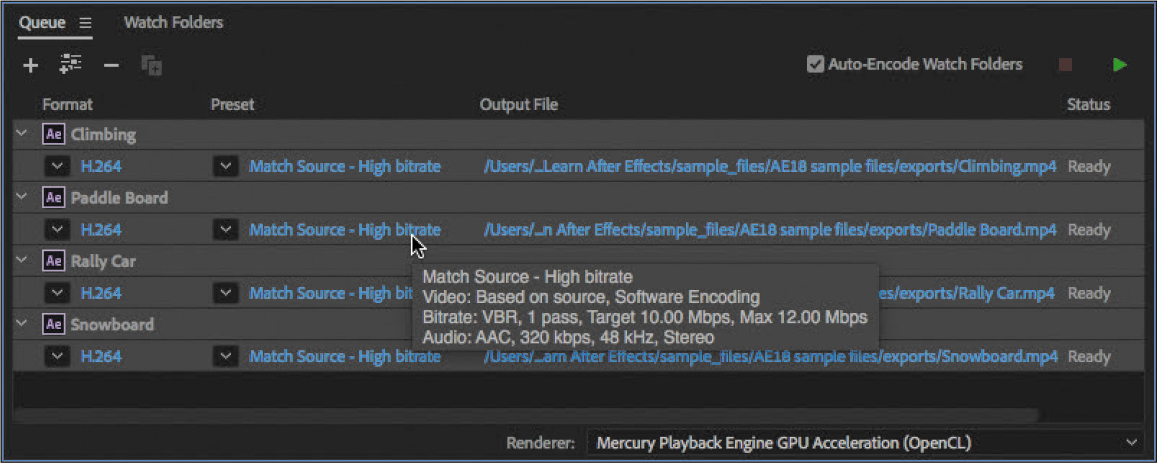
Figure 4.40 Clicking to edit export settings for all intro videos that were added to the Adobe Media Encoder Queue and selected
Adjust settings and click OK.
This is a useful technique even if you don’t need to change anything, because you can use it to verify that the settings are correct for all selected items.
When everything looks right, click the Start Queue button (the green triangle).
When all queue items are finished rendering, you can go to the Output File folder you specified to make sure they exported as expected.
Tip
Always make sure the Output File folder and filename are correct for each item. If you forget to specify the location, files may not export to the folder you expected.
Challenge
Now that you’ve tried a variety of ways to add visual interest to a series of social media intro videos, try making a set of your own, especially if you already have some social media accounts. For example, the ability to specify an intro video before every post is built into YouTube.
Always check the specific requirements of each social media platform. For example, the videos created for this chapter use a 1:1 aspect ratio (square) format and frame dimensions that would be appropriate for a phone-based social media platform such as an Instagram feed, but 9:16 aspect ratio (vertical) videos are used in Instagram Stories. If you create intro videos for YouTube, both the frame aspect ratio and frame dimensions would need to be appropriate for YouTube (typically, 16:9 aspect ratio widescreen at 720p, 1080p, or 2160p).