
Chapter 1. Introduction to Adobe After Effects CC
Chapter Objectives
Chapter Learning Objectives
 Set up and manage project files.
- Understand job requirements.
- Start After Effects.
- Open a project.
- Learn which panels are primarily used in After Effects.
- Use basic Composition panel features.
- Use basic Timeline panel features.
- Explore After Effects preferences.
- Compare the general similarities and differences between After Effects and Premiere Pro.
Chapter ACA Objectives
For more information on ACA Objectives, see pages 294–299.
DOMAIN 1.0 Working in the Video and Motion Graphics Industry
1.1, 1.2
DOMAIN 2.0 Project Setup and Interface
2.1, 2.2, 2.3, 2.4
DOMAIN 3.0 Organizing Video Projects
3.1
DOMAIN 4.0 Creating and Modifying Visual Elements
4.1, 4.7
DOMAIN 5.0 Publishing Digital Media
5.1, 5.2
On the surface, learning about motion graphics might seem to be about mastering a motion graphics application. But successful motion graphics design—even with an application as powerful and versatile as Adobe After Effects CC—is often about much more than just pushing the right buttons on the computer. Video production typically involves a high degree of both integration and collaboration.
![]() Video 1.1
Video 1.1
Welcome to the Team
Integration means creating an animated composition by pulling together media from potentially several different sources, such as conventional video cameras, smartphones, drones, action cameras, stock footage, 3D digital objects and environments, and 2D digital images and graphics.
Collaboration is often required because the many elements that go into a project are typically created by a wide range of specialists—such as directors of photography, cinematographers, and 3D digital artists—and are coordinated by a producer or art director. You will work with them as a team, so working successfully includes coordinating and cooperating with everyone on the team. That requires clear communication about standards and procedures.
In the next chapter, you’ll complete a project in which you’ll act as a member of the Brain Buffet production team, working with them to create a 5-second promotional video for a client (Figure 1.1). In this chapter, you’ll organize the media assets you’ll use in the newsletter project. In the process, you’ll get an introduction to the After Effects user interface and some of the things you can accomplish with it.
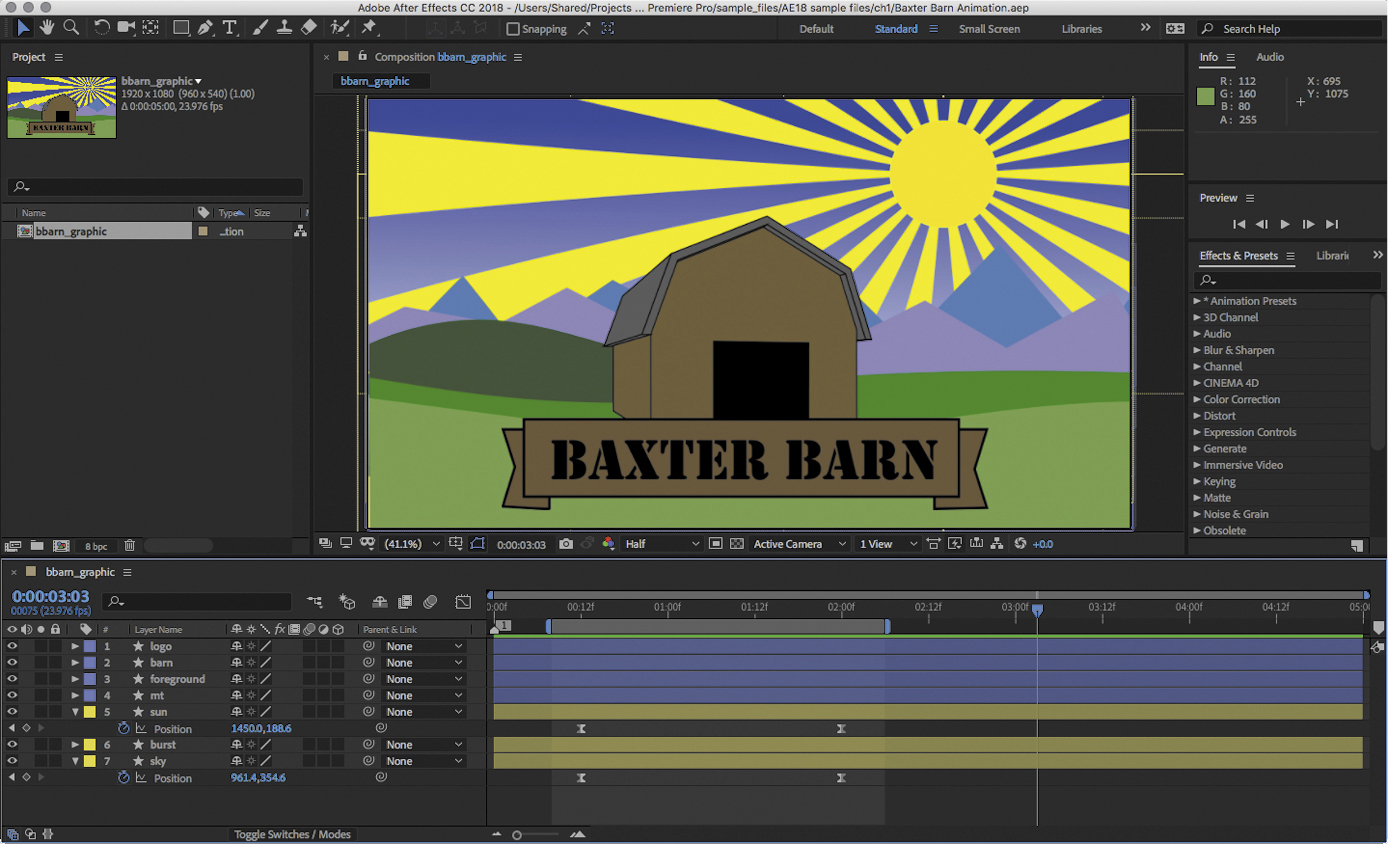
Figure 1.1 Working on the promotional animation
About Adobe Learn Books
Let’s take just a second to explain what we’re trying to accomplish so we can be sure we’re on the same page (pun intended!). Here’s what we hope to accomplish in this series.
Have Fun
This is seriously a goal for us, as we hope it is for you! When you’re having fun, you learn more, and you’re more likely to remember what you’re learning. Having fun also makes it easier to focus and stick with the task at hand.
Even if the projects you create as you complete the exercises in this book aren’t the kinds of things you’d create on your own, we’ll make them as entertaining and fun as possible. Just roll with it, and it will make the time you spend with this book more enjoyable. Have fun, make jokes, and enjoy your new superpowers.
Learn Adobe After Effects CC
This goes along with the previous item, but when you’re working on the projects in this book, you have the freedom to explore and make your projects your own. Of course, you’re welcome to follow along with our examples, but please feel free to change text or styles to fit your own interests. When you’re sure you grasp the concepts we’re talking about, we encourage you to apply them in your own way. In some projects, you may want to even take things beyond the scope of what appears in the book. Please do so.
Prepare for the ACA Exam
This book covers every objective for the Adobe Certified Associate (ACA) exam, but instead of organizing the book around the objectives, it’s organized around workflows that you’ll need to know on a real job, and the objectives are covered along the way. The authors of this series are teachers and trainers, and we’ve been doing this for a long time. We’ll cover the concepts in the order that makes the most sense for learning and retaining the information best. You’ll read everything you need to pass the exam and qualify for an entry-level job—but don’t focus on that now. Instead, focus on having a blast learning After Effects!
Develop Your Creative, Communication, and Cooperative Skills
Aside from the actual hands-on work of learning After Effects, this book explores the skills you need to become a more creative and cooperative person. These skills are critical for success—every employer, no matter what the industry, values creative people who can work collaboratively and communicate well. This book describes the basics of creativity, how to design for (and work with) others, and project management.
Downloading, Unpacking, and Organizing
For the projects in this book, you’ve been provided with a ZIP file containing the content you’ll use. A ZIP archive is a convenient way to combine multiple files into a single package that’s easy to transfer online, so it’s one way you’re likely to receive project content.
![]() Video 1.2
Video 1.2
Unpacking and Organizing
The ZIP format is also popular for online transfers because it has built-in file compression; converting to ZIP can dramatically reduce the file size of some types of documents. However, many video and audio formats are already compressed, so adding those formats to a ZIP archive won’t necessarily compress them any further. But ZIP is still useful for lesson files because you can download multiple files as a single package document.
Downloading Lesson Files
For every project-based lesson, you’ll need to download the lesson files from the Peachpit website. To do this, see “Accessing the free Web Edition and lesson files” on page xii.
Unpacking a ZIP file
While extracting content from a ZIP file works the same way in Windows and macOS, the results are slightly different.
In both platforms, simply double-click the ZIP file (Figure 1.2):
 Windows opens the ZIP file as a window that displays its contents. If you close the window, you still have the ZIP file.
- macOS extracts the ZIP file into a new folder containing its contents. You now have both the original ZIP file and the new folder containing the contents of the ZIP file.

Figure 1.2 In Windows 10, even though the .zip filename extension is not visible, you can tell it’s a compressed folder because of the description in the Type column and because the top of the window offers Compressed Folder Tools. (In macOS, the Kind column would say ZIP Archive.)
By default, the contents of a ZIP file unpack into the same folder that contains the ZIP file. In Windows, you can choose a different folder to save the unpacked files to by right-clicking the ZIP file and choosing Extract All. In macOS, you can unpack a ZIP file to a different folder if you use third-party utility software for opening and unpacking ZIP files.
Note
On a Mac, you may see a number of Thumbs.db files inside the lesson folders. You can delete all Thumbs.db files; they are included when a ZIP file is packaged in Windows but are not needed on a Mac.
Deleting a ZIP File
Once you unpack a ZIP file, you have two copies of the contents: the original downloaded ZIP file and the unpacked copies. You can then do one of the following:
- To free up some storage space, delete the ZIP file since you now have all of the contents in unpacked form. You delete a ZIP file the same way you delete other files in your operating system; for example, drag its icon to the Recycle Bin (Windows) or Trash (macOS).
- If you’re not concerned about storage space, you can keep the ZIP file around as a backup in case you want to start over with a project.
Tip
To see document types (video, audio, and so forth) more clearly, change a folder window to List view.
If the ZIP file is stored online, as it is with the lesson files for this book, that’s a reason to delete the ZIP file after unpacking it since you can easily download it again if you need it. On the other hand, if your Internet connection is slow enough that downloading the project files takes a long time, you might keep the ZIP file around so that you don’t have to download it again.
Managing Files for Video Production
Let’s talk about some fundamental practices that are common to essentially all professional video production. These procedures help a production team stay organized and make it easier for any member of the team to manage and locate all of the media that’s involved in a project.
Linking to Files Instead of Embedding Them
In other applications you might have assembled a document by pasting or importing text and graphics into it. This is also known as embedding imported content. When you save that document, its file size grows because it contains all of the content you added. But embedding content is not practical for video projects, in part because video files themselves are very large. A single HD video clip can have a file size as large as thousands of text documents or photographs.
![]() ACA Objective 2.4
ACA Objective 2.4
When you import media into an After Effects project, the media is not copied into the After Effects project file. Instead, After Effects records the media’s filename and folder path so that it can retrieve the media from that location when it needs to display that media for you. The filename and folder path are the link to the media (Figure 1.3).

Figure 1.3 File path to linked media in After Effects
If you change the name of a file or move a file to a different folder, you break the link; After Effects will lose track of the file and will be unable to load it. Fortunately, if that happens, After Effects has tools that can help you quickly resolve links to lost files.
Because imported files are kept outside the project file, the project file size won’t balloon as you add video, graphics, and audio. Another advantage is that if you need to swap in updated files for some that are already in the project, you can simply replace the old files with newer ones that have the same filename and location; After Effects will use the newer ones.
But linking also means that you are responsible for making sure that all of the assets imported into a project are always accessible to the project. If you delete a linked video file that’s used in a video project, the project will have a blank segment where that video used to be. Linking also means that you’re responsible for backing up not just the project file, but every file you imported. Naturally, that’s easier to do if you’ve stored your files in an organized way.
Deciding Where to Store Your Files
When you use your computer, it’s constantly responding to requests for file access from the operating system and from the applications you’re using. For most applications, such as web browsers and word processors, the files that are accessed are relatively small and there are long breaks between reads and writes, so your computer has no problem keeping up with them.
But video production is different. As you edit video, and especially as you scrub through video looking for specific frames or checking your work, your computer continuously reads frame after frame after frame from your video files. It’s basically reading (and sometimes writing) thousands of different pictures all the time, and this constant activity places unusually high demands on your computer. And there are many ways in which video editing can strain your system even more. For example, editing 4K video is much more demanding on your computer than editing 2K (1080p) video. The burden on your system is even higher if you’re layering multiple video clips or applying image corrections or special effects to your footage. Every correction or effect you add to a layer is one more calculation that must be applied to thousands of pixels in each frame. The more ambitious the project, the more difficult it is for your computer to keep up.
The unusually high performance requirements of video editing affect where you store video project files on your computer. If you store everything on the same drive, such as your main system drive, it’s more likely that your computer will be unnecessarily slow while video editing. That’s because the system and your video application will constantly be competing for access time on the same drive. Whenever either has to wait, you have to wait.
Working with Multiple Drives
To avoid the performance problems associated with competing demands on one storage drive, video professionals spread out project files across multiple drives. Typically, the system drive stores the operating system and the video application (in this case, After Effects). But it’s standard practice to store the media files for a project (video, audio, still images, etc.) on a completely separate drive. Temporary working files that are generated during video editing, such as preview files and cache files, might be stored on a third drive.
The great advantage of distributing files across drives is that when the operating system needs access to its files and, at the same time, After Effects requests access to video files and cache files, they aren’t going to compete for the same drive. Now that each drive has just one job, each drive can more easily concentrate on maintaining its own data stream without interruption. You experience this as better responsiveness and smoother performance while editing video.
Splitting project files, media, and caches across drives is necessary when you use hard disk drives (HDDs). They have a set of heads that move together to retrieve files from the disk, and these mechanical heads are limited in how fast they can move from place to place on disk. When your data is on more than one drive, your computer can retrieve data faster, because now you have multiple sets of drive heads working simultaneously on different data transfers at the same time.
You may have heard that solid-state drive (SSD) storage is much faster than hard drive storage. That’s true, and it’s because SSDs don’t rely on mechanical heads—they are solid-state memory modules. With no moving parts, SSDs can access large amounts of stored data at once. Although SSDs are more expensive than HDDs, they are so much faster that they can reduce the need to split project files across drives for performance reasons. But because the newer formats such as 4K video are raising required data rates even more, distributing files across multiple SSDs is still a good way to help make sure your video editing system is as responsive as it can be.
What about network storage? Because of the high performance demands of video editing, it’s not practical to store linked video on the most common types of network servers; the network transfer speed is too slow for real-time playback. Network technologies that are fast enough are available, but they require such specialized and expensive equipment that you might encounter them only in a few high-end production studios.
Coordinating Organization with Your Team
How should you distribute files across drives for your projects? If you work alone, you can decide for yourself based on your performance needs and your budget.
But in the types of projects you’re working on for this book, you would typically work as part of a team. And that means you need to coordinate file organization with the production manager. When the company you’re working for has established its own standard practices for organizing files, you need to follow them. These practices are typically set up so that a set of project drives can be passed among team members who all understand the agreed-upon organization of those drives. That way, if team members need to work on the project, they can connect the drives to their computer and begin working without delay.
Logging and Naming Clips
When you edit a project that uses many video clips and other content files, to work efficiently you’ll want to quickly find the files you need. You’ll primarily rely on filenames to pick out the correct clips to insert into the right parts of your production. You also don’t want to waste time playing back bad clips in case they might contain footage you need. For these reasons, before you begin editing, you should perform a pass through all captured clips to delete bad takes and give each file a meaningful name.
You might put all of the initially available files in a Pre-Production folder and use that folder as a starting point for organizing the content into the project folders you’ll actually use.
Managing Project Folders
To help make it easier to find the right content, it’s a good idea to keep different media types in different folders within your project folder. For example, you might want to keep all video clips in a Video Clips folder, all audio clips in an Audio Clips folder, and all still images and other graphics in a Graphics folder. The files for the lessons in this book are not stored in subfolders because there are only a few of them for each lesson, but when you work on complex projects with a large number of elements, organizing media into subfolders can help you find the right file more quickly.
Note
If you’ve used Adobe Premiere Pro, the folders in the Project panel in After Effects are essentially the same as the bins in the Project panel in Premiere Pro.
Consider adjusting the complexity of your folders to match the complexity of your project. For example, if you have many 3D objects and digital backgrounds, you may want to organize them into separate 3D and Backgrounds folders inside your folder of project media.
It’s also good to create an Exports folder that serves as a destination for exporting your project drafts and finished video (Figure 1.4).
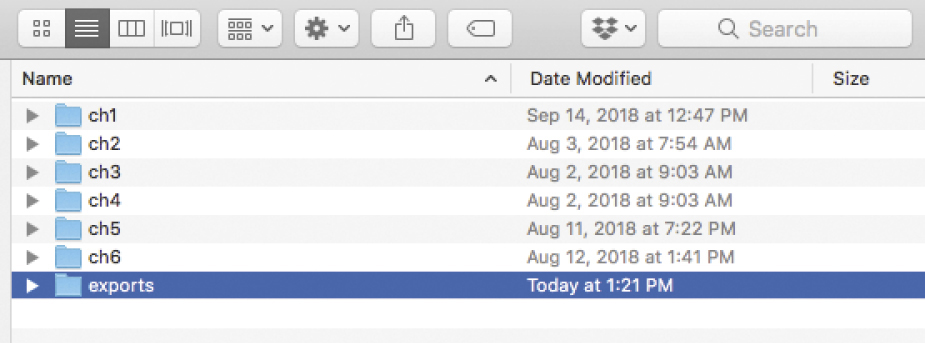
Figure 1.4 An example of organizing project media with folders
Using After Effects on a PC or Mac
![]() ACA Objective 2.3
ACA Objective 2.3
After Effects is designed to work essentially the same way whether you’re using it on a PC running Microsoft Windows or an Apple Mac computer running macOS. There are only a few minor differences between using After Effects on a PC or Mac, so even if your computing experience is mostly based on one or the other, it should be relatively easy for you to do After Effects jobs for clients running either operating system.
Before you dive into video editing, you should become familiar with how After Effects relates to the conventions of the platform you’re using.
Using Keyboard Shortcuts
PCs and Macs use different sets of modifier keys —the keys you press to change how features or other keys work:
PC Mac
Ctrl Command
Alt Option
Shift Shift
The Mac has a Control key in addition to the Command key, but it is not frequently used except to emulate a right-click (see “Using Context Menus”).
Using Context Menus
A PC comes with a two-button mouse or trackpad, so the standard way to open a context menu is to click with the right mouse button.
A Mac comes with a mouse or trackpad that may only perform a single-click by default, but you can configure it to recognize a right-click (also called a secondary click) in the Mouse or Trackpad panel in System Preferences. You can also connect a two-button mouse to a Mac. Another way to open context menus is to hold down the Control key while clicking the primary mouse button.
On PC or Mac, you can also connect other input devices such as a trackball or graphics tablet with a stylus, and you can typically set up one of their extra buttons to act as a right-click.
Opening Preferences
As you become more familiar with After Effects, you might find yourself going into the Preferences dialog box to make After Effects fit your working style, your hardware configuration, and the needs of your specific production workflow. The Preferences command appears under different menus on a PC and a Mac, and After Effects follows the convention of each platform.
To open the Preferences dialog box on a PC, choose Edit > Preferences.
To open the Preferences dialog box on a Mac, choose After Effects CC > Preferences.
Identifying Job Requirements
![]() ACA Objective 1.1
ACA Objective 1.1
![]() ACA Objective 1.2
ACA Objective 1.2
During preproduction you should clearly describe the purpose, audience, deliverables, and other considerations for the promo video that need to be resolved before production begins. Let’s take a look at the job requirements for Project 1:
![]() Video 1.3
Video 1.3
Introduction to the Baxter Barn Project
- Client: Baxter Barn. They present a unique opportunity for the public to experience history, conservation, sustainability, and community on a live working farm.
- Target audience: Baxter Barn wants to attract local families and people interested in sustainable farming.
- Purpose: To encourage facility rentals and tours of their farm.
- Deliverable: A 5-second video, without audio. The clients expect their target audience to attend screenings at the local movie theater, so they want to show an animation there. It must be based on an RGB vector graphics file so that elements can scale smoothly to any resolution.
Listing Available Media Files
In this project, some media has already been acquired or created for the project. What do you have to work with?
- Baxter Barn Animation.aep. This is a partially completed After Effects project.
- bbarn_graphic.ai. This is an Adobe Illustrator graphic that’s used in the After Effects project.
The objects in the Adobe Illustrator vector graphic are organized using layers. It was organized this way because After Effects is able to animate each layer separately, and the project will take advantage of this.
Starting After Effects
![]() ACA Objective 2.2
ACA Objective 2.2
![]() Video 1.4
Video 1.4
Interface Overview
You start After Effects just as you start any other application you use, but what might be a little different is what After Effects presents to you immediately after it starts up.
Tip
To reset After Effects preference settings when you start After Effects, hold down the Alt (Windows) or Option (macOS) key immediately after After Effects begins opening.
To start After Effects:
Do one of the following:
- In Windows, click the Adobe After Effects CC application icon on the Start menu, Start screen, or Taskbar as available. If a shortcut icon for After Effects exists on the desktop or in a folder window, you can double-click that.
- In macOS, click the Adobe After Effects CC application icon in the Laun-chpad or Dock as available. If an alias icon for After Effects exists on the desktop or in a folder window, you can double-click that.
Tip
If other applications are running that require a lot of RAM, and you don’t plan to use them while you’re running After Effects, consider closing those other applications.
Choose an option from the Start screen (Figure 1.5).
After Effects doesn’t show you a blank workspace when it launches. Instead, you see the Start screen, which is designed to help you begin working in or learning about After Effects. As a beginner, you might take advantage of the Learn tab for tutorials. As an intermediate user, you might use the New Features and Tips & Techniques tabs to get caught up with the latest enhancements.
As a beginner, consider clicking the Learn tab to watch tutorials that teach you how to make different kinds of After Effects projects.
Tip
You can also start After Effects from the Adobe Creative Cloud desktop application, or by typing its name into Windows desktop search or macOS Spotlight search.

Figure 1.5 The Start screen in After Effects
When you’re ready to make a new After Effects project, the Start screen gives you several ways to get started in the Work tab. The main way is to click the New Project button, which is a shortcut for the File > New > Project command. That opens the New Project dialog box, where you enter the specifications for a project; we’ll look more closely at that soon.
If you’d like to start from a template, type what you’re looking for into the Adobe Stock search field at the bottom of the Start screen and click Go, which will take you to an Adobe Stock web page that may contain graphics, video, and After Effects templates relevant to your search term. (Adobe Stock may not be available on computers in some schools and organizations.)
In day-to-day use, the first thing you’ll often want to do after starting After Effects is to continue working on your current projects. When the Start screen appears, make sure the Work tab is active and click Recent, which displays a list of After Effects documents that were opened recently. (The Recent list may be empty if this is your first time using After Effects on this computer, or if After Effects preferences were reset.) The Recent list is a shortcut for the File > Open Recent command.
If the file you want to work on isn’t in the Recent list, click the Open Project button. That’s a shortcut for the File > Open Project command, and it works like the Open command in other applications.
Tip
As in other applications, if you prefer to use keyboard shortcuts you can find them on the menus. To create a new file, press the keyboard shortcut for the File > New > Project command, which is Alt+Ctrl+N (Windows) or Option+Command+N (macOS). Or you can open a file by pressing the keyboard shortcut for File > Open Project, which is Ctrl+O (Windows) or Command+O (macOS).
If there are After Effects documents in Creative Cloud Files online storage, you can see them by clicking CC Files. Creative Cloud Files is cloud storage associated with the Adobe ID that’s signed into the computer. If you’ve used cloud storage services such as Dropbox, Google Drive, Microsoft OneDrive, or iCloud Files, Creative Cloud Files works much the same way. You can transfer files to and from Creative Cloud Files storage using a web browser, folders on your Windows or Mac desktop, or a mobile app on your phone or tablet.
Note
If you’re using a shared computer where you can’t sign in with your own Adobe ID, you probably won’t be using Creative Cloud Files, or it may be using Creative Cloud files to store documents for the organization that owns the computer.
The Start screen includes other options that are outside the scope of this book because they’re more advanced. The Sync Settings button is for using your Creative Cloud account to synchronize your After Effects settings, such as preferences, with other installations of After Effects. New Team Project and Open Team Project are buttons you’ll use only if you’re part of a workgroup using the cloud-based Adobe Team Projects collaborative video workflow for After Effects CC and Prelude CC. If your organization is interested in using Team Projects, see:
www.adobe.com/creativecloud/team-projects.html
If the Start screen isn’t open and no project is open, an empty workspace appears (Figure 1.6). It isn’t completely empty, because two buttons appear in the Composition panel: New Composition and New Composition From Footage. A project needs at least one composition, so these buttons are provided to give you a quick way to create the project’s first composition.
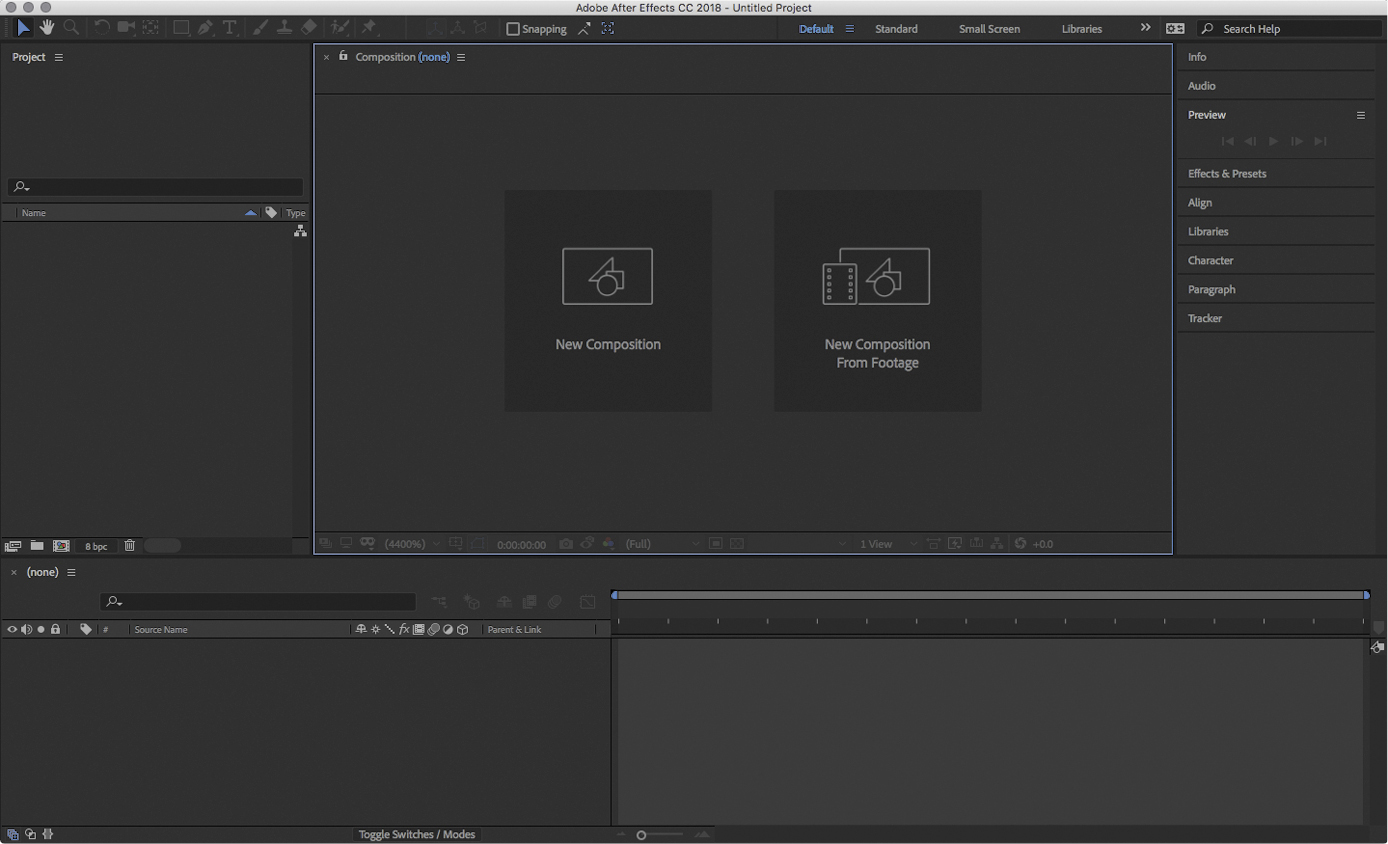
Figure 1.6 An empty After Effects workspac
Fortunately, you don’t have to create your own composition yet, because the first project you’ll soon work on will be partially built.
Resetting Preferences when Starting After Effects
At times it may be useful to reset the settings in the Preferences dialog box in After Effects. You can do this when you start After Effects.
To reset After Effects preferences, immediately after starting After Effects, press Ctrl+Alt+Shift (Windows) or Command+Option+Shift (Mac).
Locating a Project and Editing Its Settings
![]() ACA Objective 2.1
ACA Objective 2.1
There may be times when you have a project open, and you’re not sure of the folder or even the drive where it’s stored. Fortunately, the folder path to an After Effects project file is always listed in the title bar for the application window (Figure 1.7). If you see an asterisk at the end of the path, it means the project has unsaved changes.

Figure 1.7 Project path in the application window title bar
If you’re trying to change settings such as Frame Rate and Frame Size, those are settings for a composition, not a project. A project can contain multiple compositions with different settings. To change the settings for individual compositions within a project, choose Composition > Composition Settings when a composition is selected or active.
To learn more about a task you’re trying to accomplish, click the Help menu and choose Adobe After Effects Help or Adobe After Effects Support Center.
The Help menu isn’t the only place to get assistance with After Effects issues. You can also get help from various online sources:
- To ask other users questions on the Adobe Communities forum for After Effects, go to forums.adobe.com/community/aftereffects_general_discussion.
- To get news about After Effects, check the After Effects CC blog at theblog.adobe.com/creative-cloud/after-effects/.
- To get updates about After Effects on Twitter, follow @AdobeAE.
- To get Creative Cloud support on Twitter, follow @AdobeCare.
Exploring Panels
![]() ACA Objective 2.2
ACA Objective 2.2
The After Effects CC user interface is designed to be powerful and flexible enough for professional workflows. Like other applications you may have used, it has menu commands with keyboard shortcuts as well as floating panels of options that you can arrange.
![]() Video 1.5
Video 1.5
Working in the Composition Panel
In After Effects, you’ll spend most of your time using controls in panels. If you can’t find the control you’re looking for, the panel that contains it might be hidden. To open any panel, including the hidden ones, click the Window menu and choose the name of the panel you want (Figure 1.8).

Figure 1.8 The Window menu in After Effects CC lists all available panels.
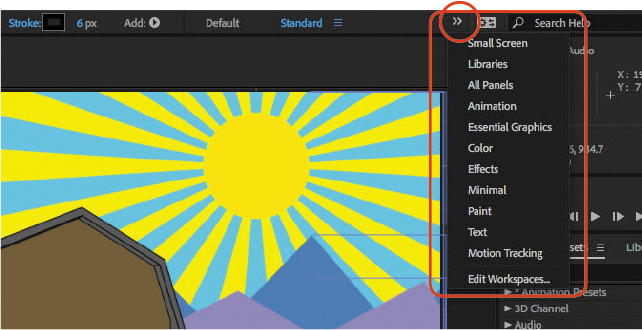
You can save a panel arrangement as a workspace. Several workspaces are provided; they’re optimized for specific tasks and screen sizes. We’ll take a deeper look at workspaces later, but for now, you should know that you can change workspaces using the Tools panel at the top of the After Effects application window (Figure 1.9) or in the Window > Workspaces submenu.

Figure 1.9 Choose a workspace from the Tools panel.
Looking at the Primary Panels for Video Editing
In most workspaces, the three most prominent panels in the application window are the Project, Composition, and Timeline panels (Figure 1.10). To grasp what’s going on, you should first understand the basic structure of an After Effects project:
- Every project needs at least one composition, the most basic form of arrangement in After Effects. You can think of a composition as similar to how a song is the basic form of arrangement in music.
- A composition contains at least one layer, or object that can be animated, but most compositions have multiple layers.
- To arrange and animate layers over time, you work with them in the timeline.
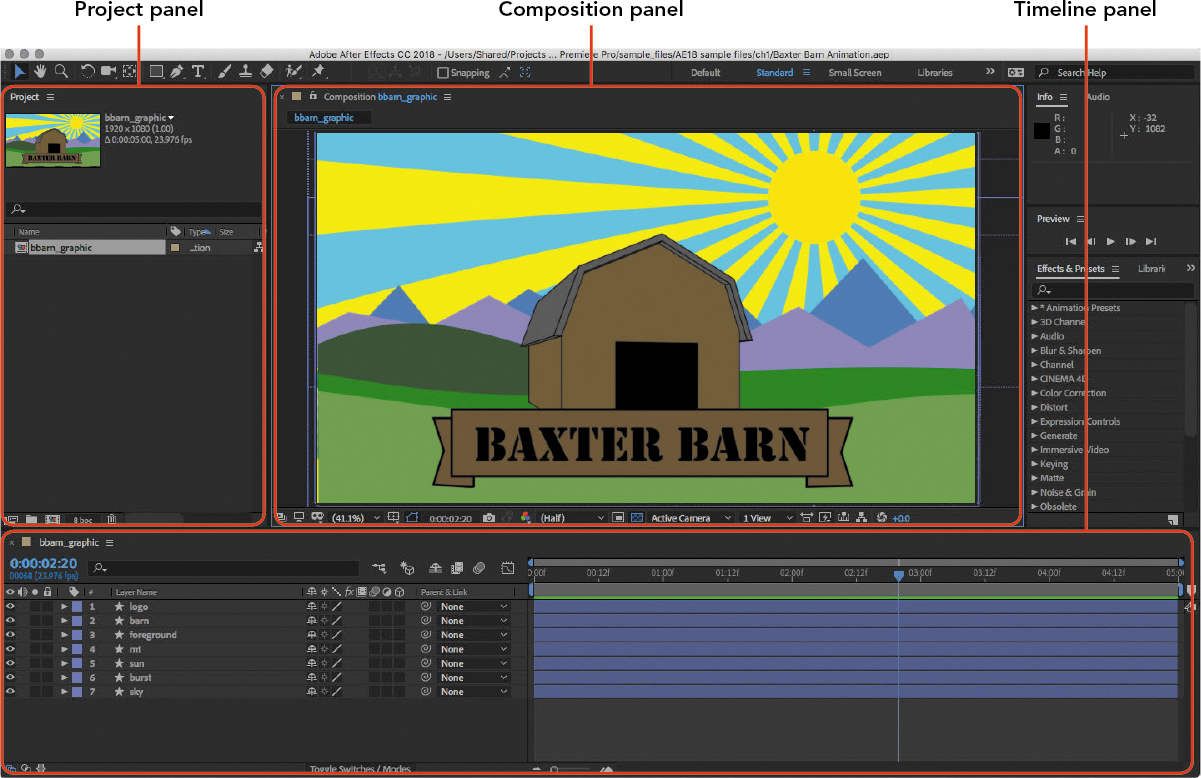
Figure 1.10 The Project, Composition, and Timeline panels in their standard arrangement.
The Timeline and Composition panels are two views of a composition; the Timeline panel shows how layers in a composition are organized over time, and the Composition panel shows the visual state of the composition at a specific time. As you play back a composition, the Current Time Indicator moves along the Timeline, and the Composition panel displays the video at the time indicated by the current-time indicator.
On the left side is the Project panel. This contains all the media imported into the project, including media that you haven’t used in a composition. In this way, the Project panel is a place to manage the media you plan to use in compositions. The Project panel also lists the compositions you’ve created.
Working in After Effects typically involves the following workflow:
Import footage and other media into the Project window.
View footage in the Footage panel, usually by double-clicking it in the Project panel. If it’s time-based media like a video, trim its beginning and end in the Footage panel if needed.
Add the footage to a composition, either by dragging and dropping or using a keyboard shortcut. If a composition isn’t already open or created, dragging a footage to the Composition panel or Timeline panel creates a new composition containing that footage.
See the results in the Composition panel and replay the footage if needed to review whether the resulting program plays back as expected.
This cycle of moving from the Project panel to the Footage panel, and then between the Timeline and Composition panels, is fundamental to assembling a composition.
Exploring Other Important Panels
A composition isn’t just about footage in a timeline. It will often include audio, effects applied to the video, and other content such as still images and titles. The After Effects user interface includes panels that let you work with all of those (Figure 1.11):
- The Tools panel contains tools that you can use to edit and view media interactively. Notice that many of the tools have a tiny triangle in the bottom-right corner; this indicates that additional tools are hidden behind that tool. To see the hidden tools, click and hold the mouse button on the tool, and the tool group pops out.
- The Effects & Presets panel includes lists of effects and transitions for video and audio, along with color grading presets.
- The Preview panel lets you control playback of the composition. In its basic form you can play and stop a composition, but you can make the panel larger, revealing controls that help you trade off playback quality to lower the processing burden on your computer.
- The Audio Meters panel shows you the audio level at the current-time indicator. It includes clipping indicators so that you can instantly see whether audio levels are too high.

Figure 1.11 Additional important panels
Arranging Panels
The first time you start After Effects, you’ll see all panels contained within a single application window. Panels share dividers with adjacent panels, so making one panel smaller makes another panel larger.
Panels can be arranged in three ways (Figure 1.12):
- Docking. You can attach panels to each other along their edges. This lets you view sets of panels side by side so that you can see more information at once.
- Grouping. You can combine panels so that they share a single space, like a stack of paper folders. When panels are grouped, you can see their named tabs along the top of the group like folders in a file cabinet. If you’ve used tabbed windows in a web browser, tabs in panel groups work the same way.
- Floating. You can pull a panel out of a set of docked or grouped panels so that it’s positioned on its own, in front of other panels.

Figure 1.12 You can arrange panels in multiple ways.
When many panels are grouped in a narrow space, there might not be room to show all of the panel tabs. You can click an overflow menu (Figure 1.13) to see the names of all the panels in that group.

The Panel menu contains the Close Panel and Close Panel Group commands.
The Overflow menu shows the names of all panels in a group.

The Close button closes a floating panel. For docked panels it’s an X, for floating panels it is a Windows or Mac window close button.
Figure 1.13 Window management controls
If you want to close a panel, there are two ways to do that. If a panel is grouped with others and there is no close button, click the panel menu and choose Close Panel; if the panel is floating, click the Close button in the top-left corner.
Docking a Panel
In the default After Effects workspace, the Audio panel is grouped with other panels, so it can end up behind other panels in its group. Suppose you’d like to see the Audio panel all the time because you want to monitor audio levels at any point in the composition. You can drag it out of the group and dock it instead. To do this:
Drag the Audio panel tab to the left out of its group, and then without releasing the mouse button, drag it slowly over the right side of the Composition panel to the center. Notice the dark drop zone overlays that temporarily appear over a panel when you drag another panel over it (Figure 1.14), and how the drop zone under the pointer is always the darkest. One of three things will happen:
- If you drop a panel over a center drop zone, the panel you drop will become grouped with the panel you drop it onto.
- If you drop a panel over an edge drop zone, the panel you drop will be inserted next to that edge of the panel you drop it onto.
- If you hold down the Ctrl (Windows) or Command (macOS) key while releasing the mouse button, the panel will become a floating panel.
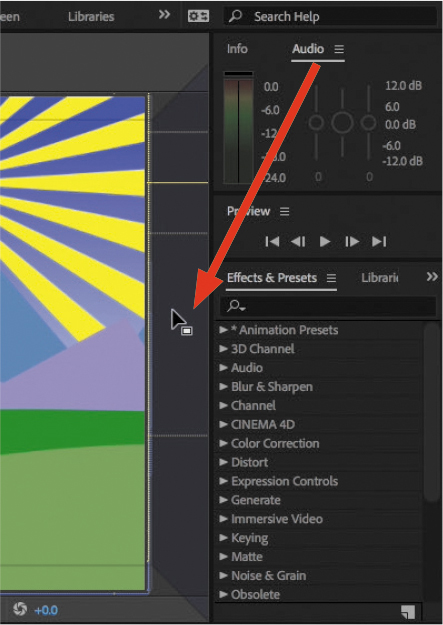
Figure 1.14 Dragging the Audio tab to the drop zone on the right side of the Composition panel
Position the pointer over the right drop zone of the Composition panel, and when it’s highlighted, release the mouse button.
The Audio panel is now docked between the right side of the Composition panel and its former panel group (Figure 1.15).

Figure 1.15 Dropping the Audio panel on the drop zone inserts the Audio panel to the right of the panel group.
Position the pointer over the right edge of the Effects panel, which is also a vertical divider between the Effects panel and Tools panel.
Drag horizontally to adjust the width of the two panels (Figure 1.16). As you make one panel larger, the adjacent panel becomes smaller. Adjust the divider for the best use of space; for example, you might want to make the Effects panel wider and the Tools panel narrower. You can drag vertical and horizontal dividers.

Figure 1.16 Dragging a vertical panel divider
Tip
There are times when it’s useful to temporarily maximize one of the panels. To do this without permanently modifying the workspace, position the pointer over a panel and press the tilde (~) key. Press the tilde key again to restore the panel to its usual place in the workspace.
Floating a Panel
Sometimes a panel is easier to work with if it’s completely independent, floating above other panels. Let’s float the Preview panel.
Click the panel menu in the Preview panel and choose Undock Panel (Figure 1.17).
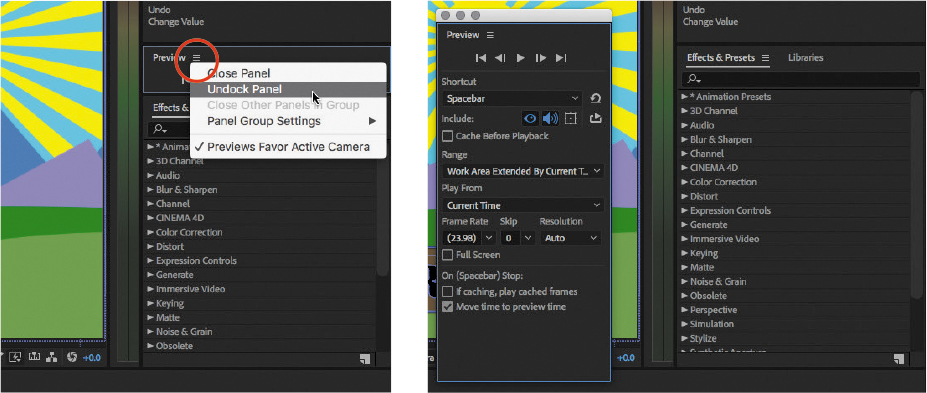
Figure 1.17 Undocking the Preview panel
Drag the title bar of the Preview panel to position it anywhere on the screen.
If you want to resize the panel, position the pointer over any panel edge or corner until you see a two-headed arrow, and then drag.
Note
Undocking is what the tutorial video demonstrated as floating a panel, though in the video it’s done with a shortcut. In Windows, Ctrl-drag a panel tab; in macOS, Command-drag a panel tab.
Other panels can be docked and grouped with this floating panel.
Tip
The application window doesn’t have to fill the screen. You can resize it by dragging any corner or side. Making the application window smaller can be useful if you want to reveal the desktop or another application behind After Effects so that you can drag and drop items into an After Effects project.
Grouping a Panel
It’s easy to put a floating or docked panel into a panel group. Drag the Effects panel tab, position it over the center drop zone of the panel group containing the Projects panel, and release the mouse button to drop it (Figure 1.18).

Figure 1.18 Dropping the Preview panel into the center drop zone of a group
This is the same panel group that the Effects panel was originally part of. As in other applications that use tabbed windows, you can arrange the order of tabs in a panel group by dragging them left or right within the group.
If you want to use After Effects across multiple monitors, you can move some panels to the second monitor. First, in the display settings for your operating system, make sure the second monitor is set to extend the primary desktop, not to mirror (duplicate) it.
Simply drag the tab of any After Effects panel to the second monitor. As soon as you drag the panel outside the application window, it will become a floating window just like the application window. Position this second window on the second monitor.
You can now drag any other panels into the After Effects window on the second monitor, docking and grouping them into an arrangement just like you can in the main application window.
Exploring the Composition Panel
The basic use of a composition is to organize layers in the correct order in time. A project can contain multiple compositions, which lets you break down a complex composition into parts that you can refine separately. For example, if you’re creating an animation of a family of five walking through an amusement park, you might have the following:
- Five separate compositions for each walking family member
- A composition showing a rotating Ferris wheel
- Four other compositions of four other animated amusement park rides
- A master composition for the overall scene
![]() ACA Objective 2.2
ACA Objective 2.2
![]() Video 1.5
Video 1.5
Working in the Composition Panel
You would create each of the family member compositions, the rotating Ferris wheel composition, and each amusement park ride compositions, and drop them into the master composition to combine them with other elements, such as layers of clouds moving across the sky. When you play back the master composition, all of the compositions and layers play together, and you now have a busy scene of a person walking through an amusement park with several rides in operation and clouds moving across the sky.
Being able to use multiple compositions means you can also use a single project to create compositions with different specifications. For example, a project can contain multiple versions of the same composition. One composition might be designed to be rendered as a theatrical movie trailer at a very high quality level for display on a full-size wide cinema screen, whereas another composition might be a simplified version designed to be rendered as a square web page ad for mobile devices.
The icons and buttons along the bottom of the Composition panel let you customize how you work with a composition, and let you adapt it to different needs (Figure 1.19).

Figure 1.19 Composition panel controls (covered in detail later in this chapter)
Focusing on the Composition Panel
Because the Composition panel is the visual representation of a composition, it’s one of the panels you’ll spend a lot of time using.
Tip
Press the (backslash) key to switch between the Composition and Timeline panels. The key always goes to the Composition panel first, so it’s also a great way to go directly to the Composition panel from any other panel.
Other visual panels, such as the Layer and Footage panels, may share the same space as the Composition panel (they’re typically a tabbed group of panels). If you want to look at the composition but the panel contents are not what you expect, make sure the Composition tab is active and not one of the other panels.
Moving Around in the Composition Panel
There are no scroll bars in the Composition panel, because it’s typically faster to use other methods to move around in that panel.
Use the Hand tool (![]() ) to shift the preview image in any direction.
) to shift the preview image in any direction.
Note
When you use the spacebar to temporarily activate the Hand tool, make sure you hold down the spacebar instead of giving it a brief tap. The spacebar is the default keyboard shortcut for playing back a composition, so if you tap it, the composition may start playing.
When another tool is active, you can temporarily switch to the Hand tool by holding down the spacebar.
Changing the Preview Magnification
You can easily change the magnification of the preview image in the Composition panel so that you can zoom in to inspect details or zoom out to see the big picture. Not only is it easy, but there are several ways to do it.
To change the magnification of the Composition window preview, do one of the following:
- With the Zoom tool (
 ), click in the Composition window to enlarge the preview, or Alt-click (Windows) or Option-click (macOS) to reduce the preview. If you’re an experienced Photoshop user, you’ll be familiar with this technique.
 - Click the zoom ratio pop-up menu at the bottom of the Composition panel and select a magnification or reduction percentage.
- Choose View > Zoom In, or View > Zoom Out.
- Press the , (comma) key to reduce the preview, or press the . (period) key to enlarge the preview. A great way to remember this shortcut is to notice the less than (<) symbol above the comma key, and the greater than (>) symbol above the period key.
- Use the scroll wheel on a mouse, or the scroll gesture on a trackpad.
- To fit the composition in the Composition panel, choose Fit in the zoom ratio control, or press Shift+/ (the slash key).
Other Composition Panel Controls
At the bottom of the Composition panel you see a row of icons. These are clickable controls that you can use to customize how the Composition panel works. They control the view, not the content, so the way you set them has no effect on how the composition renders to a file.
We don’t need to look at all the controls because some of them are for advanced workflows. But certain controls are always useful, such as the zoom ratio control you learned about in the previous section. Let’s go over those.
Grid and Guide Options
You can apply different overlays to help you position objects within the Composition panel (Figure 1.20):
- Title/Action-safe Margins. These help you compose layers while accounting for the different aspect ratios and edge limitations of various displays. For more information, see the sidebar “About Title/Action-safe Margins.”
- Proportional Grid. This displays the same number of lines regardless of the frame size.
- Grid. If you want gridlines spaced using a specific number of pixels, use this grid. This is the same as enabling View > Show Guides.
- Guides. If you’ve created or want to create horizontal or vertical guides, enable this option. This is the same as enabling View > Show Guides. To create a guide, make sure the rulers are displayed (see Figure 1.20), and drag a guide out of the horizontal or vertical ruler.
- Rulers. You can display pixel rulers in the Composition panel.
- 3D Reference Axes. When working with 3D layers, you can display the 3D Reference Axes to help you understand which way the camera is oriented.

Figure 1.20 Examples of grid and guide options
To set the spacing for both the Grid and the Proportional Grid, open the Preferences dialog box and adjust the options in the Grid & Guides panel.
You can control whether objects you drag snap to the grid or guides. Choose View > Snap to Grid or View > Snap to Guides.
You can enable a set of margin guides around the edges of the Composition panel. These are called title-safe margins and action-safe margins (top left, Figure 1.20). The inner margin is called the title-safe margin, and the outer margin is called the action-safe margin.
Safe margins were more important back in the days when many televisions were set at the factory to enlarge the picture slightly, to better fill the smaller screens at the time. This effect was called overscan, partly because enlarging would cut off the edges of the image. There was no standard for how much to overscan, so to make sure important content was not cut off on various televisions, the industry developed the concept of safe margins that were thought to be visible on most TVs. Videographers and video designers were instructed to keep all important content inside the action-safe margin and keep all text inside the title-safe margin.
If you’re creating a video program that may be distributed widely and viewed on a range of displays, including older televisions, it can be a good idea to respect the action-safe and title-safe margins. But the safe margins are much less necessary for video that will be shown on recent digital displays such as computer screens or high-definition televisions, because overscan is much less likely to be used on them.
The margins inside the edges represent common aspect ratios used in television and video production. The narrowest margins represent the 4:3 aspect ratio used on older, non-widescreen televisions. If you anticipate that your production may be viewed on displays of different aspect ratios, consider framing the composition so that all important content can be viewed within all anticipated aspect ratios.
Viewing a Different Frame in the Composition Panel
When you want to change which frame is previewed in the Composition panel, you’ll typically do that in the Timeline. But the Composition panel also displays the current time, and you can click that display to change the current time in the Go to Time dialog box (Figure 1.21). This can be convenient when the Timeline panel isn’t displayed.
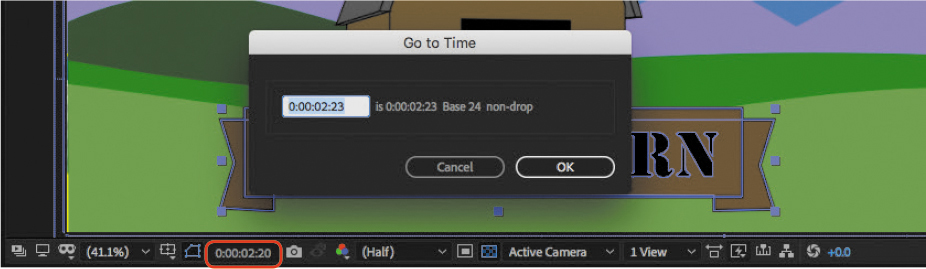
Figure 1.21 Click the time display to change the current time.
Changing the Quality of the Preview Image
When you play back a composition, it might not always play back smoothly. For example, if each frame of a composition involves many layers and effects, the required processing may be too much for your computer to be able to calculate and display 24 or 30 frames per second.
The frame size plays a major role; for example, a 4K (3840x1060-pixel) frame requires processing four times the number of pixels as a 2K (1920x1080-pixel) frame. This contains a clue as to how to speed up a preview: reduce the number of pixels that must be calculated by dropping the preview frame size (Figure 1.22). But you don’t want to permanently change the composition frame size, so instead drop the resolution of just the preview.
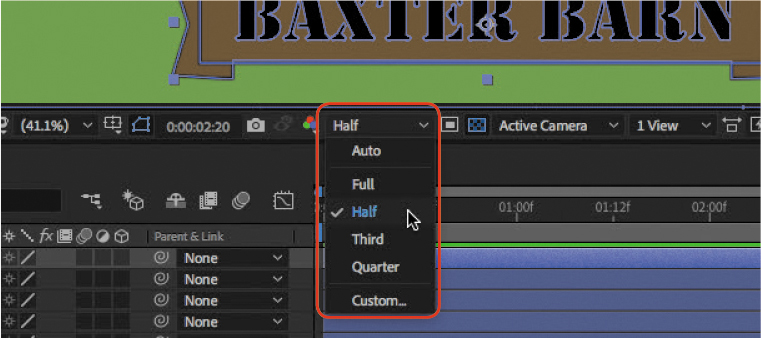
Figure 1.22 Lowering the preview resolution
Lowering the preview resolution may not be enough to produce smooth playback on its own, but it’s useful when combined with other techniques that reduce the preview processing load without affecting the content or the final render.
Indicating Transparency
When a composition has a transparent background, you need a way to tell the difference between transparent areas and areas that are the background color of a composition.
After Effects can indicate transparent areas using a checkerboard grid when you toggle the Toggle Transparency Grid button (Figure 1.23).

Figure 1.23 Toggling the transparency grid
If you’re experienced using Photoshop, the transparency grid may already be familiar to you.
Editing Composition Settings
When you start a new composition, you’ll see the Composition Settings dialog box. You learned earlier that a project needs at least one composition, so you’ll see this dialog box frequently. It’s important that you understand the basics of setting up the Composition Settings dialog box.
![]() ACA Objective 2.1
ACA Objective 2.1
![]() Video 1.6
Video 1.6
Editing Composition Settings
You may be working with a composition that’s already created, as in the bbarn_graphic composition in the Baxter Barn Animation.aep project file. In that case, you should know how to change existing composition settings.
To view or change composition settings:
Choose Composition > Composition Settings.
View or change settings as needed in each tab, and then click OK.
You’re probably wondering about all the options within the Composition Settings dialog box. Let’s briefly examine them.
The Composition Settings dialog box has three tabs. You probably won’t need to adjust everything in all three tabs. But you’ll probably have to adjust, or at least check, the Basic tab for every composition you make.
The Basic Tab
The Basic tab contains the most commonly adjusted settings (Figure 1.24):
- Composition Name. This can be anything you want, but it pays to be thoughtful about it. Composition Name is the default name of the video file that will be rendered, so give a composition the name you want for the video you’ll render from it so that you don’t have to rename the output. Also, if your project will combine multiple compositions, name them so that it’s easy to understand how each composition fits into the whole.
- Preset. Select a preset that is the best match for the technical requirements of your composition. The preset you choose sets every option in the first section of the Composition Settings dialog box: Width, Height, Pixel Aspect Ratio, and Frame Rate. This is helpful because once you set the correct preset, you don’t have to set those other options unless your composition has special requirements.
- Width and Height. This is the frame size of the composition, in pixels.
- Pixel Aspect Ratio. This represents the proportion of width to height of a pixel. In most cases today you will work with square pixels (aspect ratio 1:1); non-square pixel aspect ratios were more common with older video standards. Pixel aspect ratio is different from the frame aspect ratio, which is displayed to the right of the frame aspect ratio and based on the frame width and height.
- Frame Rate. This is how many frames play per second. It can be measured as drop frame or non-drop frame timecode, but drop frame is typical.
- Resolution. This is the same resolution setting you saw in the Composition panel. You can set the preview resolution lower than the frame size in case full resolution doesn’t play smoothly.
- Start Timecode. Adjust this only if you need the composition to start at a time other than zero.
- Duration. This is how much time it takes for a composition to play. For example, if you’re animating one rotation of a wheel that will be part of a car, set Duration to the number of seconds and frames you would like for the wheel to complete that rotation.
- Background color. You can change the background color by clicking the rectangle. Or you can sample a color by using the eyedropper to click on a color you see on the screen, even outside After Effects. The background color of the current composition becomes transparent if you use it inside another composition (called nesting).

Figure 1.24 The Basic tab of the Composition Settings dialog box controls the technical fundamentals of a composition.
The Advanced and 3D Renderer Tabs
The options in the Advanced and 3D tabs are intended for less common situations, so they aren’t typically adjusted. You won’t be using them during the lessons in this book.
In the Advanced tab (Figure 1.25), the Anchor option lets you pin layers to a side or corner when you change the frame size of the composition.
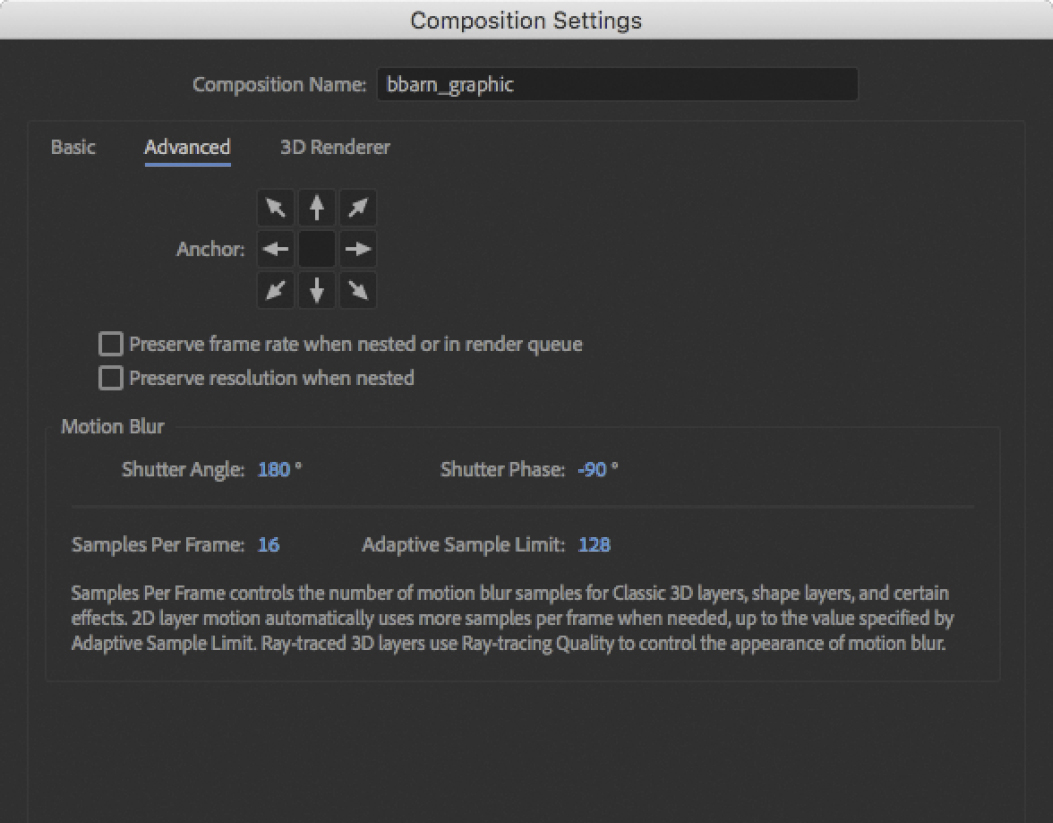
Figure 1.25 The Advanced tab of the Composition Settings dialog box
When you nest one composition inside another, the nested composition inherits the settings of the parent composition. The two options below the Anchor option are provided in case you want to override that default behavior for frame rate and resolution.
The Motion Blur options customize how motion blur looks. You would adjust Shutter Angle or Shutter Phase when you want to reproduce the look of motion blur produced by a rotating shutter in a movie camera.
The 3D Renderer tab comes into play only when you work with 3D layers. The reason you’d make any changes is to balance 3D rendering quality and appearance against rendering speed, depending on the computer hardware you’re using. To help you decide, selecting each option displays a list of which 3D effects can or can’t be rendered. The Ray-traced 3D option tells you that it works best with an NVIDIA CUDA card.
Exploring the Timeline Panel
![]() ACA Objective 2.2
ACA Objective 2.2
![]() ACA Objective 3.1
ACA Objective 3.1
You’ve learned that the Composition panel is the visual representation of the composition frame at a particular point in time. When you want to work with content over time, you need more than that. You need a way to see how the composition changes over time, to set up and play back animations and other moving content.
![]() Video 1.7
Video 1.7
Exploring the Timeline Panel
The Timeline panel fills all those needs. Where the Composition panel is about space, the Timeline panel is about time. It’s useful to think of the Timeline panel as complementary to the Composition panel.
Moving Around in the Timeline
In After Effects you’ll probably spend the bulk of your time using the Timeline panel. Use the Timeline panel to move to different frames, or points in time, in the composition.
The main area of the Timeline panel is where you see layers sequenced. Here are some of the most useful ways you’ll navigate the Timeline panel (Figure 1.26):
- Zoom the time magnification level using the zoom slider at the bottom, or by pulling in the ends of the magnification range bar at the top. You can also press the – (minus) and + (plus) keys (don’t press Shift).
- Zoom the timeline with a mouse or trackpad while pressing Alt (Windows) or Option (macOS) as you scroll with the mouse wheel or a trackpad gesture.
- To fit the entire composition duration to the width of the Timeline panel, press Shift+; (semicolon key).
- When the timeline is magnified, change which time range is visible by dragging the handle in the middle of the scroll bar at the bottom, dragging the Hand tool (
 ) in the timeline, or dragging the magnification bar at the top of the timeline.
 - Move the current-time indicator in time by dragging it, entering the time into the Current-Time Indicator Position time display, or using keyboard shortcuts such as spacebar to play/pause your video playback.
- Control which tracks are targeted, locked, hidden, muted, and so forth using the icons along the left side of the Timeline panel.
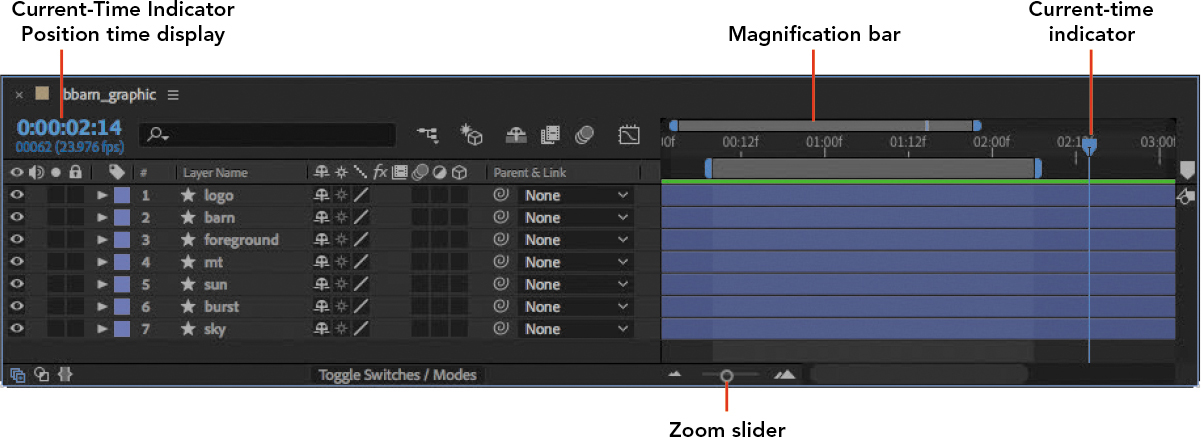
Figure 1.26 Overview of Timeline panel time controls
Tip
If your keyboard has Home and End keys, you can use them to navigate the composition. To go to the first frame of a composition, press Home. To go to the last frame, press End.
Controlling Layers in the Timeline
In addition to moving through a composition in time, another primary function of the Timeline panel is to manage layers.
Using Layers
A layer is a footage item that’s been added to a composition. As an example, suppose you have an After Effects project containing a video file, a graphics file, and a new empty composition. When you add the video file to the composition, the composition now has one layer (the video file). If you then add the graphic, the composition now has two layers.
It’s also possible to create objects in After Effects, such as a text object, and add that as a layer in a composition.
If you’ve used other Adobe applications, the way that layers work may seem familiar. In the list of layers, a layer at the top of the stacking order appears in front of other layers in the composition:
To rearrange the layer stacking order (Figure 1.27), in the Timeline panel, drag a layer up or down.
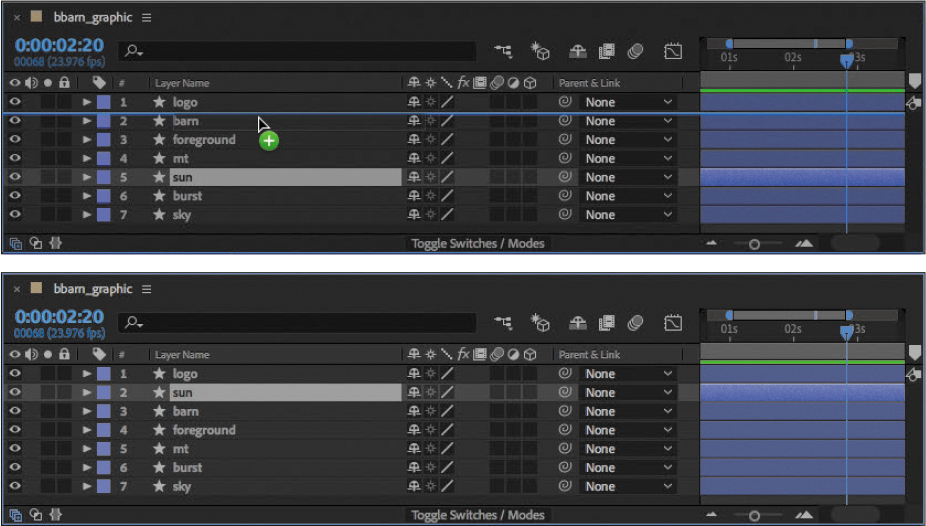
Figure 1.27 Dragging a layer to a new position in the stacking order, before and after
Note
On an extended macOS keyboard, there is a Return key on the main keyboard and an Enter key on the numeric keypad. Return and Enter are distinct keys, so when renaming a layer, pressing Return will rename the layer, but pressing Enter will not
To rename a layer:
In the Timeline panel, select a layer and press Enter (Windows) or Return (macOS); the layer name becomes highlighted.
Type the new name, and then press Enter/Return to confirm the new name.
Exploring Layer Switches
The Switches and Modes section at the left side of the Timeline panel (Figure 1.28) provides numerous controls for how layers appear in the Timeline panel. By default, After Effects displays layer switches to the right of layer names.

Figure 1.28 Primary Timeline controls and layer switches
The layers in a composition are listed near the left side of the Timeline panel. To the left and right of the layer name are the switches for that layer.
Let’s take a quick look at the most commonly used layer switches to the left of the layer name:
- Hide/show layer. Click the eye icon to toggle layer visibility. When the eye icon is visible, the layer is visible in the Composition panel.
- Mute audio. If a layer contains audio, this switch displays a speaker icon. Click to hide the speaker icon and mute that layer’s audio.
- Solo. Click this switch to hide all layers except the layer (or layers) where Solo is on. Use this when you want to concentrate on a single layer, without other layers getting in the way or distracting you. If you solo more than one layer, only those layers will display.
- Lock. Click to prevent changes to a layer. When a layer is locked, you can’t select it.
- Properties. The triangle to the left to the label isn’t really a switch, but it’s important. Click to twirl it open, revealing the properties for a layer. You will spend a lot of time editing layer properties, especially when you create animations.
- Label. You can apply a color label to a layer to help identify important layers and visually associate layers in the list. Because layer colors are only labels, they have no effect on the content or rendering of a composition.
- Number. Layers in a composition are always numbered by their stacking order. The top layer is always layer 1. If a layer changes its position in the stacking order, its number will change accordingly.
Another set of switches and options are found to the right of a layer name (Figure 1.29). These tend to be used by more advanced users. For now, we’ll cover the ones that can be helpful when you’re still learning After Effects:
- Shy. When a composition has many layers, less important layers can get in the way of the more essential ones that you need to work on. You can mark some layers shy by turning on their shy switch, and then when you enable the Hide Shy Layers switch (covered later in this chapter), all shy layers are hidden, simplifying your view of the Timeline.
- Collapse Transformations/Continuous Rasterization. Collapse Transformations changes the rendering order of layer elements such as transformations, masks, and effects. You might not need to use this option until you start building complex nested compositions. But for shape/vector-based layers that you plan to scale up over time, you can turn on Continuous Rasterization so that vector objects maintain full frame resolution as they grow in size.
- Quality, Effect, and Frame Blending. If a composition becomes complex and slow to play back, you can adjust these three options. Quality can be set to Best or Draft, and Effects and Frame Blending can be set to display or not display. (Frame Blending can help create smooth motion when a layer’s frame rate is lower than the composition frame rate.) Setting Quality to Draft and disabling Effects and Frame Blending reduces the processing burden on your computer.
- Motion Blur. Enabling Motion Blur applies the Motion Blur settings you saw earlier in the Composition Settings dialog box. As with the three options to the left, turning off this option can reduce the processing burden on your computer to help previews play back more smoothly.
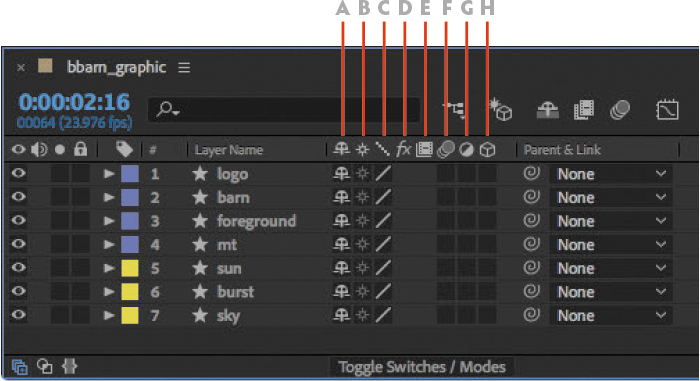
Figure 1.29 Some advanced Timeline layer switches
A Shy
B Collapse Transformations/Continuous Rasterization
C Quality
D Effect
E Frame blending
F Motion Blur
G Adjustment layer
H 3D layer
Note
If you look at the layer switch area of the Timeline panel and they aren’t there, the Timeline display may have been changed. Try clicking the Toggle Switches/Modes area at the bottom of the switches/modes area.
The last two switches to the right of the layer name change how a layer works:
- Adjustment Layer. This option lets you use a layer to affect the appearance of all layers below it in the stacking order. For example, if you want to darken all four layers at the bottom of the layer list in the Timeline panel, set the layer above those four as an Adjustment Layer and apply an effect that darkens that layer. As an adjustment layer it will affect everything under it.
- 3D Layer. A layer is 2D by default, so it has X and Y Position coordinates. When you enable the 3D switch for a layer, it becomes a 3D layer and now has X, Y, and Z (depth) Position coordinates, and will now work with the 3D features in After Effects.
Identifying Shape Layers
When a star icon appears next to a layer name (Figure 1.30), that indicates that the layer is a shape (vector) layer, like a shape drawn in After Effects or converted from a layer imported from Adobe Illustrator. In other words, it isn’t a pixel-based layer like a video frame.
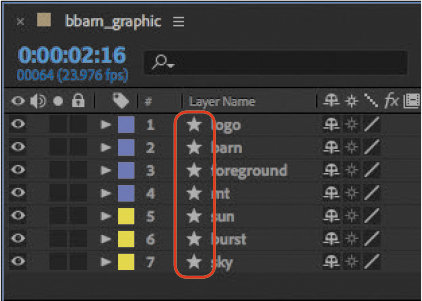
Figure 1.30 A star next to a layer name indicates a shape layer.
Tip
If your keyboard has a numeric keypad, you can select a layer by pressing a number on the numeric keypad. For example, if you want to select the layer numbered 3 in the Timeline panel, press the 3 key on the numeric keypad
There are many more options in the Timeline panel, but most are for advanced techniques and the sheer number of them can overwhelm you if you’re just starting to learn After Effects. Other Timeline options will be covered when you need to use them in a lesson.
Animating a Layer
The core feature of After Effects is to animate layers—to move layers, or change the properties of layers or effects applied to them, over time.
![]() ACA Objective 4.7
ACA Objective 4.7
![]() Video 1.8
Video 1.8
Animating a Layer
To animate a layer, you need to do two things: identify the property you want to change (such as Position), and then set two different values for that property at two points in time. When you play back the composition, After Effects automatically works out how the values should change from frame to frame, and what you see upon playback is a change over time.
![]() Video 1.9
Video 1.9
Working With Keyframes
To mark the points in time where you want to set or change properties for a layer, you use keyframes in the Timeline panel.
Revealing Layer Properties
To be able to set a keyframe for a specific layer property, first you have to display that property in the Timeline panel (Figure 1.31). Earlier you learned that you can reveal layer properties by clicking the triangle next to the layer label (color). That’s how you reveal the property that you want to animate.

Figure 1.31 Revealing the properties of a layer
To reveal a layer property:
In the Timeline panel, find the layer you want to animate, and click the triangle next to its label to twirl it open and expand that layer’s properties.
If you don’t see the property you want, and you see more triangles, that means there are property groups to expand, such as Contents, Effects, and Transform.
Click the triangle next to the group that contains the property you want.
If you still don’t see the property you want to adjust or animate, continue to reveal groups until you see that property.
Tip
One of the most useful single-letter layer property keyboard shortcuts is U. If a layer has any properties with keyframes applied, pressing U reveals those properties. Pressing UU reveals only modified properties.
Many layer properties have single-letter keyboard shortcuts—you simply press a letter, without also pressing a modifier key. These let you reveal a specific property much more quickly than repeatedly clicking through the hierarchy of layer properties. For example, for a selected layer, to reveal Position, press P; to reveal Rotation, press R; and to reveal Opacity, press T. (The Opacity shortcut is T because O is a standard keyboard shortcut for out point; in After Effects pressing O goes to the layer out point.)
There are only 26 letters in the alphabet but many more properties. For this reason, After Effects also provides shortcuts that use the same letter pressed twice. For example, the shortcut to reveal the Opacity property is T, and the shortcut for Mask Opacity is TT.
For a complete list of one- and two-letter layer property shortcuts, see the After Effects Keyboard Shortcut Reference:
helpx.adobe.com/after-effects/using/keyboard-shortcuts-reference.html
Setting Up an Animation
A layer animation requires a minimum of two keyframes with different values.
To set up an animation:
Position the current-time indicator at the frame where you want the animation to be in a certain state.
You can set the current-time indicator at the frame where you want the animation to start. But it’s also okay to start at the frame where you want the animation to end and work backward, as in Video 1.8, where the sun is animated.
On the layer you want to animate, click the triangle next to the layer label to reveal the layer property you want to animate.
In Video 1.8, the layer properties of the Sun layer are revealed until the Position property is displayed. The Position property is hidden within the Transform group of properties.
If the stopwatch icon for a property is not already enabled, click to enable it (Figure 1.32).

Figure 1.32 You can tell the stopwatch is enabled because it shows a watch hand and is blue.
When the stopwatch is enabled, a keyframe is added at the current time, and editing the value of that property at other points in time will automatically add keyframes at those times.
If the value of the property is not already set to the value you want at the start of the animation, change it.
Position the current-time indicator at a frame where you want the state of the layer to be different. Then edit the same layer property to set it to the value you want it to have at that keyframe (Figure 1.33).

Figure 1.33 When a layer property is enabled for animation and the stopwatch is enabled, editing the value of that property creates a keyframe.
For example, in Video 1.8 the animation was built starting with a keyframe at two seconds, so to complete the animation, Joe moved the current-time indicator to half a second (12 frames, or 0:00:00:12) and changed the Position value.
Sometimes you can change the value of a property visually, instead of having to enter a different number. For example, in Video 1.8, Joe used the Move tool to drag the sun to its starting position. Using the Move tool always alters the values of the Position property.
To change the value of a keyframe:
Move the current-time indicator to the keyframe you want to change.
An easy way to move among existing keyframes is to click the Go To Previous Keyframe or Go To Next Keyframe buttons to the left of the layer property name (Figure 1.34).
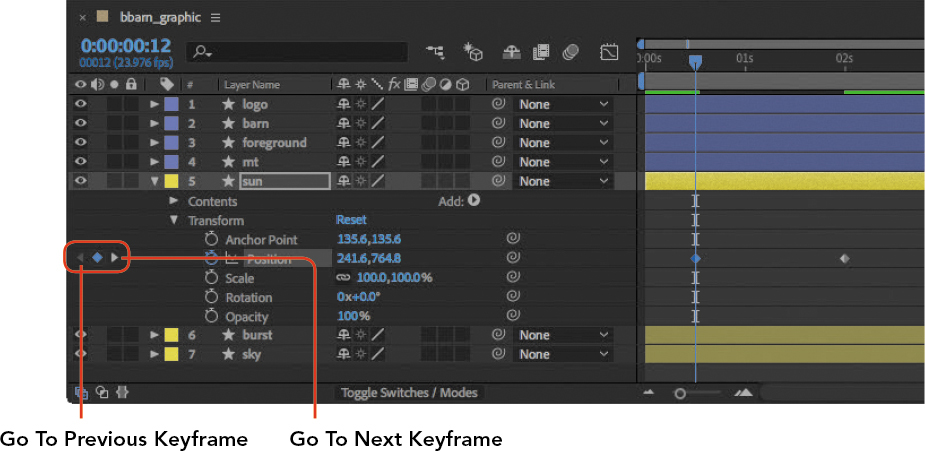
Figure 1.34 Keyframe navigation buttons
Tip
To make sure you position the current-time indicator exactly on a keyframe, hold down the Shift key as you drag the current-time indicator so that it snaps to the keyframe.
Display the layer property you want to change.
Edit the value of that property.
When you see blue values, the blue color means you can edit them. You can click the blue value and enter a new one, but when you don’t know how much to adjust something you can use more interactive ways to change the values.
Use a tool. Some properties are represented by a tool. For example, if you find it more intuitive to drag a layer in the Composition panel with the Move tool, that will alter Position values. Similarly, the Rotate tool is a visual way to alter the values of the Rotation property.
Scrub. You can change values by dragging the value itself. Position the pointer over the value, and drag left to reduce the value, or drag right to increase the value. If dragging changes the value too quickly or too slowly, you can press modifier keys to alter the rate of change. To change the value faster, Shift-drag; to change the value slower, Ctrl-drag (Windows) or Command-drag (macOS).
Use the arrow keys. After clicking in a value, press the Up Arrow key to increase a value, or press the Down Arrow key to decrease it. When you want the arrow keys to change a value by a larger or smaller amount, you can use the same modifier keys that you use for altering the amount of change for scrubbing.
Note
The spacebar is the default keyboard shortcut for previewing, but that shortcut can be changed in the Preview panel. If you use After Effects on a different computer and you discover that pressing the spacebar does not start playing a preview, expand the Preview panel and see how the preview shortcut is set.
Previewing a Composition
To preview a composition, do one of the following:
- In the Preview panel, click the Play button (Figure 1.35).

Figure 1.35 Preview panel
- Press the spacebar.
- Choose Composition > Preview > Play Current Preview.
To stop playing a preview, click the Stop button, press the spacebar, or press the Esc key.
Making Animation More Natural with Easing
In Video 1.8, the first version of the sun animation starts and stops abruptly. Many animations look better and more realistic if they ease out, or accelerate, from a start and ease in, or decelerate, to a stop. In After Effects, you can apply easing quickly and easily.
To apply easing:
Select one or more keyframes.
For a simple two-keyframe animation such as the sun in Video 1.8, you’ll typically select both keyframes so that you can ease both the start and stop.
Do one of the following:
- Choose Animation > Keyframe Assistant > Easy Ease.
- In the Timeline panel, right-click (Windows) or Control-click (macOS) any of the selected keyframes and choose Keyframe Assistant > Easy Ease (Figure 1.36).
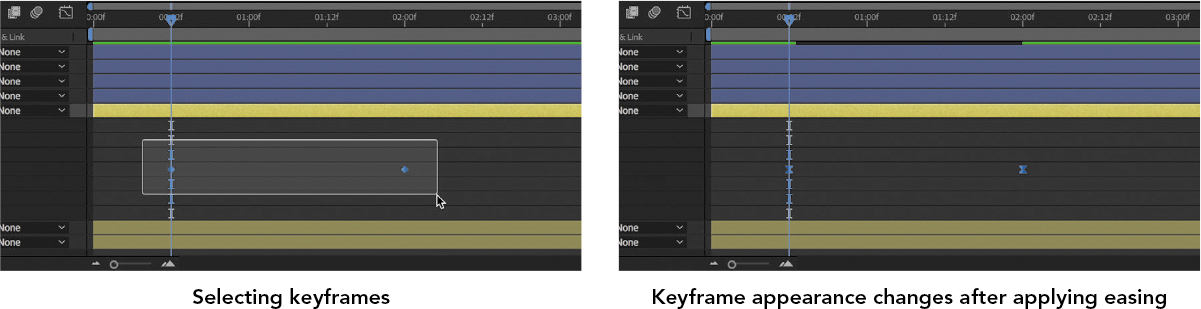
Figure 1.36 Applying Easy Ease
Easy Ease automatically applies appropriate easing to the selected keyframes. Notice that the Keyframe Assistant submenu also contains the Easy Ease In and Easy Ease Out commands, in case you want more control over easing for keyframes you’ve selected.
![]() ACA Objective 4.1
ACA Objective 4.1
![]() ACA Objective 4.7
ACA Objective 4.7
Adding a Gradient to a Shape
![]() Video 1.10
Video 1.10
Animating a Gradient
In Video 1.10, a gradient is added to a shape and then animated, to create the effect of a blue sky lightening as the sun rises. The shape layer in the video is a rectangle originally created in Adobe Illustrator, but it could have also been drawn in After Effects using the Rectangle tool.
To add a gradient to a shape:
(Optional) To show only the shape layer you want to edit, click the Solo switch for that layer. All other layers are temporarily hidden.
Select the shape layer. In the bbarn_graphic composition, this is the Sky layer.
Click the Fill label (the text, not the rectangle).
In the Fill Options dialog box (Figure 1.37), click to select the Linear Gradient option, and click OK.
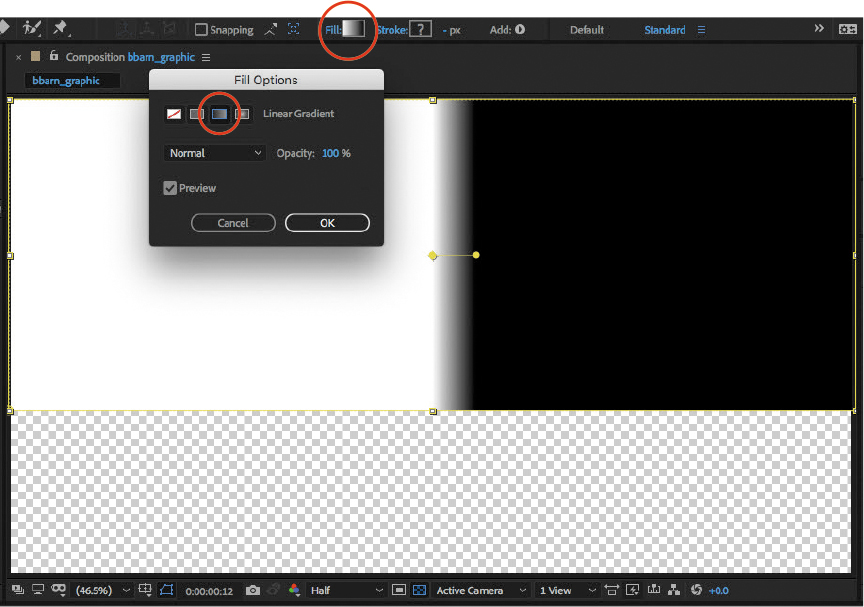
Figure 1.37 Use the Fill Options dialog box to set the fill of a shape to a Linear Gradient.
Click the Fill Color option (the rectangle).
The Gradient Editor dialog box opens. You control the gradient using the strip across the top. The strip has stops above and below it. The stops across the top of the strip control opacity so that you can fade a gradient out to transparent. The stops across the bottom control colors along the gradient.
You can add more stops by clicking along the strip, drag stops to different positions on the strip, or remove stops by dragging them away from the strip. But for this chapter you can use the stops that are already there.
For the Baxter Barn composition, the opacity stops above the strip are both left at 10% opacity (solid), and the color stops under the strip are changed.
In the Gradient Editor dialog box (Figure 1.38), click to select the color stop at the left end of the bottom of the gradient strip.
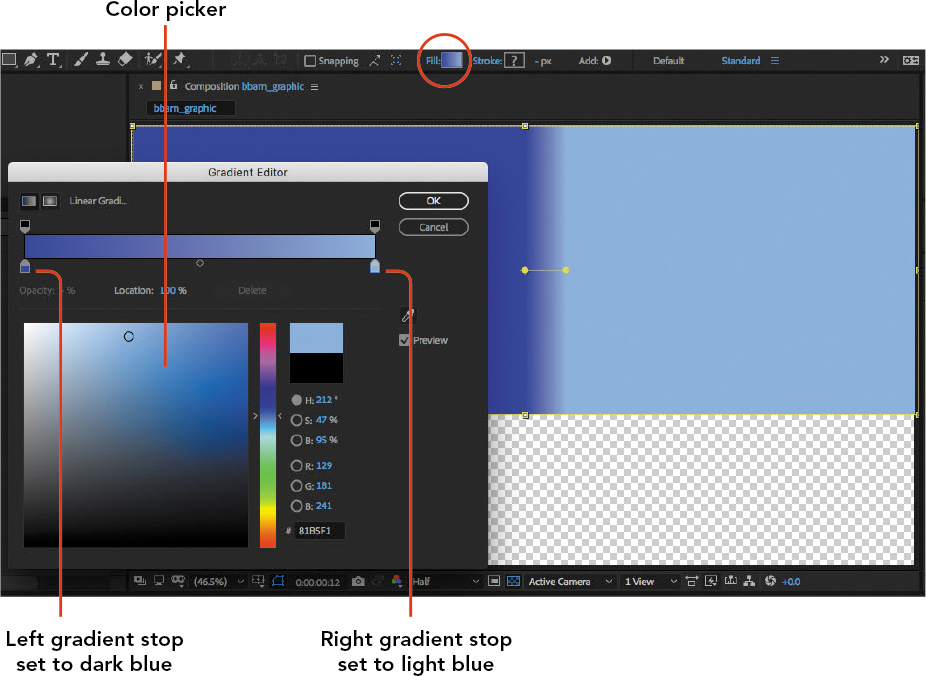
Figure 1.38 Both color stops along the bottom of the gradient strip were set using the color picker below them.
In Video 1.10, the left stop is set to a dark blue to represent the twilight sky, and the right stop is set to a light blue to represent the morning sky.
Use the color picker at the bottom of the Gradient Editor dialog box to set the color for the selected stop.
Repeat steps 6 and 7 for the color stop at the right end of the bottom of the gradient strip.
When a stop is selected, the diamond along the gradient strip represents the midpoint between gradient stops. You can drag it to change the midpoint.
Click OK.
As long as the shape is selected, you can see a gradient control in the middle of the shape.
Now you’ll set the distance and rotation angle of the gradient.
Drag the two handles of the gradient control line in the middle of the shape (Figure 1.39). This sets how far the gradient extends as well as the gradient angle.

Figure 1.39 Adjust the gradient angle and location by dragging the two gradient handles.
Drag the middle handle on the bottom of the Sky shape layer to make sure it fills the space behind the barn and the horizon.

Figure 1.40 Enlarging the gradient to make sure it fills the space behind the barn and horizo
Click the Solo switch for the Sky layer to deselect it so that the other layers in the composition display again.
As demonstrated in Video 1.10, to simulate a sky that lightens as the sun comes up you can now animate the Position property of the Sky layer gradient using the keyframe techniques you’ve learned.
Exploring the Preview and Timeline Panels
![]() ACA Objective 2.1
ACA Objective 2.1
![]() ACA Objective 2.2
ACA Objective 2.2
![]() Video 1.11
Video 1.11
Previewing and Managing the Timeline
The Baxter Barn composition is simple enough that it should play smoothly. If you create a more complex composition that does not preview smoothly, you may need to adjust the settings in the Preview panel so that it plays more smoothly.
Using the Preview Panel
You can drag the top or bottom edge of the Preview panel to expand it (Figure 1.41) and change additional settings.
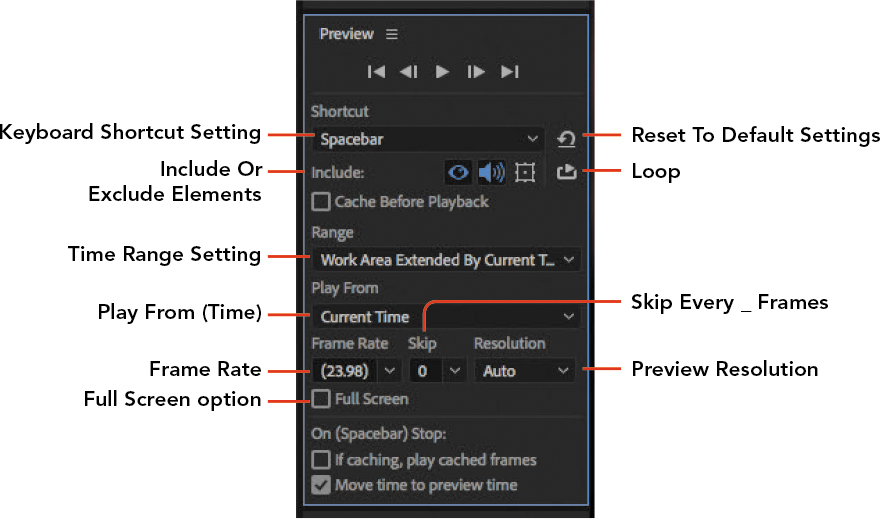
Figure 1.41 Commonly used options in the expanded Preview panel
By default, the preview plays in the Composition panel. If you want it to play full screen, select the Full Screen option in the Preview panel.
A major reason the Preview panel has so many options is to help you compensate for compositions that don’t play smoothly. This can happen when a composition has so many layers and effects that it taxes the capabilities of your computer system, or when you’re using a computer that has less processing power than is optimal for the compositions you’re editing. In either case, you can try adjusting the following Preview panel settings:
- Range. Reduce the range of frames to preview. For example, set the Work Area (discussed in the next section) to a duration shorter than the composition, then set Range to Work Area.
- Frame Rate. Lower the Frame Rate value so that fewer frames need to be processed every second.
- Skip. Omit frames at regular intervals to reduce the total number of frames that need to be processed.
- Resolution. Drop the Resolution value to reduce the number of pixels that need to be processed for each frame.
Frames processed for previewing are cached (held) in RAM. A long composition may require a number of preview frames that won’t fit in the available RAM on your computer. When that happens, you can try reducing the range and increasing the Skip value.
Adjusting preview options is a trade-off between preview quality and performance. Achieving higher preview performance on the same computer may require compromising preview quality.
Using the Work Area in the Timeline Panel
In the Timeline, the work area (Figure 1.42) lets you designate a time range that’s shorter than the composition duration. Setting a work area is useful when you want to focus on a particular part of an animation; for example, the Preview panel can be set to loop the work area.
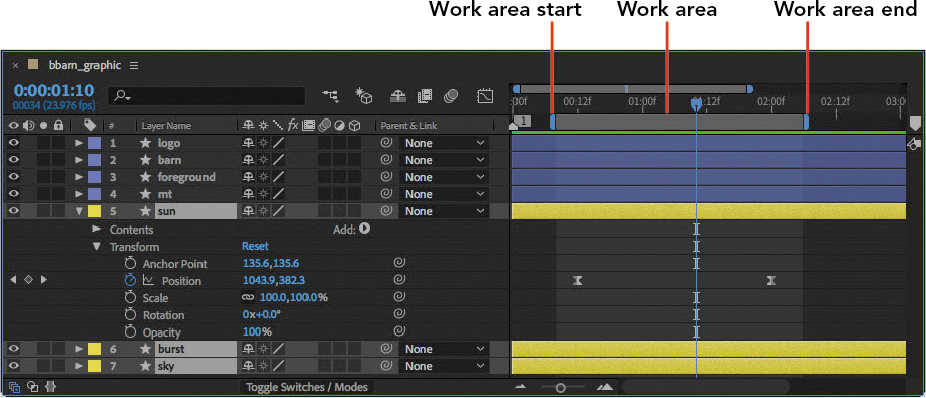
Figure 1.42 The Work Area bar in the Timeline panel
Because calculating preview frames can take time and consumes RAM, restricting the preview area with the work area can help previews finish processing faster and use less RAM.
Tip
Understand the difference between the Work Area bar below the time ruler, and the thinner Timeline magnification bar above the time ruler.
You can also use the work area to define the range of frame that exports.
If you want to permanently set the composition start and end to the current work area, choose Composition > Trim Comp To Work Area.
Exporting a Composition
![]() ACA Objective 5.1
ACA Objective 5.1
![]() ACA Objective 5.2
ACA Objective 5.2
Exporting an After Effects composition renders its layers to frames of pixels for playback. You’ve already seen After Effects render a preview of a composition. Another form of rendering is exporting frames to a file.
![]() Video 1.12
Video 1.12
Checking and Exporting Your Composition
Exporting can take time, even hours, when a composition is complex or has a high-resolution frame size. For this reason, you want to make sure you’ve carefully checked that the composition is correctly set up before rendering to a file.
Video 1.12 discusses a checklist that you can use before exporting to a file:
- Ask another person to review the composition. Use the preview feature in After Effects to show them the composition.
- Proof all text. You don’t want spelling errors in a final render.
- Check safe zones. Make sure important text and graphics are not extending into title/action-safe zones.
- Check audio. If the composition includes sound, preview it while listening carefully to the audio, preferably on studio monitors.
- Check layer visibility. Are there any layers that were hidden temporarily, and are still hidden?
- Check composition settings. In the Composition Settings dialog box, make sure all of the settings are consistent with the technical requirements of the production. This is especially important if the composition will be integrated with a video program; you don’t want to supply a video with a different frame size or frame rate.
To export a composition to a file:
Make sure the composition is active in the Composition panel or Timeline panel, or selected in the Project panel.
Choose File > Export and choose Add To Render Queue.
There are other options on the Export submenu, but for now you’ll add the composition to the Render Queue panel, which is part of After Effects. The other three options send the composition to other applications.
The composition appears in the Render Queue panel (Figure 1.43) with several groups of options:
- Render Settings. Click the blue text to edit the composition settings for the render and click OK. This is your last chance to make sure options such as Quality, Resolution, and Frame Rate are set correctly.
- Output Module. Click the blue text to edit the file format settings for the exported file and click OK. The format you select at the top determines which settings are available in the rest of the dialog box. Some formats are audio-only, such as AIFF, so video settings won’t be available for them.
- Output To. Even if you don’t adjust Render Settings or Output Module, be sure to click the blue text for Output To so that you can tell After Effects where to save the output file. Select the folder that you want to be the destination for the exported file and click Save.

Figure 1.43 The Render Queue panel
Click Render to start the Render Queue.
Note
While QuickTime can be installed in Windows to make QuickTime formats available, Apple no longer provides security updates for QuickTime for Windows, so installing QuickTime for Windows is no longer recommended.
There are two ways to export a composition to a video file. You can export it from After Effects using Render Queue, or send the composition to the queue in Adobe Media Encoder CC, a separate program that comes with After Effects. Using Media Encoder has several benefits:
- Media Encoder can process exports in the background, so you can return to After Effects and keep working on other compositions while your exports are processing. Keep in mind that when a computer tries to balance staying responsive in the application you’re using with processing exports in the background, one or both activities may take longer. The slower the computer, the more you’ll notice delays from intensive multitasking.
- Media Encoder can queue multiple exports. Instead of exporting a composition from After Effects and waiting until it’s done to export the next one, you can send multiple compositions from After Effects to Media Encoder, where they will be queued up and automatically processed in turn.
- If you need multiple versions of a composition and the only difference between the versions are the export settings, you can export that composition once from After Effects, duplicate it in Media Encoder, and change the export settings for each duplicate. This will be much faster than exporting a composition multiple times from After Effects to Media Encoder, and involve less clutter than creating copies of a composition.
Because Media Encoder is a stand-alone video converter, you can even use it on its own to convert video files from their current format to another, a process called transcoding. For example, you can drag multiple video files into the Media Encoder queue and apply an export settings preset that converts them all for YouTube.
Exploring Key After Effects Preferences
![]() ACA Objective 2.2
ACA Objective 2.2
The Preferences dialog box lets you adjust the overall operation of After Effects to more closely fit the way you work and the hardware available to you.
![]() Video 1.13
Video 1.13
Setting Preferences
The Preferences dialog box in After Effects is very deep, with a large number of settings. It isn’t necessary for a beginner to review all of the settings because many of them are for specialized workflows. We’ll review some of the settings that you saw in Video 1.13. For more information about the rest of the settings in the Preferences dialog box, see:
helpx.adobe.com/after-effects/using/preferences.html
Video 1.13 covers the following preferences (Figure 1.44):
- Appearance. After Effects uses a dark user interface design by default. This is consistent with the dark appearance used by many video-editing applications, but you can adjust it if you want.
- Auto-Save. Even if you already have the good habit of saving your work regularly, Auto-Save provides an additional layer of protection because it can save multiple versions of your work over time. That’s useful if you want to go back to a version of your work that’s no longer available in the project document you’ve been saving. Auto-Save stores those versions in a folder called Adobe After Effects Auto-Save, which is next to the project by default.
- Memory. Modern operating systems dynamically allocate RAM to applications, constantly responding to and adjusting for the memory requests of the applications that are currently running. The Memory preference is a way of limiting the amount requested by the Adobe applications in the RAM Available For list. Increase the RAM Reserved For Other Applications value if you want to keep more RAM available for non-Adobe applications. If you want maximum RAM allocated to the listed Adobe applications, decrease the value. You can’t decrease it to zero because the operating system needs a certain amount of RAM.
- Media & Disk Cache. Rendering frames can take so much processing power and time that After Effects caches, or keeps, frames it has rendered. If you want to see a frame that hasn’t changed, reading it from a cache is often faster than recalculating it. Caching uses free space on your local storage drives, and it works best when you have lots of free space on fast drives. If you’re a beginner, leave these settings at their defaults. As you become more advanced, you can free up storage space on your system drive by setting up additional fast drives for caching.
- Grids & Guides. You learned about grids and guides in “Grid and Guide Options” earlier in this chapter. This is where you can customize grid spacing and colors.
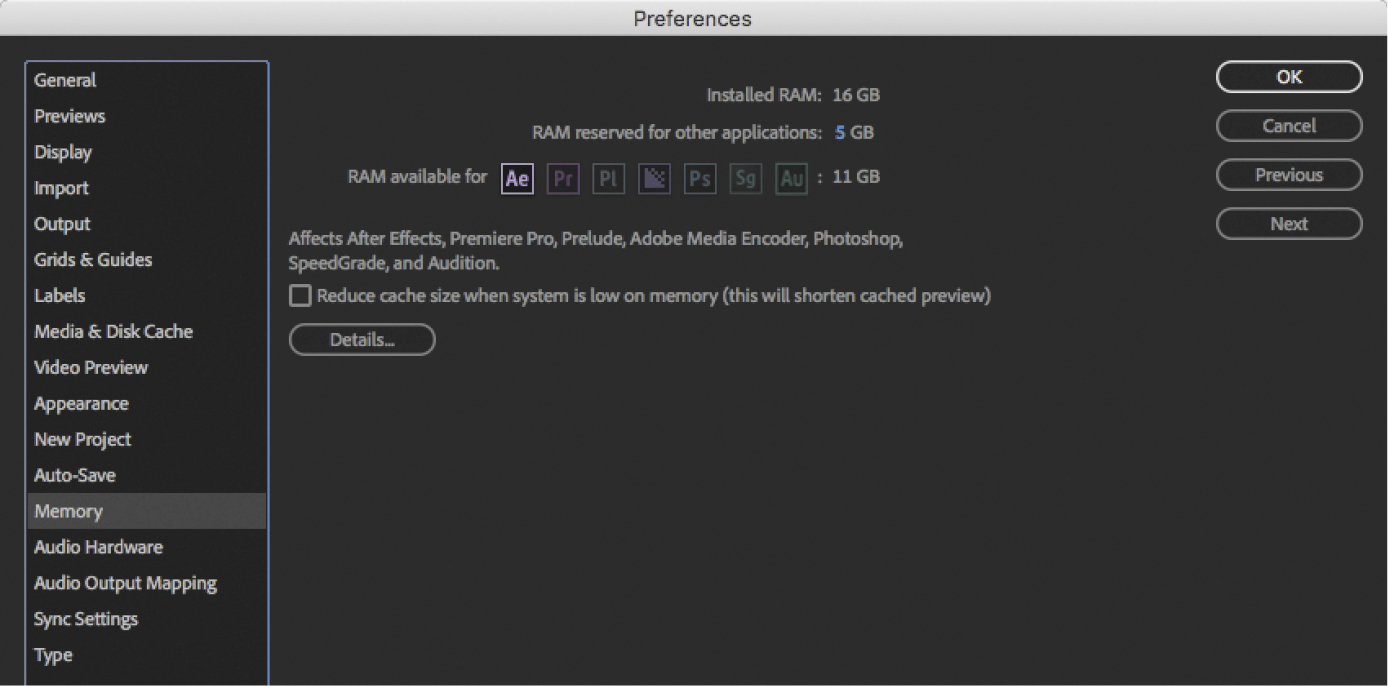
Figure 1.44 Click a heading on the left side of the Preferences dialog box to view that panel.
For more details about all of the preferences, see:
helpx.adobe.com/after-effects/using/memory-storage1.html
Comparing After Effects and Premiere Pro
Adobe offers both After Effects and Premiere Pro, and both are heavily used in the video industry. Why do both exist, and what are their differences?
![]() Video 1.14
Video 1.14
Differences Between After Effects and Premiere Pro
Video 1.14 describes some of the major differences between After Effects and Premiere Pro (Figure 1.45). For example, you can think of After Effects as a more vertically oriented application because it’s focused on animating a stack of layers, whereas Premiere Pro is more of a horizontally oriented application because it focuses on arranging a number of finished clips across time.

Figure 1.45 After Effects vs. Premiere Pro
Those descriptions may not seem too different on the surface, but the difference is clearer when you think about the time scales that you use for each application. Many After Effects compositions are less than a minute long; think of the special effects shots in action movies or the animations in commercials that are on the screen for only a few seconds before the movie cuts to the next shot. In contrast, Premiere Pro sequences can run the entire length of an hour-long television program or a two-hour feature film.
To extend the comparison, you can think of Premiere Pro in the following ways:
- Premiere Pro excels at long-form editing, able to efficiently edit many clips into full-length video titles.
- Premiere Pro is a “generalist” application, able to handle a wide range of video-editing and motion graphics tasks competently, but not deep in specific areas such as masking, compositing, and effects.
- Premiere Pro concentrates on integrating many diverse types of content into a cohesive whole.
In contrast, After Effects differs from Premiere Pro in the following ways:
- After Effects is optimized for editing short-duration compositions that are often intended to be components in longer programs. You can create short stand-alone pieces using After Effects, but the longer the duration, the more efficiently it will be handled in Premiere Pro.
- After Effects is a “specialist” application, offering a deep set of features for the specific purpose of creating motion graphics and other special effects.
- After Effects also integrates many types of content into a single composition, but the short pieces you produce with After Effects in turn may often become components of a longer program that you may be building in Premiere Pro.
Challenge
In this first chapter, not only have you taken a tour of the primary After Effects panels, but you’ve animated and exported an actual project! Now is a good time to review what you’ve learned. See if you can do the following:
- Start After Effects.
- Open the Baxter Barn Animation.aep document from the Start screen in After Effects.
- Rearrange a panel or two in the workspace. For example, move the Preview panel to a different part of the workspace, as demonstrated in Video 1.11.
- Animate a different part of the bbarn_graphic composition. For example, make the Logo layer move into position starting from outside the frame.
- Preview your edited animation.
- Render your new version of the composition to a file in your Exports folder.
Conclusion
Congratulations! You reached the end of Chapter 1. You should now have a basic understanding of the animation workflow in After Effects. You learned about file organization and After Effects panels. You learned how to find your way around the most important panels in After Effects, open a composition, animate its elements by setting keyframes for layer properties, and export the composition to a finished video file.
You learned quite a lot already, and this is only Chapter 1! In the rest of the book, you explore those subjects in more detail.