8
Introduction to Cloth Simulations
The next type of simulation we will discuss is a cloth simulation. This is one of the easier simulations to work with, but it is also quite complex due to the amount of internal and external interactions it will have. This simulation makes things that would otherwise be very difficult to model—such as tablecloths, flags, and blankets—super simple and easy to create! Normally, it’s used to create two-dimensional (2D) things such as the examples I just mentioned, but it can also be used to create pillows, stuffed animals, and even balloons!
The goal of this chapter is to give you an understanding of how cloth simulations work in Blender and what all the settings and values do. Just as with the previous chapters, we will start by learning what a cloth simulation is, then we will jump straight into the settings.
Here are the topics we will cover:
- What is a cloth simulation?
- Understanding collision objects
- Understanding cloth simulation settings and values
Technical requirements
This chapter requires you to have Blender version 3.0 or above installed.
To download Blender, visit www.blender.org.
What is a cloth simulation?
A cloth simulation in Blender is used to simulate the behavior and interactions of cloth in the real world. It is great for creating things such as fabrics, blankets, pillows, flags, and much more. While you can get similar results using a soft body simulation, a cloth simulation is designed and better suited for this type of thing, and you will generally get better results. You can see an example of a cloth simulation here:

Figure 8.1 – Cloth simulation example
The cloth calculates and simulates its physical properties by creating virtual springs that are connected to each vertex of the object. These springs control how stiff the cloth will be, how much it will bend, or how much it will resist collapsing. There are four types that you need to remember, as outlined here:
- Tension springs are used to control how stiff the cloth will be and how much it will resist stretching
- Compression springs are used to control the overall structure of the cloth
- Shear springs are used to control angular deformations
- Bending springs are used to control how much the cloth will bend and fold
We will be covering these springs in a bit more depth, and you will see examples of how they work later in this chapter!
To add a cloth simulation to your object, first head over to the Physics panel, then select Cloth, as illustrated in the following screenshot:
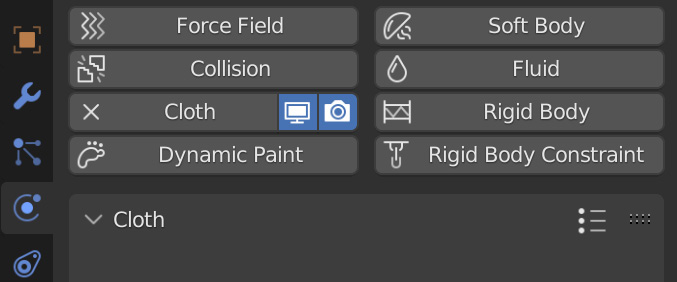
Figure 8.2 – Physics cloth simulation
One thing to keep in mind before you start simulating is the amount of geometry on your object. You need to have enough geometry on the mesh for it to simulate and deform. If you try to add a cloth simulation to a plane with only four vertices, that’s not going to work very well. Likewise, if you have too much geometry, the simulation will slow down and take longer to calculate and bake.
A good idea would be to have enough geometry to get a nice simulation and then add a Subdivision Surface modifier on top. This will smooth out the cloth and make it look much better while not impacting the performance. You can view the differences by looking at the following screenshot:

Figure 8.3 – Subdivision Surface modifier
If you add the Subdivision Surface modifier above the Cloth modifier, the simulation will take that extra geometry into account when simulating. Therefore, make sure to add the Subdivision Surface modifier below the Cloth modifier, as shown in the following screenshot:
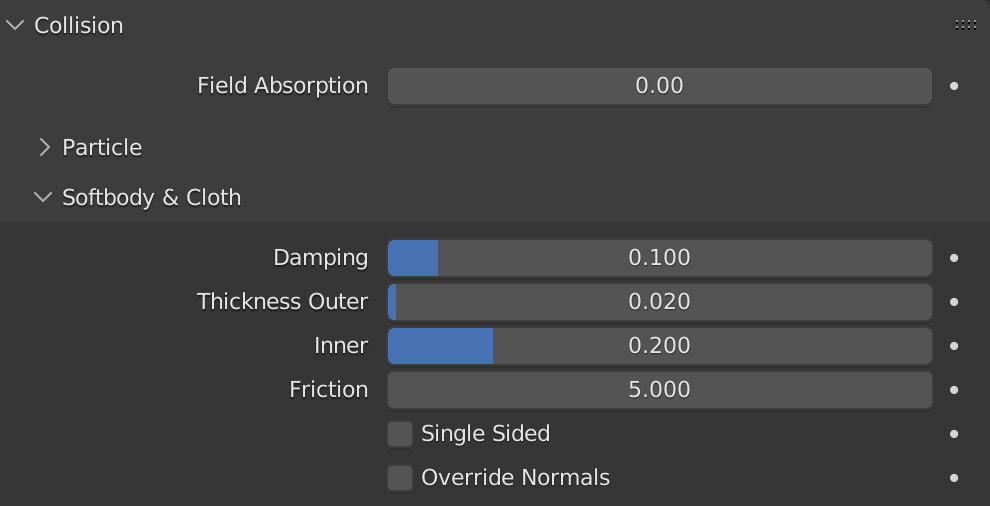
Figure 8.4 – Cloth and Subdivision Surface modifiers
Another thing to note is when you apply the Cloth modifier, it will lock the cloth in place, and from here, you will be able to go into Edit Mode and see the geometry. This will also remove the modifier and you won’t be able to simulate anymore. Why would you want to apply a modifier? Well, this can be very useful when you want to create an animation but you want the cloth to remain still, like a blanket draped over a couch or a towel hanging from a hook.
Now, before we jump straight into the settings of the cloth, it’s important to discuss collision objects and how they can interact with the simulation!
Understanding collision objects
We discussed collisions in Chapter 6, Getting Started with Soft Bodies, and it works basically the same way with cloth objects. You first need to select a mesh you want to add collision to, then head over to the Physics panel and select Collision. This will also add the Collision modifier in the Modifier panel.
Keep the modifier stack in mind when working with collisions. You need to make sure that the Collision modifier is at the very bottom of the stack; this way, Blender will accurately calculate the collision boundaries when simulating. The following example is of a cube with a Subdivision Surface modifier above and below the Collision modifier:
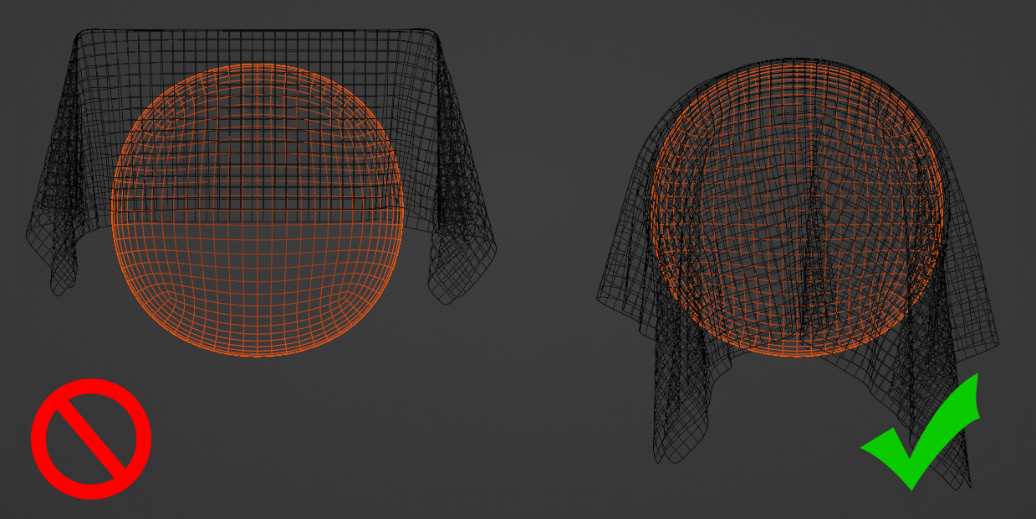
Figure 8.5 – Collision modifier stack
With the collision object selected, you will be able to see the settings in the Physics panel, like so:
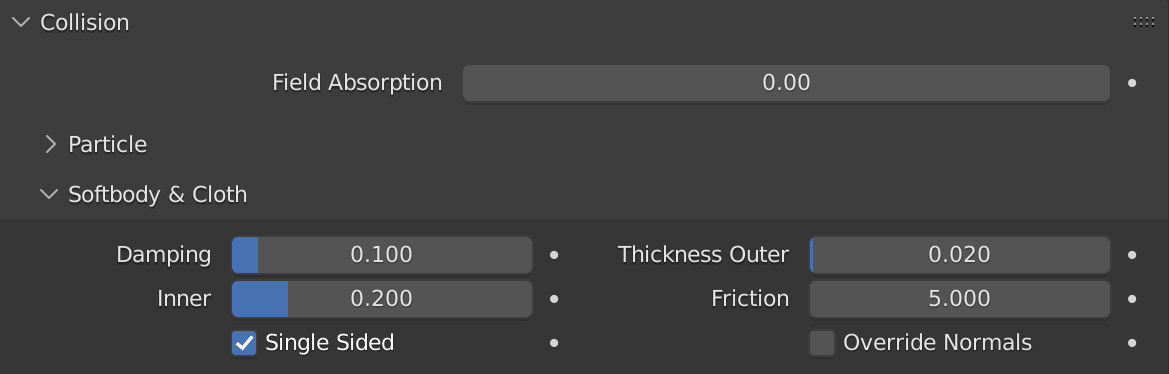
Figure 8.6 – Collision settings
Let’s go through each one and talk about them, as follows:
- Field Absorption allows you to absorb a percentage of a force field’s strength. For example, if a wind force field is going through a collision with the Field Absorption value set at 0.2, it will absorb 20% of the force field’s strength. If the value is set at 1, it will absorb 100% of the force field, and no wind will be able to get through.
- The Particle tab only deals with particle systems and does not affect the cloth, so let’s skip that for now.
- The Damping option does not affect the cloth simulation either. That is used only for soft bodies.
- The Thickness Outer option is the boundary of the collision. Turning this value up will extend the collision boundary past the object’s surface.
- The Inner option is the collision boundary for the inside of the object. If the cloth enters this zone, it will be pushed out.
- Friction is how slippery the cloth will be to the object. A value of 0 will make the collision behave like ice, and the cloth will slide around. A higher value will prevent sliding and increase the stickiness of the collision.
- When Single Sided is turned on, the collision will be based on the direction of normals. When it’s turned off, normals will be ignored and the collision boundary will be over the entire object. This means that if you were to flip a plane upside down with Single Sided turned off, the cloth would collide with the underside of the plane rather than pass through, like it would with Single Sided turned on.
- Override Normals works with fast-moving collisions. When enabled and a collision hits the cloth, it will shoot out in the direction of the normals of the collider. With a lot of testing, this setting seems to have very little effect on the outcome of the simulation.
Remember—if your collision seems to be acting strange, double-check the modifier stack and make sure it’s at the very bottom! With that out of the way, let’s jump straight into Cloth settings and properties!
Understanding cloth simulation settings and values
Now that we understand what a cloth simulation is all about and how collision objects work, it’s time to jump into all the settings and values. You can see an overview of the Cloth settings here:
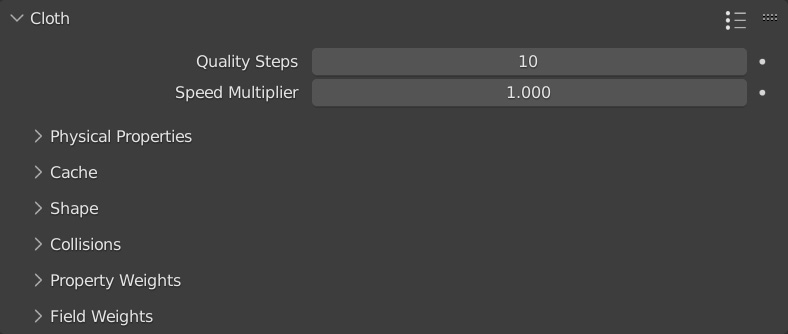
Figure 8.7 – Cloth settings
We are going to start out at the very top and work our way down, as follows:
- If you click on the three dots and lines above Quality Steps, you will see a list of presets to choose from, as shown in the following screenshot:

Figure 8.8 – Presets
This is a quick and easy way to create different types of cloth. You can also create your own presets by giving them a name and hitting the + button.
- The Quality Steps option controls how many simulation steps per frame Blender will calculate. The higher the value, the more accurate the simulation will be, but in turn, this will take longer to bake. If cloth or collision objects aren’t working properly or if you have very fast-moving collisions, it’s recommended to turn this value up.
- And the Speed Multiplier option, of course, controls how fast the cloth will simulate when you play the animation. Higher values will increase the speed, while lower values will slow the simulation.
Now, let’s move on to the different submenus of the cloth simulation, starting with Physical Properties! Here is where we will learn how the cloth behaves and interacts with collisions!
Physical Properties
The Physical Properties settings of the cloth are exactly what they sound like. These settings and values change how stiff the cloth will be, how much it will weigh, and much more. When you are changing these settings, you need to think about what kind of cloth you are trying to create (leather, for example, will have a much higher stiffness than silk, and a comforter for a bed will weigh more than a thin blanket). You can see an overview of the settings here:

Figure 8.9 – Physical Properties
Again, let’s start out at the very top and work our way down and talk about each value, as follows:
- Vertex Mass controls the weight of the cloth. Every single vertex will weigh the amount you set here. This is important because if you have a lot of geometry, the cloth is going to weigh more. The weight also impacts how a force field will interact with the cloth. If the Vertex Mass value is high, you will need a much higher-strength value for the force field to interact and push the cloth around. Generally, it’s a good idea to have this value set low.
- The Air Viscosity option sets the thickness of the air around the object. Increasing this value will make the cloth fall through the air slower.
- Bending Model basically sets how the springs in the cloth will bend and deform. There are two options for Bending Model: Angular and Linear. The differences between these two are minimal, but I’ve noticed Angular looks a bit better in most cases. In the following screenshot, Angular is on the left and Linear is on the right:

Figure 8.10 – Bending models
Next up, let’s discuss the other tabs in the Physical Properties submenu, starting with Stiffness!
Stiffness
Below Bending Model, we have the Stiffness tab, as shown here:

Figure 8.11 – Stiffness settings
There are four options that we can change here, as outlined next:
- Tension controls how much the cloth will resist stretching. Higher values will make the cloth a bit stiffer and not stretch. If you have a high Vertex Mass value but a low Tension value, you may see some stretching because the cloth weighs so much; this can be very useful for creating rubber bands and stretchy fabrics!
- Compression is how much the cloth will resist collapsing. Higher values will help the cloth keep its structure, while lower values will make the cloth collapse. The values in the following screenshot are 1 (left) and 25 (right):
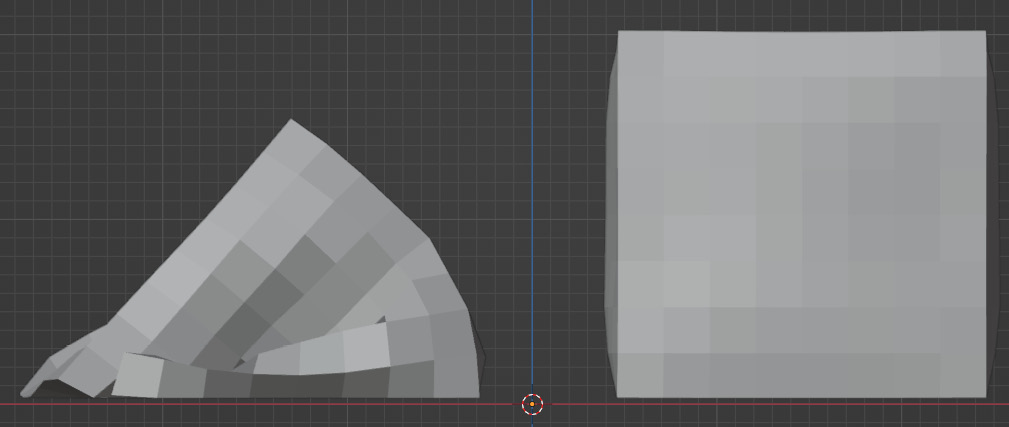
Figure 8.12 – Compression example
- Shear works similarly to Compression. It helps prevent the cloth from collapsing on itself. Higher values will help keep the structure of the cloth, while lower values will let the cloth bend and lose its structure.
- Bending sets how much the cloth will bend and wrinkle. A higher value will make the cloth stiffer and produce bigger folds, and lower values will create smaller wrinkles and be a lot looser. Setting this value higher can be very useful for creating fabrics such as leather and rubber. The values in the following screenshot are 0.5 (left) and 50 (right) so that you can see the difference:
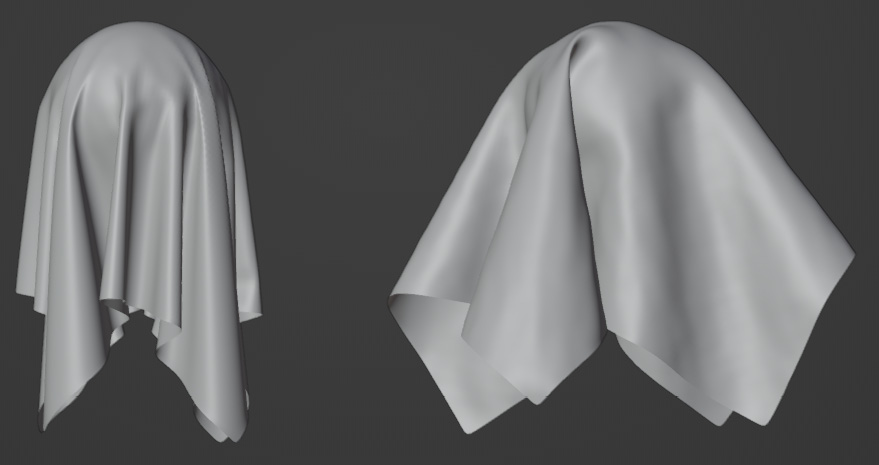
Figure 8.13 – Bending example
- Finally, if you set Bending Model to Linear, the Tension and Compression settings will disappear and be replaced with Structure. This setting controls both the structure of the cloth and how much it will stretch.
Damping
The Damping tab has all the same settings listed in the Stiffness menu: Tension, Compression, Shear, and Bending. These values basically slow down the effect of each setting in the Stiffness tab.
For example, if the Compression option in the Stiffness tab is set at 0 but Compression in the Damping tab is set at 50, the cloth will still collapse but it’s going to take longer. If the Compression option in the Damping tab were also set at 0, then the cloth would collapse instantly and lose all its structure. So, again, these settings slow and dampen the effect of each option in the Stiffness tab.
Internal Springs
Checking the Internal Springs box will basically turn your cloth into a soft body.
Remember earlier in this chapter we talked about springs for a cloth simulation? Well, normally, springs can only be applied to 2D surfaces, but when Internal Springs is enabled, three-dimensional (3D) springs will be created inside the object, and now, it will behave very similarly to a soft body.
When you check the Internal Springs box, these options will be available:
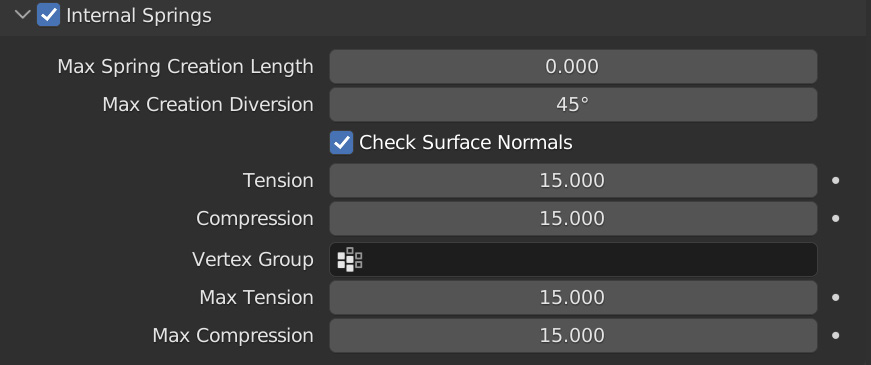
Figure 8.14 – Internal Springs settings
Let’s go through each of them, as follows:
- Max Spring Creation Length sets the maximum distance for a spring. If the distance exceeds this length, no spring will be created. For example, in the following screenshot, there is a big cube and a small cube. Max Spring Creation Length is set at 0.5 for each. Since the distance inside the big cube is longer than 0.5, no springs are created, and it collapses. However, the small cube is within that 0.5 distance, so springs are created, and it retains its structure:

Figure 8.15 – Max Spring Creation Length
- Max Creation Diversion sets the maximum angle at which a spring will be created. If the angle of the normals exceeds this value, no springs will be created.
- Check Surface Normals checks and sees if normals are pointed in opposite directions. If normals are not pointed in opposite directions, no springs will be created. In the following screenshot example, the top of the cube has normals pointed toward the inside of the mesh. That means no springs will be created on that top face. When this setting is unchecked, it will ignore the normals and add springs everywhere:
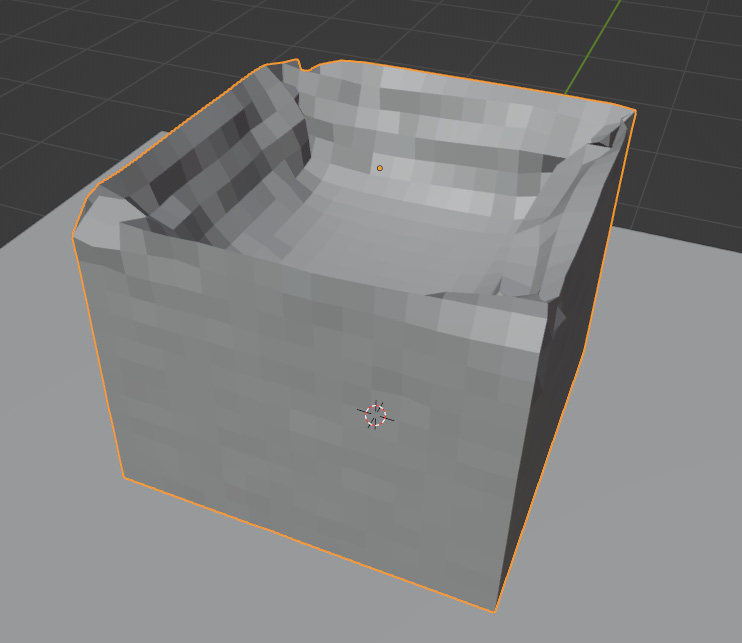
Figure 8.16 – Check Surface Normals example
- And then, of course, we have the values for Tension and Compression. Higher Tension values will have the cloth resist stretching, and higher Compression values will keep the cloth from collapsing.
- You can also create a vertex group and assign internal springs to it. This gives you finer control over where you want springs to be created. The Max Tension and Compression values control how the vertex group will be applied.
With that done, let’s take a look at Pressure!
Pressure
Enabling Pressure will allow you to inflate your cloth, which can be very useful for creating things such as pillows or balloons. You can see an overview of the settings here:
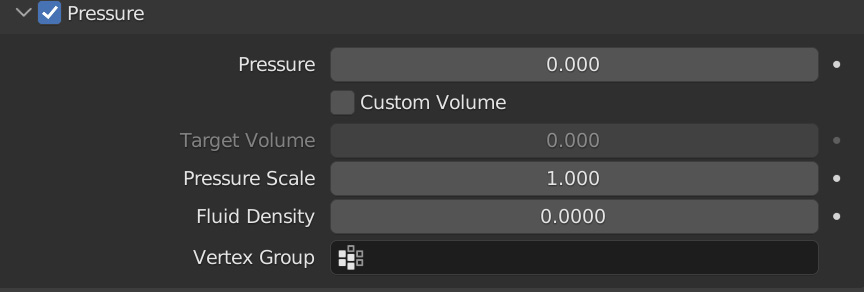
Figure 8.17 – Pressure settings
Let’s discuss the settings, as follows:
- Pressure controls how inflated the cloth will be. Positive values will expand the mesh out, and the higher you set, this value the more it will expand. You can also set a negative value, which will deflate the object, causing it to shrink. The following screenshot provides an example of text with the Pressure value set at 15:

Figure 8.18 – Pressure example
- When Custom Volume is checked, you will be able to set a target volume. This means that the pressure is going to be calculated based on the volume of the object rather than the mesh itself. Normally, when Custom Volume is unchecked, the pressure will be the same for all objects regardless of the size, as you can see in the following screenshot:
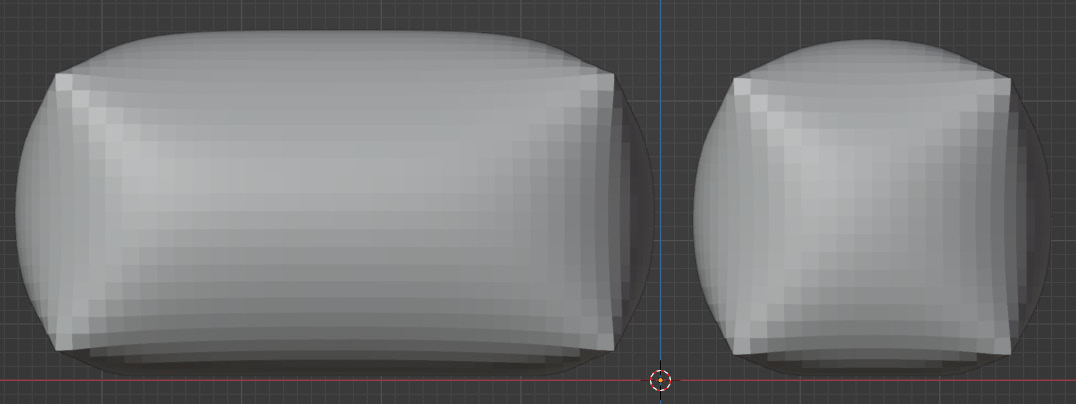
Figure 8.19 – Pressure volume example
When it is checked, the size of the mesh will be calculated when applying pressure. In the following screenshot example, Target Volume is set at 15 for each cube. Since the bigger cube has a larger volume, the pressure is not going to be as strong as the smaller cube:

Figure 8.20 – Target Volume example
- Pressure Scale is the ambient pressure on the outside and inside of the object. Increasing this value tends to expand the mesh even more.
- Fluid Density is the density of the fluid (air) inside the object. When you increase this value, the air inside will become denser, thus making the cloth weigh more. Setting this value to a negative number will do the opposite and make the object rise and float into the air (this option is a good way of creating a balloon).
- Then, of course, you can create a vertex group to fine-tune where you want the pressure/inflation to happen, as illustrated in the next screenshot.
Using a vertex group for the pressure
When selecting a vertex group to determine where the mesh has pressure, you may experience some strange movement. Due to the pressure on one side of the mesh, it will force the cloth to fly off in that direction. This may not be how it’s intended to work but keep that in mind if you decide to use this feature!
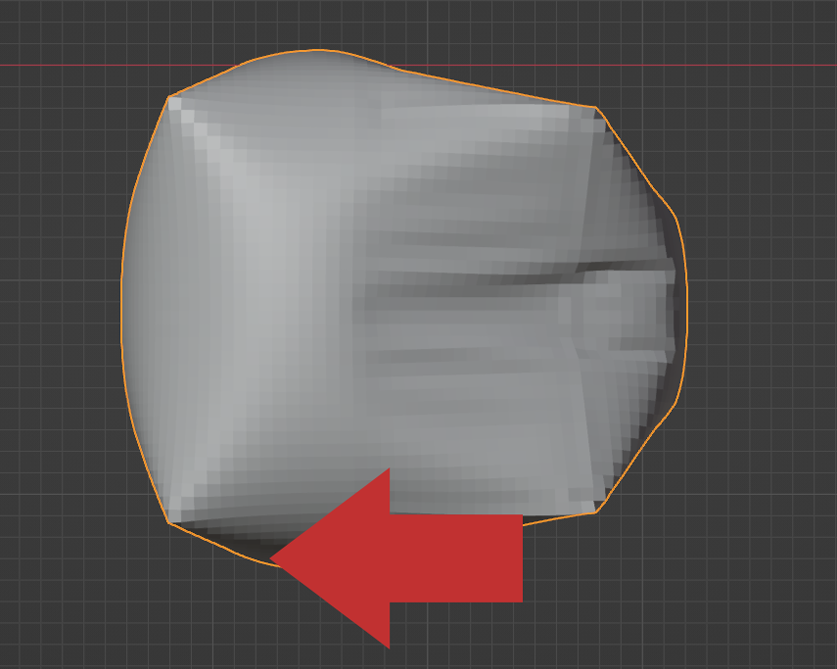
Figure 8.21 – Pressure vertex group
Now, let’s move on to the Cache tab and learn how to bake the simulation!
Cache
The Cache tab is where you bake in the simulation. It’s usually a good idea to bake in the simulation before you render it, just to make sure everything works correctly, but it’s not necessary.
The Cache tab may look familiar; that’s because it’s the same as the Soft Body Cache tab, as we can see here:
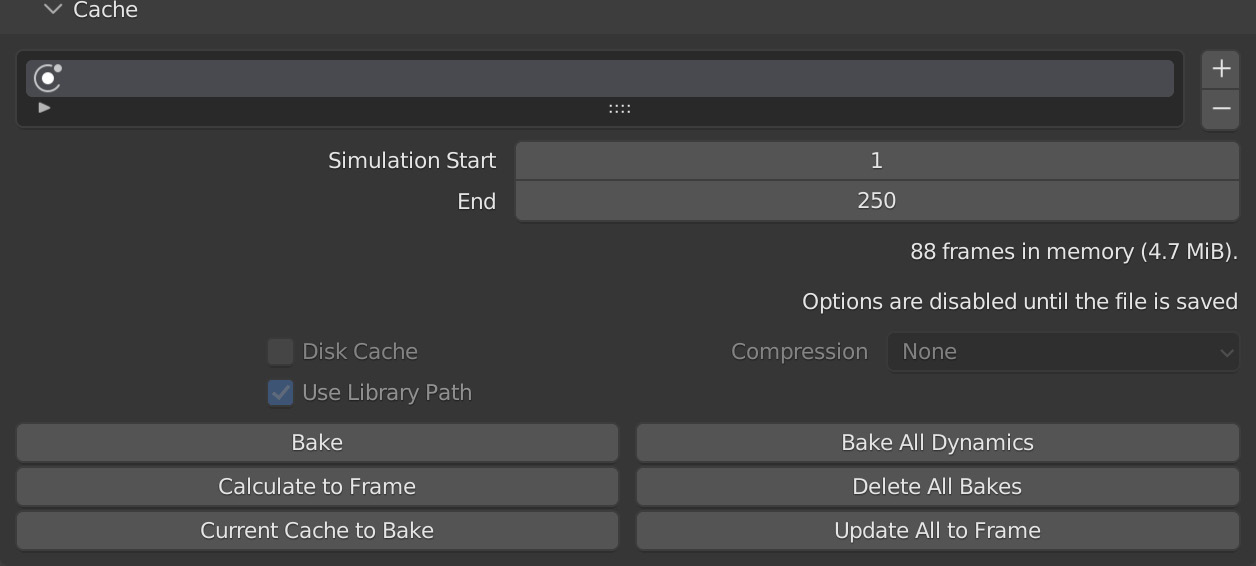
Figure 8.22 – Cache
You should already know how all this works because we went over it in Chapter 6, Getting Started with Soft Bodies, but here are some quick notes just in case you wish to recapitulate:
- Simulation Start and End control the frame range of the simulation.
- To bake in the cloth, all you have to do is click on Bake. This will gray out all the settings, and you won’t be able to change them unless you click Free Bake.
- If you have multiple clothes, soft bodies, or even particle systems and you want to bake everything at once, just click Bake All Dynamics. This will then bake every simulation in the scene at once.
The great thing about baking in the simulation is you can skip to any frame in the Timeline and preview what the cloth will look like in that frame. Without baking it in, you won’t be able to skip any frames; rather, you will have to play the simulation from the start.
As for the rest of the settings, since we have already discussed them in Chapter 6, Getting Started with Soft Bodies, let’s go ahead and move on to the Shape tab!
Shape
The Shape tab allows you to pin vertices in place. This can be very useful for creating things such as flags, a towel hanging from a hook, a hammock, or anything where cloth is pinned to something.
To get the cloth to be pinned in a certain place, first go into Edit Mode and select the parts of the mesh you want to pin, as illustrated in the following screenshot:

Figure 8.23 – Selected vertices
Next, head over to the Object Data panel and create a new vertex group by clicking the + button. Make sure the Weight value is set to 1 and click Assign. You can see an overview of this in the following screenshot:

Figure 8.24 – Assigned vertex group
Over in the cloth simulation, select that vertex group in the Pin Group menu, as illustrated here:

Figure 8.25 – Pin Group
Now, when you play your animation, those vertices you assigned will be stuck in place!
Your cloth will now be pinned in those places you assigned. Let’s talk about the rest of the settings, as follows:
- Stiffness simply controls the stiffness of pinned vertices. For example, when the Stiffness value is at 0, only vertices with a Weight value of 1 will be pinned. But if you set the Stiffness value to 50, then a lot more vertices will be pinned, even though the Weight value is less than 1. You can see an example of this in the following screenshot:

Figure 8.26 – Shape stiffness
- Next up is Sewing, which allows you to create virtual strings on the mesh and pull them together, just as in real-life sewing. This is a fast way to create clothing for your character or to have a cloak tied around their neck. How this works is you need to have the parts you want to be pulled together connected by an edge and not a face, as shown in the following screenshot:

Figure 8.27 – Sewing edges example
After that, enable Sewing and play the animation. Your cloth should now close together where those edges are connected, as shown in the following screenshot:

Figure 8.28 – Sewing example
- Max Sewing Force controls how strong and fast those edges will be pulled together. If it is set at 0, that means there is no max force, and the edges will be pulled extremely fast. This may cause issues in the simulation, so it’s recommended to turn this value up.
- Shrinking Factor will either shrink or grow the mesh when the edges are pulled. Negative values will make the cloth grow, while positive values will shrink the mesh; in the following screenshot, it is set at -0.2, and as you can see, the cloth has now expanded due to being set at a negative value:
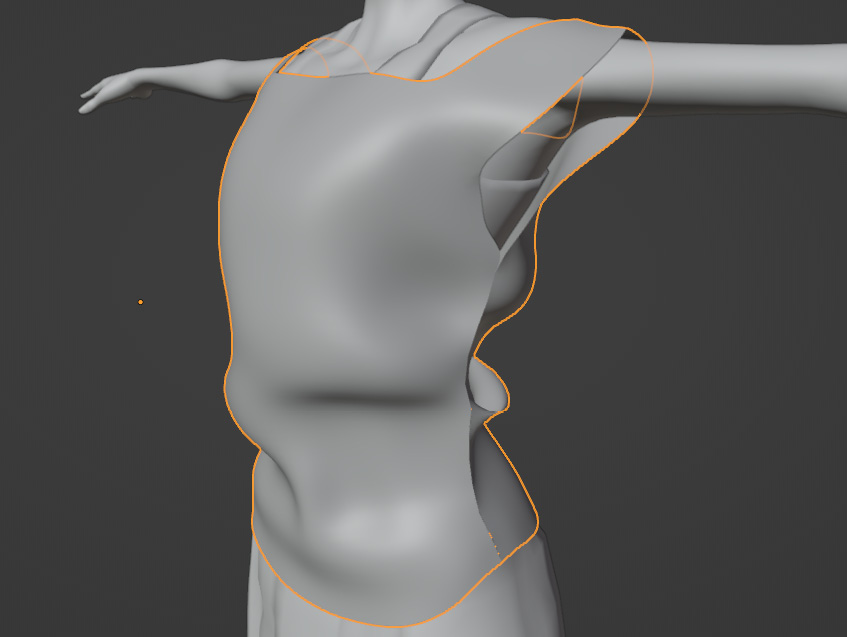
Figure 8.29 – Shrinking Factor example
Finally, Dynamic Mesh enables the sewing to allow any animation or deformation modifiers applied to the mesh (this could be an armature, lattice, and so on). When enabled, every frame of the simulation is recalculated to give more accurate results when those modifiers are in use.
Now that we understand the Shape tab, let’s move on to the Collision tab and learn about how the cloth collides with other objects!
Collisions
Now, it’s time for all the Collision settings and values. Here is where we set up the quality, the distance, and if we want the cloth to collide with itself.
As I mentioned earlier in the chapter, to get the cloth to collide with something, we need to give that object collision in the Physics panel. Then, in the Cloth settings, make sure the Object Collisions box is checked (it should already be checked by default; unchecked will mean the cloth will just pass through any collisions). You can see an illustration of this in the following screenshot:
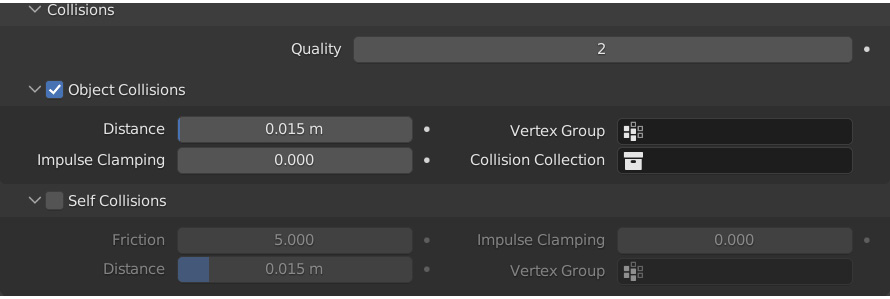
Figure 8.30 – Cloth collision settings
Now, your cloth should collide with the object, so let’s go through the settings and talk about each one, as follows:
- Quality controls how accurately and how well the collision will happen. Higher values will produce better collisions and fewer errors but will take longer to simulate. If the collision is not working as intended, try turning this value up.
- Distance is how far away the cloth will collide. If this value is set too low, you might get some errors and the cloth might clip through the collider. Generally, the default value of 0.015 works well for most scenes.
- Sometimes, in tight, complicated collisions, the cloth may experience some errors and explode out. Impulse Clamping helps prevent any explosions from happening by restricting the movement of the cloth after a collision. So, if your collision is not working properly, try turning this value up.
- You can also select a Vertex Group type to be the collision area. This can be useful if you want only half of the cloth to collide.
- Collision Collection will allow you to limit which collection will interact with the cloth. This is also useful if you have multiple simulations and don’t want them interacting with each other.
- Normally, the cloth will not collide with itself unless you check Self Collisions. If you create a pillow using Pressure, you don’t necessarily need Self Collisions because the cloth won’t overlap itself. On the other hand, if you are creating a blanket falling on the couch, you probably want Self Collisions turned on. This will take longer to calculate, so only enable it when it’s needed or if you want realistic results.
The Friction option within the Self Collisions menu relates to how slippery the cloth will be when it collides with itself. The value you set here depends on the type of cloth you are trying to create. For example, a cotton blanket will have much higher friction than a silk one.
We have already discussed the rest of the settings, and they are used the same, except they apply to the self-collision.
Property Weights
Remember when we discussed the different spring types earlier in this chapter? Well, the Property Weights tab allows you to fine-tune those springs for the cloth using vertex groups. This can be very useful if you want some parts of the cloth to have different physical properties. For example, you can set some parts of the cloth to have more tension using the Structural Group type or shrink down using the Shrinking Group type.
Another example would be creating a blanket with different materials. If some parts of the blanket bend and wrinkle more than others, you can use the Bending Group type. And of course, if you want some parts of the cloth to collapse and shear less, you can use the Shear Group type.
You can see the different group types in the following screenshot:
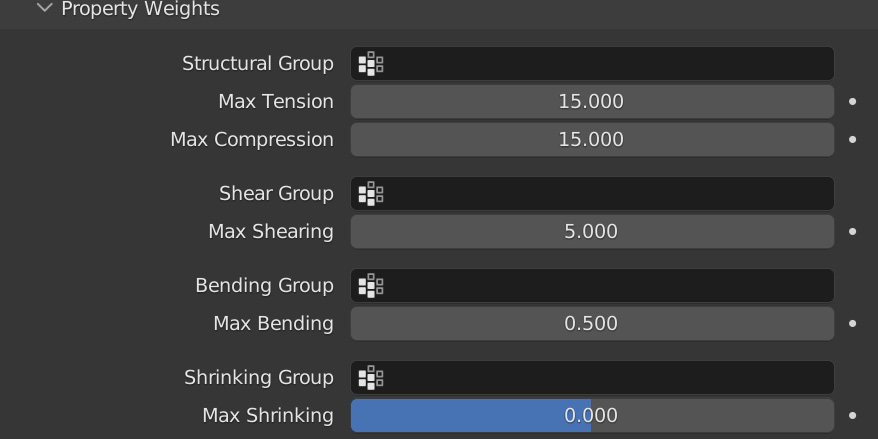
Figure 8.31 – Property Weights
To use property weights, you first create a vertex group and assign vertices to it. In this example, I have assigned half of the vertices on this plane to a weight of 1:
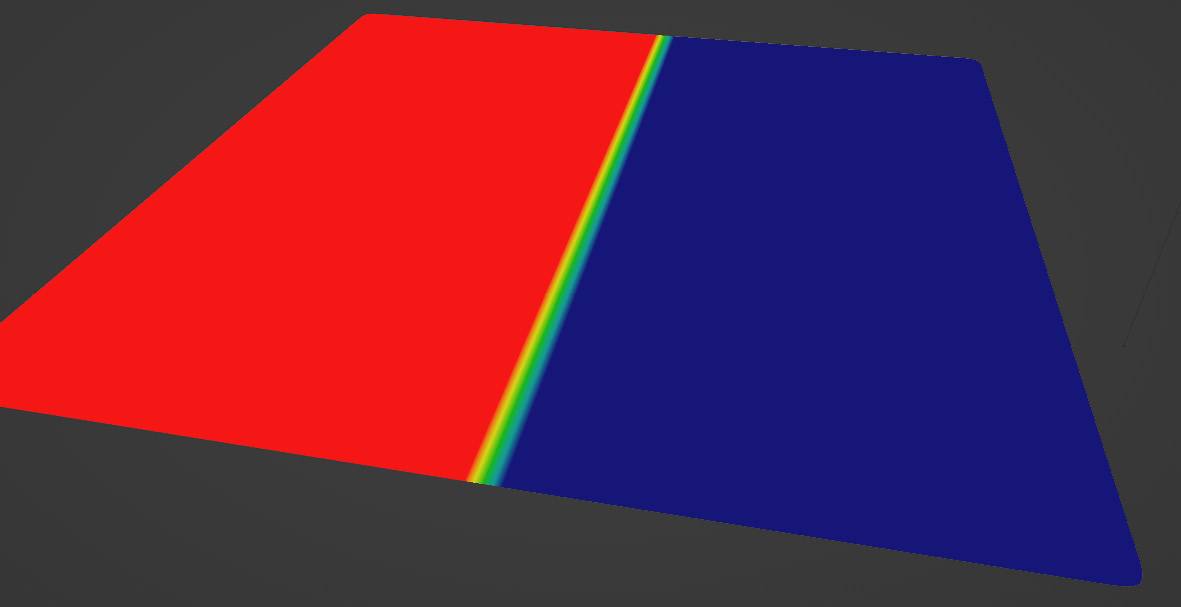
Figure 8.32 – Plane vertex group
Then, in the Property Weights tab, I set Max Tension and Max Compression to 100. I also set Max Bending to 15 and assigned all the vertex groups. Now, when the simulation plays and it collides with the sphere underneath, you can see that half of the plane is very stiff and the other half is loose, as depicted here:

Figure 8.33 – Property Weights example
So, again, the Property Weights tab allows you to fine-tune certain areas on your cloth to have certain physical properties. Now, before this tutorial ends let’s quickly discuss the Field Weights tab!
Field Weights
Finally, the last tab in the cloth simulation settings is the Field Weights tab. Here, you can fine-tune how force fields affect your cloth. You can see an overview of this tab here:

Figure 8.34 – Field Weights
Here, Effector Collection allows you to limit which collection will affect the cloth. If no collection is set, then every force field in the scene will interact with the simulation.
You also have the option to change the Gravity value of the simulation. Do you want your cloth to float like it’s in space? Just set the Gravity value to 0 and you’re good to go!
As for the rest of the values, they control how strong of an effect the force fields will have. For example, if Wind is set at 0.5, then only half of any wind force field’s strength will affect the cloth. This can be useful if you have multiple cloths and you want the wind to affect each one differently!
And there we go! We have covered every single setting for a cloth simulation in Blender. With that done, let’s do a quick summary!
Summary
We have discussed around 60 settings and values in this chapter so far. This can be quite a lot to remember, so you can always reference this chapter if you forget what something does. As for right now, let’s do a quick recap to go over what we learned!
First, we talked about what a cloth simulation is, the importance of the modifier stack, and how the cloth simulates using different springs. After that, we learned about collision objects and how they interact with the simulation. And then, we went over every setting for the cloth. We discussed the physical properties, the internal springs, pressure, pinning, cloth collisions, and property weights.
Modeling a tablecloth with realistic wrinkles and folds can be challenging and take a long time. Thankfully, with a cloth simulation, it can save you many hours from having to do that. Hopefully, this chapter gave you a good understanding of this simulation and how it works. And in the next chapter, we will be putting those skills to the test by creating a realistic flag using this system!