14
Creating a Raindrop Effect
For the final project in this book, we will be using dynamic paint and particles to create a realistic raindrop effect on a lake! With what you learn in this chapter, you will be able to add raindrop effects to puddles on a road or create a boat traveling across an ocean, leaving a trail of waves! There are many different ways to use this effect, and it can definitely add another level of detail to your renders! We will first start by adding all the objects we will need for the scene. From there, we will learn how to use the particle system to create rainfall! After that, we will jump into the dynamic paint simulation and learn how to use the waves surface type to create realistic raindrops. Finally, we will create a nice water material and render the animation using Eevee!
Here are the topics we will cover:
- Setting up the scene
- Creating the rain particles
- Simulating the waves
- Creating the water material
- Setting up the render
Technical requirements
This chapter requires you to have Blender version 3.0 or above installed.
To download Blender, visit www.blender.org.
Make sure to also download the startup file found here:
https://github.com/PacktPublishing/Learn-Blender-Simulations-the-Right-Way/tree/main/Chapter14.
Setting up the scene
First, make sure to download the Raindrop Effect Startup.blend file. You can find the link in the Technical requirements section. This .blend file includes a couple of rocks with nice textures, an HDR for lighting, and a bit of camera animation. Open the file and let’s get started:
- Press Shift + A to add a plane object. This is going to be the canvas in our simulation.
- We need to scale this plane up so that it fits the scene a bit better. With it selected, you can open the Properties panel and set Dimensions for X and Y to 13 meters. Doing this causes the Scale numbers to change, so let’s press Ctrl/Command + A and click Scale. This will bring those numbers back down to 1.000.

Figure 14.1 – The plane dimensions
Setting the scale
When working with dynamic paint, it’s always important to apply scale to your objects, especially if you are working with the displace or waves surface type. When the scale numbers are not set to 1.000, you may see inaccurate simulations. In my testing for this chapter, I noticed some of the rain particles were not creating waves. The reason for this was that scale was not applied on the canvas. Always remember to apply scale!
- Next, we need to add more geometry to the plane for it to create waves. To do this, go into Edit Mode, and with the entire mesh selected, right-click and select Subdivide. Open the Subdivide menu at the bottom left and set Number of Cuts to 100.

Figure 14.2 – Subdividing the plane
- Unfortunately, we still need more geometry, and we can’t set Number of Cuts higher than 100. So, instead, let’s right-click again and select Subdivide. Do this twice, and then our plane should have plenty of geometry to create nice smooth waves.
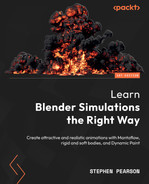
- If we go into the camera view by pressing Numpad 0 or by going up to View | Cameras | Active Camera, we can see the edge of the plane.
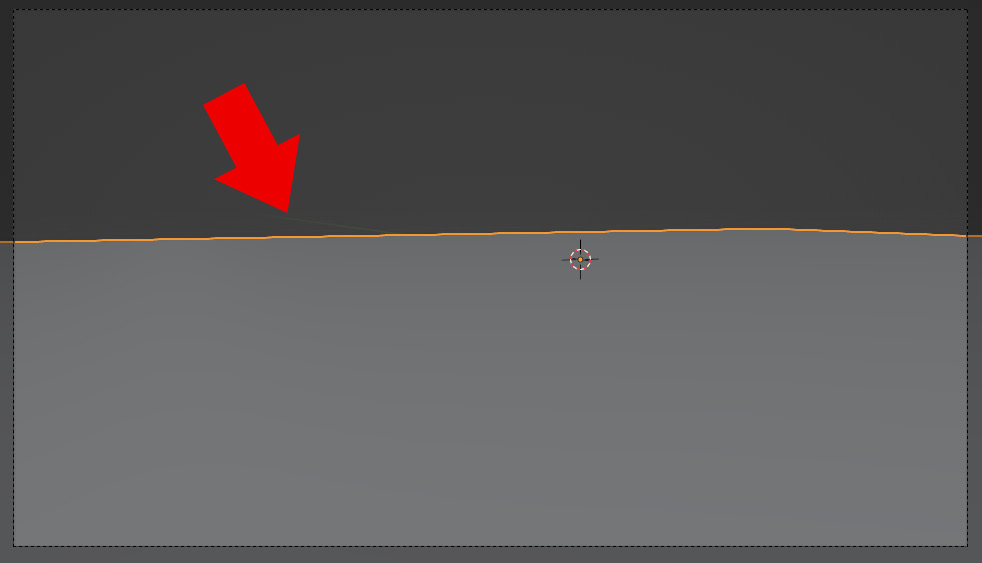
Figure 14.3 – The edge of the plane
- This doesn’t give the illusion of a big lake, so to fix that, let’s add another plane object and scale it up very big. Press Shift + A, go to Mesh, and select Plane.
- In Dimensions, let’s set X and Y to 65 meters, and then, of course, press Ctrl/Command + A and apply the scale.
- We don’t need the big plane object extending behind the camera, so let’s move it forward until the edges of both plane objects line up. Then, move it slightly down so that they are not intersecting.

Figure 14.4 – Moving the big plane
Why are we using two plane objects?
The reason we are using two plane objects is that we want a lot of geometry close to the camera to create nice smooth waves, but we don’t need that level of detail in the distance. That would just be a waste of memory on your computer, and it would increase render times.
- The next step is to fake the raindrop effect on this bigger plane using a Displace modifier! Select the bigger plane object and head over to the Modifier panel. Let’s first add a Subdivision surface modifier to add more geometry to the plane. Set Mode to Simple, and set the Viewport and Render levels to 8.

Figure 14.5 – The Subdivision surface modifier
- After that, let’s add the Displace modifier. Click New to create a new displacement texture, and then head over to the Texture panel,
 .
. - Change the type of texture to Clouds, and in the Clouds tab, set the size to 0.10.

Figure 14.6 – A displacement texture
- Now, we can jump back over to the Modifier panel and lower the strength of the displacement to 0.070.
- The last thing we need to do is animate the location of this displacement texture. This will give the illusion of raindrops in the distance. Here is how we do that:
- Press Shift + A to add a new empty object.
- On Frame 1, press I and add a Location keyframe to the empty object.
- Next, skip all the way to the end of the animation (Frame 200) and move the empty object 0.5 meters along the X axis. You can do this by pressing G, then X, typing 0.5, and then hitting Enter. Then, press I and add another Location keyframe.
- We need to change the interpolation of these keyframes to Linear so that the empty object moves at a constant rate throughout the entire animation, rather than speeding up and slowing down. Select both keyframes in the Timeline by dragging a box, then press T, and choose Linear.
- With that done, we can jump back over to the Displace modifier. Switch Coordinates to Object, and in the Object menu, select Empty.

Figure 14.7 – The Displace modifier
If correctly done, the displacement on the bigger plane should be moving as the empty object moves! This will give the illusion of raindrops in the distance!
- The last step is to position the rocks around the scene. I recommend going into the camera view and placing the rocks. This way, you know what they will look like when you do the render. Scale, rotate, and move them around until you fill out the scene. If you want to add more rocks, you can press Shift + D to duplicate. Here is what my scene looks like so far:

Figure 14.8 – Rock positions
Great! Now that we have the scene filled out, let’s create the rain using a particle system!
Creating the rain particles
To create this particle system, let’s first add an emitter object to emit the particles into the scene:
- Press Shift + A and add another plane object. Let’s scale it to be the same size as the smaller plane and then move it up about 4 meters above the water.
- To create the particle system, head over to the Particle System panel and click + to create a new one.
- Now, let’s decide how much rain we want there to be. Do you want it to be pouring down or just a light sprinkle? Let’s go with something in the middle and create light rain. To do this, set the number of particles to 3000.
- For Frame Start, set it to -50 so that it looks like it’s already raining when we play the animation. For Lifetime, set it to 35 so that the particles disappear after they go beneath the water.

Figure 14.9 – Emission settings
- In the Velocity tab, set Normal to 0 and Object Aligned Z to -1. This will cause the particles to have a starting velocity along the -Z axis.
- The particles are moving a bit too fast right now. To fix that, head down to the Physics tab and set Damp to 0.050. This will slow down the particles just a little bit.

Figure 14.10 – The Physics tab
- Now, we need an object to represent each particle. Since a raindrop is spherical, let’s use an icosphere! Press Shift + A and add an icosphere object. Move it out of the way so that you can’t see it from the camera, and then scale it down by 0.2. Then, of course, always remember to apply the scale! Press Ctrl/Command + A and select Scale.
You can also right-click and select Shade Smooth to smooth out the edges of the icosphere.
- Select your particle system again, and in the Render tab, switch Render As to Object, and then for Instance Object, select the icosphere you just added. Also, make sure to turn off Show Emitter so that the plane does not show up in the render!
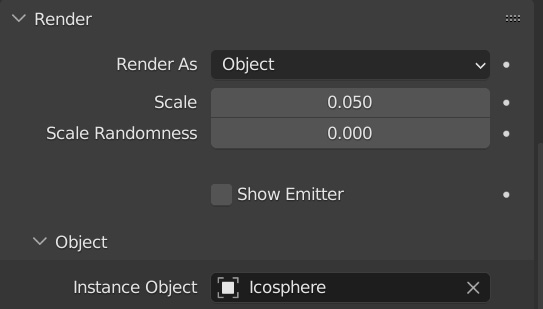
Figure 14.11 – The Render tab
- Now, we are ready to bake in the particle system! Head up to the Cache tab and click on Bake!
Figure 14.12 – Rain particles
With all that done, we are ready to move on to creating the dynamic paint simulation!
Simulating the waves
Now the part you have been waiting for – let’s create the dynamic paint simulation and simulate the raindrop effect! Let’s start by creating the canvas, and then we can move on to the brush objects:
- Select the smaller plane object and head over to the Physics panel. Select Dynamic Paint, make sure that Type is set to Canvas, and click Add Canvas.
- The Frame Start and End settings should already be the correct values we need. Let’s also make sure to change Sub-Steps to 5 to help make the simulation more accurate.
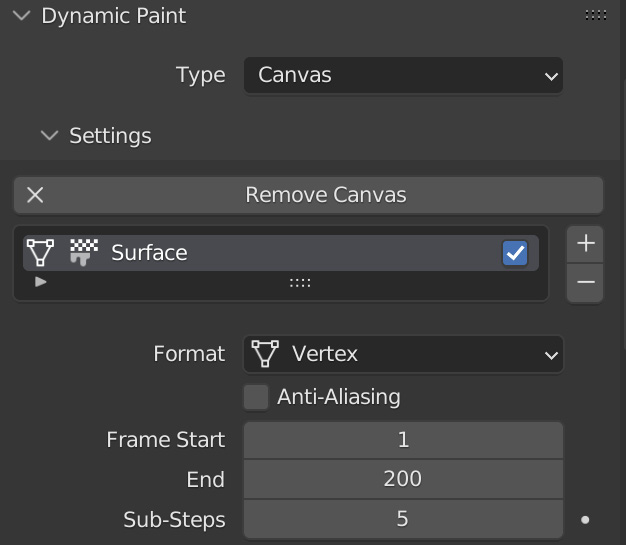
Figure 14.13 – Dynamic Paint settings
- Head down to the Surface tab and set Surface Type to Waves. We are going to be changing some settings in Waves, so let’s go through them one by one:
- First, let’s turn on Open Borders so that the waves don’t bounce off the edge of the mesh.
- Next, change Timescale to 0.30 to slow down the simulation.
- Speed controls how fast the waves move; let’s also slow this down by changing it to 0.40.
- To help the waves to dissipate a bit faster, set Damping to 0.20.
- Finally, to make the waves bounce a bit more, you can change Spring to 0.50.

Figure 14.14 – Wave canvas settings
And that is all the settings we need for the canvas! Next, let’s select the particles and add them to the simulation:
- Select your particle system object and head over to the Physics panel. Select Dynamic Paint, switch Type to Brush, and click Add Brush.
- In the Source tab, switch Paint to Particle System, and select ParticleSystem from the drop-down menu.
- Next, check Use Particle’s Radius. This will allow the radius affecting the canvas to be the exact size of the particle.
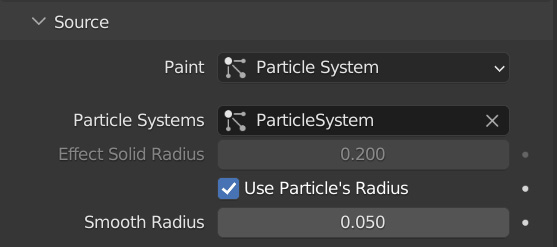
Figure 14.15 – Brush Source settings
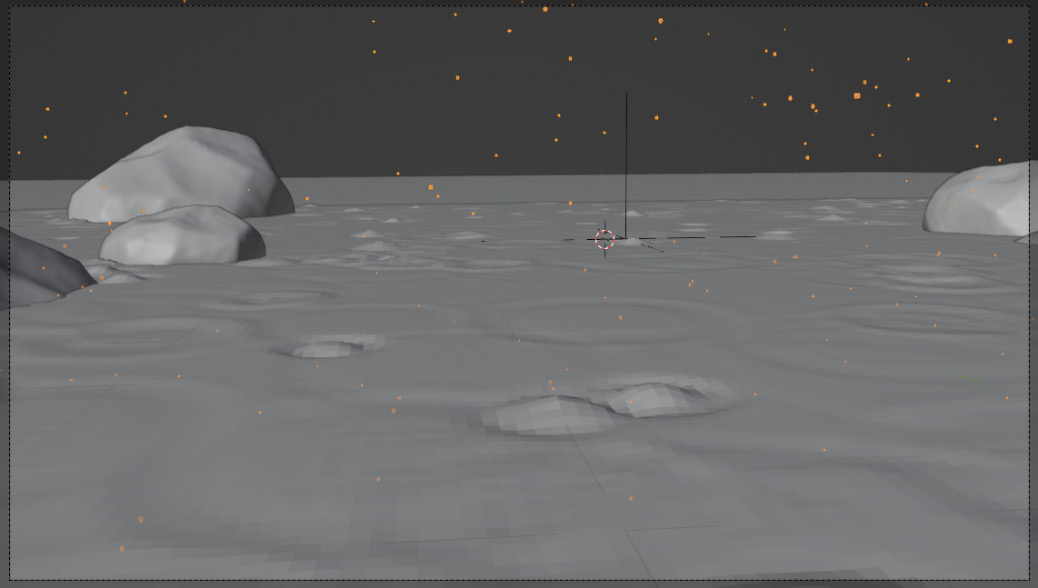
Figure 14.16 – Simulating waves
If you want to create bigger splashes, you can set Factor in the Brush Waves tab to a higher value. You can see the different values in the following figure:
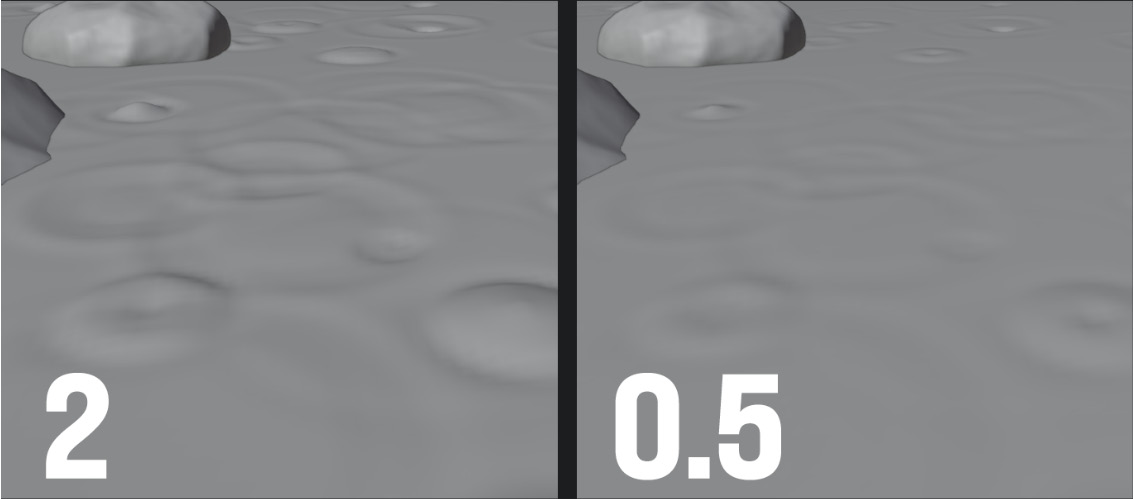
Figure 14.17 – The waves factor
- Also, make sure to select your canvas object, and right-click and select Shade Smooth to make sure faces are nice and smooth. If, however, the canvas object still does not look smooth, you can add a Subdivision surface modifier to help as well! Repeat this step for the bigger background plane!
- And finally, let’s allow the rocks to interact with the simulation as well! Select one of the rocks in the scene, and in the Physics panel, choose Dynamic Paint, switch Type to Brush, and click Add Brush.
- In the Waves tab, switch Type to Reflect Only.

Figure 14.18 – Reflect Only
This will allow the rocks to reflect any waves that hit them! Repeat Step 6 and Step 7 for each rock in the scene!
- Once you are happy with how everything looks, we can bake in the simulation! Select your canvas once again, and in the Cache tab, click on Bake!

Figure 14.19 – A baked simulation
There we go! The simulation is done and ready to go! Next, let’s create some nice water materials!
Creating the water material
There are two materials that we need to create, water and raindrop materials. Let’s create the water material first:
- Select the canvas object, and head over to the Shading workspace at the top. Create a new material by clicking the New button.
- Name this material Water so that it’s easy to find later.
Figure 14.20 – The material name
- Set Base Color in the Principled BSDF shader node to a nice dark blue. If you want to use the same color I’m using, the hex code is #274C7A.
- To make the lake glossy and reflective, set Roughness to 0.
- Finally, set Transmission to 1 to give the glass look and IOR to 1.333. IOR stands for Index of Refraction. This is basically how light passes through objects. In this case, the IOR of water is 1.333. There is also a long list of other IOR values for different real-life materials, which you can reference here: https://pixelandpoly.com/ior.html.

Figure 14.21 – The Principled shader
- Right now, the water looks a bit flat, so let’s give it some bump! This will increase the detail and make the water look like it’s moving around in the wind! Press Shift + A, go to Texture, and add a Noise Texture node.
- Next, let’s add a Bump node. Press Shift + A, go to Vector, and add a Bump node.
- Now, we need to plug all the nodes together! Take Fac from Noise Texture and plug that into Height of the Bump node. Then, take Normal from the Bump node and plug that into Normal of the Principled BSDF shader. It should look like this:
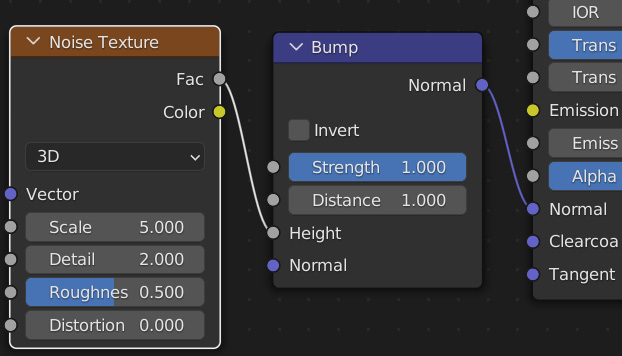
Figure 14.22 – Noise and Bump nodes
- Right now, the water looks a bit too bumpy, so let’s change some values in these nodes to make it look better:
- Starting with Noise Texture, let’s switch the mode from 3D to 4D.
- A W value should have appeared. Increasing this value will allow the water to look like it’s moving. Let’s add a driver to this value so that it automatically increases over the course of the animation. To do this, type in the field #frame/1500.
- Set Scale to 75 to make the bumps smaller and the Detail to 2.
- The bumps on the water are way too strong now, so let’s bring Strength in the Bump node down to 0.050 and Distance down to 0.100. Here is what it should look like now:

Figure 14.23 – Noise Texture and Bump values
If we now take a look at the water, it should have a lot more detail and not be as flat!
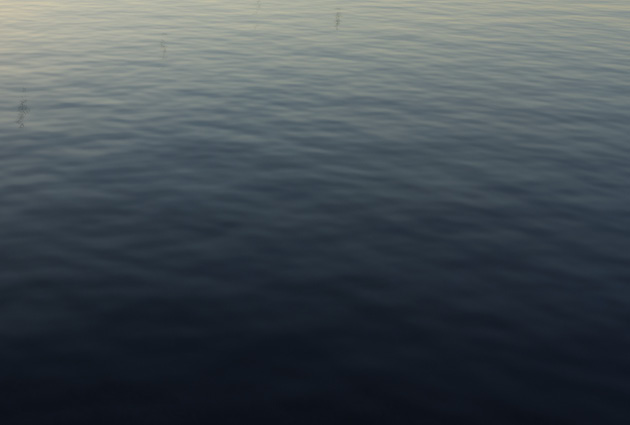
Figure 14.24 – Water with bumps
- Let’s give the bigger plane that same material by selecting the object, and in the Material panel, click on the Browse Material button and choose the Water material.

Figure 14.25 – The Browse Material button
- If you press Z and go into Rendered View, you will be able to see what the scene looks like so far!

Figure 14.26 – A water material preview
- Now, let’s create the particle material! Select the icosphere object, click the Browse Material button, and choose the Water material.
- We are going to be changing the color of this material, so make sure to click on the little 3 button at the side to duplicate this material.
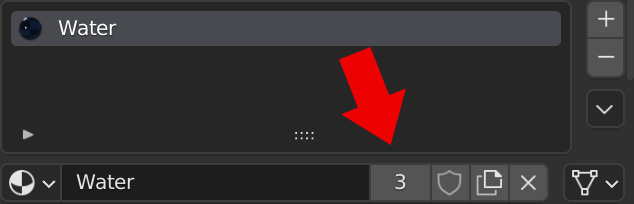
Figure 14.27 – Duplicating the material
Now, we can change this material without affecting other objects!
- All we really need to do is set Base Color to a very light blue color. If you want to use my exact color, the hex code is #B1D4E5.

Figure 14.28 – The particle material
Awesome! All the materials are now done, and our scene is really starting to look nice! Before this project ends, let’s set up the render and really make this raindrop effect look great!
Setting up the render
Now that everything is set up, we are basically ready to render the animation. Before we do that, let’s quickly go over some Eevee settings to really make our animation pop:
- Head over to the Render panel and turn on Ambient Occlusion. This will darken the corners of the rocks and give us a better-looking render.
- Next, let’s enable Screen Space Reflections! This will allow the water to reflect the rocks. Make sure to also uncheck Half Res Trace, as this will lower the quality of the reflections.
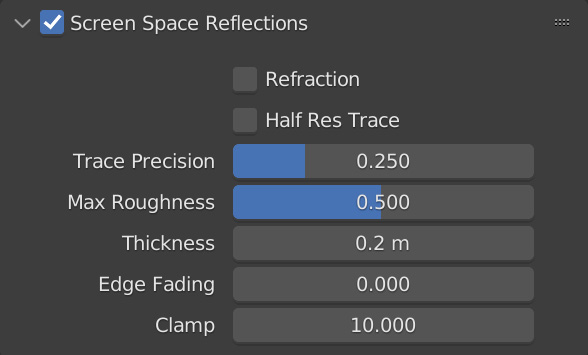
Figure 14.29 – Screen Space Reflections
- I would also recommend setting Edge Fading to 0.000 in the Screen Space Reflections tab, as this will sometimes give you unwanted reflections on the edges, as shown in the following figure:
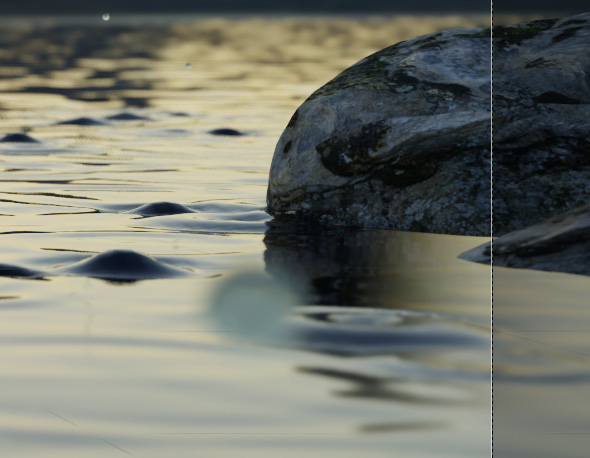
Figure 14.30 – Edge Fading
- To give the rain the look of motion, let’s enable Motion Blur! The Shutter value sets how strong the motion blur will be. Let’s bring this down to 0.25. The Steps value is also important. The higher you set this, the better the motion blur will look, but it will take longer to render. A value of 8 will work well for this scene.

Figure 14.31 – Motion Blur settings
- To give the overall scene a better look, open the Color Management tab and set Look to High Contrast.
- Finally, the last thing we can set up is some depth of field! Select the camera and head over to the Object Data Properties panel,
 .
. - Enable Depth of Field, and for Focus on Object, you can either add a new empty object or use the same one we used for the Displace modifier.
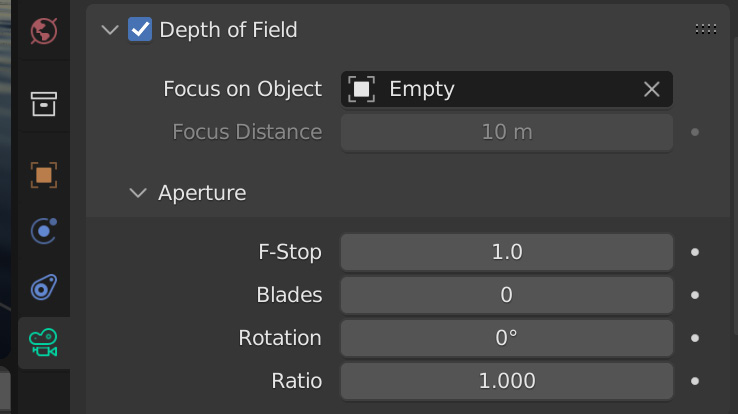
Figure 14.32 – Depth of Field
- The F-Stop value controls how shallow the depth of field will be. Lower values will make the render more shallow, and higher values will make the render crisp and sharp. I think a nice shallow depth of field looks nice, so I’m going to set mine to a value of 1.0.
With that done, we are ready to render the animation! Feel free to add some more elements to the render as well! Maybe add a couple of trees along the shoreline or hanging above the camera. You could also have a boat going along the water in the distance, creating even more waves! Have fun with it and experiment with different ideas! Once you are ready, just sent an output and then render the animation! Remember, if you need a refresher on how to render animations, check out Chapter 4, Creating a Waterfall Using Mantaflow.

Figure 14.33 – The final result
Also, if you would like to download and play around with this project’s finished .blend file, you can do that by clicking this link:
https://github.com/PacktPublishing/Learn-Blender-Simulations-the-Right-Way/tree/main/Chapter14
Summary
The Dynamic Paint simulation is a great tool, and it has so many practical uses! Creating a paintbrush and a raindrop effect is just a small portion of what you can do using this simulation. I encourage you to jump into Blender and experiment with cool and interesting ideas. The limit is your imagination!
Let’s go through and recap what we learned in this chapter. First, we added all the objects that we needed for this scene! After that, we learned about particle systems and creating rainfall. Next up was the Dynamic Paint simulation. We learned how to use the particle system to create waves, and we tweaked settings to get the most realistic results. After that, we added the water materials and set up the render.
I hope you enjoyed learning about Dynamic Paint over these preceding three chapters and that it has helped you with your own projects and animations. Every simulation discussed in this book has its own uses and can help drastically with a lot of different scenes and projects. Remember to keep learning, and if you ever need a refresher on a certain simulation in Blender, you can always open this book again!