5
Creating a Realistic Explosion
To get an explosion to look right, there are a lot of factors to think about. First, you need to decide what kind of explosion you are creating. There are three main types: chemical, mechanical, and nuclear. Mechanical is when gas rapidly expands and causes pressure that is stronger than its current container. A nuclear explosion happens when there is a fusion or fission reaction; this explosion creates the iconic mushroom cloud look. Finally, there’s a chemical explosion, which is the one we will be creating in this chapter. These kinds of explosions happen when there is a decomposition or combination of certain gases:

Figure 5.1 – Explosion examples
Whatever kind of explosion you are trying to make, I recommend looking at reference images before you even open Blender.
The goal of this chapter is to help you understand how to make an explosion in Blender and how to customize it to get the look you want. I will also provide some troubleshooting tips along the way!
In this chapter, we will cover the following topics:
- Creating the particle system
- Creating the simulation
- Creating the material
- Rendering in Cycles and Eevee
Technical requirements
This chapter requires you to have Blender version 3.0 or above installed.
To download Blender, visit www.blender.org.
To view the final result or to download this project’s .blend file, please visit https://github.com/PacktPublishing/Learn-Blender-Simulations-the-Right-Way/tree/main/Chapter05.
Creating the particle system
There are a couple of ways to create an explosion. The easy way would be to have a flow object scale up very quickly. This way looks OK but the problem with it is that it’s way too uniform. The better way and the way we will be creating it is with a particle system. This system will be the initial shape of the blast, so it’s important to get it right. If you have never used a particle system, don’t worry. We will go through this step by step and learn exactly what it takes to create one! So, open Blender and let’s get started:
- First, let’s delete everything so that we have a blank scene to work with. Next, we need an object for the particles to emit from. Press Shift + A, select Mesh | Icosphere, and scale it down to 0.125. Make sure that you apply the scale as well. To do so, press Ctrl/Cmd + A and choose Scale.
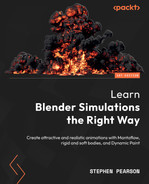
- To create a particle system, head over to the Particle System panel and click on the + icon:
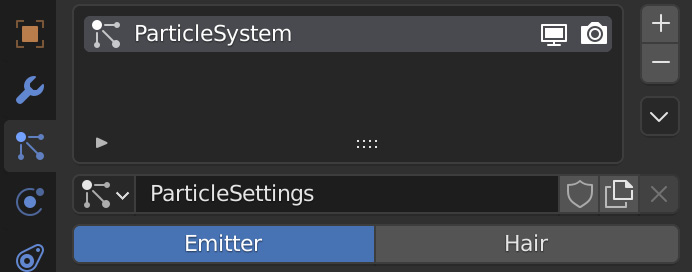
Figure 5.2 – Creating a particle system
- If you press the spacebar to play the animation, you will notice all the particles emitting and falling straight down. To fix this, go to the Velocity tab and set Normal to 7 m/s. This will increase the velocity of the particles along the normals of the faces. To make it less uniform, set Randomize to 6.000. Now, the particles should be shooting out everywhere:

Figure 5.3 – The Velocity tab
- This is starting to look like an explosion, but it is still not perfect. Now, we need to set when the particles will emit and how long they will last. Go to the Emission tab and set Frame Start to 10 and End to 14. This means that over four frames, 1,000 particles will be emitted. But I want more particles than this, so set Number to 5000.
- The particles are also lasting way too long in the animation. Let’s set Lifetime to 5. This way, they only last for 5 frames and then disappear. Here is what the simulation should look like so far:

Figure 5.4 – Particle system example
- If we were to add the smoke simulation to this particle system, it wouldn’t be that interesting. The reason is that right now, we have a perfect circle of particles. We need more randomness and variation. To achieve this, let’s add a new object with another particle system. Add a Circle and open the menu at the bottom. Set Fill Mode to N-Gon; this will make sure the circle has a face.
- Scale it down and rotate it so that it’s on the right-hand side of the Icosphere. Give it a new particle system by clicking the + sign in the Particle System panel.
- We are going to be doing something very similar to the previous system. Set Number to 2000, Start to 10, End to 14, and Lifetime to 5.
- In the Velocity tab, set Normal to 7 once again but set Randomize to 3. This will give a tighter spread of particles. It might be hard to see what this looks like with the first particle system, so you can hide the Icosphere by clicking the Eye icon at the top right:

Figure 5.5 – Hiding objects
The circle particle system should look something like this now:

Figure 5.6 – Circle particle system
- Let’s duplicate the circle twice (Shift + D) and place them on the top and left sides of the Icosphere. Feel free to play around with the position, rotation, and scale of these circles to get more variation.
- Unless you are creating an explosion in the air, we need a floor for the particles to hit. Press Shift + A and add a Plane. Scale it up pretty big and make sure it’s below all the objects.
- To add collision to this plane, head over to the Physics panel and choose Collision. In the Particle tab, set Friction to 0.9; this will make sure the particles don’t slide around the plane. Also, set Damping to 0.9; this value controls the bounciness of the collision. Higher values will equal less bounce. For more variation, you can set Randomize for both settings to 0.3:

Figure 5.7 – Collision settings
- Finally, let’s bake in the particle system! Select the Icosphere and head back over to the Particle System panel. Under the Cache tab, click on Bake All Dynamics. This will bake in all four particle systems automatically!
Here is what the particle should look like so far:

Figure 5.8 – Front view of particles
We have now finished creating the particles for our explosion! If you want to change any of the settings for the particles, make sure to click on Delete All Bakes in the Cache tab. This will free all the settings and you can change what you like.
Feel free to play around with the velocity and randomness to get different results. You can also add more emitter objects for a bigger explosion! Once you are happy with your results, we can start creating the smoke and fire simulation!
Creating the simulation
Now, we need to use the particle system we just created as an inflow for the simulation. This means that every particle is going to emit smoke and fire into the scene. Let’s set up all the settings and values for the simulation and bake it out!
Setting up the domain
Follow these steps:
- Of course, we need a domain object. A quick and easy way to do this is to select the Icosphere and choose Object | Quick Effects | Quick Smoke:

Figure 5.9 – Quick Smoke
This will automatically add a domain for us with the default smoke settings!
- The domain is currently the wrong size and in the wrong place. Let’s move it up so that it’s on top of the plane and scale it up. Since we are creating an explosion, we want the domain to be pretty large:

Figure 5.10 – Domain size
Here are the dimensions I used:

Figure 5.11 – Domain dimensions
- Now, we can set up the simulation settings! With your domain selected, head over to the Cache panel and set Type to Modular. Also, enable Is Resumeable. As for End Frame, set it to 150 or however long you want the simulation to be.
- Scroll up to the top and set Resolution Divisions to 256. Keep in mind that this is a high resolution. If you have a computer that is a little bit slower, I recommend setting this to 128 instead, or you might spend a very long time baking and rendering the animation.
- Moving on from there, let’s head go to Border Collisions. Check the Bottom box so that the smoke will collide with the floor of the domain.
- After that, enable Adaptive Domain. This will improve the baking time by quite a bit. Be careful, though – sometimes, this setting will delete smoke when you don’t want it to. If this happens, you may want to turn down the Threshold value in the Adaptive Domain settings.
- In the Gas tab, set Vorticity to 0.1. This will add more swirls and randomness to the smoke.
- Now, it’s time to enable Noise. This is going to give the smoke much more detail. And again, if you have a computer that can handle it, set Upres Factor to 2, but if it can’t, I recommend leaving it at 1. The rest of the settings can be left as-is.
With that done, we are now ready to start working on the Inflow objects!
Adding the inflows
Now that the domain is ready to go, let’s start setting up the inflows for the simulation:
- Select the Icosphere. Since we used the Quick Smoke feature, it should already have the basic flow settings. The first thing we need to change is Flow Type. Set this to Fire + Smoke.
- Since the particles are moving very quickly, it’s also a good idea to turn up Sampling Substeps to 5.
- Right now, the smoke is coming from the Icosphere itself and not the particles. To fix this, open the Flow Source tab, set Flow Source to Particle System, and select the one we created from the dropdown menu:

Figure 5.12 – Flow Source
- The last very important step is to check Initial Velocity. This will keep the momentum of the smoke when the particles shoot out. If this is not checked, the smoke will just stop moving right when the particles reach the max distance. This will look very strange and not realistic, so make sure Initial Velocity is checked!
- The Source value multiplies the current velocity. A value of 1 means the smoke will move at the same speed as the particle. This also means that the higher you set this, the more velocity the smoke will have. Let’s bring it up to a value of 15. If you find the smoke moves too fast, bring this value back down.
- With that done, let’s select the rest of the inflows and then select the Icosphere last so that it’s the Active Object. Press Ctrl/Cmd + L and select Copy Modifiers. Now, each of those circles will have the same settings as the Icosphere! You can also go to Object | Link/Transfer Data | Copy Modifiers to do this.
With that done, we are ready to bake the simulation! Remember that if you haven’t saved your project, the cache data will be put in a temp folder. This means it will get deleted once you close this .blend file. You can set a custom folder for the cache or if you save your project, the cache will automatically be put into the same folder as your .blend file:

Figure 5.13 – Temp cache folder
Once you have saved, select your domain object and click Bake Data. This might take a while but once it has finished, go to the Noise tab and click Bake Noise as well!
Now, just wait for the baking to finish. At this point, we can start creating the material for our explosion!
Creating the material
Now that the simulation is done, we are ready to set up the material for our smoke and fire! This is where you want to look at reference images again. When you look at chemical explosions, you will notice that the smoke is very dark and dense. The fire has a very bright orange and yellow color, so let’s replicate that in the material!
Creating the smoke
Let’s start creating the smoke:
- To see what our explosion looks like, press Z and select Rendered View. The scene lighting is also a bit boring, so add a Sunlamp and rotate it so that it’s facing the front. In the Lamp Properties panel, set Strength to 15:
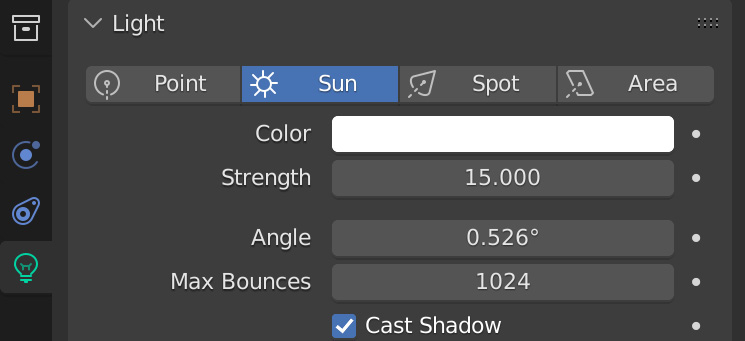
Figure 5.14 – Lamp Properties
- Open a new window by moving your mouse to any edge of the viewport until it turns into a double arrow. Right-click and select Vertical Split. This will allow you to add a new window to Blender.
- Place the split in the middle of your screen and, in the Editor Type menu, choose Shader Editor:
Figure 5.15 – Shader Editor
- With your domain selected, you should see a basic material already in place since we used the Quick Smoke feature. Before we start working on the material, you need to decide which rendering engine to use. When working with smoke materials, I like to use Cycles, just because it looks better and allows us to see the smoke and fire more clearly. Later in this chapter, we will learn how to use both engines to render, but for now, select Cycles in the Render panel.
- Now, let’s start creating the material. Let’s add three nodes so that we can plug everything in. The first node we will add is a Volume Info node. This node allows us to take attributes from the smoke simulation and plug them into the material. Press Shift + A and select Input | Volume Info. Place it to the left of Principled Volume for now.
- Next, let’s add a ColorRamp node. This node is fantastic, and it will enable you to do so many things in the material. In this case, it’s going to allow us to control the falloff of the density. Place it between the Principled Volume and Volume Info nodes.
- Finally, let’s add a math node to control how dense the smoke will be. Press Shift + A and go to Converter | Math. You can place this in between ColorRamp and Principled Volume.
- Change the mode from Add to Multiply. Once we plug everything in, the bottom Value will control how dense the smoke will look:
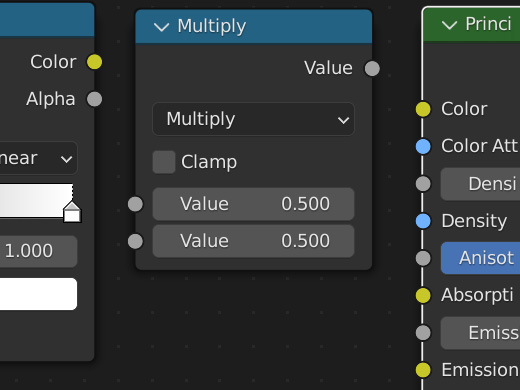
Figure 5.16 – Math node
- Take the Density output from the Volume Info node and plug it into ColorRamp. Then, take ColorRamp and plug that into the Math node. Finally, plug the Math node into Density of Principled Volume. I know that was a lot, so view the following screenshot if you get confused:

Figure 5.17 – Smoke density
- Now, let’s change some values to get the smoke looking a lot better! First, set the bottom Value in the Math node to 100. This will make the smoke much denser. Currently, the smoke becomes less dense as it gets closer to the edge. We can change this by taking White Handle of ColorRamp and dragging it much closer to Black Handle. Now, there should be hardly any falloff density.
- Finally, let’s set the Color property of Principled Volume to a darker gray to get the look of smoke from an explosion. Make sure to go into Rendered View in the 3D Viewport area to see what your smoke looks like. Here is what the scene should look like so far:

Figure 5.18 – Frame 48 of the explosion
Now that the smoke is looking good, let’s continue working on the material and creating the fire!
Creating the fire
The next step in this tutorial is creating the fire from the explosion. Let’s do the same process by adding all the nodes, plugging everything in, and then changing the values:
- To get fire into the smoke, we will be using the Emission values in the Principled Volume area. If we drag Strength up, it’s not going to work because we need to tell Blender where to put the fire.
Let’s create the color of the fire first. Add a new ColorRamp and place it below the first ColorRamp.
- In the Volume Info node, there is a Flame output, but that is not what we will be using because I found that it doesn’t look as good. Instead, we will be using the Heat attribute, as we did in Chapter 3, Creating a Realistic Campfire Simulation.
Press Shift + A, add an Input | Attribute node, and place it on the left. In the Name field, type the word heat (no caps) and plug Fac into the Fac property of ColorRamp. Then, take ColorRamp and plug that into Emission Color.
One thing to keep in mind is that the Heat attribute does not work in Eevee. If you decide to use Eevee, take the Density output from Volume Info instead. It will work very similarly to the Heat attribute. The following screenshot shows what the material looks like now:
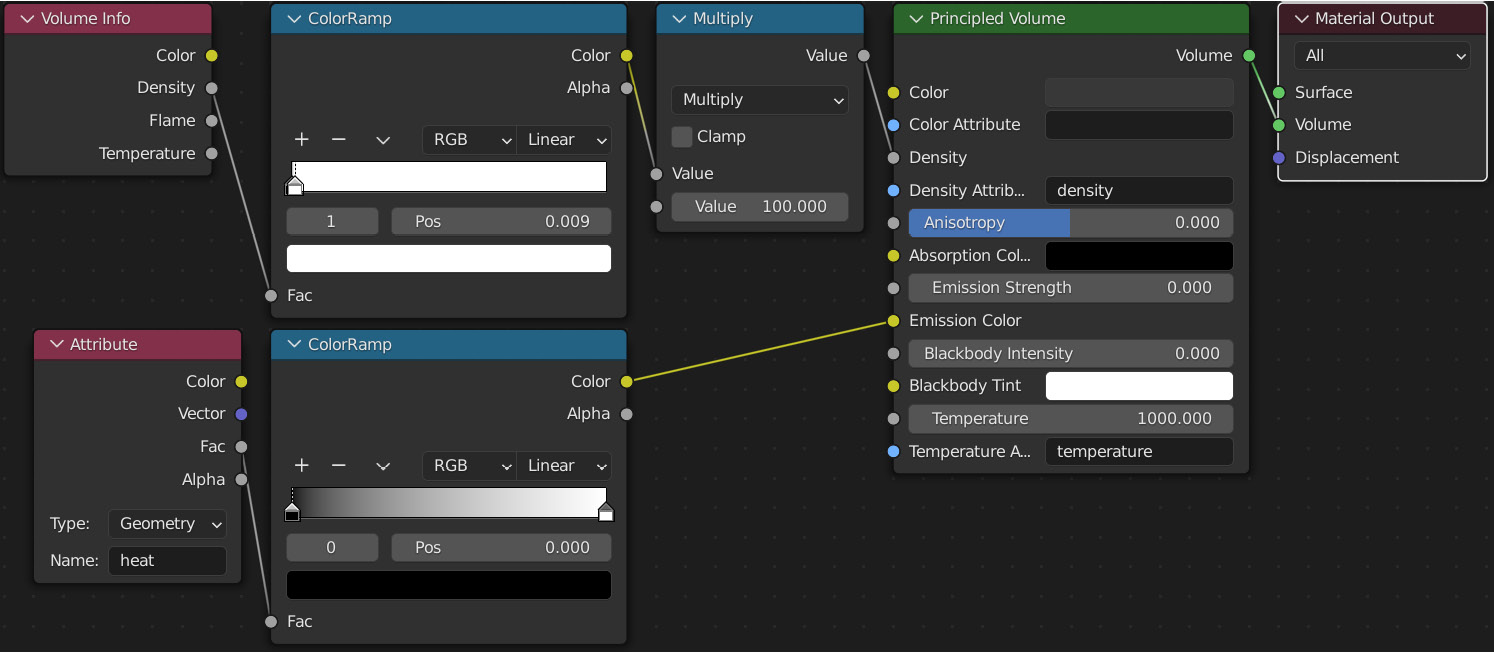
Figure 5.19 – Fire node preview
- Now, let’s make this fire look good! Set Emission Strength to 100 so that we can see what we are doing.
- Next, take Black Handle of ColorRamp and drag it about a quarter of the way to the right. This will clamp down on the amount of emission in the smoke.
- As for the color, let’s add a new handle by clicking the + sign in ColorRamp. Set this handle to a nice red/orange color. Then, select White Handle and set that to a bright yellow color. Play around with the position and colors until you are happy. You can add more handles if you want; this way, you will be able to play around with the color even more! Here is the full material if you want to take a look:

Figure 5.20 – Full material preview
With that, the material is done! Feel free to play around with the values, colors, and handles to get your desired look. The following figure shows my result of the explosion so far:
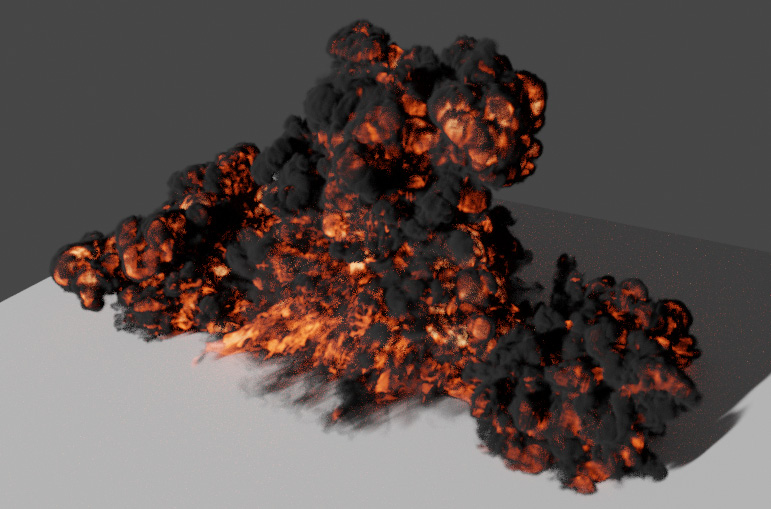
Figure 5.21 – Explosion result
In the next section, we will be discussing rendering and how to use Cycles and Eevee to properly render fire!
Rendering the explosion in Cycles and Eevee
The last step in this tutorial is to set up the camera and render settings. So, let’s get started by setting up the camera and rendering the explosion with Cycles first:
- Since we deleted the camera at the beginning, we need to add a new one. Press Shift + A and select Camera. Place it where you want to view the explosion. I think a high-up angle looking down looks pretty nice.
- Next, go to the Render panel and scroll down to the Color Management tab. Set Look to High Contrast. This will make your colors pop:

Figure 5.22 – The Color Management tab
- Finally, if you are using Cycles, set Render Max Samples to 100, then just render out the animation. Here is what my simulation looks like at frame 40:
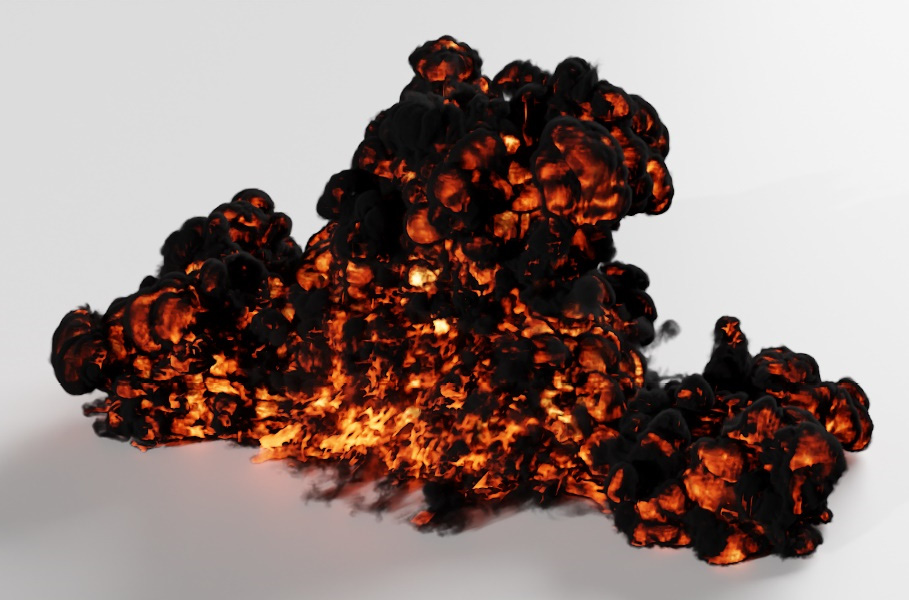
Figure 5.23 – Cycles render preview
That is all you have to do when rendering with Cycles. Eevee, on the other hand, is a bit different and requires more setup. Let’s go ahead and switch the engine to Eevee and discuss how this works!
Rendering in Eevee
Right when you switch to Eevee, you will notice the smoke looks terrible. It’s way too pixelated and the fire has now disappeared. The reason for this is that the Heat attribute doesn’t work in Eevee. So, instead, we need to jump back over to the material and switch it to the Density attribute. Let’s get started:
- Open the Shader Editor area again and take the same Density output from Volume Info and plug that into the bottom ColorRamp. You may need to play around with Black Handle if too much fire is coming in.
- Now, let’s get back to the detail in our smoke. First, check Bloom in the Render panel. This will give the fire a bit of glow. Play around with the Intensity value until it looks good.
- Now, open the Volumetrics tab. Here is where we will add back all the detail. Let’s start by setting Tile Size to 2px. This will bring back a lot of the detail and it will make the next step a bit easier to see.
- One thing you need to know about Eevee is that, when rendering volumes, it will chop up the volume into different layers and stack them on top of each other. The number of layers is determined by Samples, and where these layers are positioned is determined by the Start and End values.
Because End is set to 100 meters and Samples is set to 64, 64 layers are being distributed over that distance. This thins out the details and doesn’t make our smoke look that great. What we need to do is set Start and End exactly where the smoke is located from the camera. This way, all the layers are squished together, and we get the most detail.
- So, bring up the Start value until the smoke starts to disappear. I usually like to go 2 meters before it starts disappearing just to make sure everything is still visible. Then, bring down the End value until the smoke starts to disappear in the back as well. Again, I like to set it to about 2 meters before it starts disappearing.
For my scene, I used a value of 16 for Start and 25 for End. Don’t use the same values for your scene because this is based on where my camera is located, and it could be different for your scene.
- Now, our simulation should have much more detail. The next step is to enable Volumetric Shadows. This will give the smoke shadows and make it look a lot more realistic. Samples determines how good those shadows will look. Set this value to 64.
- You can also set Samples below Tile Size to 128 to get more detail, but this will increase the render time, so it’s not completely necessary. And that is all the setting up you need to do to get realistic smoke in Eevee. View the following screenshot just in case you missed anything:
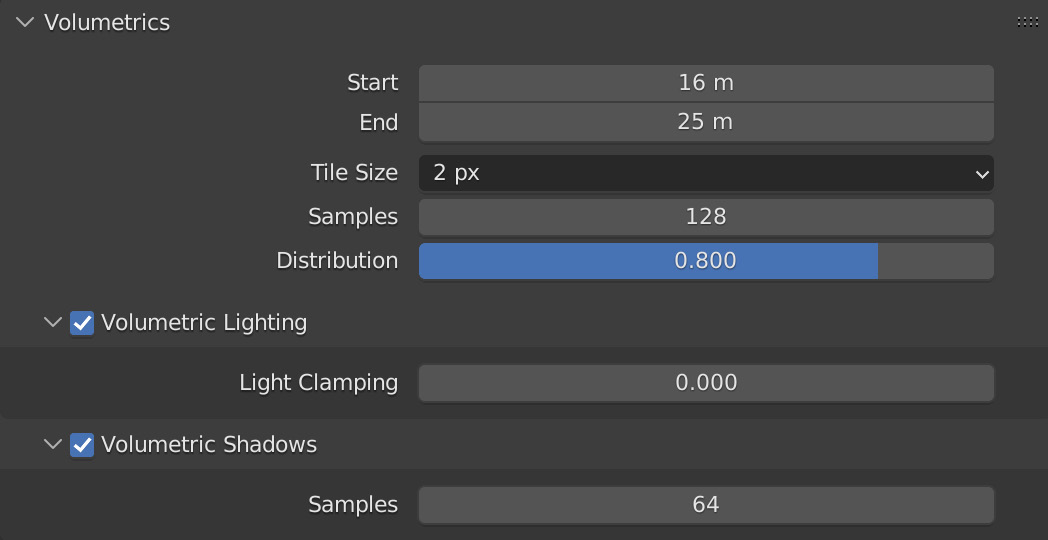
Figure 5.24 – Eevee Volumetrics
One thing to note about using Eevee is that you won’t be getting any shadows underneath the smoke from the sunlamp. That is one of the limitations of Eevee – you can get shadows in the volume itself but it’s not going to cast shadows on other objects in the scene.
So, if you want to get a realistic result with shadows, you are going to have to render this scene in Cycles. But if you don’t care too much about that, Eevee will be much faster at rendering!
The last step is to set an output and render out the animation. I recommend rendering it as a .png or another image format and then sequencing it out later. Refer to Chapter 4, Creating a Waterfall Using Mantaflow, to see how to do that. The following figure shows one frame after using the Eevee render engine:

Figure 5.25 – Eevee final result
As you can see, Eevee does look pretty good, but again, you will notice that there are not any shadows underneath the smoke. So, whichever rendering engine you decide to use is up to you. They both have their advantages and disadvantages but the result will still look great!
This scene doesn’t have to end here. You can also add a lot to it! For example, you could create an environment and have the explosion come from barrels filled with oil. You could also have a rainy sky to set the atmosphere! It’s all up to you!
Summary
And there we go! We have successfully created an explosion in Blender using a particle system and Mantaflow. Hopefully, you learned something new along the way and created something cool!
We covered a lot of topics in this chapter, so let’s recap. First, we created the initial shape of the explosion using a particle system. Then, we added three more particle systems to give variation and randomness to the simulation.
After that, we started working on the smoke and fire. We used the Quick Smoke feature to automatically add a domain and then set up all the settings for the inflow objects. We learned about creating a dense smoke material and how to add fire to the smoke. Finally, we discussed how to render in both Cycles and the real-time render engine Eevee!
That also concludes the first part of this book! We have covered four Mantaflow tutorials so far and now, it’s time to move on to a different simulation. In Part 2 of this book, we will be diving into the Soft Body and Cloth simulations and learning how to use those simulations efficiently!