
3
CREATING A GUI FOR OUR GUESSING GAME

In this chapter, we’ll create a GUI version of the Hi-Lo guessing game from Chapter 2, as shown in Figure 3-1. When this version of the program runs, it presents a graphical, or visual, interface that users will interact with. The GUI version allows the user to play the game in a desktop window like the applications you use every day. It’s a professional, windowed app complete with a text field for the user’s guess, a button to submit the guess, and a label that tells the user if they’ve guessed too high, too low, or correctly.

Figure 3-1: A GUI version of the Hi-Lo guessing game running on Windows (left) and on macOS (right)
Best of all, the exact same Java source code produced both versions of the app in Figure 3-1. With the GUI code we’ll write in this chapter, our game will be playable on Windows, macOS, and Linux!
Practicing with JShell
JShell works at the command line, accepting text commands and usually responding with text output. However, JShell also has access to the full set of Java libraries—prewritten packages of code—and isn’t limited to just text. Before we start programming our game, let’s create a simple GUI in JShell as practice.
Creating a GUI in Four Lines of Code
We can create a simple GUI window with just four lines of code in JShell. Let’s take each statement one at a time. First, enter an import statement into JShell to import the javax.swing.JFrame class:
jshell> import javax.swing.JFrame
The JFrame class we’ve just imported creates a frame or window using Java. Next, let’s create a frame using that class. Enter the following declaration to create a JFrame called myFrame:
jshell> JFrame myFrame = new JFrame("Hello!")
The new keyword creates a new object of the JFrame class—in this case, a GUI window that we’ll program to say "Hello!" in its title bar. JShell responds with a long line letting us know some of the default properties the window will have:
myFrame ==> javax.swing.JFrame[frame1,0,0,0x0,invalid,hidden,layout=java.awt.BorderLayou ...
The information shown after the square bracket is a string representation of myFrame and its property values, like its size (0x0, which is 0 by 0 pixels) and whether it’s hidden or visible. Let’s change one of those properties by setting the size to something bigger than 0 by 0 pixels.
The third line of code sets the size of the window in pixels by specifying a width and height for the frame:
jshell> myFrame.setSize(300,200)
This tells Java to make the window 300 pixels wide and 200 pixels tall, big enough for us to see the window and title bar.
Finally, let’s show the window on the screen by calling the setVisible() method:
jshell> myFrame.setVisible(true)
We use setVisible(true) to show a window and setVisible(false) to hide it. Since we’ve called myFrame.setVisible(true), you should see your window appear on the screen, as shown in Figure 3-2.

Figure 3-2: Our GUI window on Windows (left) and on macOS (right)
We’ve created a GUI window by entering just four snippets of code into JShell!
Creating an Interactive GUI in 10 Lines of Code!
I showed the previous example to my students at the university and to my sons at home, and both groups responded with something like “That’s really cool, but can you make the window do something?”
Thankfully, the answer is yes. By adding just a few more lines of code, we can add a button to the window that prints something every time you click it.
Let’s begin with a fresh JShell. Clear your JShell history by entering /reset at the JShell prompt:
jshell> /reset
| Resetting state.
Next, let’s use the built-in JShell editor to write a 10-line snippet of code to create an interactive GUI app that responds to your click. At the JShell prompt, enter /edit to open the JShell editor:
jshell> /edit
The JShell Edit Pad, which is helpful when we want to write several lines of code at once or when we want to go back and edit a line we’ve typed earlier, appears with an empty window as shown in Figure 3-3.

Figure 3-3: The JShell Edit Pad is a convenient editor for writing longer snippets of code.
In this case, we want to type 10 lines of code that will create an interactive GUI window with a button that prints something when it’s clicked. Enter the following lines, being extra careful with your capitalization and adding a semicolon at the end of each complete statement to separate the multiple commands:
import javax.swing.*;
JFrame window = new JFrame("Bryson's Window");
➊ JPanel panel = new JPanel();
JButton button = new JButton(➋"Click me!");
➌ panel.add(button);
➍ window.add(panel);
window.setSize(➎300,100);
➏ button.addActionListener(e ->
System.out.println("Ouch! You clicked me!"));
➐ window.setVisible(true);
First, we import all the Swing GUI classes, including JFrame, JPanel, and JButton. An asterisk (*) at the end of a Java library is called a wildcard character and means “include every class in this package.” Then, we create a JFrame just like we did in the previous example. At ➊, we create a panel inside the window. The panel will serve as a container for other GUI components like labels and buttons.
Next, we add a button with the text “Click me!” ➋ printed on it. At ➌, we add the button to our GUI panel, and then we add the panel to the window at ➍. Then, we set the size of the window to 300 pixels wide by 100 pixels high ➎, similar to the previous example.
The lines at ➏ are where the magic happens: here we add an action listener to the “Click me!” button to respond every time the user clicks the button. The action listener will print "Ouch! You clicked me!" to the console whenever the user clicks the GUI button. We’ll use listeners like this one in the GUI apps we build in this book to make the programs interact with the user whenever the user performs an action.
Finally, we make the window visible ➐, and we’re ready to test the program by clicking the button.
When you’ve finished typing all 10 lines of code and double-checked them for accuracy, click the Accept button in JShell Edit Pad to accept the code and run it in JShell, as shown in Figure 3-4.
After accepting the code, click Exit to close the JShell Edit Pad. JShell will run the code snippet, and if you’ve typed everything correctly, you’ll see a small window pop up like the one in Figure 3-5.

Figure 3-4: After typing all 10 lines of code into the JShell Edit Pad, click Accept.

Figure 3-5: An interactive GUI window with a clickable button
Click the button labeled Click me! with your mouse, and you’ll see Java respond as follows in the JShell window:
jshell> Ouch! You clicked me!
Ouch! You clicked me!
Ouch! You clicked me!
Ouch! You clicked me!
If you close the small GUI window, all you have to do to get it back is repeat the last line that sets the window to visible. Press ENTER a couple of times after clicking back into the JShell command line window to get the prompt and cursor back and then enter the following:
jshell> window.setVisible(true)
The window reappears when we set the visible property to true; if you close the window, the visible property becomes false.
This 10-line snippet is cool enough, but now you’ll learn how to build a game with a GUI!
Setting Up the GUI App in Eclipse
If you still have the HiLo project open in Eclipse from Chapter 2, as in Figure 3-6, close or minimize the editor window for any other Java files you may have been working on ➊. Also, collapse the HiLo project by clicking the small down arrow next to the HiLo folder in the Package Explorer on the left side ➋. This allows us to keep projects together in a single workspace without getting files mixed up.

Figure 3-6: Close any open files and collapse the HiLo project folder.
From the Eclipse menu bar, go to File ▸ New ▸ Java Project and name the project GuessingGame. After you’ve typed in the project name, click the Finish button at the lower right. This creates the new project folder in which we’ll develop the GUI version of the guessing game.
Expand the GuessingGame folder in the Package Explorer window and find the src folder. Right-click (or, on macOS, CONTROL-click) the src folder and select New ▸ Class. Name the new class GuessingGame. Be sure to use camel case, beginning with an uppercase G for the class name. Check the box next to the public static void main(String[] args) method stub. This adds the skeleton of a main() method so that we can run our app as a stand-alone program.
Before we finish, we’ll need to do one more step differently than in the command line app we built in Chapter 2. We’re going to change the superclass from the default java.lang.Object to the javax.swing.JFrame class, like the JFrame we used in JShell at the beginning of this chapter. A superclass or parent class in Java is a class that we extend in order to reuse code that’s already been written, which in this case is the code needed to build a graphical, windowed interface. The JFrame class in the javax.swing package is one way we can include GUI components in our own apps, so we’ll use JFrame to create a window and then customize a version of it to add some more features. Since the JFrame class is an extension of the Object superclass itself, we don’t need java.lang.Object because JFrame will inherit the Object superclass’s code. That means that JFrame will have all the features of the Object class, plus some. We’ll see how extensions work in a bit.
Figure 3-7 shows these settings in the New Java Class dialog for our guessing game.
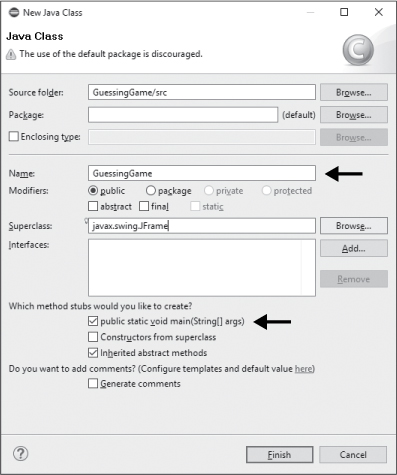
Figure 3-7: Be sure to change the superclass to javax.swing.JFrame to prepare for a GUI class.
Click Finish to see the following source code for GuessingGame.java:
➊ import javax.swing.JFrame;
public class GuessingGame ➋extends JFrame {
public static void main(String[] args) {
// TODO Auto-generated method stub
}
}
On the first line, Eclipse has imported the javax.swing.JFrame class ➊ to allow our program to use the GUI capabilities of Swing’s set of packages. In the second line, we use a new coding superpower, the extends keyword ➋.
In object-oriented programming, a parent class or superclass can have child classes that inherit all the methods and attributes contained in the parent class. Once we write a class that does something important that we plan to reuse, we can refer to that original class and extend it to add new functionality without changing the code in the parent class. In this case, a JFrame parent class has the ability to display text fields, labels, buttons, and other GUI components that we can customize and arrange for the new guessing game app.
The JFrame parent class we’re extending in this app will enable us to display a window with GUI elements like text fields, labels, and buttons by designing the GUI layout with the WindowBuilder Editor in Eclipse. Let’s see how the WindowBuilder Editor works next.
GUI Design with Eclipse’s WindowBuilder Editor
The most popular Java IDEs include tools to help programmers build an attractive GUI in a design view, with a what-you-see-is-what-you-get (WYSIWYG) interface. WYSIWYG interfaces allow users to position design elements as they will look in the final product. For instance, Microsoft Word is a WYSIWYG interface, because it allows you to edit text as it will look in its final print form. In the same way, Java IDE tools like the WindowBuilder Editor allow programmers to place GUI components like text fields, labels, and buttons as they will look in the final windowed application, helping programmers deliver professional-looking GUI apps.
To open the WindowBuilder Editor, right-click the GuessingGame.java file in the Package Explorer on the left and then select Open With ▸ WindowBuilder Editor. A new window that looks like a regular text editor will open. But, if you look at the lower-left corner of the window, you’ll see two new tabs, Source and Design. The Source tab is the plain text, source code view of your application. If you click the Design tab, you’ll see the design view shown in Figure 3-8.
The WindowBuilder Editor appears only for GUI classes, such as GuessingGame, that extend JFrame or one of the other GUI superclasses. Notice that the preview window has a title bar with a Java icon on the left side and three buttons to minimize, maximize, and close the window. The preview window in Figure 3-8 looks slightly different on Windows, macOS, and Linux. This window will be our playground for building a GUI guessing game that looks and feels like a real app.

Figure 3-8: The WindowBuilder Editor’s Design tab makes it easy to build GUI windowed apps.
Designing the User Interface
Double-click the GuessingGame.java tab at the top of the WindowBuilder Editor to expand the WindowBuilder design view to fullscreen. This will create more room for designing the GUI layout. You can double-click the tab again to restore the normal Java perspective when you’re ready to get back to programming.
Setting GUI Properties in the Properties Pane
We’ll use the Properties pane to start customizing the GUI window for our guessing game. The Properties pane can be found on the bottom left of the Design tab in the WindowBuilder Editor. As you can see in Figure 3-9, if you click a component in the Components pane (on the left under Structure), the Properties pane immediately below it lists several properties and values we can view and edit for that component.

Figure 3-9: The Properties pane helps you customize the properties of each GUI component in your app.
We’re going to build a customized GUI window for the guessing game app. First, let’s change the title property of this JFrame. In the Components pane, click javax.swing.JFrame, then scroll down in the Properties pane until you see the title property. Click in the empty box to the right of title and enter Your Name's Hi-Lo Guessing Game. (Replace the italicized text with your name; this is your app, after all!) After you enter the title text, press ENTER. The GUI preview on the right will automatically update to show Your Name’s Hi-Lo Guessing Game in the title bar.
With the title done, let’s set a few other properties to make the GUI look and behave like we want for the guessing game. Scroll up in the Properties pane to find defaultCloseOperation (it may just display part of the name like defaultClose... or something similar if the pane is too narrow). Click the box to the right of defaultCloseOperation and select EXIT_ON _CLOSE from the drop-down menu. This means that when you click the close window button on the title bar of this JFrame, you’ll exit the program. This is usually the default, but there might be times you want to close a window but not close the whole application—for example, in a save dialog or a pop-up window. For this single-window game, though, we want to exit the application when the main window closes.
Next, we’ll change the way GUI components are arranged inside the app window. Click the getContentPane() entry in the Components pane, just under javax.swing.JFrame. A content pane is the interior of the JFrame, where we’ll build the guessing game GUI layout. Now, find Layout in the Properties pane and click the down arrow in the right edge of the field. Select Absolute Layout from the drop-down list of values; this enables us to place GUI elements with pixel-perfect precision.
Customizing GUI Components in the Palette Pane
Let’s start customizing our guessing game app. You can find the elements you’ll need for almost any GUI app in the Palette pane. The Palette pane can be found in the middle of the WindowBuilder Editor on the Design tab. Note that you can expand or collapse a pane by clicking the small arrow to the left of the pane’s title. Click the arrow once to collapse the pane. Click the arrow again to expand the pane. This can be handy when you need extra room for a large, complex GUI layout.
In the Palette, scroll down until you see the Components section, as shown in Figure 3-10.
The Palette contains all the standard components you’re probably already familiar with, like labels (JLabel), text fields (JTextField), buttons (JButton), and checkboxes (JCheckBox). You might have noticed that GUI components in the javax.swing package all begin with an uppercase J, followed by the name of the component in camel case. This makes it easy to remember the class name for each of the GUI elements in an app that uses the Swing toolkit.
Let’s place a label at the top of the GUI window that says Your Name’s Hi-Lo Guessing Game. Click JLabel under Components in the Palette. Then, mouse over the GUI preview on the right; you should see gridlines appear. By default, the WindowBuilder Editor provides these gridlines to help you place elements. Now, hover your mouse near the top center of the gray content pane (the interior of the JFrame) and click to place a JLabel in that spot.

Figure 3-10: The Components section in the Palette pane is where we’ll find the most common GUI components.
When you first place the JLabel, you can edit the text in the label directly in the GUI preview. Type Your Name's Hi-Lo Guessing Game and press ENTER. If you want to change the text later, go to the text property of the JLabel in the Properties pane on the lower left and type in your text. At first, you’ll probably only see part of the text in the label, because the label is too small to show the full text. Click the label, and you’ll see small black resizing squares on each corner. Click the lower-left corner of the label and drag it to the left border of the content pane to stretch the label to the content pane’s left edge. Then, click the label’s lower-right corner and drag to resize it to the content pane’s right edge.
Now your full label text should fit inside the label at the top of the GUI preview. Next let’s make the label text centered and bold. First, find the horizontalAlignment property of the label in the Properties pane. Click the value and choose CENTER from the drop-down list. Next, find the font property of the label and click the three dots to the right of the font property’s value. A font chooser window will open, allowing you to choose a font, style, and size. I chose Tahoma, 15 point, and Bold, as shown in Figure 3-11. Note that you may have to resize your label to fit a larger font.

Figure 3-11: The first label, customized and in place, at the top of the content pane
Let’s add a label for the first prompt a user will see in the game. Click JLabel in the Palette pane, then place the new label just above the middle of the content pane. Enter Guess a number between 1 and 100: as the text of the label. You’ll need to resize the label a little wider than the text for extra padding.
Just to the right of the label, let’s place a text field for the user to enter their guess. Click JTextField on the Palette and then drop the text field into place to the right of the label you just placed.
Resize it so it’s just big enough to hold a three-digit number. Click the label again and change its horizontalAlignment property to RIGHT to bring the text closer to the text field, as shown in Figure 3-12.

Figure 3-12: The guessing game now has a label and text field for the user’s guess.
Next, let’s place a button the user can push to submit their guess. On the Palette, find and click JButton. Mouse over the middle of the GUI preview window and click to place the JButton. Change the text to Guess!.
Finally, place a JLabel below the button, give it the text Enter a number above and click Guess!, and resize the label to the full width of the JFrame. Then, change the horizontalAlignment to CENTER. Later, this label will also be where we tell users whether they guessed too high, too low, or correctly. The alignment of each component may not be perfect yet, but your GUI layout should look something like Figure 3-13.

Figure 3-13: The GUI layout has all the components, just not perfectly aligned yet.
Now that we have all the GUI components on the screen, we’re ready to make a few tweaks to balance and center the layout. First, be sure to save your file.
Aligning GUI Elements
So far, we’ve been positioning GUI components by eye, trying to space them correctly and center them as much as possible. However, when we run a program, we expect the layout to be “perfect.” Fortunately, Eclipse has built-in tools to help us align components.
First, let’s distribute the four main elements evenly, spacing them the same distance apart vertically. Select the three labels and the button by clicking each one while holding down the SHIFT button. For now, don’t click the text field where the user enters their guess. You should see a small row of alignment tools appear above the GUI preview window. Mouse over each tool to see a tool tip that tells you what that button does. You may need to resize your Eclipse window if you don’t see all the tools at first.
Click the tool that looks like stacked buttons (the rightmost icon in Figure 3-14). All four selected items should now be spaced an equal distance apart from top to bottom.
Now select just the text field. Move it to realign it with the label prompting the user to guess a number. We didn’t include the text field originally because Eclipse would have distributed all five components evenly, separating the text field and its label from each other and creating five rows instead of four.
Figure 3-14: You can align and space components evenly using the tools above the GUI preview window.
NOTE
If you ever mess up while aligning things (or doing anything else) in WindowBuilder, you can undo your previous action by pressing CTRL-Z or ![]() -Z. This is a great safety feature in the WindowBuilder Editor and lets you try new things without permanently messing up the layout.
-Z. This is a great safety feature in the WindowBuilder Editor and lets you try new things without permanently messing up the layout.
Finally, click the button labeled Guess! and click the alignment button above the GUI preview (the one near the far right with the tool tip “Center horizontally in window”). You can center or adjust the other components as desired. If you want to move two or more components together, you can SHIFT-click to select both, then click and drag to move them.
When you’re happy with the layout, it’s time to prepare for coding by naming the components. Take a moment to save your changes.
Naming GUI Components for Coding
The user interface of the guessing game app is ready for the player. To make the app easier to work with, however, we need to make a few final tweaks over in the Java source code file, where we’ll be programming the rest of the game. We need to name each component so that we’ll know how to refer to it inside the source code.
This step is sometimes called “wiring up,” because we’ll be connecting each GUI component needed in the program to variable names that we can access in the Java source code. Eclipse has been naming each GUI element for us as we’ve added them, but we’ll want to change those names. Select the text field where the user will enter their guess. If you look in the Properties pane, you’ll see the very top property is Variable. The variable name Eclipse has given your first text field by default is probably something like textField. Click the value field beside the Variable property and rename the variable for this text field to txtGuess, as shown in Figure 3-15.

Figure 3-15: Rename the variables for each GUI element so we can use them easily in the Java source code.
The name txtGuess will remind us that it’s a text field and that it stores the user’s guess. You’ll find that naming GUI components consistently and logically will help you code more quickly and efficiently, with fewer errors.
After you’ve renamed the text field, select the label at the bottom of the GUI window that reads “Enter a number above and click Guess!”. This is the label that will output information for the user to read, like Too high, Too low, or You win!, so let’s rename the variable lblOutput. This name will help us remember it’s a GUI label (lbl) and that it’s the one we want to use for output to display information to the user.
In the Source tab at the lower left of the WindowBuilder Editor window, you’ll see that Eclipse has been writing the Java source code to produce the GUI layout you’ve been designing (Figure 3-16).

Figure 3-16: Click the Source tab, and you’ll see Eclipse has coded the GUI components in Java for us.
Notice that the new variable names you gave the text field (txtGuess) and output label (lblOutput) are both visible in the source code. Now is a good time to save the file with all the changes you’ve made so far.
But before we start writing the code for the guessing game app, we’re going to make an adjustment to the source code.
Connecting the GUI to Your Java Code
Scroll up to the top of the GuessingGame class, and you’ll see that Eclipse has declared the JTextField txtGuess right at the top of the GuessingGame class:
public class GuessingGame extends JFrame {
private JTextField txtGuess;
Eclipse does this for text fields by default for a reason. Declaring text fields at the top level of the class makes it possible to access the text field (to see if the user’s guess is too high or too low, for example) from anywhere inside the class. Text fields are usually used in this way, so Eclipse declares a private JTextField txtGuess right at the top of the GuessingGame class instead of in a method or function further down in the class. The modifier private is used as an object-oriented programming best practice (a recommended way of doing things). Making something private keeps other classes from being able to see that part of the code. Since txtGuess is private, classes other than GuessingGame won’t be able to access it or accidentally change the txtGuess variable, which is what we want.
In this guessing game app, we want to be able to access the value the user enters into the txtGuess text field, so it’s great that Eclipse has declared it at the top level of the class. We also want to access the label lblOutput to be able to change the text displayed to the user (when their guess is too high, too low, or correct). So we need to add one more declaration to the top of the class, right under the declaration of txtGuess:
public class GuessingGame extends JFrame {
private JTextField txtGuess;
private JLabel lblOutput;
This line of code declares lblOutput as a variable that refers to a JLabel object in the GUI layout for the app. We’ve chosen to make this object reference private to hide this data from outside programs, but we’ll still be able to use it throughout the GuessingGame class.
One final change is to correct the line where lblOutput was originally declared, down near the bottom of the class. Find the line that looks like this, further down in the code:
JLabel lblOutput = new JLabel("Enter a number above and click Guess!");
And change it to this:
lblOutput = new JLabel("Enter a number above and click Guess!");
Notice we’ve removed the additional JLabel declaration. If you leave this second JLabel declaration in the program, your app won’t work because you’ve already declared lblOutput to be of type JLabel at the top of your class. If you leave the second JLabel declaration, Java will think you mean to have two separate JLabel objects named lblOutput. By removing the second JLabel declaration, you’re telling Java to use the one JLabel lblOutput you’ve created at the top of the program and initialize it with a text value of "Enter a number above and click Guess!".
While we’re declaring variables at the top level of the GuessingGame class, let’s add one more important variable: theNumber. Remember in the text-based version of the game, this is what we named the secret, random number the user is trying to guess. Add a declaration for theNumber after txtGuess and lblOutput as follows:
public class GuessingGame extends JFrame {
private JTextField txtGuess;
private JLabel lblOutput;
private int theNumber;
Now that our variables are correctly declared at the top of the class, we’re ready to begin coding the GUI version of the guessing game app. In the next section, you’ll learn how we can get the user’s guess from the GUI text field and check to see if it’s too high or too low. We’ll also show the output text in the GUI label lblOutput to help the user make their next guess.
Adding a Method to Check the Player’s Guess
Now that the GUI is wired to the Java source code with the private variables we added, txtGuess and lblOutput, we’ll begin coding the logic of the guessing game.
Let’s write a method called checkGuess() near the top of the GuessingGame class. The signature, or skeleton, of this method will look like this:
public class GuessingGame extends JFrame {
private JTextField txtGuess;
private JLabel lblOutput;
private int theNumber;
public void checkGuess() {
}
Notice that the method is declared as public. Variables in a class are usually declared as private, but methods or functions that operate on those variables are usually declared as public so other classes can call on them. You can think of it like your checking account. Your balance is private and can only be accessed by you or the bank, but the function of making deposits is public (other people can deposit money into your account).
The second term, void, tells Java that we’re not expecting a return value, which is a value that a function or method outputs, from this function. For example, a conversion calculator for Fahrenheit to Celsius called convertFtoC() could take a value representing a temperature in Fahrenheit and return a numeric value representing the converted temperature in Celsius. In this guessing game application, the checkGuess() method will not return information like this to the rest of the program. Instead, we’re going to program the app to display information to the user through the graphical user interface, so we use the void return type, which doesn’t return a value.
Finally, we’ve named the method checkGuess() and provided the opening and closing braces that will contain the code that tells the program how we want to check a user’s guess.
Getting Text from a JTextField
Let’s start building the checkGuess() method, which will take the string the user enters and check it against the number to guess. Add this line between the two braces for the checkGuess() method:
public void checkGuess() {
String guessText = txtGuess.getText();
}
This line creates a new String variable called guessText that will hold the number the user enters into the GUI text field. To get the text the user entered, we’ll need to use the getText() method by calling txtGuess.getText() and storing the result in the new string variable called guessText.
You may see a window pop up near where you’re typing when you add the dot operator (.) after txtGuess, as shown in Figure 3-17.

Figure 3-17: After you type txtGuess and the dot operator (.), you may see a helpful code recommendation window appear.
This is known as a content assist—Eclipse is trying to help by suggesting lines of code to finish the statement you’re working on. This particular kind of content assist is also called a code recommender, because it recommends common code options, like methods in the current class or object. Code recommendation is one feature that makes Eclipse a powerful IDE for professional Java developers. It’s not only faster in most cases to select a code recommender suggestion, but doing so also helps prevent errors and makes coders more efficient as they develop complex applications.
Now, we need to create a string to hold the message telling the user whether their guess was too high, too low, or correct. Let’s declare one additional string:
public void checkGuess() {
String guessText = txtGuess.getText();
String message = "";
}
We don’t know yet whether the user’s guess is too high or too low, so we’ve initialized message to an empty string with a pair of double quotes (""). After we test the user’s guess against the random number, or theNumber, we’ll update this string with more information before we output it in the GUI label. To test the user’s guess, we’ll need to turn their text entry, currently stored in guessText, into numeric form so that we can compare it to theNumber.
Converting Strings to Numbers
In the text-based version of this app we made in Chapter 2, we used a Scanner object to scan a number value from the keyboard text the user entered. A scanner could work in a GUI, but there’s a more compact way to do this that will work better for this version.
Just like the Math class had Math.random() so that we could generate a random number, there is also a class for working with integers, called Integer. The Integer class has several functions that are useful for working with whole numbers, including a method to look for integers in strings of text, Integer.parseInt(). Enter the following line below String message = "".
public void checkGuess() {
String guessText = txtGuess.getText();
String message = "";
int guess = Integer.parseInt(guessText);
}
First, this line declares guess to be an integer variable. Then, it searches for, or parses, an integer from the text the user entered. For example, the string "50" will become the number 50. Finally, it stores the number in the variable guess. We need the numeric version of the user’s guess in order to compare it to theNumber, using the comparison operators < and >.
With the user’s guess stored in the variable guess, we’re ready to test it against the computer’s secret, random number theNumber. We haven’t actually programmed theNumber to hold a value yet, but we’ll do that soon. Comparing the guess with theNumber will look like it did in the text-based version of the game, except we won’t print to the console using System.out.println(). Instead, we’ll store output for the user in the string variable message that we created:
String guessText = txtGuess.getText();
String message = "";
int guess = Integer.parseInt(guessText);
if (guess < theNumber)
message = guess + " is too low. Try again.";
else if (guess > theNumber)
message = guess + " is too high. Try again.";
else
message = guess + " is correct. You win!";
}
Notice the three if-else statements are virtually identical to those in the text-based version of the game, except that we’re storing the output message (too high, too low, or correct) in a variable instead of outputting it directly to the console window. We still need to show message to the user, so we’ll do that using the lblOutput GUI label. We’ll use the setText() method like so:
else
message = guess + " is correct. You win!";
lblOutput.setText(message);
}
This command will show the output message to the user in the GUI window by changing the text property of the JLabel called lblOutput to the correct String variable message based on the user’s guess.
Your completed checkGuess() code should look like the following:
public void checkGuess() {
String guessText = txtGuess.getText();
String message = "";
int guess = Integer.parseInt(guessText);
if (guess < theNumber)
message = guess + " is too low. Try again.";
else if (guess > theNumber)
message = guess + " is too high. Try again.";
else
message = guess + " is correct. You win!";
lblOutput.setText(message);
}
Next, we need to write the code that assigns a random value to theNumber. We’ll use the newGame() method, because we want to have a new random number every time the user begins a new game.
Starting a New Game
We want to tell the computer to pick a new, secret, random number whenever a new round of the guessing game starts, so it makes sense to do this in a method in the GuessingGame class. By doing it this way, we’ll be able to call on the method every time the user wins and wants to play a new game.
The method signature of the newGame() method looks similar to the checkGuess() method. Place it just after the closing brace for checkGuess() and before public GuessingGame():
lblOutput.setText(message);
}
public void newGame() {
}
public GuessingGame() {
We’ll make this method public so that it can be called from an outside class. We also need to let Java know that just like the checkGuess() method, this method has no information that needs to be returned, so its return type is void. Finally, the method’s name is newGame, and it includes open and close parentheses, (). The method body is empty right now, with nothing between the braces, but we’ll address that next.
A new game in this app just means that we’re telling the computer to pick a new random number. The code to assign this random value to theNumber will look and function like it did in the text-based version of the game, except now we’re putting this code inside its own, separate method. So, the finished newGame() method should look like this:
public void newGame() {
theNumber = (int)(Math.random() * 100 + 1);
}
That’s it! Now we have all the necessary pieces in place to build a functional guessing game app, so we just have to connect them to the GUI interface. Once the app can listen for user events so it can respond to the user clicking the “Guess!” button, we’ll be ready to run the game!
Listening for User Events: Click to Guess!
The last step we need to complete before running the app is to connect the btnGuess button (labeled “Guess!”) with the function that checks the user’s guess, checkGuess(). With Java, we can use event listeners to do this. Event listeners are just code that tells the program to wait, or listen, for user interaction events, like button clicks, mouse movement, or keyboard entries.
Go back to the GUI preview of the app by clicking on the Design tab. In the GUI preview window, find the “Guess!” button, as shown in Figure 3-18, and double-click it.

Figure 3-18: In the Design view, double-click the “Guess!” button to add an event listener to the code.
Double-clicking the “Guess!” button automatically opens the Source tab, where you’ll notice Eclipse has added new code. This new code is the skeleton of an event listener—in this case, an ActionListener() for the event that occurs when the user takes an action on the JButton btnGuess. In this case, the action is clicking the button.
Eclipse has added everything except the action we want to perform when the user clicks the button. Let’s take a look at the event listener code Eclipse has created for us.
JButton btnGuess = new JButton("Guess!");
➊ btnGuess.addActionListener(new ➋ActionListener() {
➌ public void actionPerformed(ActionEvent e) {
}
});
btnGuess.setBounds(172, 149, 89, 23);
getContentPane().add(btnGuess);
The event listener for an ActionListener(), the specific listener that handles button clicks, is connected to btnGuess with the addActionListener() method at ➊. The next couple of lines of code are all built inside the parentheses for the addActionListener() function.
Inside the addActionListener() method, the first thing we see is the keyword new, letting us know that Eclipse is creating a new object of the ActionListener class at ➋. What makes this new object different from the ones we’ve seen in the past, though, is that it’s an anonymous inner class, meaning that it doesn’t have a variable that refers to it and it’s created entirely inside the GuessingGame class. Anonymous inner classes can help us code faster since we don’t need to build a completely separate class to handle short, quick events like a button click. Instead, we can insert the code for an event handler right where we create the button. In this case, the ActionListener will be listening for just a button click, so it’s a perfect candidate for an anonymous inner class.
Eclipse creates the skeleton for the anonymous inner class, but we still need to code the button’s behavior. This next section of code will go inside the braces of the actionPerformed() method at ➌. The actionPerformed() method is where we describe what we want the app to do when the user has clicked btnGuess. The method accepts an ActionEvent as an argument, which is the event, or user action, the listener is listening for. In this case we’ve named the ActionEvent e, but you can use any variable name you’d like. When the user enters a guess and clicks the “Guess!” button, that action is assigned to e, and we need to check their guess with the checkGuess() method we created earlier:
btnGuess.addActionListener(new ActionListener() {
public void actionPerformed(ActionEvent e) {
checkGuess();
}
});
Thanks to Eclipse, the only part we had to add was the checkGuess(); command. The automatic code completion feature has saved us time and helped us avoid typographical errors.
With this section of code in place, now we just need to tell the app what to do on startup. Take a moment to save your work so far.
Setting Up the GUI Window
Before we run the game for the first time, we need to tell the program what to do to set up the GUI window. This includes building the GUI interface, starting a new game by calling the newGame() method, and setting the desired width and height dimensions of the window.
Inside the braces for the main() method near the bottom of the file, add the following lines of code:
public static void main(String[] args) {
➊ GuessingGame theGame = new GuessingGame();
➋ theGame.newGame();
}
}
The line of code at ➊ creates a new GuessingGame called theGame. The line at ➋ will start the guessing game with a new random number.
Now, let’s give Java an idea of the size we want the window to be. For a GUI desktop app, we can specify the size of the frame for the app using the setSize() method, entering the width and height of the window we want to create.
public static void main(String[] args) {
GuessingGame theGame = new GuessingGame();
theGame.newGame();
theGame.setSize(new Dimension(450,300));
The setSize() method requires a parameter of the Dimension type that’s built into the java.awt library (.awt is short for abstract window toolkit). The new Dimension() inside the parentheses for setSize() tells Java to create an object of type Dimension with width and height parameters of 450 pixels wide by 300 pixels tall. But we haven’t imported the java.awt library yet, which means Eclipse doesn’t know what Dimension refers to, so your Eclipse editor will tell you there’s an error with this statement by underlining the class name Dimension in red. If you click the word Dimension in the editor, Eclipse shows you a list of Quick Fix options, as shown in Figure 3-19. (If you aren’t able to get the Quick Fix pop-up to display, press CTRL-1 or ![]() -1 after placing your cursor in Dimension.)
-1 after placing your cursor in Dimension.)

Figure 3-19: Eclipse recommends Quick Fix options for the new code we’ve entered; choose the top option to import the correct class.
We want to make use of the Dimension class that’s already provided in the java.awt package, so the topmost Quick Fix option, Import 'Dimension' (java.awt), is the right one for this situation. Click it, and Eclipse will add java.awt.Dimension to the list of imported classes at the top of the file.
import javax.swing.JFrame;
import javax.swing.JLabel;
import javax.swing.SwingConstants;
import java.awt.Dimension;
import java.awt.Font;
import javax.swing.JTextField;
Finally, add this line to the main() method to make the app visible on the screen:
theGame.setSize(new Dimension(450,300));
theGame.setVisible(true);
}
This command calls the setVisible() method on the GuessingGame object theGame. Remember, GuessingGame extended the class JFrame, so theGame is also a descendent of the JFrame parent class. We want to set the visible property of the main JFrame holding the GUI version of the guessing game to true, which is a Boolean value.
There are only two Boolean values, true and false (both spelled with all lowercase letters), and these are used in Boolean expressions. Boolean expressions are any set of arguments that can be evaluated to true or false. The if statements we used in the checkGuess() method, like the expression (guess < theNumber), are just one example we’ve already seen. When we evaluate this expression and check whether guess is less than theNumber, the expression evaluates to either true (meaning guess is less than theNumber) or false (guess is not less than theNumber). The result of that Boolean expression determines whether the statement following the if statement will run.
The complete main() method for the GuessingGame class is as follows:
public static void main(String[] args) {
GuessingGame theGame = new GuessingGame();
theGame.newGame();
theGame.setSize(new Dimension(450,300));
theGame.setVisible(true);
}
Time to Play!
With your code complete, now is a good time to save the GuessingGame.java file. Once you’ve done so, click the run button or select Run ▸ Run from the menu. The game window will appear.
Try entering some guesses and see if the app works. While you’re playing the game, check each component to make sure it works. Make sure to test the “Guess!” button, the label at the bottom, and the text field. If you spot problems, go back and check your code. Pay attention to when or where the error occurs to narrow down the source. You’ll get better at finding errors as you learn to code. Figure 3-20 shows how the app might look when it’s working properly.

Figure 3-20: The “Guess!” button works!
When your game is playable all the way through, you’re ready to take the next step.
Right now, the game is playable, but only until you win. The current version of the app doesn’t have the code to tell Java to start a new game every time we win the current one.
First, let’s set it up so we can keep playing the game even after we win once, and then we’ll make a few tweaks to the user interface to provide a better user experience.
Adding a Play Again Feature
Just like we did in the first text-based version of the game, let’s add a play again feature. We created a newGame() method already, but we only called that method when setting up the game for its initial display in the main() method of the app.
We need to either change the GUI or change the app behavior. We could add a Play Again button for the user to click when they want to play another round, or we could just make the app automatically start a new game every time the user wins.
The benefit of adding a Play Again button is that it would be easy to understand from the user’s perspective. However, we wouldn’t want the Play Again button to be visible in the GUI window all the time, because it’s needed only when the user wins. One option would be to add a button but make it invisible while the game is running, having it become visible only when the user wins. In order to keep our game simple, we won’t do this here, but if you’re interested in trying it out, see Programming Challenge #2 on page 73.
Instead of adding a button, let’s change the app’s behavior so that a new number is picked automatically after the user wins the current round. This requires changing only one section of the program, the else statement that handles a guess matching the random number. If the user has won a round, a new round should begin automatically. This makes intuitive sense—no extra buttons, no decisions to make. If the player decides they’re done playing, they can simply close the window. We’ll add this behavior by changing the following lines:
else
message = guess + " is correct. You win!";
We’ll call newGame() to start a new game. To add the call to the newGame() method inside this else statement, we’ll group two statements (setting the variable message and calling newGame()) together as one block like so:
else {
message = guess +
" is correct. You win! Let's play again!";
newGame();
}
The braces group these two statements as a single block of code to be executed together whenever the else statement is selected as the correct program path. Without the braces, only the first line after the else statement would be executed, and the newGame() method would run after the if-else statements are evaluated. This would make the game change the secret number every time the user tried to guess.
Notice also that we added Let's play again! to the end of the message string. This lets the user know that they’re able to play again just by guessing and can expect the computer to pick a new number each round. Make these changes, save the program, and run it again to see the new version of the game!
Improving the UX
As you play the game, you may notice a few elements of gameplay that could make the user interface even better. For example, if we could have the app accept a new guess either when the user clicks the “Guess!” button or when they press ENTER from the keyboard, that would provide a more natural and intuitive user experience (UX).
One other problem is that when we want to guess a new number, we have to highlight and select the old number (or, alternatively, press the DELETE or BACKSPACE key) to clear the previous guess. We also have to click back into the text field, because the focus switches to the “Guess!” button. To improve the user interface, we could have the cursor return to the text field after each guess and automatically highlight or delete the previous guess’s text so that the new guess replaces the old one.
Let’s tackle these two items now.
Allowing Users to Press Enter to Guess
The first improvement we’ll make is to allow the user to press ENTER
to submit their guess. First, go to the Design tab and right-click the “Guess!” button. In the pop-up menu, select Add event handler ▸ action ▸ actionPerformed.
Just like when we created an event handler for btnGuess, Eclipse will automatically add the code to create an action listener for txtGuess, as shown in the following code snippet. And, just like we did before, we’ll add the checkGuess() method inside the braces of the actionPerformed() portion of this code. The only action event we usually want to handle from inside a text field is the user pressing the ENTER key.
txtGuess.addActionListener(new ActionListener() {
public void actionPerformed(ActionEvent e) {
checkGuess();
}
});
After you add this line, save the file and run it again. Now when we press the ENTER key, it activates the checkGuess() method. The “Guess!” button still works, so the user has their choice of interacting only by keyboard or with their mouse.
Automatically Removing Old Guesses
Now let’s solve the issue of having to click back into the text field to delete our old guesses. To address this, we’ll need to learn a couple of new methods for working with JTextField objects like txtGuess.
First we have to consider when we want text to be selected. For the guessing game, after the user’s guess is evaluated is probably the right time to enable the user to guess again. In the code, this would be at the end of the checkGuess() method, as we want it to occur after the user has made one guess and is ready to make another.
So, we know we need to add code inside the end of the checkGuess() method to place the cursor back into the txtGuess text field and select the text from the user’s previous guess. But how do we know which commands would place the cursor in the text field and select all the text? This is a great time to use the content assist feature in Eclipse. Type the name of the object, txtGuess, followed by the dot operator (.), and Eclipse will display a list of available methods, as shown in Figure 3-21.

Figure 3-21: The content assist feature displays all the methods available for the JTextField txtGuess.
You’ll see that there are dozens of methods available for working with JTextFields like txtGuess, but the one we’re looking for is requestFocus(). The documentation for this function says, “Requests that this Component gets the input focus.” The focus in this case is the cursor. This method will do exactly what we want and request that the cursor be placed back in the text field every time the user guesses again.
Finally, we want to select all the text from the user’s previous guess so that their new guess will replace the old one automatically. To select all the text in a text field, use the selectAll() method, which is also listed in Eclipse’s content assist feature suggestions. Add both these lines to the end of the checkGuess() method, right after the line for lblOutput.setText(message); and right before the closing brace:
lblOutput.setText(message);
txtGuess.requestFocus();
txtGuess.selectAll();
}
Now is a good time to save your application. When you try running the game again, you should feel a much smoother, more intuitive user experience. The guessing game finally has an elegant, easy-to-use GUI that provides a simple UX. Our game is easy to play, but a challenge to master. It’s just like the games that we play for fun, but we’ve built this one from scratch, using Java and the Swing toolkit for a professional appearance.
Now, we have a great app all around, except for one important thing: security. You may ask, “What? Security? I thought we were just building a fun GUI game!” And that’s true—the program works beautifully, but only as long as the user enters their numbers correctly.
What happens if the user’s fingers slip and they press ENTER or click the “Guess!” button before they’ve typed their guess? What if they enter any noninteger text, like blah, as a guess? Figure 3-22 shows what happens in Eclipse when the user enters bad input.

Figure 3-22: Bad things happen when the user enters bad data, like blah, in the text field.
As you can see, our console window is now filled with errors. The bad input resulted in an exception—an unexpected or faulty programming situation. The first line of output in Figure 3-22 tells us there was a NumberFormatException because the string "blah" is not recognized as a number. You’ll need to learn how to handle exceptions in the programs you create.
Handling Bad User Input
Java provides a safe way of anticipating and dealing with exceptions, the bad things that can happen when a program runs. In addition to bad user input like we just discussed, exceptions can include missing files (a file gets deleted, or you remove a USB drive unexpectedly) or network problems (such as a missing connection or a bad server).
We call the code built for dealing with exceptions an exception handler. An exception handler deals with exceptional situations. But how do we know when an exception might occur? Do we have to predict everything bad that could happen when a program is running?
Many of the situations in which errors could occur are particular types of events, like user input, file input/output, or network access. For example, think about the exceptions we listed previously. Bad user input could happen any time we ask the user for input of a certain type. A missing file could be a problem whenever we’re reading or writing files; for example, when viewing and saving pictures from a photo app. If we can anticipate possible exceptions and write exception handlers to deal with those exceptions, our code will be safer, more secure from malicious hackers who might want to crash your program by entering bad input, and more reliable.
In the case of the guessing game, the exception occurred when we asked the user for a number, but they entered text instead. Specifically, the exception was triggered when we tried to parse an integer out of a string that didn’t contain an integer. User input is a common source of exceptions, both accidental and intentional. An example of the latter is a hacker trying to break your program.
Java gives us a clean way of handling exceptions with the try-catch statement. The idea of a try-catch block is that we want the program to try to do something that we know might cause an exception and catch, or handle, the exception that might occur rather than allowing it to break the program. The catch block executes only when an exception happens.
The last part of a try-catch is the optional finally block. In a try-catch-finally statement, the finally block will always execute if it’s provided, regardless of whether there’s an exception. If there’s no exception, the finally block will still run after the try block finishes. If an exception occurs, the finally block will run after the catch block has completed.
The format of a try-catch typically looks something like this (don’t type this into your code; this is just an example of the format):
try {
// Something that could cause an exception, like getting bad input
} catch (Exception e) {
// Handle or recover from the exception, like asking for good input
} finally {
// Any wrap-up code; this will always run last, exception or not
}
Notice we group statements for each part of the try-catch-finally statement with braces, just like we do for if-else and loop statements. The catch part requires an Exception parameter; this can be a specific exception, like NumberFormatException, or we can use the base class Exception. This parameter will receive information about the Exception, like what line number the exception occurred on.
To place the try-catch-finally blocks correctly in our game’s code, we need to think about where the exception might occur (and wrap that code inside a try block), what we want to do if there is an exception (and put that in a catch block), and what we want to do after either the try or catch block finishes (this part goes inside the finally block).
Because the user input problem occurred when we tried to parse an integer out of text the user entered, we want to wrap that code in a try block. Let’s put the try keyword and an opening brace right before the line that parses the integer out of the text:
public void checkGuess() {
String guessText = txtGuess.getText();
String message = "";
try {
int guess = Integer.parseInt(guessText);
if (guess < theNumber)
If the user didn’t enter a number, we can’t test for too high or too low, so the try clause will go all the way to the end of this pair of if-else statements. Place a closing brace for the try block after the closing brace for the else statement, as shown in the following listing. The catch keyword should go next. In this game, if a user enters bad input, we just want to ask them to enter a whole number between 1 and 100. We can do that with the message string that gets displayed in lblOutput later. So, the catch block should look like this:
else {
message = guess +
" is correct. You win! Let's play again!";
newGame();
}
} catch (Exception e) {
message = "Enter a whole number between 1 and 100.";
}
The last step we want to take, whether there was an exception or not, is to show the output message, request the focus for the text field, and select all the text to prepare for the next entry. These three statements will go into the finally block, after the closing brace of the catch statement we just added:
} finally {
lblOutput.setText(message);
txtGuess.requestFocus();
txtGuess.selectAll();
}
}
public void newGame() {
You may notice that the statements inside each of the try-catch-finally blocks are indented to make the code easier to read. Remember, there’s a shortcut in Eclipse that will automatically indent everything correctly after you’ve made any changes. Just select all the code, then go to Source ▸ Correct Indentation.
Save your app and run it a few times to test the user interface. Test a few nonintegers to make sure the exception handling works the way it’s supposed to. If you run into errors that prevent the file from compiling, check your braces. Whenever we add blocks around existing code, braces are the first place to check for errors. Once your try-catch-finally statements are in place, you’ve got a more reliable, more predictable, and safer version of the GUI guessing game app.
Safe programming isn’t just a nice touch—it’s often a critical part of writing good software. For our guessing game, the consequences of bad code don’t seem dire. But think about the code running on a medical device, a satellite, a car, an airplane, or the power grid that delivers electricity to your home and city. Secure code is vital to our safety and security. And even a small game or app running unsecure code on your smartphone could expose your data to hackers. Safe programming is always a smart practice.
What You Learned
In the GUI version of the guessing game app, we’ve grown our Java skills to include all the following:
• Creating GUI windows by importing the javax.swing package
• Setting up a GUI app in Eclipse
• Designing a GUI with the WindowBuilder Editor
• Using the Properties pane to change GUI component properties
• Naming GUI components consistently for easy use in Java code
• Connecting GUI elements to Java variables and programming code
• Getting user text from a JTextField and using it in a program
• Listening for user events, like button clicks
• Improving the user experience, or UX, by testing the app with the user in mind
• Handling exceptions with try-catch-finally
Programming Challenges
Try these challenges to review and practice what you’ve learned and to expand your programming skills by trying something new. If you get stuck, visit https://www.nostarch.com/learnjava/ for sample solutions.
#1: Showing Users How Many Tries They Took
Try changing the winning message to tell the user how many tries they took when they win, as in the following:
62 is correct! You win after 7 tries!
To accomplish this task, you’ll need to create a new variable (like numberOfTries) to store how many times the user guessed, add to the number of tries every time the checkGuess() method runs successfully, and display the number of tries to the user when they win.
As an alternative version, you could begin the game with seven or eight tries and then subtract a try every time the user guesses. When the last guess has been used, you could tell the user they lost, show them what the correct number was, and start a new game. Give it a shot!
#2: Showing and Hiding a Play Again Button
When we built the GUI for this chapter’s guessing game, we decided not to include a Play Again button because it would have cluttered the interface when it wasn’t in use and it would really only be needed at the end of the game. As it turns out, we can hide a GUI component with the setVisible(false) method. Then we can show it again with setVisible(true), just as we did with our JFrame.
First, we could add a Play Again button, called btnPlayAgain, to the GUI layout. In the code after the button is created, we could call btnPlayAgain .setVisible(false) to hide the button. In the winning else statement in checkGuess(), we could call btnPlayAgain.setVisible(true) to show the button instead of starting a new game. Once you’ve written that code, remember to double-click the button in the GUI preview to add an event listener, call newGame() in that listener, and then hide the button again.
One important note before you start: unlike with the other button (btnGuess), you need to change the the visible property to hide and show the button from several places in the code. As with txtGuess and lblOutput, you’ll need to declare private JButton btnPlayAgain at the top of the class, but make sure not to redeclare the button in the code below it.
When you get it working, the game should start with the Play Again button hidden, and the button should appear when you win the game. When you click the button, a new game will start, and the button will disappear again. Play the game with the button, and if you think of any other improvements for the UX, go ahead and try them!
#3: Creating a GUI MadLib
Look back at the MadLibs.java program you built in Chapter 2 (Programming Challenge #3 on page 41) and create a new MadLibGUI.java app that prompts the user for several words in a graphical user interface with labels and text fields, like txtColor, txtPastTenseVerb, txtAdjective, and txtNoun. Add a button that the user can press to generate a MadLibs-style story.
Explore and play around with several more properties of the GUI elements in the WindowBuilder Editor, including background colors, fonts, initial text values, and more. When the user clicks the button, the program should display the completed MadLibs story in a JLabel or a JTextArea, as shown in Figure 3-23.
