
5
POLISHING YOUR APP BY ADDING MENUS AND PREFERENCES

You’ve written a fun Android app, but it’s still missing a few things. You haven’t learned how to build a settings or options menu in Android or how to save high scores, game stats, and other information. In this chapter, we’ll add an options menu to our Hi-Lo guessing game app and the capability to store information.
Adding an Options Menu in Android
Most apps and games have options or settings that the user can access through a menu. For the Hi-Lo guessing game, we might want to allow the user to change the game’s difficulty level, start over, see their game stats, or view an About screen, so we’ll create a menu that can perform all of these actions.
There are four general steps to adding an options menu in Android:
1. Edit the app’s default XML menu file to create items that will serve as the options the user can select.
2. Modify the app’s activity file to display the menu and options that we created in the previous step.
3. Create an event handler to determine when the user selects an option.
4. Write the code to execute for each option when the user selects it.
Adding the options menu not only will make our app look and feel more professional but will also give the user greater control over their gaming experience. My sons loved being able to change the range of the guessing game from 1 to 10, then 1 to 100, then 1 to 1,000, but when we added the Game Stats option that displays the number of games won, I almost couldn’t get my device back from them—they wanted to keep running the number higher and higher! I hope you’ll find these extra features as fun (and maybe as addictive) as they did.
Adding Items to the Menu’s XML File
Open your Hi-Lo guessing game project in Android Studio and, in the Project Explorer pane, change the view at the top left to Android. Then, open the default menu file by expanding app ▸ res ▸ menu and double-clicking menu_main.xml.
Change the XML code in your menu_main.xml file to match the following listing:
<menu xmlns:android="http://schemas.android.com/apk/res/android">
<item
android:id="@+id/action_settings"
android:title="Settings" />
<item
android:id="@+id/action_newgame"
android:title="New Game" />
<item
android:id="@+id/action_gamestats"
android:title="Game Stats" />
<item
android:id="@+id/action_about"
android:title="About" />
</menu>
The <menu> tag creates a menu resource using the XML namespace for Android XML documents, identified by the uniform resource identifier (URI) http://schemas.android.com/apk/res/android. We can use XML to store or display everything from web pages to databases by connecting XML tags to those elements. The xmlns (XML namespace) attribute in this code selects the main Android namespace so that the tags in this XML file will refer to common elements in an Android application. So, the <menu> tag refers to an Android menu, and each <item> tag describes an item or entry in that menu with attributes. This menu will have the four options Settings, New Game, Game Stats, and About, so we add four <item> tags. We assign those names to each item’s title attribute, which determines the text displayed for each option when the user opens the menu. We’ll use the id attribute later in our code to determine which option the user has selected.
Save the menu_main.xml file. Now it’s time to display our options menu in the Hi-Lo guessing game app.
Displaying the Options Menu
We’ve set up the menu, but in order to display it, we need to add some Java code to our app’s MainActivity.java file. Open MainActivity.java in the Project Explorer pane under app ▸ java ▸ com.yourdomain.GuessingGame.
Near the middle or bottom of the MainActivity class, you should find a method called onCreateOptionsMenu(). Modify it to match the code snippet below. (If your code doesn’t have the onCreateOptionsMenu() method, add the following code after the closing brace of onCreate() but before the final closing brace for MainActivity.)
public boolean onCreateOptionsMenu(Menu menu) {
MenuInflater inflater = getMenuInflater();
inflater.inflate(R.menu.menu_main, menu);
return true;
}
} // Final closing brace of the MainActivity.java file
The onCreateOptionsMenu() method does exactly what its name implies—it tells Android what to do when creating the options menu for our app. In this case, we tell Android we want to expand the menu_main.xml file to serve as our options menu. The menu_main.xml file isn’t a menu yet, so we need to convert it into a menu using a class called a MenuInflator. We’ll create a MenuInflator instance, which we call inflater, by using the getMenuInflator() method. Once we have inflater, we call the inflate() method and pass it the XML file (R.menu.menu_main) and the menu we want the XML file’s items to inflate into (menu). You may need to press ALT-ENTER (on macOS, OPTION-ENTER) to correct any missing import statements as you add the code to your file.
After making this change, save and run the app. Android lets you know there’s an options menu available by displaying the three dots in the action bar of your app (see Figure 5-1, top). Clicking the dots will display the options menu (see Figure 5-1, bottom).
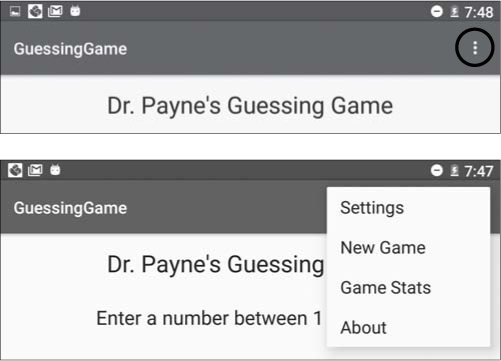
Figure 5-1: The options menu shows up as three dots in the app’s action bar (top). Clicking the three dots will expand the options menu (bottom).
You’ll notice that clicking the options doesn’t do anything yet because we haven’t added the code to respond to user selections. We’ll do that next.
Responding to User Selections
When the user chooses an option from the menu, we want our app to perform the requested action. In order for our app to do that, we need to add an event handler that keeps track of which option was selected. We’ll use the id attribute associated with each item to tell selections apart.
In the MainActivity.java file, find and modify the onOptionsItemSelected() event handler method. Alternatively, you can add it right below the method onCreateOptionsMenu() that we modified in the previous section, but before the closing brace on the final line of the file.
public boolean onCreateOptionsMenu(Menu menu) {
MenuInflater inflater = getMenuInflater();
inflater.inflate(R.menu.menu_main, menu);
return true;
}
public boolean onOptionsItemSelected(MenuItem item) {
switch (item.getItemId()) {
case R.id.action_settings:
return true;
case R.id.action_newgame:
newGame();
return true;
case R.id.action_gamestats:
return true;
case R.id.action_about:
return true;
default:
return super.onOptionsItemSelected(item);
}
}
}
In this code, we use a switch statement to determine which of the options the user selected on the menu. A switch statement is another way of testing multiple conditions, similar to a long chain of if-else statements. Rather than chaining four if-else statements to test for each possible menu item selection, though, we can use a single switch statement, with the variable we’re testing inside parentheses after the switch keyword. In this example, we’re checking the id of the menu item the user selected, so we use switch (item.getItemId()). Then, inside the braces for the switch statement, we list the values we want to test as case statements (e.g., case R.id.action_settings), each of which is followed by a colon (:), the code to run for that selection, and either a break or return statement. This event handler returns a Boolean value, so we’ve used return statements instead of break statements in each case block. If we didn’t have return statements here, we would need to use a break command as the final statement of each case.
Each case statement in this code tests for one of the id values of the items we entered in the menu_main.xml file, and the code for each value will execute in response to the user’s selection. Right now, we have code only for the action_newgame case, which starts a new game using the newGame() method. The other cases require writing a bit more code, so we’ll define those one at a time.
Creating an Alert Dialog Pop-up for the About Screen
For the About menu option, we’ll pop up a dialog window similar to other applications you’ve likely seen. To do this, we’ll use an alert dialog, a flexible pop-up used to inform the user about something or to prompt them for a response. This kind of pop-up is more adaptable than the Toast pop-up we used in Chapter 4 (Programming Challenge #1 on page 106), because the AlertDialog class allows us to customize the properties of our dialog through the Builder subclass. In this case, we’ll use an alert dialog to respond to the user selecting the About option with a message telling them who created the awesome Hi-Lo guessing game they’ve been playing.
Add the following code to the case statement for the action_about item selection:
case R.id.action_about:
➊ AlertDialog aboutDialog = new AlertDialog.Builder(MainActivity.this).create();
➋ aboutDialog.setTitle("About Guessing Game");
➌ aboutDialog.setMessage("(c)2018 Your Name.");
➍ aboutDialog.setButton(AlertDialog.BUTTON_NEUTRAL, "OK",
new DialogInterface.OnClickListener() {
public void onClick(DialogInterface dialog, int which) {
➎ dialog.dismiss();
}
});
➏ aboutDialog.show();
return true;
We use the AlertDialog.Builder class ➊ to create a customized popup window. The code at ➋ sets the title of the pop-up window to "About Guessing Game", and the line at ➌ displays a simple message with copyright information and your name (though you can write any text you’d like here). The setButton() method ➍ adds a button to the pop-up with the text "OK", and the subsequent onClick() event listener closes the pop-up whenever the user clicks the OK button by calling the dismiss() method ➎. Finally, the customized pop-up is shown with the show() command ➏.
Use ALT-ENTER (or OPTION-ENTER) to import the AlertDialog class. Then save your updated code and run the new version of the app. When you click the options menu and select the About option, you should see a pop-up window like the one in Figure 5-2.

Figure 5-2: A custom alert dialog pop-up
The Hi-Lo guessing game app is beginning to feel even more like a professional Android app! Now let’s knock it out of the park by allowing the user to choose the difficulty level of the game and to keep track of how many games they’ve won.
Changing the Guessing Range
Letting the user choose the guessing range—say, from 1 to 10, 1 to 100, or 1 to 1,000—would be a huge enhancement. Now that you understand option menus and alert dialogs, let’s map out how we might upgrade the game to allow the user to change the range setting.
First, we’ll need to add a variable for the range so that instead of using a hardcoded value of 100, we’ll use the user’s chosen range. Second, we’ll need to modify the app’s behavior in a couple of ways. We’ll change the newGame() method to use the new range variable. We’ll also make the TextView that currently reads, "Enter a number between 1 and 100:" display a different prompt depending on the range selected. Finally, we’ll need to give the user a method of choosing the range. We’ll do this by building another custom alert dialog with the three range selections: 1 to 10, 1 to 100, and 1 to 1,000.
Adding a Variable for the Range
First, we’ll replace the hardcoded value of 100 we use in the random number calculation with a variable. At the top of the MainActivity class, add a variable for the range and set it to a default value of 100:
public class MainActivity extends AppCompatActivity {
private EditText txtGuess;
private Button btnGuess;
private TextView lblOutput;
private int theNumber;
private int range = 100;
While we’re adding variables, let’s also add a second TextView for the label that reads, "Enter a number between 1 and 100:". When the user selects a range other than 1 to 100, this label will no longer be correct, so we need a variable to store the appropriate text to display. We’ll create the variable called lblRange to do this:
private int range = 100;
private TextView lblRange;
To wire up the GUI to the lblRange variable, add the following line of code to the
onCreate() method:
protected void onCreate(Bundle savedInstanceState) {
super.onCreate(savedInstanceState);
setContentView(R.layout.activity_main);
txtGuess = (EditText) findViewById(R.id.txtGuess);
btnGuess = (Button) findViewById(R.id.btnGuess);
lblOutput = (TextView) findViewById(R.id.lblOutput);
lblRange = (TextView) findViewById(R.id.textView2);
If you get an error, check the name of your prompt’s TextView in the design view: open app ▸ res ▸ layout ▸ content_main.xml and click the label reading "Enter a number between 1 and 100:". Change the label’s id property to textView2.
With the range and lblRange variables set up, it’s time to modify the behavior of the app to use these variables instead of hardcoded values.
Using the range Variable
First, let’s modify the newGame() method to use the range variable. Let’s also add the code needed to change the prompt to let the user know the correct range to guess from:
public void newGame() {
theNumber = (int)(Math.random() * range + 1);
lblRange.setText("Enter a number between 1 and " + range + ".");
txtGuess.setText("" + range/2);
txtGuess.requestFocus();
txtGuess.selectAll();
}
In addition to using range to set the random number correctly, we’ve changed the lblRange prompt to use the range variable as well. The last three lines are a finishing touch—I’ve taken the liberty of entering a default starting value in the txtGuess text box, one half of the range. So, if the user is guessing between 1 and 10, the guessing text field will show 5 as a default first guess; if the range is 1,000, the text field will recommend 500 for the first guess.
One last range-related change is found in the checkGuess() method. We added a try-catch statement to handle bad user input, and in the catch statement, we tell the user to enter a valid whole number in the range from 1 to 100. Let’s change just the catch statement to reflect the user’s selected range:
public void checkGuess() {
--snip--
}
} catch (Exception e) {
message = "Enter a whole number between 1 and " + range + ".";
} finally {
--snip--
}
}
Now both TextView labels will display the user’s selected range correctly. It’s time to build the alert dialog to allow the user to select the difficulty level of their game.
Building the Dialog to Allow the User to Select the Range
The range settings dialog should display all the range options (1 to 10, 1 to 100, and 1 to 1,000) to the user whenever they select the Settings option in the menu. To display the list of options, we’ll build another customized alert dialog, but this one will display a list view of the three range options.
First, scroll back down to your onOptionsItemSelected() method and add the following code inside the case statement for action_settings:
public boolean onOptionsItemSelected(MenuItem item) {
switch (item.getItemId()) {
case R.id.action_settings:
final CharSequence[] items = {"1 to 10", "1 to 100", "1 to 1000"};
AlertDialog.Builder builder = new AlertDialog.Builder(this);
builder.setTitle("Select the Range:");
builder.setItems(items, null);
AlertDialog alert = builder.create();
alert.show();
return true;
These six lines of code will display an alert dialog with a list view of the three options for the guessing range, but we need to add just a bit more code to handle the user’s selection. The builder.setItems() method will accept both a list of items and an event listener to handle the user’s choice from the list.
If the user selects the first option, we need to change the value of the range variable to 10, and likewise for the second and third options to 100 and 1000, respectively. The code for the event listener goes inside the builder.setItems() statement:
case R.id.action_settings:
final CharSequence[] items = {"1 to 10", "1 to 100", "1 to 1000"};
AlertDialog.Builder builder = new AlertDialog.Builder(this);
builder.setTitle("Select the Range:");
builder.setItems(items, new DialogInterface.OnClickListener() {
public void onClick(DialogInterface dialog, int item) {
switch(item) {
case 0:
range = 10;
newGame();
break;
case 1:
range = 100;
newGame();
break;
case 2:
range = 1000;
newGame();
break;
}
dialog.dismiss();
}
});
AlertDialog alert = builder.create();
alert.show();
return true;
Notice that after we set the new range for each item selection, we call newGame() to create a new random number in that range and to change the prompt on the user’s screen to reflect the new range.
Save the file after making these changes and run the game to test the new options. Change the range from 1 to 10 and guess a few rounds, then go back to 1 to 100, and if you’re brave, go for 1 to 1,000.
Close the app and open it again, however, and you’ll notice that the game doesn’t remember your preferred range when it’s run a second time. The app also doesn’t remember how awesome you are at guessing the correct number. If only there were a way to have the app remember your preferred range and the number of games you’ve won. . . .
Storing User Preferences and Game Stats
The key to remembering user preferences and game statistics from one session to another is the ability to save persistent information to your Android device. Persistent information is any data that remains on the device after the app is closed. In the Hi-Lo guessing game, we want to store the user’s preferred difficulty level and the number of games they’ve won as persistent information.
There are three ways to save persistent data to your Android device: storing shared preferences, saving files, and saving data in a database. Shared preferences are a type of object that stores a relatively short list of settings that your app needs to save for the next time you use the app. They’re called shared preferences because you can share the settings across several activities or screens in your app, such as an options menu and the main game screen in the guessing game. Saving a file to the device is useful when you need to store a large amount of data, such as a text document, and databases are necessary for apps such as an address book or contacts list. But for the guessing game, we just need to store a few numbers, so we’ll use shared preferences.
Storing and Retrieving the User’s Preferred Range
Shared preferences are stored as sets of key/value pairs where each value has an associated key that is used to retrieve it. For example, you could have a pair like "range" and "100", where "range" is the key and "100" is the value we’re storing under that key. Let’s write a method to store the user’s preferred range to shared preferences.
Near the bottom of your MainActivity.java file, add the following method after the onOptionsItemSelected() method and just before the closing brace:
default:
return super.onOptionsItemSelected(item);
}
}
public void storeRange(int newRange) {
SharedPreferences preferences =
PreferenceManager.getDefaultSharedPreferences(this);
SharedPreferences.Editor editor = preferences.edit();
editor.putInt("range", newRange);
editor.apply();
}
}
There is already a default shared preferences object for every app you make, which you can access by creating a SharedPreferences object to connect to it. To do this, access the default object by calling getDefaultSharedPreferences() on the PreferenceManager object that creates and maintains lists of shared preferences. Remember to import as you go, or press ALT-ENTER (or OPTION-ENTER).
To write to shared preferences, we must use an Editor object, which allows us to edit individual shared preference values. To store a specific key/value pair, we use a put method, such as putString to store a string value, putInt to store an integer, putFloat to store a floating-point decimal value, putBoolean to store a true/false value, and so on. Every time the user selects a new range, we’ll pass the range variable to the storeRange() method as newRange. In order to store newRange under the "range" key, we use editor .putInt("range", newRange); to store the user’s new range value (10, 100, or 1,000) under the shared preferences key name "range". The apply() method tells Android you’re finished modifying the shared preferences values, and it can apply the changes.
Now that we can store the range to shared preferences, we need to add the storeRange() function to each case the user can select in the event listener in the onOptionsItemSelected() method:
public boolean onOptionsItemSelected(MenuItem item) {
switch (item.getItemId()) {
case R.id.action_settings:
final CharSequence[] items = {"1 to 10", "1 to 100", "1 to 1000"};
AlertDialog.Builder builder = new AlertDialog.Builder(this);
builder.setTitle("Select the Range:");
builder.setItems(items, new DialogInterface.OnClickListener() {
public void onClick(DialogInterface dialog, int item) {
switch(item) {
case 0:
range = 10;
storeRange(10);
newGame();
break;
case 1:
range = 100;
storeRange(100);
newGame();
break;
case 2:
range = 1000;
storeRange(1000);
newGame();
break;
}
dialog.dismiss();
}
});
AlertDialog alert = builder.create();
alert.show();
return true;
Finally, we need to retrieve the range when the game loads so that the user’s last selected range will be the range the game uses the next time it runs. Scroll up to the onCreate() method and add the following two lines to retrieve the range from shared preferences:
protected void onCreate(Bundle savedInstanceState) {
super.onCreate(savedInstanceState);
setContentView(R.layout.activity_main);
txtGuess = (EditText) findViewById(R.id.txtGuess);
btnGuess = (Button) findViewById(R.id.btnGuess);
lblOutput = (TextView) findViewById(R.id.lblOutput);
lblRange = (TextView) findViewById(R.id.textView2);
SharedPreferences preferences =
PreferenceManager.getDefaultSharedPreferences(this);
range = preferences.getInt("range", 100);
newGame();
Notice that we’ve retrieved the shared preferences before we call the newGame() method to ensure that the user gets the range they last used whenever the app starts over. The getInt() method looks for the value stored in the key "range", but if it doesn’t find a value, the second parameter tells it to default to 100. We do this so that range has a value the first time the user runs the app.
Save the file, build, and run it. This time, choose a different range and then close the app entirely. The same range will be waiting for you the next time you start the app!
Storing the Number of Games Won
High scores, leaderboards, winning streaks—anything that records our accomplishments tends to make us want to try harder, play longer, and beat the record. One finishing touch we’ll add to the game is the ability to track the number of games won. Once again, we can easily store these stats as shared preferences.
When the user wins a round of the game by guessing the correct number, we can use a shared preference to retrieve the number of games they’ve won, add 1 to it, and store the new value. Add this code to your checkGuess() method, putting it inside the else statement for a winning guess:
public void checkGuess() {
String guessText = txtGuess.getText().toString();
String message = "";
try {
int guess = Integer.parseInt(guessText);
if (guess < theNumber)
message = guess + " is too low. Try again.";
else if (guess > theNumber)
message = guess + " is too high. Try again.";
else {
message = guess +
" is correct. You win! Let's play again!";
➊ SharedPreferences preferences =
PreferenceManager.getDefaultSharedPreferences(this);
➋ int gamesWon = preferences.getInt("gamesWon", 0) + 1;
➌ SharedPreferences.Editor editor = preferences.edit();
➍ editor.putInt("gamesWon", gamesWon);
➎ editor.apply();
newGame();
}
Here, we’ve accessed the default SharedPreferences at ➊, and at ➋, we’ve retrieved the value stored under the key name "gamesWon" (with a default of 0 if this is the first time the user has won) and added 1 to account for this win. At ➌, we create an editor to write a new value to shared preferences. At ➍, we put the integer value gamesWon into shared preferences under the corresponding key name for later use, and at ➎, we tell Android to write the changes to the device.
That takes care of storing the number of games won, but how about displaying those stats to the user? To do that, we’ll need to add code for the action_gamestats case in the onOptionsItemSelected() method, as follows:
case R.id.action_gamestats:
➊ SharedPreferences preferences =
PreferenceManager.getDefaultSharedPreferences(this);
➋ int gamesWon = preferences.getInt("gamesWon", 0);
➌ AlertDialog statDialog = new AlertDialog.Builder(MainActivity.this).create();
statDialog.setTitle("Guessing Game Stats");
➍ statDialog.setMessage("You have won "+gamesWon+" games. Way to go!");
statDialog.setButton(AlertDialog.BUTTON_NEUTRAL, "OK",
new DialogInterface.OnClickListener() {
public void onClick(DialogInterface dialog, int which) {
dialog.dismiss();
}
});
statDialog.show();
return true;
At ➊, we connect to the app’s default shared preferences, and at ➋, we retrieve the number of games won (which we give a default value of 0 in case this is the first run of the program). At ➌, we build an alert dialog to show the user the number of games they’ve won, and at ➍, we display the number along with an encouraging message.
Save that final change and then build and run your app. Your last challenge may be trying to stop playing! Figure 5-3 shows how the Game Stats screen may look if you have a couple of math whizzes playing your game.

Figure 5-3: The Game Stats screen keeps track of the number of times you (or your friends) have guessed the correct number.
Adding options menus, saving game stats and user preferences, displaying alert dialogs—these are the kinds of finishing touches that can make your game or any other app really stand on its own as a professional-looking, fully functional mobile application. Keep making improvements to your app as you think of new features, and you’ll have an app worth sharing with friends—or with the world. Happy coding!
What You Learned
You’ve built a professional-quality Android mobile game by adding several finishing touches to the Hi-Lo guessing game app, including:
• Adding an options menu to an Android app
• Designing the options menu by editing the menu’s XML file
• Displaying the options menu using a MenuInflater
• Responding to user selections in a menu
• Using a switch statement with multiple case statements to replace long if-else chains
• Creating customized pop-ups in Android with the AlertDialog class
• Storing shared preferences and app statistics using the SharedPreferences class
• Retrieving the user’s shared preferences when an app starts
Programming Challenges
Try these programming challenge exercises to review and practice what you’ve learned and to expand your programming skills. Visit the book’s website at https://www.nostarch.com/learnjava/ to download sample solutions.
#1: You Win Some, You Lose Some
Programming Challenge #1 in Chapter 4 (page 106) asked you to give the user seven tries to guess a number between 1 and 100. Now that you’ve added the ability to change the range, you need to change the number of tries to match.
You learned in Chapter 4 that we could guess a number between 1 and 100 using a binary search strategy (guessing in the middle of the remaining possible values each time) because 27, or two to the seventh power, is equal to 128. This means that we should be able to guess a number between 1 and 128 in seven guesses every time using the binary search method. But how many guesses do we need to get a number between 1 and 10, or 1 and 1,000?
To figure out the number of tries needed, we need to know the lowest exponent we can raise 2 to that will give us a number greater than the range. For example, for a number between 1 and 10, 24 = 16, and 16 > 10, so we need up to four guesses for that range; for a range from 1 to 1,000, 210 = 1,024, so we need 10 guesses.
To find the exponent to which you need to raise a number to be equal to another number, you can use logarithms. A logarithm takes a number and a base to find the exponent the base should be raised to in order to result in the given number. Java has a Math.log() method that will take a number and find the exponent for base 10. When you divide the logarithm of one number by the logarithm of another number in base 10, the result is the same as taking the logarithm of the first number with the second number as a base. This means that dividing Math.log(range) by Math.log(2) will tell you what power of 2 will give you range. Because exponents can be decimals and you don’t want the user to have a noninteger number of guesses, like 7.25, you’ll need to also round up and cast the result into an int. To find the exponent for the number of guesses needed for each range, you can use the expression (int)(Math.log(range)/Math.log(2)+1).
Modify the Hi-Lo guessing game to adapt the maximum number of guesses to suit the range the user selects, both when the game starts and whenever the user selects a new range in the options menu. For example, you could create a variable called maxTries to use in place of the hardcoded number 7 when testing whether your user has run out of tries.
#2: Ratio of Wins to Losses
After completing Programming Challenge #1, modify the Hi-Lo guessing game app to store both the number of games won and lost. Modify the game stats menu code to retrieve both numbers and show the number of games won, the total number of games played, and the winning percentage (games won divided by total games played, multiplied by 100). Figure 5-4 shows an example.

Figure 5-4: The Game Stats screen showing the percentage of games won