
7
CREATING ADVANCED GUIs AND SHARING YOUR APP

For the GUI desktop version of the Secret Messages app, we’re going to provide two large text areas that allow the user to copy and paste long messages in the GUI interface. By the end of the chapter, we’ll add a slider for key selection like the one shown in Figure 7-1, which will make cracking Caesar ciphers very easy, even when the key is unknown!

Figure 7-1: The Secret Messages encoder/decoder app we’ll build in this chapter
This version of the app is more user-friendly than the console-based app, and we’ll be able to reuse some code from Chapter 6 because the algorithm for encoding and decoding messages is the same.
Setting Up the Secret Messages GUI App Project
Open Eclipse and create a new Java project by going to File ▸ New ▸ Java Project. Name the project SecretMessagesGUI and then click Finish. Close any open files and expand the SecretMessagesGUI project folder in the Package Explorer pane to find the src folder. Right-click the src folder and select New ▸ Class to create a new Java source code file. Name this SecretMessagesGUI as well.
We’re going to use the Swing toolkit again, so in the New Java Class dialog, change the superclass to javax.swing.JFrame and select the checkbox to create a main() method.
Click Finish, and you’ll see some familiar skeleton code for the SecretMessagesGUI.java file. Right-click the SecretMessagesGUI.java file in the Package Explorer and select Open With ▸ WindowBuilder Editor to begin creating the GUI interface for the Secret Messages app.
Designing the GUI and Naming Components
Open the WindowBuilder Editor’s Design tab. Expand the javax.swing.JFrame component in the Components pane and select getContentPane(). Now go to the Properties pane and change the Layout property to Absolute layout, as shown in Figure 7-2. This will allow us to position components with pixel-perfect accuracy.

Figure 7-2: Change the Layout property to Absolute layout before placing any GUI components.
Next, in the Components pane, click javax.swing.JFrame. Then, in the Properties pane, set the defaultCloseOperation to EXIT_ON_CLOSE. Also, change the title property to Your Name's Secret Message App, as shown in Figure 7-3.

Figure 7-3: Change the defaultCloseOperation and title properties to customize the app.
Next, let’s give ourselves some room to build a slightly larger GUI interface so we can encode and decode longer messages. With javax.swing.JFrame still selected in the Components pane, click the outside border of the window in the design preview. Click the small black resize box at the lower-right corner of the window, and drag down and to the right to resize the frame to 600 by 400 pixels, as shown in Figure 7-4.

Figure 7-4: Resize the JFrame to hold bigger messages.
Now we’re ready to begin placing the GUI interface components. For the GUI version of the app, we want to be able to encode and decode long messages, so the first component we’ll place is a JTextArea. Like a JTextField, text areas allow you to enter text, but a JTextArea can hold, display, and even wrap several lines of text.
To insert the first JTextArea for the user to input a message, under Components in the Palette, click JTextArea. Then place it near the top of the JFrame in the design preview. Click and drag to draw a JTextArea approximately one-third of the height of the content pane, with a small margin between the JTextArea and the edge of the frame. The JTextArea should be approximately 564 pixels wide by 140 pixels tall. Then, in the Properties pane, change the Variable property to txtIn.
To create the second JTextArea for the outputted message, right-click txtIn in the Preview pane, select Copy, right-click the content pane, and select Paste. Place the new JTextArea near the bottom edge of the frame. To name the new JTextArea, change the Variable property to txtOut. You should end up with two JTextArea components, as shown in Figure 7-5.

Figure 7-5: Copy and paste txtIn to create a second JTextArea and name it txtOut.
Next, let’s add a text field for the encryption key value. Click JTextField in the Palette pane under Components and then click near the center of the content pane to place the JTextField. Change the JTextField’s Variable property to txtKey and resize it to about half its original size.
Add a JLabel to the left of txtKey, entering Key: as the label’s text property. Set the horizontalAlignment to RIGHT. Finally, add a JButton to the right of txtKey, entering the words Encode/Decode as the button’s text property. Expand the width of the button until it shows all the text. The interface should look like Figure 7-6. To preview the interface without running the app, press the small Test GUI button above the Palette, circled in Figure 7-6.

Figure 7-6: Test the GUI interface by pressing the Test GUI button above the Palette.
Now that you have the user interface set up, it’s time to code the program.
Coding the Secret Messages GUI App
Switch back to the source view by clicking the Source tab on the bottom left of the design view window. You’ll see that Eclipse has added all the GUI code in the SecretMessagesGUI.java file. To connect the GUI to our app, we first need to add the declarations for the two JTextArea variables at the top of the SecretMessagesGUI class. Eclipse knows that JTextField components usually need event handlers for user input, so it places txtKey at the top of the class, but we need to do the same with the two JTextArea components, txtIn and txtOut. Add the two bottom lines shown here:
public class SecretMessagesGUI extends JFrame {
private JTextField txtKey;
private JTextArea txtIn;
private JTextArea txtOut;
After declaring the JTextArea variables at the top of the file, we need to modify the code inside the SecretMessagesGUI() constructor. Delete the variable type JTextArea at the beginning of each of these two lines:
public SecretMessagesGUI() {
setTitle("Dr. Payne's Secret Message App");
setDefaultCloseOperation(JFrame.EXIT_ON_CLOSE);
getContentPane().setLayout(null);
txtIn = new JTextArea(); // Delete "JTextArea" from start of line
txtIn.setBounds(10, 11, 564, 140);
getContentPane().add(txtIn);
txtOut = new JTextArea(); // Delete "JTextArea" from start of line
txtOut.setBounds(10, 210, 564, 140);
getContentPane().add(txtOut);
With these changes, we’re ready to begin writing the method to encode messages whenever the user clicks the Encode/Decode button.
Creating the encode() Method
The encode() method we’ll write is similar to checkGuess() from the Hi-Lo guessing game app in Chapter 3. The checkGuess() method took a string that was the user’s guess, but the method didn’t need to return a value, so it returned void. Unlike checkGuess(), encode() will take a message and an encryption key as values, and instead of returning void, it will return an encoded message.
Methods return values so that the program can use them. We want encode() to take a message and key from the user and then run some code on those values to produce the encoded message, which our program will use as the output for the user. When declaring a method that returns information, we state the return value’s data type before the name of the method. The type of information we want returned from encode() is a String variable. So, encode() will be declared as public String encode().
We need to tell Java what kind of information we want to pass to encode(); this information is known as a method’s parameters. To declare parameters for a method, we place them inside the parentheses following the method name, with the data type first and the name of the parameter second. Multiple parameters are separated by commas. The declaration for the encode() method looks like this:
public String encode( String message, int keyVal )
Let’s add braces for the body and place the encode() method right below the declarations for the two JTextArea variables, above the SecretMessagesGUI() constructor method:
public class SecretMessagesGUI extends JFrame {
private JTextField txtKey;
private JTextArea txtIn;
private JTextArea txtOut;
public String encode( String message, int keyVal ) {
}
public SecretMessagesGUI() {
Eclipse will underline the encode() method in red to let you know you haven’t returned a value, but that’s because we haven’t written the code inside the method body yet. Here we’ll be reusing some of our code from Chapter 6.
Declare a String called output, set it equal to an empty string for now, and add a line to return output as the result of the encode() method using a return statement:
public String encode( String message, int keyVal ) {
String output = "";
return output;
}
Since encode() was declared to return a String value and we’re returning output, which is a String, Eclipse will remove the red underline to let us know we’ve fixed the problem of the missing return value.
Next, we’ll reuse a selection of code from the text-based version of the app for encoding messages. Open the SecretMessages project from Chapter 6 in the Project Explorer pane.
We can copy the code starting at char key and ending at the closing brace of the for loop, right before System.out.println(output); near the end of the program. This is the part of the app that encodes a message using the Caesar cipher algorithm.
Paste the copied code from SecretMessages.java into SecretMessagesGUI.java, inside encode(), between the two lines we just added. The finished encode() method looks like this:
public String encode( String message, int keyVal ) {
String output = "";
char key = (char) keyVal;
for ( int x = 0; x < message.length(); x++ ) {
char input = message.charAt(x);
if (input >= 'A' && input <= 'Z')
{
input += key;
if (input > 'Z')
input -= 26;
if (input < 'A')
input += 26;
}
else if (input >= 'a' && input <= 'z')
{
input += key;
if (input > 'z')
input -= 26;
if (input < 'a')
input += 26;
}
else if (input >= '0' && input <= '9')
{
input += (keyVal % 10);
if (input > '9')
input -= 10;
if (input < '0')
input += 10;
}
output += input;
}
return output;
}
Because we named our variables consistently, we can reuse the Caesar cipher encryption code. Consistent naming is a good habit, and well-written code in Java can be reused across multiple platforms.
Writing the Event Handler for the Encode/Decode Button
We want the user to provide both the input message and the key value that we’ll pass along to encode() in the GUI interface, and we want the output message to be returned when the user presses the Encode/Decode button, so let’s write the code to handle the button click event.
Switch to the design view in SecretMessagesGUI.java and double-click the Encode/Decode button. Eclipse will switch back to the source view and insert the code for the actionPerformed() event handler for the Encode/Decode button, like the code snippet shown here:
JButton btnEncodedecode = new JButton("Encode/Decode");
btnEncodedecode.addActionListener(new ActionListener() {
public void actionPerformed(ActionEvent arg0) {
}
});
This is an anonymous inner class, like the one we first encountered in Chapter 3. All we have to add is the code inside actionPerformed() to tell Java how the button should behave when it’s clicked.
We want the Encode/Decode button to perform the following steps:
1. Get the input message from txtIn.
2. Get the key from txtKey.
3. Encode the message using the key.
4. Show the output message in txtOut.
Think about how we might accomplish each of those steps. Try it yourself before reading further and then read below to see how my solution compares.
For the first step, we can set up a String called message that gets the text from the txtIn field. Just like a JTextField, a JTextArea has a getText() method:
public void actionPerformed(ActionEvent arg0) {
String message = txtIn.getText();
For the second step, we can get the user’s key from txtKey using the Integer.parseInt() method, which pulls an integer value out of a text string. Then we’ll store the integer we get in a variable we’ll call key:
String message = txtIn.getText();
int key = Integer.parseInt( txtKey.getText() );
To encode the message in the third step, we just need to call the encode() method and pass it two arguments. Arguments are the values we give a method to serve as its parameters. Remember we defined encode() to require two parameters, so we’ll need to pass encode() two arguments, which will be the variables message and key.
We can call encode() with the statement encode(message, key). When it has finished executing, it will return the encoded message, which is output. Note that a method returns the value itself, not the variable the value is stored in. That means that the encoded message is stored in output, but when encode() returns output, we’re actually getting only the encoded string. In addition to that, all the code and variables created inside encode() aren’t carried over to the rest of the program, so the output variable doesn’t exist anymore once encode() returns. We’ll need to store the value returned by the method in a new variable if we want to save it. In order to keep our naming consistent, let’s call the new variable output too:
String message = txtIn.getText();
int key = Integer.parseInt( txtKey.getText() );
String output = encode( message, key );
Finally, we’ll use the setText() method to show the output message in txtOut:
String message = txtIn.getText();
int key = Integer.parseInt( txtKey.getText() );
String output = encode( message, key );
txtOut.setText( output );
The actionPerformed() method is almost complete, except for some error handling. We’ve used the Integer.parseInt() method, which can throw exceptions if the user enters bad input, so we’ll need to add try-catch statements.
Handling Bad Input and User Errors
The code to process button clicks includes a call to Integer.parseInt(), and we learned back in Chapter 3 that this method can throw exceptions when the user enters erroneous input. In particular, if the user were to leave the txtKey field blank or type anything other than an integer into that JTextField, the Integer.parseInt() method would fail.
We need to protect the program from bad input by using try-catch blocks to handle exceptions. Since we want to encode or decode a message only when the user has correctly entered an encryption key, we can wrap all four lines of actionPerformed() inside a try block by adding the keyword try and an opening brace before the first line, as well as a closing brace after the fourth line, as shown here:
public void actionPerformed(ActionEvent arg0) {
try {
String message = txtIn.getText();
int key = Integer.parseInt( txtKey.getText() );
String output = encode( message, key );
txtOut.setText( output );
} catch (Exception ex) {
}
}
Eclipse will highlight the closing brace in red, so let’s go ahead and add the catch block as shown. We’ll need to tell Java what to do when bad input is received, and we’ll add those steps inside the braces for the catch statement a little later. But first, let’s finish the main() method so that we can test the app.
Building the main() Method and Running the App
Just like when we created our game app in Chapter 3, we need to add some setup code to the main() method to create an instance of the Secret Messages app, correctly size the GUI window, and make the GUI visible to the user. Near the bottom of the SecretMessagesGUI.java file, find the main() method stub Eclipse provided and add the following three lines.
public static void main(String[] args) {
➊ SecretMessagesGUI theApp = new SecretMessagesGUI();
➋ theApp.setSize(new java.awt.Dimension(600,400));
➌ theApp.setVisible(true);
}
The line at ➊ creates a SecretMessagesGUI object called theApp. The new keyword followed by the class name runs the constructor method SecretMessagesGUI(), which sets up all the components of the GUI interface.
Next, we set the size of the JFrame to match the width and height that we used in designing the layout, 600 by 400 pixels ➋. Finally, we set the JFrame’s visible property to true ➌, allowing the user to see the GUI. Save these changes and then run the app to test it, as shown in Figure 7-7.
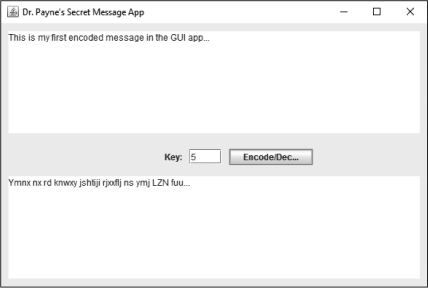
Figure 7-7: The Secret Messages app is still a bit plain, but it can encode and decode messages!
The following is the full source code for SecretMessagesGUI.java to this point:
import javax.swing.JFrame;
import javax.swing.JTextArea;
import javax.swing.JTextField;
import javax.swing.JLabel;
import javax.swing.JButton;
import java.awt.event.ActionListener;
import java.awt.Dimension;
import java.awt.event.ActionEvent;
public class SecretMessagesGUI extends JFrame {
private JTextField txtKey;
private JTextArea txtIn;
private JTextArea txtOut;
public String encode( String message, int keyVal ) {
String output = "";
char key = (char) keyVal;
for ( int x = 0; x < message.length(); x++ ) {
char input = message.charAt(x);
if (input >= 'A' && input <= 'Z')
{
input += key;
if (input > 'Z')
input -= 26;
if (input < 'A')
input += 26;
}
else if (input >= 'a' && input <= 'z')
{
input += key;
if (input > 'z')
input -= 26;
if (input < 'a')
input += 26;
}
else if (input >= '0' && input <= '9')
{
input += (keyVal % 10);
if (input > '9')
input -= 10;
if (input < '0')
input += 10;
}
output += input;
}
return output;
}
public SecretMessagesGUI() {
setTitle("Dr. Payne's Secret Message App");
setDefaultCloseOperation(JFrame.EXIT_ON_CLOSE);
getContentPane().setLayout(null);
txtIn = new JTextArea();
txtIn.setBounds(10, 11, 564, 140);
getContentPane().add(txtIn);
txtOut = new JTextArea();
txtOut.setBounds(10, 210, 564, 140);
getContentPane().add(txtOut);
txtKey = new JTextField();
txtKey.setBounds(258, 173, 44, 20);
getContentPane().add(txtKey);
JLabel lblKey = new JLabel("Key:");
lblKey.setBounds(202, 176, 46, 14);
getContentPane().add(lblKey);
JButton btnEncodedecode = new JButton("Encode/Decode");
btnEncodedecode.addActionListener(new ActionListener() {
public void actionPerformed(ActionEvent arg0) {
try {
String message = txtIn.getText();
int key = Integer.parseInt( txtKey.getText() );
String output = encode( message, key );
txtOut.setText( output );
} catch (Exception ex) {
}
}
});
btnEncodedecode.setBounds(312, 172, 144, 23);
getContentPane().add(btnEncodedecode);
}
public static void main(String[] args) {
SecretMessagesGUI theApp = new SecretMessagesGUI();
theApp.setSize(new java.awt.Dimension(600,400));
theApp.setVisible(true);
}
}
This first version of the app is a success, but it leaves a bit to be desired visually. We can make the GUI interface look more professional with just a few tweaks.
Improving the GUI
Let’s switch back to the design view to correct the issues we noted in the last section. First, click the Encode/Decode button and make it a bit wider. Different computers can have other default fonts and sizes, so give the button a little extra room to be safe.
Now, let’s make the font sizes in the two JTextArea fields larger and easier to read. We want to change the font properties of both text areas, so we can select both txtIn and txtOut at the same time by clicking txtIn and then using CTRL-click (or ![]() -click) to also select txtOut.
-click) to also select txtOut.
With both text areas selected, go to the font property in the Properties pane and click the three dots next to the font size. The Font Chooser dialog will appear, as shown in Figure 7-8.
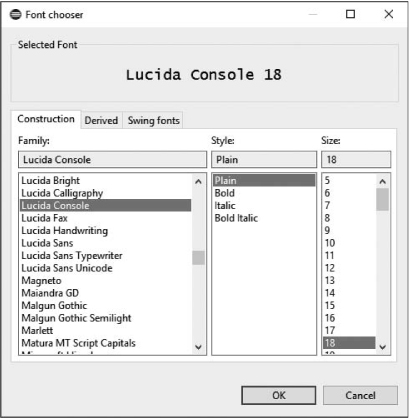
Figure 7-8: We can change the font properties for both JTextArea fields at the same time.
Choose a font size of 18 or greater and select a font that you like. Stick with a familiar font so that when you share the app with friends on different computers, the look and feel won’t change too dramatically. I’ve selected Lucida Console, 18 point. Click OK to save the font selection.
Finally, let’s change the background color of the content pane to personalize it. Select the content pane by clicking getContentPane() in the Components pane in the upper left. Then, click the three dots beside the background property in the Properties pane. In the Color Chooser dialog that pops up, select the Named colors tab, as shown in Figure 7-9. You’ll see a broad selection of colors. Choose a color that you like and click OK.

Figure 7-9: Change the background color of the content pane and button to make the app more stylish.
You can also change the background color of the Encode/Decode button. You may not see all your changes in the design preview, but if you run the app, you should see your new selections, as shown in Figure 7-10, along with any new background color you chose.

Figure 7-10: The GUI after you change the button size and font size.
There are a lot of other properties you can customize based on your preference. Explore the Properties pane for each component and adjust things until the app looks how you want it. Remember to stop and save your app so your changes don’t get erased!
Setting Line Wrap and Word Wrap
So far, the messages I’ve used in my examples have been shorter than one line. But what happens if we type several lines of text?
Let’s try typing or pasting a long sentence into the input text area. I’ll use the first sentence of the Gettysburg Address, by US president Abraham Lincoln:
Four score and seven years ago our fathers brought forth on this continent, a new nation, conceived in Liberty, and dedicated to the proposition that all men are created equal.
You can use this sentence or make up your own long sentence. Either way, as soon as you type it in, you’ll notice a problem, as shown in Figure 7-11.

Figure 7-11: Longer messages in the app don’t yet automatically wrap at the end of a line.
To correctly wrap longer lines of text by full words, you’ll need to change two properties for each text area in the Properties pane. Select both JTextArea objects again in the design preview and then, under Properties, select the checkboxes next to lineWrap and wrapStyleWord. The first property, lineWrap, tells Java to wrap text longer than one line down to the next line. Setting the wrap style to wrapStyleWord tells Java to break the line at the end of a whole word, as we do in a word processor or as you see in this book.
Now save and run the app again. Paste your long sentence into the first text box, and you should notice an improvement. Now the text is correctly wrapped across multiple lines, with line breaks after the last full word that fits on each line. Enter a key and press the Encode/Decode button, and you’ll see the same text wrapping in the output text area, as shown in Figure 7-12.

Figure 7-12: Changing both the lineWrap and wrapStyleWord properties to true results in a nice multiline interface, complete with word wrapping.
This version of the program is becoming more professional looking, but what happens if we enter bad input in the text field for the encryption key? Well, nothing yet. We added a try statement earlier, but we didn’t complete the catch statement. Let’s do that now. We’ll also learn how to create pop-up message dialogs to alert the user to errors.
Handling Bad Input and User Errors: Part 2
Earlier in the chapter, we added a try block around the button event handler, but we left the body of the catch statement empty. It’s time to fill that in with code.
Our catch statement will handle bad or missing user input in the txtKey text field. If the user forgets to enter a value for the encryption key or if the value they entered is not a number, one way of handling that is to pop up a message describing the problem, like the one shown in Figure 7-13.

Figure 7-13: A dialog pops up to alert the user to an error.
After the user closes the pop-up window, another helpful touch is to move the cursor to the txtKey text field and highlight or select any text there so the user can type a new value easily, without needing to click and select the value manually.
The javax.swing toolkit that we’ve been using for GUI components such as JFrame and JTextField also has classes that handle various kinds of pop-up windows. Some examples are input dialogs, which allow the user to provide text input; confirm dialogs, which allow the user to select Yes/No/OK or Cancel; and message dialogs, which provide information to the user in a pop-up window.
The error message we’d like to provide to the user is best displayed in a message dialog. The javax.swing.JOptionPane class has a method called showMessageDialog() that takes two parameters, which are the parent window and the message to display. If we were writing a larger application, we would use the parent window parameter to center the dialog over the main word processing window, for example. But for this app, we can use the keyword null to center the dialog over the desktop instead, as shown here:
JOptionPane.showMessageDialog(null,
"Please enter a whole number value for the encryption key.");
When this line of code is called, it will pop up a message dialog reading “Please enter a whole number value for the encryption key.”
To add this pop-up error message to the catch statement we created earlier, go to the design view and double-click the Encode/Decode button. This is a quick way to have Eclipse take you directly to the source code for the button-click event handler that contains the catch statement.
After the error message is displayed, we’ll also want to place the cursor in the txtKey field and select any text currently in the txtKey field, as we did for the Hi-Lo guessing game GUI app. We’ll add the message dialog and the same requestFocus() and selectAll() statements we used in the Hi-Lo guessing game app inside the braces for the catch statement. The finished event handler code for the Encode/Decode button looks like the following:
btnEncodedecode.addActionListener(new ActionListener() {
public void actionPerformed(ActionEvent arg0) {
try {
String message = txtIn.getText();
int key = Integer.parseInt( txtKey.getText() );
String output = encode( message, key );
txtOut.setText( output );
} catch (Exception ex) {
JOptionPane.showMessageDialog(null,
"Please enter a whole number value for the encryption key.");
txtKey.requestFocus();
txtKey.selectAll();
}
}
});
NOTE
When you add JOptionPane, if you don’t use the content assist or if you see an error at JOptionPane, you may need to press ctrl-shift-O to import the javax.swing .JOptionPane class correctly at the top of your code.
Run the app now, either leaving the key field blank or entering nonnumeric text as the key. The message dialog will pop up, asking you to enter a valid key. It will also highlight the text in the key field so that it’s easy to type a whole number when the dialog closes.
A first-time user might not know what to type into the key field, so adding a default value might also be a helpful UI tweak. Click the Design tab, select the txtKey text field, and enter a default key value into the text property in the Properties pane. I’ll choose 3 as my default encryption key, but you can choose any number. Let’s also change the horizontalAlignment property of the txtKey field to CENTER. Feel free to change other properties to make txtKey look exactly like you want, including the font color and style.
Adding a Slider to the Secret Messages GUI
We’ll add one more user interface improvement to the Secret Messages app—a numeric slider that will allow the user to quickly slide through key values and see how the message changes with each new key.
In design view, under Components in the Palette, select the JSlider component. Hover over the middle left of the design preview, beside the key prompt, and click to drop the JSlider into place as shown in Figure 7-14—you can adjust the position later if needed.
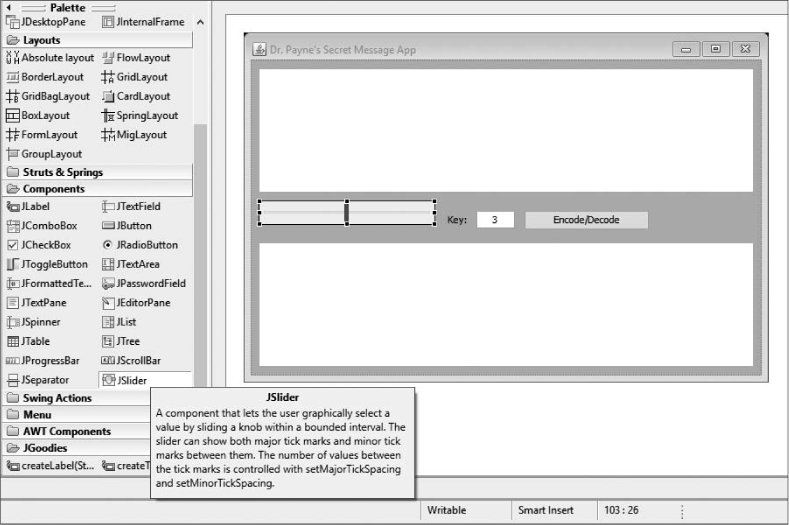
Figure 7-14: Add a JSlider to the graphical user interface for a quick, easy way to try different key values.
Now let’s customize some properties of the JSlider. First, let’s change its background color to match the rest of the app. With the new JSlider selected in the design preview, click the three dots next to the background property in the Properties pane, go to Named colors in the Color Chooser dialog, and pick the same color you used for the rest of the GUI. Click OK to save the new background color for the slider.
Next, we’ll add custom labels, tick marks, and a default value for the slider. First, turn on the paintLabels property by selecting the true checkbox beside it. Second, enter a maximum value of 26 and a minimum value of –26 to make it easy to choose a key value in the correct range.
Next, for the minorTickSpacing property, enter a value of 1—this will add small tick marks on the slider track to help the user see the range of possible values. Then, for the majorTickSpacing property, enter 13—this will show a label every 13 values between -26 and 26 on the slider. Now, turn on the paintTicks property by selecting the true checkbox next to it. The complete Properties pane with all the changes we’ve made is shown in Figure 7-15.

Figure 7-15: Customizing the properties of the slider
We’re almost done! Change the default value of the slider to match your default key value in the key text field by modifying the value property. I selected 3 as my default key value, so I’ll enter 3 in the value property for the slider. Finally, you’ll need to make the slider a bit taller to show the labels, as shown in the finished slider in Figure 7-16.

Figure 7-16: The Secret Messages app with the GUI slider in place
Now, we need to add the code to make the slider work, allowing the user to slide easily among various key values to encode and decode messages quickly.
Code Cracking with the Slider
We want the user to be able to change the encryption key value by clicking and dragging the slider we added in the previous section, so next we’re going to add an event handler to listen for changes to the slider.
Right-click or CONTROL-click the slider in the design preview and go to Add event handler ▸ change ▸ stateChanged, as shown in Figure 7-17. The stateChanged event handler will work similarly to the actionPerformed event handler for the Encode/Decode button, but it will run anytime the user changes the slider’s position to update the encryption key value.

Figure 7-17: Adding an event handler to the slider that will detect when the user changes the slider’s value
When you click to add the stateChanged event handler to the slider, Eclipse will automatically generate another anonymous inner class, much like the one it created for the Encode/Decode button. But before we check out the anonymous inner class, we’ll need to add the JSlider to the top of the class with the JTextArea declarations. To do that, we have to declare the JSlider as an instance variable. Add the last line shown here to the declarations at the top of the SecretMessagesGUI class:
public class SecretMessagesGUI extends JFrame {
private JTextField txtKey;
private JTextArea txtIn;
private JTextArea txtOut;
private JSlider slider;
Then, scroll back down to the slider code. Remember, you can switch back to design view and right-click to add the event handler again to go directly to the code anytime you get lost. Now, change the first line, removing the JSlider type declaration, as shown here:
slider = new JSlider();
slider.addChangeListener(new ChangeListener() {
public void stateChanged(ChangeEvent arg0) {
The first action we’d like the slider to do is update the txtKey text field to show the slider’s current position. We can get the slider’s current position with the getValue() method, and we can set the text of the txtKey field with its setText() method. Adding those together, we can write the first line of the stateChanged() method:
public void stateChanged(ChangeEvent arg0) {
txtKey.setText( "" + slider.getValue() );
The slider.getValue() method returns an integer—the current position value of the slider—so we added an empty string to the number to turn it into a string or text value. This will change the txtKey text field to show the slider’s value. But it doesn’t automatically re-encode the message using the new value yet. If you run the app now, you still need to click the Encode/Decode button to change the message.
Let’s modify the code in the stateChanged() method so that the slider updates the message like the Encode/Decode button would. We can copy the code from inside the try statement for the Encode/Decode button and paste it after the first line of the stateChanged() method for the slider, making only one change:
slider = new JSlider();
slider.addChangeListener(new ChangeListener() {
public void stateChanged(ChangeEvent arg0) {
txtKey.setText( "" + slider.getValue() );
➊ String message = txtIn.getText();
➋ int key = slider.getValue();
➌ String output = encode( message, key );
➍ txtOut.setText( output );
}
});
The lines at ➊, ➌, and ➍ are copied directly from the Encode/Decode button’s event handler, but we’ve made a small change at ➋. Instead of parsing the value out of the text field, we can access the slider’s value directly as an integer using the getValue() method. This means we don’t need a try-catch statement, because we’re no longer relying on the user to supply a hand-typed value. This is more convenient for the user and more secure for the programmer, as using the GUI slider removes one potential error while also making the interface easier to use.
Save the changes and run the application, and you’ll see that you can type in a message and then change the position of the slider to try different encryption key values. To test the ability to decode, copy an encoded message from the bottom text area using CTRL-C (or ![]() -C) and paste it into the top text area using CTRL-V (or
-C) and paste it into the top text area using CTRL-V (or ![]() -V). Then slide the slider to the left or right until you see the original message again.
-V). Then slide the slider to the left or right until you see the original message again.
You’ll even be able to “crack” the Caesar cipher encryption for messages that you don’t have the key to by sliding the slider slowly until you can read the decoded message in the bottom text area. Give it a try! Type the following message into the top text area of your app:
Epdetyr esp lmtwtej ez mcplv esp Nlpdlc ntaspc htes xj Dpncpe Xpddlrp laa...
Then, slide the slider to the far left and slowly slide it to the right until it reveals the secret message. Can you tell what secret key was used to encode the message? See Figure 7-18 for a hint.

Figure 7-18: You can use the Secret Messages app to break Caesar cipher messages by sliding the slider left and right until a plaintext message appears!
Moving the slider to -11 results in a plaintext English message, so the secret key must have been 11. You may also notice that 15 will break the message (because 15 = 26 – 11). You can always find a couple of values that work to break messages in the basic Latin alphabet. Of course, you can send messages in other languages as well, as shown in Figure 7-19.

Figure 7-19: Any languages that use characters in the basic Latin alphabet can be used with this version of the Secret Messages app to send and receive encoded messages; Spanish (left) and French (right) are shown here.
You can copy and paste encoded messages back and forth with your friends using email, Twitter, and Facebook—you can even send encoded text messages, although that would be easier to do from your mobile device. We’ll see how to turn this Secret Messages desktop app into a mobile app in Chapter 8.
For now, in order to share secret messages back and forth, it would be nice to be able to share your Secret Messages app with your friends easily. We’ll learn to do that in the following section.
Bonus: Sharing Your App as a Runnable JAR File
For it to be really useful, you need to be able to share the Secret Messages app with your friends—possibly even with friends who don’t know how to code in Java and don’t have Eclipse installed on their computer.
The great news is that Eclipse and Java make it easy to export an application as a runnable file and share it with any of the millions of computers worldwide that run Java. Your friends don’t even have to download the Java JDK developer’s edition; all they need is the JRE, which comes installed on most computers. Eclipse can export an application in a runnable Java archive (JAR) file that you can share by email, USB flash drive, or some other means. All your friends have to do is double-click the JAR file, and they’ll be able to run your app!
To export a runnable JAR file from Eclipse, go to File ▸ Export. Then expand the Java folder and click Runnable JAR file, as shown in Figure 7-20.

Figure 7-20: Share your application with others by exporting a runnable JAR file.
Click Next, and Eclipse will ask you for a launch configuration and an export destination. The launch configuration means which class or app you’d like to run and from which project. Under Launch configuration, click the drop-down list and choose SecretMessagesGUI – SecretMessagesGUI. This means you want to run the SecretMessagesGUI.class file in the SecretMessagesGUI project.
NOTE
You have to compile and run your application at least once to have a launch configuration for that app.
The export destination is just the location and filename you want to use for your executable app. Under Export destination, click Browse and then select the destination folder you’d like to save your finished app in, such as your Desktop folder, for example. Give your program file a name, like Secret Messages.jar. You can use spaces (or other special characters) to name your file exactly how you’d like people to see it when they open it. When you’ve made your selections, as shown in Figure 7-21, click Save and then Finish.
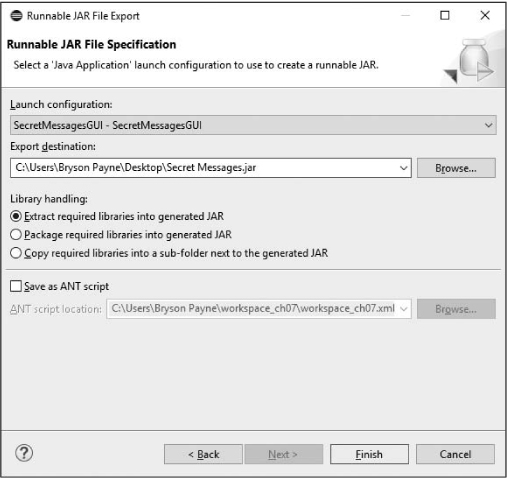
Figure 7-21: Choose a location and name for your runnable JAR file.
You may see a warning after clicking Finish, but you can ignore it and click OK. Go to wherever you saved your JAR file, and you should see a Java icon with your filename, as shown in Figure 7-22. Now you should be able to run the program and send and receive coded messages.

Figure 7-22: The desktop icon for the executable JAR file, on Windows (left) and on macOS (right)
NOTE
On newer versions of macOS, you’ll need to hold down CONTROL when you click the app the first time, then select Open, and finally click Open on the dialog that pops up to allow the app to run.
Some email programs may block files ending in .jar as a safety precaution, but you can upload the file to your favorite file-sharing program (Dropbox, Google Drive, or SkyDrive, for example) and share the file from there. Once your friend has the file, all they have to do is run it, and you can share scrambled messages with each other.
NOTE
You can also export a runnable JAR file for the GUI guessing game app from Chapter 3. Just follow these same steps for the GuessingGame.java file in the GuessingGame project.
What You Learned
You reused code from the text-based Secret Messages app in this app, and you substantially expanded your understanding of GUI interface design and programming. Here are some of the skills covered in this chapter:
• Naming GUI components and variables consistently for code readability and reusability
• Reusing algorithms, such as the encode() method that we copied from the text-based version of this app
• Declaring methods that accept parameters and return information
• Writing more advanced event handlers for a wider variety of GUI components, including buttons, sliders, and text fields
• Working with properties of GUI components in design view to customize the UI further
• Setting line wrap and word wrap for JTextArea objects
• Popping up javax.swing.JOptionPane dialogs, including message dialogs
• Adding and working with a JSlider GUI slider
• Changing a text field’s text using a stateChanged() event handler on a slider
• Exporting a runnable JAR file to share your app with friends
Programming Challenges
Try these programming challenges to review and practice what you’ve learned and to expand your programming skills by trying something new. Visit the book’s website at https://www.nostarch.com/learnjava/ to download sample solutions.
#1: Movin’ On Up!
The Secret Messages app is great for sending simple, encoded messages to your friends, but it’s also fun to use all by yourself. One task that gets repetitive from time to time is copying encoded messages from the output text area and pasting them into the input text area. Your first programming challenge is to create a Move Up ^ button, which moves the encoded message up and automatically decodes it!
Place the Move Up ^ button next to the Encode/Decode button. Then, add an event handler that will get the text from the txtOut text area and set it as the text of the txtIn text area. As a bonus, have the event handler for the Move Up ^ button change the slider to the opposite of its value. You can also change the background of the button to match the rest of your app. A sample solution to this challenge is shown in Figure 7-23.

Figure 7-23: Adding a Move Up ^ button to swap the message and slider value to automatically decode your message
#2: Scrolling Away!
Another improvement we could make to the app would be to handle even longer messages. In this case, we should add a scroll bar along the side and scroll down automatically whenever the user enters a message too long for the input text area. The JTextArea won’t add a scroll bar by itself, but Eclipse makes adding a scroll bar to any text area quick and easy!
In the design view, right-click either of the JTextArea boxes and select Surround with ▸ javax.swing.JScrollPane, as shown in Figure 7-24.

Figure 7-24: Adding an automatic scroll bar to a JTextArea
You’ll need to do this for the other JTextArea as well. Run the app when you’re finished, typing a long selection of text into the input text box to see the scroll bar appear automatically. In Figure 7-25, I’ve pasted the entire US Constitution into the input text area and encoded it.

Figure 7-25: By adding a JScrollPane around each JTextArea, you can encode text as long as the US Constitution or even longer!
Only part of the text is visible in Figure 7-25, but now there is a scroll bar along the right side of both text areas. The scroll bar lets us know that there’s more text than will fit into the text area, and all we have to do is scroll down to see it.
To customize the app even more, explore the Properties pane for each of the GUI components we’ve added and change various property values such as background colors, fonts, and so on. Make the app your own and share it with friends to show off what you’ve created!
#3: Changing the Text to Change the Slider
For this challenge, let’s make one last tweak to the user interface. When the user slides the slider, the key value shown in the text field changes. But what if we want the slider to move whenever the value in the text field changes?
HINT
You’ll want to add an event handler to the txtKey text field. Right-click the txtKey JTextField and then go to Add event handler ▸ key ▸ keyReleased. This will create an event handler that listens for keystrokes in the txtKey text field.
To accomplish this, you’ll need to write code for the event handler that will get the integer value from the text field and set the slider to that value. Remember to use a try-catch block when dealing with user-supplied text. Good luck!