
Nature and human civilization are about collections. Families collect relatives, cities collect people acting together, houses collect people and their belongings, math set theory uses collections for relation formulas, galaxies collect stars, atoms collect elementary particles, and so on. It is thus no surprise that computer languages, intended to model real-world scenarios, must be able to model collections as well.
In the real world this is not such a big topic, but computers from the very beginning have drawn a sharp distinction between fixed-size collections and variable-size collections. Fixed-size collections are easier to handle and show high performance, whereas variable-size collections are slower, but show greater flexibility and according to the circumstances could exhibit a lower memory footprint. Both options are needed for various collection-related tasks, so a developer has to learn how to handle both worlds. To make the difference clearer, fixed-size collections are called arrays, and for variable-size collections the term used is collection.
The built-in libraries of Kotlin contain several functions to mediate between arrays and collections, and to make a developer’s life a little bit easier Kotlin also tries to unify the handling of arrays and collections, so the switching between the two worlds is easier to achieve. In the following section we first talk about arrays, as they came first in computer language history, and later switch to collections.
Defining and Using Arrays
Arrays are fixed-size containers for elements, which could be objects or primitive data types. We know a lot about objects by now, but we haven’t talked much about primitive data types yet. From the Kotlin point of view, it would be preferable to not have this distinction at all, dealing with objects and nothing else.
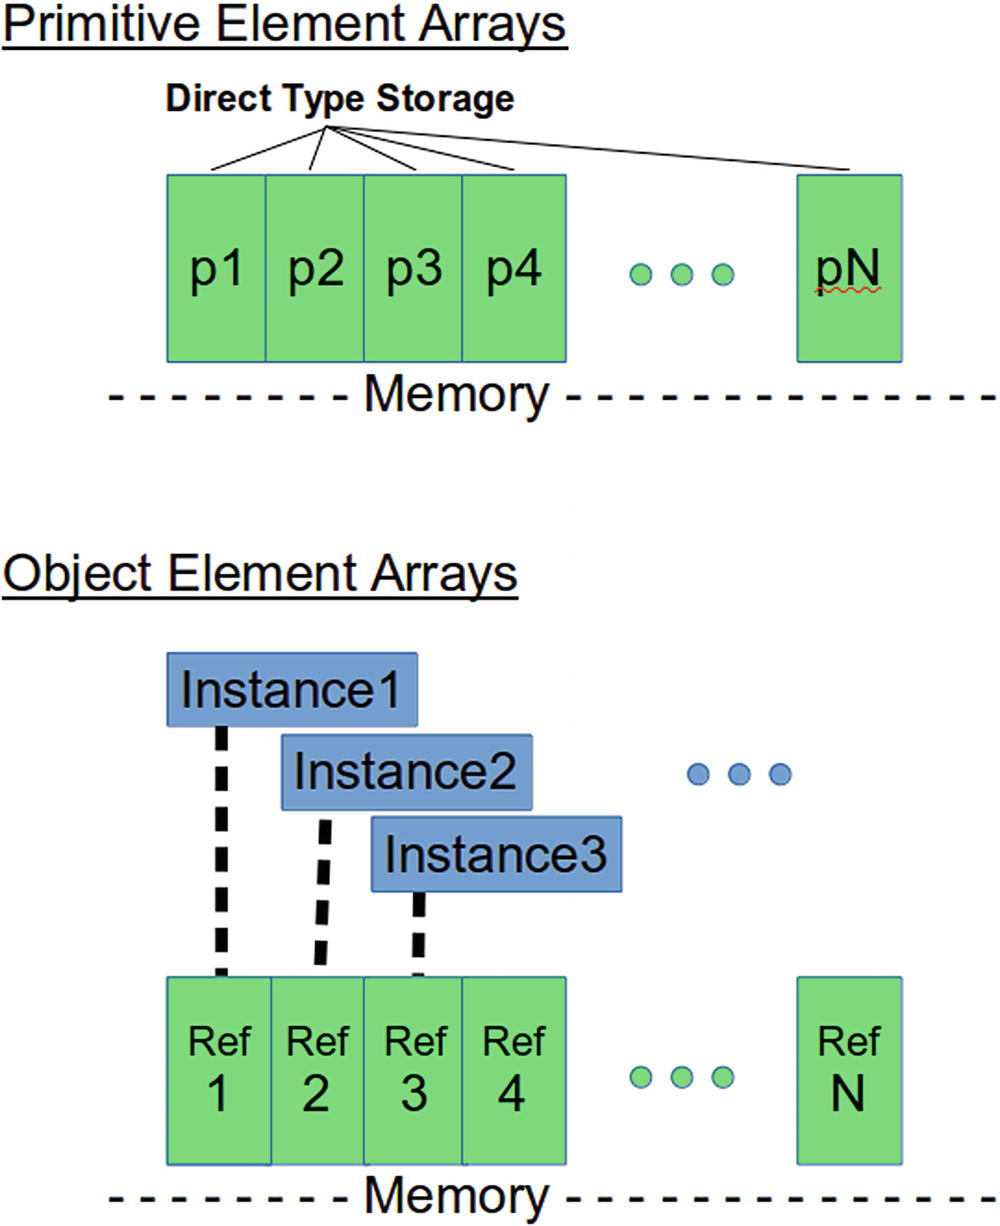
Primitive versus object arrays
Note
Any sits on the very top of Kotlin’s type hierarchy, and any object implicitly and automatically inherits from it. Therefore any object, no matter how you declared it, automatically also is an instance of Any.
Angle brackets declare a generic type. We cover generics later in the book.
To access array elements, use array[index] where index ranges from 0 to the array length diminished by one. The length itself is given by property size , and the last index by property lastIndex. You can read array elements as in val elem1 = array[0] and write array elements as in array[77] = .... If while accessing array elements you try to address an element that is outside the bounds, your app will crash, so you must take precautions to ensure index limits are not exceeded.
Array Instantiation
Now that we know how to declare arrays, we need to now how to create or instantiate them. This is the right side of val arr:IntArray = ... and alike.
The elements of these arrays all are initialized with the default values 0 for number types and false for the boolean array.
where for SomeType you substitute an existing class.
Exercise 1
Define and initialize an IntArray with elements 100, 99, 98, ..., 0. Assign it to a val arr.
which looks much more concise. There are accordingly named array initialization functions for all the array types, and you can use them anywhere in your code: intArrayOf(), longArrayOf(), doubleArrayOf(), and so on.
coll.toTypedArray(): Array<ElementType>
This converts a collection with element type ElementType to an array of objects. It never returns a primitive element array.
coll.toXXXArray(): XXXArray
This converts a collection with element type XXX (one of Int, Long, Byte, Short, Double, Float, Boolean, or Char) to a corresponding primitive element array.
Exercise 2
Create a BooleanArray with values true, false, true.
Array Operations
first(): E
This is the first element of the array.
last(): E
This is the last element of the array.
copyOf(): Array<E>
For object arrays, this creates a copy of an array. This is a shallow copy, meaning the copy will contain the same object references as the original array.
copyOf(): XXXArray
For primitive element type XXX (one of Int, Long, Byte, Short, Double, Float, Boolean, or Char), creates a copy of the array.
fill(element:E>)
This sets all array elements to the given element.
sliceArray(indices:IntRange)
This creates a new array from a part of the original array. An IntRange could be entered (e.g., 1..100). Indices are as usual zero-based.
contains(element:E): Boolean
This checks whether the specified element is contained in the array.
all(predicate: (E) -> Boolean): Boolean
This returns true if the predicate is met for all elements. The predicate is a function taking each element and performing a check; for example, { element -> ... [boolean expression] }.
any(predicate: (E) -> Boolean): Boolean
This returns true if the predicate is met for any of the elements. The predicate is a function taking each element and performing a check, for example { element -> ... [boolean expression] }.
This list is not exhaustive. For more functions, refer to the online API documentation.
Note
As of this writing, the API documentation of Kotlin can be found at https://kotlinlang.org/api/latest/jvm/stdlib/index.html . If this link is out of date, you can easily find the documentation by searching “kotlin stdlib api documentation” in your favorite search engine.
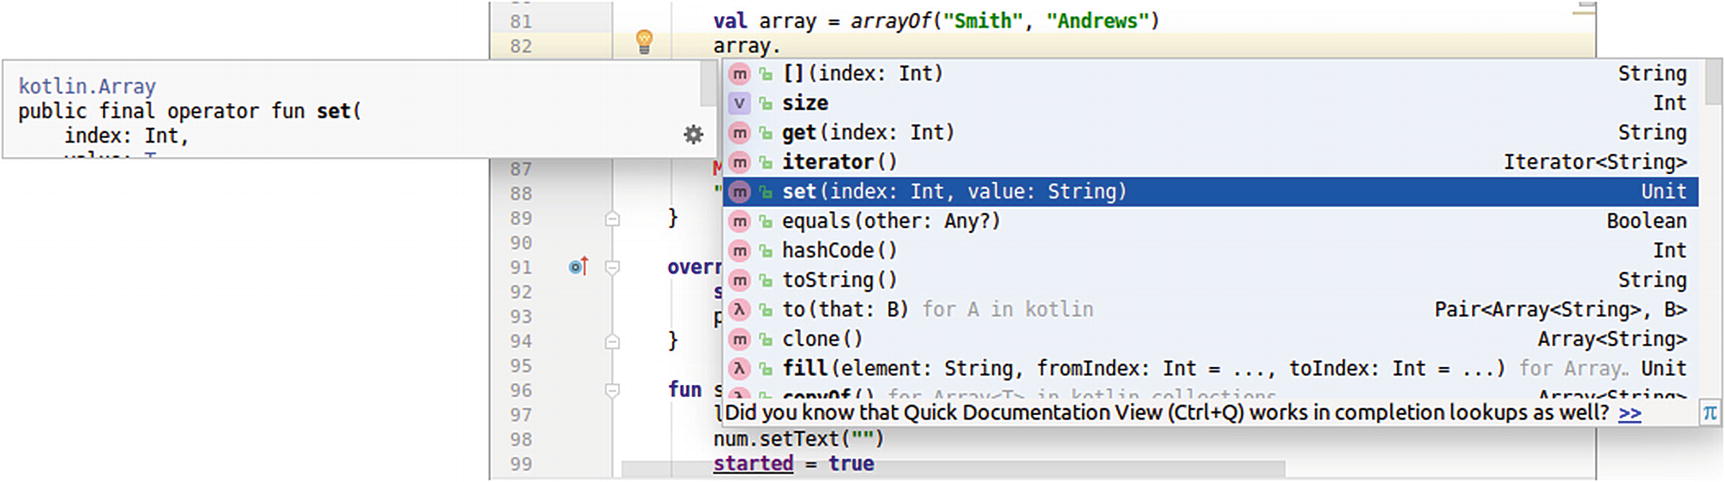
Android Studio helps a lot in finding object properties and functions. Just enter the object’s name, a dot, and if necessary press Alt+Enter. Android Studio then shows a list with all properties and functions, which you can scan through using the cursor up and down keys (see Figure 9-2). You can even go to the sources; place the cursor over a class name and then press Ctrl+B.
Automatic API documentation
Sets, Lists, and Maps
Sets: Sets are collections of unique elements. They contain any number of elements, but duplicates are not allowed. So [1, 27, 3] is a set, but [5, 1, 5] is not. Also, sets don’t have an order, so [1, 3, 5] is the same set as [1, 5, 3].
Lists: A list is an ordered collection of elements in which duplicates are allowed. Therefore both [1, 2, 3, 1] and [1, 1, 2, 3] are lists, but they are not the same.
Maps: A map is an unordered collection of pairs [A, B] where there is a mapping relation between the pair members: A → B. The idea behind that is, if you have a map A1 → B1, A2 → B2, and A3 → B3, given any A you can determine the corresponding B using map functions or operators. The pair [A, B] is commonly referred to as a key/value pair, where A is the key and B is the value. In Kotlin idioms, if m is the map and property a contains a key, both m[a] and m.get(a) can be used to retrieve the corresponding value.
Sets
Set is not a class, but an interface. For instantiation we need an implementation. The HashSet you see here is a standard implementation that gets used quite often for sets.
HashSet can be used for both mutable and immutable sets. We have to explicitly state the variant in the property declaration. See set1 and set2 in the example.
setOf() and mutableSetOf() try to infer the element type from their parameters. If it is unclear or you need a conversion to happen, the type must be explicitly declared inside angle brackets, as for set4 in the example.
Just like the other collection types, the Set and MutableSet classes contain a vast number of properties and functions. Listing them all here would inflate the size of this book. Instead I present the ones most often used; for all the others, refer to the online API documentation.
Note
As of this writing, the API documentation of Kotlin can be found at https://kotlinlang.org/api/latest/jvm/stdlib/index.html . If this link is out of date, you can easily find the documentation by searching “kotlin stdlib api documentation” in your favorite search engine.
As for arrays, you can let Android Studio show you all properties and functions of an object. Enter the object’s name, a dot, and if necessary press Alt+Enter (refer back to Figure 9-2). To see the sources, place the cursor over a class name and then press Ctrl+B.
size
This indicates the size of the set.
add(element:E): Boolean
(MutableSet only) Add an element. This returns true if the element was really added (it didn’t exist before).
addAll(elements:Collection<E>): Boolean
(MutableSet only) This adds many elements. A Collection is another set or a list. It returns true if the set was modified due to that operation.
addAll(elements:Array<out E>): Boolean
(MutableSet only) This adds all the elements from the specified array. The out inside the array type parameter allows us to add arrays with elements that are also subclasses from the type needed for the set. It returns true if the set was modified due to that operation.
intersect(other:Iterable<E>): Set<T>
This returns a set of elements contained in both this set and the specified Iterable. Sets and lists are also iterables.
clear()
(MutableSet only) This removes all elements.
isEmpty(): Boolean
This returns true if the set is empty.
isNotEmpty(): Boolean
This returns true if the set is not empty.
contains(element:E): Boolean
containsAll(elements:Collection<E>): Boolean
This checks whether all the specified elements are contained in the set.
toMutableSet(): MutableSet<E>
(Non-MutableSet only) This returns a new mutable set based on the elements from the immutable set.
map(transform: (E) -> R): List<R>
This applies a mapping function on each element of the set and returns a list from that. Given, for example, a set of names, the transform function { s -> s + " (${s.length})" } returns a list of the names with the name lengths appended.
remove(element:E): Boolean
(MutableSet only) This removes the specified element, if it exists inside the set. It returns true if the element existed and was removed.
removeAll(elements:Collection<E>): Boolean
(MutableSet only) This removes all the specified elements, as far as they exist inside the set. A Collection is another set or a list. It returns true if at least one element was removed.
removeAll(elements:Array<E>): Boolean
(MutableSet only) This removes all the specified elements, as far as they exist inside the set. It returns true if at least one element was removed.
retainAll(elements:Collection<E>): Boolean
(MutableSet only) This removes all the elements that are not also inside the specified elements. A Collection is another set or a list. It returns true if at least one element was removed.
retainAll(elements:Array<E>): Boolean
(MutableSet only) This removes all the elements that are not also inside the specified array. It returns true if at least one element was removed.
all(predicate: (E) -> Boolean): Boolean
This returns true if the predicate is met for all elements. The predicate is a function taking each element and performing a check; for example, { element -> ... [boolean expression] }.
any(predicate: (E) -> Boolean): Boolean
This returns true if the predicate is met for any of the elements. The predicate is a function taking each element and performing a check; for example, { element -> ... [boolean expression] }.
filter(predicate: (E) -> Boolean): List<E>
This returns all the elements from the set for which the predicate returns true. The predicate is a function taking each element and performing a check; for example, { element -> ... [boolean expression] }.
forEach(action: (E) -> Unit)
This loops through the set. Loops are discussed later in this chapter.
Exercise 3
Create a mutable set val fruits with elements Apple, Banana, Grape, and Engine as elements. In a separate statement, add Cherry to the set. In another statement, remove Engine from the set. Create a new set val fruits5 from this set, as a result of filtering elements with five characters. Note: You can get a string’s length by addressing its length property.
Lists
Lists are similar to sets, but they do not require uniqueness, so elements may appear several times. In addition, lists have an order.
List is an interface. The implementation we use here, ArrayList, is a frequently used choice.
ArrayList can be used for both mutable and immutable lists. We have to explicitly state the variant in the property declaration. See list1 and list2 in the example.
listOf() and mutableListOf() try to infer the element type from their parameters. If they are unclear or you need a conversion to happen, the type must be explicitly declared inside angle brackets, as for list4 in the example.
Due to their nature, lists and sets share many properties and methods, so the following list includes methods that were already possible for sets. Again, the list is not exhaustive, so please consult the online documentation for more details.
Note
This commonality is not just a coincidence. In fact, both Set and List are extending the Collection interface. You will see the Collection interface used once in a while for certain tasks, but usually the conceptional differences between Set and List are worth retaining, so set and list interfaces are being used more often.
size
This indicates the size of the list.
lastIndex
The is the size of the list minus 1.
add(element:E): Boolean
(MutableList only) This adds an element at the end. It returns true if the element was really added. Because this will always happen, the function will always return true.
addAll(elements:Collection<E>): Boolean
(MutableList only) This adds many elements. A Collection is another list or a set. It returns true if the list was modified due to that operation. Unless the parameter provided belongs to an empty collection, the function will always return true.
addAll(elements:Array<out E>): Boolean
(MutableList only) This adds all the elements from the specified array. The out inside the array type parameter allows us to add arrays with elements that are also subclasses from the type needed for the list. It returns true if the list was modified due to that operation. Unless the parameter provided belongs to an empty array, the function will always return true.
get(index:Int): E
This retrieves an element from the list. The index is zero based. It maps to the [ ] operator, so you can use list[index] to achieve the same result.
set(index:Int, element:E): E
(MutableList only) This sets an element inside the list. The index is zero based. It maps to the [ ] operator, so you can use list[index] = ... to achieve the same result.
clear()
(MutableList only) This removes all elements.
isEmpty(): Boolean
This returns true if the list is empty.
isNotEmpty(): Boolean
This returns true if the list is not empty.
contains(element:E): Boolean
This checks whether the specified element is contained in the list.
containsAll(elements:Collection<E>): Boolean
This checks whether all the specified elements are contained in the list.
indexOf(element:E): Int
This retrieves the index of the specified element in the list, or −1 if not found. The index is zero based.
lastIndexOf(element:E): Int
This retrieves the last index of the specified element in the list, or −1 if not found. The index is zero based.
toMutableList(): MutableList<E>
(Non-MutableList only) This returns a new mutable list based on the elements from the immutable list.
subList(fromIndex:Int, toIndex:Int): List<E>
This returns a view of the list starting at index fromIndex until (not including) toIndex. The view implies that if you change elements in the returned list, the change will also happen in the original list.
asReversed(): List<E>
This returns a read-only view of the list in reverse order. Any changes in the original list are reflected in the reversed list as well.
distinct(): List<E>
This returns a new list with duplicates removed.
shuffled(): List<E>
This returns a new list with the elements from the original list shuffled.
map(transform: (E) -> R): List<R>
This applies a mapping function on each element of the list and returns a new list from that. Given, for example, a list of names, the transform function { s -> s.length } returns a list of the name lengths from that.
remove(element:E): Boolean
(MutableList only) This removes the specified element, if it exists inside the list. It returns true if the element existed and was removed.
removeAt(index:Int): E
(MutableList only) This removes the element at the specified index (zero based) and returns the removed element.
removeAll(elements:Collection<E>): Boolean
(MutableList only) This removes all the specified elements, as far as they exist inside the list. A Collection is another list or a set. It returns true if at least one element was removed.
removeAll(elements:Array<E>): Boolean
(MutableList only) This removes all the specified elements, as far as they exist inside the list. It returns true if at least one element was removed.
retainAll(elements:Collection<E>): Boolean
(MutableList only) This removes all the elements that are not also inside the specified elements. A Collection is another list or a set. It returns true if at least one element was removed.
retainAll(elements:Array<E>): Boolean
(MutableList only) This removes all the elements that are not also inside the specified array. It returns true if at least one element was removed.
drop(n:Int): List<E>
This returns a new list with n elements removed from the beginning.
dropLast(n:Int): List<E>
This returns a new list with n elements removed from the end.
first(): E
This returns the first element.
take(n:Int): List<E>
This returns a new list with the first n elements of the original list.
first(predicate: (E) -> Boolean): E
This returns the first element matching the predicate. The predicate is a function taking each element and performing a check; for example, { element -> ... [boolean expression] }.
last(): E
This returns the last element.
takeLast(n:Int): List<E>
This returns a new list with the last n elements of the original list.
last(predicate: (E) -> Boolean): E
This returns the last element matching the predicate. The predicate is a function taking each element and performing a check; for example, { element -> ... [boolean expression] }.
all(predicate: (E) -> Boolean): Boolean
This returns true if the predicate is met for all elements. The predicate is a function taking each element and performing a check; for example, { element -> ... [boolean expression] }.
any(predicate: (E) -> Boolean): Boolean
This returns true if the predicate is met for any of the elements. The predicate is a function taking each element and performing a check; for example, { element -> ... [boolean expression] }.
filter(predicate: (E) -> Boolean): List<E>
This returns all the elements from the list for which the predicate returns true. The predicate is a function taking each element and performing a check; for example, { element -> ... [boolean expression] }.
forEach(action: (E) -> Unit)
This method loops through the list.
forEachIndexed(action: (index:Int,E) -> Unit)
This method also loops through the list.
Lists can be converted to arrays using toArray(), toIntArray(), toDoubleArray(), and so on. The conversion to one of the primitive typed arrays will only be successful if the elements have the correct type.
Maps
Maps are probably the most interesting, but also the most involved part of the collection framework in Kotlin. Maps get used whenever you need a mapping in the mathematical sense, which means unique elements from a set A = {a0, a1, a2, ...} get mapped to (possibly repeated) elements from a collection B = {b0, b1, b2, ...}. As a result, whenever you have an ai you immediately can determine the (one and only) mapped bj from it. In computer languages, the data you map from are usually called the key, and the value you map to has the name value.
In nature and culture, maps are everywhere: a pair of geographical coordinates on earth map to an altitude, every second of January 23 maps to an air temperature in New York, every Social Security number maps to a name, time maps to Earth’s position in its orbit, the temperature maps to the state of aggregation (solid, liquid, gas) of water, the note played by an instrument maps to a frequency, the index of an element in an array maps to some value, and so on.
Similar to sets and lists, we again have the distinction between mutable (changeable) and immutable (unchangeable) maps.
where HashMap is one of the implementations used most often. The apply{...} is new. Actually, you can use it for any instance, but here it means this: Take the map we just created and do something with it. The this refers to the instance of the map being created, not the class instance or object we are currently in. We use apply{ ... } at this place to add some key/value pairs.
Note
The instances of to in the preceding initializers actually are operators that create an instance of the built-in Pair class. If desired, you could use your own explicit instances of Pair as in val p1 = Pair(152835937, "Albert Einstein") and then mapOf(p1, ...).
associate(transform: (T) -> Pair<K, V>): Map<K,V>
This creates a map with key type K and value type V. The transform function is supposed to create a Pair<K,V> given each element of the original set, list, or array. Given, for example, a set of integers (T = Int) such a transform function could read { i -> Pair(i, i*i) }, creating a map mapping integers to their square.
associateWith(ValueSelector: (K) -> V): Map<K,V>
This is much the same as associate(), but as a shortcut always takes the original element as the key. The valueSelector is supposed to generate the value. Given, for example, a set of integers again, the lambda function { i -> i * i } again maps integers to their square.
associateBy(keySelector: (T) -> K): Map<K,V>
This is much the same as associate(), but as a shortcut always takes the original element as the value. The keySelector is supposed to generate the key. Given, for example, a set of doubles, the lambda function { d -> Math.floor(d).toInt() } uses the integer equal to or just below the given double as a key.
groupBy(keySelector: (T) -> K): Map<K, List<T>>
This gathers elements from the original collection or array and saves them under the generated key in the resulting map. Say, for example, you have several names—John, Adam, Joe, and Gabriel—and apply the keySelector { s -> s.length }. The resulting map then maps name lengths to names: 3 → [“Joe”], 4 → [“John”, “Adam”], and 7 → [“Gabriel”].
Note that if possible, you should prefer associateWith() and associateBy() over associate(), because the latter implies an object creation, which always takes some time.
Pairs and Triples
to get a pair of String and Double.
To fetch the first and second components for pairs, you simply use the properties first and second as in pair.first and pair.second. The components for a triple are accordingly accessible via properties first, second, and third.
Loops over Data Containers
Looping over data containers means visiting each of their members to perform some action on it. This is an important use case for data containers if you want to print it, transform it, or aggregate over it to deduce some container characteristics. Think of summing, concatenating, or averaging.
In the past, computer languages provided some kind of a looping construct circling around some indexing variable, and in fact this is possible with Kotlin as well. We covered this old-fashioned kind of looping earlier in the book, but let me show you here a more elegant and straightforward way to loop over containers in Kotlin.
the elem gets the integers 1, 2, 3, 4, -1, one after the other, and elem automatically has the type Int, because the container is a list of Int elements.
Note
In fact you could add :Int here as in forEach { elem:Int -> ... } if it helps to improve the readability of your code.
The index variable gets values 0, 1, 2, ... and always has the type Int. Again, you are free to change the name of the index variable to whatever you like.
If using a single parameter as in map.forEach { me -> ...} this parameter will be of type Map.Entry<K,V> where K is the key type and V is the value type. From me you then get the key via me.key and the value via me.value. You can also write me.toPair() to build a Pair from that.
(Only for Android API level 24 or greater) If using two parameters they will receive the key and the value during each iteration: map.forEach { k,v -> ... }.
Sorting Arrays and Collections
Sorting arrays and collections like lists and sets is a task you frequently need to accomplish before you present data to your app users. Also, sorting must happen before you can start the binary search algorithm we discuss in the section ”Searching in Arrays and Collections” later in this chapter.
Sorting can happen in place, which means the array or collection you want to have sorted gets altered, or in a functional style, which means the result of the operation is the sorted array or collection and the original data container stays untouched. Sorting in place will be the faster choice, but bears the risk that other program parts get corrupted if they hold a reference to the original array or collection. Functional sorting can improve program stability, but you can expect some performance penalty, so choose wisely.
Array.sorted() : List<T>
This returns a List with the elements from the array sorted according to their natural sort order. The type T must be a subinterface of Comparable, which is the case for all built-in numeric types and strings. As the array, you can use an object array or any of the primitive element type arrays (IntArray, DoubleArray, etc.).
Array.sortedArray() : Array<T>
This is the same as Array.sorted(), but returns an array instead. Kotlin always returns an object array, never a primitive typed array. Therefore, arrayOf(1,2,3).sorted() returns an Array<Int>, not an IntArray. You can, however, add method toIntArray() to convert the Int object array to an IntArray. The same holds for the other primitive element type objects.
Collection.sorted() : List<T>
This is the same as Array.sorted(), but for collections like sets and lists.
You can add a Descending to any of them to reverse the sort order.
Array.sortedBy(selector: (T) -> R?) : List<T>
This creates a sorted list according to the natural sort order of the value returned by the selector function. Type R must implement the Comparable interface. Say, for example, you want to sort an array of data class Car(val make:Int, val name:String) by make. You can then write array.sortedBy({ car -> car.make }).
Collection.sortedBy(selector: (T) -> R?) : List<T>
This is the same as Array.sortedBy() shown earlier, but for collections like sets and lists.
Array.sortedWith(comparator: Comparator<in T>) : List<T>
This creates a sorted list according to the comparator provided. You could provide a subclass implementation of Comparator, but the Kotlin standard library also provides a couple of Comparator generator functions. The in in the type specifier indicates it is enough for the comparator to handle a superclass of T as well.
Array.sortedArrayWith(comparator: Comparator<in T>) : Array<T>
This is the same Array.sortedWith() shown earlier, but returns an array.
Collection.sortedWith(comparator: Comparator<in T>) : List<T>
This is the same as Array.sortedWith() shown earlier, but for collections like sets and lists.
You can add a Descending to most of them to reverse the sort order (there is no sortedWithDescending() and no sortedArrayWithDescending()).
compareBy(vararg selectors: (T) -> Comparable<*>?): Comparator<T>
and
compareByDescending( vararg selectors: (T) -> Comparable<*>?): Comparator<T>
This is an important function you likely want to show up inside sortedWith(). It takes any number of functions evaluating to a Comparable. Those functions get worked through in consecutive order. The first Comparable comparison not resulting in an equals will break the chain and continue with the next iteration in the sorting algorithm. As a function element you can write a lambda function as in
{elem -> elem.someProperty}
if this property is a Comparable like an Int or a String, but you can also directly refer to property getters by writing T::propertyName. As an example: take a list of
data class Car(val make:Int, val name:String)
and consider comparing by the make. Using sortedWith() for sorting then reads
list.sortWith( compareBy( Car::make ) ).
compareBy(comparator: Comparator<in K>, selector: (T) -> K): Comparator<T>
and
compareByDescending(comparator: Comparator<in K>, selector: (T) -> K): Comparator<T>
This creates a comparator that first applies the selector to the incoming data and applies the provided comparator to the result from the selector.
nullsFirst(): Comparator<T>
Use this as a first argument to compareBy() to extend the natural-order comparator implicitly used there with the capability to allow null values in the sorted array or collection. Such null values will show up first in the returned list. The nullsFirst() comparator can only be used in a context where Comparable elements get compared, which is automatically the case if you use nullsFirst() as the first parameter in compareBy().
nullsLast(): Comparator<T>
This is similar to nullsFirst, but null values will show up last in the list returned.
reverseOrder(): Comparator<T>
Use this as a first argument to compareBy() to reverse the order of the natural-order comparator implicitly used there. It is possible to mix with the other comparator extenders, as, for example, in nullsFirst( reverseOrder() ).
then
Use this as an infix operator to chain comparators. You can, for example, write compareBy(...) then compareBy(...) inside sortWith().
Exercise 4
Using sortWith(), do a sorting of a list val gul = listOf(...) of GameUser instances from the NumberGuess game app, first by the last name, and then by the first name. Assign the result to val sorted.
sort() and sortDescending()
This sorts the array or mutable collection in place, according to the element’s natural sort order. The elements must implement the Comparable interface for this to work.
sortBy(selector: (T) -> R?) and sortByDescending(selector: (T) -> R?)
This sorts the array or mutable collection in place, according to the provided selector function, which must return a Comparable.
sortWith(comparator: Comparator<in T>)
This sorts the array or mutable collection in place, according to the provided comparator. The in in the comparator type specification means the comparator must handle the elements, but also can handle a superclass of the element type. For the comparator parameter, the same Kotlin standard library functions can be used as for the functional style sorting functions described earlier.
Note
You should prefer functional style sorting over in-place sorting, unless performance or resources housekeeping is an important issue.
Exercise 5
Do the same as for Exercise 4, but perform in-place sorting.
Grouping, Folding, Reducing, and Zipping
Grouping, folding, reducing, and zipping are advanced operations on arrays and collections like lists and sets. We discuss each of these in turn.
Grouping
This operation is called grouping , and in this particular case we group based on the make.
Exercise 6
With substring(0,3) extracting the first three chapters from a string, perform a grouping for the cars list with the first three characters of the vin as a key. Call it val groupedByManufacturer. Extract the WXX manufacturer from the grouping result.
There are three more grouping functions. The first is groupBy() with one more parameter. This one performs a transformation on the values before adding them to the grouping result. Two more functions, groupByTo(), save the grouping result into a map provided as a parameter. They are more or less convenience functions. For details, refer to the official Kotlin API documentation.
Folding
fold(initial: R, operation: (acc: R, T) -> R)): R
The function takes as parameters the object that is going to be updated each loop iteration and a function that performs the updating. This updater takes as parameters the actual version of the gathering object and the current loop element. This returns the gathering object with all data container elements applied. In most practical cases the first parameter is probably a newly constructed object, as in list.fold(Gatherer(), ...).
foldRight(initial: R, operation: (T, acc: R) -> R)): R
This is similar to fold(), but it iterates through the array or collection in reverse order. To express this backward scanning, the parameter order of the inner function gets reversed, too.
foldIndexed(initial: R, operation: (index:Int, acc: R, T) -> R)): R
This is the same as fold, but the inner function gets the loop iteration index as an additional first parameter.
foldRightIndexed(initial: R, operation: (index:Int, T, acc: R) -> R)): R
This is similar to foldIndexed(), but it iterates through the array or collection in reverse order. Again, to express this backward scanning, the parameter order for parameters two and three of the inner function gets reversed, too.
There is also an advanced folding mechanism that includes a grouping operation. If you use groupingBy() on an array or a collection (list or set), you will receive a Grouping object that you later can apply on an array or a collection like a set or a list. This is kind of a convenience function, as you could do grouping and then folding manually. For details, please consult the Kotlin API documentation.
Reducing
reduce(operation: (acc: S, T) -> S): S
This performs the provided reduction operation on the current gatherer value and the current loop element. It then returns the reduction result. The reduction function might return a value of the original data type T or a subclass of it.
reduceRight(operation: (T, acc: S) -> S): S
This is similar to reduce(), but it scans through the data in reverse order. Note that the order of the parameters of the reduction function is reversed, too.
reduceIndexed(operation: (index: Int, T, acc: S) -> S): S
This is the same as reduce(), but the reduction function receives the current looping index as an additional first parameter.
reduceRightIndexed(operation: (T, acc: S) -> S): S
This is similar to reduceRight(), but it scans through the data in reverse order. Note that the order of parameters two and three of the reduction function is reversed, too.
Exercise 7
Create a list [1, 2, 3, 4, ..., 100]. Then, using reduce, calculate the number 1 ∗ 2 ∗ 3 ∗ ... ∗ 100 from it. Hint: You can convert a range (f rom..to) to a list via function toList().
Zipping
Looping , sorting, folding, and reducing already provide a quite versatile tool set for handling arrays and collections (sets and lists). We don’t have a tool yet, though, to combine two arrays or collections element-wise. In Kotlin there is a set of functions dealing with exactly this kind of task.
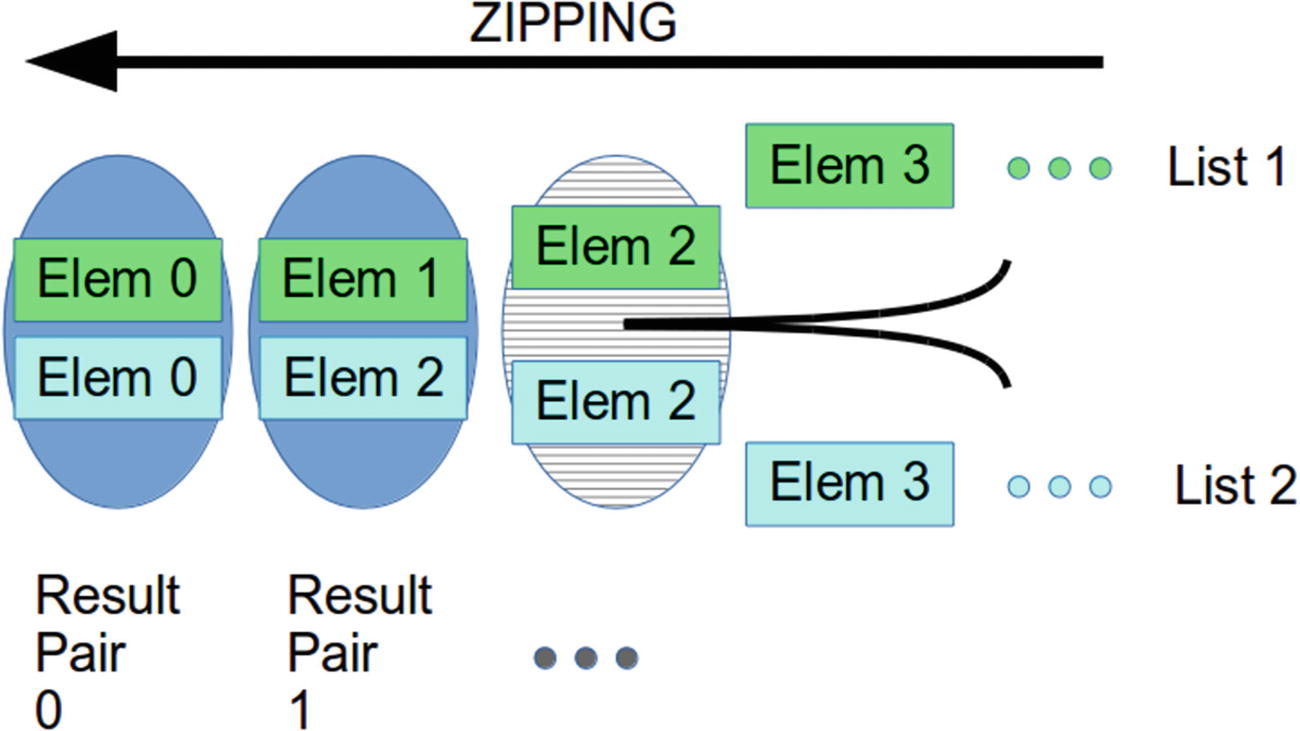
Zipping
If you try to zip arrays or collections of unequal lengths, the bigger one gets clipped at the end and the resulting list will have the size of the smaller one.
The unzip() function performs the inverse operation: It takes a list of pairs and extracts two lists of single elements from it, packed in a pair: unzip(): Pair<List<T>, List<R>>, where types T and R are the types of the first and second element of each pair in the original list.
For zipping there is an alternative function to having a second parameter added. This is a transform function doing something with the paired elements before outputting them to the zip result; for example, list1.zip(list2, a,b -> ... where a and b are the elements of lists 1 and 2 at the same index. This is a way to avoid creating pairs in case you don’t need them. The same process works for arrays, too.
Exercise 8
With two lists val fruits = listOf("Bananas", "Apples", "Oranges") and val prices = listOf(1.69, 2.19, 2.79), and a data class Fruit(val name:String, val price:Double), perform a zipping with the resulting list containing Fruit elements.
Searching in Arrays and Collections
We’ve already seen that by using indexOf() we can find the index of a particular element in an array or a list. For very large arrays or collections (e.g., 1 million entries), that might not be the fastest way to find an element. Internally indexOf() must iterate through the whole array or list and must check for the equality of each data value until a hit occurs.
For sorted arrays or lists there is a better choice: a binary search. In such a binary search, the N elements of an array or list get split into two equal parts of approximate size N /2. Then the part that contains the search element is chosen. With the smaller range, we again perform a split in the middle, do another check, and so on. Using this algorithm to search for an element in an array or list of 1 million entries, we don’t need more than about 20 checks to find it.
binarySearch(element:E, fromIndex:Int = 0, toIndex:Int = size)
This finds the element in an array or a list using its natural ordering. The element type must have the Comparable interface, which is automatically the case for all number types and strings. If the element does not exist in the array or in the list, the appropriate insertion index gets returned. In [1, 2, 4, 5] searching for a 3 thus returns 2, because this is the index of 3 in [1, 2, 3, 4, 5]. Because fromIndex and toIndex have adequate default values, you can omit them if you want to search the whole list.
binarySearch(element:E, comparator: Comparator<in E> fromIndex:Int = 0, toIndex:Int = size)
This finds the element in an array or a list using the provided comparator. The list or array must have been presorted according to the comparator provided. If the element does not exist in the array or in the list, the appropriate insertion index gets returned. Because fromIndex and toIndex have adequate default values, you can omit them if you want to search the whole list. The in in the type parameter indicates that the comparator used also can deal with superclasses of E.
Note that in all cases sorting the array or list in ascending order is mandatory. Otherwise the result is undefined.
The Spread Operator
The * in front of the parameter is called a spread operator . Note that this works only for arrays, but for lists or sets you can perform an appropriate conversion via .toArray(), .toIntArray(), .toDoubleArray(), and so on.
Queues and Stacks: Deques
Sets and lists are not the only collection types you can use. Kotlin does not explicitly handle collection types other than sets and lists, but it sits on top of the Java virtual machine (JVM) and includes a significant subset of the Java standard libraries, including all Java collection types. We do not cover all of them, because some are rather specialized and show features you don’t normally need. One interesting type is worth a more thorough investigation, though: deques.
Head: The head of a list is the element first added to a list. It is thus the element with index 0. For deques you explicitly state that you want to do something with the head by using one of the functions containing First in its name.
Tail: The tail of a list is where elements get added via the add() function. For deques you explicitly state that you want to do something with the tail by using one of the functions containing Last in its name.
ArrayDeque<E>()
This constructs a deque with an initial capacity of 16 elements of type E. From a client-side perspective, you don’t have to think about capacities unless performance or resources housekeeping is a problem. If you expect many elements, you could specify a higher initial capacity size using the constructor shown later.
ArrayDeque<E>(numElements:Int)
This constructs a deque with the given initial capacity.
ArrayDeque<E>(c:Collection<out E>)
This constructs a deque initialized with the given elements. The out in the type specification means subclasses of E are allowed for the parameter.
For example, to create a deque holding Int elements, you writ: val dq = ArrayDeque<Int>(). Note that the ArrayDeque class will let its internal data container grow as necessary; the initial capacity thus is a mere hint.
addFirst(element:E)
This adds an element to the HEAD of a deque.
addLast(element:E)
This adds an element to the TAIL of a deque. It corresponds to add() for a list.
removeFirst(): E
This gets and removes the element at the HEAD of the deque. It throws an exception if the deque is empty.
removeLast(): E
This gets and removes the element at the TAIL of the deque. It throws an exception if the deque is empty.
getFirst(): E
This retrieves but does not remove the element at the HEAD of the queue. It throws an exception if the deque is empty.
getLast(): E
This retrieves but does not remove the element at the TAIL of the queue. It throws an exception if the deque is empty.
peekFirst():E?
This gets but does not remove the HEAD of a deque. If the deque is empty, it returns null instead.
peekLast():E?
This gets but does not remove the TAIL of a deque. If the deque is empty, it returns null instead.
pollFirst():E?
This gets and removes the HEAD of a deque. If the deque is empty, it returns null instead .
pollLast():E?
This gets and removes the TAIL of a deque. If the deque is empty, it returns null instead.
Deques can be used to mimic first-in, first-out (FIFO) queues if you use addLast() and removeFirst(). Likewise, last-in, first-out (LIFO) stacks can be simulated by using addLast() and removeLast().
A Statistics Class for the NumberGuess App
Our NumberGuess game app to this point doesn’t contain any list-like structures, which is why we didn’t mention it for a while. This can be changed readily and the extension we add for that aim is a dedicated statistics activity that counts attempts and hits for us.
Adding an Action Bar to The App
- 1.Update the AndroidManifest.xml file. Add as an XML attribute inside the <activity> tag: android:theme = "@style/AppTheme.NoActionBar" (right after the android:name= ... entry in a new line)<activityandroid:name=...android:theme="@style/AppTheme.NoActionBar">
- 2.Update the res/values/styles.xml file. Inside the <resources> tag add:<resources>...<style name="AppTheme.NoActionBar"><item name="windowActionBar">false</item><item name="windowNoTitle">true</item></style><style name="AppTheme.AppBarOverlay"parent="ThemeOverlay.AppCompat.Dark.ActionBar"/><style name="AppTheme.PopupOverlay"parent="ThemeOverlay.AppCompat.Light"/></resources>
- 3.Update the res/layout/activity_main.xml file:<?xml version="1.0" encoding="utf-8"?><android.support.design.widget.CoordinatorLayoutxmlns:android="http://schemas.android.com/apk/res/android"xmlns:app="http://schemas.android.com/apk/res-auto"xmlns:tools="http://schemas.android.com/tools"android:layout_width="match_parent"android:layout_height="match_parent"tools:context=".MainActivity"><android.support.design.widget.AppBarLayoutandroid:layout_height="wrap_content"android:layout_width="match_parent"android:theme="@style/AppTheme.AppBarOverlay"><android.support.v7.widget.Toolbarandroid:id="@+id/toolbar"android:layout_width="match_parent"android:layout_height="?attr/actionBarSize"android:background="?attr/colorPrimary"app:popupTheme="@style/AppTheme.PopupOverlay"/></android.support.design.widget.AppBarLayout><include layout="@layout/content_main"/></android.support.design.widget.CoordinatorLayout>
- 4.Create a new file res/layout/content_main.xml:<?xml version="1.0" encoding="utf-8"?><android.support.constraint.ConstraintLayoutxmlns:android="http://schemas.android.com/apk/res/android"xmlns:app="http://schemas.android.com/apk/res-auto"xmlns:tools="http://schemas.android.com/tools"android:layout_width="match_parent"android:layout_height="match_parent"app:layout_behavior="@string/appbar_scrolling_view_behavior"tools:showIn="@layout/activity_main"tools:context=".MainActivity"><LinearLayoutandroid:orientation="vertical"android:layout_width="match_parent"android:layout_height="match_parent"android:padding="30dp"tools:showIn="@layout/activity_main"tools:context=".MainActivity"><TextViewandroid:layout_width="wrap_content"android:layout_height="wrap_content"android:text="@string/title.numberguess"android:textSize="30sp"/><Buttonandroid:id="@+id/startBtn"android:onClick="start"android:layout_width="match_parent"android:layout_height="wrap_content"android:text="@string/btn.start"/><Space android:layout_width="match_parent"android:layout_height="5dp"/><LinearLayoutandroid:orientation="horizontal"android:layout_width="wrap_content"android:layout_height="wrap_content"><TextViewandroid:text="@string/label.guess"android:layout_width="wrap_content"android:layout_height="wrap_content"/><EditTextandroid:id="@+id/num"android:hint="@string/edit.number"android:layout_width="80sp"android:layout_height="wrap_content"android:inputType="number"tools:ignore="Autofill"/><Buttonandroid:id="@+id/doGuess"android:onClick="guess"android:text="@string/btn.do.guess"android:layout_width="wrap_content"android:layout_height="wrap_content"/></LinearLayout><Space android:layout_width="match_parent"android:layout_height="5dp"/><TextViewandroid:id="@+id/status"android:text="@string/status.start.info"android:textColor="#FF000000"android:textSize="20sp"android:layout_width="wrap_content"android:layout_height="wrap_content"/><Space android:layout_width="match_parent"android:layout_height="5dp"/><TextView android:text="@string/label.log"android:textStyle="bold"android:layout_width="wrap_content"android:layout_height="wrap_content"/><kotlinforandroid.book.numberguess.gui.Consoleandroid:id="@+id/console"android:layout_height="100sp"android:layout_width="match_parent"/></LinearLayout></android.support.constraint.ConstraintLayout>
- 5.Make sure the MainActivity.kt file contains as imports:import kotlinx.android.synthetic.main.activity_main.*import kotlinx.android.synthetic.main.content_main.*
- 6.Also inside class MainActivity, let function onCreate() read:override fun onCreate(savedInstanceState: Bundle?) {super.onCreate(savedInstanceState)setContentView(R.layout.activity_main)setSupportActionBar(toolbar) // NEWfetchSavedInstanceData(savedInstanceState)doGuess.setEnabled(started)}
- 7.
Create a menu resource folder. For that aim, right-click the res folder, then select New ➤ Android Resource Directory. As the directory name, enter menu, and from the resource types, select Menu.
- 8.Create a menu resource: Right-click the res/menu folder, then select New ➤ Menu resource file. As the file name, enter menu_options. With the file opened, switch to Text view by pressing on the tab at the bottom of the editor view. As contents, write<?xml version="1.0" encoding="utf-8"?><menu xmlns:android="http://schemas.android.com/apk/res/android"xmlns:app="http://schemas.android.com/apk/res-auto"><item android:id="@+id/statistics"android:icon="@android:drawable/ic_menu_info_details"android:title="@string/statistics.menu_title"app:showAsAction="ifRoom"/></menu>
- 9.Create a string resource: Open res/values/strings and add<string name="statistics.menu_title">Statistics</string>
- 10.In the MainActivity class, addoverridefun onCreateOptionsMenu(menu: Menu): Boolean {val inflater: MenuInflater = menuInflaterinflater.inflate(R.menu.menu_options, menu)return true}private fun openStatistics() {val intent: Intent = Intent(this,StatisticsActivity::class.java)startActivity(intent)}
The activity class will now show an error, because the StatisticsActivity does not exist yet. We create it in the following section.
The Statistics Activity
- 1.
Right-click app, then select New ➤ Activity ➤ Empty Activity. As the activity’s name, enter StatisticsActivity. Make sure Generate Layout file is selected, and use kotlinforandroid.book.numberguess as a package name. As source language select Kotlin and set main as the target source. Click Finish.
- 2.Open the file res/layout/activity_statistics.xml, switch to the Text view type, and replace its contents with this:<?xml version="1.0" encoding="utf-8"?><LinearLayoutxmlns:android="http://schemas.android.com/apk/res/android"xmlns:tools="http://schemas.android.com/tools"xmlns:app="http://schemas.android.com/apk/res-auto"android:id="@+id/statisticsContainer"android:layout_width="match_parent"android:orientation="vertical"android:layout_height="match_parent"tools:context=".StatisticsActivity"></LinearLayout>
- 3.Open the new activity class StatisticsActivity and replace its contents with this:package kotlinforandroid.book.numberguessimport android.support.v7.app.AppCompatActivityimport android.os.Bundleimport android.view.ViewGroupimport android.widget.TextViewimport kotlinforandroid.book.numberguess.statistics.Statisticsclass StatisticsActivity : AppCompatActivity() {overridefun onCreate(savedInstanceState: Bundle?) {super.onCreate(savedInstanceState)setContentView(R.layout.activity_statistics)showData(Statistics.getStatistics())}fun showData(s:List<String>) {val container = findViewById<ViewGroup>(R.id.statisticsContainer)container.removeAllViews()s.forEach {line ->container.addView(TextView(this).apply {text = line})}}}
The last import must be entered in a single line, not like shown here. The editor will show errors for the class, but we correct them soon.
- 4.
Create a new package kotlinforandroid.book.numberguess.statistics and inside a new object Statistics.
- 5.For now let the Statistics read:package kotlinforandroid.book.numberguess.statisticsobject Statistics {fun getStatistics(): List<String> {return emptyList()}}
The errors in class StatisticsActivity should now disappear.

Empty statistics activity
State Housekeeping for the Statistics
where the ArrayList<GameSessionRecord> means we want a mutable list of exactly such session records. The : Serializable is a marker interface that makes sure the objects from this class can be converted into a language-agnostic representation.
Note
Unfortunately we cannot write val data = mutableListOf() because this is not marked serializable. We need a language-agnostic representation for the complete list as well, so we have to fall back to the concrete implementation.
The ?.run{ } constructs make sure the run block gets executed only if the value in front of it is not null. If it gets executed, this contains exactly this value. Therefore the getSerializable() actually translates to this.getSerializable() and thus to the getSerializable() from the savedInstanceState object. The this as ... is needed because the getSerializable() by language design has lost its type information, so we must explicitly state the type.
Communicating Between the Activities
The game itself gets handled by the MainActivity class and the statistics by StatisticsActivity. For those running the same process, we choose the simplest way of communication: using a singleton object for sharing data. We have not yet covered processes; in most cases it is enough to know that a process is a technical bracket around app components, and that singleton objects reside within a process’s boundaries.
Note
For more complicated data structures to share between app components, consider using the built-in Android database.
Note that for this to work the Statistics singleton object needs to be imported: import kotlinforandroid.book.numberguess.statistics.Statistics.
Implementing Statistical Calculations
- 1.
The if() ... ;else ... checks whether we have data at all. If there is no record, the average cannot be built and we have to avoid dividing by 0.0. In this case, we return 0.0.
- 2.
The map() applies the provided lambda function to each element of data and returns a new list with the number of attempts as elements.
- 3.
The sum() is available for any collection with number type elements. Here it obviously sums up all tries.
- 4.
The toDouble() is necessary, because otherwise an Int by Int division will result in an Int, not the desired Double.
We divide the sum by the number of game sessions to obtain the result.

 designates the average. The corresponding Kotlin function reads:
Because we need the average inside a loop, we introduce a val variable holding the average. It is thus not possible here to use the fun functName() = ... notation. We cannot put it into a single expression. Well, we could, but not without significant performance penalties.
For the standard deviation we need at least two records. If we have fewer, we prematurely exit the function and return 0.0.
The Math.sqrt() calculates the square root needed for the calculation:
 .
.The Math.pow(x, 2.0) calculates the square: x2.
Similar to the average calculation, the map() extracts
 where
where  designates the average.
We again take the sum from the result list by applying sum().
The division by size − 1 is part of the formula.
We see a practical implementation of groupBy(). You will see groupBy() often when it comes to counting things based on some criterion. Here we count record objects based on the number of tries. This is exactly what the function parameter of groupBy() here does.
The result of the groupBy() function is a map Int → List<GameSessionRecord>. We don’t need the list per tries figure, though, only the number of records. This is what the mapValues() is used for; it converts the value of each mapped to item from the map and replaces the list that it happens to be, in this case by the list size. The me in the parameter of mapValues() is of type Map.Entry. This is something mapValues() prescribes. Map.Entry has two properties: the .key and the .value. The key is the tries figure, and the value is the list. We take the value and from it the size. The result is the desired map.
We again use the groupBy() function . This time, however, we need to calculate figures for the numberToGuess member and accordingly extract this property as the groupBy -key.
We get a map with a list of GameSessionRecord elements as values. We take each list and calculate the average of tries needed. For this aim we map the list to a new list containing only the tries figures, take the sum, convert it to a double, and divide it by the list size.
For this to work, the import import java.text.DecimalFormat needs to be added to the imports list. The NumberFormat used here is new; we need it to avoid doubles being printed out with too many fraction digits. The .toSortedMap() makes sure the maps get sorted according to their keys.

NumberGuess statistics