
6 The pipeline: Connecting commands
In chapter 4, you learned that running commands in PowerShell is the same as running commands in any other shell: you type a cmdlet name, give it parameters, and press Enter. What makes PowerShell special isn’t the way it runs commands but the way it allows multiple commands to be connected to each other in powerful, one-line sequences.
6.1 Connecting one command to another: Less work for you
PowerShell connects commands to each other by using a pipeline. The pipeline provides a way for one command to pass, or pipe, its output to another command, allowing that second command to have something to work with. This can be seen with the vertical bar | between two cmdlets (figure 6.1).

You’ve already seen this in action in commands such as Dir | more. You’re piping the output of the Dir command into the more command; the more command takes that directory listing and displays it one page at a time. PowerShell takes that same piping concept and extends it to greater effect.
PowerShell’s use of a pipeline may seem similar at first to the way UNIX and Linux shells work. Don’t be fooled, though. As you’ll come to realize over the next few chapters, PowerShell’s pipeline implementation is much richer and more modern.
6.2 Exporting to a file
PowerShell provides several powerful ways to export data to useful formats, such as TXT, CSV, JSON, and XML (Extensible Markup Language). In your workflow, you may need to export data from Azure Active Directory or from cloud storage. In this chapter, we will go through the process of piping data. We will start by getting the data from some simple built-in commands to simplify the process, but the concept is the same.
Let’s start by running a few simple commands. Then we’ll learn how to join them together. Here are a few commands that we can use:
We picked these commands because they’re easy and straightforward. We gave you the aliases for Get-Process and Get-Command in parentheses. For Get-History, we specified the -count parameter with a value of 10 so that we only get the last 10 history entries.
Try it Now Go ahead and choose the commands you want to work with. We use Get-Process for the following examples; you can stick with one of the three we’ve listed, or switch between them to see the differences in the results.
What do you see? When we run Get-Process, a table with several columns of information appears on the screen (figure 6.2).

It’s great to have that information on the screen, but you might want to do more with the information. For example, if you want to make charts and graphs of memory and CPU utilization, you might want to export the information into a CSV file that could be read into an application for further data manipulation.
6.2.1 Exporting to CSV
Exporting to a file is where the pipeline and a second command come in handy:
Similar to piping Dir to more, we’ve piped our processes to Export-CSV. That second cmdlet has a mandatory positional parameter (discussed in chapter 3) that we’ve used to specify the output filename. Because Export-CSV is a native PowerShell cmdlet, it knows how to translate the output generated by Get-Process into a standard CSV file.
Go ahead and open the file in Visual Studio Code to see the results, as shown in figure 6.3.

The first line of the file contains column headings, and the subsequent lines list the information for the various processes running on the computer. You can pipe the output of almost any Get- cmdlet to Export-CSV and get excellent results. You may also notice that the CSV file contains a great deal more information than what’s typically shown on the screen. That’s intentional. The shell knows it can’t possibly fit all of that information on the screen, so it uses a configuration, supplied by Microsoft, to select the most important information for onscreen display. In later chapters, we’ll show you how to override that configuration to display whatever you want.
Once the information is saved into a CSV file, you can easily email it to colleagues and ask them to view it from within PowerShell. To do this, they’d import the file:
The shell would read in the CSV file and display the process information. It wouldn’t be based on live information, but it would be a snapshot from the exact point in time that you created the CSV file.
6.2.2 Exporting to JSON
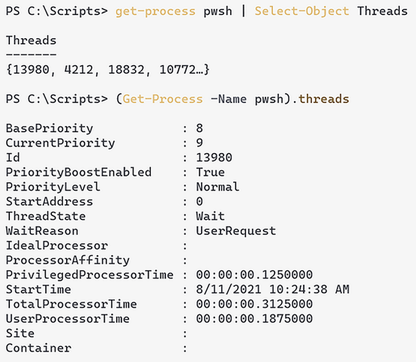
Let’s say you want to export the process information and include the thread information. The thread information is what is called a nested property on the process object. Let’s take a look (figure 6.4). Note that Select-Object Threads tells PowerShell to display only the Threads property. We will cover Select-Object in more depth in chapter 8.
If you try to export processes using ConvertTo-CSV, the Threads property will have the value System.Diagnostics.ProcessThreadCollection. So, we need another way to export data if we want the nested properties under the Threads property.
PowerShell also has a ConvertTo-Json cmdlet, which creates a JSON file that allows storage of these nested properties. Most languages have libraries to understand JSON. You’ll also have a matching ConvertFrom-Json cmdlet. Both the ConvertFrom and ConvertTo cmdlets (such as ConvertFrom-CSV and ConvertTo-CSV) either produce or consume a string on the pipeline. This is the command to convert processes into JSON, using Out-File to save the results to a file:
You can get the data back by running the following command:
If you run this command, you will notice that the data is in a very different format than when you run the Get-Process command. We will show you how to deal with that in the next section. Figure 6.5 shows an excerpt of what the Threads property looks like in the exported JSON.

6.2.3 Exporting to XML
In the previous section, you noticed that the data returned by ConvertFrom-Json is displayed very differently than if you get it from the original command. This is because the objects are not of the same type (we will cover objects in chapter 8). There is a command to export data and get back the original objects.
PowerShell has an Export-Clixml cmdlet, which creates a generic CLI XML file that allows PowerShell to reconstruct the original objects (or something very close). Clixml is unique to PowerShell, and although any program is technically capable of understanding the XML it produces, it is best for when the results are being used by PowerShell. You’ll also have a matching Import-Clixml cmdlet. Both the import and export cmdlets (such as Import-CSV and Export-CSV) expect a filename as a mandatory parameter.
Try it Now Try exporting such things as processes, or commands, to a CLIXML file. Make sure you can reimport the file, and try opening the resulting file in Visual Studio Code or another text editor on your system to see how each application displays the information.
Does PowerShell include any other import or export commands? You could find out by using the Get-Command cmdlet and specifying a -Verb parameter with either Import or Export.
Try it Now See if PowerShell comes with any other import or export cmdlets. You may want to repeat this check after you load new commands into the shell—something you’ll do in the next chapter.
6.2.4 Out-File
We have talked about CSV, JSON, and XML files, but what if you simply want a flat file to store your data in? Let’s look at the Out-File command. It takes the data that is in the pipeline and directs it out to a flat file—below a text file in our example:
6.2.5 Comparing files
Both CSV and CLIXML files can be useful for persisting snapshots of information, sharing those snapshots with others, and reviewing those snapshots at a later time. In fact, Compare-Object has a great way of using them.
First, run help Compare-Object and read the help for this cmdlet. We want you to pay attention to three parameters in particular: -ReferenceObject, -DifferenceObject, and -Property.
Compare-Object is designed to take two sets of information and compare them to each other. For example, imagine that you run Get-Process on two computers that are sitting side by side. The computer that’s configured exactly the way you want is on the left and is the reference computer. The computer on the right might be the same, or it might be somewhat different; this one is the difference computer. After running the command on each, you’re staring at two tables of information, and your job is to figure out whether any differences exist between the two.
Because these are processes that you’re looking at, you’re always going to see differences in things like CPU and memory utilization numbers, so we’ll ignore those columns. In fact, focus on the Name column, because we want to see whether the difference computer contains any additional, or any fewer, processes than the reference computer. It might take you a while to compare all of the process names from both tables, but you don’t have to—that’s exactly what Compare-Object will do for you. Let’s say you sit down at the reference computer and run this:
We prefer using CLIXML rather than CSV for comparisons like this, because CLIXML can hold more information than a flat CSV file. You then transport that XML file to the difference computer and run this command:
Because the previous step is a bit tricky, we’ll explain what’s happening:
-
As in math, parentheses in PowerShell control the order of execution. In the previous example, they force
Import-ClixmlandGet-Processto run beforeCompare-Objectruns. The output fromImport-Clixmlis fed to the-Referenceparameter, and the output fromGet-Processis fed to the-Differenceparameter.The parameter names are
-ReferenceObjectand-DifferenceObject. Keep in mind that you can abbreviate parameter names by typing enough of their names for the shell to be able to figure out which one you want. In this case,-Referenceand-Differenceare more than enough to uniquely identify these parameters. We probably could have shortened them even further to something like-refand-diff, and the command would still have worked. -
Rather than comparing the two complete tables,
Compare-Objectfocuses on theName, because we gave it the-Propertyparameter. If we hadn’t, it would think that every process is different because the values of columns such asVM,CPU, andPMare always going to be different. -
The result is a table telling you what’s different. Every process that’s in the reference set but not in the difference set will have a
<=indicator (which indicates that the process is present only on the left side). If a process is on the difference computer but not the reference computer, it’ll have a=>indicator instead. Processes that match across both sets aren’t included in theCompare-Objectoutput.
Try it Now Go ahead and try this. If you don’t have two computers, start by exporting your current processes to a CLIXML file, as shown in the previous example. Then start some additional processes, another pwsh, such as Visual Studio Code, nano (a command-line editor), the browser, or a game. Your computer will become the difference computer (on the right), whereas the CLIXML file will still be the reference computer (on the left).
Here’s the output from our test:
PS C:Scripts>Compare-Object -ReferenceObject (Import-Clixml ./procs.xml)
     ➥ -DifferenceObject (Get-Process) -Property name

name            SideIndicator
----            -------------
nano            =>
pwsh            =>
This is a useful management trick. If you think of those reference CLIXML files as configuration baselines, you can compare any current computer to that baseline and get a difference report. Throughout this book, you’ll discover more cmdlets that can retrieve management information, all of which can be piped into a CLIXML file to become a baseline. You can quickly build a collection of baseline files for services, processes, operating system configuration, users and groups, and much more, and then use those at any time to compare the current state of a system to that baseline.
Try it Now For fun, try running the Compare-Object command again, but leave off the -Property parameter entirely. See the results? Every single process is listed, because values such as PM, VM, and so forth, have all changed, even though they’re the same processes. The output also isn’t as useful, because it displays each process’s type name and process name.
By the way, you should know that Compare-Object generally doesn’t do well at comparing text files. Although other operating systems and shells have a Compare-Object command that’s explicitly intended for comparing text files, PowerShell’s Compare-Object command works differently. You’ll see how differently in this chapter’s lab.
Note If it seems as though you’re using Get-Process and Get-Command often, well, that’s on purpose. We guarantee you have access to those cmdlets because they’re native to PowerShell and don’t require an add-in such as Azure PowerShell or AWS Tools for PowerShell. That said, the skills you’re learning apply to every cmdlet you’ll ever need to run, including those that ship with Azure compute, Azure Storage, Azure Virtual Network, and Azure PowerShell module.
6.3 Piping to a file
Whenever you have nicely formatted output—for example, the tables generated by Get-Command or Get-Process—you may want to preserve that in a file or even on paper. Normally, cmdlet output is directed to the screen, which PowerShell refers to as the host, but you can change where that output goes. We’ve already shown you one way to do so:
The > character is a shortcut added to PowerShell to provide syntactic compatibility with the Bash shell. In reality, when you run that command, PowerShell does the following under the hood:
You can run that same command on your own, instead of using the > syntax. Why would you do so? Because Out-File also provides additional parameters that let you specify alternative character encodings (such as UTF-8 or Unicode), append content to an existing file, and so forth. By default, the files created by Out-File are 80 columns wide, which means sometimes PowerShell might alter command output to fit within 80 characters. That alteration might make the file’s contents appear different than when you run the same command on the screen. Read the help file for Out-File to see if you can spot a parameter that would let you change the output file width to something other than 80 characters.
Try it Now Don’t look here for the answer—open up that help file and see what you can find. We guarantee you’ll spot the right parameter in a few moments.
PowerShell has a variety of Out- cmdlets. One is called Out-Default, and it’s the one the shell uses when you don’t specify a different Out- cmdlet. If you run
even if you don’t realize it. Out-Default does nothing more than direct content to Out-Host, which means you’re running
without realizing it. Out-Host displays information on the screen. What other Out- cmdlets can you find?
Try it Now Time to investigate other Out- cmdlets. To get started, try using the Help command and wildcards such as Help Out*. Another option is to use the Get-Command in the same way, such as Get-Command Out*. Or you could specify the -Verb parameter Get-Command -Verb Out. What did you come up with?
Out-Null and Out-String have specific uses that we won’t get into right now, but you’re welcome to read their help files and look at the examples included in those files.
6.4 Converting to HTML
Want to produce HTML reports? Pipe your command to ConvertTo-Html. This command produces well-formed, generic HTML that displays in any web browser. It’s plain-looking, but you can reference a Cascading Style Sheets (CSS) file to specify more-attractive formatting if desired. Notice that this command doesn’t require a filename:
Try it Now Make sure that you run that command yourself—we want you to see what it does before you proceed.
In the PowerShell world, the verb Export implies that you’re taking data, converting it to some other format, and saving that other format in some kind of storage, such as a file. The verb ConvertTo implies only a portion of that process: the conversion to a different format but not saving it into a file. When you ran the preceding command, you got a screen full of HTML, which probably wasn’t what you wanted. Stop for a second; can you think of how you’d get that HTML into a text file on disk?
Try it Now If you can think of a way, go ahead and try it before you read on.
See how connecting more and more commands allows you to have increasingly powerful command lines? Each command handles a single step in the process, and the entire command line as a whole accomplishes a useful task.
PowerShell ships with other ConvertTo- cmdlets, including ConvertTo-CSV and ConvertTo-Xml. As with ConvertTo-Html, these don’t create a file on disk; they translate command output into CSV or XML, respectively. You could pipe that converted output to Out-File to then save it to disk, although it would be shorter to use Export-CSV or Export-Clixml, because those do both the conversion and the saving.
6.5 Using cmdlets that modify the system: Killing processes
Exporting and converting aren’t the only reasons you might want to connect two commands together. For example, consider—but please don’t run—this command:
Can you imagine what that command would do? We’ll tell you: you could kill critical processes. It would retrieve every process and then start trying to end each one of them. It would get to a critical process, such as the /usr/sbin/coreaudiod on macOS, and your computer would no longer be able to play sound. If you’re running PowerShell inside a virtual machine and want to have a little fun, go ahead and try running that command.
The point is that cmdlets with the same noun (in this case, Process) can often pass information among themselves. Typically, you’d specify the name of a specific process rather than trying to stop them all:
Jobs offer something similar: the output from Get-Job can be piped to cmdlets such as Stop-Job, Receive-Job, Wait-Job, and so forth. We will cover jobs in detail in chapter 14.
As you might expect, specific rules limit which commands can connect to each other. For example, if you look at a command sequence such as Get-Process | New-Alias, you probably wouldn’t expect it to do anything sensible (although it might well do something nonsensical). In chapter 7, we’ll dive into the rules that govern how commands can connect to each other.
We’d like you to know one more thing about cmdlets such as Stop-Job and Stop-Process. These cmdlets modify the system in some fashion, and all cmdlets that modify the system have an internally defined impact level. The cmdlet’s creator sets this impact level, and it can’t be changed. The shell has a corresponding $Confirm-Preference setting, which is set to High by default. Type the following setting name to see your shell’s setting:
Here’s how it works: when a cmdlet’s internal impact level is equal to or higher than the shell’s $ConfirmPreference setting, the shell will automatically ask, “Are you sure?” when the cmdlet does whatever it’s trying to do. If you used a virtual machine to try the crash-your-computer command we mentioned earlier, you probably were asked, “Are you sure?” for each process. When a cmdlet’s internal impact level is less than the shell’s $ConfirmPreference setting, you don’t automatically get the “Are you sure?” prompt. But you can force the shell to ask you whether you’re sure:
You just add the -Confirm parameter to the cmdlet. This should be supported by any cmdlet that makes some kind of change to the system, and it’ll show up in the help file for the cmdlet if it’s supported.
A similar parameter is -WhatIf. This is supported by any cmdlet that supports -Confirm. The -WhatIf parameter isn’t triggered by default, but you can specify it whenever you want to:
PS C:Scripts > Get-Process | Stop-Process –WhatIf
What if: Performing operation "Stop-Process" on Target "conhost (1920)
".
What if: Performing operation "Stop-Process" on Target "conhost (1960)
".
What if: Performing operation "Stop-Process" on Target "conhost (2460)
".
What if: Performing operation "Stop-Process" on Target "csrss (316)".
This tells you what the cmdlet would have done, without letting the cmdlet do it. It’s a useful way to preview what a potentially dangerous cmdlet would have done to your computer, to make certain that you want to do that.
6.6 Common points of confusion
One common point of confusion in PowerShell revolves around the Export-CSV and Export-Clixml commands. Both commands, technically speaking, create text files. The output of either command can be viewed in Visual Studio Code, as shown in figure 6.3. But you have to admit that the text is definitely in a special kind of format—either in CSV or XML.
The confusion tends to set in when someone is asked to read these files back into the shell. Do you use Get-Content (or its alias type)? For example, suppose you do this:
PS C:Scripts>Get-Process | Select-Object -First 5 | export-CSV processes.CSV
➥ -IncludeTypeInformation
Notice the -IncludeTypeInformation switch; we will come back to it later. Now, try reading that back in by using Get-Content:
PS C:Scripts>Get-Content ./processes.CSV
#TYPE System.Diagnostics.Process "Name","SI","Handles","VM","WS","PM","NPM","Path",
"Parent","Company","CPU","FileVersion","ProductVersion","Description","Product","__NounName","SafeHandle",
"Handle","BasePriority","ExitCode","HasExited","StartTime","ExitTime","Id","MachineName","MaxWorkingSet",
"MinWorkingSet","Modules","NonpagedSystemMemorySize64","NonpagedSystemMemorySize","PagedMemorySize64",
"PagedMemorySize","PagedSystemMemorySize64","PagedSystemMemorySize","PeakPagedMemorySize64",
"PeakPagedMemorySize","PeakWorkingSet64","PeakWorkingSet","PeakVirtualMemorySize64","PeakVirtualMemorySize",
"PriorityBoostEnabled","PriorityClass","PrivateMemorySize64","PrivateMemorySize","ProcessName",
"ProcessorAffinity","SessionId","StartInfo","Threads","HandleCount","VirtualMemorySize64","VirtualMemorySize",
"EnableRaisingEvents","StandardInput","StandardOutput","StandardError","WorkingSet64","WorkingSet",
"SynchronizingObject","MainModule","MainWindowHandle","MainWindowTitle","Responding",
"PrivilegedProcessorTime","TotalProcessorTime","UserProcessorTime","Site","Container"
"","87628","0","0","0","0","0",,,,,,,,,"Process",
"Microsoft.Win32.SafeHandles.SafeProcessHandle","0","0",,"False",,,"0",".",,,"System.Diagnostics.ProcessModuleCollection",
"0","0","0","0","0","0","0","0","0","0","0","0","False",
"Normal","0","0","",,"87628",,"System.Diagnostics.ProcessThreadCollection","0","0","0",
"False",,,,"0","0",,,"0","","True",,,,,
We truncated the preceding output, but there’s a lot more of the same. Looks like garbage, right? You’re looking at the raw CSV data. The command didn’t try to interpret, or parse, the data at all. Contrast that with the results of Import-CSV:
PS C:Scripts>Import-CSV ./processes.CSV
 NPM(K)    PM(M)      WS(M)     CPU(s)      Id  SI ProcessName
 ------    -----      -----     ------      --  -- -----------
      0     0.00       0.00       0.00       0 ...28
      0     0.00       0.00       0.00       1   1
      0     0.00       0.00       0.00      43  43
      0     0.00       0.00       0.00      44  44
      0     0.00       0.00       0.00      47  47
Much nicer, right? The Import- cmdlets pay attention to what’s in the file, attempt to interpret it, and create a display that looks more like the output of the original command (Get-Process, in this case). To do this with Export-CSV, you must use the -IncludeTypeInformation switch. Typically, then, if you create a file with Export-CSV, you read it by using Import-CSV. If you create it by using Export-Clixml, you generally read it by using Import-Clixml. By using these commands in pairs, you get better results. Use Get-Content only when you’re reading in a text file and don’t want PowerShell attempting to parse the data—that is, when you want to work with the raw text.
6.7 Lab
We’ve kept this chapter’s text slightly shorter because some of the examples probably took you a bit longer to complete and because we want you to spend more time completing the following hands-on exercises. If you haven’t already completed all of the “Try it now” tasks in this chapter, we strongly recommend that you do so before tackling these tasks:
-
Create two similar, but different, text files. Try comparing them by using
Compare-Object. Run something like this:Compare-Object -Reference(Get-ContentFile1.txt)-Difference(Get-Content File2.txt). If the files have only one line of text that’s different, the command should work. -
What happens if you run
Get-Command|Export-CSVcommands.CSV|Out-Filefrom the console? Why does that happen? -
Apart from getting one or more jobs and piping them to
Stop-Job, what other means doesStop-Jobprovide for you to specify the job or jobs you want to stop? Is it possible to stop a job without usingGet-Jobat all? -
What if you want to create a pipe-delimited file instead of a CSV file? You’d still use the
Export-CSVcommand, but what parameters would you specify? -
How do you include the type information in the
#comment line at the top of an exported CSV file? -
Export-ClixmlandExport-CSVboth modify the system because they can create and overwrite files. What parameter would prevent them from overwriting an existing file? What parameter would ask whether you were sure before proceeding to write the output file? -
The operating system maintains several regional settings, which include a default list separator. On US systems, that separator is a comma. How can you tell
Export-CSVto use the system’s default separator rather than a comma?
6.8 Lab answers
-
PS C:Scripts > "I am the walrus" | Out-File file1.txtPS C:Scripts > "I'm a believer" | Out-File file2.txtPS C:Scripts > $f1 = Get-Content .file1.txtPS C:Scripts > $f2 = Get-Content .file2.txt -
If you don’t specify a filename with
Out-File, you’ll get an error. But even if you do,Out-Filewon’t do anything because the file is created byExport-CSV. -
Stop-Jobcan accept one or more job names as parameter values for the–Nameparameter. For example, you could run this: