7 Adding commands
One of PowerShell’s primary strengths is its extensibility. As Microsoft continues to invest in PowerShell, it develops more and more commands for products such as Azure compute (Virtual Machines), Azure SQL, Azure Virtual Network, Azure DNS, and so on. You typically manage these through the Azure portal. We will discuss how to install the Azure PowerShell modules later in this chapter.
7.1 How one shell can do everything
How can one shell do everything? Let’s think about your smartphone. How do you add functionality to your phone without upgrading the operating system? You install an app.
When you install an app, it can add widgets or even add commands you can say to the voice assistant. Adding commands to the voice assistant is probably the most like the extension model of PowerShell. PowerShell provides ways of adding commands that you can use.
So, let’s say you installed an app called Ride Share. The app might add a voice command that lets you say, “Book me a ride to work with Ride Share.” The phone finds your work address and sends the command to the app.
PowerShell works in a similar way. PowerShell calls its extensions modules. There are no widgets, but commands can be added. We will cover how to install modules later in the next section.
7.2 Extensions: Finding and installing modules
Before PowerShell 6.0, there were two kinds of extensions: modules and snap-ins. PowerShell v6 and newer support one type of extension called a module. Modules are designed to be more self-contained and easier to distribute.
Microsoft introduced a module called PowerShellGet, which makes it easier to search for, download, install, and update modules from online repositories. PowerShellGet is a lot like the package managers Linux admins love so much—rpm, yum, apt-get, and so on. Microsoft even runs an online gallery, or repository, called PowerShell Gallery (http://powershellgallery.com).
WARning Microsoft runs doesn’t mean Microsoft produces, verifies, and endorses. The PowerShell Gallery contains community-contributed code, and you should use due caution before running someone else’s code in your environment.
You can search for modules like most search engines at https://powershellgallery .com/. The module for Azure is called Az. Figure 7.1 shows an example of searching for that module.

If you click the Az module name, it will take you to more detail about the module. Under Package Details > PSEditions, you can check if the author has tested the module with PowerShell Core (figure 7.2).

Then look under Installation Options (figure 7.3).
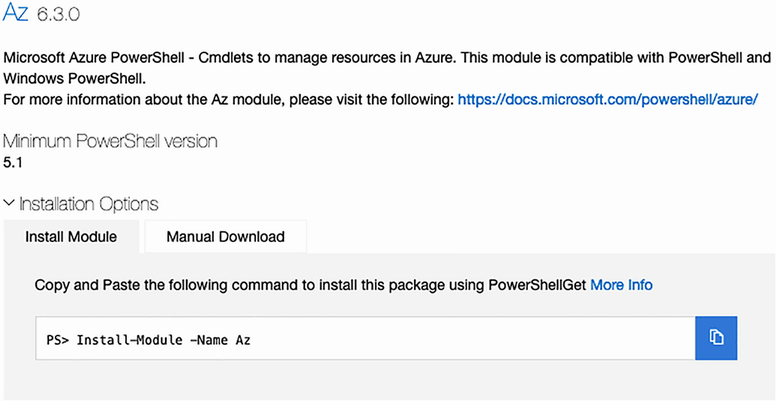
Notice it says that at least PowerShell 5.1 is required to run the module, and it gives instructions on how to install the module. If we run the command Install-Module -Name Az, we can see what happens:
PS C:Scripts> Install-Module az

Untrusted repository
You are installing the modules from an untrusted repository. If you trust this
repository, change its InstallationPolicy value by running the Set-PSRepository
 cmdlet. Are you sure you want to install the modules from 'PSGallery'?
[Y] Yes  [A] Yes to All  [N] No  [L] No to All  [S] Suspend  [?] Help
(default is "N"):y
It prompts you asking if you trust installing from the gallery, and if you say yes, then it installs the module. You can run the Get-Module command to verify it installed the module, but the -ListAvailable parameter is required because the module is not loaded:
PS C:Scripts> Get-Module az -ListAvailable


    Directory:
    C:UsersTylerDocumentspowershellModules

ModuleType Version    Name
---------- -------    ----
Script     6.3.0      Az
The path and version will vary for you, but the output should be similar.
7.3 Extensions: Finding and adding modules
PowerShell automatically looks in a certain set of paths to find modules. The PSModulePath environment variable defines the paths where PowerShell expects modules to live:
PS /Users/Tyler> (Get-Content Env:/PSModulePath) -split ':'
C/Users/Tyler.local/share/powershell/Modules
/usr/local/share/powershell/Modules
/usr/local/microsoft/powershell/7/Modules
Try it Now The preceding command was run on a macOS device. Run the command (Get-Content Env:/PSModulePath) -split ':' and see what the results are for you. Note that they will be different, depending on what OS you are using.
As you can see in this example, there are three default locations: one in the folder where PowerShell is installed, where system modules live; one in the local/share/ folder, where you can put modules shared by all users; and one in the .local folder, where you can add any personal modules. If you’re running even later versions of PowerShell, you might see additional locations that Microsoft is now using. You can also add a module from any other location, provided you know its full path. On your Windows machine, you will see a similar layout where modules are installed:
$env:PSModulePath -split ';'

C:UsersAdministratorDocumentsPowerShell7Modules
C:Program FilesWindowsPowerShellModules
C:Windowssystem32PowerShell7Modules
The path is important in PowerShell. If you have modules located elsewhere, you should add their paths to the PSModulePath environment variable. You can do this in your profile with the following command (we’ll cover how to set up a profile later in this chapter):
NOTE There are a few things that we have not mentioned yet in the preceding example. But that’s okay. We promise we will get to them.
Why is the PSModulePath so important? Because with it, PowerShell can automatically locate all of the modules on your computer. After it finds your modules, PowerShell autodiscovers them. It will look to you as if all of your modules are loaded all of the time. Ask for help on a module, and you’ll get it, without having to load it. Run any command you’ve found, and PowerShell will automatically load the module containing that command. PowerShell’s Update-Help command also uses PSModulePath to discover what modules you have, and then it seeks updated help files for each one.
For example, run Get-Module | Remove-Module to remove any loaded modules. This will remove almost all commands from the current session, so if you try this, close and reopen PowerShell. Then run the following command (your results may differ slightly, depending on your OS and what modules you have installed):
PS C:Scripts> help *storaget*
       Name                                    Category ModuleName

       Get-AzStorageTable                      Cmdlet   Az.Storage
       Get-AzStorageTableStoredAccessPolicy    Cmdlet   Az.Storage
       New-AzStorageTable                      Cmdlet   Az.Storage
       New-AzStorageTableSASToken              Cmdlet   Az.Storage
       New-AzStorageTableStoredAccessPolicy    Cmdlet   Az.Storage
       Remove-AzStorageTable                   Cmdlet   Az.Storage
       Remove-AzStorageTableStoredAccessPolicy Cmdlet   Az.Storage
       Set-AzStorageTableStoredAccessPolicy    Cmdlet   Az.Storage
As you can see, PowerShell discovers several commands (of the Cmdlet variety) that have the word storage in their name (I used storaget to simplify the results in the example). You can then ask for help on one of these, even though you haven’t loaded the module:
PS C:Scripts> Get-Help Get-AzStorageTable
       NAME
       Get-AzStorageTable
SYNOPSIS
    Lists the storage tables.

SYNTAX
    Get-AzStorageTable [[-Name] <System.String>] [-Context
<Microsoft.Azure.Commands.Common.Authentication.Abstractions.IStorageContext>]
➥ [-DefaultProfile

<Microsoft.Azure.Commands.Common.Authentication.Abstractions.Core
➥ .IAzureContextContainer>] [<CommonParameters]
If you want to, you can even run the command, and PowerShell will make sure the module is loaded for you. This autodiscovery and autoloading functionality is useful, helping you to find and use commands that aren’t even present in the shell when you start.
PowerShell’s module autodiscovery enables the shell to complete command names (using Tab in the console or IntelliSense in the Visual Studio Code), display help, and run commands, even for modules you haven’t explicitly loaded into memory. These features make it worth the effort to keep PSModulePath as lean as possible (i.e., don’t put a lot of different locations in it) and keep your modules up to date.
What if a module isn’t located in one of the paths referenced by PSModulePath? You’d need to run Import-Module and specify the complete path to the module, such as C:Scripts/myModules/myModule.
Modules can also add PowerShell providers. Running Get-PSProvider will get you a list of providers:
PS /Users/James> get-psprovider

Name                 Capabilities                  Drives
----                 ------------                  ------
Alias                ShouldProcess                 {Alias}
Environment          ShouldProcess                 {Env}
FileSystem           Filter, ShouldProcess, Crede... {/, Temp}
Function             ShouldProcess                 {Function}
Variable             ShouldProcess                 {Variable}
7.4 Command conflicts and removing extensions
Take a close look at the commands we added for both Google Cloud SQL instances and Azure Table storage. Notice anything special about the commands’ names?
Most PowerShell extensions—Amazon Web Services being a notable exception—add a short prefix to the noun portion of their command names. Get-GcSqlInstance, for example, or Get-AzStorageTable. These prefixes may seem awkward, but they’re designed to prevent command conflicts.
For example, suppose you load two modules that each contain a Get-User cmdlet. With two commands having the same name and being loaded at the same time, which one will PowerShell execute when you run Get-User? The last one loaded, as it turns out. But the other command with the same name isn’t inaccessible. To specifically run either command, you have to use a somewhat awkward naming convention that requires both the module name and the command name. If one Get-User comes from a module called MyCoolPowerShellModule, you have to run this:
That’s a lot of typing, and it’s why Microsoft suggests adding a product-specific prefix, such as Az or Gc, to the noun of each command. Adding prefixes helps prevent a conflict and helps make commands easier to identify and use.
Note The Amazon Web Services module does not use a prefix.
If you do wind up with a conflict, you can always remove one of the conflicting modules. Run Remove-Module, along with the module name, to unload a module.
Note Add your own prefix to any module when you import the module. Import-Module ModuleName -Prefix MyPrefix will change Get-OriginalCmdLet to Get-MyPrefixOriginalCommand.
7.5 Playing with a new module
Let’s put your newfound knowledge to use. We want you to follow along with the commands we present in this section. More important, we want you to follow the process and the thinking that we’ll explain, because this is how we teach ourselves to use new commands without rushing out and buying a new book for every product and feature that we run across. In the lab for this chapter, we’ll have you repeat this same process on your own, to learn a more in-depth task.
Our goal is to compress a file on our computer into a zip archive. We have no idea whether PowerShell can even do this, so we start by asking the help system for a clue:
PS C:Scripts> help *-archive
Name                              Category  Module
----                              --------  ------
Compress-Archive                  Function  Microsoft.PowerShell.Arc...
Aha! As you can see, we have an entire Microsoft.PowerShell.Archive (the full name was truncated) module on our computer. The previous list shows the Compress-Archive command, but we’re curious about what other commands are available. To find out, we manually load the module and list its commands:
PS C:Scripts> get-command -Module Microsoft.PowerShell.Archive


CommandType     Name
-----------     ----
Function        Compress-Archive
Function        Expand-Archive
Note We could have asked for help on Compress-Archive or even run the command directly. PowerShell would have loaded the Microsoft.PowerShell .Archive module for us in the background. But because we’re exploring, this approach lets us view the module’s complete list of commands.
This list of commands looks more or less the same as the earlier list. Fine, let’s see what the Compress-Archive command looks like:
PS C:Scripts> Get-Help Compress-Archive

NAME
    Compress-Archive

SYNTAX
    Compress-Archive [-Path] <string[]> [-DestinationPath]
    <string> [-CompressionLevel {Optimal | NoCompression |
    Fastest}] [-PassThru] [-WhatIf] [-Confirm]
    [<CommonParameters>]
Seems straightforward, and only -Path and -DestinationPath are mandatory parameters. Let’s try creating a file and compressing it with the command:
PS C:Scripts> 'test lunch' | Out-File chapter7.txt
PS C:Scripts> Compress-Archive -Path .chapter7.txt -DestinationPath
➥ .chapter7.zip
Okay, no news is usually good news. Still, it’d be nice to see that the command did something. Let’s try this instead:
PS C:Scripts> Compress-Archive -Path .chapter7.txt -DestinationPath .chapter7.zip -Force -Verbose
VERBOSE: Preparing to compress...
VERBOSE: Performing the operation "Compress-Archive" on target
➥ "C:Scriptschapter7.txt".
VERBOSE: Adding 'C:Scripts/chapter7.txt'.
The -Verbose switch is available for all cmdlets and functions, although not all of these commands do anything with it. In this case, we get a message indicating what’s happening, which tells us the command did run. The -Force switch for this command says to overwrite the zip file we created the first time.
7.6 Common points of confusion
PowerShell newcomers frequently do one thing incorrectly when they start working with modules: they don’t read the help. Specifically, they don’t use the -Example or -Full switches when asking for help.
Frankly, looking at built-in examples is the best way to learn how to use a command. Yes, it can be a bit daunting to scroll through a list of hundreds of commands (the Az.* modules, for example, add well over 2,000 new commands), but using Help and Get-Command with wildcards should make it easier to narrow the list to whatever noun you think you’re after. From there, read the help!
7.7 Lab
As always, we’re assuming that you have the latest version of PowerShell on a computer or virtual machine to test with:
-
Browse the PowerShell Gallery. Find a module or two that you think sounds interesting and install it.
-
Browse the available commands for the module you just downloaded.
-
Use the commands from section 7.2 to find and install (if needed) the latest-version module by Microsoft for working with archives that contain the command
Compress-Archive. -
Create a Tests folder for the next step with 10 files in it, and name it ~/TestFolder.
-
Use
Compress-Archiveto create a zip of the contents of ~/TestFolder, and name the archiveTestFolder.zip. -
Use
Compare-ObjectandSelect-Object-ExpandPropertyNameto compare just the names of the files in the folders to verify you have the same files.
7.7 Lab answers
Here’s one way to approach this:
-
Find-Module -Command Compress-Archive | Install-Module -Force -
1..10will create a collection of the numbers between 1 and 10. If you did this another way, don’t worry. -
Compress-Archive ~/TestFolder/* -DestinationPath ~/TestFolder.zip -
Expand-Archive ~/TestFolder.zip -DestinationPath ~/TestFolder2 -
This is a possible way. Remember,
diris an alias forGet-ChildItem.$reference = Get-ChildItem ~/TestFolder| Select-Object -ExpandProperty name$difference = Get-ChildItem ~/TestFolder3| Select-Object -ExpandProperty nameCompare-Object -ReferenceObject $reference -DifferenceObject $difference