2 Meet PowerShell
This chapter is all about getting you situated and helping you to decide which PowerShell interface you’ll use (yes, you have a choice). If you’ve used PowerShell before, this material might seem redundant, so feel free to skim this chapter—you might still find some tidbits here and there that’ll help you down the line.
Also, this chapter applies exclusively to PowerShell on Windows, macOS, and Ubuntu 18.04. Other Linux distributions have a similar setup, but they will not be covered in this chapter. For those other installation instructions, you can get them right from PowerShell’s GitHub page at https://github.com/PowerShell/PowerShell#.
2.1 PowerShell on Windows
PowerShell has come preinstalled on Windows PCs since Windows 7 (and Server 2008). It is important to note that the process name for PowerShell 7 has changed on Windows. It is no longer powershell.exe but pwsh.exe. PowerShell 7 is a side-by-side installation, meaning that Windows PowerShell (5.1) is still installed by default (hence why the process name had to change).
Let’s install PowerShell 7 first. There are multiple ways to install this (e.g., from the Microsoft Store, winget, Chocolatey), so you can choose any method you like, but for this book we are going with the straightforward approach, which is to download the MSI from the PowerShell GitHub repo: PowerShell/PowerShell. Make sure you download the stable release, as this is the latest GA (general availability) release from the PowerShell team (figure 2.1).
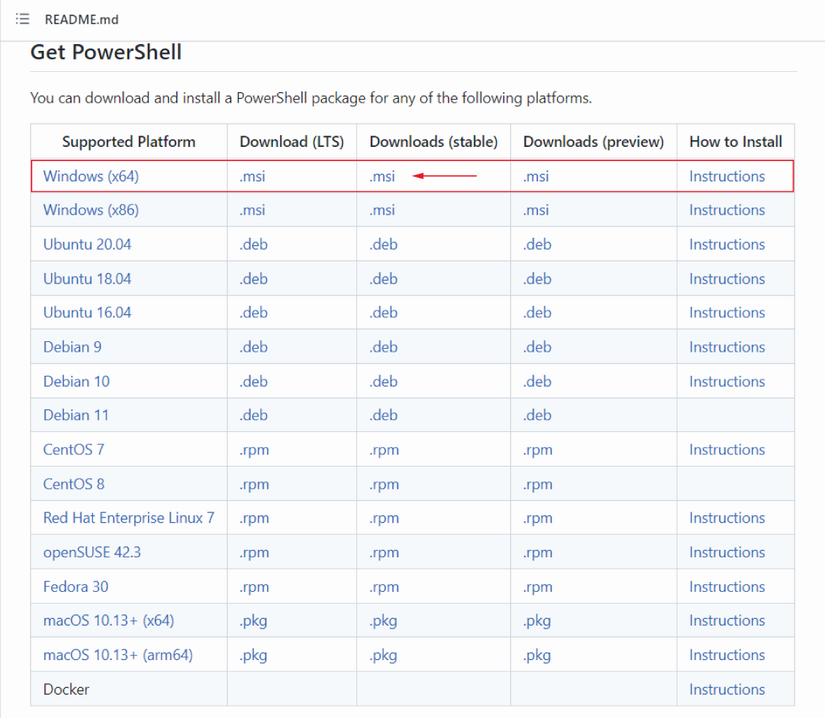
Figure 2.1 This shows the different installs available for PowerShell, with the MSI pointed out for Windows installation.
Walk through the MSI wizard, accept the defaults, and then you are done. There are several ways to launch PowerShell (figure 2.2). After it is installed, you can search for it in the task bar. This is also a great time to point out that the icons have changed a little bit as well.
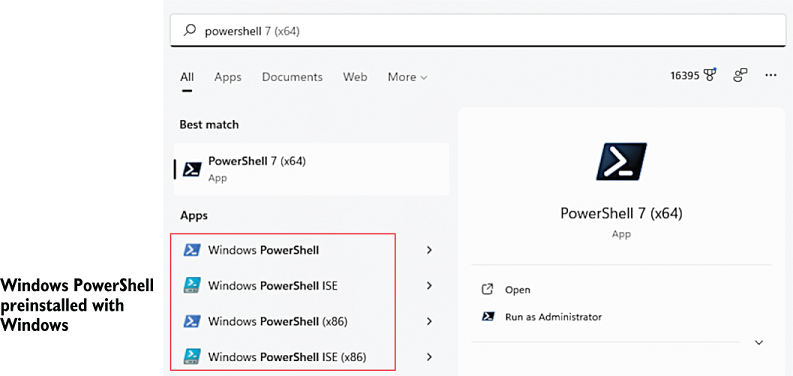
Figure 2.2 Start menu on Windows 10 showing the side-by-side installation for PowerShell 7 and PowerShell 5.1
If you click the PowerShell 7 icon (we suggest you make it a task bar icon as well), this will launch the PowerShell console. If you are familiar with Windows PowerShell, you will see a noticeable difference in the way it looks. That is because the background color is black and not blue. For the purposes of this book, we have changed our console colors so that they are easier to read.
The PowerShell console application is your only option when you’re running PowerShell on a server that doesn’t have a GUI shell installed:
-
The console application is tiny. It loads fast and doesn’t use much memory.
-
It doesn’t require any more .NET Framework stuff than PowerShell itself needs.
-
You can set the colors to green text on a black background and pretend you’re working on a 1970s-era mainframe.
If you decide to use the console application, we have a few suggestions for configuring it. You can make all of these configurations by clicking the window’s upper-left-corner control box and selecting Properties. The resulting dialog box is shown in figure 2.3. This looks slightly different in Windows 10, as it’s gained some new options, but the gist is the same.
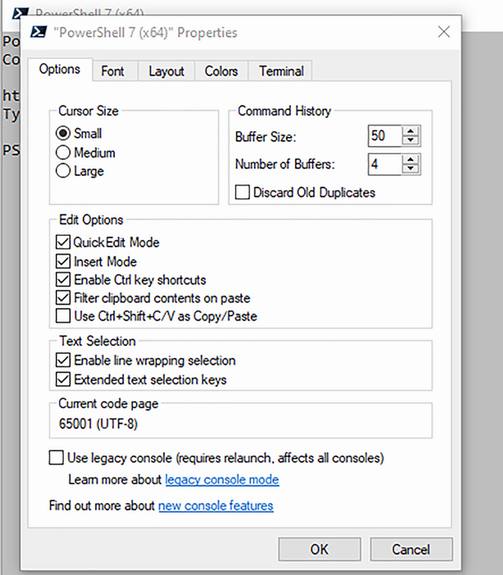
On the Options tab, you can increase the size of the Command History Buffer Size. This buffer enables the console to remember which commands you’ve typed and lets you recall them by using the up and down arrows on your keyboard.
On the Font tab, pick something a bit larger than the default 12-point font. Please. We don’t care if you have 20/10 vision; jack up the font size a bit. PowerShell needs you to be able to quickly distinguish between a lot of similar-looking characters—such as ' (an apostrophe or a single quote) and ` (a backtick or a grave accent)—and a tiny font doesn’t help.
On the Layout tab, set both width sizes to the same number and make sure the resulting window fits on your screen. Failing to do this can result in a horizontal scrollbar at the bottom of the window, which can lead to some PowerShell output appearing wrapped off the right side of the window, where you’ll never see it. We’ve had students spend half an hour running commands, thinking they were producing no output at all, when in fact the output was scrolled off to the right. Annoying.
Finally, on the Colors tab, don’t go nuts. Keep things high contrast and easy to read. And if you really want to, you can set the colors to match your Windows PowerShell terminal.
One point to keep in mind: this console application isn’t PowerShell; it’s merely the means by which you interact with PowerShell.
NOTE We will not be using Windows PowerShell or the ISE for any part of our journey together. The ISE does not support PowerShell 7. We will instead be using Visual Studio Code, which is covered a little later in the chapter.
2.2 PowerShell on macOS
If you’re using a Mac, this section is for you. We’ll talk about how to install and run PowerShell specifically on macOS. This book assumes that you know how to open Terminal—macOS’s default Terminal application. You can use a different terminal on macOS if you have it, but we’ll stick with the default one for this book. Okay, let’s install PowerShell!
2.2.1 Installation on macOS
Today, PowerShell does not come included with macOS. Maybe one day that will happen, but until then, we have to install it ourselves. Thankfully, it’s easy to install and there are many ways to do it. We’ll cover the easiest way to install PowerShell for macOS, which is via Homebrew—the preferred package manager for macOS. Homebrew provides the ability to install PowerShell via a terminal without a single click of our mouse.
Note Homebrew also doesn’t come with macOS, so if you don’t have it already, you can head over to Homebrew’s website (https://brew.sh) for instructions on how to install it. Go ahead and get it. We’ll wait for you to get back!
Once you have Homebrew installed and ready to go, you can install PowerShell. All you need is an instance of Terminal, so go ahead and open that on your Mac. Leveraging Homebrew, you will install PowerShell in one command:
Type that command into Terminal and press ENTER. You will then see Homebrew install PowerShell (figure 2.4).
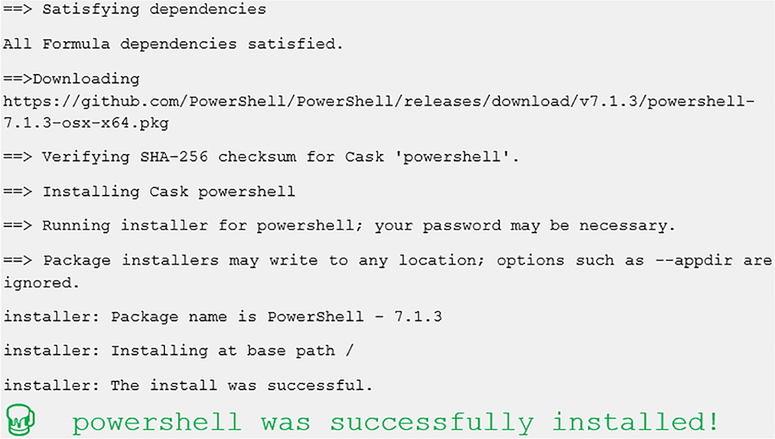
You’re all set! Let’s run it. What do we run? Great question. To run PowerShell, all you do is run the command pwsh, which will start PowerShell in your terminal. You should see the following output:
~ pwsh
PowerShell 7.1.3
Copyright (c) Microsoft Corporation. All rights reserved.

https://aka.ms/pscore6-docs
Type 'help' to get help.

PS /Users/steve>
We now have PowerShell running in the Terminal app on macOS! Well done. This is one of the main ways to interact with PowerShell on macOS. We’ll go over the other main way in a bit, but first we need to address those of you who are using Linux as your operating system.
2.3 PowerShell on Linux (Ubuntu 18.04)
This is the part where we tell you that PowerShell is so awesome that it’s able to run on an incredibly long list of Linux distributions. This is also the part where we tell you that if we went through the installation of every one of those distributions, our publisher would wonder why the book turned into one million pages. We’re going to run through how to install PowerShell on Ubuntu 18.04, since it was the latest LTS version at the time of writing. If you’re using a machine that runs something else, fear not! All the documentation on how to install PowerShell on all the different supported Linux distributions can be found in the PowerShell docs article on specifically this topic: http://mng.bz/YgnK.
All right, now on to the installation. We should also mention . . . this book assumes that you know how to open the Terminal application on Ubuntu 18.04. You can use any terminal for these steps, but we’ll stick to the default one.
2.3.1 Installation on Ubuntu 18.04
Ubuntu 18.04 ships with Canonical’s own package manager, called snap. This gives us a single command installation of PowerShell. First, go ahead and open up an instance of Terminal and type the following command:
Once you do that, press ENTER to run it. You may be asked to put in your password, and if so, go ahead and put that in. This is because snap needs to be run as root to install PowerShell. The output you see should look like this:
Note We are adding --classic to the command because PowerShell is considered a “classic snap package.” Classic snaps remove the restrictions on snap packages, allowing PowerShell to fully interact with the operating system.
You’re all set! Let’s run it. What do we run? Great question. To run PowerShell, all you have to do is run the command pwsh, which will start PowerShell in your terminal. You should see the following output:
~ pwsh
PowerShell 7.1.3
Copyright (c) Microsoft Corporation. All rights reserved.

https://aka.ms/pscore6-docs
Type 'help' to get help.

PS /Users/tyleonha>
We now have PowerShell running in Terminal on Ubuntu 18.04! Well done. This is one of the main ways to interact with PowerShell on Ubuntu 18.04. Now that we’ve got it working in the terminal, let’s get the other PowerShell interface working.
2.4 Visual Studio Code and the PowerShell extension
Wait! Don’t run away yet. We know it sounds like we’re asking you to get that application that all your C# developer friends use, but it’s just not true! Let us explain.
Microsoft offers two products with very similar names that are completely different (the saying “There are two hard problems in tech: cache invalidation, naming things, and off-by-1 errors” is true). The first product is one you might have heard of: Visual Studio. It’s a full-featured integrated development environment (IDE). It’s typically used by C# and F# developers. Visual Studio Code, on the other hand, is a completely different application. It’s a lightweight text editor that has some resemblance to other text editors like Sublime Text or Notepad++, except that it has some added features to enhance the experience.
One of the added features is extensibility. People can author extensions for Visual Studio Code and put them on the Visual Studio Code’s marketplace for other folks to consume. The PowerShell team offers an extension for PowerShell on the marketplace, and with it comes a whole bunch of nice features that will help you along your journey of learning PowerShell. Visual Studio Code with the PowerShell extension is the recommended editing experience for PowerShell, and just like PowerShell itself, they’re open source and work cross-platform. You can find the source code at these locations:
-
Visual Studio Code—https://github.com/Microsoft/vscode
-
PowerShell extension—https://github.com/PowerShell/vscode-powershell
This is also a great opportunity for us to say that if you do have any issues with those products, open an issue on their respective GitHub pages. That’s the best way to give feedback and report problems. All right, let’s get into the installation steps.
NOTE Visual Studio Code and the PowerShell extension will be more valuable in later chapters when you learn to write scripts. You’ll get there. We promise.
2.4.1 Installing Visual Studio Code and the PowerShell extension
If you’ve gotten this far, you’ve already installed PowerShell on your operating system. To install Visual Studio Code, you can use the same steps. For Windows, macOS, or Linux, go to https://code.visualstudio.com/Download and download and run the installer (figure 2.5).

Figure 2.5 This shows the logo for the extensions and the Install button for the PowerShell 7 extension in VS Code.
For those of you who prefer the command line, you can also install VS Code and the PowerShell Extension via the terminal:
You’re getting the hang of this! If you’ve done this correctly, running the code command in the terminal should open an instance of Visual Studio Code. If it doesn’t work, close all of your terminal windows, open a new one, and try running the code command again. Once that’s installed, you need to install the PowerShell extension. Since we like typing in the world of PowerShell, let’s install the extension in a single command. You can install extensions by using the code command like so:
Which gives you the following output:
~ code --install-extension ms-vscode.powershell
Installing extensions...
Installing extension 'ms-vscode.powershell' v2019.9.0..
Extension 'ms-vscode.powershell' v2019.9.0 was successfully installed.
We’re ready to see what this all has to offer. If you haven’t already, go ahead and open Visual Studio Code by running the code command in your terminal.
2.4.2 Getting familiar with Visual Studio Code
From here on, the experiences will be the same regardless of what OS you are running. Here we have Visual Studio Code. It might look daunting at first, but with a little bit of practice, you’ll be able to harness its power to help you write some awesome PowerShell scripts. With Visual Studio Code open, we should get it ready to work with PowerShell. Start by clicking on the little PowerShell stencil icon on the left side next to the other crazy-looking icons. It’s highlighted in figure 2.6.

After clicking on the PowerShell icon, a couple of things pop up. Let’s go over what we see (figure 2.7):
-
Command Explorer (A)—A list of commands that are available for you to run. When you hover over one, it gives you a few different actions. You can hide this by clicking on the PowerShell icon again.
-
Script editor pane (B)—We won’t be using this until the end of the book, but this is where your scripts will appear in different tabs.
-
Integrated Console (C)—This is where the magic happens. This is PowerShell. You can run commands here just like you did in the PowerShell running in the Terminal application.

In the top right of the Integrated Console, we see a few different actions. Let’s start from the right side. First we see an “x” icon. This will hide the Integrated Console and the whole terminal pane. If you ever want to bring it back, press Ctrl+`. After that you have the caret (^) icon. This will hide the script pane and maximize the terminal pane. Then we have trash can icon. This kills terminals. Repeat after us: “I PROMISE TO NEVER EVER EVER KILL THE POWERSHELL INTEGRATED CONSOLE.” The Integrated Console is the heart of the PowerShell extension and all its features, and if you kill it, then the extension will stop working—so, please, don’t trash the Integrated Console.
Next we have the split terminal button and the plus sign button. These buttons spawn additional terminals that can be seen in the drop-down next to them. It’s important to note that Visual Studio Code picks Bash as default for these terminals since Bash is installed by default. You can easily configure this in your settings, but we can come back to that later. In the meantime, if you open a Bash terminal in Visual Studio Code, you can type pwsh just as you did in the Terminal application, and you get PowerShell.
The Visual Studio Code experience with PowerShell is heavily catered toward writing PowerShell scripts and modules, while the PowerShell in a Terminal application is an experience more for running through a few quick commands or long-running tasks. They both serve their purpose, and we’ll see more of them throughout the book.
2.4.3 Customizing Visual Studio Code and the PowerShell extension
Like we said earlier, extensibility is a big deal to Visual Studio Code. As such, it’s very easy to customize Visual Studio Code and the PowerShell extension to your liking. We’ll go through a few things you can do—some useful, others just for fun!
First, let’s start with Visual Studio Code’s Settings page. We’ll be able to configure just about anything we want. Go to File > Preferences > Settings to open the Settings page (figure 2.8). From here you can search for anything you’d like in the search box, or just scroll through everything. There’s a lot to configure! If you’re curious what settings the PowerShell extension provides, all you have to do is search for powershell, and you’ll see them all.
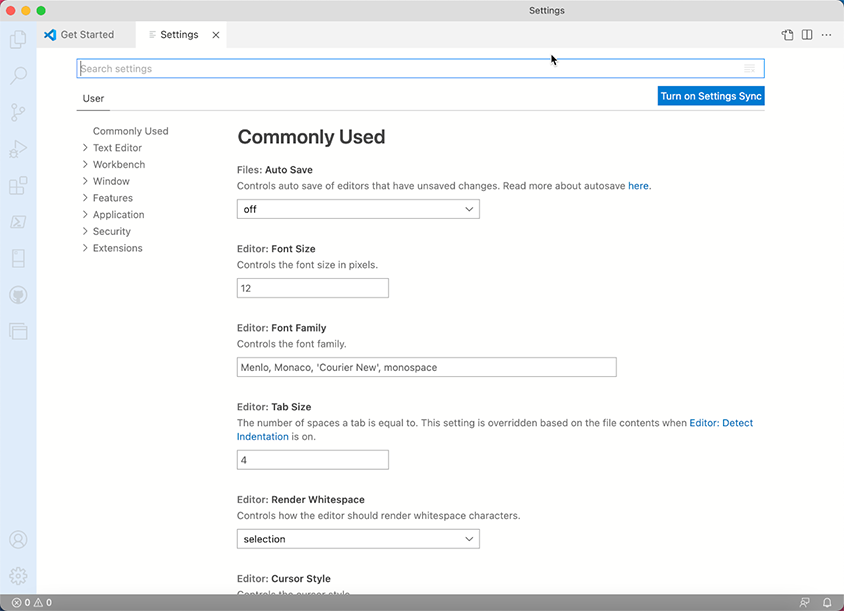
Figure 2.8 Visual Studio Code’s Settings page. We’ve outlined where to see the JSON version of the settings.
You might notice that we outlined a button in this screenshot. If you click on this, you’ll get a JavaScript Object Notation (JSON) representation of the settings that you have set. If you’re not already familiar with JSON, don’t worry. You can use the regular setting window to do just about everything the JSON view can do.
Table 2.1 shows a list of commonly used settings that you can paste right into the search box and configure to your liking.
Table 2.1 Recommended settings
Another thing you can change about Visual Studio Code is the color theme. The default dark theme is nice, but you have a plethora of options out there if you’d like to go digging for the theme that fits you perfectly. It’s easy to change—all we have to do is open the Command Palette. To do this, press CMD+SHIFT+P on macOS or CTRL+SHIFT+P on Windows/Linux (alternatively, you can press F1 on either platform).

The Command Palette (figure 2.9) is one of the most useful features of Visual Studio Code, as it allows you to search for actions that you can take. The action we want to take is “changing the color theme,” so let’s just search for theme in the Command Palette. You should see an option called Preferences: Color Theme—click that. This gives you a list of theme choices that you have available (figure 2.10). Use the arrow keys to go through the themes; you’ll notice the theme of Visual Studio Code gets updated automatically, so you can see what you’re getting into before you commit.

Most in the list are default themes that come with Visual Studio Code; however, the PowerShell ISE theme comes with the PowerShell extension. You can search for more cool themes on the extension marketplace (we personally like the Horizon theme, but that’s just us!) by choosing the Install Additional Color Themes item in the list.
Try it Now For the remainder of this book, we’ll assume you’re using Visual Studio Code with the PowerShell extension and not some other scripting editor when you need to write or examine a script. Go ahead and configure the settings and your color theme to your liking if you so choose. If you decide to use PowerShell in a Terminal application instead, you’ll be fine—most everything in the book will still work. We’ll let you know if something is console-only or editor-only.
2.5 It’s typing class all over again
PowerShell is a command-line interface, and that means you’ll do a lot of typing. Typing leaves room for errors—typos. Fortunately, both PowerShell applications provide ways to help minimize typos.
Try it Now The following examples are impossible to illustrate in a book, but they’re cool to see in action. Consider following along in your own copy of the shell.
The console application supports tab completion in four areas:
-
Type
Get-Pand press Tab a few times. You’ll notice a list of possible completions. As you type more, this list will get smaller, and when PowerShell can guess that it must be a certain command, it will complete it for you. -
Type
Dir, then a space, then/, and then press Tab. PowerShell shows you the files and folders that you can drill into from this directory. -
Type
Get-Procand press Tab. Then type a space and a hyphen (-). Start pressing Tab to see PowerShell’s possible completions for this parameter. You could also type part of a parameter name (e.g.,-E), and press Tab twice to see matching parameters. Press Esc to clear the command line. -
Type
New-Iand press Tab. Type a space, then-I, and press Tab again. Type another space and press Tab twice. PowerShell shows the legal values for that parameter. This works only for parameters that have a predefined set of allowable values (the set is called an enumeration). Again, press Esc to clear the command line; you don’t want to run that command yet.
Visual Studio Code with the PowerShell extension offers the editor pane something like, and better than, tab completion: IntelliSense. This feature operates in all four of the same situations that we showed you for tab completion, except that you get a cool little pop-up menu, like the one shown in figure 2.11. Use your arrow keys to scroll up or down and find the item you want, press Tab or Enter to select it, and then keep typing.
Caution It’s very, very, very, very, very important to be very, very, very, very accurate when you’re typing in PowerShell. In some cases, a single misplaced space, quotation mark, or even carriage return can make everything fail. If you’re getting errors, double- and triple-check what you’ve typed.

Figure 2.11 IntelliSense works like tab completion in Visual Studio Code with the PowerShell extension. It also shows you information about the item you’re completing if it’s available.
2.6 What version is this?
With PowerShell, there’s an easy way to check your version. Type $PSVersionTable and press Enter:
PS /Users/steve> $PSVersionTable
Name                           Value
----                           -----
PSVersion                      7.1.3
PSEdition                      Core
GitCommitId                    7.1.3
OS                             Linux 4.18.0-20-generic #21~18.04.1-Ubuntu...
Platform                       Unix
WSManStackVersion              3.0
SerializationVersion           1.1.0.1
PSCompatibleVersions           {1.0, 2.0, 3.0, 4.0...}
PSRemotingProtocolVersion      2.3
You’ll immediately see the version number for every PowerShell-related piece of technology, including PowerShell itself. If this doesn’t work, or if it doesn’t indicate 7.0 or later for PSVersion, you’re not using the right version of PowerShell for this book. Refer to earlier sections in this chapter (2.2, 2.3, and 2.4, depending on your OS) for instructions on getting the most current version of PowerShell.
Try it Now Don’t wait any longer to start using PowerShell. Start by checking your version number to ensure it’s at least 7.1. If it isn’t, don’t go any further until you’ve installed at least v7.1.
2.7 Lab
Because this is the book’s first lab, we’ll take a moment to describe how these are supposed to work. For each lab, we give you a few tasks that you can try to complete on your own. Sometimes we provide a hint or two to get you going in the right direction. From there, you’re on your own.
We absolutely guarantee that everything you need to know to complete every lab is either in that same chapter or covered in a previous chapter (and the previously covered information is the stuff for which we’re most likely to give you a hint). We’re not saying the answer is in plain sight; most often, a chapter teaches you how to discover something on your own, and you have to go through that discovery process to find the answer. It might seem frustrating, but forcing yourself to do it will absolutely make you more successful with PowerShell in the long run. We promise.
Keep in mind that you can find sample answers at the end of each chapter. Our answers might not exactly match yours, and that will become increasingly true as we move on to more complex material. You’ll often find that PowerShell offers a half dozen or more ways to accomplish almost anything. We’ll show you the way we use the most, but if you come up with something different, you’re not wrong. Any way that gets the job done is correct.
Note For this lab, you can complete it on any machine running Windows 10, macOS, or Linux as long as you have PowerShell 7.1 or higher installed.
We’ll start easy: we just want you to get both the console and Visual Studio Code with the PowerShell extension set up to meet your needs. Follow these five steps:
-
If you haven’t downloaded and installed everything, go do that.
-
Configure the font and text size in your Terminal application (you may have to dig around for this!) and in Visual Studio Code (hint hint . . . it’s a setting!).
-
In Visual Studio Code, maximize the Console pane; remove or leave the Commands Explorer at your discretion.
-
In both applications, type a single quote (
') and a backtick (`) and make sure you can easily tell the difference. On a US keyboard (at least), a backtick is on the same key as the tilde (~) character, under the Esc key. -
Also type parentheses
( ), square brackets[ ], angle brackets< >, and curly brackets{}to make sure the font and size you’ve selected display well, so that all of these symbols are immediately distinguishable. If there’s some visual confusion about which is which, change fonts or select a bigger font size.
We’ve already walked you through how to accomplish most of these steps, so you don’t have any answers to check for this lab, other than to be sure you’ve completed all five of the steps.