1
SETTING UP FOR YOUR ADVENTURE

Before you can start making cool Python programs for your Minecraft world, you need to set up Minecraft, Python, and a few other things on your computer. In this chapter, I’ll show you how to install and run all the required software.
You can use Minecraft on your Windows PC or Mac, or you can use Minecraft: Pi Edition on a Raspberry Pi computer. If you’re using a Windows PC, just keep reading. If you’re using a Mac, flip to “Setting Up Your Mac” on page 11. If you’re using a Raspberry Pi, flip to “Setting Up Your Raspberry Pi” on page 18.
NOTE
For information on other platforms and updates to these instructions, visit https://www.nostarch.com/pythonwithminecraft/.
SETTING UP YOUR WINDOWS PC
You need to install five things so you can control Minecraft with Python:
• Minecraft
• Python 3
• Java
• Minecraft Python API
• Spigot Minecraft Server
In this section, I’ll guide you through installing each of these on your computer. Let’s start with Minecraft.
INSTALLING MINECRAFT
If you already own Minecraft and have the latest version installed on your PC, skip ahead to “Installing Python” on page 3. If you’re not sure whether you have the latest version of Minecraft, follow the steps in this section to install the latest version.
If you don’t already own the game, you can buy a copy from the official Minecraft website, https://minecraft.net/. You might need to grab a grown-up to help you with that! Remember the username and password you use when you purchase Minecraft—you’ll need it to log in later.
After you’ve purchased Minecraft, follow these steps to install Minecraft on your PC:
Under the Minecraft for Windows section, find the Minecraft.msi link and click it to download it. If you’re given the option to save or open the file, select Save File.
Wait for the file to download and then open it. If a dialog pops up asking whether you want to run this file, click Run. Don’t worry, we know this file is safe!
When the Minecraft Setup Wizard opens, click Next. Then click Next once more. Then click Install.
You might be asked whether you want to install Minecraft. Of course you do! Click Yes. Wait a bit while Minecraft installs. I got a glass of water and a cookie while the game installed.
After the installation completes, click Finish.
Minecraft should now be installed.
You know what would be a great idea? Playing Minecraft, of course. Take a few minutes to get it up and running:
To open Minecraft, click the Start Menu (or press the Windows key on your keyboard), find Minecraft in the list of programs, and click the icon.
Minecraft will start up and might install updates.
The login window will open next. Enter the username and password you used when you purchased Minecraft and click Log In.
Click Play. Minecraft will download a couple more updates before opening.
Finally, click Single Player ▸ Create New World. Name your world whatever you want and click Create New World. The world will generate, and you can play to your heart’s content.
Have some fun! If you’ve never played Minecraft before, try playing around for a while, until it gets dark in your Minecraft world. Watch out for monsters! Note that when you use Minecraft with Python, you’ll be using a multiplayer game world, which will be different from this world. We’ll get to that in “Running Spigot and Creating a Game” on page 7.
Back to work! It’s time to install Python. To free your cursor from Minecraft, just press ESC on your keyboard. Close Minecraft before continuing the rest of the installation.
INSTALLING PYTHON
Python is the programming language you’ll learn in this book. Let’s install it now.
Click the button labeled Download Python 3.5.0. (This is the latest version of Python 3 at the time of this writing, but you might see a later version. Install the most recent version.)
Python will begin to download. If you’re asked to choose between saving or opening the file, select Save File.
When the installer has downloaded, click it. If a dialog pops up asking whether you want to run the file, click Run.
When the installer opens, select the Add Python 3.5 to Path checkbox, as shown at the bottom of Figure 1-1. Then click Install Now.
A dialog might ask whether you want to allow the program to install software on the computer. Click Yes and then wait for Python to install. I stood up to close the window while it was installing, and the installation had finished when I sat back down.
Click Finish. Python is now installed.

INSTALLING JAVA
Now that Minecraft and Python are both installed, you’ll have to set things up so that they can talk to each other. You’ll use a program called Spigot to do that, but in order for Spigot to work, you first need to make sure Java is installed on your computer. Let’s do that now.
First, check whether Java is already installed:
Click the Start Menu (or press the Windows key on your keyboard) and enter cmd in the search box. Open the program called cmd.
You’ll see a window with a black background and a prompt (mine says C:UsersCraig>). At the prompt, type java -version and press ENTER.
If you see a message like the one in Figure 1-2, Java is already installed. Skip ahead to “Installing the Minecraft Python API and Spigot” on page 6.
If you get a message that says that Java is not recognized, install it using the following instructions.

Figure 1-2: After entering the java -version command, I can see that Java is installed.
To install Java, follow these steps:
Click the Free Java Download button. Then click the Agree and Start Free Download button.
When the installer has downloaded, click it. If a dialog pops up asking whether you want to let the program make changes to your computer, choose Yes.
When the installer opens, click Install.
This bit is super important! If a page opens that asks if you want to install another program, such as the Ask Search App, a Yahoo! search bar, or something else, uncheck the box so that this extra program will not install. That’s just another program that you don’t need.
You might be asked if you want to set Yahoo! as your homepage. You probably don’t. Select Do not update browser settings and click Next.
Wait while Java installs. I wrote a short message to a friend before it installed. Click Close when it finishes.
Now let’s check whether Java has installed properly:
Click the Start Menu and enter cmd in the search box. Open the cmd program.
In the cmd window, type java -version at the prompt and press ENTER.
If you see a message like the one in Figure 1-2, Java installed correctly. If you get an error that says “‘Java’ is not recognized as an internal or external command, operable program or batch file,” Java hasn’t installed properly. To fix this, try reinstalling Java and running it again. If you still get this error after reinstalling, go to http://www.java.com/en/download/help/path.xml for more information.
That’s it! Java is set up and ready to run the Minecraft server! Let’s get to that next.
INSTALLING THE MINECRAFT PYTHON API AND SPIGOT
Next you need to install the Minecraft Python API and the Minecraft server on your computer.
API stands for application programming interface. It lets programs communicate with applications that other people have created. In this case, the Minecraft Python API allows programs that you write in Python to communicate with Minecraft. For example, you could write a Python program that uses the API to tell Minecraft to make a block in the game or to change the position of the player.
A standard Minecraft single-player game does not support an API. Instead, your programs will interact with a Minecraft server, which allows the use of APIs. Minecraft servers are mostly used online so that many people can play together in a single game world. You can also run a server on your own computer and play by yourself. Both multiplayer and single-player Minecraft servers allow you to use an API with Minecraft. In this book, you’ll be using a single-player Minecraft server called Spigot on your computer.
Now that you know what an API and a server do, let’s get them installed on your computer. I’ve created a handy download so you can get these set up quickly. Just follow these steps:
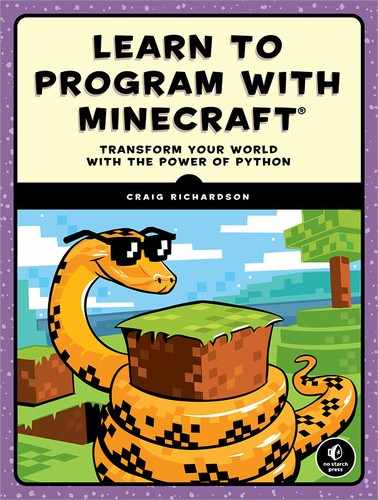
Go to https://www.nostarch.com/pythonwithminecraft/ and download the Minecraft Tools.zip file for Windows.
When the file has downloaded, right-click it and choose Extract All. You will be asked where you want to put the extracted files. Click the Browse button and go to your My Documents folder. Click the Make a New Folder button and call the new folder Minecraft Python. Select this folder and click OK. Click Extract to extract the files.
Go to the Minecraft Python folder in your My Documents folder, where you should see the extracted files.
Open the Minecraft Tools folder. Its contents are shown in Figure 1-3.
Double-click the file called Install_API. This will open a new window and install the Minecraft Python API. If you get a warning message, click Run Anyway.
When the installation completes, press any key to finish.
NOTE
If you get an error message that says pip is not recognized, that means you didn’t install Python correctly. Go back to “Installing Python” on page 3 and reinstall Python. Make sure you select the checkbox that says Add Python 3.5 to Path.
The Minecraft Python API and Minecraft server are now installed. The final step is to run the server. We’ll do that in the next section.
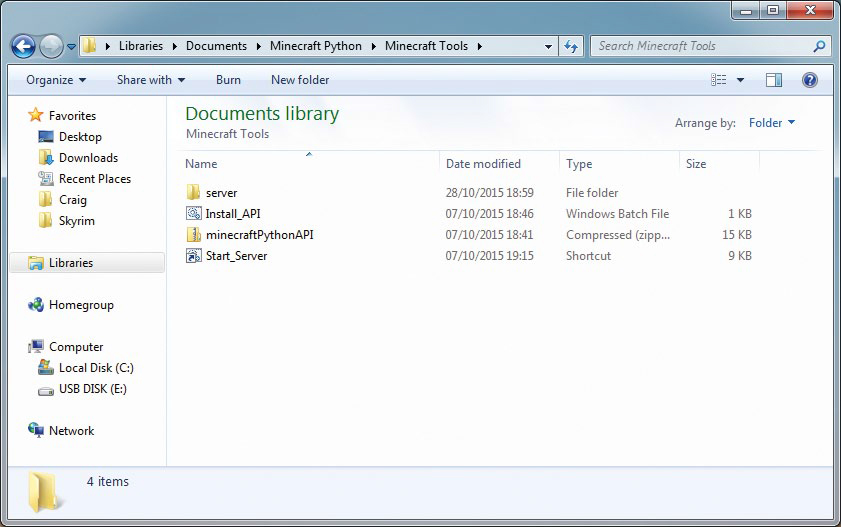
Figure 1-3: The Minecraft Tools folder
RUNNING SPIGOT AND CREATING A GAME
When Spigot runs for the first time, it will create a Minecraft world for you. To start Spigot, follow these steps:
Go to your Minecraft Python folder and open your Minecraft Tools folder.
In the Minecraft Tools folder, double-click the Start_Server file. If you get a message asking whether you want to allow access, click Allow.
Spigot will start your Minecraft server. You’ll see a window pop up with a bunch of text in it while Spigot generates the game world for you. When Spigot is done, your screen will look like Figure 1-4. Keep this window open.

Open Minecraft and click Multiplayer.
Click the Add Server button.
In the Server Name box, name your server Minecraft Python World, and in the Server Address box, type localhost, as shown in Figure 1-5. Then click Done.
Double-click Minecraft Python World, and the world created by Spigot will open.
Let’s have a quick look at your new Minecraft world on the Spigot server. The world is set up in Creative Mode so you can fly around. Double-tap the spacebar to fly. Holding the spacebar will make you fly higher, and holding SHIFT will lower you toward the ground. If you want to stop flying, just double-tap the spacebar again.
STARTING OVER WITH A NEW WORLD
Creating a brand-new Minecraft world with a server is a little different from creating a new world in single-player mode. Follow these steps to create a new world:
Go to the Minecraft Python folder. Right-click the Minecraft Tools folder and click Copy.
Right-click anywhere in the Minecraft Python folder and click Paste. This will create a copy of the Minecraft Tools folder with the name Minecraft Tools - Copy.
Right-click the Minecraft Tools - Copy folder and click Rename. I named the new folder New World, but you can name yours anything you want.
Open the New World folder (or whatever you named it) and then open the server folder.
In the server folder, select the world, world_nether, and world_the_end folders, as shown in Figure 1-6. Press DELETE to delete these.

Figure 1-6: I’ve highlighted the folders that you need to delete.
Still in the server folder, click the start file. (Note that it’s important to click this start file inside of the server folder, not the original Start_Server file!) This will start the server again and generate a new world.
Now when you open Minecraft and open the Minecraft Python World, you will see a newly generated world.
You can repeat this process to create a new world as many times as you want. If you want to open the old world, you can still run it by clicking the Start_Server file in the Minecraft Tools folder.
To delete a world and replace it with a new one, just delete the world, world_nether, and world_the_end folders in the folder of the world you want to replace.
PLAYING OFFLINE
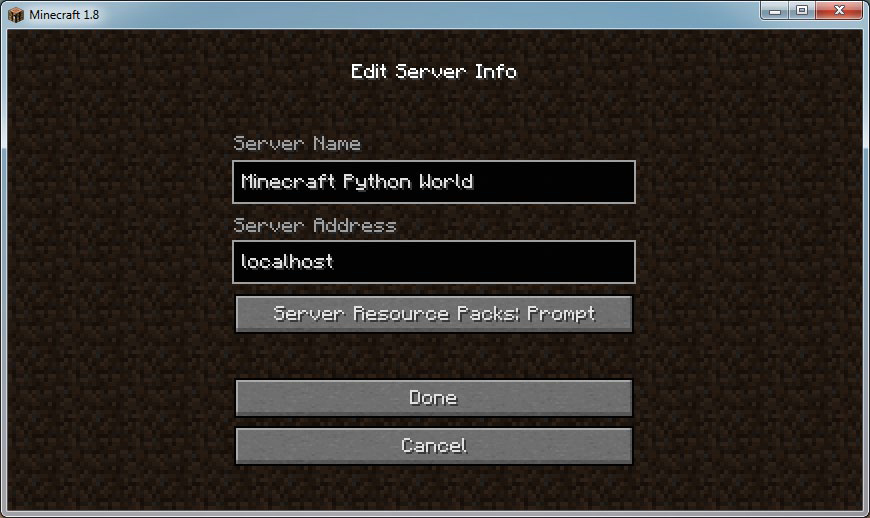
If you don’t have access to an Internet connection, you’ll get an error when you try to connect to the Minecraft server from your Minecraft game. You can fix this by changing the server’s properties. First, make sure you have closed the server window. Then open the Minecraft Python folder, then the Minecraft Tools folder, and then the server folder. Open the server.properties file in a text editor, such as Notepad, and change the online-mode setting (Figure 1-7) from true to false. Save the changes. Then go back to your Minecraft Tools folder and double-click Start_Server to start the server again. Now you’ll be able to play offline.
Figure 1-7: Change the highlighted setting from true to false.
SWITCHING TO SURVIVAL MODE
I’ve set the default game mode for your Minecraft server to Creative Mode. This will make things easier for you when you’re writing and running Python programs because you won’t have to worry about the player losing health, getting hungry, or being attacked.
But you might want to test some programs in Survival Mode just for fun. It’s easy to switch the server from Creative Mode to Survival Mode and back.
To switch the server from Creative Mode to Survival Mode, follow these steps:
Open the Minecraft Tools folder. Inside this folder open the server folder.
Find the server.properties file and open it with a text editor, such as Notepad.
In the file, find the line that says gamemode=1 and change it to gamemode=0, as shown in Figure 1-8.
Figure 1-8: I’ve switched to Survival Mode by setting gamemode to 0.
Save the file and close it.
Start the server by clicking the Start_Server file in the Minecraft Tools folder. When you join the Minecraft Python World game, it will now be in Survival Mode.

You can change back to Creative Mode at any time. Just repeat these steps, but in step 3, change gamemode=0 to gamemode=1 in the server.properties file.
Now you’re set up on your PC! Next let’s meet IDLE, which is where you’ll be writing your code. Flip to “Getting to Know IDLE” on page 20.
SETTING UP YOUR MAC
You need to install five things so you can control Minecraft with Python:
• Minecraft
• Python 3
• Java Development Kit
• Minecraft Python API
• Spigot Minecraft Server
In this section, I’ll guide you through installing each of these on your computer. Let’s start with Minecraft.
INSTALLING MINECRAFT
If you already own Minecraft and have the latest version installed on your Mac, skip ahead to “Installing Python” on page 13. If you’re not sure whether you have the latest version of Minecraft, follow the steps in this section to install the latest version.
If you don’t already own the game, you can buy a copy from the official Minecraft website, https://minecraft.net/. You might need to grab a grown-up to help you with that! Remember the username and password you use when you purchase Minecraft—you’ll need it to log in later.
After you’ve purchased Minecraft, follow these steps to install Minecraft on your Mac:
Under the Minecraft for Mac OS X section, find the Minecraft.dmg link and click it to download it. (If the Minecraft for Mac OS X section isn’t visible, click Show all platforms.)
Wait for the file to download (I looked out the window for a moment) and then open it. When the window pops up, drag the Minecraft icon to the Applications folder as shown in Figure 1-9.
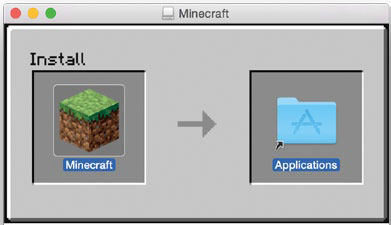
Figure 1-9: Drag the Minecraft icon into the Applications folder to install it.
Minecraft should now be installed.
You know what would be a great idea? Playing Minecraft, of course. Take a few minutes to get it up and running:
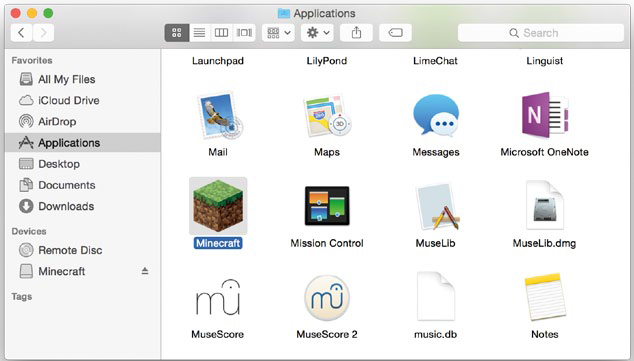
To open Minecraft, click the Finder icon on the Dock to open the file browser.
In the sidebar, click Applications.
Find Minecraft in the Applications folder as shown in Figure 1-10. Double-click it and select Open.
You might be asked whether you want to open Minecraft, because it was downloaded from the Internet. Click Open.
Minecraft will start up and might install updates.
The login window will open next. Enter the username and password you used when you purchased Minecraft and click Log In.
Click Play. Minecraft will download a couple more updates, then open.
Finally, click Single Player ▸ Create New World. Name your world whatever you want and click Create New World. The world will generate, and you can play to your heart’s content.
Have some fun! If you’ve never played Minecraft before, try playing around for a while, until it gets dark in your Minecraft world. Watch out for monsters! Note that when you use Minecraft with Python, you’ll be using a multiplayer game world, which will be different from this world. We’ll get to that in “Running Spigot and Creating a Game” on page 16.
Back to work! It’s time to install Python. To free your cursor from Minecraft, just press ESC on your keyboard. Close Minecraft before continuing the rest of the installation.
INSTALLING PYTHON
Python is the programming language you’ll learn in this book. Let’s install it now.
Click the link that says Latest Python 3 Release - Python 3.5.0. (This is the latest version of Python 3 at the time of this writing, but you might see a later version. Install the most recent version.) Python will begin to download.
When the installer has downloaded, click it.
When the installer opens, click Continue three times. You’ll be asked to agree to the terms of the software license agreement. Click Agree.
Click Install and then wait for Python to install. I checked the weather forecast while I waited.
Click Close. Python is now installed.
INSTALLING JAVA
Now that Minecraft and Python are both installed, you’ll have to set things up so that they can talk to each other. You’ll use a program called Spigot to do that, but in order for Spigot to work, you first need to install the latest Java Development Kit (JDK) on your computer. Let’s do that now:
Go to http://www.oracle.com/technetwork/java/javase/downloads/index.html and click the Java Download button.
Select Accept License Agreement and then click Mac OSX x64.
When the installer has downloaded, click it.
When the installer opens, double-click the Install icon.
When asked for your password, enter it.
Wait for Java to install. Click Close when it finishes.
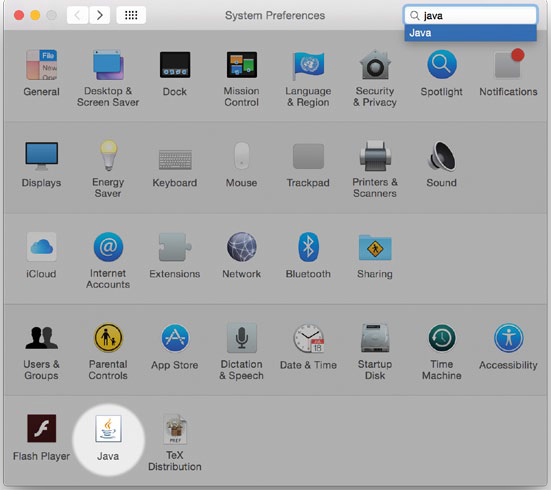
Now let’s test whether the JDK has installed properly:
Click System Preferences.
You should see a Java icon under System Preferences, as shown in Figure 1-11.
That’s it! Java is set up and ready to run the Minecraft sever! Let’s get to that next.
INSTALLING THE MINECRAFT PYTHON API AND SPIGOT
Next you need to install the Minecraft Python API and the Minecraft server on your computer.
API stands for application programming interface. It lets programs communicate with applications that other people have created. In this case, the Minecraft Python API allows programs that you write in Python to communicate with Minecraft. For example, you could write a Python program that uses the API to tell Minecraft to make a block in the game or to change the position of the player.
A standard Minecraft single-player game does not support an API. Instead, your programs will interact with a Minecraft server, which allows the use of APIs. Minecraft servers are mostly used online so that many people can play together in a single game world. You can also run a server on your own computer and play by yourself. Both multiplayer and single-player Minecraft servers allow you to use an API with Minecraft. In this book, you’ll be using a single-player Minecraft server called Spigot on your computer.
Now that you know what an API and a server do, let’s get them installed on your computer. I’ve created a handy download so you can get these set up quickly. Just follow these steps:
Go to https://www.nostarch.com/pythonwithminecraft/ and download the MinecraftTools Mac.zip file.
When the file has downloaded, open the Downloads folder and click Show in Finder.
In Finder, CONTROL-click on the file and select Copy MinecraftTools Mac.zip.
Go to your Documents folder. CONTROL-click in the folder and select New Folder. Call the new folder MinecraftPython. Make sure you don’t include a space in the name of the folder.
Open the MinecraftPython folder. CONTROL-click in the folder and select Paste Item. The MinecraftTools Mac.zip file will be copied here.
CONTROL-click and choose Open With ▸ Archive Utility. When Archive Utility has opened the zip file, you’ll have a new folder called MinecraftTools.
Open the MinecraftTools folder. Its contents are shown in Figure 1-12.
CONTROL-click the file called Install_API.command and select Open. This will open a new window. Enter your password to install the Minecraft Python API.
NOTE
If you get an error that says Install_API.command can’t be opened because it is from an unidentified developer, click System Preferences, and then click Security and Privacy. You will see a message that says “Install_API.command was not opened because it is from an unidentified developer.” Click Open Anyway. Then the window should pop up.
When the installation completes, close the window.

The Minecraft Python API and Minecraft server are now installed. The final step is to run the server. We’ll do that next.
RUNNING SPIGOT AND CREATING A GAME
When Spigot runs for the first time, it will create a Minecraft world for you. To start Spigot, follow these steps:
Go to your MinecraftPython folder and open your MinecraftTools folder.
In the MinecraftTools folder, CONTROL-click the Start_Server file and select Open. If you get an error message, go to System Preferences and then to Security and Privacy and click Open Anyway.
Spigot will start your Minecraft server. You’ll see a window pop up with a bunch of text in it while Spigot generates the game world for you. When it’s done, make sure you keep this window open.
Open Minecraft and click Multiplayer.
Click the Add Server button.
In the Server Name box, name your server Minecraft Python World, and in the Server Address box, type localhost, as shown in Figure 1-13. Then click Done.
Double-click Minecraft Python World, and the world created by Spigot will open.
Let’s have quick look at your new Minecraft world on the Spigot server. The world is set up in Creative Mode so you can fly around. Double-tap the spacebar to fly. Holding the spacebar will make you fly higher, and holding SHIFT will lower you toward the ground. If you want to stop flying, just double-tap the spacebar again.
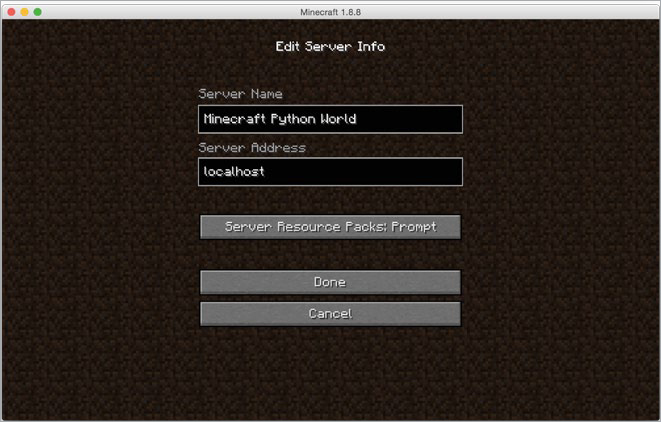
Figure 1-13: Add the server so that you can access it easily in the future.
STARTING OVER WITH A NEW WORLD
Creating a brand-new Minecraft world with a server is a little different from creating a new world in single-player mode. Follow these steps to create a new world:
Go to the MinecraftPython folder. CONTROL-click the MinecraftTools folder and click Copy.
CONTROL-click anywhere in the folder and click Paste. This will create a copy of the MinecraftTools folder with the name MinecraftTools copy.
CONTROL-click the MinecraftTools copy folder and click Rename. I named the new folder New World, but you can name yours anything you want.
Open the New World folder (or whatever you named it) and then open the server folder.
In the server folder, select the world, world_nether, and world_the_end folders. Press SHIFT-DELETE to delete these.
Go back to the New World folder and click the Start_Server file. This will start the server again and generate a new world.
Now when you open Minecraft and open the Minecraft Python World you will see a newly generated world.
You can repeat this process to create a new world as many times as you want. If you want to open the old world, you can still run it by clicking the Start_Server file in the MinecraftTools folder instead of the New World folder.
To delete a world and replace it with a new one, just delete the world, world_nether, and world_the_end folders in the folder of the world you want to replace.
PLAYING OFFLINE
If you don’t have access to an Internet connection, you’ll get an error when you try to connect to the Minecraft server from your Minecraft game. You can fix this by changing the server’s properties. First, make sure you have closed the server window. Then open the MinecraftPython folder, then the MinecraftTools folder, and then the server folder. Open the server.properties file in a text editor, such as TextEdit, and change the online-mode setting from true to false (see Figure 1-7 on page 10). Save the changes. Then go back to your MinecraftTools folder and click Start_Server to start the server again. Now you’ll be able to play offline.
SWITCHING TO SURVIVAL MODE
I’ve set the default game mode for your Minecraft server to Creative Mode. This will make things easier for you when you’re writing and running Python programs because you won’t have to worry about the player losing health, getting hungry, or being attacked.
But you might want to test some programs in Survival Mode just for fun. It’s easy to switch the server from Creative Mode to Survival Mode and back.
To switch the server from Creative Mode to Survival Mode, follow these steps:
Open the MinecraftTools folder. Inside this folder open the server folder.
Find the server.properties file and open it with a text editor, such as TextEdit.
In the file, find the line that says gamemode=1 and change it to gamemode=0 (see Figure 1-8 on page 11).
Save the file and close it.
Start the server by clicking the Start_Server file in the MinecraftTools folder. When you join the Minecraft Python World game, it will now be in Survival Mode.
You can change back to Creative Mode at any time. Just repeat these steps, but in step 3, change gamemode=0 to gamemode=1 in the server.properties file.
Now you’re set up on your Mac! Next let’s meet IDLE, which is where you’ll be writing your code. Flip to “Getting to Know IDLE” on page 20.
SETTING UP YOUR RASPBERRY PI
Log in to your Raspberry Pi and start the desktop with the startx command. (If you’re using the most recent version of the Raspberry Pi operating system, you won’t need to enter this command.)
Depending on your Raspberry Pi, you might have two or three different versions of Python installed. For this book, you’ll use the most recent version of Python, Python 3.
By default, the Raspberry Pi computer comes installed with a simplified version of Minecraft called Minecraft: Pi Edition. Everything you need to get started programming your Minecraft world with Python is already installed. If you’re new to using a Raspberry Pi, you can find instructions for getting started on the official website, http://www.raspberrypi.org/.
If you’re using an older SD card image (created before August 2014), you might find that Minecraft is not installed. It’s easy to install if it isn’t already there. First you’ll need to connect to the Internet with your Raspberry Pi. You can find a guide for connecting your Raspberry Pi to the Internet at http://www.raspberrypi.org/.
Once you’re connected to the Internet, follow these steps:
On the desktop, double-click LXTerminal.
Once LXTerminal is open, enter this command:
$ sudo apt-get update
Once the update has finished, enter this command:
$ sudo apt-get install minecraft-pi
Wait until the installation is complete. Minecraft is now installed.
There are some limitations to Minecraft on the Raspberry Pi compared to the desktop edition. The game world is a lot smaller, and a lot of blocks and other features (such as Survival Mode) are missing, but you’ll still be able to write and run all the awesome programs in this book.
Before we move on, let’s create a folder where you can store your Python programs. On the taskbar, click the file browser icon. Open the Documents folder, and then right-click in the background of the file browser and select Create New... ▸ Folder. Name the folder Minecraft Python and click OK.
NOTE
If you’re using an original Raspberry Pi, you’ll find that some of the programs in this book run slowly due to limitations of the Raspberry Pi. The Raspberry Pi 2 will have fewer problems with speed.
To open Minecraft, click the start menu in the top-left corner of the desktop. (If you’re using an older version of the Raspberry Pi operating system, the start menu will be in the bottom-left corner.) Go to Games and click Minecraft. Minecraft will open. The first time you open Minecraft, you’ll have to click Create World.
As a general rule, don’t resize the window, as you might encounter some problems.
Sometimes when you open other windows or dialogs (such as confirmation that you want to save a file in Python), they’ll hide behind the Minecraft window. Just minimize Minecraft when you want to use other windows. If you’re having any issues, try restarting your Raspberry Pi after installing Minecraft.
GETTING TO KNOW IDLE
Now that you have everything installed and set up, let’s check out IDLE, the software you’ll be using to write and run your Python programs. Your Python installation includes IDLE, so you don’t need to install it separately. Let’s open IDLE now!
Windows Open the Start Menu and enter IDLE in the search box.
Mac Open the Applications folder and click the IDLE icon.
Raspberry Pi On the desktop, double-click the IDLE icon labeled Python 3.
An IDLE window will open, as shown in Figure 1-14. This window is called the Python shell. The Python shell is so awesome that it blew my mind when I learned how to program with Python!
Figure 1-14: An IDLE window that is used for writing Python programs
GETTING TO KNOW THE PYTHON SHELL
The Python shell allows you to write and run programs one line at a time. You can write a line of code, instantly run it and see what happens, and then write another line. This is great because you can play around and test your code easily.
In the window you should see three chevrons (>>>) at the beginning of the line. This is called the command prompt. The command prompt is the Python shell telling you that it’s ready for you to give it a command. Let’s start with a really basic command: getting Python to add two numbers.
Click in the Python shell, next to the command prompt, and type 2 + 2. Note that you don’t have to type the command prompt itself (>>>). You should have something that looks like this:
>>> 2 + 2
After you type this command, press ENTER. The Python shell will output the result. In this case it’s 4:
>>> 2 + 2
4
You can also use the shell with text. Type this code into the Python shell and press ENTER:
>>> "W" + "o" * 5
Wooooo
As you can see, this code outputs the word Wooooo. The number at the end of the command determines how many o’s there are in the word. By changing this number, you can change how long the word is. Try changing it to 20 (or any other number that you want):
>>> "W" + "o" * 20
Woooooooooooooooooooo
Woooooooooooooooooooo! The Python shell can be a lot of fun.
Notice that IDLE colors the code. This is called syntax highlighting, and it makes the different parts of the code easier to see. All of the code in this book is the same color as it is in IDLE so the colors will match when you write your programs.
Next let’s look at IDLE’s text editor.
SAY HELLO TO IDLE’S TEXT EDITOR
When it comes to writing longer programs, you can’t use the shell. IDLE’s text editor is the solution! Unlike the shell, it doesn’t run a line of code immediately after you enter it. Instead, it runs the whole program when you tell it to.
In IDLE, click File on the menu bar and select New File. A new window will open that looks like the one in Figure 1-15. This is the text editor.
Figure 1-15: IDLE’s text editor
“Hey!” I hear you say. “The text editor looks just like IDLE’s Python shell.” Well, yes it does, but there is one really big difference. The new window doesn’t have a command prompt (>>>) at the beginning of each line.
Let’s see what that means. On the first line of the text editor, type this code and press ENTER:
print(2 + 2)
Did you expect something to happen? Pressing ENTER doesn’t run the code here—it just creates a new line. Because the text editor doesn’t run code when you press ENTER, you can write as many lines as you want before running them. Let’s add a few more lines. This is what your file should look like when you’re done:
print(2 + 2)
print("W" + "o" * 20)
print("PYTHON!")
print("<3s")
print("Minecraft")
Before you run your Python code from IDLE’s text editor, you need to save it. To save the program, click File, then Save As. Create a folder in your Minecraft Python folder called Setting Up. Save this program as pythonLovesMinecraft.py in the Setting Up folder.
Now let’s run it. Go to Run on the menu and click Run Module. The shell window will open and your program will run in it. The output is shown in Figure 1-16.
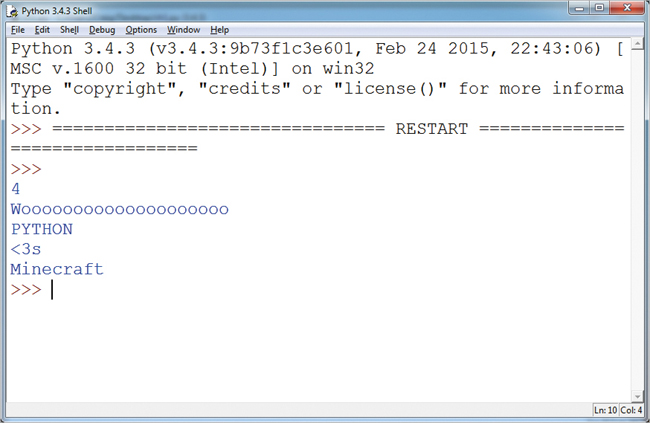
Figure 1-16: The output of the Python program
Unlike in the shell, commands run from the text editor will not automatically output their results. This is why you use print() to output the results of your code. Don’t worry too much about the details now—you’ll learn all about this later in the book.
Whenever you run programs from IDLE’s text editor, the shell will open to run the program. Even though you write the program in a separate window, IDLE always uses the shell to run your program.
WHEN TO USE THE PYTHON SHELL AND WHEN TO USE THE TEXT EDITOR
Now that you’ve seen the difference between IDLE’s Python shell and IDLE’s text editor, you might be wondering when it’s better to use one over the other. As a general rule, I use the Python shell when I only want to test a few lines and I don’t intend to reuse them. As you follow along with this book, I recommend that you run the short examples using the Python shell.
I use the text editor for programs that have quite a few lines of code or that I want to reuse. All of the missions in this book use the text editor so you can save your progress, but you can always play around in the shell whenever you want to try something out quickly.
THE PROMPTS USED IN THIS BOOK
Throughout this book, whenever you see a piece of code that is written in IDLE’s Python shell, it will begin with the command prompt (>>>) like this:
>>> print("Wooooo Minecraft")
I recommend that you copy the code into IDLE as you read so that you can familiarize yourself with it. Any output from the shell will be written on the next line:
>>> print("Wooooo Minecraft")
Wooooo Minecraft
Code that’s written in the text editor won’t begin with the command prompt, like so:
print("Adventures")
The output for the code won’t automatically display on your computer. To show you what the output should look like when you run it, I’ll either explain it or display it in a new box. For example, running the code above should output:
Adventures
To make it easier for you to follow the explanations of the code in the book, I’ve included markers to point out what I’m talking about. Whenever you see one in the code, there’ll be a corresponding explanation in the text, and vice versa. The markers look like this:
➊ ➋ ➌ ➍ ➎ ➏
TESTING YOUR MINECRAFT PYTHON SETUP
Let’s make sure you have all of the software installed correctly. To do this, we’ll take a quick dive into a very basic Python program that will interact with Minecraft.
First things first: if you’re using a PC or a Mac, you need to open three pieces of software. Follow these steps:
Open Spigot by going to your Minecraft Tools folder and clicking Start_Server.
Open Minecraft and connect to the Spigot server by selecting Minecraft Python World from the multiplayer menu.
Hit ESC on your keyboard to free your cursor from the Minecraft window, and then open a Python shell in IDLE.
You’ll need to have these three pieces of software open whenever you write programs that interact with Minecraft.
If you’re using a Raspberry Pi, open IDLE and Minecraft.
Now enter this line into your shell. Make sure that you enter lowercase and uppercase letters to match exactly!
>>> from mcpi.minecraft import Minecraft
Press ENTER so you’re on the next line in the shell. Then enter this line:
>>> mc = Minecraft.create()
At this point, if you see an error message that looks something like Figure 1-17, there’s something wrong.

Figure 1-17: An error message that means I haven’t started Spigot
Check these things in order: Do you have Minecraft open? Is Spigot running? Are you in the multiplayer world? Are you using the correct version of Python (3, not 2)? If the error occurred after you typed the first line, that means you didn’t install the API correctly. Go through the steps to install the API again. If the error happened after the second line, you might not have Java or Spigot installed correctly. Try reinstalling these things one at a time.
If you get an error that says ImportError: No module named 'mcpi', you might be using an older version of Python. Make sure you have the latest version installed!
If you don’t get an error message, add this line to the program in IDLE:
mc.player.setTilePos(0, 120, 0)
When you do this, the player will fly high into the air! This code teleports the player to a new position. You’ll learn more about this in Chapter 2. Turn the page to get started!