10
MINECRAFT MAGIC WITH FOR LOOPS

Now it’s time to learn about for loops. for loops are super useful because they iterate over lists of items, like the lists you saw in Chapter 9. This means that they are perfect when you want to use loops with lists in your programs.
While following along with the missions in this chapter, you’ll use for loops to generate stairs, pillars, pyramids, and weather-beaten walls. With nested for loops and lists, you’ll be able to create pixel art and generate new structures in seconds. for loops are very powerful tools for building in Minecraft!
A SIMPLE FOR LOOP
A for loop repeats a block of code for each item in a list until the list ends, rather than using a condition like a while loop or an if statement.
The list you use in a for statement can contain any number of items of any data type. The for loop will iterate through each one in order, that is, by its index. For example, to print every item in the noodle soup list, we would use the following code:
noodleSoup = ["water", "soy sauce", "spring onions", "pepper", "noodles",
"beef", "vegetables"]
for ingredient in noodleSoup:
print(ingredient)
We use the for operator to tell Python we’re using a loop.
After the for operator is a variable, ingredient, that represents the item that the loop is currently using. The value changes every time the loop iterates until it has looped through each item in the list. The first time the loop executes, the value will be the item in index position 0 (in this case "water"), the second time the value will be the item in index 1 ("soy sauce"), the third time the value will be the item in index 2 ("spring onions"), and so on.
The in operator and the list name at the end of the statement tell Python which list you’re using. The name of the list in this example is noodleSoup.
The loop executes once for each item in the list and then ends when it reaches the end of the list. Here’s the output for this program:
water
soy sauce
spring onions
pepper
noodles
beef
vegetables
Every item in the list is printed! Now let’s have some fun with for loops in Minecraft.
MISSION #55: MAGIC WAND
Every tool in Minecraft has its own purpose. The shovel digs dirt, the pickaxe breaks stone blocks, the axe cuts wood, and the sword hits baddies. Usually, you can’t change how the tools behave; you just have to accept that the sword only hits enemies. But with Python, you can change how the tools work. In this program, we’ll turn the sword into a magic wand.
In Chapter 9, you learned about the pollBlockHits() function. This function returns a list of block coordinates that the sword has hit. Using a for loop, you can access each set of coordinates in this list. We’re going to turn all the blocks we hit in the last 60 seconds into melons. You can see how this works in Figure 10-1.
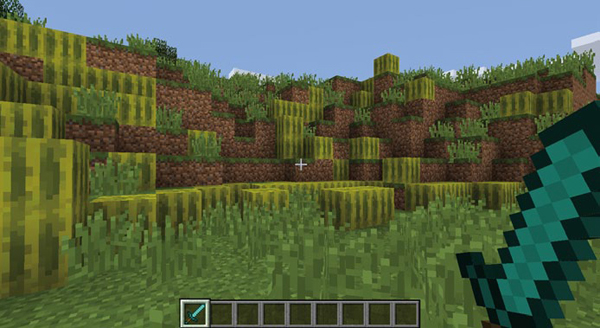
Figure 10-1: Abracadabra! All the blocks I hit are now melons.
Listing 10-1 contains the start of the program. Save it as magicWand.py in a new folder called forLoops.
magicWand.py
from mcpi.minecraft import Minecraft
mc = Minecraft.create()
import time
time.sleep(60)
➊ hits = mc.events.pollBlockHits()
block = 103
➋ for
➌ x, y, z = hit.pos.x, hit.pos.y, hit.pos.z
➍ # Set melon blocks at the coordinates
Listing 10-1: The start of the magic wand program
To get the list of block hits, we call the pollBlockHits() function and store the result in the hits variable ➊.
Included is a line of code that will get the position of any block you hit and store its coordinates in the x, y, and z variables ➌. It uses a tuple (introduced in “Tuples” on page 175) to assign the three variables in a single line.
At the moment, this line of code won’t work because the hit variable doesn’t exist. Create a for loop at ➋ and call the variable of the for loop hit. The for loop should iterate over the hits list. The code for the first part of the for loop should look like this:
for hit in hits:
Make sure you indent the line of code that gets the x, y, and z values inside the for loop at ➌. On the last line of the for loop, add the setBlock() function to set a melon block at the x-, y-, and z-coordinates ➍.
When the user runs the completed program, they’ll have 60 seconds to run around and right-click as many blocks as they can with their sword. After 60 seconds, all the blocks that were hit with the sword will turn to melons.
THE RANGE() FUNCTION
The range() function creates a list of integers. It’s a good way to create a list of numbers for your for loops very quickly. Let’s take a look and pass two arguments, 0 and 5, to the range() function:
aRange = range(0, 5)
This is a faster way to create a list than writing each item in the list individually, which would look like this:
aRange = [0, 1, 2, 3, 4]
Notice that the range() function’s second argument is 5, but the last item in the list is 4. This is because the function only creates values that are less than but not equal to the second argument.
To create a loop that uses the range() function to print the numbers 1 to 15, you would use the following code:
for item in range(1, 16):
print(item)
You could print double the value of every item in a list like so:
for item in range(1, 16):
print(item * 2)
You can do the same thing with a while loop, which you learned about in Chapter 7. The following code uses a while loop instead of a for loop to print the numbers 1 to 15:
count = 1
while count < 16:
print(count)
count += 1
Notice that the for loop is simpler and easier to read. In large and complex programs, a for loop is often a better choice than a while loop with count.
MISSION #56: MAGIC STAIRS
One of the best features of using Minecraft with Python is that you can build things quickly with just a few lines of code. Instead of spending lots of time building walls, you can just run some code and it’s done. You can also reuse the code as many times as you want, saving time and effort.
Building stairs is one task that often takes a long time to do. Fortunately, with just a few lines of Python code, you can quickly create a staircase in Minecraft. In this mission, you’ll use a for loop to make a staircase appear in the game world.
Listing 10-2 creates a staircase in Minecraft using a while loop. Save it as stairs.py in the forLoops folder.
stairs.py
from mcpi.minecraft import Minecraft
mc = Minecraft.create()
pos = mc.player.getTilePos()
x, y, z = pos.x, pos.y, pos.z
stairBlock = 53
step = 0
while step < 10:
mc.setblock(x + step, y + step, z, stairBlock)
step += 1
Listing 10-2: A program that creates a staircase using a while loop
Although you can use a while loop for this program, as shown here, a for loop is actually more suitable. Unlike the while loop, a for loop doesn’t require a count or step variable. Instead, you can use the range() function to determine how many times the loop repeats.
To complete the program, change the code so it uses a for loop instead of a while loop.
You can see the result of the program in Figure 10-2.

Figure 10-2: Where will your magic staircase lead?
PLAYING AROUND WITH RANGE()
You’ve learned a bit about the range() function and what happens when you pass two arguments to the function. What if you pass just one argument? Enter this code in the IDLE shell to see what happens:
>>> aRange = range(5)
>>> list(aRange)
[0, 1, 2, 3, 4]
When you give the range() function only one argument, it will start at 0 and store each value up to one less than the value you pass in as an argument. In other words, it’s as if you passed 0 for the first argument and 5 for the second argument. In this example, the list() function shows the list values created by the range() function (otherwise, you wouldn’t see them!). As you can see, the value of list(aRange) is a list of five numbers that start at 0: [0, 1, 2, 3, 4]. This is a fast way to create a range if you want to start with 0 as the first value.
As you’ve seen, when you pass two arguments to range(), the list starts at the first argument provided and ends before the second argument:
>>> aRange = range(2, 5)
>>> list(aRange)
[2, 3, 4]
This example creates a range equivalent to the list [2, 3, 4].
When you give range() three arguments, the third argument defines the step between items. Normally, each value in the list created by the range() function is one larger than the previous value. By changing the step, you change the difference between values. For example, a step of 2 would make the next value in a list 2 more than the previous item. A step of 3 would make it 3 more than the previous item, and so on.
For example, this list adds 2 to the previous value to get the next value:
>>> aRange = range(3, 10, 2)
>>> list(aRange)
[3, 5, 7, 9]
Notice that each item is 2 more than the previous item (5 is 3 + 2, 7 is 5 + 2, and 9 is 7 + 2).
You can even give range() a negative step value, like this:
>>> newRange = range(100, 0, -2)
>>> list(newRange)
[100, 98, 96, 94, 92, 90, 88, 86, 84, 82, 80, 78, 76, 74, 72, 70, 68, 66, 64,
62, 60, 58, 56, 54, 52, 50, 48, 46, 44, 42, 40, 38, 36, 34, 32, 30, 28, 26,
24, 22, 20, 18, 16, 14, 12, 10, 8, 6, 4, 2]
Notice that the values in the list decrease by 2 because of the negative step value.
OTHER LIST FUNCTIONS
Because we’re working with lists, let’s explore a few other functions designed to interact with lists.
The reversed() function takes one argument, the list you want to use, and returns the list reversed. The last item will be the first item, the second-to-last item will be the second item, and so on. Let’s reverse an earlier list:
>>> backwardsList = reversed(aRange)
>>> list(backwardsList)
[9, 7, 5, 3]
Items in the list have been reversed, just as we wanted. This kind of list manipulation comes in handy when you’re writing for loops.
The following example generates a list of numbers from 1 to 100 using the range() function. It then reverses the list and prints it using a for loop, effectively creating a countdown from 100 to 1:
countDown = range(1, 101)
countDown = reversed(countDown)
for item in countDown:
print(item)
Run it to see the output!
100
99
98
97
96
--snip--
3
2
1
You can also reverse the list when you declare the for loop without needing a variable to store the list:
for item in reversed(range(0, 101)):
print(item)
This program requires fewer lines of code while having the same effect. Use this trick to save time so you can focus on building!
MISSION #57: PILLARS
Wouldn’t it be cool to build a palace in Minecraft? Because palaces should be grand, ours should have rows of tall, imposing pillars. Obviously, we don’t want to build them by hand, so using a loop to build them is the best solution.
We’ll create a function that builds a pillar and then call the function when we want to build one. Listing 10-3 contains the function to build a pillar. Copy it into a new file called pillars.py and save it in the forLoops folder.
pillars.py
from mcpi.minecraft import Minecraft
mc = Minecraft.create()
def setPillar(x, y, z, height):
""" Creates a pillar. Args set position and height of pillar """
stairBlock = 156
block = 155
# Pillar top
mc.setBlocks(x - 1, y + height, z - 1, x + 1, y + height, z + 1, block, 1)
mc.setBlock(x - 1, y + height - 1, z, stairBlock, 12)
mc.setBlock(x + 1, y + height - 1, z, stairBlock, 13)
mc.setBlock(x, y + height - 1, z + 1, stairBlock, 15)
mc.setBlock(x, y + height - 1, z - 1, stairBlock, 14)
# Pillar base
mc.setBlocks(x - 1, y, z - 1, x + 1, y, z + 1, block, 1)
mc.setBlock(x - 1, y + 1, z, stairBlock, 0)
mc.setBlock(x + 1, y + 1, z, stairBlock, 1)
mc.setBlock(x, y + 1, z + 1, stairBlock, 3)
mc.setBlock(x, y + 1, z - 1, stairBlock, 2)
# Pillar column
mc.setBlocks(x, y, z, x, y + height, z, block, 2)
pos = mc.player.getTilePos()
x, y, z = pos.x + 2, pos.y, pos.z
➊ # Add the for loop here
➋ # Call the function here
Listing 10-3: A function that creates a pillar
The setPillar() function creates a pillar. It takes four arguments: the x-, y-, and z-coordinates and the pillar height.
To finish the program, add a for loop ➊ that calls the setPillar() function ➋. We want to create a row of 20 pillars that are each 5 blocks apart. To do that, use a range() function with three arguments to determine how many pillars will be created and how far apart they will be. By adding the values stored in the for loop’s variable to the x or z variable in the setPillar() function call, you can make each pillar an equal distance apart.
Figure 10-3 shows some of the pillars.
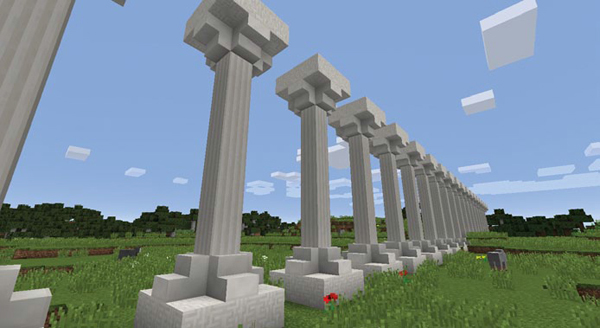
Figure 10-3: A brilliant row of pillars
MISSION #58: PYRAMID
Continuing the theme of building awesome stuff with for loops, let’s build a pyramid. A pyramid is made up of many levels. The bottom level is the widest, and the top level—the peak—is the narrowest. Each level is a square of blocks. We’ll make a pyramid that’s two blocks narrower on each level. For example, if the base level is seven blocks wide, the next level would be five blocks wide, then three blocks, and finally the top level would be one block wide.
Listing 10-4 creates a pyramid. Copy it into a new file called pyramid.py and save it in the forLoops folder.
pyramid.py
from mcpi.minecraft import Minecraft
mc = Minecraft.create()
block = 24 # sandstone
➊ height = 10
➋ levels = range(height)
pos = mc.player.getTilePos()
➌ x, y, z = pos.x + height, pos.y, pos.z
➍ for level in levels:
➎ mc.setBlocks(x - level, y, z - level, x + level, y, z + level, block)
y += 1
Listing 10-4: An upside-down pyramid program
Although Listing 10-4 creates a pyramid, it contains a minor bug you need to fix! We store the pyramid’s height in the height variable ➊. You can change the value of the height variable to anything you want. The levels variable uses the range() function to create a list that contains one item for each level of the pyramid ➋. The height variable is added to the player’s x-coordinate when we set the x, y, and z variables ➌. If we didn’t do this, the player would be trapped at the center of the pyramid when it’s built.
The for loop iterates for each level in the levels list ➍. The line of code that creates each level of the pyramid uses the level variable to work out the width of each square of blocks that it creates ➎. The width and length of each pyramid level will always be twice the size of the level variable.
Remember that bug I mentioned earlier? Run the program to see what the problem is. The pyramid is upside down!
To fix this issue and make the pyramid right side up, you’ll need to use the reversed() function on the levels variable to make a list that gets smaller over time. Or you could be sneaky and call the range() function with a negative value.
Figure 10-4 shows the finished pyramid.

Figure 10-4: A magnificent pyramid
LOOPING OVER A DICTIONARY
You can also use a for loop to loop over a dictionary. When you’re using a dictionary with a for loop, the syntax is the same as a for loop with a list; however, the loop will only iterate through the dictionary’s keys.
For example, the following code prints the for loop’s variable each time the loop iterates. In this case, it prints the key of each item in the dictionary:
inventory = {'gems': 5, 'potions': 2, 'boxes': 1}
for key in inventory:
print(key)
This code prints the following:
gems
potions
boxes
To print the value associated with each item in the dictionary, you need to use the dictionary[key] syntax. Here’s how to change the code so it prints the value of each item as well as the key:
inventory = {'gems': 5, 'potions': 2, 'boxes': 1}
for key in inventory:
print(key + " " + str(inventory[key]))
This example now prints the following:
gems 5
potions 2
boxes 1
Notice that this output is much easier to read than the dictionary itself. By using a loop to output the values of a dictionary, you have much more control over how the information is displayed.
MISSION #59: SCOREBOARD
Recall the swordHitsScore.py game from Mission #54 (page 192). The game recorded the number of blocks a player hit in a minute. The score was stored in a dictionary along with the name of the player. Although the program worked just fine, the scoreboard at the end of the program didn’t output the scores and names in a very readable format. It just printed a dictionary without any formatting.
To improve the program, in this mission you’ll modify swordHitsScore.py so it outputs the scoreboard dictionary in an easy-to-read format. To do this, you’ll use a for loop.
Open your swordHitsScore.py program (it should be in the lists folder) and save it as scoreBoard.py in the forLoops folder. In the program, find and delete this line:
print(scoreboard)
Replace this line with a for loop that prints the name of each player and their score. These values are stored in the scoreboard dictionary: each player’s name is a key in the dictionary, and their score is the value of the key.
Figure 10-5 shows the updated output.
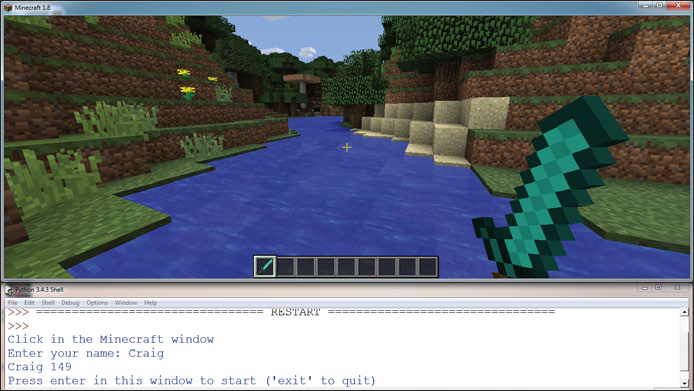
Figure 10-5: The output of the program is now easier to read.
FOR-ELSE LOOPS
You can also use the else statement with a for loop. When you use else with a for loop, it executes after the for loop reaches the end of the list. If the for loop doesn’t reach the end of its list, the else statement will not execute.
For example, here’s a bit of code that prints the ingredients of a sandwich and then uses an else statement:
sandwich = ["Bread", "Butter", "Tuna", "Lettuce", "Mayonnaise", "Bread"]
for ingredient in sandwich:
print(ingredient)
else:
print("This is the end of the sandwich.")
When you run this code, it prints the following:
Bread
Butter
Tuna
Lettuce
Mayonnaise
Bread
This is the end of the sandwich.
You might think this code is just the same as writing the following:
for ingredient in sandwich:
print(ingredient)
print("This is the end of the sandwich.")
Well, yes it is. Both pieces of code will do the same thing. So what is the point of using else with a for loop? Well, when used with a break statement, the else statement will behave differently. Let’s look at that next.
BREAKING A FOR-ELSE LOOP
Using a break statement to exit a for loop is one way to prevent the else statement from executing.
The following example incorporates a break statement within an if statement. The loop will break if the current item is "Mayonnaise":
sandwich = ["Bread", "Butter", "Tuna", "Lettuce", "Mayonnaise", "Bread"]
for ingredient in sandwich:
if ingredient == "Mayonnaise":
print("I don't like mayonnaise on my sandwich.")
break
else:
print(ingredient)
else:
print("This is the end of the sandwich.")
Can you predict what the output will be? Think about it before running this code, and then run the code and see what happens.
MISSION #60: THE DIAMOND PROSPECTOR
Sometimes when I’m playing Minecraft with friends, they won’t let me use Python programs to generate diamond blocks. But I still need diamonds for armor, tools, and building diamond castles. Digging straight down for diamond is easy enough, but you don’t always find it.
To save some time, I wrote a program that checks whether any diamond ore is directly below me. The program gets my current position and then uses a for loop to check the blocks below me one at a time to see whether they’re diamond ore. If diamond ore is found, the program tells me how deep the ore is; if no diamond ore is found, the program posts a message to say no diamond ore is below me.
Create a new program and save it as diamondSurvey.py in the forLoops folder.
Use a for loop to change the value of the y variable by –1 each time the loop iterates. In total, the loop should repeat 50 times to check 50 blocks deep. For each iteration, use an if statement to check whether the block at that position is diamond ore (block ID 56). If it is a diamond ore block, post a message to the chat to say how far the block is below the player and break the loop. If no diamond ore blocks are found, use an else statement in your for loop to post a message that says no diamond ore blocks are directly below the player.
Figure 10-6 shows the working program.
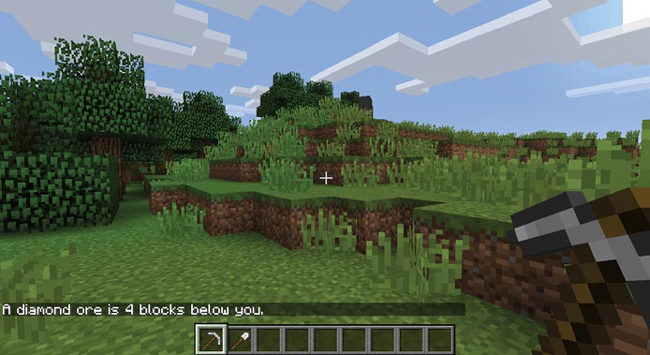
Figure 10-6: It looks like a diamond ore block is four blocks below me. Time to start digging!
NESTED FOR LOOPS AND MULTIDIMENSIONAL LISTS
Within your programs, you can use multiple lists together for a variety of reasons. It’s possible to include lists within lists, which are called multidimensional lists. In this section, we’ll use two-dimensional (2D) and three-dimensional (3D) lists to build structures in Minecraft.
THINKING IN TWO DIMENSIONS
You’ve learned how to write lists, specifically one-dimensional lists. They’re called one-dimensional lists because each position in the list contains only one item.
For example, look at the following list, called oneDimensionalRainbowList. The formatting of this list is a bit different just to emphasize that each position contains a single item; otherwise, it’s the same as other lists you’ve worked with:
oneDimensionalRainbowList = [0,
1,
2,
3,
4,
5]
There are six items in this list: the numbers 0 to 5. Each item in the list has only one value, making the list a one-dimensional list.
Listing 10-5 displays this list in Minecraft as wool blocks. The program file, rainbowStack1.py, is available in the book’s resources. Download the code files from https://www.nostarch.com/pythonwithminecraft/ or type it yourself and play along!
rainbowStack1.py
from mcpi.minecraft import Minecraft
mc = Minecraft.create()
➊ oneDimensionalRainbowList = [0, 1, 2, 3, 4, 5]
pos = mc.player.getTilePos()
x = pos.x
y = pos.y
z = pos.z
➋ for color in oneDimensionalRainbowList:
mc.setBlock(x, y, z, 35, color)
y += 1
Listing 10-5: Building a rainbow stack of blocks
The program creates a list of block colors ➊ and then uses a for loop to create a stack of wool blocks with colors based on the colors in the list ➋.
When you run the program, you’ll get a single stack of wool blocks, as you can see in Figure 10-7. Notice that the stack is six blocks high and one block wide. You’ve used the x, y, and z variables throughout this book. Each of these variables can also be referred to as a dimension. This program creates a stack of six blocks on the y-dimension. By changing the x variable on the last line of the code instead of the y variable, you can build a stack of blocks on the x-dimension, which you can see in Figure 10-8.
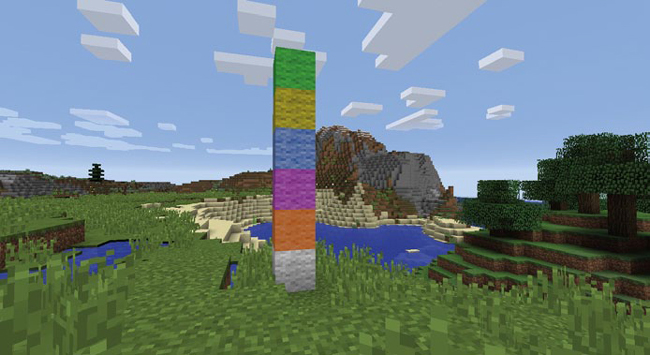
Figure 10-7: The rainbow stack of blocks created by rainbowStack1.py
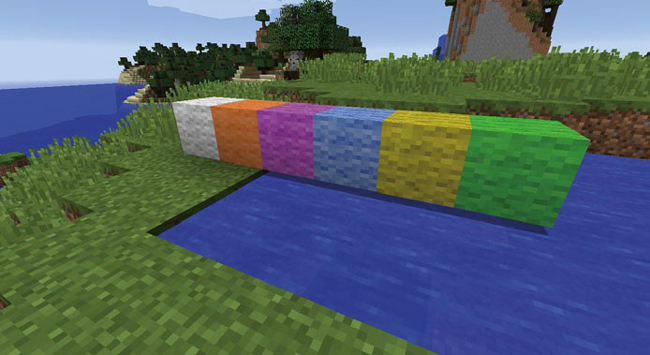
Figure 10-8: Swapping the y variable for the x variable on the last line of the program builds the blocks in a horizontal row.
Because the list is one-dimensional, you can change the value of only one variable on a single dimension at a time. In other words, you can change the value of the y variable, x variable, or z variable but can’t change all of them at once.
So, it’s time to start thinking about two dimensions! One-dimensional lists allow you to have a single list with only one value in each position, but two-dimensional lists allow you to have many values in each position of a list. You do this by putting a list at each position of the original list, as follows.
➊ twoDimensionalRainbowList = [[0, 0, 0],
➋ [1, 1, 1],
➌ [2, 2, 2],
[3, 3, 3],
[4, 4, 4],
➍ [5, 5, 5]]
Look closely and you’ll see an opening square bracket on the first line followed by a list full of zeroes and then a comma ➊. That is a list inside a list! We can call the main list the outer list and say that it contains nested lists.
In index position 1 is a list that contains three 1s ➋. In index position 2 is another list, this one containing three 2s ➌. This repeats on every line. On the last line is a list of three 5s, followed by a square bracket, which closes the outer list ➍. This code shows a list with six items in it, each of which is also a list. This is a two-dimensional list!
You’ll better understand two-dimensional lists when you use them in Minecraft. Let’s look at an example. By modifying rainbowStack1.py, we can make it work with the two-dimensional list. This new program is named rainbowRows.py:
rainbowRows.py
from mcpi.minecraft import Minecraft
mc = Minecraft.create()
twoDimensionalRainbowList = [[0, 0, 0],
[1, 1, 1],
[2, 2, 2],
[3, 3, 3],
[4, 4, 4],
[5, 5, 5]]
pos = mc.player.getTilePos()
x = pos.x
y = pos.y
z = pos.z
➊ startingX = x
➋ for row in twoDimensionalRainbowList:
➌ for color in row:
➍ mc.setBlock(x, y, z, 35, color)
➎ x += 1
➏ y += 1
➐ x = startingX
Before I explain the code, look at Figure 10-9 to see the output of rainbowRows.py, which is a set of blocks six blocks high on the y-dimension and three blocks wide on the x-dimension.
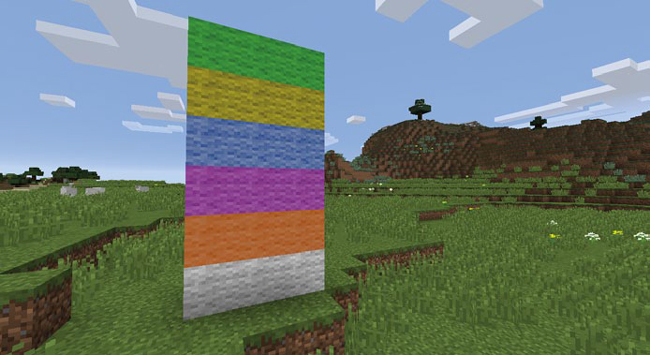
Figure 10-9: Using a two-dimensional list to make a rainbow wall
Because we’re working with two dimensions, we need two for loops to output the values in the twoDimensionalRainbowList list. The first loop iterates through each item in the outer list ➋. The second loop ➌, called a nested loop because it is inside another loop, then goes through each item in each nested list.
For example, the first time the outer loop runs, it gets the item stored in index position 0 of the twoDimensionalRainbowList list and stores it in a variable called row ➋. The value of row is [0, 0, 0] because it’s the first item in the list.
The second loop then works through each item in the row list and stores it in the color variable ➌. In this case, each item will be 0. The program then sets the blocks using the color variable to determine the color of each wool block ➍. The nested loop finishes after it has placed all three blocks for that row, and then the outer loop runs again. Next, the outer loop moves to index position 1 and stores the value in the row variable, which is now [1, 1, 1]. It then runs through the nested loop to set the blocks again and iterates again until it reaches the end of the twoDimensionalRainbowList list.
When you’re working in two dimensions, you can change two coordinate variables at the same time. In this example, we increment the y variable on the second-to-last line of the outer for loop ➏ so each row of blocks will be placed above the previous row. We also increment the x variable inside the nested for loop ➎ to make sure the blocks are placed in a row. Then we need to reset the x variable to its original value (which is stored in the startingX variable ➊) every time the outer for loop iterates ➐. Resetting the x variable causes the first block of each row to be placed directly on top of the first block in the previous row, and so on, so the rows line up correctly with one another.
ACCESSING VALUES IN 2D LISTS
When getting or setting a value in a one-dimensional list, you use square brackets and the index position. For example, this code creates a list called scores that records a player’s scores, and then it changes the item in index position 2 from 6 to 7:
scores = [1, 5, 6, 1]
scores[2] = 7
Using or changing values in a two-dimensional list isn’t much different. You still use square brackets and the index position, but because you’re accessing two lists at the same time, you use two sets of indexes and square brackets. Let’s have a look!
Here’s the list you saw earlier:
twoDimensionalRainbowList = [[0, 0, 0],
[1, 1, 1},
[2, 2, 2],
[3, 3, 3],
[4, 4, 4],
[5, 5, 5]]
If we wanted to change the second item (index position 1) in the first list (index position 0) to the value of 7, we would use this code:
twoDimensionalRainbowList[0][1] = 7
Because we’re using two lists and one list is nested inside the other, we need to use two sets of square brackets. The first one picks the index position 0 of the twoDimensionalRainbowList list, which is its first nested list. In the second bracket we put the index position we want to access in the nested list, 1. We then set the value of this position to 7 using the equal sign.
I added this code to the rainbowRows.py program (page 211) and reran it. Figure 10-10 shows the result. Notice that the second block on the first row has changed because we changed the value in the nested list to 7.
If you wanted to get the value of an item in a two-dimensional list, you would also use two sets of square brackets. For example, if you wanted to print the value in the first position (index 0) of the last row (index 5), you would use this code:
print(twoDimensionalRainbowList[5][0])
This code outputs the value 5.
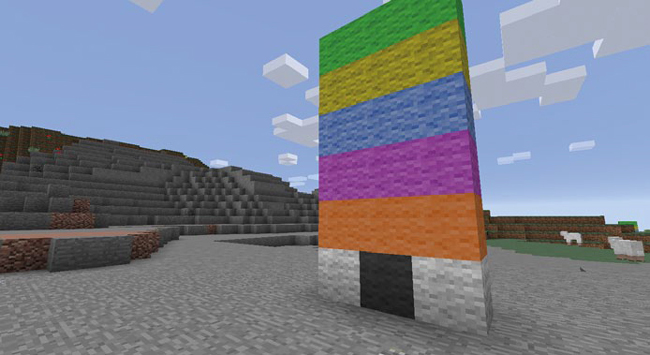
Figure 10-10: Changing one of the values in a nested list to get a different result
MISSION #61: PIXEL ART
Pixels are single-colored squares that make up images on your computer. By combining lots of pixels in a grid, your computer can display text, images, videos, and everything else shown on your monitor. All photos and drawings on your computer are displayed using pixels.
Pixel art is quite popular in Minecraft. Using different colored blocks in the Minecraft game, players build pictures in Minecraft. Pictures of characters from 2D video games are some of the most popular. You can create pixel art by hand, or of course, you can use a Python program to generate the pixel art.
In this program, you’ll use a 2D list and nested loops to create pixel art in Minecraft. Listing 10-6 contains the beginning of the program. Copy it into a new file called pixelArt.py and save it in the forLoops folder.
pixelArt.py
from mcpi.minecraft import Minecraft
mc = Minecraft.create()
pos = mc.player.getTilePos()
x, y, z = pos.x, pos.y, pos.z
➊ blocks = [[35, 35, 35, 35, 35, 35, 35, 35],
[35, 35, 35, 35, 35, 35, 35, 35],
[35, 35, 35, 35, 35, 35, 35, 35],
[35, 35, 35, 35, 35, 35, 35, 35]]
➋ for row in reversed(blocks):
for block in row:
mc.setBlock(x, y, z, block)
x += 1
y += 1
x = pos.x
Listing 10-6: A two-dimensional list that draws a smiley face
The program creates a two-dimensional list called blocks that contains block IDs ➊ and then uses two loops to set the blocks in the Minecraft world ➋. To make sure the first row of the list is at the top when it is placed in Minecraft and the bottom row of the list is placed at the bottom, the reversed() function is included with the first for loop ➋. If it wasn’t, the image would be upside down compared to the order of the blocks list.
At the moment, the blocks are all white wool blocks and don’t display a picture. To finish the program, you need to rewrite the two-dimensional blocks list so it draws a smiley face, as shown in Figure 10-11.
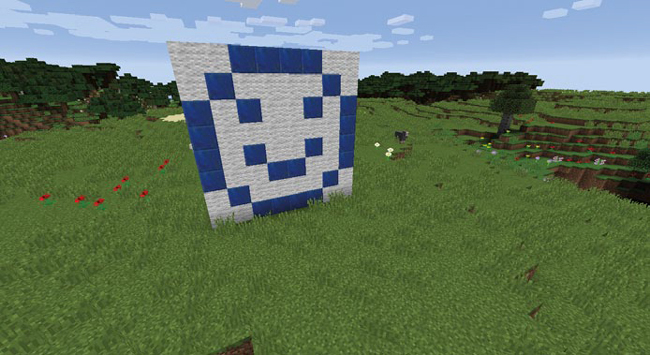
Figure 10-11: A smiley face drawn with blocks
Change the values inside the lists so the output matches Figure 10-11. You’ll need to change some of the values in the lists from wool blocks (block ID 35) to lapis lazuli blocks (block ID 22). For example, change the first line to this:
blocks = [[35, 35, 22, 22, 22, 22, 35, 35],
You’ll also need to add more rows to the blocks list so the height of the image matches the one in the picture.
GENERATING 2D LISTS WITH LOOPS
Programs that use random numbers are fun because they behave differently every time you run them. In the past, I’ve created lots of programs that use random numbers in two-dimensional lists to create pictures. Each random number might display a color, or in the case of Minecraft, a different block.
Here’s the beginning of a program that generates random numbers and stores them in a two-dimensional set of lists:
import random
➊ randomNumbers = []
for outer in range(10):
➋ randomNumbers.append([])
for inner in range(10):
➌ number = random.randint(1, 4)
randomNumbers[outer].append(number)
print(randomNumbers)
The program starts with an empty list called randomNumbers ➊. Every time the outer for loop repeats, it adds a new empty list into the randomNumbers list ➋. In the inner loop, the program then generates a random number between 1 and 5 and stores this in the inner list ➌. The inner loop repeats 10 times to generate 10 items in each inner list.
After we add line breaks for readability, the output of the program looks like this (notice the 10 items in the 10 inner lists):
[[3, 1, 4, 1, 4, 1, 2, 3, 2, 2],
[1, 3, 4, 2, 4, 3, 4, 1, 3, 2],
[4, 2, 4, 1, 4, 3, 2, 3, 4, 4],
[1, 4, 3, 4, 3, 4, 3, 3, 4, 4],
[3, 1, 4, 2, 3, 3, 3, 1, 4, 2],
[4, 1, 4, 2, 3, 2, 4, 3, 3, 1],
[2, 4, 2, 1, 2, 1, 4, 2, 4, 3],
[3, 1, 3, 4, 1, 4, 2, 2, 4, 1],
[4, 3, 1, 2, 4, 2, 2, 3, 1, 2],
[3, 1, 3, 3, 1, 3, 1, 4, 1, 2]]
By incorporating random numbers into your 2D Minecraft creations, you can create some very cool effects that would be difficult to make by hand!
MISSION #62: A WEATHER-WORN WALL
When I build walls in Minecraft, I don’t use a single block type. By swapping some cobblestone blocks for mossy cobblestone blocks, I can turn a plain wall into a wall that looks damaged, weather-beaten, organic, and cool. As fun as it is to build a wall by hand, I can never get the blocks I’ve added randomly to look random enough. You’ve probably guessed that the solution to making broken walls look more random is to use a Python program.
To generate a weather-worn wall with Python, you need to break down the program into two main steps:
Create a two-dimensional list and store block values in the list.
Output the two-dimensional list into the Minecraft world.
To get you started, Listing 10-7 includes the code to choose a random block value, set up the list, and get the player’s position. Copy the listing into a new file called brokenWall.py and save it in the forLoops folder.
brokenWall.py
from mcpi.minecraft import Minecraft
mc = Minecraft.create()
import random
➊ def brokenBlock():
brokenBlocks = [48, 67, 4, 4, 4, 4]
block = random.choice(brokenBlocks)
return block
pos = mc.player.getTilePos()
x, y, z = pos.x, pos.y, pos.z
brokenWall = []
height, width = 5, 10
# Create the list of broken blocks
# Set the blocks
Listing 10-7: The start of the program to create a broken wall
The brokenBlock() function returns a random block value that’s used to build the wall ➊. The width and height variables set the width and the height of the wall.
To finish the program, you need to generate a two-dimensional list of block values, then use those values to build the design in Minecraft.
Start with the blank list brokenWall. Using a for loop nested inside another for loop, generate random block values with the brokenBlock() function. Store the block values in lists, and store those lists in the brokenWall list. Then use another set of nested loops to place the blocks in Minecraft.
When your program is complete, move to where you want to build your weather-worn wall in your Minecraft world and run the code. You can use the program to decorate a castle or create spooky-looking ruins in the forest. Experiment with different locations to see what you like best! Figure 10-12 shows what a wall will look like when you run the program.
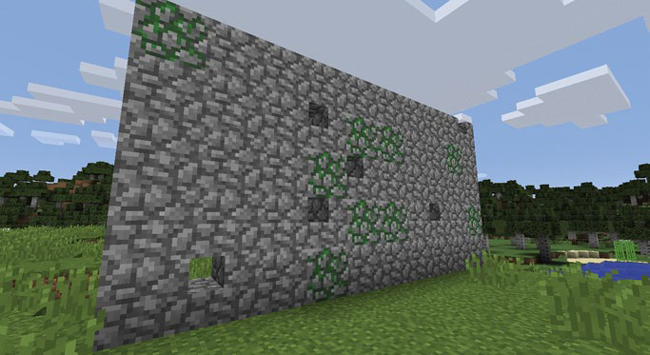
Figure 10-12: A wall with randomly generated broken blocks. It looks like it might be haunted!
THINKING IN THREE DIMENSIONS
Of course, Minecraft is a game that uses three dimensions. And you’ve used three dimensions throughout this book. Each of the x, y, and z variables you used in most programs represents a dimension.
You’ve seen how to put one group of lists inside another to get a two-dimensional list and create cool pixel art and weathered walls. Putting a third group of lists inside a two-dimensional list creates a three-dimensional list, which lets you take your building skills to a whole new dimension!
Three-dimensional lists are extremely useful in Minecraft because you can use them to duplicate 3D structures, such as buildings, sculptures, and lots of other things.
The three-dimensional list in Listing 10-8 has four lists nested inside it. The kicker is that inside each index of those nested lists is another list! Basically, each item in this list is a 2D list. I’ve added blank comments to make the list easier to read.
cube = [[[57, 57, 57, 57],
[57, 0, 0, 57],
[57, 0, 0, 57],
[57, 57, 57, 57]],
#
[[57, 0, 0, 57],
[0, 0, 0, 0],
[0, 0, 0, 0],
[57, 0, 0, 57]],
#
[[57, 0, 0, 57],
[0, 0, 0, 0],
[0, 0, 0, 0],
[57, 0, 0, 57]],
#
[[57, 57, 57, 57],
[57, 0, 0, 57],
[57, 0, 0, 57],
[57, 57, 57, 57]]]
Listing 10-8: A three-dimensional list with nested lists
Code like this can be used to make a cool cube structure! Next we’ll dig into a program that does just that.
OUTPUTTING 3D LISTS
Lists that have three dimensions are perfect for storing data about three-dimensional objects, such as your awesome Minecraft buildings. Storing three-dimensional objects is important, and correctly outputting them to Minecraft is just as important. Because a three-dimensional list is a list within a list that is within a list, you can use a for loop inside another for loop that is also inside another for loop to access all the data. In other words, you can use three nested for loops.
In Listing 10-9, I’ve copied the three-dimensional list from Listing 10-8 and created a program called cube.py. This program uses three nested for loops to output all the values of the three-dimensional list one at a time to build a cube structure in the Minecraft world.
cube.py
from mcpi.minecraft import Minecraft
mc = Minecraft.create()
pos = mc.player.getTilePos()
x = pos.x
y = pos.y
z = pos.z
cube = [[[57, 57, 57, 57], [57, 0, 0, 57], [57, 0, 0, 57], [57, 57, 57, 57]],
[[57, 0, 0, 57], [0, 0, 0, 0], [0, 0, 0, 0], [57, 0, 0, 57]],
[[57, 0, 0, 57], [0, 0, 0, 0], [0, 0, 0, 0], [57, 0, 0, 57]],
[[57, 57, 57, 57], [57, 0, 0, 57], [57, 0, 0, 57], [57, 57, 57, 57]]]
startingX = x
➊ startingY = y
➋ for depth in cube:
for height in reversed(depth):
for block in height:
mc.setBlock(x, y, z, block)
x += 1
y += 1
x = startingX
➌ z += 1
➍ y = startingY
Listing 10-9: Code to create a three-dimensional cube made of diamonds
Figure 10-13 shows the result of this program.
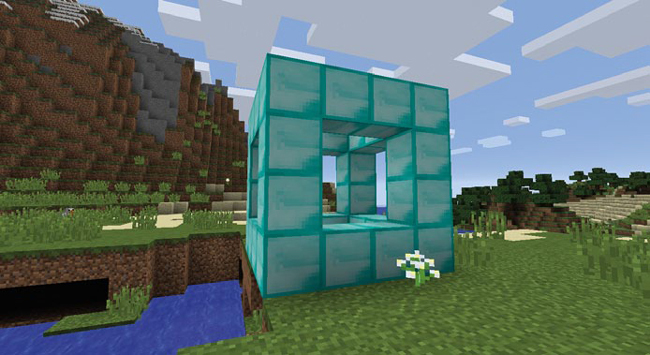
Figure 10-13: The cube created by the cube.py program
The code in cube.py is very similar to the two-dimensional rainbowRows. py program (page 211) that builds a rainbow wall. The main difference is that cube.py uses three for loops instead of two, because it works with a three-dimensional list. The extra for loop adds an extra dimension to the structure, depth ➋. So now the structure has width, height, and depth.
Each time the outer loop for depth in cube runs, it creates a two-dimensional list using the two nested loops, for height in reversed(depth) and for block in height. The code in the two nested loops is similar to the code in the rainbowRows.py program, which means these loops build a wall in Minecraft.
Let’s look at the result of the outer loop each time it repeats so we can see it build the cube step-by-step. The first time the outer loop runs, it outputs the blocks in index position 0 of the cube list. That list looks like this:
[[57, 57, 57, 57],
[57, 0, 0, 57],
[57, 0, 0, 57],
[57, 57, 57, 57]]
Figure 10-14 shows the output: our first wall of blocks.

Figure 10-14: The result of the first two-dimensional loop, cube index 0
After each two-dimensional list is built in the game, the value of the z variable in cube.py ➌ is increased to move one block farther along the z-axis. This gives the cube depth, so we’re not just building a wall. We also need to reset the value of the y variable at ➍ to its original value ➊ so the blocks on the bottom of the cube line up with each other every time the outer loop repeats. If the y variable wasn’t reset, the y-coordinate of each set of blocks would keep getting higher and higher, creating some weird-looking stairs! Figure 10-15 shows what this would look like.

Figure 10-15: We reset the y variable so this won’t happen!
The second time the outer loop runs, it outputs the blocks in index position 1 of the cube list, which looks like this:
[[57, 0, 0, 57],
[0, 0, 0, 0],
[0, 0, 0, 0],
[57, 0, 0, 57]]
This adds the next part of the cube, as you can see in Figure 10-16. After this part of the cube is built, the z variable increases by 1 ➌ and the y variable is reset to its original value again ➍.

Figure 10-16: The result of the second two-dimensional loop, cube index 1
The next time the loop repeats, it outputs the two-dimensional list in index position 2 of cube:
[[57, 0, 0, 57],
[0, 0, 0, 0],
[0, 0, 0, 0],
[57, 0, 0, 57]]
Figure 10-17 shows the result. Again, the z value is increased by 1 and the y value is reset.
Then the loop repeats a fourth and final time, outputting index position 3 of cube:
[[57, 57, 57, 57],
[57, 0, 0, 57],
[57, 0, 0, 57],
[57, 57, 57, 57]]
Figure 10-18 shows the finished cube structure.

Figure 10-17: The result of the third two-dimensional loop, cube index 2

Figure 10-18: The result of the last two-dimensional loop, in the final cube index position
Experiment with this program—use a different block type, try making a larger cube, or anything else you can imagine! In the next section, I’ll show you how to access values in three-dimensional lists so you can make some of these changes.
ACCESSING VALUES IN 3D LISTS
The values inside three-dimensional lists can be changed just as in one-dimensional and two-dimensional lists, using square brackets and index positions.
Let’s start with our three-dimensional diamond cube list:
cube = [[[57, 57, 57, 57],
[57, 0, 0, 57],
[57, 0, 0, 57],
[57, 57, 57, 57]],
#
[[57, 0, 0, 57],
[0, 0, 0, 0],
[0, 0, 0, 0],
[57, 0, 0, 57]],
#
[[57, 0, 0, 57],
[0, 0, 0, 0],
[0, 0, 0, 0],
[57, 0, 0, 57]],
#
[[57, 57, 57, 57],
[57, 0, 0, 57],
[57, 0, 0, 57],
[57, 57, 57, 57]]]
I want to change the bottom-left block on the front of my cube to gold.
First I need to access the index of the cube list that contains the front of the cube, which is 0. So the first part of the expression will look like this:
cube[0]
If I printed the value of this expression, I would get the following output (which I’ve formatted to make it easier to read):
[[57, 57, 57, 57],
[57, 0, 0, 57],
[57, 0, 0, 57],
[57, 57, 57, 57]]
This two-dimensional list represents the front of the cube. Next, I want to access the bottom row, which is index 3. So I add [3] to my expression:
cube[0][3]
If I printed the list stored at this position, I would get the following:
[57, 57, 57, 57]
Finally, I want to access the leftmost block in the row, which is index 3. So the final expression to change the bottom-left block to a gold block looks like this:
cube[0][3][3] = 41
When I run the cube.py program with this line added, I get a cube made of diamonds with one single golden block, as in Figure 10-19.

Figure 10-19: The modified cube with a single golden corner
MISSION #63: DUPLICATE A BUILDING
Even though building things in Minecraft using a Python program saves a lot of time, if you’re like me, you might still spend a considerable amount of effort adding details, like pictures and furniture, to your buildings. Sometimes you might need to make an identical copy of a particular object, and copying an object by hand can take lots of time. Placing each block one by one is a lot of work as well, and you might place a block in the wrong spot. The obvious solution is to make a program that copies a building in Minecraft and builds a copy of it in the game for you!
The finished program will need to do two things: first it will copy an area of the game and store it in a three-dimensional list, and then it will build the copied structure using that three-dimensional list.
I’ve included the start of the program in Listing 10-10 to help you. Copy the listing into a new file and save it as duplicateArea.py in the forLoops folder.
duplicateArea.py
from mcpi.minecraft import Minecraft
mc = Minecraft.create()
➊ def sortPair(val1, val2):
if val1 > val2:
return val2, val1
else:
return val1, val2
➋ def copyStructure(x1, y1, z1, x2, y2, z2):
# Sort the highest and lowest x, y, and z values
x1, x2 = sortPair(x1, x2)
y1, y2 = sortPair(y1, y2)
z1, z2 = sortPair(z1, z2)
width = x2 - x1
height = y2 - y1
length = z2 - z1
structure = []
print("Please wait...")
➌ # Copy the structure
return structure
➍ def buildStructure(x, y, z, structure):
xStart = x
yStart = y
➎ # Build the structure
# Get the position of the first corner
➏ input("Move to the first corner and press enter in this window")
pos = mc.player.getTilePos()
x1, y1, z1 = pos.x, pos.y, pos.z
# Get the position of the second corner
➐ input("Move to the opposite corner and press enter in this window")
pos = mc.player.getTilePos()
x2, y2, z2 = pos.x, pos.y, pos.z
# Copy the building
➑ structure = copyStructure(x1, y1, z1, x2, y2, z2)
# Set the position for the copy
➒ input("Move to the position you want to create the structure and press ENTER ![]()
in this window")
pos = mc.player.getTilePos()
x, y, z = pos.x, pos.y, pos.z
buildStructure(x, y, z, structure)
Listing 10-10: When the program is finished, it will duplicate buildings.
This program is divided into several parts. First, the sortPair() function ➊ sorts a pair of values into a tuple with the lowest value in the first index position and the highest value in the second index position. For example, if I gave sortPair() the arguments 9 and 3, it would return a tuple with the value of (3, 9) because 3 is less than 9. I use this function to sort pairs of x, y, and z values so the width, length, and depth variables are always positive when calculated.
Next, the copyStructure() function ➋ copies the structure from the game world, but it’s incomplete ➌. The buildStructure() function ➍ builds the structure, but it is also incomplete ➎. You’ll complete both in this mission.
I’ve added a neat trick to get the coordinates of the building you want to copy and the location in the game where you want to build the copy: Using the input() function, the program first asks you to move your character to one corner of the building and press ENTER ➏. The input() function makes the code wait until you’ve moved the player to where you want them to be. As soon as you press ENTER, it gets the player’s position using the getTilePos() function. We do the same again at the opposite corner of the building ➐. Then the copyStructure() function uses these two sets of coordinates to copy the building ➑. (When copying larger structures, this part of the program can take a while to run.) Finally, you move to where you want the building to be built and press ENTER ➒ to pass the player’s last position to the buildStructure() function.
To finish the program, it’s your job to complete the copyStructure() and buildStructure() functions. Add three nested loops to the copyStructure() function to copy all the blocks between the coordinates given in the argument into a three-dimensional list at ➌. To finish the buildStructure() function, add three nested for loops that output the block values from the three-dimensional list at ➎. The function should use the given coordinates in its arguments.
Make sure the program works through x, y, and z positions inside the structure. Use the for loops to change the x, y, and z positions.
Although duplicateArea.py is a long program, it’s very useful and worth the effort. After you finish this mission, you’ll be able to build entire cities in your Minecraft world! I used duplicateArea.py to duplicate an interesting cliff I found when I was exploring. Figure 10-20 shows the cliff that I wanted to copy.

Figure 10-20: I liked the look of this cliff, so I made a copy of it.
When you’re using the duplicateArea.py program to make copies, first stand outside (if your structure is a building) and near the bottom corner of the object you want to copy. Then press ENTER in IDLE. Figure 10-21 shows me standing on the first corner.
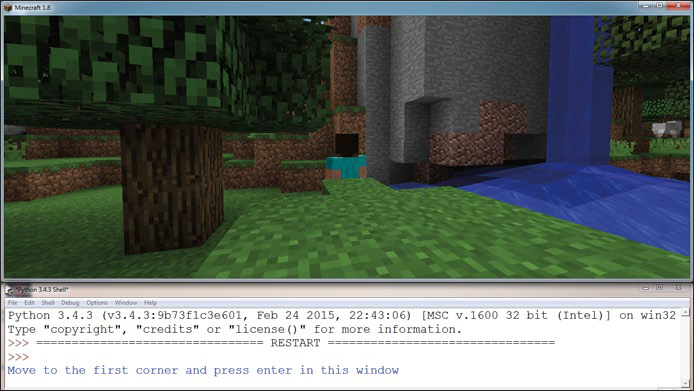
Figure 10-21: First I moved to one corner of the structure and pressed ENTER in IDLE.
Next, fly up and around to the opposite corner of the object you want to copy and press ENTER a second time. Figure 10-22 shows that I’ve flown into the air and moved around the cliff.

Figure 10-22: Then I moved to the opposite corner of the structure and pressed ENTER.
You’ll get a message asking you to wait a moment while the structure is being copied by the program. Move to the location where you want to build the copy and wait for a message asking you where you want to build the new structure (Figure 10-23).
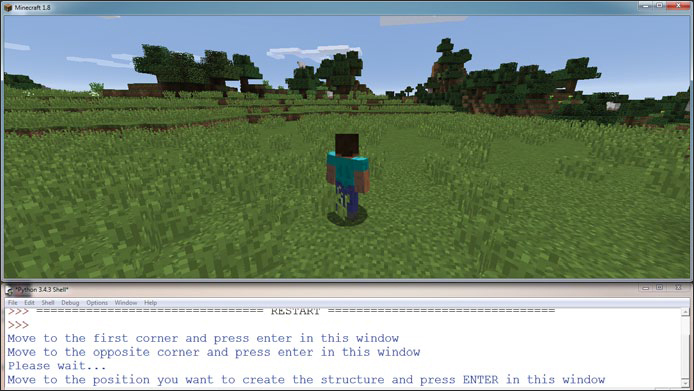
Figure 10-23: I waited a while for the structure to copy. Then I moved to where I wanted to build the copy and pressed ENTER to build it.
Press ENTER when you’re in the right place for the new building, and a copy of it will be built right in front of you! Figure 10-24 shows my copy of the cliff.

Figure 10-24: The copy of the original cliff!
WHAT YOU LEARNED
This chapter covered a lot of ground. You learned how to use for loops with lists, and you learned how to use the range() function. You also learned more about for loops and lists, such as reversing lists, looping over dictionaries, and breaking for loops. You created two- and three-dimensional lists with nested loops, which are super useful for building an awesome Minecraft world.
From generating stairs and pyramids to duplicating structures and creating art, you now have much more control over Minecraft than ever before. The programs in this chapter are some of my favorite programs in the book, and they’ll help you create your own advanced projects!
This chapter and Chapter 9 focused strongly on lists and for loops, which are closely related. In Chapter 11, you’ll move on to files and modules, which are closely related to functions and which you’ve been using throughout this book. As part of the missions, you’ll learn how to save and load structures to and from files.