11
SAVING AND LOADING BUILDINGS WITH FILES AND MODULES

Files are a major part of computing. They let you save data for long-term storage and load data for use in your programs. So far, the programs you’ve been working with have stored data only in variables. You’ve either used hardcoded data in your programs or taken data from user input. Although you can do amazing things with this data, you’re limited to single sessions and your own Minecraft world. Once you learn how to store and retrieve data, you can save and load your Minecraft creations into any Minecraft world, even your friends’ games!
In this chapter, you’ll learn how to get input from files and how to output data to files. You’ll use some built-in functions in Python and learn how to use two Python modules, the pickle and shelve modules, to store entire Minecraft creations.
Modules can extend what it’s possible to accomplish with Python. Using modules, you can draw pictures on the screen or run websites. Modules also provide functions for common tasks so you don’t have to write your own solutions.
You’ll also learn about pip, which is a very useful program for installing new modules. You’ll try it out by using the Flask module to make a simple website that connects to Minecraft and displays the player’s position.
USING FILES
When you work with computers, you work with files all the time. Anytime you write a text document or some Python code and save it, you’re working with files. Text, pictures, videos, and music are all files! Even this book was stored as a text file while I was writing it. Python’s file-handling features are easy to learn and will let you create files, save files, and read information from files to do cool things in Minecraft. Let’s start with the basics and learn how to read and write to a text file in Python.
OPENING A FILE
Opening a file is the first step when you’re working with files. To open a file in Python, you use the open() function, which takes two arguments: the file’s location and its permissions. A file’s location is where the file is stored on your computer. You’ll pass this into the open() function in the form of a string. The file’s permissions control whether or not Python is allowed to read or modify the file.
To open (or create) a text file named secretFile.txt in Python, you would use the argument "secretFile.txt":
secretFile = open("secretFile.txt", "w")
The second argument, "w", is the permissions argument, which specifies what the program is allowed to do with the file. In this case, w means that the program can write data to the file secretFile.txt.
When a program calls the open() function with a filename, Python first checks whether a file already exists with that name. If the file exists, Python will use the contents of that file in the program. If it doesn’t exist, Python will create a new file with that name.
If you don’t specify a directory with your filename (a folder and a directory are the same thing), Python will look for the file in the directory where the program is located. If the file is stored in a different directory, you must specify that in the argument. For example, if secretFile.txt was in the secrets directory, the first argument would be "/secrets/secretFile.txt":
secretFile = open("/secrets/secretFile.txt", "w")
If you provide a directory in the argument and the directory doesn’t exist, or if the file doesn’t exist, you’ll get an error message.
There are four options for the permissions argument:
w This means write only. Write-only permissions let the program write new data to the file and overwrite content that is already in the file, but the program cannot read the contents of the file. If a file doesn’t exist with the name that you provide as the first argument, the program will create a new one.
r This means read only. Read-only permissions let the program read the contents of the file, but the program is not allowed to modify the file’s contents. This permission cannot be used to create a new file.
r+ This means read and write. Read-and-write permissions let the program read and change the contents of the file. The program can also write over any content that is already in the file. However, if the file doesn’t exist, a new one will not be created; instead, you’ll get an error.
a This stands for append. Append permissions let the program write new data only to the end of the file, leaving the other contents of the file intact. The program cannot read the contents of the file either. This permission can be used to create a new file.
There are different circumstances in which you’d use each kind of permission. Let’s say you write some directions to an awesome diamond mine that you found, and you want to load the directions into Minecraft without accidentally changing them. In that case, you’d want to use the read-only permission to make sure nothing in the file changes. Alternatively, if you want someone to be able to add data to a file but you don’t want them to see the other data stored in the file, you would use the append permission. For instance, you could use append if you want to let your friends add notes to a shared travel log without letting them peak inside and read about all your secret treasure!
Next, you’ll learn how to write data to an open file, and you’ll learn how to close that file to use that data later.
WRITING TO AND SAVING A FILE
The write() function writes data to a file that the program has opened. This is the bread and butter of working with files because it lets you save all kinds of data. You provide the data you want written to the file as an argument to the write() function.
For example, let’s open a file and write a simple string to it:
secretFile = open("secretFile.txt", "w")
secretFile.write("This is a secret file. Shhh! Don't tell anyone.")
➊ secretFile.close()
First, you must open the file using the open() function. Next, use dot notation to call the write() function to write a string to secretFile.txt. Then, you need to call the close() function ➊, which saves and closes the file. It’s important to remember to include the close() function; otherwise, the data will not be stored in the file.
Run the program and then open secretFile.txt in a text editor to see if your secret message was saved. Try changing the string to write something different to the file and run the program again. What happens? The old message should have been replaced with the new message! Try changing the message again, but instead of passing "w" pass in "a" instead. Now what happens? Pretty cool, huh?
READING A FILE
The read() function reads the entire contents of a file that a program has opened. You may want to use the data in your program, modify the data and then send it back to the file, or output the data to make it easy to look at. Whatever the reason, you’ll use the read() function to read files.
To read a file, you must first open it and then remember to close it when you’re finished. It’s important to learn this habit when you’re working with files in your programs to avoid errors!
Let’s read a file and then output its contents so we can see what it says. This program, showSecretFile.py, outputs the contents of a file using the read() and print() functions:
showSecretFile.py
secretFile = open("secretFile.txt", "r")
➊ print(secretFile.read())
secretFile.close()
First, we open the file, and we pass in "r" as the permission argument so our program can read from the file. You could also pass in "r+", but in this case we’re not writing to the file, so "r" is best. To print out the contents of secretFile.txt, we pass secretFile.read() to a print statement. Finally, even though we haven’t written any data to the file, it’s still a good idea to close it with the close() function.
Run the program to see what happens. The contents of secretFile.txt should be printed to the screen. Now you can read the file without having to open it in a text editor like you normally would!
READING A LINE OF A FILE
Let’s say you have a long text document and you want to look at only part of it. This is where the readline() function comes in handy. Unlike the read() function, which gets the entire contents of the file, the readline() function gets a single line of the file at a time.
To try the readline() function, first add a bunch of text to secretFile.txt. You can do this either by using a text editor or by using your fancy new Python abilities to write a bunch of information to it! If you use Python to write to your file, add to your strings whenever you want a new line. For example, if you write "Cool Dance Party" to a file, Python places "Cool" on one line, "Dance" on the next, and "Party" on the last line, like so:
Cool
Dance
Party
After you’ve added text to secretFile.txt, write this code into a Python file and save the file as showSecretLines.py in a new folder called files:
showSecretLines.py
secretFile = open("secretFile.txt", "r")
print(secretFile.readline())
print(secretFile.readline())
print(secretFile.readline())
secretFile.close()
Once again, you must open secretFile.txt before you can read from it using the readline() function. Because you want your showSecretLines.py program to read data from the file, you must pass in r (or r+) again. Next, include three print statements to print the first three lines of secretFile.txt. Finally, close the file again using close().
The readline() function starts with the first line of your file. Each time the readline() function is used, it reads the next line automatically. This function is very handy for printing a couple of lines from the beginnings of text files.
NOTE
The readline() function converts the file to a list of strings, where each item in the list represents a single line. If you want to print a line from the middle of a text document, you could write a loop to find and print a particular string in the list!
MISSION #64: TO-DO LIST
Sometimes you might not have much spare time to play Minecraft. You might build complex structures across several days in short sessions. As you add programs to open doors or teleport the player somewhere, your builds will become more complex and might take longer to finish. Working on projects across several days could cause you to forget what you were doing and what you need to do next. This happens to me often. Fortunately, you can make a program to help you remember!
The programs in this mission create a to-do list and display it in the Minecraft chat. You can use this program to keep track of your Minecraft goals so when you have to stop playing, you can easily pick up where you left off.
To make the to-do list, you’ll write two separate programs: one to write the list and the other to display the list. Let’s start by creating the program that writes the list.
PART 1: WRITING THE TO-DO LIST
First, you need a program to create the items in the to-do list. Listing 11-1 starts you off, using a while loop and the input() function to add items to the to-do list. Copy it into a file in IDLE and save it as inputToDoList.py in the files folder.
➊ toDoFile =
➋ toDoList = ""
➌ toDoItem = input("Enter a to-do list item: ")
➍ while toDoItem != "exit":
➎ toDoList = toDoList + toDoItem + "
"
toDoItem = input("Enter a to-do list item: ")
➏ # Write the to-do list to the file
➐ # Close the file
Listing 11-1: The start of the program to write items in your to-do list
The program creates an empty string called toDoList ➋, which will store all the items for your to-do list when you enter them. Using the input() function, the program then asks you to enter an item into the to-do list ➌. The while loop then checks whether the input is not equal to "exit" ➍; if it’s not, the program adds your item to the to-do list with a new line at the end using " " ➎. However, if you enter "exit", the loop no longer runs, and you won’t be able to add any more items to the to-do list.
Your mission is to finish the program. To do that, you need to write the code that opens the file, writes toDoList to the file, and then closes the file. Use the open() function to open the file at the start of the program ➊. You should open it with write permissions. Name the file that the function opens toDoList.txt. Your program will create the file if it doesn’t already exist in the directory.
At the end of the program, write the contents of the to-do list to the file so you can access it later. Use the write() function to write the toDoList variable to the toDoFile ➏. After the file has been written to, make sure you close it with the close() function on the last line ➐.
Figure 11-1 shows me writing a to-do list with the program. When I’m finished, I type exit.
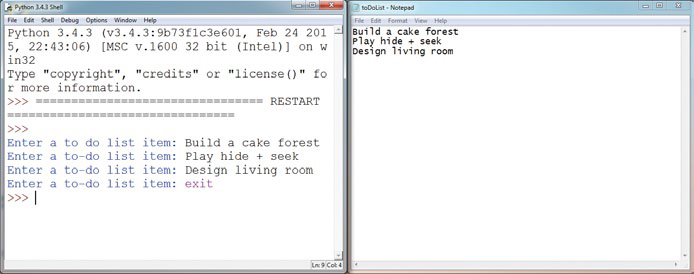
Figure 11-1: Entering things to do, like build a cake forest and play hide-and-seek
PART 2: DISPLAYING THE TO-DO LIST
Now that you have a program to write a to-do list to a file, you need to display the to-do list in the Minecraft chat, one line at a time. Listing 11-2 starts the program for you. Copy the listing into a new file and save it as outputToDoList.py in the files folder.
outputToDoList.py
from mcpi.minecraft import Minecraft
mc = Minecraft.create()
➊ toDoList =
for line in toDoList:
➋ # Output "line" to the chat
Listing 11-2: Program to output the to-do list file to the Minecraft chat
Listing 11-2 uses a for loop to output each line in the toDoList.txt file to the Minecraft chat, one at a time. At the moment, the program is incomplete. To finish the program, add the open() function to open the toDoList.txt file that you created with inputToDoList.py ➊. Make sure the file has read permissions. After you open the file, add code inside the for loop to output the string stored in the line variable to Minecraft’s chat ➋. You’ll have to use the readline() and postToChat() functions to do this.
Figure 11-2 shows my to-do list in the Minecraft chat.
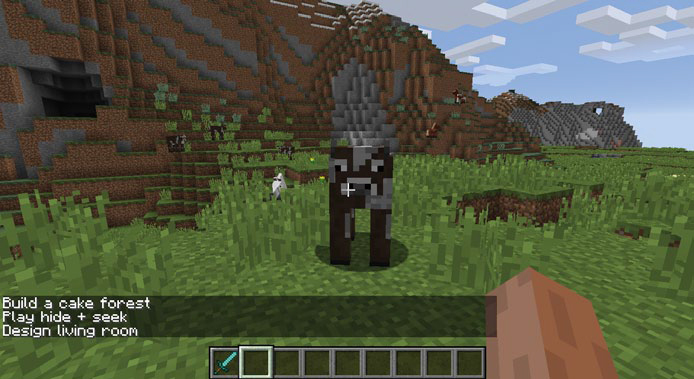
Figure 11-2: Now when I come back to building, I can see what I need to do.
USING MODULES
Modules are collections of functions that you can import into Python so you don’t have to write those functions in your programs. A module usually has a specific purpose, such as performing scientific calculations or making games, and a wide variety of modules are available for Python. You might be surprised to know that you’ve been using modules throughout this book! The Minecraft Python API is a module: every time you’ve written from mcpi.minecraft import Minecraft, you’ve been using a module. The Minecraft Python API module lets you connect your Python programs to Minecraft. Because it’s prewritten by someone else, you can use the module’s functions without having to write the code yourself.
Python comes with a bunch of modules that you can use in your programs. These modules, together with all the Python you’ve learned in this book so far, are called the Python standard library. You can also install modules that are not part of the standard library; we’ll do that in “Installing New Modules with pip” on page 252.
In this section, you’ll learn all the ways that you can set up your programs to use modules. As an example, we’ll use the pickle module, which provides more advanced ways to save and load data with files than just writing and reading data from them. Let’s look at the pickle module now.
THE PICKLE MODULE
The pickle module is very useful when you’re writing complicated data to a file. For example, dictionaries and multidimensional lists are challenging to store and retrieve using the standard functions that we used earlier in the chapter. This is where the pickle module comes in handy.
The pickle module can save you hours of writing and debugging your own solutions for storing complex data. You can also use the pickle module on simple data: for example, you can use it to store numbers without converting them to and from strings, which is necessary for standard file input and output.
In other words, you can use the pickle module to save a variable’s value in a file and then read the variable’s value directly into another program without any extra processing. The data type remains the same as when you stored the value, even if the data type is a string, integer, float, or Boolean.
Next, you’ll learn how to import modules using pickle as an example. Then you’ll use pickle to save some complex data—an entire Minecraft building!
IMPORTING PICKLE
To use any module’s functions, you need to import them by using the import keyword. Actually, you’ve already used the import keyword to import modules, such as the time module, as well as functions from the Python Minecraft API.
After you’ve imported the module into your program, you can use the module’s functions by using dot notation. Include the module name, a dot, and the function you want to use. Let’s import the pickle module and use a couple of its functions:
➊ import pickle
locations = {'John': 'Forest', 'Phillipa': 'Mountains', 'Pete': 'City'}
➋ secretFile= open("secretFile.txt", "wb")
➌ pickle.dump(locations, secretFile)
We import the pickle module at ➊. Next we open secretFile.txt with a special file permission, "wb" ➋. When you open a file with pickle, you must add b to the file permission. In this case, "wb" writes data to the file using a special format that the pickle module requires.
The dump() function writes to the file at ➌. The pickle module’s dump() function stores a variable in a file. It takes two arguments: the data to be written to the file and the open file that it will write to. This example stores the locations of secret agents in a dictionary called locations and then dumps that dictionary in a file called secretFile. Because dump() belongs to the pickle module, you must use dot notation to specify both the module and the function with pickle.dump(). Unlike the standard file functions in Python, the dump() function saves the data to the file automatically—you don’t need to close the file with the close() function.
The pickle module also lets you read stored data. You can use pickle’s load() function to read the contents of a file. It takes one argument, the file that you want to load, and returns the contents of the file. The following example loads the locations dictionary we stored earlier. Add this code to the program:
import pickle
➊ secretFile= open("secretFile.txt", "rb")
locations = pickle.load(secretFile)
First we open the file with the permission "rb" ➊, which allows your program to read a special data format that pickle uses. Then we load the dictionary.
Now that the dictionary has been loaded, you can treat it like any other dictionary. For example, you can access the value of one of the keys. Just add this code after the pickle.load() function:
print(locations['Phillipa'])
This will print 'Mountains', the value of the 'Phillipa' key. That’s because the dictionary in the file is unchanged when it’s loaded into the program with pickle—it’s still a dictionary, so we can access its keys and values and use it just like any other Python dictionary. You could do the same with a list or a variable as well.
IMPORTING ONE FUNCTION WITH THE FROM CLAUSE
Importing a module means you have access to all the functions in that module, but sometimes you need only one function in a module. If you want to import just one function, you use the from clause when you import the module. This clause lets you access the function without including the module name and dot notation every time you call a function. You would just write function() instead of module.function().
Sometimes when you use the pickle module you might want to use only the dump() function, not its other functions. To do this, change the code that you wrote earlier so it looks like this:
➊ from pickle import dump
locations = {'John': 'Forest', 'Phillipa': 'Mountains', 'Pete': 'City'}
secretFile= open("secretFile", "wb")
➋ dump(locations, secretFile)
The first line uses the from clause to import only the dump() function from the pickle module ➊. The last line calls the dump() function ➋. Notice that it doesn’t have dot notation. You just call the function name without referencing the module name.
You can also import more than one function from a module using from. All you need to do is separate the function names with a comma. For example, if you want to use the dump() and load() functions from pickle in the same file, you could import them both:
➊ from pickle import dump, load
locations = {'John': 'Forest', 'Phillipa': 'Mountains', 'Pete': 'City'}
secretFile= open("secretFile", "wb")
➋ dump(locations, secretFile)
➌ locations = load(secretFile)
print(locations['Phillipa'])
The first line uses the from clause with commas to import both the dump() and load() functions ➊. This means that later in the program, you can use these functions without having to include the function name and dot notation, which you can see at ➋ and ➌.
IMPORTING ALL FUNCTIONS WITH *
You can also import all the functions in a module so you don’t need to include the name of the module with dot notation every time you use it. You do this by entering an asterisk (*) at the end of the import statement, like this:
➊ from pickle import *
locations = {'John': 'Forest', 'Phillipa': 'Mountains', 'Pete': 'City'}
secretFile= open("secretFile", "wb")
➋ dump(locations, secretFile)
➌ locations = load(secretFile)
print(locations['Phillipa'])
Because this code imported all the functions in the module using an asterisk ➊, we don’t need to use dot notation when we call the dump() ➋ and load() ➌ functions.
The * option is very handy, but it comes with a risk! If you’re working with multiple modules, two modules might share the same function names. When this happens, Python will get confused and you might get an error. So when you’re working with many modules, it’s best to avoid using the * option and instead import only the functions you need to use.
GIVING A MODULE A NICKNAME
Sometimes you’ll want to rename a module because its name is too long and you want to use a shorter name in your program. Or, you want to change the module’s name to make it easier to remember. Or, perhaps you want to change its name because the module shares the same name as another module and you want to avoid conflicts.
You can use the as clause with the import statement to give a module an alias—a nickname. For example, this code imports the pickle module and renames it to p:
import pickle as p
Now, every time you want to use the pickle module, you can write p in your program instead of pickle. Here’s an example of this in action:
p.dump(locations, secretFile)
Notice that p.dump() is used instead of pickle.dump(). This saves you time because you don’t have to keep typing pickle!
MISSION #65: SAVE A BUILDING
Building things is my favorite part of Minecraft. I’ve spent hours building houses, castles, villages, and so many other things. But when I move to another part of the map or to a different world, I have to leave my creations behind. I’m sure you’ve also had to abandon some awesome creations.
Wouldn’t it be cool if you could save your buildings and take them with you when you move into different worlds? Well, with pickle and the Python API, you can!
In this mission, you’ll develop two programs that will save and load buildings into your Minecraft game. One program will store the building, and the other will load the building. Both programs build on duplicateArea.py from Chapter 10 (page 225).
PART 1: SAVING THE BUILDING
The first program will save a building into a file. Listing 11-3 includes the code to copy the building. Copy the listing into a file in IDLE and save it as saveStructure.py in the files folder.
saveStructure.py
from mcpi.minecraft import Minecraft
mc = Minecraft.create()
import pickle
def sortPair(val1, val2):
if val1 > val2:
return val2, val1
else:
return val1, val2
➊ def copyStructure(x1, y1, z1, x2, y2, z2):
x1, x2 = sortPair(x1, x2)
y1, y2 = sortPair(y1, y2)
z1, z2 = sortPair(z1, z2)
width = x2 - x1
height = y2 - y1
length = z2 - z1
structure = []
print("Please wait..." )
# Copy the structure
for row in range(height):
structure.append([])
for column in range(width):
structure[row].append([])
for depth in range(length):
➋ block = mc.getBlock(x1 + column, y1 + row, z1 + depth)
structure[row][column].append(block)
return structure
➌ # Get the position of the first corner
input("Move to the first position and press ENTER in this window")
pos1 = mc.player.getTilePos()
x1 = pos1.x
y1 = pos1.y
z1 = pos1.z
➍ # Get the position of the second corner
input("Move to the opposite corner and press ENTER in this window")
pos2 = mc.player.getTilePos()
x2 = pos2.x
y2 = pos2.y
z2 = pos2.z
➎ structure = copyStructure( x1, y1, z1, x2, y2, z2)
➏ # Store the structure in a file
Listing 11-3: Incomplete code to store a building in a file
The copyStructure() function copies an area in the game into a set of three-dimensional lists ➊. It takes two sets of coordinates as arguments. I’ve made a slight change in the copyStructure() function compared to duplicateArea.py. I’ve used the getBlockWithData() function instead of the getBlock() function ➋. Rather than getting just the block ID for a block at certain coordinates, the getBlockWithData() function also gets the block’s state. This is useful for blocks like stairs, where the direction of the stairs is stored in the block state. When the structure is copied, stairs and other blocks that face a certain way will be built in the correct direction.
I’ve included some neat code so you can use the player’s position to set the coordinates of a building you want to copy. When you run the program, it asks you to move to the first corner of the structure and then press ENTER in the Python shell ➌. The program uses the player’s position to get the first set of coordinates for the building. Next, it asks you to move to the opposite corner of the structure and do the same ➍. As a result, you can just stand where you want to start copying your building instead of writing coordinates or hard-coding them into your program.
The values of these coordinate variables are passed to the function copyStructure() at ➎. The returned value is stored in a variable called structure.
To complete the code, you need to open a new file with pickle. Call the new file "pickleFile". Then write the code to store the building in the file. Do this by using the pickle module to write the value of the structure variable to a file ➏.
Figure 11-3 shows a tower that I built in my Minecraft world.
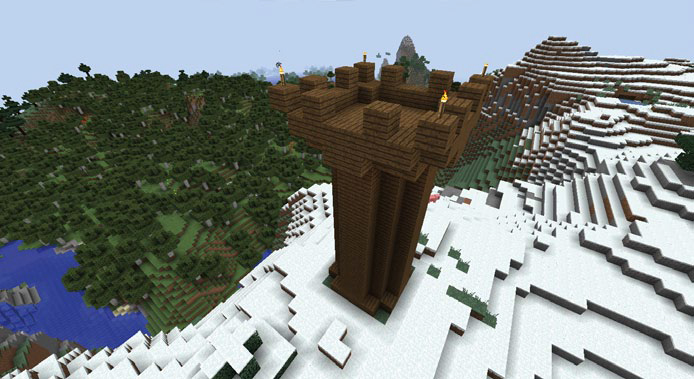
Figure 11-3: My tower that I want to copy
To copy the tower using saveStructure.py, I move to one corner and press ENTER in IDLE (Figure 11-4).
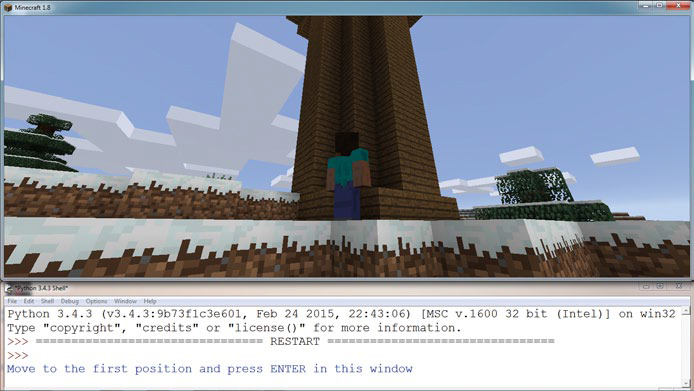
Figure 11-4: Standing next to one corner of the tower
Then I fly to the opposite corner of the tower and press ENTER in IDLE a second time (Figure 11-5).
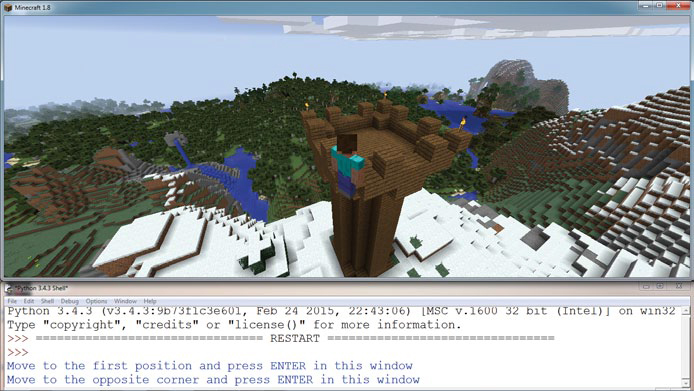
Figure 11-5: Flying to the opposite corner of the tower
Follow the same steps to use saveStructure.py to save one of your own buildings. Next we’ll complete the other half of the process and load our saved buildings into the game.
PART 2: LOADING THE BUILDING
The second program needs to load the building into the game from the file (named pickleFile) created by saveStructure.py. Listing 11-4 includes code from the duplicateArea.py program (page 225) that places a building stored in lists. Copy the listing into a file in IDLE and save it as loadStructure.py in the files folder.
loadStructure.py
from mcpi.minecraft import Minecraft
mc = Minecraft.create()
import pickle
➊ def buildStructure(x, y, z, structure):
xStart = x
zStart = z
for row in structure:
for column in row:
for block in column:
mc.setBlock(x, y, z, block.id, block.data)
z += 1
x += 1
z = zStart
y += 1
x = xStart
# Open and load the structure file
➋ structure =
➌ pos = mc.player.getTilePos()
x = pos.x
y = pos.y
z = pos.z
➍ buildStructure(x, y, z, structure)
Listing 11-4: When complete, this program will build a building from a file.
The buildStructure() function ➊ does most of the work in this program. It builds the structure in the game using four arguments: x-, y-, and z-coordinates and a structure stored in a three-dimensional list.
Import the pickle module so you can load the structure into the program, and then store it in the structure variable at ➋. Using the open() function, open the pickleFile file that you saved the structure into. Then load it into the structure variable using pickle’s load() function. After the structure has been loaded, close pickleFile using pickle’s close() function.
Also included in Listing 11-4 is some code that gets the player’s position to use as the starting location for the structure ➌.
After the structure is loaded and the coordinates are set, pass the structure to the buildStructure() function along with a position ➍, which will build the saved structure.
Figure 11-6 shows the program in action. The building I saved earlier has been loaded into the game and rebuilt at a new position. Try it yourself—now you have the ability to take your creations with you wherever you go!
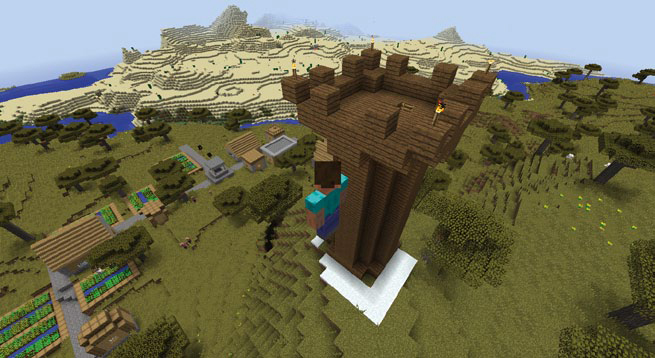
Figure 11-6: Look, it’s a copy of my tower!
But what if you create a whole village and want to take it with you? You could save each building in its own file using pickle, but that’s not very convenient. The pickle module works great for saving a single building, but it’s not so good for saving a bunch of buildings. That’s where the shelve module comes in. Let’s look at that next.
STORING LOTS OF DATA WITH THE SHELVE MODULE
The pickle module can store only one piece of data at a time. In some programs, you might want to store several variables; if you use the pickle module, you’ll need to create several files, which can be difficult to manage.
Python’s shelve module solves this problem. It can store several items of data in a single file. It works like a dictionary in which each data value has a key that you can use to store and retrieve the data. Think of shelve like a shelf: each compartment in the shelf stores different data values.
OPENING A FILE WITH SHELVE
After importing the shelve module, you’ll use its open() function to open a file. If the file doesn’t already exist, a new one will be created.
The following code opens the locationsFile.db file and stores it in the shelveFile variable:
import shelve
shelveFile = shelve.open("locationsFile.db")
The open() function takes only one argument, the name of the file. You don’t need to specify file permissions when you use the shelve module because it automatically grants read-and-write privileges.
When naming a file with the shelve module, you must include the .db extension at the end of the filename. You can see the .db at the end of my locationsFile.db file.
ADDING, MODIFYING, AND ACCESSING ITEMS WITH SHELVE
The shelve module works like a dictionary. To add data to the file, you use square brackets with a key name to store a value. For example, let’s say a secret agent named Beatrice is on a submarine, and we want to store Beatrice’s location in the shelveFile dictionary:
import shelve
shelveFile = shelve.open("locationsFile.db")
shelveFile['Beatrice'] = 'Submarine'
shelveFile.close()
First we open the file. Next, we give the shelveFile dictionary a key of 'Beatrice' and the value 'Submarine'. This line creates a new item in the shelveFile dictionary with the key 'Beatrice' and the value 'Submarine'.
Then we use shelve’s close() function to add the new data to the file and safely close the file.
If a key already exists in a shelve file, this code would update the old value to the new value. Let’s say that Beatrice finishes her mission and returns to headquarters. You could update Beatrice’s location like this:
import shelve
shelveFile = shelve.open('locationsFile.db')
shelveFile['Beatrice'] = 'Headquarters'
shelveFile.close()
Now the corresponding value of the Beatrice key is 'Headquarters'.
Accessing a value from shelve works just like a dictionary, too. You use keys to access specific values. For example, to print Beatrice’s location, we’d use the following code:
import shelve
shelveFile = shelve.open('locationsFile.db')
print(shelveFile['Beatrice'])
This will output Beatrice’s location, Headquarters.
Just like a standard dictionary, the shelve module can store any data type, including floats, strings, Booleans, multidimensional lists, other dictionaries, and so on. In fact, in the next mission you’ll store and access multidimensional lists to save and load multiple structures!
MISSION #66: SAVE A COLLECTION OF STRUCTURES
The programs in this mission will store and load all of your saved structures using a single file. This mission is once again divided into two programs: one for saving and the other for loading.
You’ll need to convert the programs from Mission #65 to use the shelve module instead of the pickle module. You’ll also add code to take user input so users can name their buildings. Open the saveStructure.py and loadStructure.py files and save them as saveCollection.py and loadCollection.py.
As we did in the previous mission, let’s make the changes to these programs in two parts.
PART 1: SAVING A STRUCTURE TO A COLLECTION
Part of the original saveStructure.py file is included and annotated here to help identify where you’ll make the changes. Here’s the first line and the last few lines of saveCollection.py:
saveCollection.py
➊ import pickle
--snip--
# Name the structure
➋ structureName = input("What do you want to call the structure?")
# Store the structure in a file
➌ pickleFile = open("pickleFile", "wb")
➍ pickleFile.dump(structure)
An extra line is added to the file to ask what you want to call the structure when you save it with pickle ➋. For example, my version of the program asks “What do you want to call the structure?” and I can reply with something like “House” or “Cake forest.” Make sure you call each new structure by a different name; if a new structure has the same name as another one, the old structure will be overwritten by the new one.
To change this program to use the shelve module instead of pickle, you need to make two changes. First, swap the module import from pickle to shelve ➊. Second, change the last few lines of the code to use shelve instead of pickle. Open a file called structuresFile.db and store it in a variable called shelveFile using the shelve.open() function ➌. Then store the structure variable in a shelve dictionary using the structureName variable for the name of the dictionary’s key ➍. It should look something like this: shelveFile[structureName] = structure. Finally, close shelveFile on the last line by using close().
PART 2: LOADING A STRUCTURE FROM A COLLECTION
Now you need to change the loadCollection.py file. I’ve removed the middle of the file to save space here and to make the bits you need to change easier to see:
loadCollection.py
➊ import pickle
--snip--
➋ structure = pickle.load("pickleFile")
➌ structureName = input("Enter the structure's name")
pos = mc.player.getTilePos()
x = pos.x
y = pos.y
z = pos.z
➍ buildStructure(x, y, z, structureDictionary[structureName])
I’ve added an extra line to the code that asks for the name of the structure you want to build ➌. Also, I added a bit of code to the last line that gets the structure from the shelve dictionary and passes it to the buildStructure() function.
You need to make a couple of changes to this program. First, as in saveCollection.py, change import to shelve instead of pickle ➊. Second, load the shelveFile that you created in saveCollection.py by using shelve.open() ➋. Store the data returned by the shelve.open() function in the variable structureDictionary ➍. The code should look something like the following: structureDictionary = shelve.load("shelveFile").
All of the data for the structures, including their names and blocks, are stored in the structuresFile.db file, which means you don’t need to make any changes to loadCollection.py before you run it. All you need to do is enter the name of the structure that you want to use when you run the program.
Let’s see the program in action, using a structure from my Minecraft world. First, I copy the structure using saveCollection.py by flying to one corner of the structure and pressing ENTER (Figure 11-7).
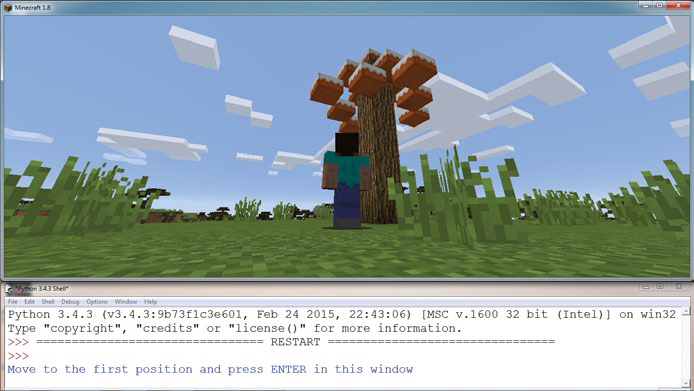
Figure 11-7: I move to one corner of the structure I want to save.
Next, I fly to the opposite corner of the structure and press ENTER again (Figure 11-8).

Figure 11-8: I move to the opposite corner.
Then the program prompts me to enter a name for my structure. Figure 11-9 shows that I’ve called my structure "Cake tree".

Figure 11-9: I enter the name that I want to save the structure as.
Finally, I run loadCollection.py, fly to the location where I want to build a copy of the structure, and enter the name of the structure I want to build (Figure 11-10). The program starts building in front of me, just like magic!

Figure 11-10: Now when I want to create a copy, I just enter the name of the structure and it builds.
You can repeat this process with as many buildings or structures as you want; for example, I’ve made a copy of a hut in Figure 11-11. After you’ve copied a structure once, you can load it anytime you want just by running loadCollection.py and entering the structure’s name!
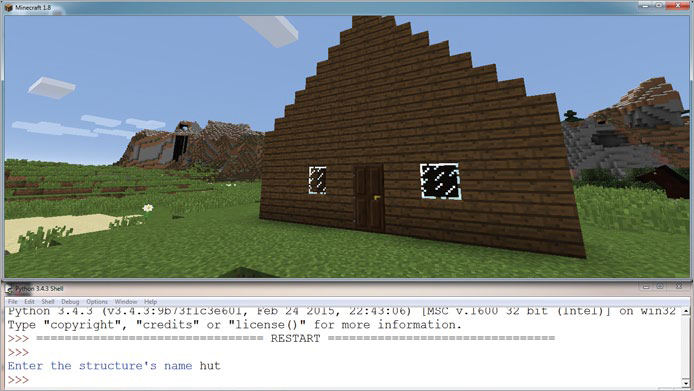
Figure 11-11: You can use the program to save multiple structures. Here I’ve copied a hut.
INSTALLING NEW MODULES WITH PIP
In addition to pickle and shelve, you can import thousands of other modules to use in your Python programs. With so many modules available, correctly installing them is very important. To simplify installing modules, Python provides a package manager called pip. A package manager is software that has a database of other software that you can install on your computer. It also includes features that make it straightforward to install, upgrade, and uninstall the other software.
The pip package manager can install, upgrade, and remove packages in Python. It also has a large collection of modules that you can use in Python. This section shows you how to install a package using pip and showcases the Flask module, which you can use to build a website!
If you’re using the most recent version of Python 3, pip is preinstalled. If you’re using an earlier version of Python, pip may not be installed. The easiest way to get pip is to install the latest version of Python. (See “Installing Python” on page 3 for Windows and on page 13 for Mac.)
Let’s look at how to use pip. Depending on the operating system you use, you can use pip in a couple of ways. Be sure to follow the instructions that match your computer!
USING PIP ON WINDOWS
When using pip on Windows, you need to open the Windows command prompt. The command prompt is similar to the Python shell. It lets you input a single command on a line, which runs when you press ENTER.
To open the command prompt, press the Windows key or open the Start menu and search for cmd. When you open the program, you’ll see a black window (Figure 11-12).

Figure 11-12: The Windows command prompt
To use pip in the command prompt, type pip followed by the action you want it to take. For example, let’s install the Python module Flask, which you can use to make websites with Python. Enter the following command in the command prompt:
> pip install Flask
On the Python Package index website at http://pypi.python.org/, you can find many other Python modules that you can install.
USING PIP ON A MAC OR RASPBERRY PI
If you’re using pip on a Mac or a Raspberry Pi, you’ll need to include sudo at the start of the command to get it to work. For example, enter this line:
$ sudo pip install Flask
If you get an error, flip to Chapter 1 to double-check the Mac or Raspberry Pi installation instructions.
On the Python Package index website at http://pypi.python.org/, you can find many other Python modules that you can install.
USING A MODULE FROM PIP: FLASK
Flask is a Python module that you can use to develop websites. In this section, you’ll learn how to set up a basic Flask website and then integrate the website with Minecraft so you can display your player’s position on a website!
With Flask, you need only a few lines of code to make and manage a website. You just write the Python code as you normally would and add some extra information related to Flask. Next, you run your code, and it makes a website that your computer can access. You can then view the website in your web browser.
Listing 11-5 creates a basic Flask website that includes the most important piece of information about me: my name.
namePage.py
from flask import Flask
➊ app = Flask(__name__)
➋ @app.route("/")
def showName():
➌ return "Craig Richardson"
➍ app.run()
Listing 11-5: A Python program that uses Flask to create a website
To use Flask, you first need to create Flask using the Flask() function ➊. The __name__ argument tells Flask that your Flask project is contained in this file, and it doesn’t need to look anywhere else to find other parts of the program. Note the two underscores, not one, at the start and at the end of the __name__ argument.
The @app.route() tag uses a decorator. Decorators provide additional information to Python about your functions. For example, in this program the @app.route() decorator tells Flask which part of the website the function will be used on. In this case, "/" tells Flask the showName() function will be used on the home page ➋. The return statement in the function tells Flask what will be displayed on the page. In this example, it returns my name, so my name will be displayed on the page ➌. The last line of the program tells Python to start Flask when this file is run ➍.
Save this file as namePage.py in the files folder. Add your own text to make your own website.
To run the website, click Run ▸ Run Module in IDLE. The program runs and generates a website file that you can open in a web browser. To find the location of the website, you need to read the line of code that your program outputs when you start running it. When I run the program, the output looks like this:
* Running on http://127.0.0.1:5000/ (Press CTRL+C to quit)
From this line, I can tell that entering http://127.0.0.1:5000/ into a web browser will take me to the Flask website that I just started running. Now when I open the web browser and go to this site, I can see my name displayed on the page (Figure 11-13).
NOTE
The website you create in this program is available only on your computer at the moment. Only you can access this website—nobody else on the Internet can look at it.

Figure 11-13: Look at my website! You can change what’s displayed here to whatever you want. What will you write on your website?
To stop the program, go into IDLE and press CTRL-C or click Shell ▸ Restart Shell.
NOTE
This chapter covers only a very basic introduction to Flask. Flask is very useful to learn because it allows you to build interactive websites quickly with Python. If you want to know more about Flask, check out this tutorial on the Flask website at http://flask.pocoo.org/docs/0.10/tutorial/.
MISSION #67: POSITION WEBSITE
One of Python’s best qualities is that it’s easy to integrate the features of different modules into a single program. You’ve been using the Minecraft Python API module throughout the book and have just learned about the Flask module. With just a few steps you can integrate the two.
In this mission, you’ll combine the Minecraft Python API with Flask to display a player’s position on a web page.
Create a new file in IDLE and save it as positionPage.py in the files folder. You need to get the player’s position from Minecraft and display it on the web page using a function with the Flask @app.route("/") tag. You can base the code on the example in Listing 11-5. Make the code display the position in the format "x 10, y 110, z 12".
Run the program and check out your web page. Pretty cool, huh? Using Flask you can create web pages with all kinds of information on them. You can even upload these pages to the Internet to share with your friends!
WHAT YOU LEARNED
In this chapter, you were introduced to using files with Python. You learned how to read and write to files using Python’s standard library, giving you control over files when you create your own programs. You also learned how to use modules, which extend Python’s capabilities and what you can do in Python.
You explored the pickle module, the shelve module, and the pip package manager. The pickle and shelve modules are used for different purposes. The pickle module saves the value of a single variable, especially when it contains a multidimensional list or dictionary, which would be difficult to store and open using the standard library. The shelve module has the same strengths as the pickle module, but it gives you more flexibility to store several values at once in a dictionary-like structure. With pip, you learned how to install new modules. You were also introduced to the Flask module, which is a quick and flexible way to build websites with Python.
With this knowledge, you completed four missions. The first allowed you to create to-do lists, which you can display in the Minecraft game to remind you what you’re working on. The second made it possible to save buildings and load them into your current world and other worlds. The third mission modified the second mission so you could store all your buildings in a single file instead of a file for each building. The final mission showed you how to use the Flask module to create a web page that displays the player’s current position.
You’ve done a great job so far! The next chapter is the final chapter. You’ll learn about classes and object-oriented programming, a popular programming style that allows you to reuse code.