
In the previous chapter, we discussed how to install Wireshark on our computers.
Let's take a quick look at the Wireshark interface:

As we can see, the interface is quite intuitive. Once a few basic decisions, as outlined in the previous chapter (such as the selection of interface to capture from) have been made, the capture operation is initiated.
Once the capture operation begins, the interface looks similar to the following screenshot:

Packet List pane
Each row in the preceding screenshot represents a packet captured by Wireshark.
When one of the rows/packets is highlighted and right-clicked, we can see the TCP stream for the in-depth detail about its contents, as shown in the following screenshot:

Another cool thing that you can get Wireshark to do is to resolve the IP addresses to real-world human-readable domains using Address Resolution, as shown in the following screenshot:

The Wireshark main window is broadly divided into three distinct areas or panes, as follows:
All these names are self-explanatory.
When we look at the top-most pane, we can see a list of the packets captured by Wireshark, as shown in the following:

This lists out the packet number, time of capture, source and destination IP address, protocol, length, and associated information, as shown in the following:

Whenever a specific packet is highlighted in the top-most pane, its details get listed in the Packet Details pane.
From a deep-dive perspective, this allows us to gain a deeper insight in the metadata related to the packet being inspected.
The metadata that is shown actually consists of the protocols and the protocol fields of the selected packet. These are presented in a tree structure that can be expanded or collapsed by the user.
Some protocol fields that are displayed include generated fields and links. The generated fields are the information that is generated by Wireshark and are usually displayed in brackets. This information is actually derived from the context and content of other related packets in the capture file. Links are usually generated if Wireshark detects a relationship with another packet in the capture file. Just like any hyperlinks, these are underlined and colored in blue. If double-clicked, the user jumps to that specific packet.
The third pane is the Packet Bytes pane. Whenever we highlight a specific packet in the Packet List pane, its contents are visible in the hex dump format. This is visible in the following screenshot:
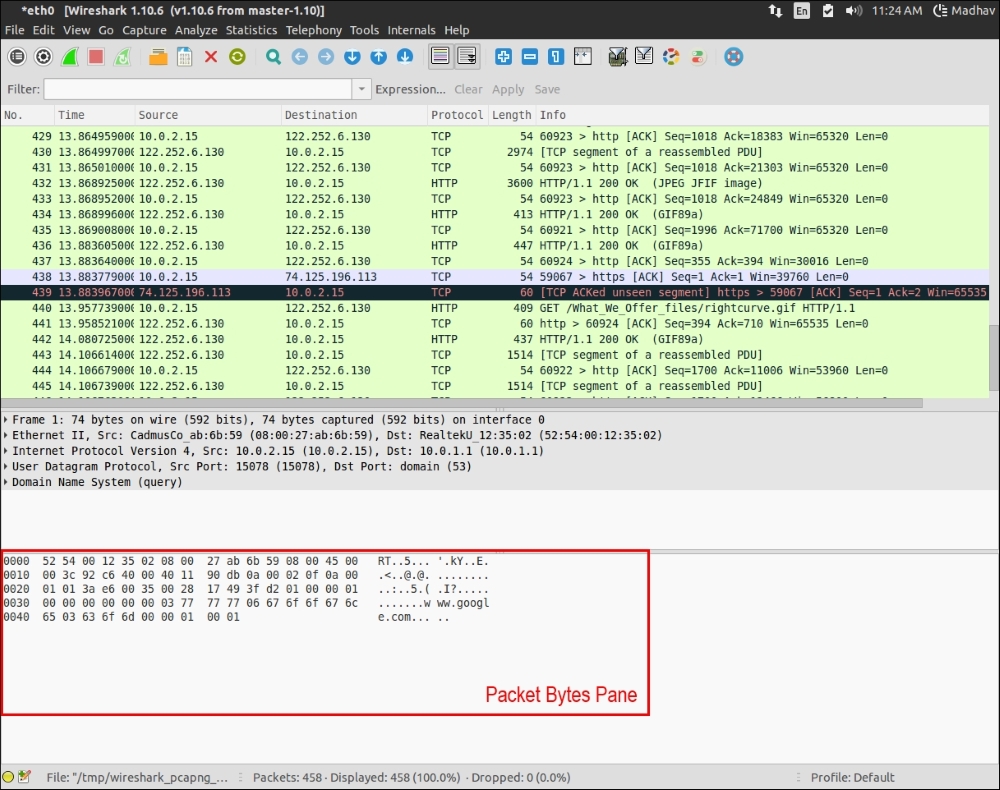
The left-most column denotes the offset, the next portion is the hex, and the last portion is the contents of the packet in ASCII. As we can see, in this case, the website being accessed is www.google.com.
A quick look at the Packet List pane shows us that different packets are colored differently as shown in the following screenshot:

Wireshark has a complex coloring scheme when it comes to packets.
This is shown in the following image:

Wireshark has a number of valuable features when it comes to the analysis of captured packets.
No criminal or wrongdoer wants to be caught. They constantly devise new ways to prevent detection. Due to the increasing use of simple employee monitoring software in organizations, we have suspects using Voice over IP (VoIP) for communication with their accomplices.
One of the really useful features of Wireshark in such a scenario is in the ability to capture and analyze VoIP traffic. We can use the Telephony | VoIP Calls option to decode the VoIP packets and play back live conversations. That's the real 007 in action!!! This can be seen in the following screenshot:

The best way to learn using Wireshark is to follow the instructions provided in the previous chapter as well as this one and get started with hands-on capturing and analysis of traffic on your network. Remember to take permissions first—you may quickly find that sniffing networks can actually reveal a lot of confidential data.