
In this chapter we will cover an overview of all Pixelmator's main sections of effects. Here we will learn how to use effects to artistically edit photos.
Pixelmator has many built-in effects that you can use to stylize your images and create artistic effects. In this chapter we are going to walk through all of the main effect sections and give you some insight about what you can do to artistically edit your images. First, if the Effects Browser panel isn't open, you can click View | Show Effects or press Command + 3 to open it up. This tool panel has a drop-down at the very top of the toolbar that allows you to sort by the different sections of effects they have. In the center of the toolbar, you will see the available effects. A nice touch that Pixelmator has is that you can move your mouse over the thumbnails of available effects to see what that effect does. Move your mouse side to side on the preview to see what effect the filter has. To use an effect just double-click on the thumbnail to open up additional settings for that Filter and apply it. There are many effects that Pixelmator has that help you artistically edit your photos, and we will walk through all of the effect options in this chapter.
When using filters, remember that they are destructive, meaning that the changes you make to the image can't simply be brushed away, like when painting on or off a layer mask. It's always best to first duplicate the layer so you are working on a copy of the layer and then make any adjustments. Then if you make a mistake, just delete the layer to start over.
The blur effects do just what the name suggests; it gives you a few different ways to add a blur effect to your images. There are six different blur filters, and we will go through what each one of these does.
One of the most popular types of blur, the Gaussian blur, is a very effective way of creating a natural looking blur in your image. This type of blur gives your image an overall soft feel. This is always a great way to apply a blur to a selected part of your image to give it a feeling of depth. When you use the Gaussian tool you will be able to set the radius of the image; this will control how much of a blur the effect causes. This will apply to the entire layer that you are on, but by using layer masks, you can have the blur effect only certain parts of your image. For example, let's say that you have a photo with a very small aperture and most of the image is in focus. You can easily create some depth by following these simple steps:
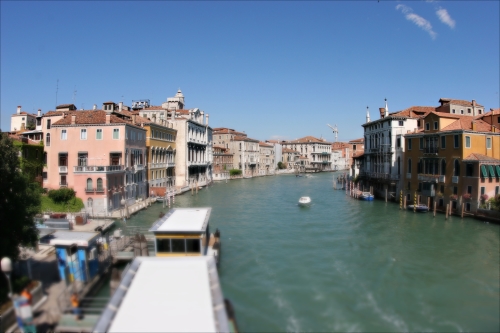
- First duplicate the layer so you have two layers of the image.
- Next, apply a Gaussian filter and adjust the Radius option to specify how much of a blur you would like.
- Now apply a layer mask and use the graduated filter to have the blur only apply to a part of the image. In the following example, the blur is only applied to the bottom part of the image to give the photo a bit more dimension:
The Motion effect gives you a blur that simulates the feeling of motion. With this effect, you can not only select the Radius option to control how much blur happens, but you can also set angle of the blur. With this blur type, you can simulate the blur that you get when moving the camera while taking a long exposure photo.
The Zoom effect is similar to the Motion effect in that it will simulate motion: but instead of giving the feel of the camera panning a scene, this effect simulates zooming the lens while taking a long exposure photo. When you select this tool, you will be able to set the Radius option to control the amount of blur but will also see a circle that you can move around the image. This will control where the center point of the zoom is going to be. In the following example, you can see how you can control the center point of the Zoom tool:
The Median effect doesn't have any settings and is designed to help reduce noise in your image. What it will do is figure out the median value for a group of neighboring pixels and replace each pixel's value with the median.
The Soften effect can also be used to reduce noise. This effect has a setting to control the color noise level so you can reduce the color noise in an image. Here you can adjust the softness of the color noise on a slider from 0 to 100 percent. Setting it at 100 percent will be the maximum amount of softness to the color noise. You can control the sharpness of the image also with a slider from 0 to 100 percent.
The Miniaturize effect is a cool way to create a tilt-shift type of look for a photo. When you open up this effect you will see two options, Linear and Elliptical (types of blur). With Linear, you will have a blur on the top and bottom of the image that fades into the middle. In the Miniaturize blur settings, you will see a circle in the center that you can move to adjust the center part of the image that will be in focus. You can also use the black circle on the left to adjust how far you want the blur to extend to in the image.
In the following example, the linear miniaturize blur effect is selected to create a blur along the top and bottom edges of the photo:
You also have control over the amount of the Blur by using the slider to go from 0 to 100 percent and setting the transition. The Transition option will let you control how hard or soft the blur transition is. If you set it on the low end of the scale, there will be a sharp change in the blur. The image will go from blurry to sharp in a very short transition; whereas if you set it to a higher level, there will be a more gradual transition from blurry to sharp.