
Adding gradients and using the paint bucket tool to fill an area can be a good way to create backgrounds. For portrait photography, often you might need to create a collage of images to tell a more complete story of the portrait shoot for your client. This can be done the traditional way by printing separate images and then matting and framing the set of images into one frame, or this can be done digitally and then printed out on any type of medium, such as a canvas or a metal for a more unique look. The fill tool is a great way to fill white space with a color, and we will start with some basics on using this tool. First, select the paint bucket in the toolbar. To select your color, you can either click on the small color box at the top of the tool options bar or use the Shift + Command + C shortcut key to open up the color picker. The color picker gives you a few different ways to select a color, but a great way to get a custom color that matches the pallet of your image is to click on the magnifying glass icon on the top-left corner of the color toolbar. This turns your cursor into a larger magnifying glass and you can click on any part of the image to sample that color. In this example, you can see the magnifier on the pink crib background; once you click on any area, it will sample that color.
When you are ready to fill an area, select the Blending option at the top tool options bar and the Opacity option of the fill and click in the area to fill.
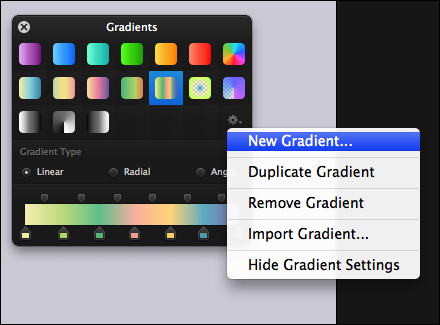
A simple fill might not be enough though, you might want to fill the area with a gradient color. The gradient tool is to the left-hand side of the fill tool in the toolbar, or can be accessed by the hotkey of G. When you bring up this tool, first click on the small color box at the top of the tool options bar or use the Command + 5 shortcut key to open up the gradient toolbar. In this toolbar, you will be able to pick from a set of many predefined gradients or even set up your own custom gradients. Creating your own gradients can be fun and is really easy to do. So let's start with creating our own custom gradient:
- First, click on the gear icon in the Gradients toolbar and select New Gradient…:
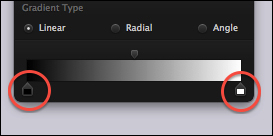
- This starts you off with a simple black-to-white gradient. To change the color of the start or endpoint, just click on the small box at the bottom of the toolbar to open up a color picker and select your color. Once you have the start and endpoints selected, you can use the arrow at the top of the gradient bar and slide this back and forth to set where the fade happens:
- You can also create as many additional color points as you would like on the gradient by clicking inside the gradient bar where you would like the new color to be introduced. If you need to remove any of these points, just right-click on the gradient and select Remove Color Stop.
Now that you have your gradient colors set, click where you would like the gradient to start, and while holding down the mouse, drag to where you would like to see the gradient end. You will see it getting created in real time, which is very helpful to get the exact placement you would like. Once you have it all set, release the mouse and you are all done!