When you install Mac OS X or boot it for the first time, the installer may ask whether you want to sign up for .Mac, Apple’s suite of Internet services that includes electronic mail (email). If you signed up for .Mac, you probably use Apple’s Mail application to send and receive email. If you didn’t sign up for .Mac, you may be using an email account provided by your Internet Service Provider (ISP) or employer along with Apple’s Mail or some other application.
There are many great graphical mail applications for Mac OS X. However, Terminal-based email programs have some benefits:
They are often faster than graphically-rich email applications because their displays are so much simpler.
They can be faster to use because your fingers don’t need to leave the keyboard.
They are not affected by conventional email viruses, although security holes do appear from time to time in nearly every program that interacts with the Internet.
You can read your email while logged in to your Mac from another machine (see Section 7.1).
Pine, from the University of Washington, is a popular program for reading and sending email from a terminal. It works completely from your keyboard; you don’t need a mouse. This section describes how to configure Pine and use it to send and receive email.
Start Pine by entering its name at a shell prompt. It also accepts
options and arguments on its command line; to find out more, enter
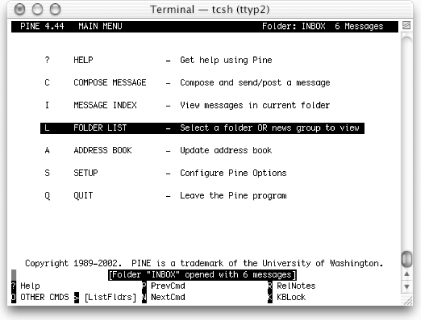
pine -h (help). Figure 8-3 shows
the starting display, the main
menu
.
The Pine
main menu has a Setup entry for configuring Pine.
After
you enter
S
(the
“Setup” command), you can choose
what kind of setup you want. From the setup screen, you can get to
the option configuration area with
C
(the
“Config” command).
The
configuration screen has page after page of options. You can look
through them with the spacebar (to move forward one page), the
- key (back one page), the N
key (to move forward to the next entry), and the P
key (back to the previous entry). If you know the name of an option
you want to change, you can search for it with
W
(the
“Whereis” command).
When you highlight an option, the menu of commands at the bottom of
the screen will show you what can do with that particular option. A
good choice, while you’re exploring, is the
?
(help) command, to find out about
the option you’ve highlighted. There are several
kinds of options:
Options with variable values: names of files, hostnames of computers, and so on. For example, the
personal-nameoption sets the name used in the “From:” header field of mail messages you send. The setup entry looks like this:personal-name = <No Value Set: using "Robert L. Stevenson">
“No Value Set” can mean that Pine is using the default from the system-wide settings, as it is here. If this user wants his email to come from “Bob Stevenson,” he could use the
C(Change Val) command to set that name.Options that set preferences for various parts of Pine. For instance, the
enable-sigdashesoption in the “Composer Preferences” section puts two dashes and a space on the line before your default signature. The option line looks like this:[X] enable-sigdashes
The
Xmeans that this preference is set, or “on.” If you want to turn this option off, use theX(Set/Unset) command to toggle the setting.Options for which you can choose one of many possible settings. The option appears as a series of lines. For instance, the first few lines of the
saved-msg-name-ruleoption look like this:saved-msg-name-rule = Set Rule Values --- ---------------------- (*) by-from ( ) by-nick-of-from ( ) by-nick-of-from-then-from ( ) by-fcc-of-from ( ) by-fcc-of-from-then-fromThe
*means that thesaved-msg-name-ruleoption is currently set toby-from. (Messages will be saved to a folder named for the person who sent the message.) If you wanted to choose a different setting — for instance,by-fcc-of-from— you’d move the highlight to that line and use the*(Select) command to choose that setting.These settings are trickier than the others, but the built-in help command
?explains each choice in detail. Start by highlighting the option name (here,saved-msg-name-rule) and reading its help info. Then look through the settings’ names, highlight one you might want, and read its help info to see if it’s right for you.
When you exit the setup screen with the E command,
Pine asks you to confirm whether you want to save any option changes
you made. Answer N if you were just experimenting
or aren’t sure.
Before you can send or receive email with Pine, you must configure it to talk to your email servers. You will need the following information (if you are not using .Mac, you will need to get this information from your ISP or system administrator):
- Your email address
This will be supplied by your ISP. If you are using .Mac, it will be
username@mac.com.
Warning
Your Mac OS X username must be the same as the username in your email address, since Pine uses your Mac OS X username and your user-domain to generate your email address.
- Incoming mail server
This is the server where your email messages sit until you’re ready to read them. Your ISP may refer to this as a POP or IMAP server. If you are using .Mac, this will be
mail.mac.com.- Incoming mail protocol
Pine supports two protocols for downloading remote email: POP (Post Office Protocol) and IMAP (Internet Message Access Protocol). If you are using .Mac, this will be IMAP.
- Outgoing mail server
This is a server that accepts your outgoing email and delivers it to the recipients. Your ISP may refer to this as an SMTP server (SMTP is Simple Mail Transfer Protocol, the network protocol for sending and receiving email). If you are using .Mac, this will be
smtp.mac.com.
Enter the setup screen by pressing S at
Pine’s main menu. Then press C to
enter the Config screen. To configure your email account, do the
following:
Look at your email address. Set Pine’s user-domain to everything after the
@symbol (for example,mac.com).Set the smtp-server to your outgoing mail server (for example,
smtp.mac.com).If you are using IMAP, set the inbox-path to
{incoming mailserver/user=username}inbox, as in{mail.mac.com/user=dtaylor}inbox.If you are using POP, set the inbox-path to
{incoming mail server/pop3/user=username}inbox, as in{pop3.nowhere.oreilly.com/pop3/user=dtaylor}inbox.
The exact settings may vary. If you need more help, visit the Usenet newsgroup comp.mail.pine and look for the latest posting of the FAQ (see Section 8.4, later in this chapter).
After you’ve made these changes, press
E to exit Setup, press Y to
commit changes, and then quit and restart Pine.
When you first start Pine, the main menu appears, as shown earlier in Figure 8-3. You may also be prompted for your password, since Pine needs this to connect to your POP or IMAP server.
The highlighted line, which is the default
command, gives a list of your email folders.[10] You can
choose the highlighted command by pressing Return, pressing the
greater-than sign >, or typing the letter next
to it. (Here, this is l — a lowercase L. You
don’t need to type the commands in uppercase.) But
because you probably haven’t used Pine before, the
only interesting folder is the inbox, which is the folder where your
new messages wait for you to read them.
The display in Figure 8-3 shows that there are six
messages waiting. Let’s go directly to the inbox by
pressing I (or by highlighting that line in the
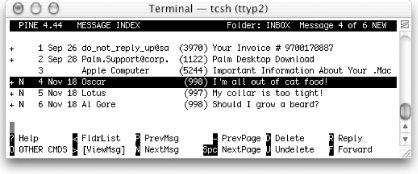
menu and pressing Return) to read the new mail. Figure 8-4 has the message index for
our inbox.
The main part of the window is a list of the messages in the folder,
one message per line. If a line starts with N, as
the fourth message does, it’s a new message that
hasn’t been read. (The first message has been
sitting in the inbox for some time now.) Next on each line is the
message number; messages in a folder are
numbered 1, 2, and so on. That’s followed by the
date the message was sent, who sent it, the number of characters in
the message (size), and, finally, the message subject.
At the bottom of the display is Pine’s reminder list
of commands. When you aren’t sure what to do, this
is a good place to look. If you don’t see what you
want here, pressing O (the letter
“o”; lowercase is fine) shows you
more choices. For more information, ? gives
detailed help.
Let’s skip the first few messages and read number 4.
The down-arrow key or the N key moves the
highlight bar over that message. As usual, you can get the default
action — the one shown in brackets at the bottom of the display
(here, [ViewMsg]) — by pressing Return or
>. The message from Oscar will appear.
Just as > takes
you forward in Pine, the < key generally takes
you back to where you came from — in this case, the message
index. You can type R to reply to this message,
F to forward it (send it on to someone else),
D to mark it for deletion, and the Tab key to go
to the next message without deleting this one.
When you mark a message for deletion, it stays in the folder message
index, marked with a D at the left side of its
line, until you quit Pine. Type Q to quit. Pine
asks if you really want to quit. If you’ve marked
messages for deletion, Pine asks if you want to
expunge (“really
delete”) them. Answering Y here
deletes the message.
If you’ve already started
Pine, you can compose a message from many of its displays by typing
C. (Though, as always, not every Pine command is
available at every display.) You can also start from the main menu.
Or, at a shell prompt, you can go straight into message composition
by typing pine
addr1
addr2, where each
addr is an email address such as
[email protected]. In that case, after
you’ve sent the mail message, Pine quits and leaves
you at another shell prompt.
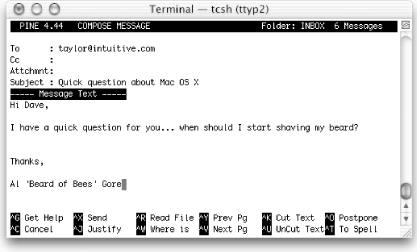
When you compose a message, Pine puts you in a window called the composer . (You’ll also go into the composer if you use the Reply or Forward commands while you’re reading another mail message.) The composer is a lot like another Unix text editor (Pico), but the first few lines are special because they’re the message header — the “To:,” “Cc:” (courtesy copy), “Attchmnt:” (attached file), and “Subject:” lines. Figure 8-5 shows an example, already filled in.
As you fill in the header, the composer works differently than when you’re in the message text (body of the message). The list of commands at the bottom of the window is a bit different in those cases, too. For instance, while you edit the header, you can attach a file to the end of the message with the “Attach” command, which is Control-J. (Pine uses the ^ symbol to indicate a control character.) However, when you edit the body, you can read a file into the place you’re currently editing (as opposed to attaching it) with the Control-R “Read File” command. But the main difference between editing the body and the header is the way you enter addresses.
If you have more than one address on the
same line, separate them with
commas
(,). Pine will rearrange the addresses so
there’s just one on each line.
There is more than one way to give the composer the addresses where the message should be sent:
Type the full email address, for example, [email protected].
Type a nickname from the address book. (See Section 8.3.3.1 later in this chapter.)
Move up and down between the header lines with Control-N and Control-P, or with the up-arrow and down-arrow keys. When you move into the message body (under the “Message Text” line), type any text you want. Paragraphs are usually separated with single blank lines.
Tip
If you put a file in your home directory named
.signature (the name starts with a dot,
.), the composer automatically adds its contents
to the end of every message you compose. (Some other Unix email
programs work the same way.) You can make this file with a text
editor such as vi, or from the Pine setup menu (see Section 8.3.1 later in this chapter).
It’s good Internet etiquette to keep this file
short — no more than four or five lines, if possible.
You can use Pico commands such as Control-J to justify a paragraph and Control-T to check your spelling. When you’re done, Control-X (exit) leaves the composer, asking first if you want to send the message you just wrote. Control-C cancels the message, though you’ll be asked if you’re sure. If you need to quit but don’t want to send or cancel, the Control-O command postpones your message; then, the next time you try to start the composer, Pine asks whether you want to continue the postponed composition.
The Pine address book can hold peoples’ names and addresses, as well as a nickname for each person. When you compose a message, enter a nickname in the message header and Pine replaces that with their full name and address.[11]
You can enter information by hand from the main menu by choosing
A (address book), then adding new entries and
editing old ones. Also, as you read email messages that
you’ve received, the
T
(take address) command scans the
message for email addresses and lets you add them to
Pine’s address book.
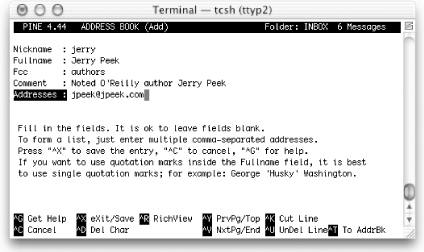
Figure 8-6 shows the address book entry form. Edit each line as you would in the composer, then use Control-X to save the entry. The “Fcc” line gives the name of an optional Pine folder; when you send a message to this address book entry, Pine puts a copy in this folder. (If you leave “Fcc” blank, Pine uses the sent-mail folder.) All lines except “Nickname” and “Address” are optional.
Once you’ve saved that address book entry, if you go into the composer and type the nickname Jerry, here’s the header you get automatically:
To      : Jerry Peek <[email protected]>
Cc      :
Fcc     : authors
Attchmnt:
Subject :
There’s much more to Pine than we can cover here. For instance, it lets you organize mail in multiple folders, print, pipe (output) messages to Unix programs, search for messages, and more.
You can practice sending and reading mail in this exercise:
[10] Pine
also lets you read Usenet newsgroups. The L
command takes you to another display where you choose the source of
the folders, then you see the list of folders
from that source. See Section 8.4.
[11] The Mac OS X version of Pine also let you store your address book on a central server, in order for you to access it from whatever other computer you’re using at the moment, via IMAP.


