
We will create a very simple Vue application with two components: one of them will contain the greetings message and the other one will contain input that will allow us to change this message. Our store will contain the initial state that will represent the initial greeting and the mutation that will be able to change the message. Let's start by creating a Vue application. We will use vue-cli and the webpack-simple template:
vue init webpack-simple simple-store
Install the dependencies and run the application as follows:
cd simple-store npm install npm run dev
The application is started! Open the browser in localhost:8080. Actually, the greeting is already there. Let's now add the necessary components:
ShowGreetingsComponentwill just display the greetings messageChangeGreetingsComponentwill display the input field that will allow to change the message
In the src folder, create a components subfolder. Start by adding ShowGreetingsComponent.vue to this folder.
It will look as simple as the following:
<template>
  <h1>{{ msg }}</h1>
</template>
<script>
  export default {
    props: ['msg']
  }
</script>
After that, add ChangeGreetingsComponent.vue to this folder. It has to contain the input with the v-model='msg' directive:
<template>
  <input v-model='msg'>
</template>
<script>
  export default {
    props: ['msg']
  }
</script>
Now open the App.vue file, import the components, and replace the markup with these two components. Do not forget to bind msg to both of them. So, your App.vue after the modifications will look like the following:
<template>
  <div>
    <show-greetings-component :msg='msg'></show-greetings-component>
    <change-greetings-component :msg='msg'></change-greetings-component>
  <div>
</template>

<script>
import ShowGreetingsComponent from './components/ShowGreetingsComponent.vue'
import ChangeGreetingsComponent from './components/ChangeGreetingsComponent.vue'

export default {
  components: { ShowGreetingsComponent, ChangeGreetingsComponent },
  data () {
    return {
      msg: 'Hello Vue!'
    }
  }
}
</script>
Open the browser. You will see the input box with our greeting; however, typing in it will not change the message in the title. We were already expecting that because we know that components cannot directly affect each other's state. Let's now introduce the store! First of all, we must install vuex:
npm install vuex --save
Create a folder named vuex in the src folder. Create a JavaScript file named store.js. This will be our state management entry. First of all, import both Vue and Vuex and tell Vue that we want to use Vuex in this application:
//store.js
import Vue from 'vue'
import Vuex from 'vuex'
  Vue.use(Vuex)
Now create two constants, state and mutations. State will contain the message msg while mutations will export the method that will allow us to modify msg:
const state = {
  msg: 'Hello Vue!'
}

const mutations = {
  changeMessage(state, msg) {
    state.msg = msg
  }
}
Now initialize the Vuex store with the already created state and mutations:
export default new Vuex.Store({
  state: state,
  mutations: mutations
})
Our whole store's code will thus look like the following:
//store.js
import Vue from 'vue'
import Vuex from 'vuex'

Vue.use(Vuex)
const state = {
  msg: 'Hello Vue!'
}
const mutations = {
  changeMessage(state, msg) {
    state.msg = msg
  }
}
export default new Vuex.Store({
  state,
  mutations
})
We can now import the store in our App.vue. By doing this, we tell all the components that they can use the global store, and as a result, we can remove data from App.vue. Also, we do not need to bind data to the components anymore:
//App.vue
<template>
  <div>
    <show-greetings-component></show-greetings-component>
    <change-greetings-component></change-greetings-component>
  </div>
</template>

<script>
import ShowGreetingsComponent from './components/ShowGreetingsComponent.vue'
import ChangeGreetingsComponent from './components/ChangeGreetingsComponent.vue'
import store from './vuex/store'

export default {
  components: {ShowGreetingsComponent, ChangeGreetingsComponent},
  store
}
</script>
Now let's go back to our components and reuse the data from the store. In order to be able to reuse reactive data from the store's state, we should use computed properties. Vue is so smart that it will do all the work for us to reactively update these properties whenever the state changes. And no, we do not need to import the store inside the components. We have access to it just by using the this.$store variable. So, our ShowGreetingsComponent will look like the following:
//ShowGreetingsComponent.vue
<template>
  <h1>{{ msg }}</h1>
</template>
<style>
</style>
<script>
  export default {
    computed: {
      msg () {
        return this.$store.state.msg
      }
    }
  }
</script>
Follow the same logic to reuse the store's msg in the ChangeGreetingsComponent. Now we just have to dispatch the mutation on each keyup event. For this to happen, we just need to create a method that will commit the corresponding store's mutation and that we will call from the input's keyup listener:
//ChangeGreetingsComponent.vue
<template>
  <input v-model='msg' @keyup='changeMsg'>
</template>
<script>
  export default {
    computed: {
      msg() {
        return this.$store.state.msg
      }
    },
    methods: {
      changeMsg(ev) {
        this.$store.commit('changeMessage', ev.target.value)
      }
    }
  }
</script>
Open the page. Try to change the title. Et voilà! It works!
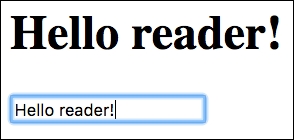
Using the Vuex store to call the mutations and change the store's state propagating it through the components
We don't need to bind the v-model directive anymore because all the changes happen due to the calling store's mutation method. Thus, the msg property can be bound as the value's attribute to the input box:
<template>
  <input :value='msg' @keyup='changeMsg'>
</template>
Check the code for this section in the chapter5/simple-store folder. In this example, we have used a very simplified version of the store. However, complex Single-Page Applications (SPAs) require a more complex and modular structure. We can and should extract the store's getters and actions that dispatch mutations to separated files. We can also group these files according to the corresponding data's responsibilities. In the next sections, we will see how we can achieve such a modular structure by using getters and actions.
It is, of course, good that we can reuse the this.$store.state keyword inside the components. But imagine the following scenarios:
- In a large-scale app where different components access the state of the store using
$this.store.state.somevalue, we decide to change the name ofsomevalue. This means that we have to change the name of the variable inside each and every component that uses it! - We want to use a computed value of state. For example, let's say we want to have a counter. Its initial state is "0". Each time we use it, we want to increment it. This means that each component has to contain a function that reuses the store's value and increments it, which means having repeated code in each component, which is not good at all!
Sorry for the not-so-good scenarios, guys! Fortunately, there is a nice way not to fall into any of them. Imagine the centralized getter that accesses the store's state and provides a getter function to each of the state's items. If needed, this getter can apply some computation to the state's item. And if we need to change the name of some of the attributes, we only change it in one place, in this getter. It's rather a good practice or a convention than an architectural mandatory system, but I strongly recommend to use it even if you have only a couple of state items.
Let's create such a getter for our simple greetings application. Just create a getters.js file inside the vuex folder and export a getMessage function that will return state.msg:
//getters.js
export default {
  getMessage(state) {
    return state.msg
  }
}
Then it should be imported by the store and exported in the new Vuex object, so the store knows what its getters are:
//store.js
import Vue from 'vue'
import Vuex from 'vuex'
import getters from './getters'

Vue.use(Vuex)

const state = {
  msg: 'Hello Vue!'
}

const mutations = {
  changeMessage(state, msg) {
    state.msg = msg
  }
}

export default new Vuex.Store({
  state, mutations, getters
})
And then, in our components, we use getters instead of directly accessing the store's state. Just replace your computed property in both the components with the following:
computed: {
  msg () {
    return this.$store.getters.getMessage
  }
},
Open the page; everything works like a charm!
Still the this.$store.getters notation contains so many letters to write. We, programmers are lazy, right? Vue is nice enough to provide us with an easy way to support our laziness. It provides a mapGetters helper that does exactly as its name suggests—provides all the store's getters to our components. Just import it and use it in your computed properties as follows:
//ShowGreetingsComponent.vue
<template>
  <h1>{{ getMessage }}</h1>
</template>
<script>
  import { mapGetters } from 'vuex'

  export default {
    computed: mapGetters(['getMessage'])
  }
</script>

//ChangeGreetingsComponent.vue
<template>
  <input :value='getMessage' @keyup='changeMsg'>
</template>
<script>
  import { mapGetters } from 'vuex'

  export default {
    computed: mapGetters(['getMessage']),
    methods: {
      changeMsg(ev) {
        this.$store.commit('changeMessage', ev.target.value)
      }
    }
  }
</script>
Note that we've changed the property used inside the template to have the same name as the getter's method name. However, it is also possible to map the corresponding getter method's name to the property name that we want to use in our component:
//ShowGreetingsComponent.vue
<template>
  <h1>{{ msg }}</h1>
</template>
<style>
</style>
<script>
  import { mapGetters } from 'vuex'

  export default {
    computed: mapGetters({
      msg: 'getMessage'
    })
  }
</script>

//ChangeGreetingsComponent.vue
<template>
  <input :value='msg' @keyup='changeMsg'>
</template>
<script>
  import { mapGetters } from 'vuex'

  export default {
    computed: mapGetters({
      msg: 'getMessage'
    }),
    methods: {
      changeMsg(ev) {
        this.$store.commit('changeMessage', ev.target.value)
      }
    }
  }
</script>
So, we were able to extract the getter for the msg property to the centralized store's getters file.
Now, if you decide to add some computation to the msg property, you only need to do it in one place. Just in one place!

Rick was always changing the code in all the components and just discovered that it is possible to only change it in one place
For example, if we want to reuse the uppercased message in all the components, we can apply the uppercase function inside the getter as follows:
//getters.js
export default {
  getMessage(state) {
    return (state.msg).toUpperCase()
  }
}
From now on, each component that uses the getter to retrieve the state will have an uppercased message:
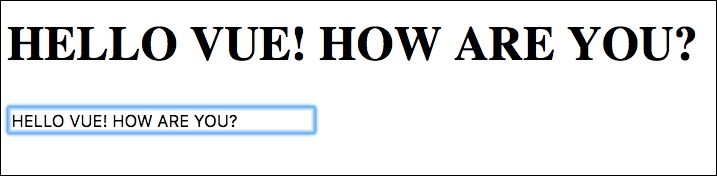
The ShowTitleComponent uppercased message. The toUpperCase function is applied inside the getters
Note also how smoothly the message is being changed to uppercase inside the input box while you're typing in it! Check the final code for this section inside the chapter5/simple-store2 folder.
If we decide to change the name of the state's attribute, we will only change it inside the getters function. For example, if we want to change the name of msg to message, we will do it inside our store:
const state = {
  message: 'Hello Vue!'
}

const mutations = {
  changeMessage(state, msg) {
    state.message = msg
  }
}
And then, we will also change it inside the corresponding getter function:
export default {
  getMessage(state) {
    return (state.message).toUpperCase()
  }
}
That's it! The rest of the application is left completely untouched. This is the power of such architecture. In some very complex applications, we can have more than one getters files that export state for different kind of the application's properties. Modularity is a power that drives the maintainability; use it!
From the previous example, it should be clear that mutations are no more than simple event handler functions that are defined by name. Mutation handler functions receive a state as a first argument. Other arguments can be used to pass different parameters to the handler function:
const mutations = {
  changeMessage(state, msg) {
    state.message = msg
  },
  incrementCounter(state) {
    state.counter ++;
  }
}
A particularity of mutations is that they cannot be called directly. To be able to dispatch a mutation, we should call a method called commit with a name of the corresponding mutation and parameters:
store.commit('changeMessage', 'newMessage')
store.commit('incrementCounter')
You can create as many mutations as you wish. They can perform different operations on same-state items. You can go even further and declare mutation names as constants in a separated file. In this way, you can easily import them and use them instead of strings. So, for our example, we would create a file inside the vuex directory and call it mutation_types.js, and export all the constant names there:
//mutation_types.js
export const INCREMENT_COUNTER = 'INCREMENT_COUNTER'
export const CHANGE_MSG = 'CHANGE_MSG'
Then, in our store, we will import these constants and reuse them:
//store.js
<...>
import { CHANGE_MSG, INCREMENT_COUNTER } from './mutation_types'
   <...>
const mutations = {
  [CHANGE_MSG](state, msg) {
    state.message = msg
  },
  [INCREMENT_COUNTER](state) {
    state.counter ++
  }
}
Inside the components that dispatch mutations, we will import the corresponding mutation type and dispatch it using the variable name:
this.$store.commit(CHANGE_MSG, ev.target.value)
This kind of structure makes a lot of sense in big applications. Again, you can group your mutation types according to the functionality they provide to the application and import only those mutations in the components that are needed for the specific component. This is, again, about best practices, modularity, and maintainability.
When we dispatch a mutation, we basically perform an action. Saying that we commit a CHANGE_MSG mutation is the same as saying that we perform an action of changing the message. For the sake of beauty and total extraction, like we extract the store state's items into getters and mutations names constants to the mutation_types we can also extract the mutations to the actions.
Let's create a simple actions file for our change, message example. But before that, let's create one more item for the store's initial state, counter, and initialize it with a "0" value. So, our store will look like the following:
//store.js
import Vue from 'vue'
import Vuex from 'vuex'
import { CHANGE_MSG, INCREMENT_COUNTER } from './mutation_types'

Vue.use(Vuex)

const state = {
  message: 'Hello Vue!',
  counter: 0
}

const mutations = {
  [CHANGE_MSG](state, msg) {
    state.message = msg
  },
  [INCREMENT_COUNTER](state) {
    state.counter ++;
  }
}

export default new Vuex.Store({
  state,
  mutations
})
Let's also add a counter getter to the getters file, so our getters.js file looks like the following:
//getters.js
export default {
  getMessage(state) {
    return (state.message).toUpperCase()
  },
  getCounter(state)
{
return (state.counter)
  }
}
And, finally, let's use the counter's getter inside ShowGreetingsComponent to show the amount of times the message msg was changed:
<template>
  <div>
    <h1>{{ msg }}</h1>
    <div>the message was changed {{ counter }} times</div>
  </div>
</template>
<script>
  import { mapGetters } from 'vuex'

  export default {
    computed: mapGetters({
      msg: 'getMessage',
      counter: 'getCounter'
    })
  }
</script>
Let's now create actions for both the mutations, for the counter and for the change message. Inside a vuex folder, create an actions.js file and export the actions functions:
//actions.js
import { CHANGE_MSG, INCREMENT_COUNTER } from './mutation_types'

export const changeMessage = (store, msg) => {
 store.commit(CHANGE_MSG, msg)
}
export const incrementCounter = (store) => {
 store.commit(INCREMENT_COUNTER)
}
We can and should use ES2015 arguments destructuring and make our code more elegant. Let's also export all the actions in a single export default statement:
//actions.js
import { CHANGE_MSG, INCREMENT_COUNTER } from './mutation_types'

export default {
  changeMessage ({ commit }, msg) {
    commit(CHANGE_MSG, msg)
  },
  incrementCounter ({ commit }) {
    commit(INCREMENT_COUNTER)
  }
}
Okay, now we have nice and beautiful actions. Let's use them in our ChangeGreetingsComponent! To be able to use actions inside components, we should first import them to our store and then export in the new Vuex object. Then actions can be dispatched using the this.$store.dispatch method inside the components:
// ChangeGreetingsComponent.vue
<template>
  <input :value="msg" @keyup="changeMsg">
</template>
<script>
  import { mapGetters } from 'vuex'

  export default {
    computed: mapGetters({
      msg: 'getMessage'
    }),
    methods: {
      changeMsg(ev) {
        this.$store.dispatch('changeMessage', ev.target.value)
      }
    }
  }
</script>
So what's actually the difference? We continue to write this.$store code, the only difference is that instead of calling the commit method we call dispatch. Do you remember how we discovered mapGetters helper? Wasn't it nice? Actually Vue also provides a mapActions helper that allows us to avoid writing the extensive this.$store.dispatch something method. Just import mapActions in the same way as we import mapGetters and use it inside the component's methods property:
//ChangeGreetingsComponent.vue
<template>
  <input :value="msg" @keyup="changeMessage">
</template>
<script>
  import { mapGetters } from 'vuex'
  import { mapActions } from 'vuex'

  export default {
    computed: mapGetters({
      msg: 'getMessage'
    }),
    methods:  mapActions(['changeMessage', 'incrementCounter'])
  }
</script>
Note that we changed the handler's function for the keyup event, so we don't have to map the events' names to the corresponding actions. However, just like in the case of mapGetters, we can also map custom events' names to the corresponding actions names.
We should also change the changeMessage invocation because we don't extract any event's target value inside the actions now; thus, we should do it inside the invocation:
//ChangeGreetingsComponent.vue
<template>
  <input :value="msg" @keyup="changeMessage($event.target.value)">
</template>
Finally, let's bind the incrementCounter action to the user's input. Let's, for example, call this action from our input template on the keyup.enter event:
<template>
  <input :value="msg" @keyup="changeMessage"
  @keyup.enter="incrementCounter">
</template>
If you open the page, and try to change the title and hit the Enter button, you will see that the counter will be incremented each time you hit Enter:
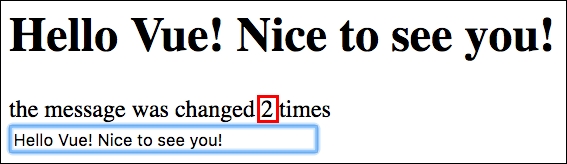
Using actions to increment the counter on the page
So, you see how easy it is to modularize our application by using actions instead of directly accessing the store. You export actions in your Vuex store, import the mapActions in the components, and call them from the event handler directives in the templates.
Do you remember our "human" example in which we were comparing the parts of the human body to the components and the human brain to the store of the application state? Imagine that you are running. It is only one action but how many changes are being dispatched and how many components are being affected by those changes? When you run, your heart rate increases, you sweat, your arms move, and your face smiles because you realize how nice it is to run! When you eat, you also smile because it is good to eat. You also smile when you see a kitten. So, different actions can dispatch more than one change, and the same change can be dispatched by more than one action.
The same happens with our Vuex store, and its mutations and actions. Within the same action, more than one mutation can be dispatched. For instance, we could dispatch our mutation for changing a message and increasing the counter within the same action. Let's create this action inside our action.js file. Let's call it handleMessageInputChanges and make it receive one argument: event. It will dispatch the CHANGE_MSG mutation with event.target.value, and in case event.keyCode is enter, it will dispatch the INCREMENT_COUNTER mutation:
//actions.js
handleMessageInputChanges ({ commit }, event) {
  commit(CHANGE_MSG, event.target.value)
  if (event.keyCode === 13) {
    commit(INCREMENT_COUNTER)
  }
}
Now let's import this action inside our ChangeGreetingsComponent component's mapActions object and let's use it calling it with the $event parameter:
//ChangeGreetingsComponent.vue
<template>
  <input :value="msg" @keyup="handleMessageInputChanges($event)" />
</template>
<script>
  import { mapGetters, mapActions } from 'vuex'

  export default {
    computed: mapGetters({
      msg: 'getMessage'
    }),
    methods:  mapActions(['handleMessageInputChanges'])
  }
</script>
Open the page, and try to change the greetings message and increment the counter by hitting the Enter button. It works!
The final code for the simple-store example can be found in the chapter5/simple-store3 folder.