Now that we know how to use existing plugins with our Vue application, why not create our own plugin? We already have a little bit of animation in our Pomodoro application, and the screen changes completely when the state is changed from the working Pomodoro interval to the resting interval. However, if we are not looking at the tab, we have no idea if we should work or rest. It would be nice to add some sounds to our Pomodoro!
When thinking about sounds in a time management application, I would like to think about the sound that is nice for working. Every one of us has our own favorite playlist for work. Of course, it differs according to each person's musical preferences. That's why I decided to add some neutral sound to our application during the working period of time. It was proven by some studies that different noises (white, pink, brown, and so on) are good for the kind of work where a high level of concentration is required. The Wikipedia entry about these studies can be found at https://en.wikipedia.org/wiki/Sound_masking . And some Quora experts talking about this can be found at http://bit.ly/2cmRVW2 .
In this section, we will use the Web Audio API ( https://developer.mozilla.org/en-US/docs/Web/API/Web_Audio_API ) to create a plugin for Vue that generates white, pink, and brown noises. We will provide a mechanism to instantiate one noise or another using Vue directives and we will also provide global Vue methods that will start and pause these sounds. After that, we will use this plugin to switch between a silent state while resting and looking at cats and a noisy state while working. Does it sound challenging and interesting? I really hope it does! Let's start then!
Our plugin will be stored in a single JavaScript file. It will contain three methods, one for the generation of each noise and provide a Vue.install method where the directives and needed Vue methods will be defined. Use the chapter6/pomodoro folder as a starting point. Start by creating a plugins subfolder in the src folder and adding the VueNoiseGeneratorPlugin.js file there. Now let's create the following three methods:
generateWhiteNoisegeneratePinkNoisegenerateBrownNoise
I will not reinvent the wheel and will just copy and paste the already existing code that I found on the Internet. Of course, I would like to give huge credit to the great resource that I found at http://noisehack.com/generate-noise-web-audio-api/ . That being said, our plugin after copying the code and organizing it in the functions should look like the following:
// plugins/VueNoiseGenerator.js
import _ from 'underscore'

// Thanks to this great tutorial:
//http://noisehack.com/generate-noise-web-audio-api/
var audioContext, bufferSize, noise
audioContext = new (window.AudioContext || window.webkitAudioContext)()

function generateWhiteNoise () {
  var noiseBuffer, output

  bufferSize = 2 * audioContext.sampleRate
  noiseBuffer = audioContext.createBuffer(1, bufferSize,
    audioContext.sampleRate)

  output = noiseBuffer.getChannelData(0)
  _.times(bufferSize, i => {
    output[i] = Math.random() * 2 - 1
  })

  noise = audioContext.createBufferSource()
  noise.buffer = noiseBuffer
  noise.loop = true
  noise.start(0)

  return noise
}

function generatePinkNoise () {
  bufferSize = 4096
  noise = (function () {
    var b0, b1, b2, b3, b4, b5, b6, node
    b0 = b1 = b2 = b3 = b4 = b5 = b6 = 0.0
    node = audioContext.createScriptProcessor(bufferSize, 1, 1)
    node.onaudioprocess = function (e) {
      var output

      output = e.outputBuffer.getChannelData(0)
      _.times(bufferSize, i => {
        var white = Math.random() * 2 - 1
        b0 = 0.99886 * b0 + white * 0.0555179
        b1 = 0.99332 * b1 + white * 0.0750759
        b2 = 0.96900 * b2 + white * 0.1538520
        b3 = 0.86650 * b3 + white * 0.3104856
        b4 = 0.55000 * b4 + white * 0.5329522
        b5 = -0.7616 * b5 - white * 0.0168980
        output[i] = b0 + b1 + b2 + b3 + b4 + b5 + b6 + white * 0.5362
        output[i] *= 0.11 // (roughly) compensate for gain
        b6 = white * 0.115926
      })
    }
    return node
  })()

  return noise
}

function generateBrownNoise () {
  bufferSize = 4096

  noise = (function () {
    var lastOut, node

    lastOut = 0.0
    node = audioContext.createScriptProcessor(bufferSize, 1, 1)
    node.onaudioprocess = function (e) {
      var output = e.outputBuffer.getChannelData(0)
      _.times(bufferSize, i => {
        var white = Math.random() * 2 - 1
        output[i] = (lastOut + (0.02 * white)) / 1.02
        lastOut = output[i]
        output[i] *= 3.5 // (roughly) compensate for gain
      })
    }
    return node
  })()

  return noise
}
You can test all these noises in the JSFiddle at https://jsfiddle.net/chudaol/7tuewm5z/ .
Okay, so we have all the three noises implemented. Now we must export the install method that will be called by Vue. This method receives the Vue instance and can create directives and methods on it. Let's create a directive and call it noise. This directive can have one of three values, white, pink, or brown, and according to the received value will instantiate the noise variable by calling the corresponding noise creation method. So, our directive creation within an install method will look like the following:
// plugins/VueNoiseGeneratorPlugin.js
export default {
  install: function (Vue) {
    Vue.directive('noise', (value) => {
      var noise

      switch (value) {
        case 'white':
          noise = generateWhiteNoise()
          break
        case 'pink':
          noise = generatePinkNoise()
          break
        case 'brown':
          noise = generateBrownNoise()
          break
        default:
          noise = generateWhiteNoise()
      }
      noise.connect(audioContext.destination)
      audioContext.suspend()
    })
  }
}
After the instantiation, we connect the noise to the already instantiated audioContext and suspend it because we don't want it to start producing the noise right on the directive binding. We want it to be instantiated on some events (for example, clicking on the start button) and paused on other events (for example, when someone clicks on the pause button). For that, let's provide methods for starting, pausing, and stopping our audioContext. We will put these three methods on the global Vue property called noise. We will call these methods start, pause, and stop. Within the start method, we want to resume audioContext and suspend it on both the pause and stop methods. So, our methods will look like the following:
// plugins/VueNoiseGeneratorPlugin.js
export default {
  install: function (Vue) {
    Vue.directive('noise', (value) => {
      <...>
    })
    Vue.noise = {
      start () {
        audioContext.resume()
      },
      pause () {
        audioContext.suspend()
      },
      stop () {
        audioContext.suspend()
      }
    }
  }
}
That's it! Our plugin is completely ready to be used. It's not perfect, of course, because we only have one audioContext, which is being instantiated once and then populated by one of the chosen noises, meaning we will not be able to use the noise directive more than once on the page, but again, this is just a prototype and you are more than welcome to enhance it and make it perfect and public!
Fine then, now we have our nice noise-producing plugin, and the only thing that is missing is using it! You already know how to do it. Open the main.js file, import VueNoiseGeneratorPlugin, and tell Vue to use it:
import VueNoiseGeneratorPlugin from
'./plugins/VueNoiseGeneratorPlugin'

Vue.use(VueNoiseGeneratorPlugin)
From now on, we can attach the noise directive and use the Vue.noise method in any part of our Pomodoro application. Let's bind it to our main template inside the App.vue component:
//App.vue
<template>
  <div id="app" class="container" v-noise="'brown'">
    <...>
  </div>
</template>
Note that we use v-noise in the name of the directive and not just noise. We already talked about it when we learned custom directives. To use a directive, we should always prepend the v- prefix to its name. Also note that we used double quotes inside the single quotes to wrap the brown string. If we didn't do it, Vue would search for the data property called brown, because that's how the Vue works. As we can write any JavaScript statement inside the directive binding assignment, we must pass the string with double quotes. You can go further and create a data property called noise and assign to it the value you want (white, brown, or pink) and reuse it inside the directive binding syntax.
After that being done, let's call the Vue.noise.start method in our start mutation:
//mutations.js
import Vue from 'vue'
<...>

export default {
  [types.START] (state) {
    <...>
    if (state.isWorking) {
      Vue.noise.start()
    }
  },
<...>
Check the page and click on the start button. You will listen to a nice brown noise. Be careful, however, to not to wake up your coworkers nor to scare your family (or vice versa). Try changing the value of the noise directive and choose your favorite noise to work with.
Still, we are not done. We created a mechanism so that the noise is started, but it's turning out to be a never-ending noise. Let's call the Vue.noise.pause and Vue.noise.stop methods on the pause and stop mutations, respectively:
//mutations.js
export default {
  <...>
  [types.PAUSE] (state) {
    <...>
    Vue.noise.pause()
  },
  [types.STOP] (state) {
    <...>
    Vue.noise.stop()
  }
}
Look at the page. Now if you click on the pause or stop button, the noise is suspended! We are still not done yet. Remember that our purpose was to have the noise only during working time and not during resting time. So, let's have a look at the tooglePomodoro method inside mutations.js and add a mechanism that starts or stops the noise according to the Pomodoro's current state:
//mutations.js
function togglePomodoro (state, toggle) {
  if (_.isBoolean(toggle) === false) {
    toggle = !state.isWorking
  }
  state.isWorking = toggle
  if (state.isWorking) {
    Vue.noise.start()
  } else {
    Vue.noise.pause()
  }
  state.counter = state.isWorking ? WORKING_TIME : RESTING_TIME
}
The code of the Pomodoro application after all these modifications can be found in the chapter6/pomodoro2 folder. Check how the noise is started when we start the application, how it's pausing when the working Pomodoro is completed, and how it restarted again when we should be back to work. Check also how the start, pause, and stop buttons trigger the noise as well. Nice work!
It's really nice that we have the noise sound bound to the working state of the Pomodoro application. It's also nice that the sound is paused when we pause the application. However, it might be also useful to be able to pause the sound without having to pause the whole application. Think about those situations when you want to work in complete silence, or you might want to receive a Skype call. In these situations, having a noise in background, even if it's nice and pink, is not nice at all. Let's add a button to our application to toggle the sound. Start by declaring a store property called soundEnabled and initialize it with true. Also, create getter for this property. So store.js and getters.js start looking like the following:
//store.js
<...>
const state = {
  <...>
  soundEnabled: true
}

//getters.js
export default {
  <...>
  isSoundEnabled: state => state.soundEnabled
}
Now we must provide a mechanism to toggle the sound. Let's create a mutation method for this and add an action that dispatches this mutation. Start by declaring a mutation type called TOGGLE_SOUND:
//mutation_types.js
<...>
export const TOGGLE_SOUND = 'TOGGLE_SOUND'
Now let's open mutations.js and add the mutation method that toggles the soundEnabled store property:
//mutations.js
[types.TOGGLE_SOUND] (state) {
  state.soundEnabled = !state.soundEnabled
  if (state.soundEnabled) {
    Vue.noise.start()
  } else {
    Vue.noise.pause()
  }
}
Now let's add the action that dispatches this mutation:
//actions.js
export default {
  <...>
  toggleSound: ({ commit }) => {
    commit(types.TOGGLE_SOUND)
  }
}
Okay then, now we have everything we need to create a toggle sound button! Let's do it in our ControlsComponent. Start by adding a necessary getter and action to the map of methods:
//ControlsComponent.vue
<script>
  import { mapGetters, mapActions } from 'vuex'

  export default {
    computed: mapGetters(['isStarted', 'isPaused', 'isStopped',
    'isSoundEnabled']),
    methods: mapActions(['start', 'stop', 'pause', 'toggleSound'])
  }
</script>
Now we can add the button to our template. I suggest that it will be the icon with the glyphicon class that will be aligned to the right.
Let's only show this icon when the application is started and not paused, and only when the Pomodoro state is
working so that we don't mess up the toggle sound button in a state where it is not supposed to have sound at all. This means that our v-show directive on this element will look like the following:
v-show="isStarted && !isPaused && isWorking"
Note that we are using the isWorking property here, which has not yet been imported. Add it to the map of methods:
//ControlsComponents.vue
<script>
  import { mapGetters, mapActions } from 'vuex'

  export default {
    computed: mapGetters(['isStarted', 'isPaused', 'isStopped',
    'isWorking', 'isSoundEnabled']),
    methods: mapActions(['start', 'stop', 'pause', 'toggleSound'])
  }
</script>
Let's also use the glyphicon-volume-off and glyphicon-volume-on classes on this element. They will indicate calling for the action to toggle the sound's state. This means that the glyphicon-volume-off class should be applied when the sound is enabled and the glyphicon-volume-on class should be applied when the sound is disabled. Putting it in the code, our class directive should look like the following:
:class="{ 'glyphicon-volume-off': isSoundEnabled, 'glyphicon-volume-up': !isSoundEnabled }"
Last but not least, we should call the toggleSound action when the button is clicked. This means that we should also bind the click event listener to this element, which will look like the following:
@click='toggleSound'
So, the whole jade markup code for this button will be like the following:
//ControlsComponent.vue
<template>
  <span>
    <...>
    <i class="toggle-volume glyphicon" v-show="isStarted &&
    !isPaused && isWorking" :class="{ 'glyphicon-volume-off':
    isSoundEnabled, 'glyphicon-volume-up': !isSoundEnabled }"
    @click="toggleSound"></i>
  </span>
</template>
Let's just add a bit of styling to this button so that it appears aligned to the right:
<style scoped>
  <...>
  .toggle-volume {
    float: right;
    cursor: pointer;
  }
</style>
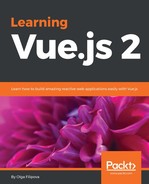
Open the page and start the Pomodoro application. Now you can see this nice button on the top-right corner that will allow you to turn the sound off, as shown in the following screenshot:
Now we can turn the sound off while working!
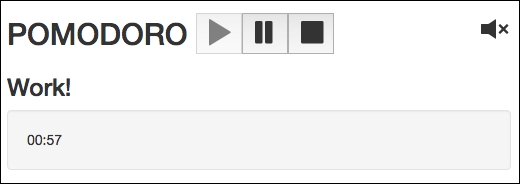
If you click on this button, it will transform into another button, whose purpose is to turn the sound on again, as shown in the following screenshot:
And we can turn it on again!
Now consider the following scenario: we start the application, turn off the sound, pause the application, and resume the application. Our current logic suggests that the sound is started each time the application is started. We will be in an inconsistent state—the application has started, the sound is playing, but the toggling sound button is suggesting to turn the sound on. That's not right, is it? But this has an easy fix—just add one more condition to the start mutation, not only it should check if isWorking is true, but also that the sound is enabled:
//mutations.js
[types.START](state) {
  <...>
  if (state.isWorking && state.soundEnabled) {
    Vue.noise.start()
  }
},
Now we are fine. The code after all these modifications can be found in the chapter6/pomodoro3 folder.
Check the code, run the application, enjoy the sound, and do not forget to have a break!