
Before starting the actual writing of our unit tests, let's establish some rules. For each of our .js or .vue files, there will exist a corresponding test spec file, which will have the same name and a .spec.js extension. The structure of these specs will follow this approach:
- It will describe the file we are testing
- It will have a
describemethod for each of the methods that is being tested - It will have an
itmethod for each of the cases we are describing
So, if we had a myBeautifulThing.js file and spec for it, it might look like the following:
// myBeautifulThing.js
export myBeautifulMethod1() {
  return 'hello beauty'
}

export myBeautifulMethod2() {
  return 'hello again'
}

// myBeautifulThing.spec.js
import myBeautifulThing from <path to myBeautifulThing>

describe('myBeautifulThing', () => {
  //define needed variables

  describe('myBeautifulMethod1', () => {
    it('should return hello beauty', () {
      expect(myBeautifulThing.myBeautifulMethod1()).to.equal('hello
        beauty')
    })
  })
})
Let's start by covering with unit tests all the things that are inside the vuex folder.
For this section, use the code inside the chapter7/shopping-list folder. Do not forget to run the npm install command. Note that there are two new mutations: ADD_SHOPPING_LIST and DELETE_SHOPPING_LIST. These mutations add new shopping list to the list and remove the list by its ID. They are used inside the createShoppingList and deleteShoppingList actions inside the promise failure handlers:
//actions.js
createShoppingList: (store, shoppinglist) => {
  api.addNewShoppingList(shoppinglist).then(() => {
    store.dispatch('populateShoppingLists')
  }, () => {
    store.commit(ADD_SHOPPING_LIST, shoppinglist)
  })
},
deleteShoppingList: (store, id) => {
  api.deleteShoppingList(id).then(() => {
    store.dispatch('populateShoppingLists')
  }, () => {
    store.commit(DELETE_SHOPPING_LIST, id)
  })
}
Thus, even if our backend server is down, we still are not losing this functionality.
If you check your project's structure, you will see that there is already an existing directory named test. Inside this directory, there are two directories, unit and e2e. For now, we should go to the unit folder. Here, you will see another directory called specs. This is where all our unit test specifications will reside. Let's start by creating a directory called vuex inside specs. Here is where all our specs for Vuex-related JavaScript files will live.
Let's start by testing the mutations.js method.
Create a mutations.spec.js file. In this file, we should import mutations.js and mutation types so that we can easily invoke mutations. Have a look at mutations declared in mutations.js. All of them receive state and some other parameters. Let's also create a fake state object with the shoppinglist array inside it so we can use it in our tests.
Let's also reset it before each test to an empty array.
So, after all the preparations, the bootstrapped spec for mutations.js looks like the following:
// mutations.spec.js
import mutations from 'src/vuex/mutations'
import { ADD_SHOPPING_LIST, DELETE_SHOPPING_LIST, POPULATE_SHOPPING_LISTS, CHANGE_TITLE } from 'src/vuex/mutation_types'

describe('mutations.js', () => {
  var state

  beforeEach(() => {
    state = {
      shoppinglists: []
    }
  })
})
Let's now add tests for the ADD_SHOPPING_LIST mutation.
Check again what it is doing:
[types.ADD_SHOPPING_LIST] (state, newList) {
  state.shoppinglists.push(newList)
},
This mutation just pushes the received object to the shoppinglists array. Pretty straightforward and easy to test.
Start by creating a describe statement with the name of the function:
describe('ADD_SHOPPING_LIST', () => {
})
Now, inside this describe callback, we can add it statements with the needed assertions. Let's think what should happen when we add a new shopping list to the shoppinglists array. First of all, the array's length will increase, and it will also contain the newly added shopping list object. This is the most basic thing to test. Our it function with the needed assertions will look like the following:
  it('should add item to the shopping list array and increase its
    length', () => {
  //call the add_shopping_list mutations
  mutations[ADD_SHOPPING_LIST](state, {id: '1'})
  //check that the array now equals array with new object
  expect(state.shoppinglists).to.eql([{id: '1'}])
  //check that array's length had increased
  expect(state.shoppinglists).to.have.length(1)
})
After creating this function, the whole spec's code should look like the following:
// mutations.spec.js
import mutations from 'src/vuex/mutations'
import { ADD_SHOPPING_LIST, DELETE_SHOPPING_LIST, POPULATE_SHOPPING_LISTS, CHANGE_TITLE } from 'src/vuex/mutation_types'

describe('mutations.js', () => {
  var state

  beforeEach(() => {
    state = {
      shoppinglists: []
    }
  })

  describe('ADD_SHOPPING_LIST', () => {
    it('should add item to the shopping list array and increase its
      length', () => {
      mutations[ADD_SHOPPING_LIST](state, {id: '1'})
      expect(state.shoppinglists).to.eql([{id: '1'}])
      expect(state.shoppinglists).to.have.length(1)
    })
  })
})
Let's run the tests! Open the console in the project's directory and run the following:
npm run unit
You should see the following output:

The output of running our test
Remember the joke about a QA engineer? We can test the add_shopping_list function for all possible inputs. What should happen, for example, if we call it without passing any object? In theory, it should not add it to the shopping list array, right? Let's test it. Create a new it statement and try to call the function without the second parameter. Assert for an empty list.
This test will look something like the following:
it('should not add the item if item is empty', () => {
  mutations[ADD_SHOPPING_LIST](state)
  expect(state.shoppinglists).to.have.length(0)
})
Run the tests with the npm run unit command. Oh, snap! It failed! The error is as follows:
expected [ undefined ] to have a length of 0 but got 1
Why? Have a look at the corresponding mutation. It just pushes the received parameter to the array without any checks. That's why we are able to add any garbage, any undefined, and any other inappropriate value! Do you remember when I said that writing good unit tests helps us to create less error-prone code? This is the case. Now we realize that we should probably run some checks before pushing the new item to the array. Let's add the check that the received item is an object. Open the ADD_SHOPPING_LIST mutation in the mutations.js file and rewrite it as follows:
//mutations.js
[types.ADD_SHOPPING_LIST](state, newList) {
  if (_.isObject(newList)) {
    state.shoppinglists.push(newList)
  }
}
Run the tests now. They are all passing!
Of course, we could be even more precise. We could check and test for empty objects and we could also run some validations for this object to contain properties such as id, items, and title. I will leave it to you as a small exercise. Try to think about all possible inputs and all possible outputs, write all the possible assertions, and make the code to correspond to them.
A good unit test is one that would fail when you change your code. Imagine, for example, that we decide to assign a default title to the new shopping list before pushing it to the array. So, the mutation would look like the following:
[types.ADD_SHOPPING_LIST](state, newList) {
  if (_.isObject(newList)) {
    newList.title = 'New Shopping List'
    state.shoppinglists.push(newList)
  }
}
If you run the tests, they will fail:

Unit test fails when the code changes
And this is very good. When your tests fail after the changes in the code, the possible outcome is that you fix the test because the code is performing the intended behavior, or you fix your code.
I am sure that you have noticed some test statistics in the console output after running the tests. These statistics display different types of coverage that our tests achieved at the time of running. Right now, it looks like the following:

Code coverage of mutations.js after writing two tests for the ADD_SHOPPING_LIST mutation
Do you remember when I said that good code coverage doesn't mean that our tests and code are perfect? We actually have somewhat nice statements, branches, and lines coverage, but we still just tested only one function of only one file, and we haven't even covered all possible inputs of this function. But numbers do not lie. We have almost 100% branches coverage because we almost do not have branches in our code.
If you want to see a more detailed report, just open the index.html file from the test/unit/coverage/lcov-report directory in your browser. It will give you a complete and full picture of your code and what exactly is covered and how. Currently, it looks like the following:

The whole picture of our codebase coverage
You can drill down to the folders, open the files, and check how exactly our code is covered. Let's check mutations.js:
Coverage report for actions.js show exactly which code was covered and which was not
Now you see what still has to be tested. Do you want to see how it reports the if…else missing branch coverage? Just skip our second test:
it.skip('should not add the item if item is empty', () => {
  mutations[ADD_SHOPPING_LIST](state)
  expect(state.shoppinglists).to.have.length(0)
})
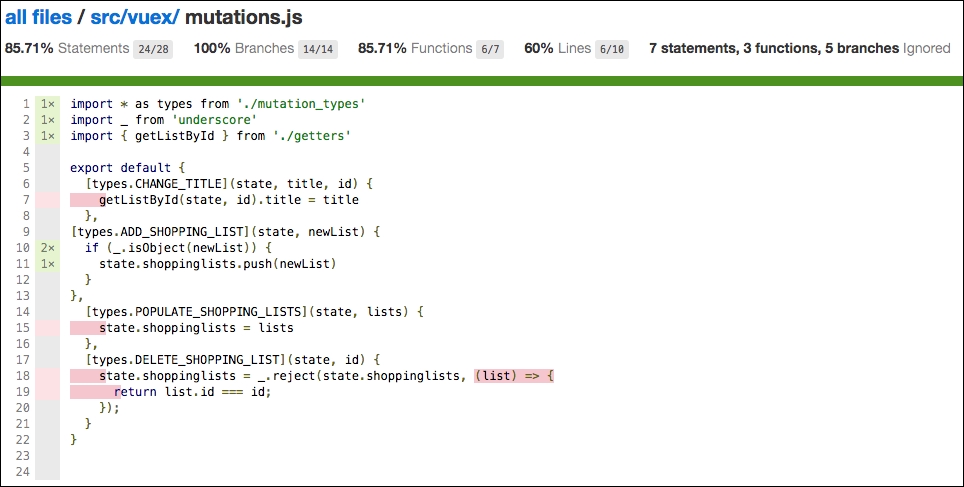
Run the tests and refresh the report for actions.js. You will see an E icon on the left of the if statement:
The E icon near the if statement indicates that the else branch was not covered by tests
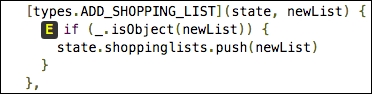
This indicates that we haven't covered the else branch. If you skip the first test and leave the one with the empty object, you will see the I icon that is indicating that we have skipped the if branch:
The I icon near the if statement indicates that the if branch was not covered by tests
Write tests for the rest of the mutations. Perform at least the following checks:
- For the
DELETE_SHOPPING_LISTmutation, check that the list with the ID we pass is actually deleted if it existed before in the list, and that calling the mutation with the ID that doesn't exist in the list will not cause any change - For the
POPULATE_SHOPPING_LISTSmutation, check that theshoppinglistarray is overridden with the array we pass when call this mutation - For the
CHANGE_TITLEmutation, check that when we pass the new title and the ID, exactly this object's title is changed
In the end, your mutation.spec.js file will probably look like the gist at
https://gist.github.com/chudaol/befd9fc5701ff72dff7fb68ef1c7f06a
.
After these tests, the coverage of mutation.js looks pretty nice, actually:
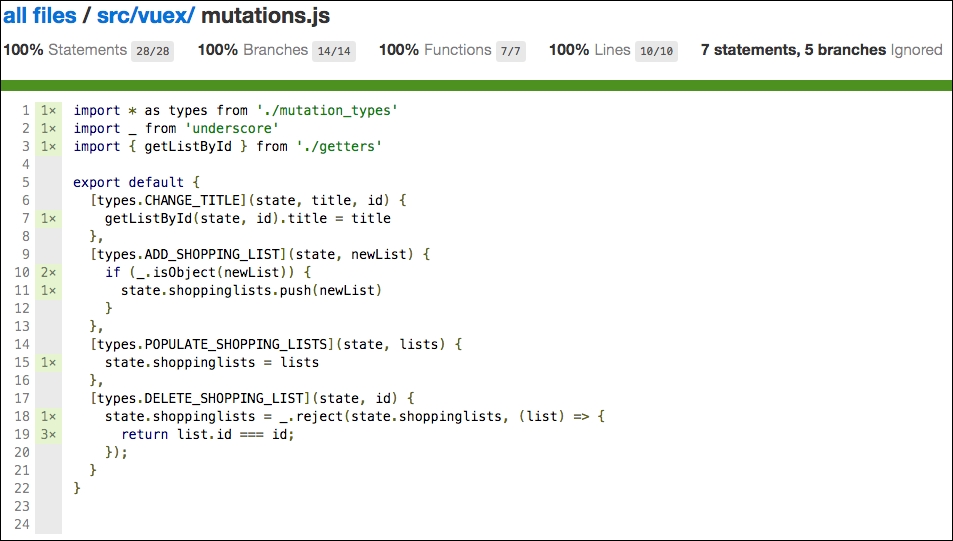
100% coverage for mutations.js after writing unit tests for all the mutations
In the exact same way, we can test our getters.js. Create a getters.spec.js file and fill it with tests to test our two getters functions. In the end, it might look like the gist at
https://gist.github.com/chudaol/e89dd0f77b1563366d5eec16bd6ae4a9
.
The only important store component that is missing in unit testing is actions.js. But our actions.js uses extensively the API that, in turn, performs HTTP requests. Its functions are also asynchronous. Can this kind of thing be unit tested in the same flexible and easy way as we just tested getters and actions? Yes, it can! Let's see how can we fake server responses using sinon.js and how can we write asynchronous tests with mocha.js.
Open the actions.js file and check the very first action method:
//actions.js
populateShoppingLists: ({ commit }) => {
  api.fetchShoppingLists().then(response => {
    commit(POPULATE_SHOPPING_LISTS, response.data)
  })
}
First of all, let's add a return statement to this function to make it return a promise. We do it to enable us to call the .then method once the promise resolves so that we can test everything that happens in the meantime. So, our function looks like the following:
//actions.js
populateShoppingLists: ({ commit }) => {
  return api.fetchShoppingLists().then(response => {
    commit(POPULATE_SHOPPING_LISTS, response.data)
  })
}
Now, check what is happening here:
- This function receives
storewith itsdispatchmethod. - It performs a call to the API. The API, in turn, calls the resource
getmethod that just performs an HTTP request to our server. - After the API's
fetchShoppingListspromise is resolved, our method is calling the store'scommitmethod with two parameters: aPOPULATE_SHOPPING_LISTSstring and the data that came in response.
How can we unit test this workflow? If we were able to catch the request and mock the response, we could check if the commit method (passed by us, which means that it can also be mocked) is called with the response that we provide in our server's mock. Sounds confusing? Not at all! The steps are the following:
- Create a mock for the
storeand itscommitmethod. - Create a mock for the hypothetical server response.
- Create a fake server that will intercept the GET request and return the mocked response.
- Check the
commitmethod is called with our mocked response and thePOPULATE_SHOPPING_LISTSstring.
It means that our test could look something like the following:
it('should test that commit is called with correct parameters', () => {
  actions.populateShoppingLists({ commit }).then(() => {
    expect(commit).to.have.been.calledWith(<...>)
  })
})
The problem here is that our tests are synchronous, meaning the code will never reach what is inside our .then callback. Luckily for us, mocha.js provides support for asynchronous testing. Check it out at
https://mochajs.org/#asynchronous-code
. The only thing you have to do is to pass done callback to it() and call it when the test is complete. In this way, our pseudo-code for this test would look the following:
it('should test that commit is called with correct parameters',
(done) => {
  actions.populateShoppingLists({ commit }).then(() => {
   expect(commit).to.have.been.calledWith(<...>)
   done()
  })
})
Let's code now! Create a test spec and call it actions.spec.js, and write all the needed bootstrapping code:
// actions.spec.js
import actions from 'src/vuex/actions'
import { CHANGE_TITLE, POPULATE_SHOPPING_LISTS } from 'src/vuex/mutation_types'

describe('actions.js', () => {
  describe('populateShoppingLists', () => {
    //here we will add our test case
  })
})
Now let's follow our steps. First of all, let's mock the server response. Just create the lists variable and initialize it in the beforeEach method:
//actions.spec.js
describe('actions.js', () => {
  var lists

  beforeEach(() => {
    // mock shopping lists
    lists = [{
      id: '1',
      title: 'Groceries'
    }, {
      id: '2',
      title: 'Clothes'
    }]
  })

  describe('populateShoppingLists', () => {
  })
})
Now, let's mock the store's commit method:
// actions.spec.js
describe('actions.js', () => {
  var lists, store

  beforeEach(() => {
    <...>
    //mock store commit method
    store = {
      commit: (method, data) => {},
      state: {
        shoppinglists: lists
      }
    }
  })
  <...>
})
Now, we have to spy on this commit method in order to be able to assert that it was called with the required parameters. We will use the sinon.stub method for this. Check the documentation on sinon.js on this matter at
http://sinonjs.org/docs/#stubs
. Creating a stub on a given function is very easy. Just call the sinon.stub method and pass to it the object and its method that we want to spy on:
sinon.stub(store, 'commit')
So, our beforeEach function will look like the following:
beforeEach(() => {
    <...>
    // mock store commit method
    store = {
      commit: (method, data) => {},
      state: {
        shoppinglists: lists
      }
    }

    sinon.stub(store, 'commit')
})
It's very important that after each method, we restore the stub so that each testing method runs in a clean environment that is not affected by other tests. For this, create an afterEach method and add the following line:
afterEach(function () {
  //restore stub
  store.commit.restore()
})
Now the only thing we need to do is fake our server response with our mocked data. Let's use Sinon's fakeServer for this purpose. Check sinon's documentation at
http://sinonjs.org/docs/#fakeServer
. We just need to create fakeServer and tell it to respond with our mocked response to the GET request:
describe('actions.js', () => {
  var lists, store, server

  beforeEach(() => {
    <...>
    //mock server
    server = sinon.fakeServer.create()
    server.respondWith('GET', /shoppinglists/, xhr => {
      xhr.respond(200, {'Content-Type': 'application/json'},
      JSON.stringify(lists))
    })
  })
  <...>
})
After these preparations, each test that will somehow perform a request should call the server's respond method in order to invoke the server's functionality.
However, we can simplify this by just telling the server to auto-respond each caught request:
server.autoRespond = true
So, our code for mocking the server will look like the following:
beforeEach(() => {
    <...>
    //mock server
    server = sinon.fakeServer.create()
    server.respondWith('GET', /shoppinglists/, xhr => {
      xhr.respond(200, {'Content-Type': 'application/json'},
      JSON.stringify(lists)
    })
    server.autoRespond = true
})
It is very important that after each test, we restore our fake server so that no other test is affected by our mocks in this test. So add the following line to the afterEach method:
afterEach(() => {
  //restore stubs and server mock
  store.commit.restore()
  server.restore()
})
Now that we have mocked everything that it was possible to mock, we can finally write our test case! So, you remember, we create an it() statement with done callback, call our populateShoppingLists method, and check that the resolved response is the same as our mocked list object. Step into the describe method and just translate into the code what we've just described:
it('should call commit method with POPULATE_SHOPPING_LIST and with mocked lists', done => {
  actions.populateShoppingLists(store).then(() => {
    expect(store.commit).to.have.been.calledWith(POPULATE_SHOPPING_LISTS,
    lists)
    done()
  }).catch(done)
})
Our whole test spec now looks like the gist at https://gist.github.com/chudaol/addb6657095406234bc6f659970f3eb8.
Run the tests with npm run unit. It works!
Now we just have to mock the server's responses for the PUT, POST, and DELETE methods. These methods do not return any data; however, in order to be able to test the responses, let's return faked success messages, and in each test, check that the returned data corresponds to these responses. Add the following variables on top of the spec:
  var server, store, lists, successPut, successPost, successDelete

  successDelete = {'delete': true}
  successPost = {'post': true}
  successPut = {'put': true}
And add the following fake responses methods to our server:
    server.respondWith('POST', /shoppinglists/, xhr => {
      xhr.respond(200, {'Content-Type': 'application/json'},
        JSON.stringify(successPost))
    })
    server.respondWith('PUT', /shoppinglists/, xhr => {
      xhr.respond(200, {'Content-Type': 'application/json'},
        JSON.stringify(successPut))
    })
    server.respondWith('DELETE', /shoppinglists/, xhr => {
      xhr.respond(200, {'Content-Type': 'application/json'},
        JSON.stringify(successDelete))
    })
Let's see how it'll work, for example, for the changeTitle method. In this test, we want to test that the commit method will be called with the given ID and title. Our test, therefore will look like the following:
describe('changeTitle', () => {
  it('should call commit method with CHANGE_TITLE string', (done) => {
    let title = 'new title'

    actions.changeTitle(store, {title: title, id: '1'}).then(() => {
      expect(store.commit).to.have.been.calledWith(CHANGE_TITLE,
      {title: title, id: '1'})
      done()
    }).catch(done)
  })
})
For this to work properly, we should also mock the store's dispatch method since it's being used inside the changeTitle action. Just add the dispatch property to our store's mock and return a resolved promise:
// mock store commit and dispatch methods
store = {
  commit: (method, data) => {},
  dispatch: () => {
    return Promise.resolve()
  },
  state: {
    shoppinglists: lists
  }
}
Check the final code for unit tests at this moment at https://gist.github.com/chudaol/1405dff6a46b84c284b0eae731974050 .
Finish the testing for actions.js by adding unit tests for the updateList, createShoppingList, and deleteShoppingList methods. Check the whole code for unit tests until now in the chapter7/shopping-list2 folder.
Now that all our Vuex-related functions are unit tested, it is time to apply specific Vue components testing techniques to test components of our shopping list application.
You remember from the first section of this chapter that in order to prepare the Vue instance to be unit tested, we must import, initiate (passing it to new Vue instance), and mount it. Let's do it! Create a components folder inside the test/unit/specs directory. Let's start by testing the AddItemComponent component. Create an AddItemComponent.spec.js file and import Vue and AddItemComponent:
//AddItemComponent.spec.js
import Vue from 'vue'
import AddItemComponent from 'src/components/AddItemComponent'

describe('AddItemComponent.vue', () => {

})
The variable AddItemComponent can be used to access directly all the component's initial data. So we can assert, for example, that the component data is initialized with a newItem property that equals to empty string:
describe('initialization', () => {
  it('should initialize the component with empty string newItem', () => {
    expect(AddItemComponent.data()).to.eql({
      newItem: ''
    })
  })
})
Let's now check which methods of this component we can cover with unit tests.
This component has only one method, which is addItem method. Let's check what this method does:
//AddItemComponent.vue
addItem () {
  var text

  text = this.newItem.trim()
  if (text) {
    this.$emit('add', this.newItem)
    this.newItem = ''
    this.$store.dispatch('updateList', this.id)
  }
}
This method access to the store, so, we have to use another strategy of initializing the component rather than just directly using the imported value. In this case, we should initialize Vue main component with AddItemComponent as a child, pass all the necessary attributes to it, and access it using the $refs attribute. So, the component's initialization inside the test method will look like the following:
var vm, addItemComponent;

vm = new Vue({
  template: '<add-item-component :items="items" :id="id"
  ref="additemcomponent">' +
  '</add-item-component>',
  components: {
    AddItemComponent
  },
  data() {
    return {
      items: [],
      id: 'niceId'
    }
  },
  store
}).$mount();

addItemComponent = vm.$refs.additemcomponent
Back to the method's functionality. So, the addItem method grabs the instance's newItem property, trims it, checks if it's not falsy and, if not, emits the custom event add, resets the newItem property, and dispatches the updateList action on store. We can test this method by assigning different values component.newItem, component.id and checking if the output corresponds to what we are expecting of it.
In our positive test, we should initialize the component.newItem property with a valid string. After calling the method, we should ensure various things:
- The
$emitmethod of the component has been called withaddand the text we assigned to thenewItemproperty component.newItemwas reset to the empty string
- The store's
dispatchmethod has been called with theidproperty of the component
Let's go! Let's start by adding the describe method for the addItem function:
describe('addItem', () => {

})
Now we can add the it() method where we will assign a value to component.newItem, call the addItem method, and check everything we need to check:
//AddItemComponent.spec.js
it('should call $emit method', () => {
  let newItem = 'Learning Vue JS'
  // stub $emit method
  sinon.stub(component, '$emit')
  // stub store's dispatch method
  sinon.stub(store, 'dispatch')
  // set a new item
  component.newItem = newItem
  component.addItem()
  // newItem should be reset
  expect(component.newItem).to.eql('')
  // $emit should be called with custom event 'add' and a newItem value
  expect(component.$emit).to.have.been.calledWith('add', newItem)
  // dispatch should be called with updateList and the id of the list
  expect(store.dispatch).to.have.been.calledWith('updateList',
  'niceId')
  store.dispatch.restore()
  component.$emit.restore()
})
Run the tests and check that they are passing and everything is okay. Check the final code for AddItemComponent in the chapter7/shopping-list3 folder.
Try to write unit tests for the rest of the components of the shopping list application. Remember to write unit tests to cover your code so that it breaks if you change it.