Chapter 1. Welcome to the Vue.js world!
Initially released in 2014, Vue.js has experienced rapid adoption, especially in 2018. Vue is considered a well-loved framework within the developer community, thanks to its ease of use and flexibility. If you are looking for a great tool to build and ship excellent performant web applications to the end-users, Vue.js probably is the answer.
This chapter highlights the core concepts of Vue.js and walks you through the valuable tools you need for your Vue.js development environment. It also explores helpful tools that make your Vue.js development process more manageable. By the end of the chapter, you will have a working environment with a simple Vue.js application ready to start your journey in learning Vue.js.
What is Vue.js?
Vue.js, or Vue, means view in French, is a JavaScript engine for building progressive, composable and reactive user interfaces (UI) in frontend applications.
Note
We will use the term Vue to indicate Vue.js from this point onwards.
Vue is written on top of JavaScript and acts as the trans-compiler (transpiler) that compiles and translates Vue code into equivalent HTML, CSS, and JavaScript code before deploying.
Vue follows the MVVM (Model – View – ViewModel) pattern. Unlike MVC (Model – View – Controller), the ViewModel is the binder that binds data between the View and Model. Hence, allowing direct communication for the view and model enables the component’s reactivity progressively.
In short, Vue was created to focus only on the view layer prototyping but is incrementally adaptable to integrate with other external libraries for more complex usage.
Since Vue focuses solely on the View layer, it empowers the development of single-page applications (SPAs). SPAs can now move quickly and fluidly while communicating data continuously with the backend.
The official website for Vue is Vue Website, including APIs documentation, installation, and primary use cases for reference.
The benefits of Vue in modern web development
One of the significant advantages of Vue is its well-written and easy-to-understand documentation. Besides, the ecosystem and supporting community built around Vue, such as Vue-Router, Vuex, and Pinia, is efficient in helping developers to set up and run their projects at the minimum effort.
Also, the APIs of Vue are straightforward and familiar to anyone who has worked with AngularJS or jQuery before. Its powerful template syntax minimizes the learning effort required and makes it easier to work with data or listen to DOM events in your application.
Another significant benefit Vue offers is its lightweight size. The size of a framework is a substantial aspect of the application’s performance, especially the initial loading time on delivery. At the time of writing, Vue stands as the fastest and most lightweight framework (~10kB in size). This advantage results in less time-consuming downloading and better run-time performance from a browser perspective.
With the release of Vue 3, the built-in support for TypeScript now offers developers the benefit of typing in types and finding their codebase more readable, organized, and maintainable in the long term.
Installing Node.js
Like any other modern framework, working with Vue requires setting up the development ecosystem and prior coding knowledge to keep up with the learning process. Node.js and NPM (or Yarn) are necessary development tools to install before you start working on any application.
Node.js (or Node in short) is an open-source JavaScript server environment built on Chrome’s V8 JavaScript runtime engine. Node allows developers to code and run JavaScript applications locally or in a hosted server, outside a browser.
Note
Browsers also use the V8 engine to interpret JavaScript code into efficient low-level computer code and execute it.
Node is cross-platform supported and easy to install. In case you are not sure if you already installed Node, open your Terminal (or Command Prompt in Windows) and run the following command:
node-v
The output should be a Node version, or “Command not found” if there is no Node installed.
If you haven’t installed Node yet, or your Node version is lower than 12.2.0, please visit the Node project website at Node Official Website and download the installer for the latest version based on your operation system (Figure 1-1).
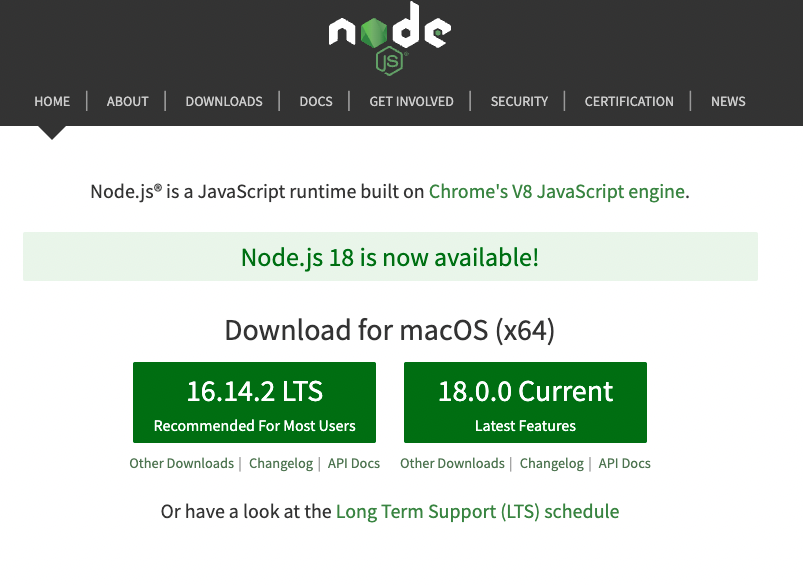
Figure 1-1. Latest version for download in Node official website
Once the download finishes, click on the installer and follow the instructions to set it up accordingly.
When installing Node, besides the node command, you also have the npm command added to the command-line tool. If you type the node -v command, you should see the installed version number displayed.
NPM
The Node Package Manager (NPM) is the default package manager for Node. It will be installed together with Node.js by default. It lets developers download and install other remote Node packages at ease. Vue and other frontend frameworks are some examples of helpful Node packages.
NPM is a powerful tool for developing complex JavaScript applications, with the ability to create and run task scripts (to start a local development server, for instance) and automatically download project package dependencies.
Similar to the Node version check, you can perform an NPM version check through the npm command as follows:
npm-v
To update your NPM version, use the following command:
npminstallnpm@latest-g
With parameter @latest, your current NPM tool automatically updates its version to the latest version. You can run npm -v again to ensure it is updated correctly. You can also replace the latest word to target any specific NPM version (in the format xx.x.x). For example, if you run the command npm install [email protected] -g, the tool will target the NPM package version 6.13.4 for installing and updating.
NPM version for this book
I recommend to install NPM version 7.x, to keep up with all the NPM code examples in this book.
A Node project usually depends on a collection of Node packages1 (or dependencies) to be up and running. In the package.json file within the project directory, you can find these installed packages. This package.json file also describes the project, including the name, author(s), and other scripting commands applied to the project exclusively.
When you run the command npm install (or npm i) within the project folder, NPM will refer to this file and install all the listed packages into a folder called node_modules, ready for the project to use. Also, it will add a package-lock.json file to keep track of the package installed version and compatibility between common dependencies.
To start a project from scratch with dependencies, use the following command within the project directory:
npminit
This command walks you through some questions related to the project and initializes an empty project with a package.json file containing your answers.
You can search for any public open-source packages at NPM Official website
Yarn
If NPM is the standard package manager tool, then Yarn is an alternative and popular package manager developed by Facebook in recent years. Yarn is faster, more secure, and more reliable due to its parallel downloading and caching mechanism. It is compatible with all NPM packages; hence it can be used as a drop-in replacement for NPM.
You can install the latest version of YARN based on your operating system by visiting Yarn Official Website.
If you are working on a macOS computer and have Homebrew installed, you can install Yarn directly using the command.
brewinstallyarn
This command installs Yarn and Node.js (if not available) globally.
You can also install Yarn globally using the NPM package management tool with the following command:
npmi-gyarn
Now you should have Yarn installed on your machine and ready to use.
To check if you have YARN installed and its version, perform the following command:
yarn-v
To add a new package, use the following command:
yarnadd<nodepackagename>
To install the dependencies for a project, instead of npm install, you only need to run the yarn command within the project directory. Once finishes, similar to NPM, Yarn will also add a yarn.lock file in your project directory.
At this point, you have set up your essential coding environment for Vue development. In the next section, let’s look at the Vue Developer Tools and what it offers us in working with Vue.
Vue Developer Tools
Vue Developer Tools (or Vue Devtools) are the official tools to help you work with your Vue projects locally. These tools include extensions for Chrome and Firefox, and an Electron desktop application for other browsers. I strongly recommend to install one of the the mentioned tools during the development process.
For Chrome users, you can head to the extension link in Chrome Web store and install the extension (Figure 1-2)

Figure 1-2. The Vue DevTools extension page for Chrome
Similarly for Firefox, you can use the extension link im Firefox Add-on page (Figure 1-3).

Figure 1-3. The Vue DevTools extension page for Firefox
Once installed and enabled, you can detect if any site currently uses Vue in production. When a site is built with Vue, the Vue icon on the browser toolbar highlights itself as shown in Figure 1-4 below:

Figure 1-4. Viewing the Vue Official site is built with Vue
The Vue Devtools enable you to inspect the Vue component tree, component props and data, events, routing information, etc within the browser’s developer console. Vue Devtools divide the information into various tabs, providing helpful insights for debugging and inspecting behaviors of any Vue component within the project.
Vite.js as a builder management tool
Introduced in 2020, Vite.js (or Vite) is a JavaScript development server which uses the native ES module2 import during development instead of bundling your code into chunks of JavaScript files like Webpack, Rollup, etc…
Note
We will use the term Vite to indicate Vite.js from this point onwards.
This approach allows Vite to perform a hot reload3 during development at an insane speed, thus making the development experience more seamless. It also offers many out-of-the-box features such as TypeScript support and on-demand compilation, hence quickly gaining its popularity and adaption among the developer community.
The Vue community has replaced Vue CLI4 (which uses Webpack under the hood) tool to be the default builder tool for creating and managing Vue projects.
Create a new Vue application
With Vite, there are various ways to create a new Vue application project. The most straightforward way is to use the following command syntax in your command prompt or terminal:
npminitvue@latest
This command will first install create-vue - an official scaffolding tool, and then present you with a list of essentials questions to configure your Vue application accordingly.
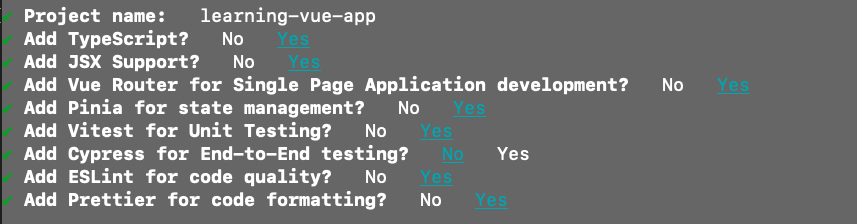
Figure 1-5. The configurations for a new Vue application project
As shown in Figure 1-5, the configurations used for our Vue application in this book includes the following:
-
The Vue project name, all in lower-case format. Vite uses this value to create a new project directory nested in your current directory.
-
TypeScript - a typed programming language built on top of JavaScript.
-
JSX5 - in Chapter 2, we will discuss how Vue supports writing code in JSX standard (writing HTML syntax directly in JavaScript code block).
-
Vue Router - in Chapter 7, we will implement routing in our application using Vue Router.
-
Pinia - in Chapter 8, we will discuss using Pinia to manage and share data across the application.
-
Vitest - this is the official unit testing tool for any Vite project, which we will explore further in Chapter 10.
-
ESLint - this tool checks your code according to a set of ESLint rules, helping to maintain your coding standard, make it more readable, and avoid hidden coding errors.
-
Prettier - this tool formats your code styles automatically. It is handy in keeping your code clean, beautiful, and following a coding standard.
Upon receiving the desired configurations, create-vue scaffolds for the project according. Once done, it will present a set of in-order commands for you to execute and get your project up and running locally (see Figure 1-6).

Figure 1-6. The in-oder commands to execute for the newly created project
Next, we will explore the file structure of our newly created project.
File Repository Structure
A new Vue project contains the following initial structure within the src directory:
-
assetsfolder where you can put images, graphics, and CSS files of the project. -
componentsfolder where you create and write Vue component following the Single File Component (SFC) concept. -
routerfolder where all the routing configurations reside. -
storesfolder where you create and manage global data of the project by store using Pinia. -
viewsfolder where all the Vue components that bind to defined routes reside. -
App.vue- the main Vue application component, acting as the root to host all other Vue components within the application. -
main.ts- contains the TypeScript code responsible for mounting the root component (App.vue) into an HTML element on the DOM page. This file is also where you set up plugins and 3rd party libraries in the application, such as Vue Router, Pinia, etc…
In the Figure 1-7 below, you can see the structure of our Vue project.

Figure 1-7. The file structure of our created learning-vue-app project
In the project’s root directory, there is an index.html file which is the entry point for loading your application in the browser. It imports the main.ts file using the <script> tag and provides the target element for the Vue engine to load the Vue application into by executing the code in main.ts. This file will likely stay unchanged during the whole development process.
You can find all the example code presented in this book in the dedicated Github respository. We organize these code files by chapter.
Summary
In this chapter, we learned about the benefits of Vue and how to install the essential tools for our Vue development environment. We also discussed the Vue Developer Tools and other tools for effectively building a Vue project, such as Vite. Now that you created our first Vue project, we are ready to learn Vue, starting with the basics - the Vue instance, the built-in directives, and how Vue handles reactivity.
1 commonly known as NPM packages
2 ES modules stands for ECMAScript modules, a popular standard for working with modules since ES6 release, firstly for Node.js and recently in browsers
3 Hot reload automatically applies the new code changes to a running application without restarting the application.
4 Vue command-line interface
5 JavaScript XML, commonly used in React