
Chapter 14
Getting Connected with LinkedIn Groups
In This Chapter
![]() Getting to know LinkedIn Groups
Getting to know LinkedIn Groups
![]() Joining a group
Joining a group
![]() Searching a group
Searching a group
![]() Creating a group
Creating a group
![]() Inviting others to join your group
Inviting others to join your group
When it comes to the reasons why people get to know each other, there's more to a professional's life than colleagues and classmates. People have always been drawn to groups based on common interests, backgrounds, or goals, and this natural tendency to join together can be seen from sports teams to Boy/Girl Scouts, from social action organizations to nonprofit charity groups. Naturally, LinkedIn also offers a way for people to connect with each other as a group — LinkedIn Groups.
In this chapter, I discuss the benefits of value in LinkedIn Groups, from information and exposure to growing your network, and cover the overall idea and structure of LinkedIn Groups and what you can expect to find. I then talk about how to search for existing groups on LinkedIn, and I walk you through the steps necessary to join that group. Finally, if you see that there should be a group for something on LinkedIn but it doesn't already exist, I discuss how to start your own LinkedIn group and how to invite others to join it.
Reaping the Benefits of LinkedIn Groups
When people who are familiar with other social networking tools are first exposed to LinkedIn Groups, they see some similarities. The group interaction in LinkedIn Groups — members list, discussion threads, and so on — feels just like Yahoo! Groups or groups on most other social networking sites. And yet, being a member of a LinkedIn group has extra benefits over other networking sites:
- Connections: Group members share a special sort of connection. Although you don't have access to their extended networks for introductions, you're considered directly connected to them, in that you can see their full profiles, and they can appear in your search results even if you aren't within three degrees of everyone in the group. Your search results can include fellow group members as well as your first-degree connections and second-degree network members.
- Visibility: By joining several groups — particularly large, open ones — you can increase your visibility in the LinkedIn network without having to add thousands of contacts.
- Knowledge: LinkedIn Groups share information and expertise among their members through the Discussions and Promotions pages of the group, which you can benefit from as a group member. Because there are thousands of groups for most industries and fields, LinkedIn Groups can be a valuable source of knowledge.
- Recognition: Employers like to see that you are connected with professional groups because it shows the desire to expand your knowledge base, stay current in your industry or field, and be open and eager to network with like-minded people.
- Group logos: The logos of the groups you're in are displayed on your profile. This is a sort of visual branding, reinforcing your association with those groups without a lot of words. For example, Figure 14-1 shows how the profile for a LinkedIn member who belongs to several groups might appear.
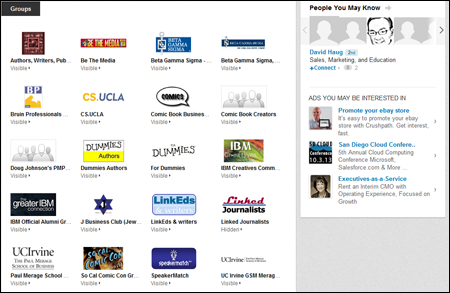
Figure 14-1: Group logos displayed on a profile.
Some LinkedIn Groups are extensions of existing organizations, and others are created on LinkedIn by an individual as a way to identify and network with people who share a common interest. In either case, they're useful tools for growing your network and leveraging your existing affiliations.
Understanding the Types of LinkedIn Groups
Because there are lots of reasons to create a group, LinkedIn has established the following six primary categories of groups:
- Alumni: These groups are alumni associations created by schools or teaching institutions as a means to keep in touch with past graduates. Graduates can also keep in touch with each other through an alumni group. As you develop your career, you can tap in to the alumni network of like-minded, qualified individuals. Loyalty to your alma mater makes you, and everyone else in the group, more likely to help a schoolmate than a complete stranger.
- Corporate: Because every company or organization has a unique culture, who better to understand that culture than current and past employees? Corporate groups allow employees from a single employer to stay in touch.
- Conference: For people planning to attend a particular conference, using a conference group to network with attendees before, during, and after the conference can be advantageous.
Before the conference, you can relay important information, such as subject matter and agenda, and any events, lectures, seminars, parties, or other info that matters to the attendees. Perhaps there are last-minute changes or announcements that need to get disseminated quickly. During the event, you can quickly relay announcements, as well as news being generated at the conference and any on-site changes. After the conference, these groups allow attendees to stay in contact and help the conference organizers and presenters see how the subject matter and industries have changed or progressed.
Also, if the conference becomes a yearly event, the conference group becomes a constant area of discussion and planning.
- Networking: A common interest is all that's needed to come together and meet similarly minded people. Networking groups are organized around concepts like women's networks, angel investors in new companies, or even Rotary Clubs. These LinkedIn groups allow you to stay involved in your interests and meet people with similar or complementary goals to your own.
- Nonprofit: After talking business all day, it's comforting to have a group where you can talk and plan any upcoming events that benefit your favorite nonprofit organization. These LinkedIn groups allow far-flung volunteers to organize, plan, and execute projects and events relating to their charity without being in the same room — which is especially convenient if everybody has a busy schedule. These groups also allow any nonprofit organizers to bring new members up to speed and answer their questions quickly so more people can become involved.
- Professional: Finally, who knows your career issues better than others in your industry or that share your job title? Professional groups allow you to network with people in the same line of work who are probably experiencing the same issues, problems, and potential solutions as you. Whether it's an organization of CFOs, workers in the wireless industry, or SAP Certified Consultants, these groups can be invaluable when it comes to furthering your career and giving you an avenue to evaluate job tips and industry news.
Joining a Group
When you look at the LinkedIn groups out there, one of the most important things to keep in mind is that you should join only those groups that are relevant to you. Although you might think it's fun to join another alumni association group besides your alma mater, it won't really help you in the long run.
As you use LinkedIn more and decide that you want to get involved by joining a LinkedIn group, you have a couple of options for getting started:
- Click the Group logo found on the profile of one of your first-degree connections to join the group yourself.
- Search the LinkedIn Groups Directory to find a group that interests you, then click the logo to join the group.
The first option may come about when you're browsing your first-degree connections list, and you see a group that you're interested in joining. After you click the logo, you simply click a Join This Group button on the next page that you see, and you've completed your part of the process. Keep in mind that some professional groups have special requirements and you may not be eligible to join due to your particular educational or professional experience.
If you plan to seek out a group to join, just follow these steps:
- From the top navigation bar, hover your mouse over the Interests link and then click the Groups link in the drop-down list that appears.
You're taken to your Groups page on LinkedIn, as shown in Figure 14-2.

Figure 14-2: You can see your specific LinkedIn Groups activity here.
- Enter keywords in the text box at the top of the page.
Use keywords to describe the group that interests you. If you're looking to join a group that promotes or encourages public speaking, for example, type public speaking into the text box.
- Click the Search button (it looks like a magnifying glass) to see a list of groups that match your keywords.
Go through the results list, as shown in Figure 14-3, and read the descriptions of each group on the list. If you need more information about the group, click the group name to see that group's summary page, which contains the group's contact e-mail, owner information, and member count. From this page, you can also contact the group owner and send him a message requesting a few details about the group.
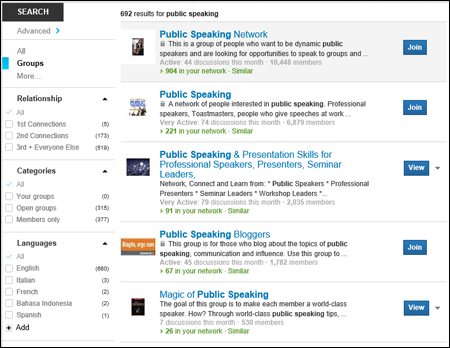
Figure 14-3: Look through a list of potential groups to join.
- Click the Join button to join the LinkedIn group.
That's it! You see a confirmation message, as shown in Figure 14-4, and you're taken back to that group's home page. Depending on the requirements for membership, your request may be sent to the group manager for manual approval, instead of getting immediately approved, and if that occurs, you are returned to your Groups page from Step 1. As mentioned before, your request may not be approved depending on the criteria for that group.
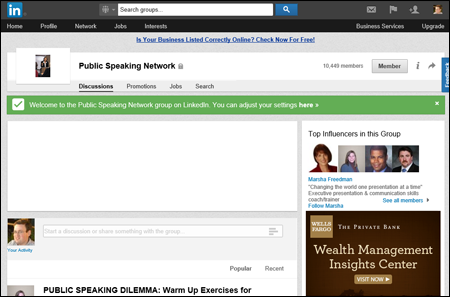
Figure 14-4: Read the summary of your LinkedIn group before you join.
Searching a Group
After you join a group, you'll probably want to see who's in the group and how the group members are connected to you. After all, the point of these groups is to stay in touch with like-minded individuals and have them be part of your extended network.
To search a group, follow these steps:
- From the top navigation bar, hover your mouse over the Interests link and then click the Groups link in the drop-down list that appears.
Your Groups page appears.
- Look through the list of groups on this page, scroll down to the group's logo, and click that logo to bring up the Groups home page. On the page, click the link that contains the number of members in the group. (This link is to the left of the Member button.)
This brings up a search result of the members in the group, sorted by how many degrees they are away from you in your LinkedIn network, as shown in Figure 14-5.
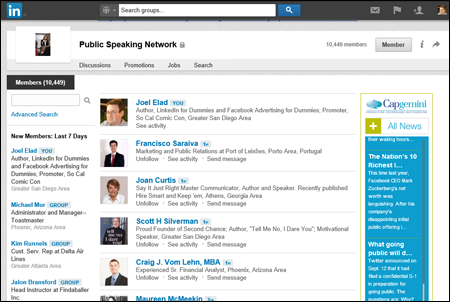
Figure 14-5: Search your group to find specific subsets of people.
- (Optional) After you are on the search results screen, on the left-hand side of the screen, you can click the Advanced Search link and add other search criteria to get a more targeted results list.
This brings up an Advanced Search Results page, and you can see that the search is automatically limited to members of your group. Now you can scroll down the page and use more of the filters provided as search requirements, such as names, companies, user types, and locations.
- Click the Search button.
Your search is carried out according to the refined search criteria you entered.
Creating a Group
When you're ready to create your own group, just follow these steps:
- From the top navigation bar, hover your mouse over the Interests link and then click the Groups link in the drop-down list that appears.
You see your Groups page, with the main section See what's new in your groups and a Create a Group button along the right side of the screen.
- Click the Create a Group button.
This step brings you to the Create a Group page, as shown in Figure 14-6. This is where you input all the information about your newly requested group.
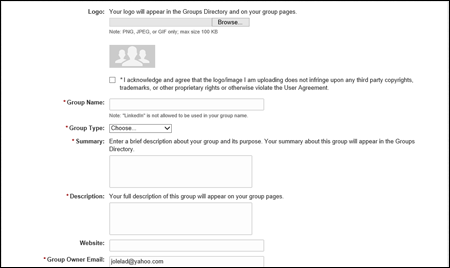
Figure 14-6: Enter your new group information here!
- Upload the logo for your group.
LinkedIn requires a logo. The file format must be PNG, JPEG, or GIF, and the memory size of the logo cannot exceed 100KB. Click the Browse button next to the logo box. In the Choose File dialog box that opens, locate the logo file on your computer so LinkedIn can upload it; then click Open.
“But where do I get a logo?” you might ask. Well, you can design your own logo at sites like www.logoyes.com or www.logoworks.com. If a logo already exists, like for an alumni association, ask one of the administrators for a high-resolution copy of the logo, or save a copy of the logo from the group's personal Web site — as long as you know you have the rights to use that image, of course.
 Your logo can't exceed 100KB, so watch that file size as you create your logo.
 - Provide your group information and settings, including group name, summary, description, type, Web site URL, manager e-mail, whether you want people to automatically have access to join or be pre-approved by you or another manager, and whether you want your group visible on your member's profile pages. (Refer to Figure 14-6.)
You have only 300 characters in your group summary, so choose your words wisely.
 If you're wondering what to write for your group description, search for similar groups using the search box at the top of the page and read through similar groups in your group type. Then, go back to the Create a Group page and enter your description. (If you check other group descriptions while writing your description, you'll lose whatever you typed.)
 - If your group is located in one geographic region, select the appropriate check box.
- Read through the Terms of Service and then select that check box.
At this point, your page should look something like Figure 14-7, where your logos and information are uploaded and ready for review.
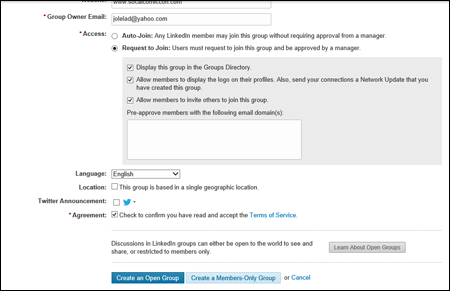
Figure 14-7: Your group request is ready to be submitted!
- Click the Create a Group button to create your group on LinkedIn.
If you want your group discussions to be visible to everyone, click the Create an Open Group button. If you want your group discussions to be visible only to members, click the Create a Members-Only Group button. Either way, after you click that button, you're taken to the newly created home page for your new group, and your request is submitted.
You should see your newly created group page, as shown in Figure 14-8. Your new group is ready for members!

Figure 14-8: Your group has been created!
Inviting Members
After you get your confirmation from LinkedIn that your new group has been created, your next step is to invite members to be a part of this group. This is actually a multi-part process:
- You have to define a list of pre-approved members of your group, which you upload to LinkedIn.
You should do this before you send out any invitations.
- You're allowed to e-mail your prospective members with an invitation to join your new group.
LinkedIn provides you with a Web page that you can use to generate your invitations.
- When someone clicks that link, LinkedIn checks to see whether that person is on your pre-approved list.
If so, she automatically becomes a member. If not, you (the group manager) see a member request in the Manage section of your group entry, which you have to manually approve so the person can officially join the group. The person's status shows up as Pending on her My Groups page until you approve her membership request.
Building your member list
The easiest way to build your list of members is to use a spreadsheet program like Microsoft Excel and create a Comma-Separated Values (CSV) file, which is simply a text file of members and their e-mail addresses. You should definitely have your member list in front of you before starting this process.
If many of the members are already connected to you in LinkedIn, you can simply export your connections to start building your member list. See Chapter 10 for more information on how to do this.
When you're ready to build your list of members, just follow these steps:
- Open a spreadsheet program, such as Microsoft Excel. Choose File⇒New from the top Excel menu to create a new blank document.
- In the first row, create these entries for the three column headers:
- First Name
- Last Name
- E-mail Address
- Starting in the second row, fill in the members’ names and e-mail addresses.
As you fill in your list, it should begin to look like Figure 14-9.
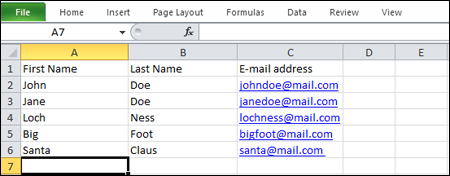
Figure 14-9: Use Excel to build your group member list.
- Choose File⇒Save As.
The Save As window pops up, as shown in Figure 14-10.
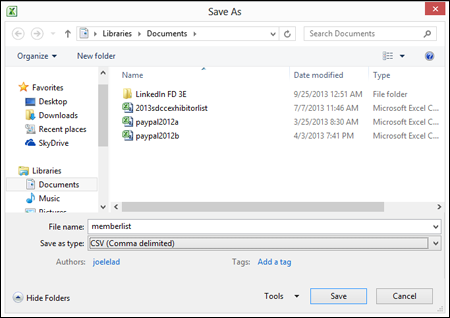
Figure 14-10: Don't forget to save your file as CSV (Comma-Separated Values).
- Make sure that the Save as Type option is set to CSV (Comma-Separated Values) and then click OK when prompted.
- Go to your LinkedIn account and click the Interests link in the top navigation bar, then click the Groups link to bring up your My Groups page. Click the group logo to bring up your Group home page.
- From your Group home page, click the Manage link to bring up the Manage Group page. Along the left-hand side of the Manage Group page, click the Pre-approve People option.
This brings up the Pre-approve People page for your group, as shown in Figure 14-11. At first, you're the only member of this new group.
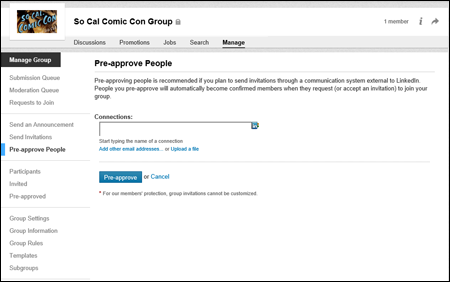
Figure 14-11: The Pre-approve People page is one of many Manage Group tasks.
- Click the Upload a File link below the Connections box in the middle of the screen.
This brings up the Upload a File page, as shown in Figure 14-12.
- Click the Browse button to find the CSV file on your computer.
- After you specify the file you want, click the Upload File button to upload the file (containing your list of members) into your group.
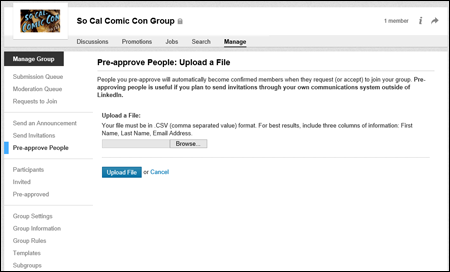
Figure 14-12: Import your list of members here.
The next page attempts to determine whether the file was uploaded correctly. You should see your member list uploaded correctly, as shown in Figure 14-13. You have two options:
- Finish Uploading: If LinkedIn brought in the first few names correctly with the right text encoding — which pretty much assures everything went according to plan — click the Finish Uploading button.
- Try Next Encoding: If the names shown don't display correctly, click the Try Next Encoding link.
You're done! Your new members appear on the pre-approved list for this group.
You can always choose the Pre-approve People option and use the form to manually add names at any time.

Figure 14-13: Look through your list and add members to your group.
 If the e-mail address of a member's LinkedIn profile is different from the e-mail address you put in the pre-approved list, this member won't be automatically approved when he clicks the link. You have to manually approve him by clicking the Requests to Join link from the Groups page.
Crafting your invitation e-mail
LinkedIn allows you to send group invitations from the Groups page because the folks at LinkedIn feel that invitations should come from the group owner — namely, you. Here are a few do's and don'ts to keep in mind as you craft your invitation:
- Do relate the purpose and benefits of the group. People are busy and need to understand why they should join this group. Explain the benefits of being connected to other people, the ability for professional development or advancement, and what you hope to accomplish with this group. Remember, you're sending this to LinkedIn members, so don't worry about explaining LinkedIn — just explain your group.
- Don't go on forever. One to two paragraphs is the maximum this invitation should be. Introduce yourself, introduce the group name, give people the benefits of joining, encourage them to join, include the link to the LinkedIn group page, and sign off. No one will read a long diatribe or laundry list of reasons to join. Use bullet points and short sentences whenever possible.
- Don't put other offers in the e-mail. Some people use this as an opportunity not only to encourage folks to join one group, but to push a second group invitation, or highlight a link to the group's non-LinkedIn Web site. The moment you start presenting multiple options for people, you lose their attention, and they won't sign up.
You can use any e-mail program to create an invitation to your group, or you can go to the Manage link of your group and click Send Invitations from the navigation options on the left-hand side of the screen. You simply type in the name of your first-degree connections (separated by commas), a Subject line, and a Welcome Message, which can look as simple as this:
- Hello,
- You are hereby invited to join the new So Cal Comic Con Group on LinkedIn. Joining this group will allow you to find and contact other people interested in the convention, so you can stay in touch, gain referrals, and view other attendees’ LinkedIn profiles.
- Hope to see you in the group!
- –Joel Elad, Co-Promoter, So Cal Comic Con
After you send out the invitations, as members respond, they're moved from the pre-approved list to the current list of your group, and the small group logo appears on their profiles.
Approving members to your group
As more and more people find out about your new LinkedIn group, and as members start joining, you may find that some of the people who have clicked the link to join aren't on your pre-approved list. Perhaps they are people you didn't realize were on LinkedIn, or you didn't realize they were valid group members, or they clicked the wrong link and/or they don't belong in your group.
It can be helpful, from an administrative standpoint, to develop criteria or guidelines for people to join your group, so you can evaluate each request as it comes in. Consider talking to the governing members of your group to develop this in the early days of your group, so you don't have to worry about it later on when things get busy.
Regardless, you need to go into LinkedIn and either approve or reject people's membership requests so they can be members (or non-members) of your LinkedIn group. When you need to do that, just follow these steps:
- From the top navigation bar, hover your mouse over the Interests link and then click the Groups link in the drop-down list that appears.
By default, you should see your Groups page, although all your group options are just a click away.
- Scroll down (if necessary) until you see the name and logo of the group you are maintaining, as shown in Figure 14-14.
Figure 14-14: You can manage your LinkedIn group membership.
- Click the Requests to Join link below the name of your group to bring up the Requests to Join page.
This step brings up the list of people waiting to be approved for your group, as shown in Figure 14-15.
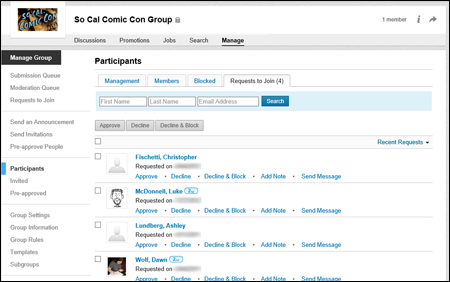
Figure 14-15: See who is waiting to be approved to your LinkedIn group.
- To accept people, select the check box next to each person you want to approve to join your LinkedIn group, then click the Approve button.
You can approve people individually or all at once if you want. You can always select the person's name on the list to read his LinkedIn profile and decide whether he belongs in the group or send him a message through his profile.
- To refuse membership, select the check box next to each person you want to decline membership to the group, then click the Decline button.
You can also click the Decline & Block button if you want to permanently block someone from trying to join the group.
Similar to the approval process, you can decline people one at a time or all at once. (The easiest way to select everyone is to select the empty check box at the top of the list; the one with no name associated with it.) In either case (approval or decline), the user's name disappears from the Request to Join page. Lastly, remember that you can remove someone from the group membership at any time after you initially approved him.
If you're going to decline someone, you may want to use the Send Message option first, before declining him, to let him know why you are declining his request. After you decline that person, you won't be able to send him a message without using the InMail system.