
Chapter 5
Managing Introductions and InMail
In This Chapter
![]() Understanding introductions and InMail
Understanding introductions and InMail
![]() Sending introductions
Sending introductions
![]() Sending InMail
Sending InMail
![]() Accepting and forwarding requests
Accepting and forwarding requests
![]() Declining requests gracefully
Declining requests gracefully
One of the goals of using LinkedIn is to expand your personal network of friends and colleagues by seeing who is connected to you at each degree level. When you can see the second and third degrees of your network, your next goal is to start interacting with these people and see how they might fit into your network, goals, or ambitions. However, the whole system of contacting people requires some order and decorum (otherwise, nobody would feel comfortable signing up for the site in the first place). Therefore, LinkedIn offers two methods for meeting and connecting with people outside your immediate network: introductions and InMail. Not so coincidentally, I cover introductions and InMail in this very chapter.
Introductions are simply where you ask to be introduced to a friend of a friend, and your friend can decide whether to pass along your introduction to the intended target. InMail allows you to directly communicate with anyone in the LinkedIn network through a private LinkedIn message. I also cover what to do when you get a request from a connection on LinkedIn.
InMail Versus Introductions
Your first question is most likely, “What's the difference between introductions and InMail?” (Figure 5-1 shows an InMail example at the top and an introduction at the bottom.) The answer depends on how involved your common friend or colleague is in connecting you with this new contact.
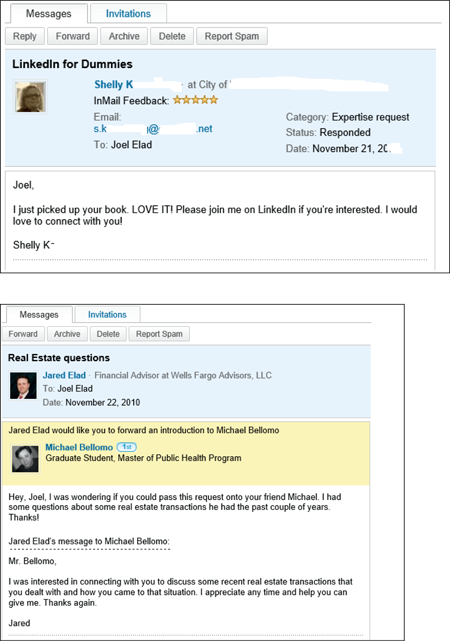
Figure 5-1: LinkedIn offers two ways of connecting with people outside your network.
 Every LinkedIn user decides on his own contact level, and a user can decline to allow any introduction or InMail to reach him, regardless of sender. If you don't want to receive any introductions or InMail, simply deselect all the Contact Settings options. (See Chapter 3 for the section on checking your contact settings.)
 If you don't mind introductions but really don't want to have to deal with any InMail, just deselect the InMail option in the Contact Settings section and leave the Introductions option alone. Otherwise, leave the InMail option selected, since it is a valuable tool for sending and receiving communication with people who might become a valuable part of your network or help you with one of your professional goals.
Understanding introductions
Say you're at a party with your friend Michael, and you say to him, “You know, I'd really like to meet someone who can help me with some software tasks for my company.” Michael looks around, sees his friend James, and introduces you to James by saying, “Hello, James. This is my entrepreneur friend from business school, [Your Name Here]. [Your Name Here], this is my old buddy James. He and I studied computer science together in college.” After that, Michael might give some more background information about each person to the other.
On LinkedIn, an introduction is very similar to my real-world example. You send a request to someone in your immediate first-degree network (Michael) and ask that person to introduce you to someone in his network (James) by forwarding your request to the intended party. In some cases, if you're trying to reach someone in your third-degree network (maybe James has a programming buddy you should talk to), your introduction request would have to go to two different parties before reaching the intended recipient.
Here are some benefits of using introductions:
- You're represented by someone close. Instead of sending a random, unexpected e-mail to a stranger, you're introduced by somebody who knows the intended party, even if that introduction is done with an e-mail. That gives your introduction request a much higher chance of being read and getting a response.
- You get your network involved. When you ask people in your network to get involved, they learn more about you and your intentions, and sometimes you might find what you're looking for is closer than you think. In addition, when you ask them to pass along your introduction request, you can offer to facilitate an introduction on their behalf, which helps both parties.
- You leverage the power of your network. By using LinkedIn, you not only expand your network by using your first-degree connections to help you meet new people, but you can also decide who would make the introduction for you. I recommend that you read up on your friend's profile and your intended party's profile to see what they have in common.
- You can have multiple introductions going on at one time. With a LinkedIn free account, you can have up to five open introductions going at any one time. When you get introduced to your intended party, that spot opens up, and you can make another introduction request. InMail, in all cases, costs money, either on a per-mail basis or as part of a premium paid account. (That means even someone with a free basic account can use InMail, but it will cost you.)
You can get more introductions at one time by upgrading to a premium account. I discuss the different paid accounts in Chapter 1.
Getting to know InMail
Because everyone on LinkedIn has a profile and a secure message Inbox, communicating with other people online is easy. LinkedIn allows you to send InMail directly to an intended party, regardless of whether he is directly or indirectly connected with you. The e-mail gets immediately delivered to the recipient's Web-based Inbox on the LinkedIn site (and, if the recipient has configured his settings to get e-mails of all his InMail, in the Inbox at his e-mail address); the sender never learns the recipient's address, so each party has some privacy. The recipient can then read your profile and decide whether to respond.
The cost of using InMail depends on whether you subscribe to a premium account. You can purchase InMail credits (one credit allows you to send one message) at a cost of $10 per InMail message. Premium accounts, such as the Job Seeker account for $29.99/month, come with a set number of InMail credits per month that roll over to the next month if unused. The Business account gets 3 credits per month, the Business Plus account gets 10 credits per month, and the Executive account gets 25 credits per month.
Here are some benefits of using InMail:
- Delivery is instant. With InMail, you simply write your message or request and send it directly to the intended party. There's no delay as a request gets passed from person to person and waits for approval or forwarding.
- You owe no favors. Sometimes, you just want to reach somebody without asking your friends to vouch for you. InMail allows you to send a request to someone new without involving anyone else.
- It's sure to be delivered. With introductions, the party(ies) involved in the middle could choose to deny your request and not pass along the message. With InMail, you know that the intended party will get a copy of your message in his e-mail account and LinkedIn Inbox.
Setting Up an Introduction
When you want to bring two (or more) parties together, you usually need to apply some thought to the process, whether it's figuring out what both parties have in common, thinking up the words you'll use to introduce party A to party B, or coming up with the timing of exactly when and where you plan to make the introduction. On LinkedIn, you should do your best to make sure the introduction process goes smoothly — but don't worry, there's not nearly as much social pressure. The following sections give you tips and pointers for setting up an introduction.
Planning your approach to each party in the introduction
When you want to send an introduction request, spend some time planning your request before you log on to LinkedIn to generate and send it. Preparing a quality and proper introduction goes a long way toward keeping your network in a helpful and enthusiastic mood, and it increases your chances of making a new and valuable connection.
You need to prepare two messages: one for your intended recipient and one for your connection/friend. Each message needs to perform a specific objective. Start with the message to your friend, and keep the following tips in mind when you're writing it:
- Be honest and upfront. Say exactly what you hope to achieve so there are no surprises. If you tell your friend that you're hoping her contact will be a new bowling buddy for you, but when you reach that contact, you ask for funding for your new business plan, you're in trouble. Your friend will probably never forward another request again, and the contact, who expected one type of interaction and got another, will see you as untrustworthy and be unlikely and/or unwilling to help on this request or any in the future. Even if your eventual goal is something big, such as asking someone for a job, start with an initial goal that is reasonable, such as asking for information or advice. Let the other person know that you would like to keep talking to see what possibilities might occur in the future.
- Be polite and courteous. Remember, you're asking your friend to vouch for you or back you up when your request goes to the intended party. So be polite when making your request and show your gratitude regardless of the outcome.
- Be ready to give in order to get. One of the best ways to go far with your network is to offer some sort of reciprocal favor when you want someone to do a favor for you. Perhaps you can introduce your friend to one of your other contacts in exchange for your friend accepting your introduction request.
- Be patient. Although you might be eager and under a deadline, your friends probably operate on different schedules driven by different levels of urgency. Some people are online all the time, other people log in to LinkedIn infrequently, and most people are completely disconnected at times, like when they're on vacation or behind on a project. Asking your friend every day whether she forwarded your request is an almost sure-fire way of getting that request bounced back to you.
When writing your message to your intended recipient, keep these tips in mind:
- Be honest and upfront. Just like with your friend, when you have a specific goal or request in mind, make it known in the message. The recipient is most likely busy and doesn't know you, so if he spends the time to talk to you and finds out that you have an ulterior motive, he feels like his time was wasted and that he was deceived, which are not good feelings to create when trying to get help from someone.
- Be succinct. You're asking someone for his time, resources, or advice, so don't beat around the bush. Introduce yourself in your first sentence or two. Then explain why you're contacting the recipient and how you hope he can help you.
- Be original. If you stick to the sample text that LinkedIn gives you, your message has an air of “Hey, I want to talk to you, but I don't want to spend a few seconds of effort to really tell you what I'm after.” When you customize your message, you have a greater chance of capturing the other person's attention. If your intended recipient gets a lot of requests, you'll stand out if you show some effort to rise above the daily noise this person encounters.
- Be ready to give in order to get. You're asking for help of some sort, so again, be ready to give something, whether it's gratitude, a reciprocal favor, or something more tangible. Most people are eager to help, especially when they understand the situation, but having something to offer in exchange rarely hurts. Explain to your recipient how you might provide something useful in return.
Sending an introduction
When you've prepared your messages (one to your contact and one to the recipient) and you're all ready to send an introduction request, just follow these steps:
- While logged in to LinkedIn, search for the person you'd like to meet.
You can use the Search box at the top of any LinkedIn page, or you can click your Connections and search your friend's networks. (See Chapter 4 for the lowdown on searching LinkedIn.)
- From the list of search results, click the name of the person you want to contact. (If you didn't find the person you're looking for, try another search.)
This step takes you to the recipient's profile page, where, as you scroll down the page, you should see two things: a chart along the right side of the page showing how you're connected to this person and a link entitled Get Introduced. (If you don't have anyone in your network yet, you won't see the chart or the link.)
Suppose I'm hoping to be introduced to Erin O'Harra, PR Associate over at LinkedIn. When I get to Erin's profile page, I see that I have a connection to her (see Figure 5-2) in the form of a business contact who I met through LinkedIn.
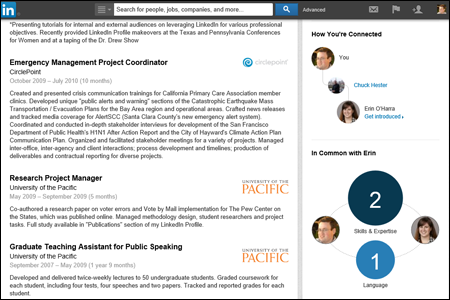
Figure 5-2: See how you're connected to your intended recipient via LinkedIn.
- On the person's profile page, click the Get Introduced link to start the introduction process.
You see a pop-up window that starts the introduction process, as shown in Figure 5-3. Select the shared connection who you'd like to have make the introduction. In cases like this example, where there is only one shared connection, you still have to select the person to continue the process.
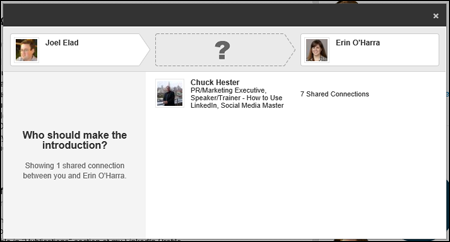
Figure 5-3: Pick the person you are requesting to make your introduction.
- Write a subject line and add a message for the person who will be passing on your introduction.
Adding a note here is required (see Figure 5-4) so the facilitator (the person who receives the introduction request from you) knows why you want to reach the other party. After all, the facilitator is going to vouch for you when he sends this request to the intended party, so the more information you give, the better. (See the preceding section, “Planning your approach to each party in the introduction,” for more about writing this message.)
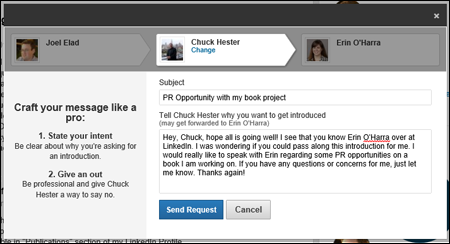
Figure 5-4: Tell your friend why you're requesting an introduction.
- Click the Send Request button.
You see a pop-up window message as you're taken back to the person's LinkedIn profile page telling you that your request has been sent, and your first-degree connection will receive this introduction request in his LinkedIn Inbox.
After that, your facilitator friend will accept or decline your request, and you'll get a notification about the facilitator's decision. You can always view your introduction request in your Sent Messages folder.
Keep in mind some LinkedIn members are inactive or may not respond, so try not to take it personally. Move on to another potentially helpful contact.
You might want to send an e-mail to your facilitator friend first before starting the introduction process, especially if you think he might not want to forward your request, you want to make sure the facilitator has kept in contact with the intended recipient well enough to make the introduction, or the intended recipient might be too busy to receive an introduction request. This also gives the facilitator a chance to let you know first that he is not interested or able in forwarding the introduction.
Sending InMail
If you're looking to connect with someone right away and you don't have an immediate or secondary connection with someone, you can use the InMail feature to send a message directly to another LinkedIn member without anyone else getting involved.
 This feature is currently available to paid members of LinkedIn with available InMail credits. If you're using a free account, you have to pay for individual InMail credits to reach other members through InMail. Consult the LinkedIn Help Center for more information (http://linkedin.custhelp.com).
InMail is basically a private e-mail message that enables you to reach other members, but it protects those members’ privacy and e-mail address information. If your message is accepted, you'll receive a message in your LinkedIn Inbox with the other party's name and e-mail address, and you can communicate further. In some cases, you see only the other person's professional headline first, and then you see the person's name after he accepts the InMail message.
When you're ready to send someone an InMail, just follow these steps:
- While logged in to LinkedIn, search for the person you'd like to meet.
You can use the Search box at the top of any LinkedIn page, or you can click your Contacts and search your friend's networks. (Chapter 4 has all sorts of details for you about searching LinkedIn.)
- From the list of search results, click the name of the person you want to contact. (If you didn't find the person you're looking for, try another search.)
You're taken to the person's profile page.
- Click the Send InMail link.
For example, suppose that I want to connect with Lynn Dralle, the Queen of Auctions, who can not only teach you how to sell on eBay, but who sells more than $100,000 a year in antiques and collectibles herself. When I look at her profile (see Figure 5-5), I see the Send InMail button, which means she is open to receiving InMail. I would click the Send InMail button to send her a message.
After you click that button, you can start filling out the Compose Your Message form.
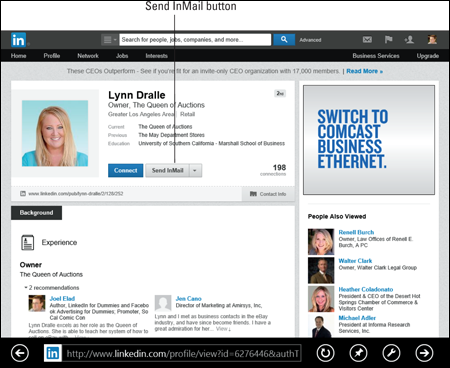
Figure 5-5: See whether who you want to contact is open to receiving InMail.
- In the Compose Your Message form, select or deselect the Include My Contact Information check box, depending on your preference.
You're asked whether to provide contact information that your recipient can use to contact you, in the form of e-mail and/or a phone number. Simply select the Include My Contact Information check box (as shown in Figure 5-6) if you want to send contact information.
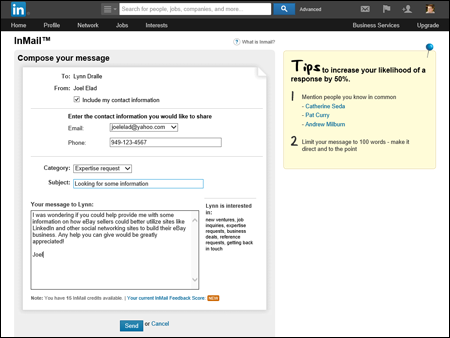
Figure 5-6: Compose your InMail message.
- Complete the Category and Subject fields, and then type a message in the text box.
As with an introduction, keep your message focused on why you would like to talk with this person, and/or what information you were hoping to exchange. (The earlier section, “Planning your approach to each party in the introduction,” contains advice about writing to an intended recipient that applies to InMail messages as well.) At the bottom of Figure 5-6, you can see how many InMail credits you have; remember that you need at least one credit to send this message.
Be sure to proofread your message before sending it out. If you send a message with typos, it probably won't help your case at all. - Click the Send button to send off your InMail.
Your recipient receives this InMail in her LinkedIn Inbox and can decide whether to accept it. (If she has configured LinkedIn to get immediate e-mails of her InMail messages, she will receive the InMail in her e-mail account Inbox as well.) If your message is accepted, it's up to the recipient to contact you in return. Be patient. While you're waiting, I recommend a game of Connect Four or Internet Chess.
Managing Introduction Requests
What if someone in your network is looking for your help to meet someone in your network? You can facilitate the introduction between your LinkedIn first-degree connections. Now that your reputation is on the line, too, you should spend some time thinking about and processing any and all introduction requests that come your way.
You really have only two options for handling an introduction request:
- Accept it and forward it on to the party it's intended for.
- Decline it (politely!).
I cover these two options in more detail in the following sections. However you decide to handle the request, keep these tips in mind:
- Act or reply quickly. The reason why LinkedIn works so well is that people are active with their networks and build upon their profile by answering questions, meeting new people, or joining groups. When you get an introduction request, you should either act on it or respond to the person with the reason why you won't act on it. Ignoring it isn't a productive use of the LinkedIn system and makes you look very unprofessional.
- Don't be afraid to ask for clarification. Sometimes you might need someone to remind you exactly how you're connected with her. Hopefully, in the note you get from this person, she includes some reminder or thought that helps you place her. If not, don't be afraid to shoot back a message and ask for clarification or a gentle reminder.
- Read your friend's request before forwarding. Chances are good that the person to whom you forward this request might come back to you and ask, “Hey, why did I get this?” or “What do you really think about this person?” If you don't know the details of your friend's request, the intended party might think you're a quick rubber-stamper who sends off stuff without offering to screen anything, and that lowers this person's impression of you. Knowing what your friend is requesting can help you decide how to promote and encourage the connection, perhaps by giving you an idea of how best to approach the intended party.
Accepting requests and forwarding the introduction
When you're ready to accept your friend's request and forward her introduction, follow these steps:
- Click the Messages button in the top navigation bar.
This brings up your Inbox of messages, as shown in Figure 5-7. When you're looking at all your messages, look for a drop-down arrow next to All Messages.
If you receive copies of introductions in your e-mail and then click the link from the e-mail message, you've already completed Steps 1 and 2.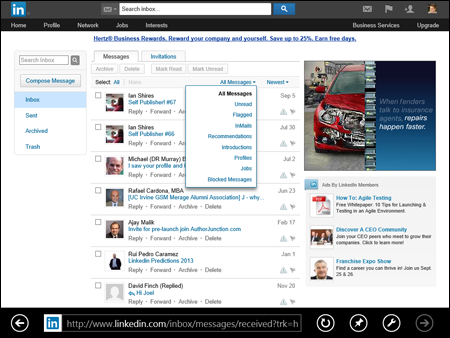
Figure 5-7: Go to your LinkedIn Inbox to find any introduction requests.
- Click the drop-down arrow and select introductions from the list provided to see your requests.
This brings up your Introductions page, as shown in Figure 5-8. Here you can see introduction requests from fellow members, as well as the results from introductions you have requested yourself.
Figure 5-8: See your introduction requests in one place.
- Click the subject line of the request you're evaluating.
In this example, I clicked Real Estate questions from Jared Elad, my brother. Doing so brings up the introduction request, as shown in Figure 5-9.
Read the full text before acting on the request. Don't just skim it — you might miss an important detail. - If you accept the request, click the Forward button.
A new window opens where you can compose your message to the recipient, as shown in Figure 5-10. The text box in the middle contains the note from your friend to you, which you can supplement with a note to the intended recipient. Be sure to add your own comments, in the place I indicated in Figure 5-10, to help connect the two people properly. You can also delete the first person's note to you, especially if that personal note was for your eyes only, not the intended recipient.
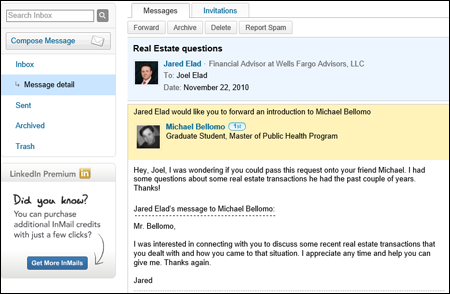
Figure 5-9: Read the introduction request from your contact.
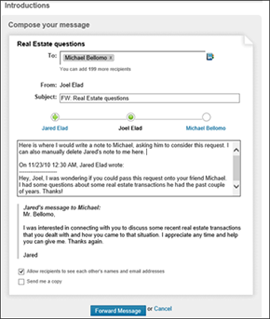
Figure 5-10: Compose a message to send to the intended recipient.
- Click the Forward Message button to send the request.
In this case, Michael Bellomo will get the introduction request from me on behalf of Jared Elad. Jared will never see Michael's direct e-mail address, and Michael can decide whether to reach out to Jared and form a connection.
Gracefully declining requests
You might receive an introduction request that you just don't feel comfortable sending to the recipient. Perhaps you don't know enough about your contact who made the request, or you're unclear about that person's true motivations. Or maybe your connection with the recipient isn't at the stage where you feel you can introduce other people to this person.
Whatever the reason, the best response is simply to gracefully decline the request. Here are some tips on how to respond:
- It's not you, it's me. The most common way to decline is to simply inform the initial contact that you're not that deeply connected with the intended recipient, and you really don't feel comfortable passing on a request to someone who isn't a strong contact. Often, you might have first-degree connections in your network who are “weak links” or people with whom you're acquainted but aren't particularly close to or tight with.
- The recipient doesn't respond well to this approach. You can respond that you know the intended recipient, and you know what she's going to say, either from past requests or other experiences with that person. Because you know or feel that the intended recipient wouldn't be interested, you would rather not waste anyone's time in sending the request.
- I just don't feel comfortable passing along the request. Be honest and simply state that you don't feel right passing on the request you've received. After all, if the original contact doesn't understand your hesitation, he'll probably keep asking, and LinkedIn will want you to follow up on any unresolved introduction. Just as in life, honesty is usually the best policy.
- I think your request needs work. Because you're vouching for this person, you don't want to pass along a shoddy or questionable request that could reflect badly on you. In this case, simply respond that you think the request needs to be reworded or clarified, and offer concrete suggestions on what should be said as well as what requests you feel comfortable forwarding.
When you're ready to decline the request, follow these steps:
- Click the Messages button in the top navigation bar, then click the drop-down arrow next to All Messages and select Introductions from the list.
This should bring up the list of introductions in your Inbox. If you receive copies of introductions in your e-mail and then click the link from the e-mail message, you've already completed Step 2.
- Click the subject line of the introduction request.
You see the introduction request. (Refer to Figure 5-9.)
- Click the Decline button at the bottom of the request.
The Not Interested in Forwarding page appears, as shown in Figure 5-11.
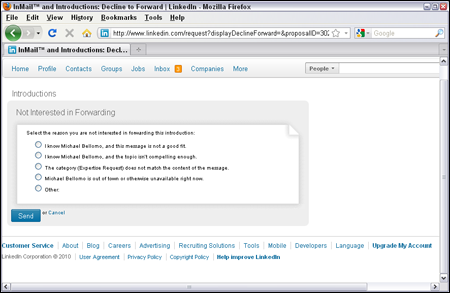
Figure 5-11: Describe why you're declining to forward the request.
- Pick a reason for not forwarding the request, or select the Other option and write a message why you're declining to forward.
If you pick any of the main options, like “I know X, and this message is not a good fit,” you don't have to provide any additional message. Unless one of these options really states your case, you should probably select Other and write a custom message (or send a separate e-mail message giving more information).
- Click the Send button to decline the request.
The original contact receives an e-mail as well as a message in his LinkedIn Inbox.