
Chapter 10
Using LinkedIn with Your E-Mail and Browser
In This Chapter
![]() Importing contacts from Microsoft Outlook
Importing contacts from Microsoft Outlook
![]() Importing contacts from a Web-based e-mail program
Importing contacts from a Web-based e-mail program
![]() Exporting your LinkedIn contacts to Outlook and other programs
Exporting your LinkedIn contacts to Outlook and other programs
![]() Enhancing your Outlook e-mail program with the LinkedIn Outlook Social Connector
Enhancing your Outlook e-mail program with the LinkedIn Outlook Social Connector
![]() Creating e-mail signatures
Creating e-mail signatures
This chapter delves in to how you can use LinkedIn as a part of your overall presence on the Internet, especially when it comes to communication. Specifically, I focus on two aspects of your Internet experience: your e-mail account with and without your Internet Web browser.
LinkedIn makes it convenient for you to exchange information between your e-mail program and your LinkedIn profile and to enhance your World Wide Web browsing experience with specialized LinkedIn functions. LinkedIn offers the capability to import your contacts list from programs such as Microsoft Outlook. You can also do the reverse: Export your LinkedIn contacts list to a variety of e-mail programs, including the Mail program that's part of Mac OS X. Other neat features in LinkedIn include a social Connector tool for use with Microsoft Outlook. For example, with the Outlook Social Connector, you can access certain LinkedIn information while writing e-mails in Outlook. I cover all these cool features in this chapter.
I also tell you about a nifty tool that LinkedIn offers to create an e-mail signature block for you that helps you promote your LinkedIn profile.
Importing Contacts into LinkedIn
One of the most popular (and necessary) activities people use the Internet for is e-mail. Your e-mail account contains a record of e-mail addresses of everyone you regularly communicate with via e-mail. And from your established base of communications, LinkedIn offers a way for you to ramp up your network by importing a list of contacts from your e-mail program. Importing your e-mail contacts into LinkedIn eliminates the drudgery of going through your address book and copying addresses into LinkedIn. The next sections show you how to generate a list of contacts and import that list into LinkedIn to update your connections.
Importing a contacts list from Outlook
Microsoft Outlook is one of the most popular e-mail programs out there. This section shows you how to import your Microsoft Outlook contacts list into LinkedIn. To do so, follow these steps:
- On the main Outlook screen, click Contacts to bring up your contacts list (similar to that shown in Figure 10-1).
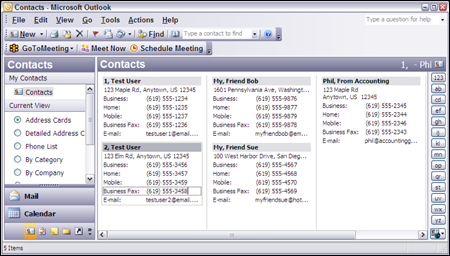
Figure 10-1: Pull up your Outlook contacts list.
- Choose File⇒Import and Export.
The Import and Export window appears.
- Select the Export to a File option, click the Next button, and then select a file type in the Export to a File window.
You see a list of options, including Comma Separated Values (DOS), Comma Separated Values ( Windows), Microsoft Access, and so on.
- Select the Comma Separated Values ( Windows) option and then click Next.
The Export to a File window appears. Here, you're asked to pick a folder that you want to export, as shown in Figure 10-2. Look for the contacts folder, which contains your list of contacts through Microsoft Outlook.
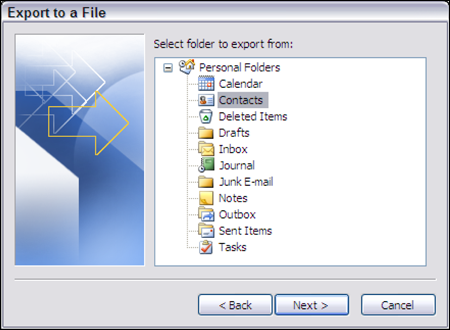
Figure 10-2: Select your contacts folder to export.
- Select the contacts folder to export and then click Next.
 If you created categories within your Outlook contacts list, you can select one of those subcategories under the main contacts folder and export just those contacts.
 - In the next Export to a File window that appears, enter a suitable filename, click the Browse button to locate a folder for storing the new (exported) file, and then click Next.
In the Export to a File window, Outlook displays the action it's about to take, as shown in Figure 10-3.
 Note the filename and location of your exported contacts file because you need this information in a few steps. Pick a memorable name and save the file to a commonly used folder on your computer.
 - Click Finish to start the export of your Outlook contacts file.
Depending on the size of your contacts list, the export process might take a few minutes. When the export is complete, the status indicator disappears, and you're ready to go to the next step.
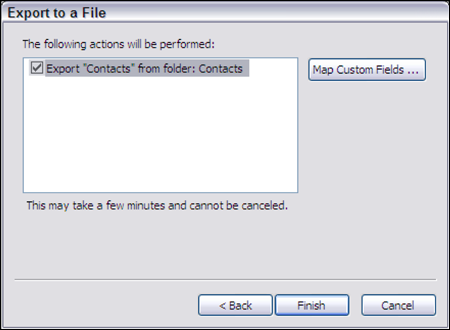
Figure 10-3: Outlook verifies the export action.
- Using your Web browser, go to LinkedIn and log in to your account; then, on the top of the page, click the Network link, and then click the Add Connections link that appears from the drop-down list.
- On the new page that appears, click the Any Mail button. When that page appears, look for the More Ways to Connect header and click the Upload Contacts File link.
The upload contacts instructions appears onscreen, as shown in Figure 10-4.
- Click the Browse button to locate the contacts file you just exported from Microsoft Outlook. When you locate that file, click the Upload File button to start the process.
After LinkedIn reads your entire contacts list, it displays the names of contacts from your list, as shown in Figure 10-5; and then, below those names where the person is already on LinkedIn, it shows how long they've been a member of LinkedIn.
 When LinkedIn imports the list, it usually drops the middle name from each person's full name when creating the imported contacts. You might need to edit your contacts to add the appropriate information.
 - Review the names, deselect any check box for someone you don't wish to invite, and then click the Send Invitations button to complete the process.
If the names you see on the screen aren't correct (perhaps LinkedIn did not read the file properly and everyone's first and last names are reversed, for example), you can click Cancel to abandon the process.
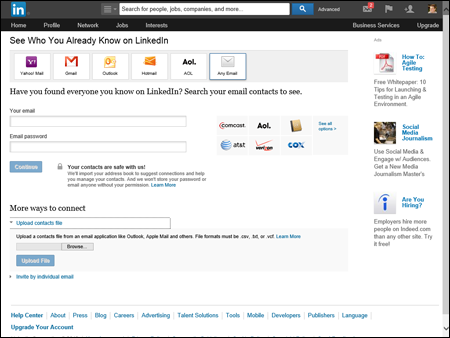
Figure 10-4: LinkedIn is ready to accept your Outlook contacts list.
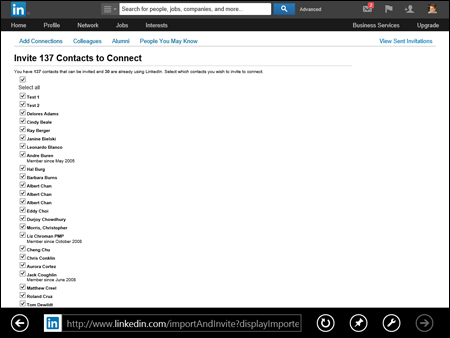
Figure 10-5: LinkedIn asks you which names from your contacts list should get an invitation.
Importing contacts from a Web-based e-mail program
Many people use a Web-based program (Webmail ) to send and receive e-mail. Gmail (from Google), Yahoo! Mail, and Hotmail are among the most popular of these programs. Just like Outlook, you can import your Webmail program contacts list and feed it into LinkedIn to expand your network. For the example in this section, I use Yahoo! Mail, but the other systems work similarly for importing contacts.
To import a Webmail contacts list, just follow these steps:
- Using your Web browser, go to LinkedIn and log in to your account.
- Click the Network link at the top of any LinkedIn page, and then click Add Connections from the drop-down list to bring up the Add Connections window.
The See Who You Already Know on LinkedIn page appears, as shown in Figure 10-6.
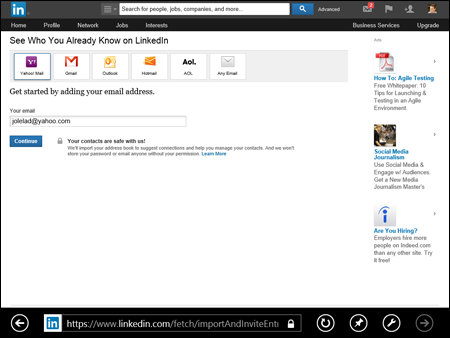
Figure 10-6: LinkedIn can check your Webmail program for contacts.
- Click the appropriate Webmail button, enter your e-mail address into the Email text box (and your password, when prompted), and then click the Continue button.
LinkedIn opens a new window in which you can connect with your Webmail program. ( You are asked for your Webmail e-mail password, so LinkedIn can log in to your account for you.)
- Follow the instructions to access your Webmail account.
For this example, I used my Yahoo! account, which took me to the Yahoo! login screen. After I was logged in to my account, Yahoo! requested my permission to let LinkedIn access my Yahoo! contacts, as shown in Figure 10-7. You must click the Agree button if you want LinkedIn to import your contacts. After you do, LinkedIn automatically goes into the account and starts importing contacts, and you're returned to the LinkedIn Web site.
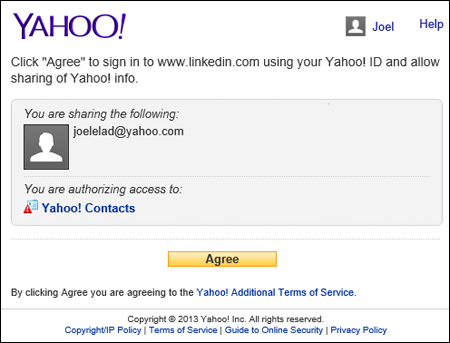
Figure 10-7: You need to allow LinkedIn to read your Webmail address book.
- Review the imported contacts and who you want to invite to your LinkedIn network.
LinkedIn may select all your contacts who aren't yet connected to you via LinkedIn and offer to send them an invitation, as shown in Figure 10-8. If that is the case, deselect the check box next to each person you don't want to invite. For some e-mail systems, you will see your imported contacts and have to manually select which contacts you want to invite by selecting the check box next to each person you want to invite. When you are ready, click the Add to Network button to send invitations to the contacts you wish to add to your network.
- When you're done, close the newly opened window that was created back in Step 3 when you started the import process.
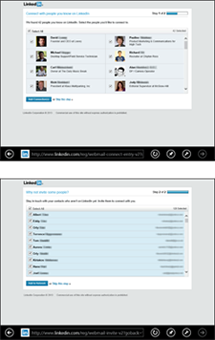
Figure 10-8: From your imported address book, decide who gets invited to your network, or who gets invited to LinkedIn and then your network.
Exporting Contacts from LinkedIn to Your E-Mail Application
As you use LinkedIn and build up your contacts network, you might end up with more contacts “on file” in your LinkedIn network than stored away in your e-mail program. However, you may want to use your own e-mail system to communicate with all your LinkedIn first-degree connections instead of relying on LinkedIn's message system. Adding these people one by one to your e-mail address book could take a while. Thankfully, LinkedIn has a function to make this easier.
In essence, your list of LinkedIn connections is similar to a list of names in any e-mail program's address book. And just like you can import contacts from an e-mail program into LinkedIn, you can export your LinkedIn contacts to your e-mail program. Exporting is a simple process that amounts to the following:
- You export your LinkedIn connections into a contacts file.
- You import the contacts file into your main e-mail program.
You can always pick and choose which contacts to export, and your e-mail program should be able to detect any duplicates — meaning that if you try to import any names that already exist, you should get a warning message. I walk you through the process of exporting your LinkedIn contacts in the next few sections.
Creating your contacts export file in LinkedIn
First, you need to generate your exported file of contacts from LinkedIn. To do so, follow these steps:
- On any LinkedIn page, hover your mouse over the Network link in the top navigation bar, choose Contacts from the menu that appears, and then click the wheel icon to load the Settings page.
- Click the Export LinkedIn Connections link.
You'll be taken to the Export LinkedIn Connections page, as shown in Figure 10-9. From the drop-down list provided, pick the e-mail program to which you want to export your contacts.
- Click the Export button to generate your contacts file.
First, you are asked to enter the text of a security image into the box provided. Then, the File dialog box appears, asking whether you want to open or save the file. Click Save to save the file to your computer. Give it a custom name, if you like, but remember the filename and location because you need that information when you load this file into your e-mail program, which I discuss in the next sections.

Figure 10-9: Pick your e-mail program and create an exported file of contacts.
Exporting contacts to Outlook
Now that you've created your contacts file, it's time to import it into your e-mail program. For my first example, I'm going to use Microsoft Outlook, but the procedure is similar with other e-mail clients. The next few sections give you an idea of how to handle other e-mail clients.
After you create your LinkedIn export file and are ready to export your LinkedIn contacts to Microsoft Outlook, just follow these steps:
- On the main Outlook screen, choose File⇒Import and Export.
The Import and Export window appears.
- Select the Import from Another Program or File option and then click Next.
- When Outlook asks you to select a file type to import from, select the Comma Separated Values (Windows) option and then click Next.
- When Outlook asks you for the file to import, enter the path and filename of your exported file, or click the Browse button to find the file on your computer. Be sure to select the Do Not Import Duplicate Items option and then click Next.
If you don't select the Do Not Import Duplicate Items option, you risk flooding your Outlook account with multiple e-mail addresses and names for the same people, which will make your life more difficult and flood your connections with unnecessary e-mail messages.
- When Outlook asks you to select a destination folder, click the contacts folder and then click Next.
- Verify that you're importing your contacts file into Outlook and then click Finish to start the process.
Exporting contacts to Outlook Express
If you prefer Outlook Express to the full Outlook program, you're in luck: Your LinkedIn contacts can go live there just as easily as they can elsewhere. After you create your export file (as described earlier, in the “Creating your contacts export file in LinkedIn” section), you can export your connections to Outlook Express by following these steps:
- On your main Outlook Express screen, choose File⇒Import.
- In the Import window that opens, select the Other Address Book option and then click Next.
- When Outlook Express asks you to select a file type to import from, select the Text File (Comma Separated Values) option and then click the Import button.
- When Outlook Express asks you for the file to import, enter the path and filename of your exported file, or click the Browse button to find the file on your computer. Click Next.
- Verify the fields that you're importing into Outlook Express (click the Change Mapping button if you want to change how the information is being imported) and then click Finish to start the process.
Exporting contacts to Yahoo! Mail
If you're using a Web-based mail program, like Yahoo! Mail, you can follow this basic procedure to export your LinkedIn contacts into your Webmail program. After you create your export file (as described earlier, in the “Creating your contacts export file in LinkedIn” section), you can export your connections to Yahoo! Mail by following these steps:
- Using your Web browser, go to Yahoo! Mail and log in. Click the Contacts tab to go to the Yahoo! Contacts page.
You see a page similar to that shown in Figure 10-10.
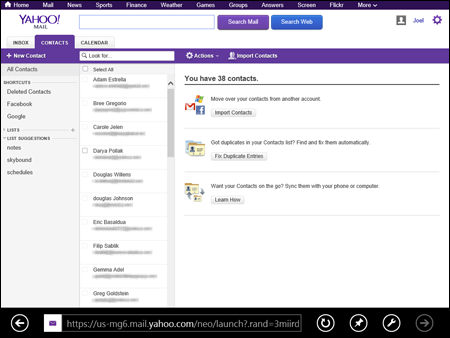
Figure 10-10: Start at your Yahoo! Contacts page.
- Click the Import Contacts button.
A new screen appears, as shown in Figure 10-11.
- Click the From File button.
The Upload from File screen appears.
- Click the Browse button to find the file on your computer, as shown in Figure 10-12.
- Click the Upload button to send the LinkedIn contacts file to your Yahoo! account.
On the next screen, you see a summary page of the number of contacts that were successfully imported or not imported, and the number of duplicate contacts that were found. Click the View Contacts button to see your new contacts list, or click the Done button to finish the process.
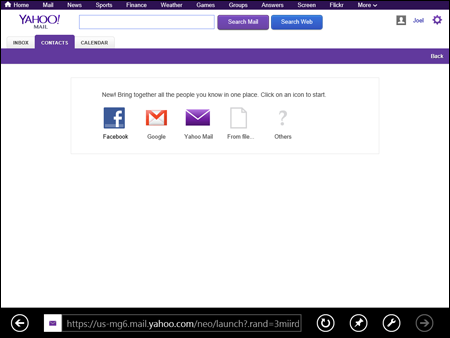
Figure 10-11: Yahoo! asks you from where you want to import contacts.
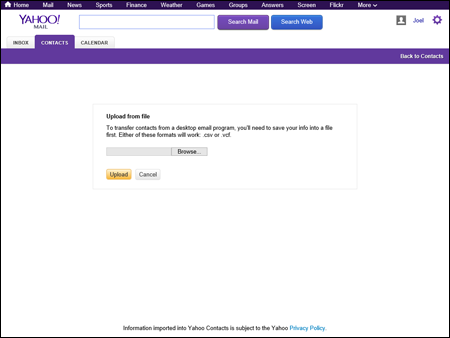
Figure 10-12: Find your exported file to import your contacts.
Exporting contacts to Mac OS X Address Book
After you create your export file (as described earlier, in the “Creating your contacts export file in LinkedIn” section), you can export your connections to Mac OS X Address Book by following these steps:
- Locate your Mac OS X Address Book icon in either the Dock or the Applications folder.
- Look for the contacts file you created in the previous section.
- Drag this file onto the Address Book icon.
This should start the importing of contacts from your LinkedIn contacts file.
Using the LinkedIn Outlook Social Connector
If you use Microsoft Outlook for your e-mail and you find yourself constantly switching between Outlook and the LinkedIn Web site to retrieve information, send e-mail to your connections via Outlook and then screen incoming e-mail by jumping to LinkedIn to read those profiles, you're in luck! LinkedIn has developed a special tool you can install in your system that automatically ties into its Web site. This Social Connector tool appears as part of your Microsoft Outlook screen and gives you several functions to make the connection between Outlook and LinkedIn smoother.
Understanding the tool's requirements and features
To use the LinkedIn Outlook Social Connector tool, you need to have certain levels of software on your computer for the tool to work correctly:
- Your operating system needs to be either Microsoft Windows 7, XP or Vista for the 32-bit version, or Windows 8 for the 64-bit version.
- Your Microsoft Outlook program should be the 2003, 2007, or 2010 version.
- You should have at least 5–10MB of free space on your hard drive before installing this program.
Here are the main benefits you can enjoy after installing this function:
- It suggests sending an invitation to someone to join your network based on the number of times you e-mail that person. The higher the “e-mail frequency,” the more likely you should add him to your LinkedIn network.
- It allows you to send invitations with one click, instead of having to find the person's profile on LinkedIn and clicking through the Invite process. You can also pull up the LinkedIn Web site with one click using the tool.
- It automatically displays a LinkedIn “mini-profile” of someone when you read an e-mail from that person using Outlook. This way, you can get more information about the sender in the form of an instant pop-up, rather than manually going to LinkedIn to research the person.
- Your Outlook contact information for a LinkedIn connection is automatically updated with that connection's profile information.
- You can receive e-mail notifications when someone in your LinkedIn network updates her profile information.
- You can access a LinkedIn “dashboard” to get a snapshot of your LinkedIn network and the status of your connections.
Installing the Outlook Social Connector
To install Outlook Social Connector, just follow these steps:
- Go to the LinkedIn home page, scroll to the bottom of the page and click the Tools link.
- From the Tools screen that appears, click the Outlook Social Connector tab.
The Outlook Social Connector screen appears, shown in Figure 10-13.

Figure 10-13: Install the Microsoft Outlook LinkedIn Social Connector tool here.
- Click the Download It Now button. When the LinkedIn Outlook Connector Setup Wizard opens, click Next.
- Review the License Agreement on the page that appears and then click the I Agree button.
- In the Choose Install Location screen that appears, accept the default location (recommended) or pick a new directory to install the toolbar program; then click Install to start the process.
LinkedIn installs all the necessary files for the Connector tool onto your computer. Allow at least a few minutes for this process to be completed. When the tool is installed, and you've restarted Microsoft Outlook, a Build Network Wizard window appears.
- Click the Start button and follow the steps to have the Social Connector tool scan your Outlook program for contacts.
You can send an invitation to these contacts to join your LinkedIn network.
If you already imported your Microsoft Outlook Address Book into LinkedIn, going through the Build Network Wizard might not result in a lot of new contacts, but this process can find contacts you might not have saved to your Outlook Address Book.
Creating E-Mail Signatures
One of the best ways to communicate your presence on LinkedIn is to add your LinkedIn profile to your e-mail signature, if you've created one. Every time you send an e-mail, you can have text appear automatically at the end of your message similar to a written signature you would put at the end of a letter. Some people just sign their name; others use this space as an opportunity to put their name and some contact information, such as phone numbers, e-mail addresses, physical addresses, and, more recently, Web site addresses. Some LinkedIn members include their profile URL, so anyone getting an e-mail from them can take a look at their personal profile and learn more about them.
LinkedIn developed a cool tool with which you can build your own advanced e-mail signature using the LinkedIn Web site. You can decide what information you want to include in your signature, and LinkedIn helps you with formatting and graphics — the entire “look and feel” of your signature.
Access the e-mail signature tool by clicking the Tools link at the bottom of the LinkedIn home page. When you get to the Tools page, skip down below the Outlook Connector section and look for the Email Signature section (shown in Figure 10-14).
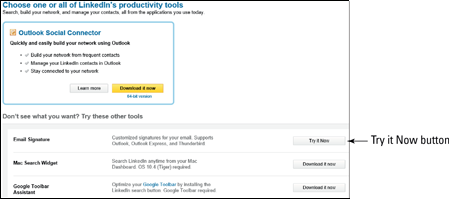
Figure 10-14: Access the Email Signature tool from the Tools page.
When you're ready to create your e-mail signature, just follow these steps:
- Log in to LinkedIn, scroll to the bottom of the page, and click the Tools menu bar item.
- On the Tools Overview page, scroll down to the Email Signature section and click the gray Try It Now button.
LinkedIn takes you to a special profile page: Create Email Signature.
- On your profile page, click the drop-down arrow next to Select Layout to choose the layout option you want.
You have multiple options to select from. Some (such as Ingot or Plastic Curve) add a graphical look; the Simple option lists your information as text; and the Executive layout presents your information in a more professional manner.
Click around and pick a few layouts to see the automatic preview of that layout on your screen. This gives you an idea which layout and color scheme you like. You may want to revisit this step after you enter all your information so that you know how your finished signature will appear. - After you pick your layout style, enter the contact information you want to appear in your signature.
You can input as much or as little as you'd like (see Figure 10-15), and that information will be reflected in your signature file (see Figure 10-16).
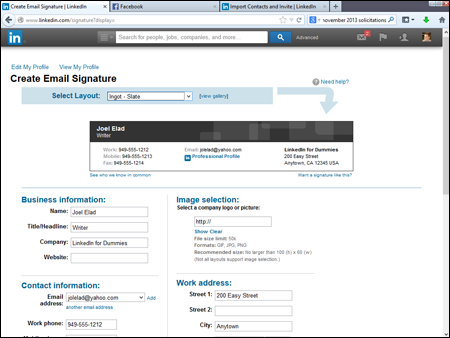
Figure 10-15: Enter your contact information.
- (Optional) Add a picture to your signature by entering the URL of that picture's location in the Image Selection field.
If you already uploaded a picture of yourself for your LinkedIn profile, you can include it here as well.
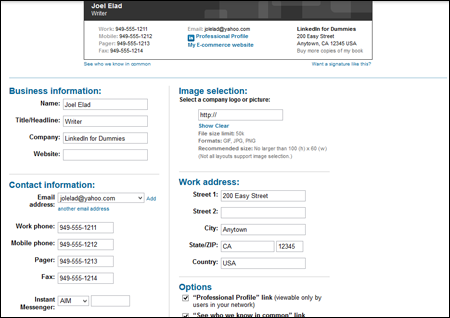
Figure 10-16: Preview how your info looks in your e-mail signature.
- Scroll down to the Options section ( below Work Address) and decide which of three links can appear as part of your signature by selecting the appropriate check box(es):
- Professional Profile: Creates a URL link to your LinkedIn profile page.
- See Who We Know in Common: Creates a link to LinkedIn that, when clicked by a LinkedIn member, shows other LinkedIn members who are connected to you and that person.
- We're Hiring: Creates a link that takes someone back to LinkedIn and starts a Job Search query for job openings in the company you've listed in your LinkedIn profile.
I highly recommend enabling the Professional Profile option. The other two links are fine to enable as well, especially if you want to promote job listings at your own company. - Near the bottom of the page, click the Click Here for Instructions link under the Save Your Email Signature header to create and save your e-mail signature (see Figure 10-17).
A pop-up window appears with your e-mail signature information. If you have a pop-up blocker on your Web browser, you may want to deactivate it temporarily before performing this step, or be ready to temporarily allow pop-ups from LinkedIn.com.
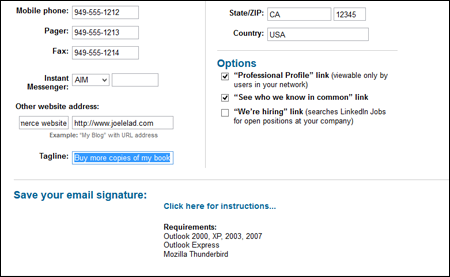
Figure 10-17: Click this link to generate your e-mail signature.
- When the page appears with the pop-up window containing the “code” of your e-mail signature, as shown in Figure 10-18, simply select all that text and then paste it into your favorite e-mail program, or you can scroll down and follow the instructions.
LinkedIn provides instructions for the most popular e-mail programs, such as Outlook and Yahoo! Mail. Click the drop-down arrow to bring up your e-mail program, and instructions appear at the bottom of the window. Instructions for Outlook Express are shown in Figure 10-18.
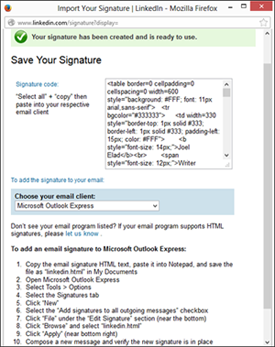
Figure 10-18: Your e-mail signature is created. Copy and paste it into your e-mail program.