

There are almost as many ways to deploy a Linux install as there are distributions themselves. Installing Linux in a clustered environment requires a different approach than installing for a standalone workstation or server. The trick is to find an install method that you’re comfortable with and that works for you.
The installation method will vary with the distribution that you have selected. Some distributions have stringent requirements on how they’re to be set up. Most distributions can be installed from just about any source imaginable—from a CD-ROM, NFS, FTP, floppy, Kickstart, or hard drive. Scyld Linux for parallel clusters has a distinct install procedure for the master and slave nodes. Linux router type distributions (single floppy) are among the easiest to set up due to the fact that they’re self-contained, although they are dependent on a predefined type of ethernet card.
Installation from a CD-ROM is the preferred method due to security requirements. If your server is not on the network, it’s much harder for hackers to break in. (Okay, if you’re in a movie, it could probably be done. Make sure you’ve read the script before proceeding.) A number of distributions allow for remote login before the system is fully up and patched. For a cluster roll out, it’s not too feasible to install every node from a CD-ROM, so take as many precautions as possible. You might consider taking the switch off the main network until your servers are patched.
When installing for a large clustered environment, it’s best to find an install method that will be able to hit the most boxes in the shortest amount of time. Install methods such as Kickstart, SystemImager, Ghost, or g4u are preferred because they can handle several installs at once. This is particularly important to free the system administrator for more important tasks, such as playing ping-pong.
This chapter covers the various methods of autoinstalling Linux and ways to push patches and software. Feel free to browse the method that works best for you and implement it as you see fit.
When installing clusters in an enterprise environment, the system administrator has to decide between static and dynamic addressing.
Choosing a static addressing scheme gives the end user more control over the individual system. When setting up a cluster with static addressing, the administrator knows that that server will get that same address after each reboot and not have to worry if the DHCP server is able to respond or not. Static IP addresses have to be entered in by hand, as well as all the networking information. When installing from an image type install, the servers must have dedicated floppies or images associated with them to maintain the different IP/networking schemas.
This method is preferred in HA environments because of situations when network connectivity could be an issue. If the network goes down, so does access to the DHCP server. If the server can’t access DCHP, there’s no network connectivity and, therefore, no network services—simple as that. Small, cluster configuration can benefit from this model, seeing as how setting up a DHCP server is just a tad bit overkill for just a few servers.
DHCP is required for SystemImager, Ghost For UNIX, and others. The reason why it’s so popular is that you just have to set up an initial scope, and your configuration remains the same each time. Static reservations can be given so that a server can get the same IP address each time the lease is up. All you have to do is record the MAC address of the ethernet card. Any configuration can easily be changed just by making a few modifications to /etc/dhcpd.conf, rather than by locating the individual server and making all the changes there.
Setting up a DHCP server in Linux can be done in just a few minutes, and there are many benefits. Just the simple fact that you can also use it to force a configuration that actually works onto the end user is reason enough.
If your distribution doesn’t come with a DHCP daemon installed, it stands to reason that you’re going to have to install one. One of the more popular daemons is distributed from the Internet Software Consortium and is fully capable of handling the DHCP requirements of your entire organization, as well as an image server and large cluster.
Before installing, you need to make sure that you have a CONFIG_PACKET and CONFIG_FILTER enabled in your kernel. This enables packet and socket filtering. Most distributions have these enabled, but it doesn’t hurt to check, just in case, so it does not present an issue in later 2.2 or 2.4 kernels. You can check to see if you have these enabled by getting the source for your distribution and taking a look at it through the config. The kernel also has to support multicast. You can determine if your kernel has multicast enabled by running /sbin/ifconfig -a.
Versions of the Linux Kernel before 2.2 have a tendency to change the broadcast 255.255.255.255 address to that of the local broadcast address. This can play havoc with buggy clients such as Microsoft. According to the ISC’s DHCP How-To, there’s a workaround. Two methods that have worked are shown here:
route add -host 255.255.255.255 dev eth0
route add -host <host> dev eth0
or
routeadd -net255.255.255.0dev eth0
where eth0 is the primary interface. Choose the primary interface that’s right for your system.
Download the source at a mirror closest to you. You can find a list of mirrors at www.isc.org/ISC/MIRRORS.html. Unpack the distribution, change into the source directory and ./configure, make, and make install as root.
Options that you pass to your clients are located in /etc/dhcpd.conf. The minimum options that you need to send to the clients are the initial IP address, a subnet mask, a gateway, default-lease-time, and max-lease-time. Comments are prefaced with a hash mark(#), and all options must be appended with a semicolon. For more information, check out man dhcp-options.
Here’s a sample configuration that shows a basic DHCP setup:
#/etc/dhcpd.conf
default-lease-time 259200;
max-lease-time 604800;
ddns-update-style ad-hoc; #backwards compatibility for older versions
option routers 192.168.1.1;
option domain-name "domain.com";
option domain-name-servers 192.168.1.250, 192.168.1.251;
option subnet-mask 255.255.255.0;
option broadcast-address 192.168.1.255;
subnet 192.168.1.0 netmask 255.255.255.0 {
       range 192.168.1.2 192.168.1.15;
       range 192.168.1.100 192.168.1.150;
}
This configuration assigns these DHCP options in the ranges of 192.168.1.2– 192.168.1.15 and 192.168.1.100 – 192.168.1.150. Static reservations are based on MAC addresses and are done as follows:
host hostname {
      hardware ethernet 0:3:ba:8:53:e6;
      fixed-address 192.168.1.16;
}
More popular options taken from the man pages are listed as follows:
option subnet-mask ip-address;
This option assigns a subnet mask to the client. If this option isn’t defined, dhcpd assigns the subnet based on which the master server lies.
option routers ip-address [, ip-address... ];
This option specifies a list of IP addresses for routers on the client’s subnet. Routers should be listed in order of preference.
option domain-name-servers ip-address [, ip-address... ];
The domain-name-servers option assigns domain name servers to the client. Servers should be listed in order of preference. Be sure to put the IP addresses rather than the fully qualified names.
option domain-name string;
This option assigns the client its domain name for use with DNS.
option broadcast-address ip-address;
This option assigns the client’s broadcast address for use on the client’s subnet.
option static-routes ip-address ip-address  [,  ip-address
  ip-address...  ];
This option specifies a list of static routes that the client should install in its routing cache. If multiple routes to the same destination are specified, they are listed in descending order of priority.
The routes consist of a list of IP address pairs. The first address is the destination address, and the second address is the router for the destination. A complete list of DHCP options is given in Appendix C, “DHCP Options.”
After you configure the /etc/dhcpd.conf file, you need to give dhcpd a place to store its lease information. This is done by touching the file /var/state/dhcp/ dhcpd.leases:
touch /var/state/dhcp/dhcpd.leases
This is a flat text file that serves as a database for all the lease information. All times in there are given in GMT format and not in the local time zone for standardization. For more information on this file, you can check the man page on dhcpd.leases.
To start the server itself, you simply enter
/usr/sbin/dhcpd
If your DHCP server is listening on multiple subnets with multiple interfaces, simply add the interface on the end of the command line:
/usr/sbin/dhcpd eth1
That’s it. To test if your server is assigning IP addresses, you might first run the server in the foreground with the -d and -f switches. Try to boot up a client on your local subnet and watch as it gets an address.
To solve the problem of installing Linux on a large number of servers, Red Hat incorporates a program called Kickstart with their distributions. Kickstart is an unattended install over CD-ROM, NFS, or FTP. The trick to Kickstart is that it places a configuration file (ks.cfg) on a network boot floppy, which has all the installation information you’ve already written on it. The ks.cfg file is a straight text file in a particular format, so it can easily be created by hand.
A decent strategy is to copy the entire contents of the CD-ROM(s) onto a hard drive that’s shared over NFS. After creating the Kickstart disk, use that to install Red Hat wherever you go. Need another node to the cluster? Install the boot disk, turn the computer on, and walk away. Come back in a half hour, and you’ve got another node. Got a problem user that erased his kernel? Not a problem. Slip in the floppy, reboot, and in no time, you’ve got a fresh install.
The advantage of a Kickstart install over a normal image is that Kickstart actually creates a new install every time. The install is fresh and not copied over from any other install, such as what you’d get from a ghosted image. If you set the server up to boot from DHCP in your configuration file, that’s all you need to do for each server. For static addresses, a Kickstart disk for each server is necessary.
Although this is a great method for unattended install, there’s a catch. As of this book’s publication, Kickstart only works on i386 machines. So those of you who dream of installing Red Hat on your Sparc IPX or Sega Dreamcast will have to wait a little while.
Starting with release 7.1, Red Hat shipped with a program called Kickstart Configurator, as shown in Figure 3.1. This program is quite the helpful GUI because it exports some of the requisite ks.cfg options in a format that Red Hat can read. If the file is incomplete or if Kickstart encounters invalid options, the install turns interactive and prompts you to insert the correct options so that it can continue.
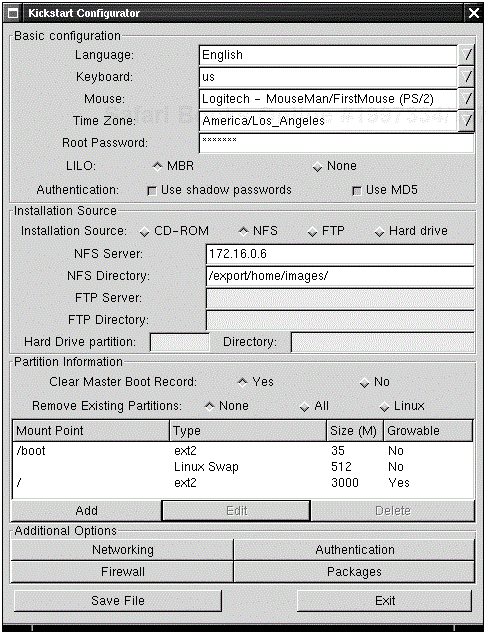
The Configurator program is rather self explanatory. However, remember that the program is designed to serve as a basic template; you’ll have to edit the resulting configuration file itself if you want a more detailed installation.
In the GUI, the options in the Basic Configuration are mandatory, so you’ll have to choose the Language, Keyboard, Mouse, Time Zone, Root Password, LILO, and Authentication.
Keep in mind that, although the program doesn’t display the root password, the resulting file will—and in straight text no less. Be sure to either encrypt the password or keep the Kickstart disk secure. You can encrypt the password easily by editing the file, copying over the password from /etc/passwd, and by appending the —iscrypted parameter to the rootpw option by editing the configuration file. See the Kickstart example that follows for configuration examples.
The next section, Installation Source, enables you to specify which install method you’d like to pursue. NFS or FTP is the preferred method, simply because that frees you from either carrying around a CD-ROM or pre-installing the distribution from a hard drive. You could easily install Kickstart from a locally attached CD-ROM, but that’s the whole point of Kickstart— you don’t have to. The program grays out the other options you don’t select so that you can’t accidentally set up an FTP install when you’re actually looking for an NFS install.
Under partition information, you have the option to select to clear out the Master Boot Record when installing lilo. The Configurator doesn’t allow you to pass kernel options during boot, nor does it let you specify more than one drive for install. The installer picks and chooses for you if you’re not careful. Be sure to edit the configuration file by hand if you’re concerned about this functionality.
The Networking option at the bottom of the screen lets you configure the primary interface. Neither the GUI nor the command line option lets you configure a secondary card. The installation program assumes that you’re installing off a network on eth0 and will not enable networking if Kickstart is not taking place over a network.
The Additional options given with Kickstart Configurator include NIS, LDAP, Kerberos, and Hesiod. The GUI launches a different screen that includes all the command-line options.
The firewall settings can be applied to different ethernet devices if you choose the Customize option. The command-line option can be used to include different ports and protocols using the format port:protocol. For example, to include SSH in your configuration, you’d use 22:tcp, 22:udp. Separate all settings with commas.
Packages, the last selection, are a set of predefined options that mirror the default install. For a list of packages and what they contain, see the RedHat/base/comps file. It’s a good idea not to install packages that you know you’re not going to need; they might pose a security risk later.
Red Hat can start a Kickstart installation from the configuration file on a floppy, CD-ROM, network, or the hard drive.
To install from a floppy, use the bootnet.img from the /images directory on the installation media and copy the Kickstart file over. The simplest method of doing this is to use dd:
dd if=/images/bootnet.img of=/dev/fd0
mount /dev/fd0 /mnt/floppy
cp ks.cfg /mnt/floppy
After the initial install, boot off the floppy drive and enter at the boot prompt:
linux ks=floppy
You can edit the sysconfig.cfg file on the boot floppy to automatically enter this information at boot time so you won’t have to. Change the default line to read ks and the prompt setting to 0:
default ks
    prompt 0
Append a ks label to the file so that the default uses this rather than another label:
label ks
   kernel vmlinuz
   append ks=floppy initrd=initrd.img
You can also keep the Kickstart configuration file on the NFS volume itself if you’re installing with that method. The format is linux ks=nfs:server:/path. For example, you’d enter the following:
linux ks=nfs:matrix.server.com:/mount/nfs/RedHat
The Network File System protocol has been a staple of UNIX that allows for sharing of directories across networks. Invented by Sun Microsystems in the early 1980s, the protocol was made publicly available from its onset. Many UNIX vendors were quick to jump on the bandwagon in adopting the protocol to their own versions.
Setting up the NFS for Kickstart is first done by starting the daemons in /etc/rc.d/init.d. As root, start the portmap and nfs daemons:
[root@matrix init.d]# ./portmap start
Starting portmapper: [  OK  ]
[root@matrix init.d]# ./nfs start
Starting NFS services:  [  OK  ]
Starting NFS quotas: [  OK  ]
Starting NFS mountd: [  OK  ]
Starting NFS daemon: [  OK  ]
To check the status of NFS, use /usr/sbin/rpcinfo -p. You should get output similar to the following:
[root@matrix init.d]# /usr/sbin/rpcinfo -p
   program vers proto   port
    100000    2   tcp    111  portmapper
    100000    2   udp    111  portmapper
    100011    1   udp    829  rquotad
    100011    2   udp    829  rquotad
    100005    1   udp   1041  mountd
    100005    1   tcp   1879  mountd
    100005    2   udp   1041  mountd
    100005    2   tcp   1879  mountd
    100005    3   udp   1041  mountd
    100005    3   tcp   1879  mountd
    100021    1   udp   1042  nlockmgr
    100021    3   udp   1042  nlockmgr
    100021    4   udp   1042  nlockmgr
Put the directory that you want to share (hopefully, the directory that houses your entire Red Hat distribution) in /etc/exports. This ensures that your files are shared over the network to allow for remote installs. The format for /etc/exports is /directory/to/export host1(permissions) host2(permissions) host3(permissions). Use one directory per line. For example:
/usr/share/redhat cthulhu(ro)
/export/share/files *(rw)
The first line shares over NFS the directory /usr/share/redhat to host cthulhu read-only. The second line also shares /export/share/files to all hosts, with read and write permissions.
To get the server to reread changes to /etc/exports, use the /usr/sbin/ exportfs -r command.
After a few tries, you’ll get a feeling for Kickstart and what it can do for you. The first few times you start, the install will probably turn interactive, meaning that you didn’t set up the Kickstart file correctly. Don’t lose heart; it happens to the best of us. It just takes getting used to. One of the most common mistakes is that you’ve set up X wrong in the configuration file. If that happens a few times, it’s easier to skip the X configuration altogether and run setup after the install finishes. Chances are that you won’t need it in the first place if you’re installing most types of clusters. Here’s an example of a Kickstart configuration that might be used to install a cluster:
#Kickstart for Parallel Cluster
#These first configuration selections are mandatory
lang en_US
keyboard us
mouse generic3ps/2
timezone —utc America/Tijuana
rootpw —iscrypted 3BVrRSeDD2vvE
network —bootproto dhcp —device eth0
install
nfs —server matrix —dir /usr/kickstart/redhat7/
auth —useshadow —enablemd5
zerombr yes
# Partitioning Information
part /boot  —size 35
part swap —size 128
part /  —size 1000 —grow
lilo —location mbr
reboot
skipx
# Install the RPM's here
%packages
@Development
@Kernel Development
@NFS Server
@Networked Workstation
@Printer Support
@Utilities
@Web Server
# Post Install Configuration
% post —nochroot
echo "Kickstart finished successfully at `date`" | sbin/sendmail
[email protected]
echo "/usr/local/bin/wmaker" > /root/.xinitrc
echo "uop.edu" > /etc/sendmail.cw
SystemImager was initially designed to do automated installs of Solaris, yet its current incarnation allows for unattended installs of virtually any Linux distribution. The premise behind SystemImager is that it takes an image of a Linux distribution, uploads it to a master server, and houses that image for use on any future machine. Basically, it’s a front end to rsync. It’s been tested with Debian, Kondura, Red Hat, Storm, Mandrake, and Turbo Linux, although the manual says that it doesn’t work with 2.0 kernels and below. SystemImager also can be run over SSH for encrypted installs. SystemImager also works with ext3 and reiserfs partitions.
What separates this image program from others is the ability to push updates to clients. After the image is sent to the master server, each update can be pushed to the clients. Only the files that have changed are pushed out.
Installing SystemImager is fairly straightforward. After installing and configuring your favorite distribution on a “golden client” with the SystemImager software on it, the entire distribution is pushed to the image server. After an update of the configuration file on the image server telling which clients can access which image, the program can then automatically install the desired image on the client.
SystemImager needs to have nasm (www.kernel.org/pub/software/devel/nasm/source/), syslinux (www.kernel.org/pub/Linux/utils/boot/syslinux/), rsync (http://rsync.samba.org/ftp/rsync/), and tftp-hpa (www.kernel.org/pub/software/network/tftp) installed as prerequisites. Tftp-hpa is only needed if you’re planning on booting off the network. You can download and install these from source or rpm; it’s your call. SystemImager also needs its client and server software installed. You can find these at http://systemimager.org/download/.
Redhat 7.1 ships with tftp enabled in /etc/services as a TCP service. Tftp is based on UDP. Commenting out tftp’s TCP service will fix the bug.
Uncompress the systemimager-server software with bzcat systemimager-server-<version>.tar.bz2 |tar xf -.
Change to the install directory and run the install script to setup the program:
cd systemimager-server-<version>
./install
This starts the install script (obviously) and installs the program. Be sure that you’ve got enough space on your image server to handle a few complete images.
To prepare the golden client, you need to first install a supported distribution of Linux to a separate client. After the initial install of the distribution, you must tweak, patch, and upgrade it to the finished product. The SystemImager client software uses this install as the image itself, and once it’s transferred to the image server, it is pushed out to subsequent clients upon request.
Download the SystemImager client software to the client, uncompress it, change into the client directory, and run the install program. The installer will run through its setup program and then ask to prepare the client. Running the prepare client is a good idea at this stage because you’ll just have to run it if you’re not finished configuring the client. To run prepareclient after the initial install, just run /usr/sbin/prepareclient. This process simply prepares your system to run rsync as needed by the image server.
After the client install, you have to run getimage on the image server. Be sure that you run this program with the destination directory option (-directory PATH), or you might run into some space problems down the road (if your partition is small). This enables rsync to pull the entire client to the image server. The format of getimage is
getimage <options> -g <client hostname> -image <imagename>
For example,
getimage -directory /export -g venom -image venom_Linux_image
runs getimage and puts the venom_Linux_image file from client venom in the /export directory. The default directory for SystemImager is /var/spool/systemimager/images.
Don’t forget that you can also substitute the client’s IP for the hostname. /usr/sbin/getimage -help will list options. SystemImager doesn’t have the ability to use an exclude list, so be sure that the distribution you transfer over is prepared exactly the way you’d like to replicate.
If you’re going to prepare the client with SystemImager, the golden client needs to be patched before you pull the distribution to the image server.
After getimage transfers the image over with rsync, the program prompts you for four different methods to assign IP addresses to the clients for future installs. SystemImager manipulates the subsequent installs to include the different IP and hostname information. The first option is to give a static IP. This will offer the same address each time from the client that was backed up. The second option, dynamic_dhcp, will use a DHCP server to assign a different address to each installed client. The third method, static, will configure a static address to the client. The fourth method will not edit the network settings at all.
The install script offers to run addclients (/usr/sbin/addclients) once you select a method to assign IP addresses. The addclients script will configure the way each subsequent client is installed. The script will ask for your domain name, the base hostname, a beginning number, and an ending number. This allows SystemImager to populate /etc/hosts and /tftpboot/systemimager/hosts with subsequent client information.
SystemImager comes with a utility called makedhcpserver, which is housed in /usr/sbin/. This script will take user-defined values and propagate /etc/dhcpd.conf with the values that you give it. If you have an existing dhcpd.conf file, it will back it up before installing its own. The utility /usr/sbin/makedhcpstatic is similar, yet will assign static address to all the hosts.
After the image is pushed to the image server, the next step is to be able to create different clients with the precreated image. SystemImager comes with three different methods to install the image: namely, creation of a boot disk, creation of an ISO from the image that can be burned onto CD-ROM, or by enabling an update of a pre-existing distribution.
Making an install floppy is done with the /usr/sbin/makeautoinstalldiskette command (SystemImager’s robust functionality comes through in the strength of its long filenames). Take a floppy, insert it in the drive, and don’t bother mounting it. The diskette command automatically formats the floppy, mounts it, copies the necessary files over to it, then unmounts it.
SystemImager will automatically install the image based on the selection criteria done at image creation time with getimage. If you’re not satisfied with your settings, you can always change them by running /usr/sbin/updateclient. Settings for the install are kept in /tftpboot/systemimager and are based on DHCP addresses soft-linked to the install image.
Creating a CD-ROM install from the image is done with /usr/sbin/makeautoinstallcd. This script makes an ISO file that can then be burned to a CD-ROM. The image will still be kept on the image server; the CD-ROM just contains the boot information should you prefer booting off CD-ROM rather than a floppy.
Making changes to the client image on the image server is done either by making changes to the golden client and running /usr/sbin/getimage again on the client, or by changing into the directory that you want to manipulate on the image server and modifying those files directly.
According to the SystemImager FAQ (http://systemimager.org/manual/ html/faq.html), you can use getimage to upload using a different image name. This allows for a makeshift version control, although this takes up space for each install.
If you modify the files on the image server directly, you can change into the root directory of the image and execute the chroot . sh command as root to change your root directory to the current directory. You can then run rp m commands to add or remove software from the subsequent image.
After the clusters are set up with the correct Linux distribution, it’s a good idea to go through and start patching the system if you haven’t done so already. For most programs on Linux, this means upgrading the packages that you’re going to use on your production systems.
If you’re installing from SystemImager, it’s a good idea to patch the golden image before creating the other clients. It’s not difficult to keep the master copy well patched and then distribute the updated image to the other clients.
Similarly, it’s easy to keep patches up with a Kickstart-based install. Red Hat keeps a list of updated packages, which you can download to your master imager. Simply replacing the old packages might not work due to dependencies, although all you’ll have to do is create a separate directory under NFS share, place the updated packages in there, and update your finish script to mount that directory and update the scripts.
If you’re doing an install from CD-ROM, don’t connect the ethernet card until your server is tightened up. Many servers have been hit and compromised as soon as they come up.
The first stop you should hit for your install is the distribution homepage itself. Times arise when the program itself won’t be buggy, although the vendor’s implementation might pose a security risk. Next, check out your favorite mirror of bugtraq or subscribe to the mailing list by sending any kind of mail to [email protected].
Here’s a list of things to keep in mind for the post installation:
Make sure that your
/etc/resolv.confis populated with the correct DNS servers.Check for updates, security holes, and bug fixes.
Close down all unneeded service ports by commenting out
/etc/services.Consider populating
/etc/hosts.allowandhosts.denyto limit access at the protocol level.Remove unnecessary accounts and groups.
Install TCP Wrappers and the latest version of SSH.
Disable all remote logins by root, especially with SSH.
Change the start up scripts so that only the desired programs start at boot.
If you’re running Red Hat or Mandrake, consider running Bastille-Linux (www.bastille-linux.org). This user configurable script will tighten down the server to your specifications. Also consider tripwire (www.tripwire.org), which is a tool that detects if system files have changed.
Go through the server on a periodic basis, starting with directly after install. Find out which files are set SUID and make sure the bit is actually needed. You can find the SUID files with
find / -type f -perm +6000 -exec ls -l {} ; > suidfiles This creates a file called suidfiles and populates it with all the files on your system that contain the SUID bit. If you want, you can remove the bit from the program with
chmod -s <programname>
After all the configuration and installations are done, plug the ethernet cables back in, fire up the primary interfaces, and play another game of ping-pong. You’ve earned it.
Linux installs don’t have to be painful if you plan accordingly. There’s a method for installing Linux on a large amount of machines, with a minimum of preparation, and some trial and error, so there’s no reason why you can’t replicate many servers with an unattended install. Add a scripting to the finished product, and you’ve got a powerful tool to help with the preparation and install of many servers. With the addition of unattended installs, you’ll never want to install a server by hand again.