

Server downtime is generally a bad thing. Losing access to vital resources can cost a company millions of dollars in lost revenue, and result in decreased worker productivity. A business or resource that relies on the uptime of a particular service can be crippled by lost connectivity. Imagine what might happen if an application with no redundancy fails.
Let’s say that you’re the system administrator for a bank in your small town. You create a secure web server to allow the customers real-time access to their bank accounts. Having services such as this potentially allows the bank to grow their business because of the greater freedom it allows customers. But what happens if the web server loses a vital piece of hardware? You have to deal with downtime.
Downtime in a business-critical server environment means that customers can’t access their data. Because customers are fickle people, who won’t tolerate not being able to access services, they’re more than likely to become someone else’s customers. Having fewer customers might also lead to a reduction in your labor force, which just might mean the unemployment line for you.
It’s imperative to have a backup plan. Each second that your servers are down means lost customers and a halt in productivity. What good is email if your email server is down? What good is a web site if it’s not available to your customers? Each minute that you spend rebuilding data from backups or restoring hardware is another minute that your users won’t be able to access your services.
That’s where high availability comes in. High availability is the science of creating redundancy in every system and subsystem to ensure that a service remains up and available. As mentioned in Chapter 1, “Clustering Fundamentals,” the perfect highly available service runs on more than one computer, has redundant networks, a generator, and backup ISPs. A highly available server essentially places one or more backup servers in standby mode, which are able to come online within mere moments after they discover a failure on the primary system. What does this mean to average system administrators? It means that they’ll fear their job less because there’s always a standby server to take over just in case the primary happens to fail.
Creating a highly available solution to run your application means that you have to decide how much availability is acceptable for your environment. Depending on the design and infrastructure, there’s got to be a threshold of acceptable downtime due to unforeseen circumstances. Anything could happen to take down a server or application. Power failures, security breaches, and viruses can all take their toll on a server or network.
Highly available services are measured by percentages of uptime. When designing your solution, you need to decide on a measurement of reliability that you can provide for your network. Having an uptime of 98 percent might be reasonable for a smaller organization that can afford almost three and a half hours a week of scheduled downtime; however, this amount of downtime is unacceptable in most financial institutions or large e-commerce sites. (See Table 5.1.)
Table 5.1. The Nines of Availability
|
Uptime in Nines |
Downtime (%) |
Downtime Per Year |
Downtime Per Week |
|---|---|---|---|
|
One (98%) |
2 |
7.3 days |
3 hours, 22 minutes |
|
Two (99%) |
1 |
3.65 days |
1 hour, 41 minutes |
|
Three (99.9%) |
0.1 |
8 hours, 45 minutes |
10 minutes, 5 seconds |
|
Four (99.99%) |
0.01 |
52.5 minutes |
1 minute |
|
Five (99.999%) |
0.001 |
5.25 minutes |
6 seconds |
These uptime requirements are referred to as the theory of nines. If you have 99.999 percent availability, you call it five nines. Having five nines of availability is almost impossible without some sort of realistic redundancy in the form of a high availability solution.
There are different types of high availability scenarios that all involve some kind of standby server. One of the more common scenarios is to have a standby server that takes over when there’s a loss of connectivity or service if the primary server fails. You can also use pools of servers that jump at the chance to become the primary, with the remaining working as standby servers. This might mean a different pool of servers being configured to take over when the first pool dies. Finally, you can use a weighted solution that forces the most powerful server to replace the primary, followed by the secondary servers.
Often, such a solution involves some sort of shared storage because of the need to access dynamic data. Unless each server is serving up static data, there has to be some method of storing current data. These servers must be configured to not only gain control of the shared storage, but to relinquish access when the server dies. Following is an example of an optimal high availability configuration that uses shared storage:
Figure 5.1 shows a totally redundant server configuration. There’s basically two of everything here, for redundancy. The only single point of failure (SPOF) in this network is the electricity, so it’s a good thing that you’ve got several backup generators, right?
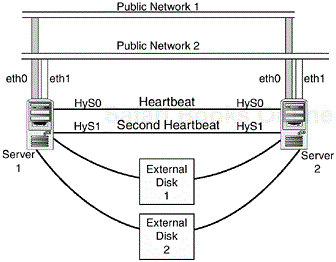
Although the servers in this picture might be going a bit overboard, this illustrates the kind of redundancy that can easily be achieved with a little know how and a decent budget. Each server has two interfaces attached to different networks in case one or the other goes down. The interfaces are programmed with a virtual IP (VIP) that can be moved from interface to interface. The servers are attached to each other by means of two heartbeat cables in case one dies. In this illustration, they use two null modem cables on /dev/ttyS0 and /dev/ttyS1. In actual practice, you might install a third network card instead of /dev/ttys1, for redundancy. Each server has to be attached to redundant external disks. This is necessary for the backup servers to take control of the data after the primary goes down. You also need a second disk group in case the primary goes down. Ideally, these are all connected to a hub by fibre connections or by a shared SCSI bus.
Hopefully by this time, the idea of redundant systems is firmly placed in your mind. There can never be too many backup systems. There are systems that you can purchase with totally redundant systems; in fact, you can buy an individual system with two motherboards, two power supplies, two controllers per machine, but those systems can get pretty pricey. It’s a good thing that you’re looking at Linux to provide you with that functionality. And always remember to avoid the SPOF.
Having two servers that can talk to each other, with the understanding that a secondary (or a tertiary) can take over if the primary fails, is a tried and true method for achieving a decent level of high availability. However, any time that you fail over to a redundant box, there are risks involved. Although the servers are set up to monitor each other and fail over to a backup should anything happen, there’s always a chance that something strange might happen, which is why it’s a good idea to make sure that your servers are filled with redundant architecture. Using redundant architecture can mean dual power supplies, redundant array of disks (RAID) controllers on separate channels, and even redundant network cards on separate networks.
Remember to implement a journaling file system on your drives. Although this added feature might cost a small hit on performance because of journal writes on drives that are constantly accessed, you save a great deal of time when rebooting from a non-graceful shutdown. The experienced administrator remembers the hours spent in front of the computer waiting for large file systems to finish with their fsck checks. Imagine if this happened on a file system that is terabytes in size? Do you remember the discussion of journaling file systems in Chapter 4, “Alternative File Systems”? This is one of the most important things you can do for your high availability systems.
Imagine that you run a business that sells widgets, and that the lifeblood of your business is the online sale of these widgets. Your business becomes successful and you start moving thousands of widgets an hour. And because of the critical nature of your business network, you decide to implement a high availability solution that allows you to keep up your web servers.
Remember that the main feature of a high availability solution is at least one redundant system. The more redundant systems you have, the greater chance you have for recovery if one of those systems goes down. One of the easiest things you can do to develop a high availability solution is to have a totally redundant system on standby in case of failure. When one system goes down, you’ve got another to take its place. With no other high availability options, you have a backup server to put in place if the primary server fails. Although this is a decent solution to a potential problem, there’s no automatic failover.
Without automatic failover, moving to the secondary server has to be done by hand, and if it is done in the middle of the night when nobody is around, it might be a while before someone responds. All of this downtime can result in lost productivity and sales.
Another layer of high availability is adding a way to fail over automatically, if the primary server fails. Any automatic failover device has to have some way of determining if the primary server has lost its ability to deliver services. Fortunately, through the use of a technology called a heartbeat, you can tell if a system is up or down. The heartbeat is either a separate program or included in the primary functionality of the clustered application. Its purpose is to continually poll the servers in a cluster configuration to ensure that they’re up and responding. It continually asks, “Are you there? Are you there? Are you there?” If the servers respond with a “Yes, I’m here,” the backup servers don’t have to do anything. If the backups don’t receive a response, the heartbeat has to be configured to take certain steps to bring up the backup server.
For the Heartbeat application to run, it needs a method of contacting the other computers. Theoretically, you can run the application over the same network as the public interfaces, but it’s highly recommended that you have a private dedicated network specifically for the task. Putting a Heartbeat on a public network can be intercepted and blocked, which causes automatic unwanted failover. A private dedicated network can take the form of basically whatever you can use to get two computers to talk to each other. Most often, you use a second Ethernet card on each node on a separate private subnet, an infrared (IrDA) connection, or a dedicated serial connection. Because the goal here is high availability, remember that the SPOF is something that is to be avoided at all costs. Therefore, some combination of connectivity between the servers is recommended.
The serial connection is perhaps the most robust route. Attaching a serial cable between servers is relatively easy, in that all you have to do is attach a null modem cable between the serial ports on two computers. This allows for reliable connectivity between nodes. If you have more than two nodes, you can daisy chain the serial ports together by using two serial connections on the nodes. You connect one end to the first computer on the first serial port, and to the second computer on its second serial port. You can repeat the process by hooking a null modem cable from the second computer’s first serial port to the third’s second port. To test serial connectivity between the nodes, you can set up a quick check after the cables have been strung between the first serial port on each computer. Assuming that /dev/ttys0 is your first serial connection, type the following as the root:
# cat < /dev/ttys0 Then, on the secondary computer, type the following:
# echo "This is a test." > /dev/ttys0 On the primary computer, you see a "This is a test." echo on the screen.
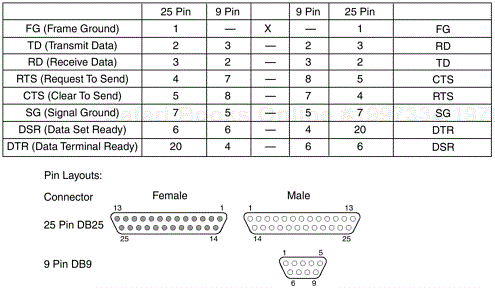
You can also build your own null modem cable for connectivity, as shown in Figure 5.2. All you need are two DB-9 to RJ-45 connectors so that you can string normal Cat-5 cable between them. You can build your own connectors by simply making sure that your transmit and receive connections cross, and that Clear To Send (CTS) and Request To Send (RTS) circuits cross.
If you choose connectivity based on an Ethernet route, it is advisable to dedicate a separate Ethernet card with its own internal subnets. You can attach a switch between more than one computer, or a crossover cable if you’re simply replicating services over a backup server. You can pick up your own cable from any number of sources, or create your own. Creating your own crossover cable is relatively easy, as shown in Figure 5.3.

If you add a secondary network to your computer, you need to add routes so that the computers can talk to each other on the secondary subnet, and keep the primary subnet and the primary gateway. First, bring up the secondary interface with something similar to the following example, (depending on your network):
# /sbin/ifconfig eth1 10.0.0.2 netmask 255.255.255.0 up
Next, add a route statement that allows the kernel to talk to the secondary network from the secondary Ethernet card:
# /sbin/route add –net 10.0.0.0 netmask 255.255.255.0 eth1
Be sure to add routes on each computer that has a secondary interface. To test connectivity, perform a straight ping from the command prompt to the secondary interface. It’s also a good idea to place this secondary interface in the /etc/hosts table, and optionally, to add a second hostname such as hostname-priv1.
You start your examination of a heartbeat with an application called Heartbeat. This program is an open-source application that is found at the Linux High Availability web site (www.linux-ha.org). This application is designed to do IP takeover for any number of servers. Heartbeat can handle both serial and Ethernet connectivity either by crossover cable or a private network. Although most programs that achieve high availability service include a Heartbeat program, this application is designed as a basis for server monitoring, and it serves as the core for other utilities.
Before installing, be sure that you’ve got the hardware configured correctly, as in the previous section. You need either two subnets over Ethernet or serial ports attached with a null modem cable. As this is being designed for high availability, it is a good idea to include both so that you can avoid the SPOF.
Download the heartbeat code from the web site at www.linux-ha.org/download/. To install, uncompress and type make install
. There are three files that you need to configure. They are called ha.cf, haresources, and authkeys. These files and the heartbeat code have to be installed on both servers in /etc/ha.d.
First, edit these files, and make sure that only the internal addresses are configured. Don’t configure the external addresses yet; Heartbeat does that for you. This means that you select a VIP for configuration. If your external addresses are 138.9.1.1 and 138.9.1.2, you want to make your VIP something similar to 138.9.1.12.
The following is a sample ha.cf file, without comments:
debugfile /var/log/ha-debug
logfile /var/log/ha-log
logfacility     local0
keepalive 5
deadtime 30
udpport 694
watchdog /dev/watchdog
bcast   eth0
node    matrix
node    aenima
The first two lines tell Heartbeat where to write the debug and log messages to. The third is a resource that configures the syslog.
The keepalive parameter sets the time between heartbeats. Because this value allows for a User Datagram Protocol (UDP) connection on a private network, there’s no reason why you can’t set this value lower; however, you do increase the chances of a potential false reading. If you set it too high, you might lose valuable seconds of uptime.
Deadtime refers to the amount of time to wait before a node is considered dead and failover begins to happen.
The udpport setting tells Heartbeat which port to use for UDP communication.
The watchdog parameter always points to /dev/watchdog. This is a software implementation of the kernel module softdog. If /dev/watchdog is written to, it calls the softdog kernel module and reboots the system. To enable /dev/watchdog, perform the following steps:
Load the softdog module,
softdog.owithinsmod softdogas the root. This loads the module into the running kernel. The location of the module varies, but it should be in/lib/modules/<kernel number>/misc.Make sure that
grep misc /proc/devicesis10and thatcat /proc/misc|grep watchdogis130.Make a character
/dev/watchdogfile withmknod /dev/watchdog c 10 130.
The bcast setting tells Heartbeat which port to listen on. In this case, eth0 is the public interface, while eth1 is the private, crossover cable-connected interface.
The node listing refers to each node in the cluster. This has to be taken directly from uname –n. If you configured your hostname to be something different, use whatever’s taken directly from uname. More nodes are obviously available, but in this scenario, you only use two nodes connected through crossover.
Heartbeat can also use a serial connection by adding the following settings:
serial /dev/ttyS0
The serial setting tells Heartbeat which serial port to use for its heartbeat connection.
The haresources file has to be the same on each computer, and it’s only comprised of one line (after taking out the comments). The only thing it contains is the hostname, the IP address, and the service(s). It should read something similar to the following:
aenima IPaddr::172.16.0.12/8 httpd mysql
This tells Heartbeat that the available hostname is aenima, that its address is 172.16.0.2 with a /8 netmask, and that it must stop and restart the httpd and mysqld processes upon death/reboot. Heartbeat looks for these scripts in both /etc/rc.d/init.d and /etc/ha.d/ha.resource.d. They have to be called with either start or stop parameters passed to them, which is similar to the run-time level scripts for Heartbeat to understand them.
Heartbeat also takes arguments and passes them onto the script, such as httpd::foobar, or whatever you need passed onto the initial program, if you need something that has that functionality.
In the case of servers with multiple interfaces, Heartbeat consults the routing tables to determine the shortest route to the other server(s) to be taken over. If there’s more than one route selected, Heartbeat chooses the first one.
The final part of setting up Heartbeat is deciding which version of authentication to use. Heartbeat currently supports cyclic redundancy check (CRC), Message Digest 5 (MD5), and Secure Hash Algorith 1 (SHA-1) authentications. The one that is best for you depends on the resources that you’re using. According to the documentation, you want to use CRC if the network you’re on consists of a straight crossover cable. MD5 offers more protection, and SH-1 uses better security, although it’s got more overhead in terms of CPU.
The only reason that you might need anything but CRC authentication is if you send the heartbeat over a public, non-switched network. Then again, the only resources that are passed are the heartbeat commands. If you care who sees the heartbeats saying, “Are you there? Are you there? Are you there?,” you’ll want to use SH-1 authentication.
The format of the file is as follows:
auth <number>
<number> <authmethod> <authkey>
For example:
auth 1
sha1 this_is_an_authentication_key
Authentication keys can be just about anything, but CRC doesn’t need an authentication key. In the preceding example, substitute SHA-1 with CRC and leave off the authentication key. The file also has to be set to mode 600.
Make sure that you’ve installed Heartbeat on both (all) your servers, and that they’re configured with the correct ha.cf, haresources, and authkeys settings. Starting Heartbeat is as simple as running the Heartbeat program and letting it take over.
You want Heartbeat to start at boot time, so be sure to place it in your startup scripts. If you use Heartbeat with the watchdog function, you also need to insert the softdog kernel module at boottime, along with insmod and your local startup scripts.
To test it, type /etc/ha.d/heartbeat on both servers, or reboot. Check the output of the logs where you’ve defined them in the ha.cf file. Take down one of the servers, and watch the other one seamlessly attempt to take over.
Heartbeat starts the node by looking at haresources and bringing up a virtual interface, eth0:0, with the IP defined in the virtual interface. When the one heartbeat can’t connect to the other machine, it starts up the services as listed in the haresources file, and assigns itself the virtual address.
Heartbeat provides a decent solution for monitoring processes and brings a secondary server up if the primary one(s) fail. Not only does this provide a decent failure mechanism for high availability servers, but it also provides the core technology for an entire variety of other Linux-based projects.
The high availability scenario seems rather simple on the surface. One server monitors the other server, and assumes the place of the other server if there’s a problem. However, underneath the surface things never run that smoothly. Although there doesn’t seem to be much involved in having a server come up when another one is down, doing so automatically, and in a matter of seconds, can be a bit tricky.
In an ideal world, having the time to guess what went wrong and to diagnose the problem is preferable to another server deciding when to do that for you. There’s not much of an issue when the primary server fails because of a blown power supply, yet sometimes services appear to be failing when they’re not. Sometimes, there’s a fine line between what passes between a downed service and one that needs a tweak.
When a secondary server takes over the address of a downed primary server, the traffic destined for that address doesn’t automatically follow the IP because the switch has the port in its cache. This causes a lag between fail over and restoration of connectivity. This is affectionately known as the Address Resolution Protocol (ARP) problem. What happens essentially is the following:
Server A is chugging along, happily being the server that could. Server B plays standby, jumping at the bit for a chance to prove itself, similar to a backup quarterback in a playoff game. The silly computer operator, who is too busy watching his latest hentai flick, kicks the power cord out of the primary server and downs his company’s web server. But he doesn’t have to worry. Server B comes up, takes over, and Mr. Operator doesn’t have to worry about missing his flick because it’s all apparently seamless.
But behind the scenes, here’s what happens. Replaying the scene back in slow motion, you see Mr. Operator kick the cord out of the server while his attention is elsewhere.
Server A instantly goes down. Server B, seeing its chance, starts into takeover mode, after waiting the configured time. After a certain number of seconds, Server B assigns itself a VIP address, and starts the web server. But how does the switch know where to send the traffic?
Meanwhile, back at the switch, it sends an ARP request to find out which address to send the traffic to. It basically asks, “Which machine owns this IP address of the web server?” It keeps asking until it finds a response. The server that holds the IP responds, “Yes, I own that IP address. Here is my Media Access Control (MAC) address, which you know me by.” Because each machine has its own unique MAC address, the switch stores it in cache so that it knows exactly which port to direct traffic to.
The problem comes in when the switch has the MAC address in cache, and then the server dies. The secondary server assumes the IP address, yet the switch says, “Um, dude, all traffic destined for this IP goes here.” It doesn’t know about the secondary server until its cache expires. And that can take upwards of fifteen minutes or so. So the problem then is that high availability isn’t so available if someone has to wait fifteen minutes for a service to come back up. You can refresh the cache manually by means of a script, or do it by hand, although that’s not a great scenario because it might mean waking up your network administrator at three in the morning. Often, refreshing the cache is the cleanest method of solving the ARP problem, although it might not be the simplest.
So, what can be done about this problem? There are several things, including hacks that can be set up on the fly so that this scenario doesn’t happen. One is to have the new interface assume the MAC of the downed server. This method is almost instantaneous, but a problem can occur when the initial server comes back online. It’s not as potentially clean as refreshing the ARP tables on the switch. Although Linux itself supports this behavior, you need to find a card that also supports it.
Another possible method is to use Network Address Translation (NAT, discussed further in Chapter 6, “Load Balancing”). A server that uses NAT can act as a front end to a web server or similar service and direct traffic itself, without having a messy switch in the way to second-guess itself. To avoid the SPOF, you also want at least one standby for the NAT server.
Another method is to implement dynamic Domain Name System (DNS) entries. Although this method can potentially solve the problem with assigning different names at servers when needed, the method is rather slow for any amount of true high availability.
Although ARP (not to be confused with AppleTalk Address Resolution Protocol or the American Association of Retired Persons (AARP)) continues to be a problem in achieving high availability, it’s not unobtainable. It is something to be considered when dealing with high availability services. The method is up to you; and the amount of uptime that you’re willing to sacrifice for a clean transition to a new server.
There lies another possible bump in the high availability roadmap, and that’s the possibility that the secondary node might come up while the primary node is still active. There are a few scenarios in which this can happen.
First, if the heart beat cable is somehow disconnected, both machines lose connectivity to each other, and they won’t hear a response to their “are you there” query. The primary machine no longer thinks that the secondary machine is around, but that’s not much of an issue, as it’s already in control of the IP, serving up web pages. Where the problem comes in is when the secondary server can’t reach the primary IP and tells itself that it has to take control. You can imagine what happens next. That’s right, two machines with the same IP serving up web pages.
Things could be worse. Let’s say you’ve got a high availability situation that has two servers sharing the same storage. Server one is in control of the array, and the heartbeat cable goes down. After the specified period of time, server two thinks that it’s supposed to come up and take control of the array, so it mounts the file system and assigns itself the VIP of the primary web server. Now you’ve got two machines that have mounted the same file system and that have the same IP. This is an almost sure fire way to ensure file system corruption. This is known as a split-brain condition; when both systems are acting independently of each other, and each is trying to take control of the cluster. This is a bad thing.
What can be done about such a situation? Well, you can Shoot The Other Machine In The Head (STOMITH) to avoid the split-brain situation. When the secondary server detects a problem with the primary server, it downs the primary server so that it doesn’t come back up. No reboot, nothing. This ensures that the primary server can’t come up and try to take over the storage or IP, or if it’s still up, that it goes down and relinquishes all resources.
Something else to think about is that, although it’s a little slower, you might consider a Network File System (NFS) share rather than a shared Small Computer System Interface (SCSI) solution. This way, having two or more servers accessing the same data won’t corrupt the file system. However, if the machine sharing the data goes down, the secondary server has to unmount the data and wait for the NFS to time out. Along with NFS, you might also want to think about a storage area network (SAN) solution. A SAN allows you to access data from across the network for your other applications, and it provides a decent resource for housing shared storage between servers that need to access the same data.
Now that you understand what’s involved in putting it all together, you can work on an imaginary setup to see just what it takes to put a high availability cluster in place. (This imaginary setup also includes an imaginary budget and an imaginary management, which assumes that money isn’t an object.) For this highly available solution, you’re going to need at least two servers, dual storage devices for maximum availability, and a mess of extra parts such as cables and stuff to hook everything together. It’s also a good idea to have some sort of KVM solution to access the multiple servers, in case anything happens to them. KVM over IP solutions allow you to monitor your machines from anywhere on the network.
The dual storage devices are best served with a hardware RAID that is connected by SCSI or a Fibre Channel interconnect. In case of a RAID controller failure, you also need dual raid controllers. For SCSI devices, consider a single-initiator SCSI bus or single-initiator Fibre Channel interconnects to a RAID array. You need the controller to provide simultaneous access to all the Logical Unit Numbers (LUNs) on the host ports so that a failover isn’t seen by the operating system. The trick here is to provide a solution that allows multisystem access to storage. You also need two SCSI controllers or Fibre Channel bus adapters in each system, and cables to connect them. The SCSI cables also need terminators. If you’re going fibre, you need a fibre hub or switch unless the storage has two ports and you can directly connect the fibre from the systems to those ports.
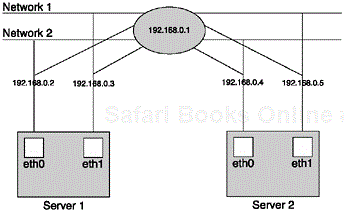
On the network side, for full availability, you need three networks. You need two public networks for redundancy on two Ethernet cards, and a third private network for a heartbeat connection. The heartbeat connection can be hooked up with a crossover cable. For a redundant heartbeat network, you need a serial connection with a null modem cable. Remember that each network card has a different IP address, and shares a virtual address between them. Look at Figure 5.4. If your web server address to mybusiness.com is 192.168.0.1 (this is a private, non-routable address, but we’re pretending here), you might configure your four network interfaces to be, 0.2, 0.3, 0.4, and 0.5, starting with 192.168. The .0.1 is a virtual address that is attached to eth0:1 of .0.2 to begin with, but can flit from server to server as it’s needed.
You also want to include an Uninterruptible Power Supply (UPS) with as much battery life as you can possibly afford. You won’t have connectivity to the humming server if your network goes down. The power supply to the switches and routers has to remain up.
Now that you’ve got your hardware purchased, you need to configure your servers and start piecing the cluster together. How you do it is up to you; either connect al the hardware at once, or piece it together as you go. The latter might save a little time and effort; however, troubleshooting might be difficult over the long term.
When setting up the initial operating system, imaging technologies can’t be stressed enough, if not for initial setup, for disaster recovery. It’s recommended to have some sort of image available, whether through Kickstart, SystemImager, Ghost, or some other service or program.
After installation of the operating system, you configure the servers to recognize the RAID arrays, dual networks, internal heartbeat network, and serial connectivity.
Install the services to be run: the web server, databases, ftp sites, and any other services that you plan on running. Make sure they’re up and working fine.
The last thing that you have to do is to put a high availability service up to monitor the network. Heartbeat is a decent, basic, open-source solution that works well enough as a standalone product, or integrates well with other products. Consider using a combination of Heartbeat with the Linux Virtual Server, as discussed in Chapter 6, or perhaps with another open source solution such as from Mission Critical Linux. For a non-free solution (which isn’t a bad avenue at all, considering the resulting technical support you get with the products), Red Hat sells their Piranha high availability solution, and the Lifekeeper product from SteelEye technologies is recommended. Legato even offers clustering products for Linux.
High availability isn’t all just about clustering programs that can catch a server that has failed over. High availability is the science of ensuring that services are accessible around the clock. Although redundant servers can be made available, it’s a good idea to make sure that the initial server doesn’t go down in the first place. How can you do this? By incorporating things such as a RAID on the drives, redundant controllers, and redundant power supplies. The more backups you can have in place, the better off you are in the long run.
After the primary server is in place with all the redundant capacity you can reasonably manage, consider a backup server that can switch in at a moment’s notice. Often, a secondary server that can switch in is less expensive than a primary system with all redundant parts. This allows you to fix the primary if it ever goes down. If your secondary system goes down, it’s time to break out the emergency sysadmin resume kit.
A backup server isn’t the single answer to high availability. Remember that, in trying to avoid the SPOF, redundant switches, redundant cabling, redundant routers, and possibly even redundant LANS are all issues when planning high availability networks.