

The most common file system for Linux is currently the ext2 file system, written by Réme Card as an alternative to the Minix file system. It is used as the basis for most distributions and appliances; anything that needs a file system can use ext2. Ext2 as a file system is robust and mature enough to be the back end for stable production use.
Ext2, although stable for most needs, does not support journaling. Journaling, basically, is the process of recording changes made by file system writes. When implemented properly, journaling can enable the system to avoid fsck altogether when coming up from a sudden reboot or ungraceful shutdown. Many different file systems, including ones that have been ported over from other manufacturers, such as SGI and IBM, handle journaling. Both SGI’s XFS and IBM’s OS/2 JFS, even the newer ext2 revision, ext3, and reiserFS are available under the GPL for integration under most any environment.
Other file-system tools enhance both ext2 and alternate file systems. The Network Block Device (NBD), essentially a loopback file system that can be mounted over the network, is an add-on that can easily enhance file-system functionality in a clustered environment. Sistina Corporation’s Global File System (GFS) provides similar functionality to NBD, but includes built-in high availability (HA) utilities. Sistina also has an implementation of HP’s Logical Volume Manager (LVM), which is a file system layer abstraction that allows for volume management similar to Veritas Volume Manager and Sun’s Solstice Disksuite.
To understand why alternative file systems might give you better performance and features, it’s helpful to get a better understanding of what makes up the ext2 file system. This will hopefully introduce a better understanding of what’s capable with such an operating system (OS) and what to expect in the future when choosing an alternate file system to implement.
You might assume that, if there’s a second extended file system, there would be a first extended file system, wouldn’t you? And if there were an extended file system in the first place, there might be an initial file system that was neither extended nor second. Well, the initial file system was based off of the Minix OS, which had a filename limit of 14 characters and had a maximum file size of 64 megabytes. The extended file system was born when Réme Card discovered that the 6-megabyte limitation was too small to rip MP3s with. Although the extended file system introduced a 255-character limit, larger file support, and increased performance, he was still taunted by the bigger kernel developers down the street. To appease them and keep his lunch money, Réme introduced the ext2 file system. (Okay, so I might be stretching the truth just a little.)
The extended file system introduced a virtual file system (VFS), a sort of abstract caching layer that allowed for support of many different file systems. The VFS sits on top of the block-level file system to keep track of which file system is mounted at any one time. Loaded at boot, the VFS has its own virtual inode and block table that corresponds to the underlying file system. Each different file system appears to the kernel itself as ext or ext2 to maintain compatibility.
At boot, the OS loads the root and other partitions, which the VFS interprets. The information about the file systems are either loaded into the kernel or, optionally, as loadable modules for file systems such as VFAT, NTFS, or perhaps Minix. When such a file system is mounted, the VFS reads the superblock information about that file system and maps that file system’s topology, associating its own inodes to reference that system. The resulting structure is kept in cache for easier access.
The buffer cache keeps the file access in memory until it’s queued to disk. The VFS also keeps track of frequently used directories. The more times a certain directory is accessed, the longer it’s kept in memory. The buffer cache also helps manage the asynchronous interface with the block device drivers. If a call is made to write data to disk, the VFS doesn’t handle the actual write. That’s the job of the underlying file system.
One problem of such an asynchronous system is that it can report that writes have taken place when, in fact, they haven’t. This can lead to file-system corruption. In normal circumstances, a user wouldn’t have to worry about asynchronous write problems. However, problems do occur; for example, a drive can be forcibly unmounted or the server can suddenly lose power when writes haven’t taken place. Those circumstances can lead to data corruption.
The ext2 file system, similar to many file systems, is made up of a certain number of blocks that happen to be all the same size. You can determine the amount of bytes per block during file system creation by using the mke2fs command (using the -b switch). Files are created starting on block boundaries. If a file system is made up of 1,024 byte blocks, a 1,025-byte file will take up two blocks. The next file that is created will start on block three, which means most of the space on block two is wasted. This isn’t a highly effective means of space allocation, but it strikes a balance between processing time, memory, and file system access time. Blocks are placed in block groups with allocation from 1 to 32 blocks.
Not all the blocks contain simply data. Parts of the blocks are dedicated to inode and block metadata. The superblock, which is illustrated in Figure 4.1, contains the basic information of the file system and its components. The superblock is backed up across block groups in case the master becomes corrupted. The superblock contains such information as the magic number, ext2 revision level, number of free inodes, number of blocks per block group, and group size.
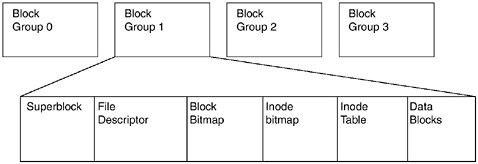
What’s in that block, anyway? The magic number for the current version of the ext2 file system is 0xEF53. This tells the mounting software that, yes, this is an ext2 file system. The revision level tells the software which features of the file system are available at any one time. The mount count and maximum mount count are numbers that determine the number of mounts of any particular file system. The mount count is an incremental number, and when it reaches the maximum mount count, an fsck is recommended. The block size is the setting for the number of bytes per block, and valid values include 1,024, 2,048, and 4,096. The first inode record points to the first inode (who would have thought?), which just happens to be /.
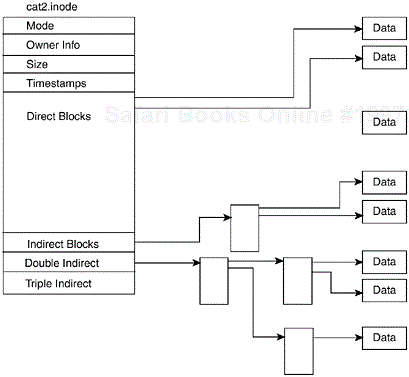
Inodes are essentially records of blocks and files. Each file system unit has a corresponding inode, with data recorded about file creation, last access time, user permissions, type of the file, and so on. One inode exists for each directory, link, file, and device on the system. (This means that thousands of inodes exist, not just one.) The inode stores information records about file types such as who owns information, the size of the file, last accessed, and the pointer to the data blocks themselves. By looking at Figure 4.2, you can see that the first 12 are pointers to the first 12 data blocks. If the file takes up more than 12 data blocks, another group of pointers takes over, and the first group will have a set of secondary pointers, which will point to that extra set. If the file is large enough, many redundant, as well as secondary and tertiary pointers, can be used for extra large files. The larger the file, the more pointers there are to the file and the slower the access to the file. (The file system keeps it in cache, so the performance isn’t too poor.) There’s a limit to the amount of inodes in each file system, so you don’t want to overdo it with large amounts of small files and directories. The inodes, at least in ext2, are created when the file system itself is created, although it’s possible to specify the amount of bytes per inode under mke2fs with the -I option. Got it? Good. The command /sbin/dumpe2fs displays block, block group, inode, and other information about the created file system.
The problem with file systems is that people tend to put files wherever there’s free space because putting files where data already exists can be con-strued as a bad thing. The ext2 file system, which is similar to other UNIX file systems, tries to allocate new files in the same block group or adjacent to other blocks to minimize the seek time. The OS allows only one process to write to the file system at any one time, so it’s done on a first come, first served basis. When writing to the block group, the process of doing so locks the superblock so no other process can write to the same place. After the process is done with the file write, it frees it up for another process to repeat (from the Second Extended File System (EXT2); www.science.unitn.it/∼fiorella/guidelinux/tlk/node95.html#ext2fsfigure). The kernel also tries to group writes for better performance, as well as block allocation across the disk platter.
Now that you have a greater understanding of how the ext2 file system works (and pretty much most UNIX file systems in general), take a look at other file systems and see how they differ in structure and design.
A loopback file system is a file that can mimic a device and can be formatted with any file system available before being mounted. Entire distributions have been created on loopback file systems, even ones that can start under Microsoft Windows. Loopback file systems enable you to share them over the network as a block device, mount an .ISO image to behave similarly to a CD-ROM, create bootable floppies, burn toast, and change the cat litter.
Creating a basic loopback file system is easy and done with the /sbin/ losetup command. losetup creates and manages loopback devices, after which you can mount, format, and use the file as a file system.
The first thing you need to do if you’re using the loadable modules is load the module loop.o:
# insmod `path_to_module/` loop
Substitute path_to_module with the correct location of your loop.o module, of course. Make the file itself with dd, then tell make it’s a loopback file:
# dd if=/dev/zero of=/<path_to_file> bs=1024 count=<size_of_filesystem>
# losetup /dev/loop0 /<file>
After that’s done, make a file system on it and mount it:
# mkfs -t ext2 /dev/loop0
# mount /dev/loop0 /mnt
To unmount and delete the loopback file, unmount the file system and run losetup against it with the -d switch:
# umount/dev/loop0
# losetup -d /dev/loop0
You can add encryption to the loopback file system by running losetup with the -e switch and adding the type of encryption that you want, assuming that you’ve got the algorithm compiled in the kernel in the first place. For example, use the following:
# losetup -e blowfish /dev/loop0 /file
Adding encryption to the kernel is a good way to store valuable data in the file system; however, remember that any encryption is dependent on the strength of the encryption scheme itself and the passwords involved. It doesn’t do any good to mount the encrypted loopback file system in your HA cluster and make it accessible by a simple .htaccess file. Keep in mind that you might not be in an area that can use all the available ciphers because of export restrictions.
According to the Loopback Encrypted Filesystem How-To (www.kerneli.org/loopback-encrypted-filesystem.html), you have to download the kernel patch through FTP at ftp.kerneli.org, in /pub/kerneli/crypto/ <kernelversion>:
Patch the kernel.
Make config (or your favorite config).
Enable Prompt For Development and/or Incomplete Code/Drivers under Code Maturity Level Options.
Under Crypto Options, enable Crypto Ciphers and your choice of encryption.
Under Block Devices include Loopback Device Support, use Relative Block Numbers As Basis For Transfer Functions (recommended), and General Encryption Support.
Recompile the kernel.
Run
liloto add the kernel into the boot up sequence.Download the newest source for
util-linuxfrom ftp.kernel.org/pub/linux/utils/util-linux and extract it.Apply the patch that’s found in
/usr/src/linux/Documentation/crypto/.Read the INSTALL file carefully, and compile and install according to the instructions.
Reboot the machine with the new kernel.
Set up the loopback as previously described by using the desired encryption.
After that’s done, you’ll have a decently encrypted file system where you can store sensitive data, such as the antidote to Aunt Lola’s fruitcake. Taking things a step further, you can actually use this file for a shared storage cluster solution using the NBD.
The Network Block Device (NBD) is essentially a loopback file system that is shared over the network by a daemon and mounted by a client file system. “Ah,” you say, “But can’t I also do this with NFS?” You can, of course. The NBD has a buffer size of 1.5k as opposed to just 1k for NFS, which translates into faster speeds. This loopback file system can be formatted and used in a software RAID just like any other file system.
First, download the NBD packages from http://atrey.karlin.mff.cuni.cz/∼pavel/nbd/. Some versions allow a Microsoft Windows machine to act as a server. Make sure that you get the appropriate versions for both server and client, which are usually encapsulated in a single tar file. If you decide to use the Windows version, you’ll have to get the GNU Cygwin tools (http://sources.redhat.com/cygwin/index.html) to compile it on your system.
Uncompress, untar the file, and change into the resulting directory. Run the ol’ configure, make, make install. make install installs nbd-client and nbd-server into /usr/local/bin. You can easily skip make install and put these files wherever you’d like, although nbd-client has to be copied over to the client machine.
As soon as you have those installed, you’ll have to create a loopback device differently than described due to the fact that you’ll be sharing it over the network rather than attaching it to a local device.
# dd if=/dev/zero of=/mnt/loopback_file bs=1024 count=1000k
This creates a loopback file just a bit larger than a gig for testing. Next, initialize the loopback for use across the network with nbd-server. The format is /us/local/bin/nbd-server <port> <filetoserve>. For example,
# /usr/local/bin/nbd-server 1024 /mnt/loopback
shares /mnt/loopback on port 1024. Next, run nbd-client on the client. Don’t try this on only one machine! Severe consequences might result, including being forced to watch endless reruns of “Leave it to Beaver.” The syntax is /usr/local/bin/nbd-client <server> <port> <device>.
# /usr/local/bin/nbd-client matrix.domain.com 1024 /dev/nb0
Next, make a file system on the new device and mount it:
# mkfs /dev/nb0
# fsck /dev/nb0
# mkdir /mnt
# mount /dev/nb0 /mnt
The ext3 file system is an alternative file system created by Dr. Stephen Tweedie. The ext3 file system is based on the ext2 file system, yet with a forked code base so that development can proceed with a pristine code base in the same kernel. The addition of the ext3 file system to the development tree was made basic so that compatibility can be addressed. The goal of the ext3 project wasn’t to make a more efficient file system, but to avoid the problems that a hard shutdown or reboot could cause.
Ext3 introduces another virtual layer similar to VFS, called JFS. This virtual layer is an API, responsible for handling the journaling transactions independently of the ext3 layer. Like VFS, it takes block transactions in the cache and executes them in an arbitrary way. It can handle journaling for alternative file structures like loopback file systems or logical volumes, just as long as it’s formatted with ext2. Ext3 doesn’t know anything about journaling; it passes everything on to the JFS layer. On that note, the JFS doesn’t know anything about file systems—that’s done by ext3.
This method of implementation enables the user to flip back and forth from ext2 to ext3 just by using mount options at boot.
Ext3 is still in development, as are most of the new journaling file systems. Ext3 has a mailing list and archive at http://listman.redhat.com/mailman/listinfo/ext3-users. The list is quite active, and the developers are quick to respond and share.
The first thing you’re going to do is download the latest kernel source and the appropriate ext3 patches. You can find patches for 2.2 version kernels at ftp.kernel.org, while 2.4 patches are found at www.uow.edu.au/∼andrewm/linux/ext3/.
Uncompress the kernel and the ext3 patch. Change into the Linux directory and run the ext3 patch against the current kernel. When recompiling the kernel, be sure to include “enable second extended FS development code.” Add the new image to lilo, run lilo, and reboot with the new kernel.
You’ll have to get an updated copy of e2fsprogs. You can find this at
ftp://download.sourceforge.net/pub/sourceforge/e2fsprogs/. Download the program, uncompress, and install it. The install procedures are a little different; you’ve got to make a “build” directory and install from that. Otherwise, configure, make, make install as usual. Also, for e2fsprogs to work correctly, you must make sure that your fstab fields are set up correctly (that is, six entries instead of four). If the fstab isn’t set up correctly, you must add entries to it—perhaps add a few 1s to make up for the difference.
For example, here’s a /etc/fstab that has four entries in two of its file systems:
/dev/hda1   /   ext3   defaults
/dev/hda2   /boot   ext2   defaults   1 1
/dev/sda1   /export ext3   defaults
The first field refers to the block device or remote device to be mounted. The second field is the mount point for the block device. The third field refers to the type of file system. The fourth field refers to extra options associated with the file system.
The fifth field, which is sometimes forgotten, specifies whether or not that file system is to be called during dump. If the field is not present or is set to 0, dump passes that file system and does not call it for a backup. The sixth field, also forgotten at times, specifies the order of preference when an fsck is not present. Although ext3 and related journaling file system don’t need to fsck, the entry still needs to be in your /etc/fstab file. Here’s what it might look like:
/dev/hda1   /   ext3   defaults 1 1
/dev/hda2   /boot   ext2   defaults   0 2
/dev/sda1   /export ext3   defaults   1 2
Having the fstab set up this way allows the root file system to undergo fsck first—only if field three is set up with ext2 as an option. The way it stands, it would normally be backed up with dump and would not undergo fsck simply because ext3 handles journaling. The second line refers to the boot partition, which is still set up with no journaling (because it’s marked ext2). It will not be backed up with dump, and it has a lesser fsck priority than the root file system. The third line refers to an scsi device mounted on /export and will not generally undergo a fsck simply because it’s ext3. It will get backed up with dump, however.
After you reboot and work out the bugs, if there are any, initialize ext3 by creating a journal on it. This is done with tune2fs:
tune2fs -j /dev/<device>
Mount it with the following:
mount -t ext3 /dev/<device> /mnt #or wherever it goes
Now, you are completely set up with a journaling file system. The good thing about adding a journal in this method is that you can instantly convert all of your partitions to ext3, including your root and boot partitions. At this point, you should be feeling brave enough to do a power cycle to try out the journaling feature. Go ahead and do a few reads and writes, get some entries in the journal, and hit the power switch. If it’s set up correctly, your system will rebound without fsck in a matter of seconds.
A journaling file system is critical when you implement an HA cluster because of the response time while recovering from a crash. Large file systems can take hours to recover, potentially costing thousands of dollars in lost revenue. Although it’s still in development, ext3 is still a production quality file system capable of running production applications.
The Reiser File System (ReiserFS) is another alternative file system for Linux that not only introduces journaling, but is also a sophisticated method of allocating inodes that is a departure from the previous ext2 file system.
Hans Reiser, the chief developer, graduated from eighth grade and went directly i1nto the computer science program at UC Berkeley (like most of us). Hans currently runs a company called Namesys (www.namesys.com) where he employs a small group of programmers to write the code for ReiserFS.
ReiserFS uses a balanced tree (Btree) method of creating inodes as opposed to a fixed block method. Similar to the way a relational database handles its data, ReiserFS sorts its data by keys. Because the file system doesn’t create fixed block sizes, each file can be placed next to each other with a corresponding inode attached. This means that each file doesn’t have to start on a block boundary, saving a great deal of space. ReiserFS also features journaling and support for quotas, which, combined with the tree allocation, makes for quite an improvement over ext2. ReiserFS also has the ability to be resized, depending on your needs.
ReiserFS is designed to be user extended with the use of plug-ins. Currently in development, ReiserFS has plug-ins planned for such things as security, backup, and node and item search.
Remember that, although ReiserFS takes a great leap ahead of ext2 and similar journaling file systems, it does have limitations. Due to the nature of the way Linux dump and restore are intertwined with ext2, they cannot be used with ReiserFS. However, you can still get around many limitations by using GNU tar, which is superior to straight UNIX tar. ReiserFS also has problems interacting with qmail, although a patch is available.
Although it is possible to change your root file system to ReiserFS (and we show you how to do it), you might ask yourself if it’s actually worth the trouble. Actually, changing the root file system isn’t that difficult. You must understand, however, that the changes you’re about to make are to a file system that doesn’t see much of a data change and is, therefore, unlikely to benefit much from ReiserFS. You might be better off considering implementing ext3, which simply adds a journal rather than a more complex file system.
To implement ReiserFS, you need to recompile the kernel yet again. Be sure to grab the latest copy of the kernel at ftp.kernel.org; ReiserFS will work with 2.2 and 2.4 versions of Linux. As of Mandrake 8, ReiserFS as a root partition was included as a install option, and Red Hat as of 7.1 comes with ReiserFS already compiled. SuSE has included ReiserFS support for quite some time as well. ReiserFS support also is included in the standard kernel release tree as of 2.4.1-pre4, so be sure and see if your distribution includes it as part of its default setup.
Patches for the kernel need to be applied. You can find these at ftp.namesys.com/pub/reiserfs-for-2.2 or 2.4. You can apply these with patch -p0 linux-2.4.5-reiserfs-umount-fix.patch or similar.
The trick to using patch is knowing how to incorporate the -p option. The -p<number> refers to stripping the number of slashes off of the patch to define the correct destination for the patch. For instance, let’s say the filename in the patch is /foo/bar/baz/boff/woof.c. If you refer to -p0, that will give you the entire patch. Using -p1 will strip the first /, resulting in foo/bar/baz/boff/woof.c. Using -p3 will result in baz/boff/woof.c. Do you see how just using a little change in number can affect where the patch will be applied? The wrong number can completely throw your patch off.
If you’re planning to use ReiserFS with RAID, be sure you’re using 2.4.1 or greater. The folks at Namesys recommend a 2.4 kernel, although 2.2. kernels still work nicely.
After patching the kernel, you need to compile it. If you’re compiling it from scratch, include the following (from the configuration page on www.namesys.com):
CONFIG_REISERFS_FS—. Either compiled in the kernel or insert as a module.CONFIG_REISERFS_CHECK—. Used for debugging.CONFIG_REISERFS_RAW—. Provides a raw interface to the ReiserFS tree and automatically removes aged files. Designed for a backend to Squid.
After configuring and making the kernel, get the latest ReiserFS utils from ftp.namesys.com/pub/reiserfsprogs/pre/. Download, uncompress, configure, make, make install as root. You also can download and install ReiserFS utils as an rpm from http://rpmfind.net/linux/RPM/mandrake/RByName.html.
After you install the utilities and reboot with the correct kernel, you can format a file system with mkreiserfs:
# mkreiserfs /dev/<device>
The reiserfs-utils package contains reiserfsck to repair inconsistencies in file systems; mkreiserfs, to initialize the Reiser File System on a raw partition; and debugreiserfs used to examine the internal structure of a file system.
You also can resize ReiserFS by using the resize_reiserfs command. You can either shrink or grow the file system, but be aware that, if you change the file system, the block device doesn’t change. This means that you have to repartition or change the partition table of the hard drive underneath. You can remap the partitions with cfdisk or repartition with fdisk.
You can grow the file system with resize_reiserfs without a problem, but if you shrink the file system, you need to make sure to unmount it before doing so. Resizing ReiserFS is done with a size parameter, -s and + or the size. Take this, for example:
# resize_reiserfs -s +1G /dev/sda1
# resize_reiserfs -s -500M /dev/hdb2
Normally, making a file system on the root partition isn’t recommended after the initial install because of the loss of all data on the partition when formatting. However, if your distribution won’t format the root partition with ReiserFS before installation, it still can be done—provided you follow a few simple steps. Be careful, however. If you don’t follow the procedures here, it might result in loss of data or worse—an unbootable system. It’s best to test this first on a system that’s not in production.
Make sure your default kernel supports ReiserFS. There’s nothing like redoing your entire partition, trying to reboot, and finding out that your kernel won’t even support its own file system. That is a bad thing. So be sure to recompile if necessary. It might not hurt to convert the rest of your partitions to ReiserFS before doing this.
Next, tar all the data from /bin, /etc, /lib, and /sbin to a spare partition. If you’re hurting for space, you can use gzip to copy the partitions over. Make sure that you’ve also got mkreiserfs copied to the spare partition. Things might be more difficult if you’ve installed your system with one big uber-partition and installed everything on there. If you did that, make sure to either copy everything over to a different disk or see that you’ve got at least a different partition to copy everything over to. This is a destructive process that will kill all of your existing data if you don’t have it backed up.
Make a boot disk for your system or download a ReiserFS aware image and create a boot disk with that. Using it to boot from, run mkreiserfs against your root partition, erasing all the data. You’ll also be erasing /bin, /etc, /lib, and /sbin.
Mount the backup partition as a ReiserFS partition and change into that directory. You should be able to un -tar all the data back into the root file system and uncompress if needed. Be sure to run lilo again to get everything set up correctly. Also change the entries from /etc/fstab from ext2 to ReiserFS and make sure that the last two fields for fsck frequency and pass are 0 0. After this, you should be able to reboot and have everything set up properly.
You can also make /boot a ReiserFS partition if you mount it with the -notail option.
The Logical Volume Manager (LVM) is a method of handling block devices through disk volumes and volume groups. Written by Heinz Mauelshagen of Sistina Software, LVM brings to Linux what companies such as Veritas brought to the UNIX world with their Volume Manager product. LVM brings Linux into the fray, competing head-to-head with the corporate UNIX environments (not that it wasn’t there already) and their volume management.
LVM offers the ability to take hard drive partitions and basically make virtual drives out of them. Not only does LVM offer the ability to resize volume groups on the fly, but it also offers disk concatenation, which enables the system administrator to make one volume out of many smaller drives or partitions. In place of /dev/sda1 and /dev/sdb1, you can actually call them “development” or “backup.” You also can add or subtract drives into the volume as the need arises. LVM also allows for hot snapshots of data. This is incredibly useful for HA systems that can’t be taken down for backups. A snapshot can be taken of a live data volume and be replicated over to a standby volume to back up formerly live data.
LVM works similar to other disk tools because it incorporates another abstraction layer into the mix. The volume group (VG) is comprised of number of physical drives or partitions. The VG presents these as a single drive or resource. On top of that layer, there exists a logical volume (LV), which can be mapped with a logical name that the system administrator can assign. These LVs can be formatted with any file system, including ext3, ReiserFS, and XFS.
LVM is incorporated in the standard Linux kernel tree as of 2.4.3, although you should still incorporate the latest patches before implementing your production software on it. Unfortunately, implementing LVM requires a kernel reconfiguration.
It’s a good idea to follow the mailing lists for a few days before starting an implementation of LVM. There are certain caveats that must be followed for both kernel and file system to play nicely. These are discussed often in the mailing list, and it’s always nice to get a feel for possible problems.
You can get the latest source code by FTP. LVM is located at Sistina’s FTP site (ftp.sistina.com/pub/<currentLVMdirectory>).
You can build LVM against either 2.2 or 2.4 series kernels. If you’re going to build against the 2.2 series, you’re going to need Stephen Tweedie’s IO patch (remember him?) from www.kernel.org/pub/linux/kernel/people/sct/rawio. There’s also a LVM patch for the kernel in the PATCHES subdirectory of the LVM distribution. You can apply these patches to the source code with the patch command (patch p0 <patchname>).
For 2.4 version kernels, LVM might already be included. You should be able to see a LVM entry in /proc, or be able to run any LVM command with the -h (help) switch. You still need to download all the correct patches from the Sistina FTP site. When recompiling your kernel, you need to check the proper settings in Multi-Device Support (RAID and LVM) and compile this in the kernel itself or a module. You’ll want namely the Multiple Devices Driver Support (RAID and LVM) and Logical Volume Manager (LVM) Support enabled.
Download the LVM software tools from ftp.sistina.com or from a mirror listed on the http://www.sistina.com. You’ll need to apply the current patches to the kernel, probably regardless of the kernel revision. There is also a patch in the LVM source code for ReiserFS. If you’re using ReiserFS, apply the l inux2.4.x-VFS-lock patch in the source PATCHES directory. Running configure in the top level directory also creates the proper makefile for addressing the patches. In the PATCH/ directory, look in the makefile for the proper location of the kernel (if it’s not in /usr/src/linux, you’ll have to point it to the right place). Typing make
from here will create the patches. You’ll want to add at least the patch for the current version of LVM, if not the proper patches for the 2.2 or early 2.4 kernels.
Add the proper patches, such as the following, compile, and boot off of the new kernel:
# cd /usr/src/Linux
# patch -p1 < /root/LVM/1.0/PATCHES/lvm-1.0-2.4.9.patch
Next comes installation of the software tools. That’s done within the LVM directory. See if you can guess how to do it? Yes, you’re right: ./configure, make, make install. But wait—there’s more. LVM also comes with a make remove script should you want to uninstall.
Starting the software requires two commands: vgscan and vgchange -ay. These have to be placed in the startup scripts, right after / is mounted and before the other file systems are. You can change this in your Red Hat start up scripts in /etc/rc.d/rc.sysinit. Debian users can just make a startup script in /etc/init.d.
After you reboot with the correct kernel, you need to tell LVM to initialize either the disk or the partition. Both are done with the pcreate command. To initialize the entire disk, use pcreate <device> or the partition, pcreate <partition>. For example,
# pcreate /dev/hdb
# pcreate /dev/hdb1
prepares the entire disk for LVM, while the latter prepares the partition for LVM. Remember that if you’re only using an individual partition, set that partition type to 8e; Linux LVM, using fdisk. If your version of fdisk doesn’t support 8e, Linux LVM, you would need to upgrade.
After you prepare the disk or partition for LVM, you must create a volume group. To do this, use the vgcreate command and include the disks or partitions that you want to include in the initial volume group. The format is vgcreate <volumename> <firstdisk> <seconddisk> <etc>. For example,
# vgcreate myvolume /dev/hda1 /dev/hdb1 /dev/hdc1
After creating the volume group, you now have to activate it. Either reboot or reread the configuration with vgchange -an. If you want to reactivate it, you’ll do that with
# vgchange -a y my_volume_group
Run vgdisplay to make sure that everything looks correct. Make certain that this reflects your environment. After you’re satisfied with the way things are looking, the next step is to make a logical volume group on top of what we already have:
# lvcreate -L1G -nmy_logical_volume myvolume
After you make the logical volume, you must format it. Format with your favorite file system, even ext2. According to the documentation, there can’t be any spaces after the -n switch, or lvcreate automatically generates the name. You wouldn’t want your mother-in-law picking your child’s name, would you? This is kind of like that.
# mke2fs /dev/my_volume_group/myvolume
Mount the volume, and you’re good to go:
# mount /dev/my_volume_group/myvolume /mnt
Instead of just setting up the three disks in one normal logical volume, you can add striping to the disks simply by adding options to lvcreate. For instance,
# lvcreate -i3 -I4 -L1G -nmy_logical_volume myvolume
The lowercase -i sets up the number of stripes. This reflects the number of physical disks or media in the set. The uppercase -I refers to the kilobytes for the granularity of the stripes.
You can even add to the volume on the fly by using the lvextend command. Running the following will grow the mymount volume to 5 gigs:
# lvextend -L5G /dev/mylogicalvolume/mymount
The following will grow the mymount volume an extra gig:
# lvextend -L+1G /dev/mylogicalvolume/mymount
Remember that only the volume here will change and that you’ll have to extend the overlaying file system as well. If you’re going to shrink the volume, you first need to unmount it and then use the lvreduce command. The following shrinks the volume by 1 gig:
# lvreduce -L-1G /dev/mylogicalvolume/mymount
If you’re going to reduce the volume size, remember that you also have to either reduce the file system on it or reformat it. If you’re using ext2, you can use e2fsadm to reduce it. ReiserFS users can use resize2fs. Be sure to unmount it, or weird things can happen as a result.
Removing a VG is accomplished first with removing the logical volume on top of it. After unmounting the volume, use the lvremove command:
# umount /mount
# lvremove /dev/my_logical_volume/myvolume
Deactivate the volume group:
# vg_change -a n myvolume
Remove the volume group:
# vgremove myvolumea
LVM offers the capacity to take a snapshot of a live file system at any point in time, then replicating it for a live backup. LVM does this by creating a sub partition inside of the partition that you’re going to be making the snapshot of. The volume that is created is a read-only copy of the live volume so that you don’t have to take your HA cluster or load balancing solution offline.
A snapshot volume can be as small as you like but only a maximum of 1.1 times the size of the original volume. The volume also has to be large enough to hold the entire snapshot for the lifetime of the backup. If the snapshot volume becomes full, it’s unusable, so calculate wisely. Running lvcreate creates a volume group, but the addition of the -s switch tells it that it will be created as a snapshot file system:
# lvcreate -L400M -s -n dbsnapshot /dev/hr/database
This creates a volume of 400 megs in /dev/hr/dbsnapshot. After the snapshot is created, place it on a mount point:
# mkdir /home/hr/database
# mount /dev/hr/database /home/hr/database
The volume will be mounted read-only. Take a backup of the file system and then umount it. Remove it with the lvremove command:
# umount /home/hr/database
# lvremove /dev/hr/database
The LVM is a great addition to any clustered solution because it enhances the Linux block device. Not only can it concatenate drives, but it can strip them for performance. You can resize the groups on the fly—not to mention the capacity you’ll have for file system snapshots. This in itself is a great reason to include LVM in any HA cluster—you don’t have to take it down for backups.
Sistina Software offers a mailing list for issues regarding LVM. You can subscribe by heading over to http://lists.sistina.com/mailman/listinfo/linux-lvm/.
The attractiveness of using Linux in a clustering environment really shines as new file systems and methods of handling these file systems become available. The goal of higher availability becomes more easily obtainable with journaling and redundant file systems. These features that you can implement freely within Linux were only available on other UNIX programs for a hefty fee. Although some of these features are still in development, many are suitable for production use.