
CHAPTER 10
Searching, Extracting, and Archiving Data
Although the word “computer” suggests a device for performing mathematical computations, much of a computer's job has more to do with data storage and retrieval than with computation. This chapter covers some of the tools you can use to search, extract, and archive data.
The chapter begins with a look at regular expressions, which are a way to describe patterns you might want to look for in data files. You can use regular expressions with many commands, two of which (find and grep) I describe in more detail. This chapter also covers tools that you can use to redirect programs' input and output, which is a useful trick in many situations. Finally, I describe some tools for creating archive files, which can be useful in transferring many files over a network or in creating backups.
 Using regular expressions
- Searching for and extracting data
- Redirecting input and output
- Archiving data
Using Regular Expressions
Documentation sometimes uses the abbreviation regexp to refer to a regular expression.
![]() Many Linux programs employ regular expressions, which are tools for expressing patterns in text. Regular expressions are similar in principle to the wildcards that can be used to specify multiple filenames, as described in Chapter 7, “Managing Files.” At their simplest, regular expressions can be plain text without adornment. Certain characters are used to denote patterns, though.
Many Linux programs employ regular expressions, which are tools for expressing patterns in text. Regular expressions are similar in principle to the wildcards that can be used to specify multiple filenames, as described in Chapter 7, “Managing Files.” At their simplest, regular expressions can be plain text without adornment. Certain characters are used to denote patterns, though.
Two forms of regular expression are common: basic and extended. Which form you must use depends on the program; some accept just one form, but others can use either type, depending on the options passed to the program. (Some programs use their own minor or major variants on either of these classes of regular expression.) The differences between basic and extended regular expressions are complex and subtle, but the fundamental principles of both are similar.
The simplest type of regular expression is an alphabetic or alphanumeric string, such as HWaddr or Linux3. These regular expressions match any string of the same size or longer that contains the regular expression. For instance, the HWaddr regular expression matches HWaddr, This is the HWaddr, and The HWaddr is unknown. The real strength of regular expressions comes in the use of non-alphanumeric characters, which activate advanced matching rules. The most powerful basic regular expression features include the following:
Bracket expressions Characters enclosed in square brackets ([]) constitute bracket expressions, which match any one character within the brackets. For instance, the regular expression b[aeiou]g matches the words bag, beg, big, bog, and bug. Including a carat (^) after the opening square bracket matches against any character except the ones specified. For instance, b[^aeiou]g matches bbg or bAg but not bag or beg.
Range expressions A range expression is a variant on a bracket expression. Instead of listing every character that matches, range expressions list the start and end points separated by a dash (-), as in a[2-4]z. This regular expression matches a2z, a3z, and a4z.
Any single character The dot (.) represents any single character except a newline. For instance, a.z matches a2z, abz, aQz, or any other three-character string that begins with a and ends with z.
Start and end of line The carat (^) represents the start of a line, and the dollar sign ($) denotes the end of a line.
Repetition A full or partial regular expression may be followed by a special symbol to denote repetition of the matched item. Specifically, an asterisk (*) denotes zero or more matches. The asterisk is often combined with the dot (as in .*) to specify a match with any substring. For instance, A.*Lincoln matches any string that contains A and Lincoln, in that order—Abe Lincoln and Abraham Lincoln are just two possible matches.
Escaping If you want to match one of the special characters, such as a dot, you must escape it—that is, precede it with a backslash (). For instance, to match a computer hostname (say, twain.example.com), you must escape the dots, as in twain.example.com.
Extended regular expressions add more features you can use to match in additional ways:
Additional repetition operators These operators work like an asterisk, but they match only certain numbers of matches. Specifically, a plus sign (+) matches one or more occurrences and a question mark (?) specifies zero or one match.
Multiple possible strings The vertical bar (|) separates two possible matches; for instance, car|truck matches either car or truck.
Parentheses Ordinary parentheses (()) surround subexpressions. Parentheses are often used to specify how operators are to be applied; for example, you can put parentheses around a group of words that are concatenated with the vertical bar to ensure that the words are treated as a group, any one of which may match, without involving surrounding parts of the regular expression.
Whether you use basic or extended regular expressions depends on which form the program supports. For programs such as grep that support both, you can use either; which you choose is mostly a matter of personal preference. Note that a regular expression that includes characters associated with extended regular expressions will be interpreted differently depending on which type you're using. Thus, it's important to know which type of regular expression a program supports, or how to select which type to use if the program supports both types.
Regular expression rules can be confusing, particularly when you're first introduced to them. Some examples of their use, in the context of the programs that use them, will help. The next section provides such examples, with reference to the find and grep programs.
Searching for and Extracting Data
Technically, of these three programs, only grep uses regular expressions, although find supports pattern matching using a similar mechanism.
Two commands, grep and find, both use regular expressions and are helpful in locating data. The grep utility locates files by scanning their contents. The grep program also returns some of the data included in files, which can be useful if you want to extract just a little data from a file or from a program's output. As its name suggests, find locates files. It uses surface features, such as the filename and the file's date stamps. Another command, wc, provides basic statistics on text files.
Using grep
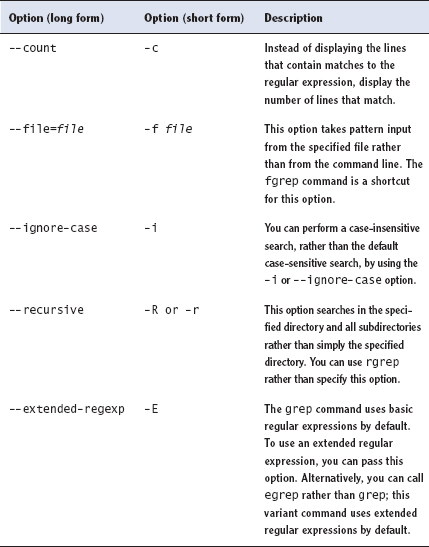
![]() The grep command searches for files that contain a specified string and returns the name of the file and (if it's a text file) a line of context for that string. To use grep, you type the command's name, an optional set of options, a regular expression, and an optional filename specification. The grep command supports a large number of options, the most common of which appear in Table 10.1.
The grep command searches for files that contain a specified string and returns the name of the file and (if it's a text file) a line of context for that string. To use grep, you type the command's name, an optional set of options, a regular expression, and an optional filename specification. The grep command supports a large number of options, the most common of which appear in Table 10.1.
If you don't specify a filename, grep uses standard input. This can be useful with pipelines, as described shortly, in “Redirecting Input and Output.”
TABLE 10.1 Common grep options
A simple example of grep uses a regular expression with no special components:
$ grep -r eth0 /etc/*
Ordinary users can't read some files in /etc. Thus, if you type this command as a non-root user, you'll see error messages relating to grep's inability to open files.
This example finds all the files in /etc that contain the string eth0 (the identifier for the first Ethernet device on most distributions). Because the example includes the -r option, it searches recursively, so grep searches files in subdirectories of /etc as well as those in /etc itself. For each matching text file, the line that contains the string is printed.
Ramping up a bit, suppose you want to locate all the files in /etc that contain the string eth0 or eth1. You can enter the following command, which uses a bracket expression to specify both variant devices:
$ grep eth[01] /etc/*
A still more complex example searches all files in /etc that contain the number 127 and, later on the same line, the hostname twain.example.com or localhost. This task requires using several of the regular expression features. Expressed using extended regular expression notation, the command looks like this:
$ grep -E “127.*(twain.example.com|localhost)” /etc/*
Type this command on your computer. It should match at least one file, /etc/hosts. Type it again without the -E option to see its operation using basic regular expressions.
This command illustrates another feature you may need to use: shell quoting. Because the shell uses certain characters, such as the vertical bar and the asterisk, for its own purposes, you must enclose certain regular expressions in quotes lest the shell attempt to parse the regular expression as shell commands.
You can use grep in conjunction with commands that produce a lot of output in order to sift through that output for the material that's important to you. (Several examples throughout this book use this technique.) For example, suppose you want to find the process ID (PID) of a running xterm. You can use a pipe to send the result of a ps command through grep:
# ps ax | grep xterm
The upcoming section, “Redirecting Input and Output,” describes pipes in more detail.
The result is a list of all running processes called xterm, along with their PIDs. You can even do this in series, using grep to further restrict the output on some other criterion, which can be useful if the initial pass still produces too much output. For instance, suppose you want to find kernel messages relating to low-speed Universal Serial Bus (USB) devices. As noted in Chapter 9, “Using Programs and Processes,” you can use dmesg to review kernel messages, but it produces copious output. You can pass this output through grep to find messages related to USB devices or to messages that include the word low, but either search alone still produces a lot of irrelevant hits. Using grep twice in succession successfully limits the output to lines that include both search strings:
$ dmesg | grep -i usb | grep low
usb 4-1.1: new low speed USB device number 3 using uhci_hcd
usb 4-1.2.2: new low speed USB device number 5 using uhci_hcd
usb 4-1.2.2: new low speed USB device number 8 using uhci_hcd
This differs from using a single grep command with both search terms (using a regular expression such as usb.*low) in that the order in which the search terms appear is important for the single search but not when using grep twice. You can also use different options when you call grep twice, as in the use of -i when searching on usb but not when searching on low in this example.
Using find
In practice, you must use a pathname or a search criterion with find, and often both.
![]() The find utility implements a brute-force approach to finding files. This program finds files by searching through the specified directory tree, checking filenames, file creation dates, and so on to locate the files that match the specified criteria. Because of this method of operation, find tends to be slow, but it's very flexible and is very likely to succeed, assuming the file for which you're searching exists. To use find, type its name, optionally followed by a pathname and a series of options, some of which use specifications that are similar to regular expressions.
The find utility implements a brute-force approach to finding files. This program finds files by searching through the specified directory tree, checking filenames, file creation dates, and so on to locate the files that match the specified criteria. Because of this method of operation, find tends to be slow, but it's very flexible and is very likely to succeed, assuming the file for which you're searching exists. To use find, type its name, optionally followed by a pathname and a series of options, some of which use specifications that are similar to regular expressions.
You can specify one or more paths in which find should operate; the program will restrict its operations to these paths. The man page for find includes information about its search criteria, but Table 10.2 summarizes common criteria.
Chapter 15, “Setting Ownership and Permissions,” covers file permissions.
TABLE 10.2 Common find search criteria
There are many variant and additional options; find is a very powerful command. As an example of its use, consider the task of finding all C source code files, which normally have names that end in .c, in all users' home directories. If these home directories reside in /home, you might issue the following command:
# find /home -name “*.c”
The result will be a listing of all the files that match the search criteria.
If you lack permission to list a directory's contents, find will return that directory name and the error message Permission denied.
Using wc
![]() A file's size in bytes, as revealed by ls or searched for using find, can be a useful metric. This size value isn't always the most useful one for text files, though. For instance, you might need to know how many words or lines are in a text file—say because you're writing a 1,000-word essay or you want to know how many pages a text document will consume when printed at 52 lines per page. The wc utility provides this information. By default, it displays a count of lines (newline characters, to be precise), words, and bytes for each file you pass it. For instance, you can discover this information for all the files with .txt extensions in your home directory:
A file's size in bytes, as revealed by ls or searched for using find, can be a useful metric. This size value isn't always the most useful one for text files, though. For instance, you might need to know how many words or lines are in a text file—say because you're writing a 1,000-word essay or you want to know how many pages a text document will consume when printed at 52 lines per page. The wc utility provides this information. By default, it displays a count of lines (newline characters, to be precise), words, and bytes for each file you pass it. For instance, you can discover this information for all the files with .txt extensions in your home directory:
$ wc ~/*.txt
1471  1839  71039 /home/rodsmith/500.txt
  31   180   1236 /home/rodsmith/Commands Outputs.txt
1012  8909  69689 /home/rodsmith/parts.txt
  19    33    383 /home/rodsmith/Problem.txt
   4     4     31 /home/rodsmith/stuff.txt
This output reveals that the file 500.txt contains 1,471 lines, 1,839 words, and 71,039 bytes, and provides similar statistics for the remaining files.
You can pass options to limit or expand wc's output, as summarized in Table 10.3. Of the options in Table 10.3, -c, -l, and -w are the defaults, so typing wc file.txt is equivalent to typing wc -clw file.txt. The program's man page describes a few more options, but the ones in Table 10.3 are the ones you're most likely to use.
Some text files use multi-byte encodings, meaning that one character can consume more than one byte. Thus, -c and -m may not produce identical results, although they often do.
TABLE 10.3 Common wc options

Be aware that wc works correctly on plain text files, but it may produce incorrect or even nonsensical results on formatted text files, such as Hypertext Markup Language (HTML) files or word processor files. You're better off using a word processor or other specialized editor to find the number of words and other statistics for such files.
Redirecting Input and Output
If the output of a program becomes annoying, or if you want to save it for future reference, you can redirect it to a file. You can also redirect the input to a program from a file. Although input redirection may sound strange, some programs rely on this feature to enable them to process data, such as raw text files fed through a program that searches the text for patterns. In addition to redirecting output to files or input from files, you can pass one program's output to another one as its input. A related technique involves the xargs command, which enables you to generate command-line options from files or other programs' output.
Using Basic Redirection Operators
![]() Redirection is achieved with the help of redirection operators, which are short strings that appear after the command and its arguments. Table 10.4 shows the most common redirection operators. Be aware that output comes in two types:
Redirection is achieved with the help of redirection operators, which are short strings that appear after the command and its arguments. Table 10.4 shows the most common redirection operators. Be aware that output comes in two types:
Standard output This is normal program messages.
Standard error This contains error messages.
Having two types of output enables them to be separated so that error messages don't confuse programs that might be expecting certain types of input from another program.
TABLE 10.4 Common redirection operators
| Redirection operator | Effect |
| > | Creates a new file containing standard output. If the specified file exists, it's overwritten. |
| >> | Appends standard output to the existing file. If the specified file doesn't exist, it's created. |
| 2> | Creates a new file containing standard error. If the specified file exists, it's overwritten. |
| 2>> | Appends standard error to the existing file. If the specified file doesn't exist, it's created. |
| &> | Creates a new file containing both standard output and standard error. If the specified file exists, it's overwritten. |
| < | Sends the contents of the specified file to be used as standard input. |
| << | Accepts text on the following lines as standard input. |
| <> | Causes the specified file to be used for both standard input and standard output. |
As an example of redirecting output, consider a grep command to search for information on a particular user in all the configuration files in /etc. Without redirection, such a command might look like this:
$ grep david /etc/*
This command will return a series of output lines like the following:
Binary file /etc/aliases.db matches
/etc/group:wheel:x:10:root, david
/etc/group:audio:x:18:mythtv, david, pulse
/etc/group:cdrom:x:19:haldaemon, david
Such output can be quite lengthy, and you might want to peruse it later. To do so, you could redirect the output like this:
$ grep david /etc/* > david-in-etc.txt
If you then wanted to see the output, you could use cat:
$ cat david-in-etc.txt
Many programs have options, set on the command line or in configuration files, that affect how verbose their output is. Check a program's man page to learn about such options.
In this example you haven't gained anything compared to simply typing grep david /etc/*, but you might in other cases. For instance, suppose a command is producing copious error messages. You might then redirect standard error to a file and load the file into a text editor so that you can browse through it, search for strings that might be relevant, and so on, even as you attempt to run the command, or a modified version of it, once more.
This example illustrates how standard error and standard output are separate. If you type grep david /etc/* as a normal user (perhaps substituting your own username for david), you're likely to see output such as that shown earlier, specifying the files in which your username appears; however, you're also likely to see error messages, since you lack permission to read some of the files in /etc:
grep: /etc/securetty: Permission denied
grep: /etc/shadow: Permission denied
The information on the files in which david appears is shown via standard output, but the errors are shown via standard error. If you're not interested in the errors, you can redirect them to /dev/null—a device file that serves as a “dumping ground” for data you want to discard:
$ grep david /etc/* 2> /dev/null
Likewise, if you redirect standard output to a file but do not redirect standard error, you'll see the error messages on your screen, but the file you create (such as david-in-etc.txt from the earlier command) will not contain the error messages. You may want to try all the different types of output redirection using grep david /etc/* to get a feel for how they work.
Using Pipes
Chapter 8, “Getting Help,” describes the less pager.
![]() Another type of redirected output is a pipe or pipeline. In a pipe, the standard output from one program is redirected as the standard input to a second program. You create a pipe by using a vertical bar (|), which is usually a shifted character above the Enter key, between the two commands. Pipelines can be useful when applied in various ways. For instance, you might pipe the lengthy output of a program through the less pager, which enables you to page up and down through the output, or use grep to search for keywords in the output:
Another type of redirected output is a pipe or pipeline. In a pipe, the standard output from one program is redirected as the standard input to a second program. You create a pipe by using a vertical bar (|), which is usually a shifted character above the Enter key, between the two commands. Pipelines can be useful when applied in various ways. For instance, you might pipe the lengthy output of a program through the less pager, which enables you to page up and down through the output, or use grep to search for keywords in the output:
$ dmesg | grep sda
The dmesg command displays messages from the Linux kernel about hardware and other low-level activities. Thus, the result of these two commands is that you'll see any kernel messages that include the string sda—an identifier associated with the first hard disk.
Generating Command Lines
![]() Sometimes you'll find yourself constructing a series of commands that are similar to each other but not similar enough to enable you to use their normal options to substitute a single command. For instance, suppose you want to remove every file in a directory tree with a name that ends in a tilde (~). (This filename convention denotes backup files created by certain text editors.) With a large directory tree, this task can be daunting; the usual file-deletion command (rm, described in more detail in Chapter 7) doesn't provide an option to search for and delete every file in a directory tree that matches such a specific criterion. One command that can do the search part of the job, though, is find, which is described in more detail earlier. If you could combine the output of find to create a series of command lines using rm, the task would be solved. This is precisely the purpose of the xargs command, which builds a command from its standard input. The basic syntax for this command is as follows:
Sometimes you'll find yourself constructing a series of commands that are similar to each other but not similar enough to enable you to use their normal options to substitute a single command. For instance, suppose you want to remove every file in a directory tree with a name that ends in a tilde (~). (This filename convention denotes backup files created by certain text editors.) With a large directory tree, this task can be daunting; the usual file-deletion command (rm, described in more detail in Chapter 7) doesn't provide an option to search for and delete every file in a directory tree that matches such a specific criterion. One command that can do the search part of the job, though, is find, which is described in more detail earlier. If you could combine the output of find to create a series of command lines using rm, the task would be solved. This is precisely the purpose of the xargs command, which builds a command from its standard input. The basic syntax for this command is as follows:
xargs [options] [command [initial-arguments]]
The command is the command you want to execute, and initial-arguments is a list of arguments you want to pass to the command. The options are xargs options; they aren't passed to command. When you run xargs, it runs command once for every word passed to it on standard input, adding that word to the argument list for command. If you want to pass multiple options to the command, you can protect them by enclosing the group in quotation marks.
For instance, consider the task of deleting all those backup files, denoted by tilde characters. You can do this by piping the output of find to xargs, which then calls rm:
$ find./ -name “*~” | xargs rm
The first part of this command (find./ -name “*~”) finds all the files in the current directory (./) or its subdirectories with a name that ends in a tilde (*~). This list is then piped to xargs, which adds each one to its own rm command.
A tool that's similar to xargs in many ways is the backtick (`), which is a character to the left of the 1 key on most keyboards. The backtick is not the same as the single quote character ('), which is located to the right of the semicolon (;) on most keyboards.
Text within backticks is treated as a separate command whose results are substituted on the command line. For instance, to delete those backup files, you can type the following command:
$ rm ′find./ -name “*~”′
Archiving Data
Another archive program, cpio, is sometimes used in Linux. It's similar in principle to tar, but different in operational details.
A file archiving tool collects a group of files into a single “package” file that you can easily move around on a single system; back up to a recordable DVD, USB flash drive, tape, or other removable media; or transfer across a network. Linux supports several archiving commands, the most prominent being tar and zip. In addition to understanding these commands, you should be familiar with the consequences of using compression with them.
Using tar
The tar program's name stands for “tape archiver.” Despite this fact, you can use tar to archive data to your hard disk or other media, not just to tapes. In fact, tarballs (archive files created by tar and typically compressed with gzip or bzip2) are often used for transferring multiple files between computers in one step, such as when distributing source code.
The tar program is a complex package with many options, but most of what you'll do with the utility can be covered with a few common commands. Table 10.5 lists the primary tar commands, and Table 10.6 lists the qualifiers that modify what the commands do. Whenever you run tar, you use exactly one command, and you usually use at least one qualifier.
Unlike most single-letter program options in Linux, you can use single-letter tar commands and qualifiers without a leading dash (-).
TABLE 10.5 tar commands
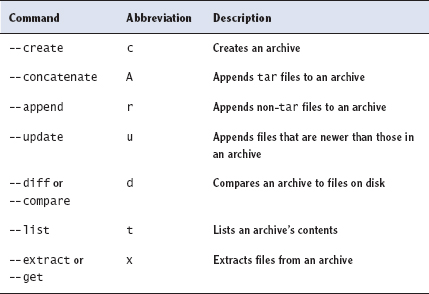
TABLE 10.6 tar qualifiers
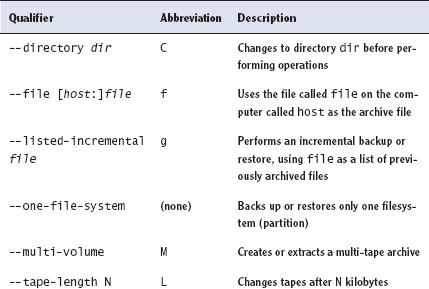

Of the commands listed in Table 10.5, the most commonly used are --create, --extract, and --list. The most useful qualifiers from Table 10.6 are --file, --listed-incremental, --one-file-system, --same-permissions, --gzip, --bzip2, --xz, and --verbose. If you fail to specify a filename with the --file qualifier, tar will attempt to use a default device, which is often (but not always) a tape device file.
The tar utility preserves Linux's ownership and permission information, even when the archive is stored on a filesystem that doesn't support such metadata.
As an example, consider archiving and compressing the my-work subdirectory of your home directory to a USB flash drive mounted at /media/flash. The following command will do the trick:
$ tar cvfz /media/flash/my-work.tgz ~/my-work
If you then transfer this drive to another system, mount it at /media/usb, and want to extract the archive, you can do so with another command:
$ tar xvfz /media/usb/my-work.tgz
This command creates a subdirectory called my-work in the current working directory and populates it with the files from the archive. If you don't know what's in an archive, it's a good practice to examine it with the --list command before extracting its contents. Although common practice creates tarballs that store files within a single subdirectory, sometimes tarballs drop many files in the current working directory, which can make them difficult to track down if you run the command in a directory that already has many files.
Using Compression
In Linux, the gzip, bzip2, and xz programs all compress individual files. For instance, you might compress a large graphics file like this:
$ bzip2 biggraphics.tiff
Once you've compressed a text file, you won't be able to search it with grep without first uncompressing it. The zgrep variant can search files compressed with gzip, though.
The result is a file with a name like the original but with the addition of a new filename extension to identify it as a compressed format. In this specific case, the result would be biggraphics.tiff.bz2. Most graphics programs won't read files compressed in this way, though. To use a file that's been compressed, you must uncompress it with a matching program. Table 10.7 summarizes the compression programs, their matching uncompression programs, and the filename extensions they create. As a general rule, gzip provides the least compression and xz the most.
TABLE 10.7 Compression and uncompression programs and filename extensions
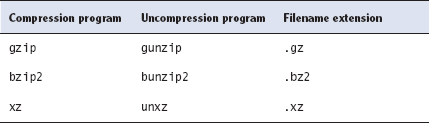
The tar program provides explicit support for all three of these compression standards, and compressed tarballs often have their own unique filename extensions (.tgz, .tbz or .tb2, and .txz for tarballs compressed with gzip, bzip2, and xz, respectively). Using two extensions on tarballs, as in archive.tar.bz2, is also common. When you compress a tarball, even by using the -z, -j, or -J option to tar, the compression program works on the tarball with all its files rather than to the individual files within the tarball. This can improve the compression ratio compared to compressing individual files and then bundling them together, but it makes it harder to extract data from a file if it becomes damaged.
Compression works better with some file types than with others. Typically, plain text files compress extremely well, binary program files compress moderately well, and pre-compressed data (such as most video file formats) compress poorly or may even expand in size when compressed again. You should be aware of this fact to know whether to apply compression to your archives. For instance, if you back up a Linux installation, which consists of program and configuration files, without user data, the result is likely to consume about half the space it does on your hard disk. On the other hand, if you want to back up a directory containing MP3 audio files or JPEG graphics, both of which are pre-compressed, you're better off not applying compression.
The gzip, bzip2, and xz compression programs all apply lossless compression, meaning that the data recovered by uncompressing the file is identical to what went into it. Some graphics, audio, and audio-visual file formats apply lossy compression, in which some data are discarded. When done properly and at low to moderate levels of compression, you'll be hard-pressed to notice the loss, since the algorithms discard data that humans have a difficult time perceiving. When a user applies lossy algorithms aggressively, though, we do notice the effect. Lossy compression tools should never be used on program files, system configuration files, or most user data files; any loss in such files could be disastrous. That's why tar supports only lossless compression tools.
Using zip
Outside of the Unix and Linux world, the zip file format is a common one that fills a role similar to a compressed tarball. Linux provides the zip command to create zip files and the unzip utility to extract files from a zip archive. Zip files typically have filename extensions of .zip.
In most cases, you can create a zip archive by passing the utility the name of a target zip file followed by a filename list:
$ zip newzip.zip afile.txt figure.tif
This command creates the newzip.zip file, which holds the afile.txt and figure.tif files. (The original files remain on your disk.) In some cases you'll need to use options to zip to achieve the desired results. Table 10.8 summarizes the most important zip options; however, the program supports many more. Consult its man page for details.
TABLE 10.8 Common zip options


Of the options in Table 10.8, the -r option is probably the most important, at least if you want to compress an entire directory tree. If you fail to use this option, your archive will contain no subdirectories. Given the speed of modern CPUs, using -9 on a regular basis also makes sense.
To uncompress and extract files in a zip archive file, you can use the unzip program:
$ unzip anarchive.zip
Zip files typically contain “loose” files in the main directory, so you should generally extract zip archives in an empty subdirectory you create for this purpose.
This example uncompresses the files in the anarchive.zip file into the current directory. Like zip, unzip supports a large number of options, the most important of which appear in Table 10.9.
TABLE 10.9 Common unzip options
As a general rule, using unzip without any options except for the input filename works well; however, you might want to use one or more of its options on occasion. The -l option is particularly useful for examining the archive's contents without extracting it.
Managing your files often requires locating them, and tools such as grep and find help you with this task. The grep utility in particular makes use of regular expressions, which provide a way to describe patterns you might want to find in files or in the output of another program. You can redirect such output into grep (or other programs or files) using redirection operators, and many Linux command-line tools and techniques rely on such redirection. The tar and zip programs both enable you to create archive files that hold many other files. In fact, the tarballs that tar creates are a common means of distributing source code and even binary programs between Linux computers.
SUGGESTED EXERCISES
 Use find and grep to locate files in your own directory and on the Linux computer at large. For instance, try locating references to your own username in configuration files in /etc.
- Use gzip, bzip2, and xz to compress a couple instances of files of various types, such as text files and digital photos. What file types compress well? Which compression tool works best for each file type?
- Which of the following commands will print lines from the file world.txt that contain matches to changes and changed?
- grep change[ds] world.txt
- tar change[d-s] world.txt
- find “change'd|s'” world.txt
- cat world.txt changes changed
- find change[^ds] world.txt
- Which of the following redirection operators appends a program's standard output to an existing file, without overwriting that file's original contents?
- |
- 2>
- &>
- >
- >>
- You've received a tarball called data79.tar from a colleague, but you want to check the names of the files it contains before extracting them. Which of the following commands would you use to do this?
- tar uvf data79.tar
- tar cvf data79.tar
- tar xvf data79.tar
- tar tvf data79.tar
- tar Avf data79.tar
- True or false: The regular expression Linu[^x].*lds matches the string Linus Torvalds.
- True or false: The find command enables you to locate files based on their sizes.
- True or false: To compress files archived with zip, you must use an external compression program such as gzip or bzip2 in a pipeline with zip.
- The character that represents the start of a line in a regular expression is ________.
- Complete the following command to redirect both standard output and standard error from the bigprog program to the file out.txt.
$ bigprog ____ out.txt
- The gzip, bzip2, and xz programs all perform __________ compression, in which the decompressed data exactly match the original pre-compression data.